by Lisa Cooke | Jan 16, 2017 | 01 What's New, DNA
Organize DNA matches with this innovative approach. If you are feeling overwhelmed with your DNA results, you are not alone. Learning to organize your DNA matches in an effective way will not only keep your head from spinning, but will help you hone in on possible matches that will break down brick walls. Here’s the scoop from Your DNA Guide, Diahan Southard.

I can tell whose turn it was to unload the dishwasher by the state of the silverware drawer. If either of the boys have done it (ages 13 and 11,) the forks are haphazardly in a jumble, the spoon stack has overflowed into the knife section, and the measuring spoons are nowhere to be found. If, on the other hand, it was my daughter (age 8,) everything is perfectly in order. Not only are all the forks where they belong, but the small forks and the large forks have been separated into their own piles and the measuring spoons are nestled neatly in size order.
Organize Your Imaginary DNA Drawer
Regardless of the state of your own silverware drawer, it is clear that most of us need some sort of direction to effective organize DNA matches. It entails more than just lining them up into nice categories like Mom’s side vs. Dad’s side, or known connections vs. unknown connections. To organize DNA matches, you really need to make a plan for their use. Good organization for your test results can help you reveal or refine your genealogical goals and help determine your next steps.
Step 1: Download your raw data. The very first step is to download your raw data from your testing company and store it somewhere on your own computer. See these instructions on my website if you need help.
Step 2: Identify and organize DNA matches. Now, we can get to the match list. One common situation for those of you who have several generations of ancestors in the United States, is that you may have ancestors that seem to have produced a lot of descendants. These descendants may have caught the DNA testing vision and this can be like your overflowing spoon stack! All these matches may be obscuring some valuable matches. Identifying and putting those known matches in their proper context can help you identify the valuable matches that may lead to clues about the descendant lines of your known ancestral couple.
In my Organizing Your DNA Matches quick sheet, I outline a process for identifying and drawing out the genetic and genealogical relationships of these known connections. Then, it is easier to verify your genetic connection is aligned with your genealogy paper trail and spot areas that might need more research.
This same idea of plotting the relationships of your matches to each other can also be employed as you are looking to break down brick walls in your family tree, or even in cases of adoption. The key to identifying unknowns is determining the relationships of your matches to each other.
Step 3: See the relationship between genetics, surnames, and locations. Another helpful tool is a trick I learned from our very own Lisa Louise Cooke–that is Google Earth. Have you ever tried to use Google Earth to help you in your genetic genealogy? Remember, the common ancestor between you and your match has three things that connect you to them: their genetics, surnames, and locations. We know the genetics is working because they show up on your match list. But often times you cannot see a shared surname among your matches. By plotting their locations in the free Google Earth, kind of like separating the big forks from the little forks, you might be able to recognize a shared location that would identify which line you should investigate for a shared connection.
So, what are you waiting for? Line up those spoons and separate the big forks from the little forks! Your organizing efforts may just reveal a family of measuring spoons, all lined up and waiting to be added to your family history.
More on Working with DNA Matches
How to Get Started with Using DNA for Family History
Confused by Your AncestryDNA Matches? Read This Post
New AncestryDNA Common Matches Tool: Love It!
by Lisa Cooke | Jun 27, 2019 | 01 What's New, Digital Archives, Photographs
Historical photos and images can bring depth and understanding to genealogical findings. In the case of sharing your family history with others in your family who don’t share your passion for genealogy, they are an essential part of bringing family history to life.
One of the best free online resources for historical photos is the Creative Commons at Flickr.
Flickr is a popular photo, image and video hosting and sharing service. It’s a great platform for sharing your favorite photos with family and friends. It’s also an excellent place to find images that fit into your family history.

An important part of the Flickr world is Creative Commons, which describes itself as part of a “worldwide movement for sharing historical and out-of-copyright images.”
Groups and individuals alike upload old images, tag and source them, and make them available to others through the Creative Commons. And when it comes to groups, the list of participants is impressive.
The British Library photostream features over a million images in its photostream! And a robust collection of historical photos and images can be found at the (U.S.) Library of Congress photostream, with over 34,000+ photos.
Searching the Creative Commons
When searching the Creative Commons, be sure to look for your favorite libraries and historical societies. If you don’t find them today, don’t worry. Check back regularly because new content is being added all the time.
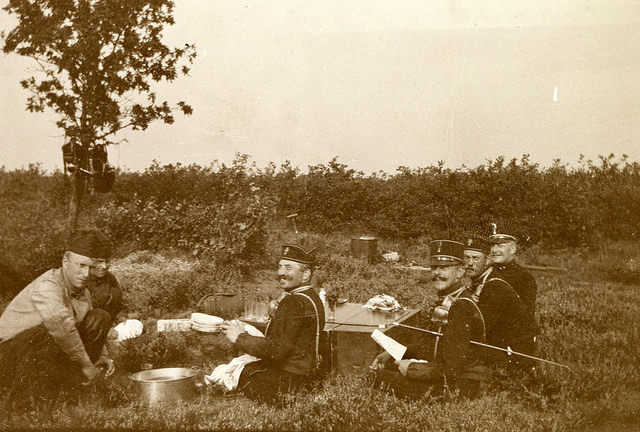
Here’s another example of what you can find at the Creative Commons. The Netherlands Institute of Military History (Nederlands Instituut voor Militaire Historie) has a photostream.

“Exercise Field Artillery Corps” album, image AKL092038, Netherlands Institute of Military History uploads at Flickr Creative Commons, https://www.flickr.com/photos/nimhimages/16026248719/.
According to the Netherlands Institute of Military History blog, “The Institute exists to serve all those with an interest in the military past of the Netherlands. Its sphere of activities covers the Dutch armed forces on land, at sea and in the air, from the sixteenth century until now. The staff of the NIMH administer a unique military history collection containing approximately 2 million images, of which they will be uploading many to the site.”
Back in 2015 when we first wrote about their brand new photostream it only included a couple dozen images, like the one shown here. Today they have well over 3,300.
Tips for Finding and Using Historical Photos at the Creative Commons
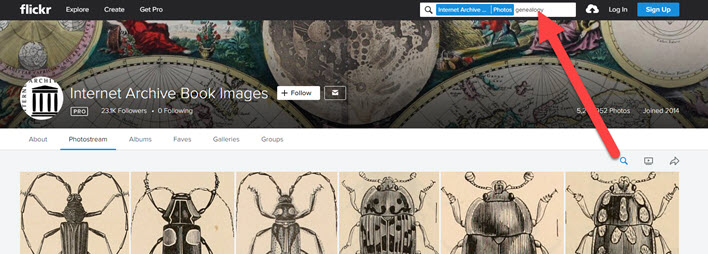
Searching for Historical Photos: On a photostream home page, click the search icon (magnifying glass) just above the first row of photos in the upper right corner. A search box will pop up at the top of the page. Enter Keywords to search for images within that photostream. (Image below)

Location isn’t Everything: Just like with brick and mortar libraries, don’t let the location of the library or archive hosting the photostream fool you! Their collections are not limited to only items in their area. If you’re in search of something specific, try the Flickr Advanced Search page here.
Understanding Downloading and Copyright: Those who post images to Flickr Creative Commons offer different rights to those who want to download and use their images. Described here (and searchable here by the kinds of rights you want), those rights may include the ability to use a photo as long as it’s for noncommercial purposes and proper credit is given. Perfect for a responsible, source-citing genealogist!
10 Favorite Flickr Photostreams with Historical Focus
It would be impossible to list all of the potential photostreams at Flickr’s Creative Commons that feature historical photos, so I won’t even try. However, I’m happy to provide this list of favorites, which illustrates the breath and depth of possibilities. I hope it inspires you to search out your favorite library or archive at the Creative Commons.
(Organized by number of photos)
Internet Archive Book Images
5,240,000+ Photos
Though not currently organized by Albums or Galleries, there is something here for absolutely everybody! Use the search feature to zero in on what you want. (See tips section below)
The British Library
1,000,000+ Photos
A gloriously eclectic mix of images. Just one example: World War I: The Canadian Experience. This photo album covers 1895 and 1924, and contain depictions of Canadians’ experiences of the First World War. From the British Library: “Either produced by photographers on home soil or individuals in Europe employed by Lord Beaverbrook’s ‘Canadian War Records Office’ the photographs provide a wide ranging account of the many Canadians involved in and impacted by the war.”
The National Archives UK
20,000+ Photos
the UK government’s official archive contains more than 1,000 years of history, so their photostream is not to be missed! Nicely organized into Albums focused on location, the images offer a sampling of their massive holdings.
The U.S. National Archives
16,500+ Photos
Nicely organized into a vast array of albums, these photos represent only a small sampling of the photographs in their collection which totals more than 25 million photos and 20,000 graphic images. Early on they focused on uploading photos from the Women’s Bureau, the Environmental Protection Agency, and a few staff favorites. According to the National Archives, “These photographs, most taken by agents of Federal agencies over the years, cover a wide range of subjects and themes documented in the work of the United States government. Higher resolution versions of many of these images can be obtained from the U.S. National Archives by following the links located below each image.”
SMU Libraries Digital Collections
10,000+ Photos
Southern Methodist University Digital Collections includes the digital libraries and online digital collections from the six SMU Libraries. You’ll find an emphasis on digital collections of Mexican photographs, locomotives, Texas history, art, and currency notes, and more.
National Library of Norway
3600+ Photos
These images either fall in the public domain or the copyright belongs to the library and has been wavered. You’ll find photos, postcards, stereograph cards and other ephemera depicting life in Norway. With all of the portraits you may just spot an ancestor!

National Library of Norway photostream
The New York Public Library
2500+ Photos
Considering how many Americans passed through New York, this photostream is definitely worth a visit.
National Library of Ireland on The Commons
2500+ Photos
Here you’ll find a range of items from the Ephemera Collections of the National Library of Ireland. They provide a snapshot of different periods in Ireland’s social, political, economic and cultural history. They’ve also added items from their Manuscript collections, Prints and Drawings, Exhibitions, as well as photos from Library Events.
UBC Library Digitization Centre
of the University of British Columbia
2400+ Photos
Just one of many Canadian library photostreams, the UBC Library shows off it’s diverse image collection in well organized albums. My personal odd-ball favorite is the Tremaine Arkley Croquet Collection!
Library Company of Philadelphia
1280+ Photos
They’ve organized their current photo collection into more than 50 albums, making it easy to quickly spot the historical collections. Notable albums feature unique historical images from the Civil War era.
by Lisa Cooke | Nov 25, 2012 | Genealogy Gems Podcast
[iframe src=”http://html5-player.libsyn.com/embed/episode/id/2136782/height/100/width/480/thumbnail/yes” height=”100″ width=”480″ scrolling=”no”]
In this episode I’ve got another blast from the past for you. We have reached deep into the podcast archive and retrieved episodes 5 and 6.
In Episode 5 we touch on using the video website YouTube for genealogy, and then I walk you through how to Bring Sites Back From the Dead with Google. Then we wrap things up with a cool little way to Spice Up Your Genealogy Database.
In episode 6 I have a gem for you called Cast a Shadow on Your Ancestors, and we cover the free genealogy website US GenWeb
Episode: # 05
Original Publish Date: March 25, 2007
MAILBOX
Email this week from Mike O’Laughlin of the Irish Roots Cafe: “Congratulations on your podcast! I am sure it will help many folks out there. I was glad to see the fine Irish families of Scully and Lynch on your latest show notes!”
GEM: You Tube Follow Up
Note: The Genealogy Tech Podcast is no longer published or available.
- YouTube in the news – the concern was raised by Viacom this month about YouTube benefiting from their programming without compensating them, which could mean copyright infringement. While the course of YouTube could change depending on the outcome of this suit, the attraction for family historians remains strong because of the nature of the content.
- Software mentioned:
Pinnacle. Final Cut for MAC. Limits with Movie Maker
- I posted 2 videos – A Nurse In Training Part 1 & 2
Genealogy Gems YouTube Channel Click the Subscribe button to receive notification of new videos
GEM: Bring Sites Back From the Dead with Google
When you get a “File Not Found” error when clicking on a link, it doesn’t mean the information is always gone forever. You may be able to find it in the Cache version.
Google takes a snapshot of each page it examines and caches (stores) that version as a back-up. It’s what Google uses to judge if a page is a good match for your query. In the case of a website that no longer exists, the cache copy us a snapshot of the website when it was still active hidden away or cached.
Practically every search result includes a Cached link. Clicking on that link takes you to the Google cached version of that web page, instead of the current version of the page. This is useful if the original page is unavailable because of:
1. Internet congestion
2. A down, overloaded, or just slow website – Since Google’s servers are typically faster than many web servers, you can often access a page’s cached version faster than the page itself.
3. The owner’s recently removing the page from the Web
Sometimes you can even access the cached version from a site that otherwise require registration or a subscription.
If Google returns a link to a page that appears to have little to do with your query, or if you can’t find the information you’re seeking on the current version of the page, take a look at the cached version.
Hit the Back button and look for a link to a “cached” copy at the end of the URL at the end of the search result. Clicking on the “cached” link should bring up a copy of the page as it appeared at the time that Google indexed that page, with your search terms highlighted in yellow.
If you don’t see a cached link, it may have been omitted because the owners of the site have requested that Google remove the cached version or not cache their content. Also, any sites Google hasn’t indexed won’t have a cache version.
Limit: If the original page contains more than 101 kilobytes of text, the cached version of the page will consist of the first 101 Kbytes (120 Kbytes for pdf files).
Really looking for an oldie but a goody? Try the Wayback Machine
It allows you to browse through 85 billion web pages archived from 1996 to a few months ago.
To start surfing the Wayback, type in the web address of a site or page where you would like to start, and press enter. Then select from the archived dates available. The resulting pages point to other archived pages at as close a date as possible. Keyword searching is not currently supported.
GEM: Spice up your database
- Search Google Images, then Right click and save to your hard drive.
- Use Silhouettes
- Find something that represents what you do know about that person. It really does help you see them more as a person and less as an entry in your database – their occupation, a reader, a sport, etc.

Episode: # 06
Original Publish Date: April 1, 2007
You can learn more about Jewish roots at the 350 Years of American Jewish History website JewishGen, The Home of Jewish Genealogy
GEM: Cast a Shadow on Your Ancestors
In the episode #5 I shared a little gem that would spice up your genealogical database – adding silhouettes and artistic images to the file of an ancestor when you don’t have a photograph.
Probably the most famous silhouette these days are the silhouettes used by Apple for advertising the iPod digital music and audio player. It may surprise your teenager or grandchild to learn that the first silhouettes were done hundreds of years ago.
Back then silhouettes (or shades as they were called), they paintings or drawings of a person’s shadow. They were popular amongst English royalty and the art form quickly spread to Europe. A silhouette can also be cut from black paper, and was a simple alternative for people who could not afford other forms of portraiture, which, in the eighteenth century, was still an expensive proposition.
The word took its name from Étienne de Silhouette, but it’s uncertain as to whether his name was attributed because he enjoyed this art form, or as the story goes because the victims of his taxes complained that they were reduced to mere shadows.
Either way, the popularity of Silhouettes hit new heights in the United States where they were seen in magazines, brochures and other printed material. But they faded from popularity as Photographs took over in the 1900s.
As a follow up, I want to share with you a simple technique for creating your own silhouettes. You can use ordinary snapshots to create a visual family record.
- Take a photo of a person in profile against a neutral background.
- Blanket the photo background with white acrylic or tempera paint
- Fill in the image with a heavy black permanent marker, curing the shoulders down for a classical pose.
- Add fun details like cowlicks, eyelashes, hats, and jewelry that express the person’s personality with a fine felt-tip pen.
- Photocopy the doctored photos onto quality art paper. Since glossy papers work print best, you could also use your computer scanner to scan the image into your hard drive. From there you can add it to your database, or print it out onto glossy photo paper for mounting.
To represent folks in your family tree, create a silhouette of your father to represent his Great Great Grandfather, and add a farmer’s hat and rake to represent his profession of farming. Chances are dad has inherited some of his profile anyway. Have fun with it and be creative. But of course be very sure to label to silhouette appropriately as a creative interpretation rather than a literal rendering.
You can also do silhouettes of your family including extended family and arrange the portraits together on a wall. Use black painted frames in a variety of shapes and sizes and hang in a way that represents the family tree / relationships.
Check out the Art Café Network website for a Short History of Silhouettes by Katherine Courtney.
For More detailed how-to information, they have additional pages on cutting visit http://artcafenetwork.net/meet/kat/silhouette/cutting.html
2 Silhouette books to turn to:
Silhouettes%20:%20Rediscovering%20the%20Lost%20Art<img%20src=”http:/www.assoc-amazon.com/e/ir?t=genegemspodc-20&l=as2&o=1&a=0970115105″%20width=”1″%20height=”1″%20border=”0″%20alt=””%20style=”border:none%20!important;%20margin:0px%20!important;”%20/>%20″ >Silhouettes: Rediscovering the Lost Art
by Kathryn K. Flocken


Old-Fashioned Silhouettes (Dover Electronic Clip Art) (CD-ROM and Book)


GEM: GenWeb Pages
Last year the website celebrated its 10th Anniversary. The USGenWeb Project consists of a group of volunteers working together to provide Internet websites for genealogical research in every county and every state of the United States. The Project is non-commercial and fully committed to free access for everyone. Organization within the website is by state and county.
You can go to the homepage of the website and click on the state of your choice from the left hand column. From the state page you can select the county you wish to search in. However, when I know they name of the county I want to search in, I’ve found it’s often quicker just to search at google.com and do a search like “genweb sibley county mn” The choice is yours.
Remember to use the Google search gem that I gave you in episode one (see episode #134 http://www.genealogygemspodcast.com/webpage/episode-145-a-blast-from-the-past ) to quickly search within the county website. Many don’t have search engines of their own, and so that’s when I first really started using that search technique. These county sites are often very rich though, and after a focused search, it’s rewarding just to wander the site. It will help you become more familiar with the county!
You’ll likely find databases of Births, Deaths, Marriages, townships histories, plat maps, surnames, and a host of other topics. Because each county has its own volunteer coordinator, the information you will find varies from county to county. And as always, info is being added regularly, so you need to book mark them and return on a regular basis to see what’s new.
Be sure and share your resources as well. That’s the power behind the GenWeb project – volunteers. Volunteering your county resources will enrich other’s experience and will likely lead to connections that will continue to further your own research.
Book Mentioned in this episode:
The Complete Idiot’s Guide to Online Genealogy, Second Edition
by Rhonda McClure
Check out this episode


