Maybe it’s as simple as having a ton of matches and not knowing what to do with them. How do you keep track of all those matches. How to you know which matches to focus on? How can you can use all your matches to do what you really want to do, which is learn more about my family history?
In this episode of Elevenses with Lisa we are visiting with someone who has worked past many of those problems. She uses her DNA matches to solve some of her genealogical questions and the questions of her patrons. Today she’s here to help you!
My special guest is Sara Allen, a librarian at the Genealogy Center at the Allen County Public Library. I wanted to talk to Sara because she’s not a biologist, or a Genetic Genealogy Guru. She’s like you and me: she’s passionate about family history! She shares genetic genealogy with folks in a very practical, and easy-to-understand way.
As a side note, we were lucky to record this episode because the day Sara and I were to meet to record the library was closed due to a snow storm. I’m in Texas and we’re buried in a deep freeze with devastating power outages, and at our house, no water for a time. But we moved things around and got it done. However, in all the chaos I managed to put my microphone on the wrong setting, so I’m going to sound like I’m sitting in a Folgers coffee can. But that doesn’t matter because it is what Sara has to say that’s really important.
Oh, and they were also doing construction at the library the day we finally recorded, so it’ll sound occasionally like we use jack hammers on our DNA! However, neither snow nor ice nor lack of water nor construction zones will keep us (as your faithful genealogists) from the swift completion of this appointed show.
How to Start Solving Genealogical Problems with DNA
Sara shared her basic over-arching plan for using DNA to answer a genealogical question:
First, do comprehensive traditional genealogical research on the problem.
Then do DNA testing.
Follow the clues where they lead.
Use the genealogical proof standard to come to an accurate conclusion/solution. Also view the DNA standards.
Then she shared the specific steps for her research plan.
Research Plan for Solving Genealogical Problems with DNA
Identify your research problem.
Summarize genealogical research results.
Choose most relevant DNA test/tests to order.
Choose the most helpful family member(s) to test. These are people who carry the particular DNA that falls you will need.
Complete the rest of your family tree to at least 4th great grandparents (4GG) if possible.
Choosing the Right DNA Test
Step 3 was to choose the most relevant DNA test. This is important because there are three main kinds of tests out there. Each has strengths and weaknesses. Understanding what each test is capable of is key to getting the results you need.
Autosomal test – autosomal DNA is inherited 50/50 from mother and father. Both men and women can be tested. Start with this test, unless your mystery goes farther back than 5-6 generations of great grandparents.
Y Chromosome test – only males can test. It tests a man’s direct paternal line.
Mitochondrial (mtDNA) test – Both men and women inherit Mitochondrial DNA and can be tested for it. However, it’s important to understand that only women can pass it on to the next generation. Follow the line of potential inheritance in order to identify the right person to test. The Mitochondrial test tests the direct maternal line only.
How to Choose the Best Family Member to DNA Test
If you’ve decided that an Autosomal DNA test is what you need, a relative one or two generations older (on the correct side of the family) is always better. Examples: Parents, Aunts/Uncles, Grandparents, Great-aunts/uncles, Parent’s first cousin
If you’re going to do a Y or mtDNA, choose a family member who falls within the correct path of DNA inheritance.
Sorting DNA Matches
Sort your matches out by family line or common ancestor couple.
View your match’s name, family tree or family names, and shared matches to help you sort into family lines.
Use known cousins to help you sort. If you are related to a cousin in only one way, then your “shared matches” with that cousin should be “relatives” on the same side of the family as the cousin.
Sara uses color coding dots to stay organized and detangle matches.
If there is a family tree, copy it, either electronically or print it out on paper. Compare and contrast trees looking for common names, common ancestor couples, common places. Work on establishing relationship between the different matches based on their trees. In other words, do genealogy!
Case #1: Who Were the Parents of Dovey Renolds Allen?
Here’s an outline of the case Sara covers in this episode so you can follow along.
Step 1: Define the Problem
Dovey Reynolds was born around 1822 in North Carolina and was married in 1846 in Owen County, Indiana to Phillip Allen. She died in 1901 in Jefferson County, Kansas. No records have been found naming her parents.
Step 2: Write a Research Summary
Records for Dovey as a married adult were found
Dovey’s obituary and death certificate from Kansas were sought. No death certificate found. Obituary did not name parents.
Owen County Library, Archives and Court house were searched. Extensive research was done, but not exhaustive; I did not document the sources that I used….so this work needs to be redone
1840 Census searched for Owen Co. Indiana Reynolds. 1 household found with female 15-19 years old (age Dovey would be), headed by William Reynolds.
William Reynolds died in 1856, leaving a widow Amy, and naming children Jane, Solomon and Edmond in his will. Dovey not mentioned
Possible father. No records found linking Dovey to this father
Step 3: Select the Right DNA Test
Autosomal DNA: Dovey was my 3rd great grandmother. I have inherited approximately 3% of my autosomal DNA from her.
Mitochondrial DNA is not relevant to this case due to inheritance path.
Since she is a female, Y-DNA is not relevant.
Step 4: Select the Right Relative to Test
Autosomal DNA – test the closest living person to the mystery ancestor: Test my father or his sister (aunt) to get one generation closer.
Step 5: Complete Family Tree for Other Family Lines
DNA Match Analysis Strategies
Search DNA matches’ trees for “Reynolds” surname.
Each DNA company has a tool for searching your matches (23andme is not as good as others.)
Results of our search for “Reynolds” in matches’ trees: Look for Reynolds in key locations in Dovey’s life such as NC and IN, especially Owen Co. IN, and maybe KS:
Matches with Reynolds in their trees from New England, Canada, England, etc. probably NOT related.
Create a note for yourself, saying, for instance, “Maine Reynolds family” so you don’t waste time on probable irrelevant matches.
Match Summary
24 matches to William Reynolds’ descendants (27 cM – 8 cM)
10 matches from daughter Lucy
4 matches from daughter Diana
1 match from daughter Temperance
3 from son Solomon
2 from son Edmond
4 from daughter Deborah
DNA Preliminary Conclusions
DNA links my aunt to descendants of 6 of William Reynold’s children.
This does not prove that Dovey was William’s daughter. She could have been his niece or other close relative.
Aunt shares the correct number of cMs with the matches to be 4th-5th cousins with them.
Aunt’s shared matches with these Reynolds matches are on her paternal line – which is the correct side of the family.
More genealogical research could provide the definite link.
Case #2: Mysterious Leroy Porter
Step 1: Define Problem:
Leroy Porter was born in 1897 in France or PA
Married Ina Hill and died in Michigan.
Leroy was a teller of tall tales; family wants to know his origins, his parentage, and was he really from France?
Step 2: Research Summary
Death certificate (informant wife) says parents were Daniel Porter and Mary Baschley of PA.
Leroy cannot be found on any census prior to 1920 as Leroy Porter.
No trace of parents of those names found
Step 3: DNA Testing Options
Granddaughter Kathy took the autosomal DNA test.
Y-chromosome test not applicable for Kathy (there may be a candidate for Y DNA testing within the family)
Mitochondrial DNA not applicable
Step 4: Test the correct person:
Several of Leroy’s daughters are alive, so if they took an autosomal test, would be one generation closer.
Ancestry DNA match sorting options:
“Add to Group” option
Allows you to name the group, and add colored dots, up to 24 different colors
Notes field = enter free text notes about matches
Results
Evaluated trees of the possible matches from Leroy’s side. Two match groups identified:
Hedges family of PA
Crute family of PA
Can we find a marriage between these 2 families? Yes – Daniel Hedges married Alice Crute ca. 1894 probably Warren Co. PA.
More Genealogical Work
Sara found “LeRoy Hedges” in the 1900 Warren Co. PA Census!
She went through Kathy’s tree to find matches to Hedges/Crute family
Were the cMs within range for the relationships? Yes = 2nd DNA points to Leroy Hedges being Leroy Porter.
Leroy Hedges = Leroy Porter Summary
Family broken up by 1910
Parents remarried
Siblings in orphanage
Leroy Hedges ran away and was not heard from again
Did he go to Michigan and marry Ina Hill as Leroy Porter?
No official name change document found
Could compare photographs if Hedges family has one…
Resources
Get My Free Genealogy Gems Newsletter – click here.
Family History: Genealogy Made Easy Podcast with Lisa Louise Cooke Republished June 18, 2014
Listen to the Family History: Genealogy Made Easy podcast by Lisa Louise Cooke. It’s a great series for learning the research ropes and well as refreshing your skills.
Welcome to this step-by-step series for beginning genealogists—and more experienced ones who want to brush up or learn something new. I first ran this series in 2008-09. So many people have asked about it, I’m bringing it back in weekly segments.
Episode 36: Your Genealogy Questions Answered, Part 1
Today’s show is all about YOU! This episode is made up completely of your emailed questions, comments and stories. I couldn’t do this podcast without you, and I definitely want it to be a two way conversation. Joining me on today’s episode to read your emails is my daughter, Lacey Cooke.
Question: When do I use the GPS (genealogical proof standard) method? How do I know whether what I’ve found meets the genealogy research standard? Do I need a research report for every ancestor? When do I use the research worksheet? – Jenna in Kansas City
Answer: First, put priority on your direct ancestors. I write up research reports on each direct ancestor, but only after I’ve done the bulk of the research on them. Use the research worksheet when you have conflicting or unclear information that needs to be worked over a little more thoroughly. Learn more about navigating your research with the genealogical proof standard in the Family History Made Easy Podcast, Episode 20 andEpisode 23.
Question: I need help finding a newspaper article on the killing of my great-great grandfather Thomas Leonard Frazier that originally appeared in The Deseret News in Salt Lake City, Utah. I didn’t cite the source when I first found it! – Kent Frazier
Answer: I found the article you’re looking for at GenealogyBank.com. Online newspapers are scattered all over the internet. I started at GenealogyBank because they have a lot and I have a subscription. If you have trouble finding newspaper article, review the episodes below. You may also want to try regional and state archives, public libraries, genealogical and historical societies and large genealogy or university libraries.
Comment: I just listened to Family History Podcast Episode 33 about hard buy medicine online gurgaon drive file organization, including organizing photos files, and I just listened to Genealogy Gems Podcast Episode 18 (not currently available online) on how to identify old photos by the cars that appear in them. My sister recently sent me a batch of old family photos, including one with the van in which I learned to drive. I decided to organize them according to your suggestions and it’s worked really well. I have one more suggestion: add a caption to each photo’s metadata. It’s like writing about the photo on the back of it.
To add a caption in Windows, right-click on the file, then click Properties. On a Mac, click on the File icon and then in the Finder menu, click on Get Info. I’m using Windows Vista, so this comes up with a window that has three tabs on it: General, Security and Details. Go to the Details tab and click to the right of the fields that are listed there to enable editing. On my computer, there are fields for Title, Subject, Tags and Comments as well as Authors, Date Taken and Date Acquired. There are a number of other fields that can be edited on this screen that have to do with the photographic equipment that was used, so scanned photos from your grandparents’ Kodak Brownie cameras can be updated too. The fields that I fill in are Subject, Tags and where known, the Authors and Date Taken. The Tags field can be very useful for the computer’s search function. If these fields are not available from the operating system itself, most modern photo editing software has functionality that will let you edit these same fields from within the photo software [for example, in Adobe Photoshop, this is under File -> File Info]. –Sean Lamb
In Genealogy Gems Premium Podcast Episode 25, I interviewed Ken Watson who talked about tagging photos with actual GPS (global positioning) coordinates in meta-tags.
Russ provides this link to his blog post about applying my hard drive organization strategies and incorporating Family Tree Maker software. For hard drive organization, see Family History Podcast Episode 32 and Episode 33.
Question: I’ve been doing genealogy for a couple of years on and off. I found your two podcasts and I’m almost caught up on Family History Made Easy. (Next will be the “Genealogy Gems” podcast!) Is there a “best practice” for which name should be used for a woman’s record? Maiden or married? Also, will you recap what a primary source is? –Bob Callahan
Answer: When I started the podcast, I wondered whether having two podcasts was overkill. I’m getting great feedback telling me that’s not the case! A primary source contains genealogical data collected at the time of the event reported by someone of authority and/or who was at the event and has first-hand knowledge. You may have several primary sources for each fact, like a family Bible and a government or church record for a birth or death. (A secondary source for that might be a birth announcement in a newspaper. The reporter obviously wasn’t there and doesn’t have firsthand knowledge of the event. If that’s all you have, dig a little deeper.)
As for your question about women’s names, a woman is listed in on a family tree with the name she was born with: her maiden name. She will be connected to any spouses later in life, and you can get her married name from there. They may appear in records with any of their surnames. A death record on Ancestry.com may have her listed by her married name, but in your family tree you should have her by her maiden name.
Comment: Let me first say that I am a new listener and have been on a Genealogy Gems and Family History Made Easy Podcast marathon! For the past month, I have listened to almost all of your podcasts and have gleaned quite a bit of information…to the point that it has almost overloaded my brain. But that is a good thing because I have a lot of new ideas for expanding the tree that my grandmother started forty plus years ago…
I just listened /watched the Premium Members Video for organizing your hard drive (available only to Premium Members). I have one more suggestion. It’s on how to copy multiple folders with the same name into your surname folders.
When setting up the surname folders and the sub-folders that go inside each, you set up one set of folders inside of one of the surname folders that are brand new with no documents inside of them. Then highlight each of them by first clicking on the first folder inside the surname folder, press and hold the shift key and click on the last folder and then right click on one of the highlighted folders and click copy from the drop down list. Then click and open the next surname folder, right click inside the folder and then click on paste from the drop down folder. –Eric Gomes
This is a GREAT suggestion! I constantly move multiple files at a time, but completely forgot that this can be done with file folders.
Question: Do you have any suggestions on what to look at when checking out and deciding on a society to join? –Eric Gomes
Answer: It depends on what your goals are. If your goals are camaraderie, education, involvement and community service, involve yourself with a local society. Go visit! See how welcoming they are, what kinds of programs they offer and whether they meet your needs. Don’t be shy about meeting the president and asking for a recent copy of their newsletter. Test drive it to see what’s a good fit for you.
If you’re trying to learn about where your ancestor lived, look for a society closest to that area. Look for societies near and far at the Federation of Genealogical Societies website on the Find a Society page. Or Google the name of the city and/or county/province and the keywords “genealogy society” to find what you’re looking for. Coming up dry? Contact a reference or local history/genealogy librarian at a local library or someone at a local historical society to ask for a recommendation.
The Genealogy Gems Podcast Episode # 193 by Lisa Louise Cooke
Episode highlights:
Genealogy milestones, anniversaries, new records, upcoming conferences and new free video tutorials;
Email response to The Genealogy Gems Podcast Episode #192: another tip on the U.S. Public Records Index, a family adoption story and his own research on the changing coastline of Sussex;
More response to the “Where I’m From” poetry initiative;
Announcement: the NEW Genealogy Gems Book Club title;
A key principle in genetic genealogy from Your DNA Guide Diahan Southard.
NEWS: FOIA Turns 50 What is the FOIA? The Freedom of Information Act opens federal records to the public. The FOIA applies to certain kinds of information about the federal government and certain information created by the federal government. It DOESN’T apply to documents that relate to national security, privacy and trade secrets, or to documents created by state or local governments.
FOIA for genealogy research: Use the FOIA to request:
Registry files for 1929 to 1944 (these document the arrival of an immigrant whose passenger or other arrival record could not be found for whatever reason);
Hosted by the Stillaguamish Valley Genealogical Society, north of Seattle in Arlington, WA on August 17-20, 2016
Theme: “Family Secrets Uncovered — Lost History Found”
Keynote speakers include Blaine Bettinger, Claudia Breland and Lisa Louise Cooke
Free Day Wednesday afternoon: Beth Foulk will address beginner’s issues — which is also a good refresher for the more seasoned genealogists
Other features: Meet a distant cousin with the “Cousin Wall;” participate in the genealogy-related scavenger hunt on Free Day Wednesday, and enjoy the free taco bar at the evening reception. Wear a costume from your ancestors’ homeland on the Friday dress-up day.
Santa Clara County Historical and Genealogical Society “Where I’m From” contest: “Anyone near and far may join our Contest. Each entry receives a gift from the. We will have a drawing from all entries of cash or a nice prize. Deadline for entries is Aug. 31, 2016. More information on scchgs.org.”
It’s a story inspired by love letters exchanged between his grandparents during World War II, when they were each in dangerous places: he on the island of Malta and she in London, both of which suffered some of the worst sustained bombing campaigns of the war.
Everyone Brave is Forgiven is a fast-paced book. It begins in London in 1939 with Mary North, a wealthy young lady from a privileged family who, on finding out that war has been declared, immediately leaves her finishing school and signs on for the war effort without telling her parents. She fulfills an assignment as a school teacher long enough to make a meaningful connection with a school official and one of her students. Then her students (along with the rest of London’s children) are evacuated to the countryside, leaving her to figure out what to do next.
The plot gets a lot more involved from here. There’s a love triangle, a long-distance romance, a series of scenes that take place on the heavily-bombarded island of Malta, harrowing descriptions of the London Blitz, homeless children who return from the evacuation only to find themselves parentless, homeless and in constant danger. It’s intense and eye-opening, but it’s compassionate and it’s still very readable for those who have less of a stomach for blood and guts but still want to understand some of the human experience of living and loving in a war zone, and then picking up the pieces afterward and figuring out how to keep living.
Click here for more Genealogy Gems Book Club titles
DNA GEM: GENETIC PEDIGREE V GENEALOGICAL PEDIGREE
A key concept in genetic genealogy is that your genetic pedigree is different than your genealogical pedigree. Let me explain.
Your genealogical pedigree, if you are diligent or lucky (or both!) can contain hundreds, even thousands of names and can go back countless generations. You can include as many collateral lines as you want. You can add several sources to your findings, and these days you can even add media, including pictures and copies of the actual documents. Every time someone gets married or welcomes a new baby, you can add that to your chart. In short, there is no end to the amount of information that can make up your pedigree chart.
Not so for your genetic pedigree.
Your genetic pedigree contains only those ancestors for whom you have received some of their DNA. You do not have DNA from all of your ancestors. Using some fancy math we can calculate that the average generation in which you start to see that you have inherited zero blocks of DNA from an ancestor is about seven. But of course, most of us aren’t trying to figure out how much of our DNA we received from great great great grandma Sarah. Most of us just have a list of DNA matches and we are trying to figure out if we are all related to 3X great grandma Sarah. So how does that work?
Well, the first thing we need to recognize is that living descendants of Sarah’s would be our fourth cousins (though not always, but that is a topic for another post!). Again, bring in the fancy math and we can learn that living, documented fourth cousins who have this autosomal DNA test completed will only share DNA with each other 50% of the time.
Yes, only half.
Only half of the time your DNA will tell you what your paper trail might have already figured out: That you and cousin Jim are fourth cousins, related through sweet 3X great grandma Sarah. But here’s where the numbers are in our favor. You have, on average, 940 fourth cousins. So if you are only sharing DNA with 470 of them, that’s not quite so bad, is it? And it only takes one or two of them to be tested and show up on your match list. Their presence there, and their documentation back to sweet Sarah, helps to verify the genealogy you have completed and allows you to gather others who might share this connection so you can learn even more about Sarah and her family. Plus, if you find Jim, then Jim will have 470 4th cousins as well, some of which will not be on your list, giving you access to even more of the 940.
This genetic family tree not matching up exactly with your traditional family tree also manifests itself in your ethnicity results, though there are other reasons for discrepancies there as well.
In short, this DNA stuff is not perfect, or even complete, but if you combine it with your traditional resources, it can be a very powerful tool for verifying and extending your family history.
Disclosure: This article contains affiliate links and Genealogy Gems will be compensated if you make a purchase after clicking on these links (at no additional cost to you). Thank you for supporting Genealogy Gems!
Frequently Asked Questions About the Free Podcast What’s the Genealogy Gems Podcast about?My goal is to provide folks who are researching their family history with nuggets of inspiration and innovation to help them get the most of out their research time. Episodes...
 The Genealogy Gems Podcast
 MAILBOX: CHRIS WITH US PUBLIC RECORDS INDEX TIP AND MORE
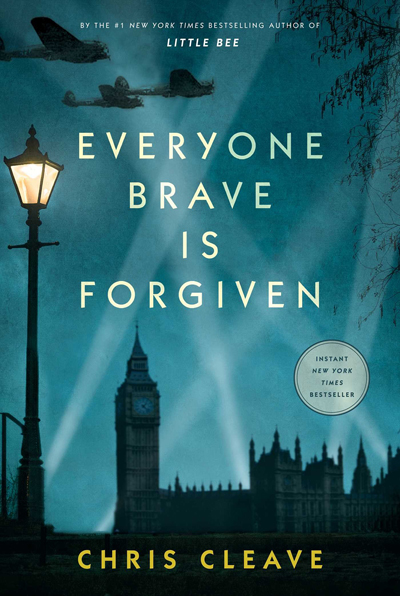 Everyone Brave is Forgiven
 DNA GEM: GENETIC PEDIGREE V GENEALOGICAL PEDIGREE