With about 1/3 of Americans claiming British ancestry, chances are that at some point you will need to extend your research across the Atlantic Ocean. Genealogical research in the British Isles has some important differences when compared to the United States. Guest blogger Kate Eakman, a Senior Researcher for Legacy Tree Genealogists, clarifies confusing terms and helps you get your research started on solid footing!
Britain? England? The United Kingdom?
When beginning British genealogy research, it’s important to first talk about the difference between British and English research. There are several terms which get used interchangeably but which really refer to different locations.
Great Britain is an island, the largest island in the British Isles.
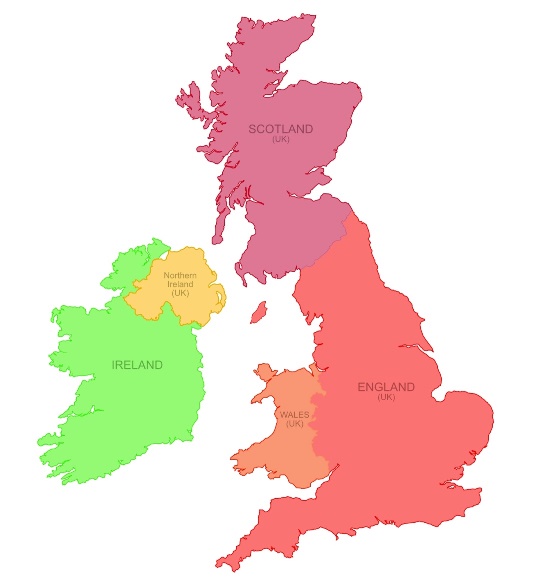
On the island of Great Britain are three of the four sovereign nations which make up the United Kingdom, or the U.K.: England, Wales, and Scotland. Northern Ireland on the island of Ireland is the fourth country of the U.K.
The four countries of the United Kingdom and the Republic of Ireland. Map courtesy Nate Parker.
Usually, when people talk about their British ancestors, what they really mean are their English ancestors. Although we Americans often treat the two words as interchangeable they really aren’t, and I suspect our English friends giggle a bit when they hear us misuse the words.
The four countries of the U.K. have some similarities but many important differences, and that is equally true for genealogical research. Rather than trying to explain all of those differences, this post will focus on English research.
One last thing to keep in mind when we talk about genealogical research in England is that today the country is divided into counties, which are sort of the equivalent of states in the U.S. Older records might refer to those counties as shires, and over time the borders have shifted, shires and counties were added, divided, or absorbed into each other. So a good map or two will be a useful tool to keep handy while you research your English ancestors.
Usually, when people talk about their British ancestors,
what they really mean are their English ancestors
What do you know?
Before beginning British genealogy research and making that leap across the pond, it is a good idea to consider what you already know about your English ancestors. Of course, you have a name, and you probably have an approximate date of birth.
Were you fortunate enough to find the name of a town or county where that ancestor lived or do all of the census reports and vital records simply say “England”?
If the ancestor arrived as an adult, what occupation did he pursue?
When did he or she arrive in the U.S.? Are there any clues on the passenger list to tell you where to start looking?
Once you have reviewed all of the information you have already acquired about your English ancestor, it’s time to start your research.
Beginning British Genealogy Research with the Census
The first step in most genealogical research is to study the existing census reports. Designed as a means to count the population for a variety of years, the census of Great Britain (including Scotland) is taken every ten years with the earliest records available in 1841. Due to very restrictive privacy laws, the most recent census available is from 1911, with one really valuable exception being the 1939 Register, available at FindMyPast.
Used for genealogical purposes, the census can give a snapshot of the family at the time the census was taken, as well as provide invaluable information such as the birthplace of the individual being recorded, occupation, birth year, and familial relationships. Elderly parents, or widowed mothers, aunts, or sisters, can be discovered living with younger members of the family.
Drawbacks of using the census for genealogical purposes include inaccurate name spellings, inaccurate age reporting, and inaccurate assumptions made by the enumerator. Another thing to keep in mind is that in the 1841 census the enumerated rounded down to the nearest five years the ages of people over 15. So a person who was listed as 25 could have been 25 through 29 years old.
It is important to remember that for the census reports through 1901 the enumerator copied the household information into books, and these copies are what we have today. Of course, when information is copied it is susceptible to error. The person who completed the census form may have had difficult-to-read handwriting, or the enumerator may have entered things on the wrong line. The individual reports have been kept for the 1911 census and offer a greater likelihood that the information they contain is very accurate.
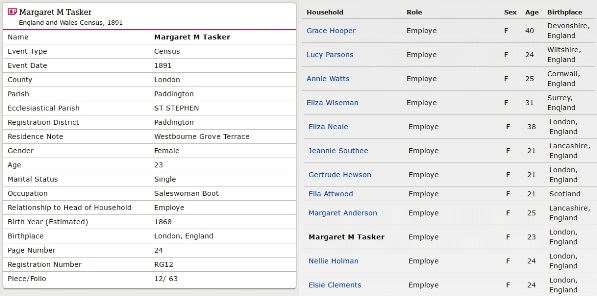
An example of a transcription from the 1891 English Census from Familysearch.org.
Detailed transcripts of English census records are available for free on FamilySearch and the images can be found for a fee at FindMyPast.
It is important to remember that for the census reports through 1901 the enumerator copied the household information into books, and these copies are what we have today.
Civil Registry of Vital Events
All English births, marriages, and deaths were required to be registered in a civil registration office beginning in July of 1837. In addition to the records themselves, there are indices which list the name of the person who was born, married, or died, the place where the event was registered, and the quarter and year in which the event occurred. Because the General Register Office (GRO) will only search one year on either side of the date provided, it is best, but not required, to include the index information when ordering documents from the GRO.
Free BMD is a free database which allows you the most freedom to search for the birth, marriage, and death index record of your relatives. You can enter whatever information you know including the place where the event happened, a specific year or range of years, age, and mother’s maiden name.
Depending on the time period, the index may be handwritten or mechanically printed. The information can then be used to order a copy of the actual record from the General Register Office (GRO) in England for about $10 per record.
An example of handwritten (left) and mechanically printed (right) birth index entries. Photos courtesy https://freebmd.org.uk.
The information contained in birth records includes:
Name, date, and place of birth;
Father’s name (if given at time of registration), occupation; and
Mother’s name, maiden surname.
The parents’ places of birth were added after 1969, and the mother’s occupation is listed after 1984.
Marriage records include:
Date and place of marriage;
Name, age and marital status (spinster/bachelor, widowed, divorced) of the bride and groom;
Occupation and usual address;
Name and occupation of the fathers of the bride and groom, with a note if either man was deceased at the time of the marriage;
Names of the witnesses;
Name of the person who solemnized the marriage.
Death records in the United States are often relied upon to provide the names of the parents. English death records do not include that information and therefore are not as useful for genealogical purposes. Each death record includes:
Name, date, and place of death;
Date and place of birth (before 1969 a certificate only showed age of deceased);
Occupation and usual address;
Cause of death;
The identity of the informant.
There are other records available, which we will talk about in a later post, which can be used to find and trace your English family members. The largest group are the religious records, and sometimes those can help you extend your family back in time to the 1600s – 400 years or more!
Beginning British Genealogy Important Take-Aways…
“Great Britain” is an island. “The United Kingdom” is a country. And “England” is a country. Normally, when people are talking about their British ancestors they are referring to their English ancestors.
England has counties, or what used to be known as “shires,” which function sort of like our states. The borders have changed over time, as have some of the names, so use a map when necessary to verify where you are researching.
Census records are available from 1841 through 1911. Really good transcriptions are available for free at Family Search, or on the for-fee site Find My Past. And remember that age idiosyncrasy about the 1841 census.
Finally, civil birth, marriage, and death records are available from the GRO. You can use the index listings to find the most likely match for your ancestor, and those can be found online at Free BMD.
Have fun and good luck finding your English ancestors!
Kate Eakman is a Senior Researcher for Legacy Tree Genealogists, a worldwide genealogy research firm with extensive expertise in breaking through genealogy brick walls.
Click here to learn more about Legacy Tree services and its research team.
(Read our Disclosure and Affiliate Disclaimer on this page)
Doing genealogy research generates a wide variety of research notes: typed and handwritten, audio, photos, video, and screenshots of information on websites. If you want one tool to pull together your current research projects, Evernote might just be the answer. In this video and article you’ll learn the role that Evernote can play, what it is and how to set it up, and your options for using for free or as a subscriber.
Evernote for Genealogy Video Tutorial
In this video and article Lisa Louise Cooke will discuss:
What Evernote is and the role Evernote can play in your genealogy research
Use it for free or upgrade to get all the bells and whistles like OCR and use on all your devices. (We will be compensated if you use our affiliate link. Thank you for supporting this free show.)
Show Notes
In my recent videos on how to avoid research rabbit holes that keep you from your genealogy goals, I mentioned that I use Evernote to capture BSOs or bright shiny objects that are interesting but not what I’m working on at the moment. So in this video I’m going to explain what Evernote is, and how to get started using it.
Evernote puts all your notes in one place and offers an incredibly fast and easy way to retrieve them.
Evernote is a:
website
software program for your computer (Win & Mac) that you download for free from their website
mobile app (iOS & Android): search for Evernote in your device’s app store
a web clipper for your computer’s web browser
Benefits
Genealogy can get a big messy. Information can be gathered from countless sources and in a variety of forms. You could funnel things through a cloud service like Dropbox. However, because Evernote is a note taking app, it offers unique and super helpful features:
Create all types of notes
From all of your devices. Thanks to Cloud synchronization you can take a note on any device and always have access to the most current version. (Free mobile app)
Web clipping – It allows you to clip items from the Internet (rather than saving entire bulky web pages),
OCR technology makes notes (such as newspaper articles) keyword searchable (subscription)
Data like URLs and the date you created the note is automatically included
No total storage limit, just monthly upload
You can use it for free, and upgrade for all the bells and whistles.
Install the software on your desktop computer (Windows & Mac)
Download the web clipper to your browser (app store or Google it)
Download the free Evernote app to your mobile devices from the iTunes App Store or Google Play
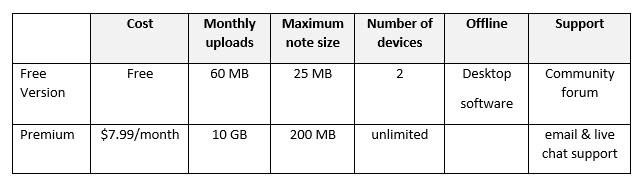
Features & Costs
(Subject to change. Visit evernote.com/compare-plans)
Evernote pricing plans comparison Sept. 2021 – See the website for the most current offer.
Software Home Layout
Evernote’s Home view gives you a summary of what you’ve got going on in Evernote. If Home is new to you and you don’t see it, simply head to the left Navigation menu and click Home.
Home gives you a place to sort of summarize what you’ve got going on in Evernote. It also allows you to add more personalization.
A fun way to personalize Evernote is by adding a background image. Click Customize in the upper right corner, and then click the Change Background button. Here you can add a preset image or add your own.
By default, Home comes with widgets such as:
Notes (highlighting your most recent notes, and Suggested notes based on your activity)
A Scratch Pad
Recently Captured items by type (web clips, images, documents, audio and emails)
While you’re in Customize mode, you’ll see additional available widgets like:
Calendar (allowing you to sync your Google calendar with Evernote)
Filtered Notes
Notebooks
Pinned Notes
An additional Scratch Pad
Shortcuts
Tags
Tasks
We’ll explore some of these further in a moment. But first, let’s create our first note!
All Notes View – SnippetView:
Left column = your files and organization
Center column = search for notes
Right column = the note you are currently working on
Change the layout by clicking the View Options icon (in SnippetView it appears at the top of the search column). This will give you a variety of layout options.
Change what appears or is hidden from view, and whether the view is dark or light by clicking View in the menu.
Notetaking 101
Create a note by clicking the New Note(+) button at the top of the screen.
Creating a new note is as simple as starting to type. Evernote saves your work instantly and without any extra effort on your part. Notes are saved in “the Cloud” on Evernote’s servers. This means all of your notes are automatically backed up. In addition, all of your notes will sync across all of your various computing devices. And Evernote facilitates sharing notes with others for research collaboration.
Click the Info icon at the top of the note to see the meta-data for that note. You can add and edit this information.
Types of Notes:
Typed
Sketched
Photos
Attachments
Video
Audio
Note Info has changed and can now be found by pressing Control + Shift + I on your keyboard, or clicking the More Actions (3 dots icon) in the upper right corner of the note and selecting Note Info.
Tagging is the Key to Organization
Add a tag based on important keywords associated with the note.
Examples of tags for genealogy:
Surnames (Cooke, Moore)
Record types (birth, census, land)
Locations (Indiana, Germany)
Time frames (1900-1909, 1910-1919)
Tasks (pending, add to database, follow up, etc.)
To tag a note, click Add Tag at the top of the note and select a tag from your list or add a new tag. Tags will appear in the left column. Click any tag in the left column to retrieve all notes with that tag.
Evernote Tasks
In June of 2021 Evernote added a Tasks feature. It operates just a little differently than how I’ve been using tasks. Evernote tasks are:
To Do Items
Note Specific (versus a tag which can retrieve all notes with that task)
Often Deadline Driven
Assignable to Others
Searchable
Where is the Trash?
You will find Evernote’s Trash bin at the bottom of the Navigation bar on the left.
Notebooks
Notebooks take organization a step further. I create notebooks sparingly. I use them to divide Evernote up into workspaces: Genealogy, Personal, Business, etc. I also use them for long-term and collaborative research projects that I may want to share with others. You can drag and drop notebooks on top of each other to create Stacks, although Evernote only allows one level of stacking.
How to create a new notebook:
In the menu select: File > New Notebook
Name the new notebook in the pop-up window
Select notebook type – usually you would set it up to synchronize, but you do have the option to have the notebook reside only on the computer it was created by selecting Local
The Cloud and Synchronization
Notes are saved on your computer and in the Cloud on Evernote’s servers. This means all of your notes are automatically backed up, and also accessible from your account on their website. Your notes will sync across all of your computing devices that have Evernote installed. There’s no need to manually sync with the new version. It happens automatically whenever you’re connected to the internet.
Web Clipping
As you visit webpages, you can clip just the portion of the page that you want to remember and keep rather than printing the page or bookmarking it. You can type the source citation directly into the note. Clippings appear as images in the note.
How to clip a screenshot using the computer software:
Right-click on the Evernote icon in your computer task bar.
Select Clip Screenshot.
Use the cross-hairs to draw a box around the desired content.
Release you mouse and you will see a quick flash on the screen indicating the content has been saved as a note in Evernote.
In Evernote click on the note to type additional information if desired.
How to download the free Evernote web clipper for your web browser:
Go to: evernote.com/webclipper
The download page will detect the browser that you are using and offer the correct web clipper. Click the download button.
The Evernote web clipper will install in your web browser (look in the upper right corner of your browser for the elephant icon.)
Sign into your Evernote account in the clipper.
Using the Browser Web Clipper:
When you visit a web page and find something that you want to clip, click the Evernote Web Clipper (elephant) icon in your web browser. The browser web clipper can save:
a full page (even the parts out of view)
an article
a simplified article (removing unwanted graphics and text not pertaining to the article)
a screenshot (where you precision clip with cross hairs)
a bookmark
As you clip you can select which notebook to file the note in and add any desired tags. It will also include the URL in the note header.
Search and Retrieval
Type a keyword into the search box and Evernote will locate and display notes that contain the keyword in the center column. This includes typed text from a website clipping or image, as in the example above. With a subscription, OCR technology makes it possible for you to search for words in Evernote to retrieve notes that include those words, both on the clipped image and in printed handwritten text.
In this episode, we’re focusing on early Virginia genealogy.
In our first segment, I’ve invited a professional genealogist to join us to help pave the way for tracing our ancestors back to Virginia just prior to the Revolutionary War. Jeri Satterwhite-Dearing specializes in early Virginia research in her work as a professional genealogist with Legacy Tree Genealogists. In this podcast episode she explains some of the biggest challenges you’ll face when researching early Virginian ancestors, the records you should be looking for, and some of the best resources.
In the second segment, I’ll cover a list of the best websites for Virginia Genealogy.
Fort Wayne, Indiana is the home of the second largest free genealogy library in the country. Make your plans to visit today. Learn more at https://www.visitfortwayne.com
Formerly known as Virginia Heritage, this website is a “consolidated database of finding aids that provides information about the vast array of manuscripts and archival materials housed in Virginia and West Virginia.”
From the website: “Part of the online presence of the Library of Virginia, the state archives and reference library. The Library maintains vast and varied collections of print materials, manuscripts, archival records, newspapers, photographs and ephemera, maps and atlases, rare books, and fine art that tell the history of the commonwealth and its people.”
From the website: “The Virtual Jamestown Archive is a digital research, teaching and learning project that explores the legacies of the Jamestown settlement and “the Virginia experiment.” As a work in progress, Virtual Jamestown aims to shape the national dialogue on the occasion of the four hundred-year anniversary observance in 2007 of the founding of the Jamestown colony.”
Every genealogist has experienced the frustration of clicking on a link and discovering that the page is gone or the resource is now defunct. Things change rapidly as technology evolves, so it’s a problem that isn’t going away any time soon.
Genealogy Gems Podcast listeners often ask what to do when they run across a broken or defunct website in the show notes of older episodes of The Genealogy Gems Podcast. I’ve got answers for you today that can help you get back on track whenever this happens to you.
I received this email from a listener of the free Genealogy Gems Podcast, and it’s one I’ve received from lots of listeners and genealogists alike:
“As one of your podcast listeners who is working my way through past episodes, I am running into a bit of frustration that I am wondering if you, on someone else reading this, can help me on. I have tried to get to a couple of websites that guests of yours mentioned, with no success. (I’m listening to episodes from) 2010, where I am at now, (and that) may not be all that long ago for many, but it is an eon in internet terms.
Are you, or anybody else reading this, aware of any person or site tracking genealogy related websites that records/posts notations of name changes, buy-outs by other service providers, or just plain disappearances? You might have mentioned some in the interim, but I’m still a hundred episodes in arrears.”
That’s the wonderful thing about podcasts, you can listen when the episode is published or even a decade later. That’s because podcasts, unlike radio shows, are recordings that you can access whenever it’s convenient for you. But my listener is correct, things change quickly online, and that includes website links I refer to in the show notes web pages of older episodes.
How to Find Information When a Website has Disappeared
I love hearing that listeners are enjoying the free Genealogy Gems Podcast archive. We hear over and over that our listeners pick up something new each time they listen. However, I completely understand the frustration of encountering defunct websites and resources. What a bother they are!
Unfortunately with the speed at which online information changes, it’s just about as impossible to keep years of web content current (while still producing new content) as it is finding a genealogy record that burned in a courthouse fire!
The good news is that with a little persistence, you can probably locate where a source has moved to or find alternatives that may provide the same function. Paying attention to clues and details around the original source itself can lead you to alternatives that can accomplish the same goals or provide the same or similar information. And of course, tracking down information that’s gone missing is certainly a valuable skill in all areas of genealogy!
Here are a few great strategies to help you find information when a website has disappeared:
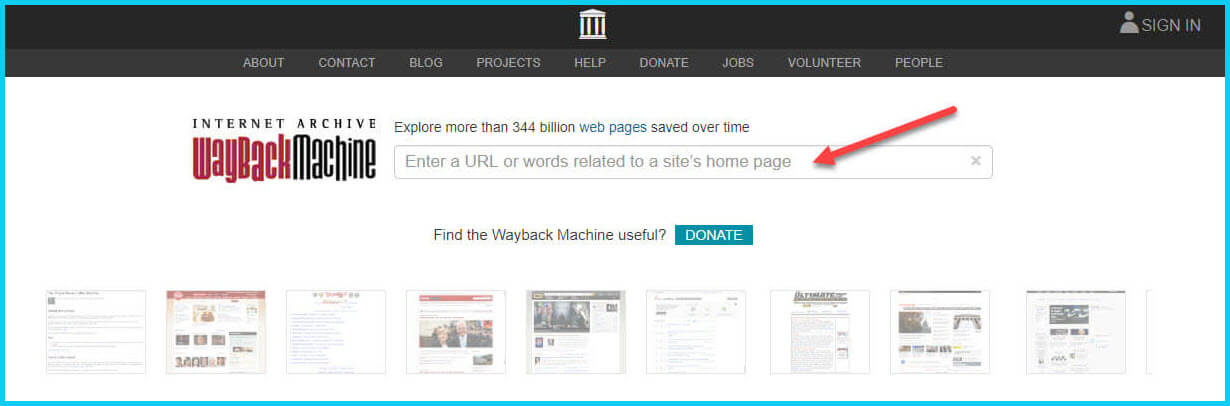
1. The Wayback Machine Can Find Defunct Sites
1) If you run across a link to a now defunct site, copy the website link. Next, go to the Internet Archive at https://web.archive.org and paste the web address that you copied into the Wayback Machine search field. Press enter on your keyboard to run the search on that address. You may very likely be able to retrieve a screenshot of the page.
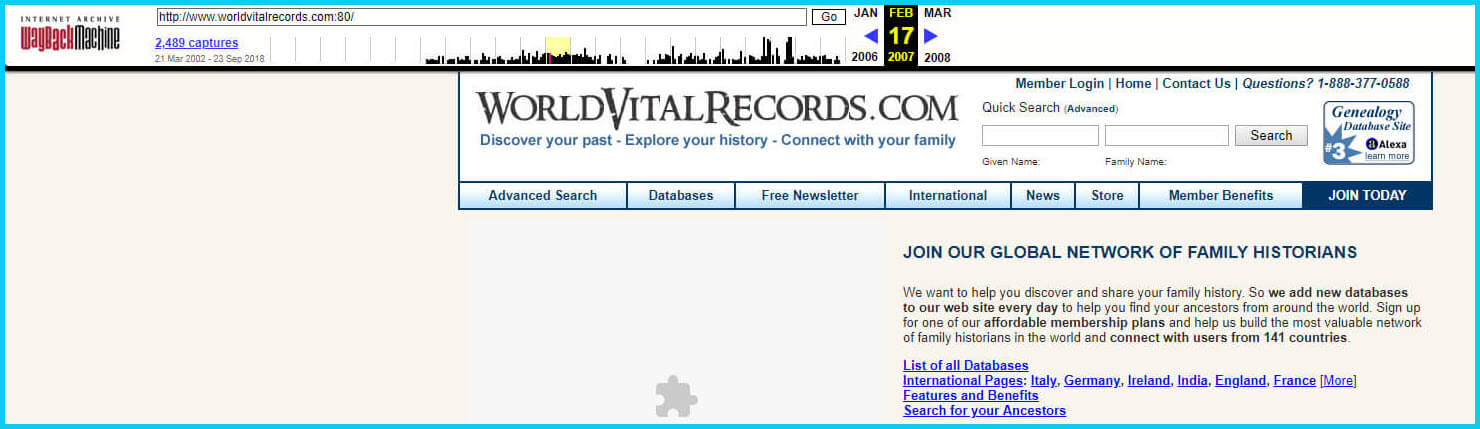
If you’ve been researching your family history for several years, you’ll probably recognize the screenshot of World Vital Records (below) at the Wayback Machine.
You may not gain access to everything that was there originally, but you’ll very likely glean clues that you can use to find the information you seek on another website using a Google search.
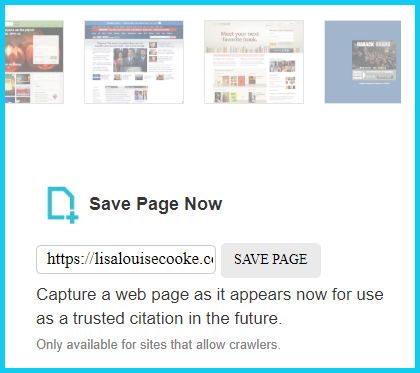
One of the features most recently added to the Wayback Machine is the Save Page Now tool. This helps you capture web pages and add them to the Wayback Machine at the time that you find them. That way, even if the site goes away, you’ll have a copy of the web page for future reference.
This tool works on any web page that allows “crawlers”, which most sites do. Crawlers are used by sites like Google and the Wayback Machine to index information and capture the pages.
To save a web page using the Wayback Machine, copy the web page’s address and paste it into the Save Page Now field. It will bring up the page in your browser and show you that it’s being processed and will be added to the Wayback Machine.
The page will be conveniently stamped with the date that it was captured. This is helpful because even though websites may stay online for years to come, the content on their pages may be changed over time. By using the Save Page Now feature and adding the web page to the Wayback Machine, you will be able to revisit the information that was on that page on that specific date well into the future, regardless of changes that may be made to it over time.
2. Google Your Question
You’ve heard me say it many times: Just Google it!And that certainly applies here. Google is great at finding alternative sources for the same information. No question is a dumb question when it comes to Google.
If you are running into a challenge with a defunct site or have a question, chances are someone else has had the same question! It may have been posted on a message forum, a blog post or the help section of a website. Google can help you find the question and the answers that were provided.
Let’s say you come across a link to the World Vital Records website in the syllabus of a class you took several years ago. (If you’ve been researching your family history for a while, then you probably remember this genealogy records website.) And imagine that when you type the link into your web browser, you discover that the link is broken and the website no longer exists.
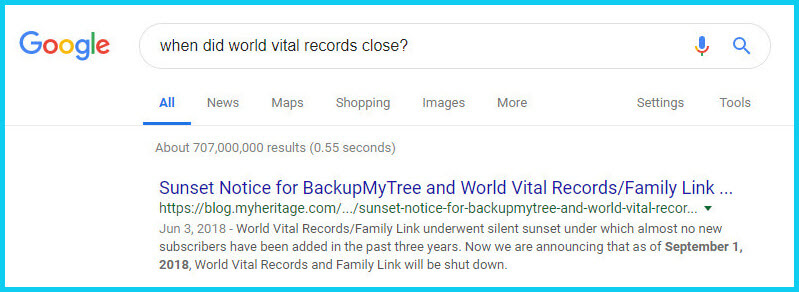
Here’s an example of what you could ask Google in order to find out what has happened to the World Vital Records website:
When did world vital records close?
Sunset notice for World Vital Records
Who acquired World Vital Records?
As you can see in the example search in the image above, the sunset notice for World Vital Records, which was acquired by MyHeritage, was issued in September of 2018. Click the link to the article to read up on all the details.
When faced with a broken link your first impulse may be to ask another person or someone you see as an expert on the subject. That can work too, but chances are they may just ask you “did you Google it?” That’s because, like it or not, Googling at the moment you have the question is much faster and provides you with the latest information.
Think of Google as asking your question to every single web page in the world – all at once. If the answer is out there, Google can probably find it.
3. Google the Content
As I said, the internet is growing and changing every day and it is very possible you may find the content is now available elsewhere.
Any good source that provides website URLs will usually include information about what you’ll find on that website. You can use that information to run a Google search. Your goal is to determine if the information you seek is available elsewhere from the same provider, or identify another website that references the same content.
Start by copying short phrases of key information and pasting it into the Google search box. Put quotation marks around the text. Quotation marks are a standard Google search operator and they will tell Google to search for web pages that include that exact phrase, sentence or paragraph. (Quotation marks also work on individual words such as surnames.) If you don’t get an exact search result, remove the quotation marks and place them just around the most important individual key words.
Here’s an example of how this works:
In Genealogy Gems Podcast episode 62 (published back in 2009) I talked with actor Darby Hinton about a new history-themed television series he was producing called Hintons Living History. The show notes include a link to the website devoted to the show. Clicking that link leads to an error page because the website has since been taken down. (For website publishers like myself, we are often faced with the decision between creating new content, or constantly combing through old published content to fix what is out of date. I think you will agree that continuing to create new content is preferable.)
Since the link no longer works, a Google search of the name of the television show in quotation marks (“Hintons Living History”) provides a plethora of information and videos to learn more about the show.
Obvious, But Not Always
While the solutions I’ve shared here may seem somewhat obvious, time and time again I’ve watched people get befuddled by running into broken genealogy website links. It’s totally understandable. In the excitement of the moment of finding something interesting, getting stopped in your tracks by a broken links creates frustration. Our brains tend to focus on that obstacle and frustration rather than the simple solutions that are available.
Now you have a game plan that you can use so that broken links will only be a blip on your genealogical research path.
This article was originally written in January 2019, and extensively updated August 6, 2019. Can you find the old version on the Wayback Machine?

 Kate Eakman is a Senior Researcher for Legacy Tree Genealogists, a worldwide genealogy research firm with extensive expertise in breaking through genealogy brick walls.


 About the Author: Lisa Louise Cooke