GEDCOM File (What is It & How to Use This Genealogy File)
A GEDCOM file is a universal type of file that genealogists use to move data from one genealogy software program to another. Using these helpful tips below, you can open genealogy files your family members send to you, or share your data with others.
When and Why You Would Need to Open a GEDCOM File
A Genealogy Gems reader recently wrote:
I recently signed up for [the Genealogy Gems] newsletter. I received a CD from a relative with family history information that was set up through Family Tree Maker. I am currently not subscribed to any of the genealogy sites. My question is, how can I retrieve this information [from the CD.] Can you help?
The answer to the question is: Use another program to open the GEDCOM file from the CD. Let me show you how easy it is to open and create GEDCOM files.
GEDCOM Basics
GEDCOM is an acronym standing for Genealogical Data Communication. It is a universal genealogy file that allows you to exchange genealogical data between different genealogy software programs.
Because it is “universal” in nature, a GEDCOM file can be read by many different types of genealogy software. That means, if you are using RootsMagic, you can still share all the data you have collected with your cousin who uses Family Tree Maker, and she will not have to type in all the names, dates, and places manually.
Occasionally, not all the information included in a GEDCOM file will transfer perfectly. There are differences in how that information is interpreted and some things, like notes and sources, may be affected. However, for the most part, much of it will transfer correctly.
How to Open a GEDCOM File
Our reader needs to open a GEDCOM file contained on the CD he was sent. To do this, he must have a program on his computer that will read a GEDCOM file. There is an option I would like to share with you.
RootsMagic is a downloadable software for both Mac and PC users. (And, it is the one we here at The Genealogy Gems Podcast use! That’s why we accepted them as a sponsor of the podcast.)
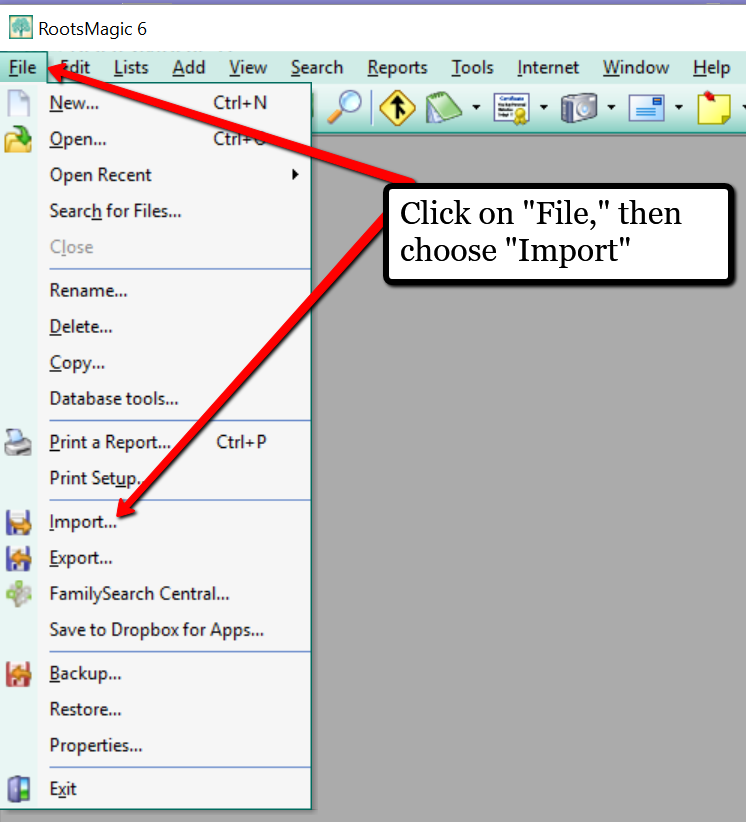
Once you have downloaded RootsMagic to your computer, open it. At the top left corner, click on File and from the pull-down menu, choose Import.
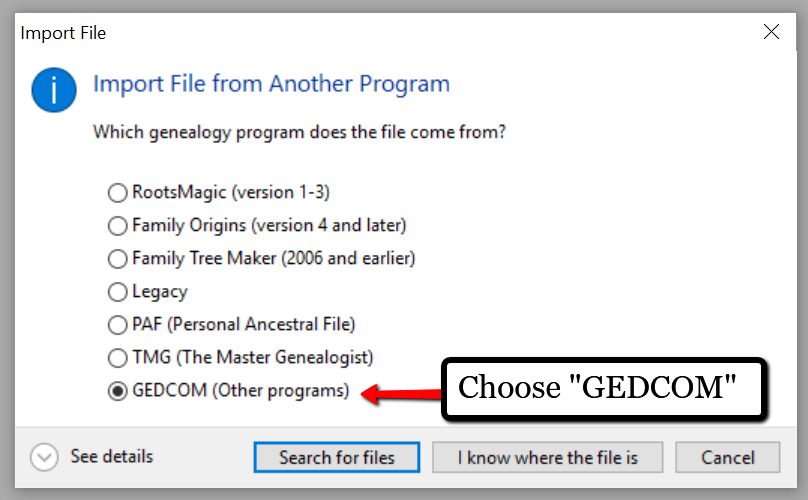
Now, a new pop-up window will open and ask from what source you would like to import from. You will notice several options, but for our reader’s question, he will choose the GEDCOM option.
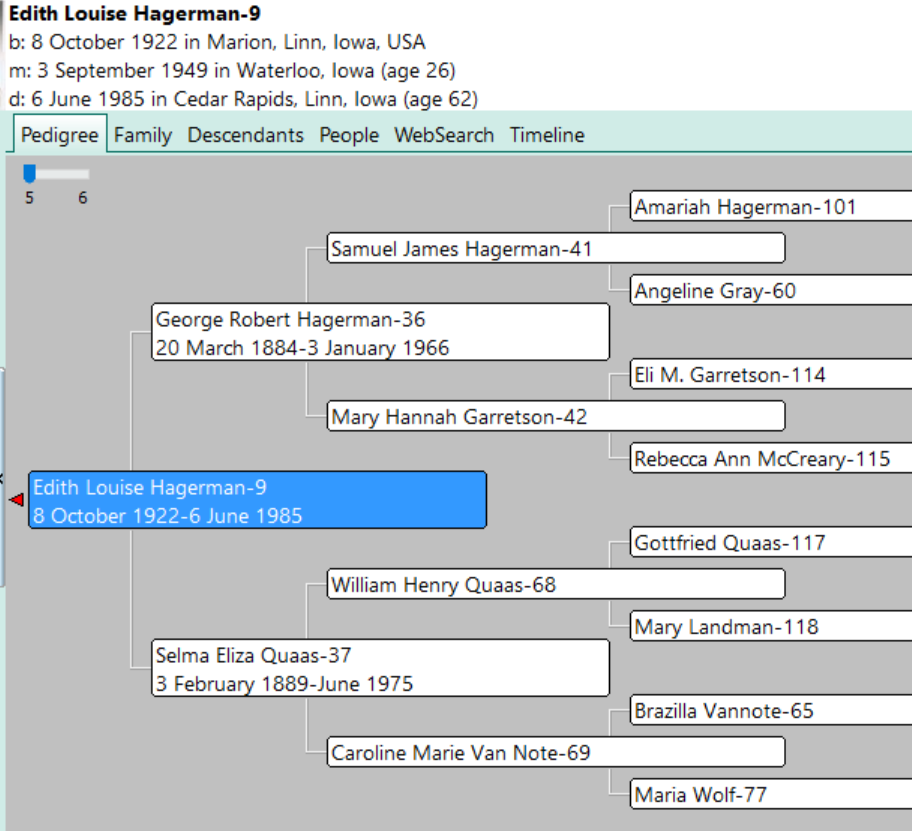
Then, choose I know where the file is, and the file explorer window will appear. In this case, our reader would click on the CD that he has loaded into his computer’s disk drive, and follow the prompts to open the GEDCOM file. All that information his relative sent him will be slurped into RootsMagic and he can easily look through the pedigree of his family.
Creating a GEDCOM to Share with Others
RootsMagic also allows you to create a GEDCOM file. This is what you would send to your relatives when they would like to have a copy of the family tree.
To do this, open RootsMagic. Click on File, as we did before, and this time choose Export from the pull-down options.
The export box will pop-up. You can choose what you wish to have included in this export. I typically choose Everyone, but you can do yours by family names by clicking on the down arrow next to Everyone and choosing Select from list.
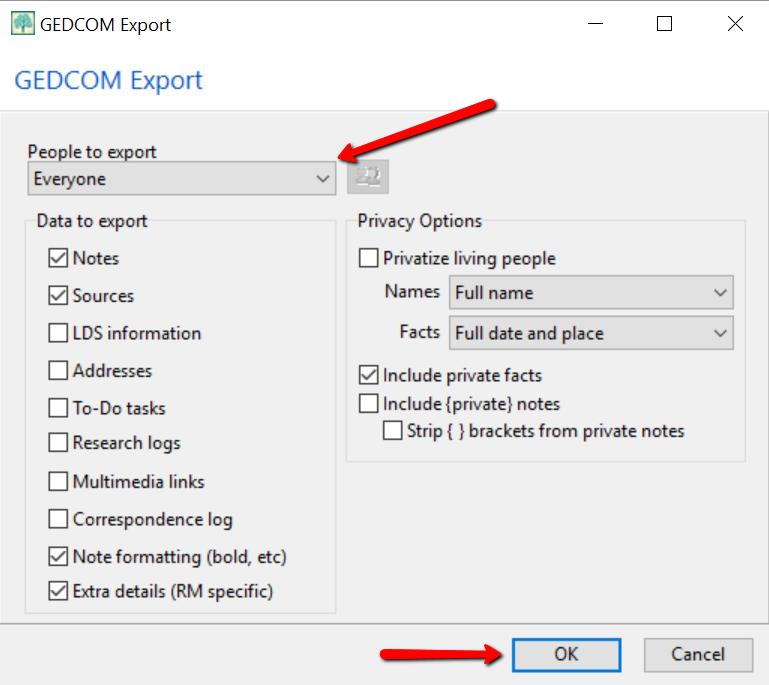
Once you have clicked OK, the GEDCOM file is ready to be saved to your computer. Save the file on your desktop or somewhere you will be able to locate it again. Remember to name the file and pay attention to where you are saving it!
Creating a GEDCOM from Ancestry.com
If you have stored your genealogy data at Ancestry.com, you may be interested to know that you can create a GEDCOM file for your family tree there as well. It’s just a matter of signing into your Ancestry account, locating the Tree Settings, and then clicking Export. I found a nice article outlining the steps on how to do that here.
Protecting Your GEDCOM Files
Creating a GEDCOM is also a great way to save or backup your hours and hours of family history research. One of the saddest tales of genealogists everywhere is losing their computer or printed family files with all that work!
GEDCOM files can be saved to a hard drive, saved to an external unit, emailed, put on a thumb drive, or uploaded to the Cloud. You can also invest in a company like Backblaze, the official backup of The Genealogy Gems Podcast, that will automatically backup all your files. (Read more about Backblaze, here.) All of these methods protect you and your genealogy.
More on Protecting Your Genealogical Data
Learn more about Backblaze, The Genealogy Gems Podcast’s first choice when it comes to backing up precious genealogy research and personal files. Read the article’s below and determine if Backblaze is the answer you’ve been looking for.
SSDI Search – How to Find Hard to Find Ancestors
Social Security Death Index (SSDI) search is not necessarily as straight forward as you might think. We’re going to explore what SSDI records are, their range of availability, and how they compare across the Genealogy Giants records websites.
If you’ve been dabbling in genealogy research for a while, then you are very likely familiar with the Social Security Death Index, more commonly referred to as the SSDI. But even experienced researchers have questions, like the one that Marti sent me recently:
From Marti in Texas:
Hi Lisa!!
Thank you so much for all your helpful resources on your website!! I just listened to the SSDI Working Backwards podcast episode (Family History: Genealogy Made Easy episode 3) and my grandparents passed away in 2012 and 2014. Do you know when the last time the index has been updated, I cannot locate them.
Thank you so much!!
This two-fold question is a good one. While many genealogical record sets have privacy laws that dramatically restrict more recent records from being available, the SSDI is not one of them. But even if the records are available, there may still be times when we have trouble locating our relatives.
Whenever you run into a road block finding ancestors in a record collection, do what good detectives do, and go back to the beginning. In this case, let’s learn more about the collection itself.
Social Security Death Index Background
The Social Security Act was signed into law in 1935 by President Franklin Roosevelt. By 1937, more than 30 million Americans had registered. Today, the Death Master File from the Social Security Administration contains around 90 million records of deaths and they are publicly available online.
Some data goes as far back as 1937, but most of the information included in the SSDI dates from 1962. This is because the Social Security Administration began to use a computer database for processing requests for benefits in 1962. Some of the earlier records back to 1937 have not been added.
It’s important to know that the SSDI does not have a death record for everyone. It’s also very possible that you may occasionally find an error here and there if something was reported incorrectly. But don’t let that stop you from tapping into this major resource! It’s a wonderful alternative source for finding people who were counted in the 1890 census (which was unfortunately mostly destroyed) because they may still appear in the SSDI. Also, those who were born before vital records registration in their home state began, may also show up. Remember, working folks just had to live past 1937 to have been possibly included. That means some people could have been born sometime in the late 1800s.
Now that we have a handle on the history of the SSDI, let’s look at who has it and how recent their records are.
Where to Find the SSDI
The Social Security Death Index (SSDI) is available on all of the ‘big 4’ genealogy records websites, which we here at Genealogy Gems refer to as the “Genealogy Giants.” The links below will take you directly to the SSDI search page for each.
- FamilySearch
(Current as of February 28, 2014) - Ancestry
(1935-2014) - MyHeritage
(It is not stated how current the database is, but a search for 2014 did retrieve results) - Findmypast
(No dates or citation provided, but a search for people who died in 2014 did retrieve results)
In Marti’s case, she will want to search every single one of these websites for her ancestors. The good news is that they all appear to be up-to-date, but that doesn’t mean they are all exactly the same. The same collection of genealogy records can appear differently from site to site for a number of reasons such as accidental omissions, variations in the power of their search engine, differences between indexers and scanners, and Optical Character Recognition (OCR) inaccuracies. These may or may not affect the SSDI, but the point is that you can’t go wrong searching each one of the Genealogy Giants just in case. And since SSDI search can be conducted for free at all of the Genealogy Giants, it doesn’t cost you anything to do so.
A quick way to find all of the websites that include the SSDI is to Google SSDI genealogy. Here’s a link to the results.
SSDI Search Head-to-Head Comparison
![]() Another excellent reason to search the SSDI on multiple websites is that each website displays the information a little differently. And as you can see from the chart below, when it comes to the Genealogy Giants, there are definitely differences.
Another excellent reason to search the SSDI on multiple websites is that each website displays the information a little differently. And as you can see from the chart below, when it comes to the Genealogy Giants, there are definitely differences.
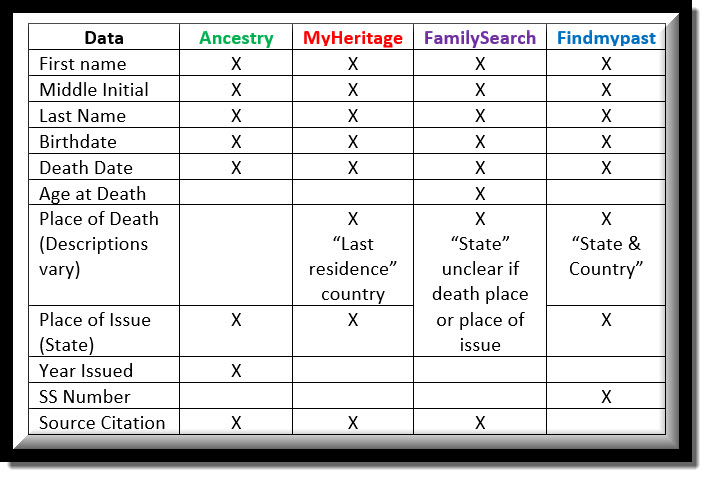
It’s interesting to note that Ancestry is the only website that provides information about the year that the Social Security number was issued. It isn’t exact, but it’s more than the others offered in my search for Alfred H. Sporan.

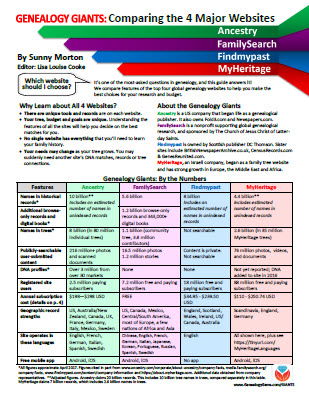
The differences between the 4 major websites can be sometimes subtle or quite dramatic. Understanding their strengths and weaknesses, as well as free versus subscription offerings, is key to successful research that is both efficient and cost-effective.
The quick reference guide Genealogy Giants: Comparing the 4 Major Websites is a must-have for anyone serious about getting the most out of free and paid subscriptions.
The author of this 4-page full-color cheat sheet, Sunny Morton, is Contributing Editor here at Genealogy Gems, and she’s packed this guide with everything you would ever want to know, and many things you probably didn’t know that you needed to know. You can pick up your copy here in our store.
SSDI Search and Beyond
There is another database at Ancestry that is worth keeping your eye on. It’s called the U.S. Social Security Applications and Claims Index and it shouldn’t be missed! Currently, this covers 1936-2007, but who knows, they may update it in the future. It includes even more information. It was first released in 2015. Read more about it here at Genealogy Gems.
Gems: Share Your SSDI Search Experience!

I invite you to take a moment to share your SSDI search experience in the comments below. Have you had any surprises? Did you find a difference between the records found at different websites? We want to hear your story because we all benefit from each other’s experiences.
Disclosure: This article contains affiliate links and Genealogy Gems will be compensated if you make a purchase after clicking on these links (at no additional cost to you). Thank you for supporting Genealogy Gems!
New Records on Ancestry.com, FamilySearch and Findmypast
Search millions of new records on Ancestry.com, FamilySearch & Findmypast, three of the Genealogy Giants. Find your family history in Australia, Brazil, Canada, Denmark, England, Germany, Hungary, New Zealand, Panama, Poland, Sweden, the U.S., Wales and in PERSI,...Family History Episode 8 – Best Genealogy Websites, Part 2
![]() Originally published Fall 2008
Originally published Fall 2008
Republished November 26, 2013
by Lisa Louise Cooke
Download the Show Notes for this Episode
Family History: Genealogy Made Easy
Welcome to this step-by-step series for beginning genealogists—and more experienced ones who want to brush up or learn something new. I first ran this series in 2008. So many people have asked about it, I’m bringing it back in weekly segments.
Episode 8: Best Genealogy Websites, Part 2
In a follow up to last week’s episode about subscription genealogy records website, in my first segment our guest is Yvette Arts, Director of Content Partnerships at World Vital Records. She tells us about exciting developments at the website that have helped make it a success.
In our second segment we look at five organizations that provide free online access to genealogy records for those with North American roots: FamilySearch, the National Archives of the United States, Ellis Island Foundation, the National Archives of the United Kingdom, and Library and Archives Canada.
Now for some updates on these sites and MORE since the show first aired:
- FamilySearch.org is still free and growing exponentially. It captures records from all over the world, not just North America and the U.K. It is now home to over 3.5 billion names in searchable databases, with over 35 million new records added every month. In addition, they’ve added over 60,000 digital books to the site. The layout of the website has changed dramatically since I described it in the original show. Click on Search to get to their databases, then enter an ancestor’s name and, if you can, a life event (birth, marriage, residence or death). A significant portion of new online records are browsable but not yet indexed. So now, after you search for individuals in their databases, scroll down to the Browse section below the search fields. There you’ll be able to see what records you can browse for a locale (choose the international region, then you can choose more specific locations). You can still order microfilmed records at the Family History Library to a satellite FamilySearch library near you. From the Search screen, choose Catalog, and you can search for and order available records by location.
- The National Archives (U.S.), also known as the National Archives and Record Administration (NARA) also offers more on its website now. The portal for genealogists looks a little different now but still helps you see how to search and use the site for genealogy. There’s a direct link to the 1940 census, with images, maps and descriptions. Remember that Footnote, the subscription site I mentioned that’s digitizing military records, is now Fold3, which we talked about in Episode 7.
- EllisIsland.org still offers free access to the passenger records of those who landed at Ellis Island. In addition, you can still look at ship information (click on Ships from the home page). The Immigrant Experience and timeline I mention can be found by clicking on the Ellis Island tab.
- The National Archives (U.K.) links from the home page to resources for ordering birth, marriage and death certificates for England and Wales, Scotland and Northern Ireland. Read about updating order information, including costs, at these sites. There is still a portal for genealogists from which you can learn all about the various record groups I mention in the podcast and more.
- Library and Archives Canada continues to add more valuable genealogical data to its site, including census data! Start from its Genealogy and Family History page. In addition to the features I mention in the show, they’ve improved their online indexes: scroll down on the above page and you’ll find the Ancestors Search (Databases) link to a main search engine and individual databases for vital records, censuses, immigration, land, military and several directories.
- Cyndi’s List and U.S. GenWeb are still fantastic online resources, but add to your list these ones as well:
- DeadFred, a photo identifying and sharing site;
- Google, for searching across the Internet for everything from individual ancestor’s names to maps and local histories (especially through Google Books at www.books.google.com);
- The Library of Congress family of websites, including the mega-newspaper site, Chronicling America;
- WorldCat, an enormous card catalog for more than 10,000 libraries worldwide.
- Find a Grave and Billion Graves, home to cemetery inscriptions for millions of tombstones.
- Of course, there are many, many more websites for genealogists, but these will certainly keep you busy to start!