In this episode we cover a plethora of strategies that will give you access to loads of free genealogy records and resources. We cover:
How to follow the path of least resistance to find what you need for your genealogy research.
The best ways to find free genealogy records online.
What you need to know about the genealogy industry that will help you save money.
How you can bee-line your way to the free records that are to be found at each of the big subscription genealogy websites (Ancestry, MyHeritage and FindMyPast).
Two Google secret searches that can help you locate free genealogy resources.
How to search online to find free records offline.
A clever way to get free help with your genealogy brick wall.
Companion Video and Show Notes
This topic comes from my YouTube video series Elevenses with Lisa episode 21. You can find all the free Elevenses with Lisa videos and show notes at https://lisalouisecooke.com/elevenses.
Genealogy Gems Premium Members have exclusive access to the 5-page downloadable show notes handout in the Resources section of the Elevenses with Lisaepisode 21 show notes page here.
Premium Members also have access to all of the archived earlier episodes. To access the Elevenses with Lisa Premium Member archive, log in to your membership at https://genealogygems.com and under in the main menu under Premium go to Premium Videos and click on Elevenses with Lisa.
Elevenses with Lisa Episode 21 – Free Genealogy! Watch the video and read the full show notes here.
Stay Up to Date with the Genealogy Gems Newsletter
The Genealogy Gems email newsletter is the best way to stay informed about what’s available with your Premium eLearning Membership. Click below to sign up today.
In this episode we discuss the latest genealogy news, one listener’s fabulous use of Google Alerts, and Maureen Taylor’s new history film project.
NEWS:
Google Earth 7 Google as just released Google Earth version 7. Google Earth is an amazing tool for genealogy so new enhancements are always welcome! This new version enables you to explore a number of cities around the world in 3D, from Long Beach, California, to Rome, Italy. The 3D imagery uses the enhanced modeling capabilities, previously found on only mobile devices.
In my video CD Google Earth for Genealogy Volume II I go into detail about 3D models and even give you resources for how you can get your own 3D models of everything from your house, to your ancestor’s home.
Download the new Google Earth 7 and get even more 3D imagery. You’ll find comprehensive and accurate tours of more than 11,000 popular sites around the world, including our growing list of cities where new 3D imagery is available.
A big change with this new version is the tour guide feature which serves as sort of a virtual local expert that suggests places nearby that you might want to explore and providing you with background information on the location. You’ll find the tour guide along the bottom of the screen, and it looks like sort of a film strip of thumbnail images representing various tours that are available. These change based on where you are on the Google Earth globe.
What’s new in RootsMagic 6 Video And there a favorite genealogy program that just got a new fresh update. RootsMagic 6 is now available, and you can see what’s new in the newest version of the genealogy database program in a brand new video they’ve published on their website at http://www.rootsmagic.com/webinars/
In the video you will see new features in action such as:
Online Publishing
Find Everywhere feature
Live Timeline View
WebTags
CountyCheck Explorer
If you are a current paid user of RootsMagic, you can upgrade for just $19.95. New users may purchase RootsMagic 6 for only $29.95. Order online at http://rootsmagic.com/RootsMagic/
Special Holiday Offer Now through Dec. 20, 2012
Order gift copies of RootsMagic 6 for just $19.95 (plus shipping). You can also order other RootsMagic products at that same $19.95 price. Order the special holiday at http://www.rootsmagic.com/holidayoffer or order by phone at 1-800-ROOTSMAGIC (1-800-766-8762).
The next item here is that the Family Tree Service coming soon to FamilySearch.org According to a FamilySearch press release, “Within the next few months, FamilySearch will make Family Tree available to everyone on its website. The first of many updates planned for FamilySearch.org, Family Tree will provide a free and engaging way to discover, preserve, and share your family history. Family Tree will also offer specialized tools to make temple work for your ancestors even easier and more convenient.
Edit and delete incorrect data, including relationships
Connect and collaborate with others on shared family lines
Show where information came from
Link to online photos and documents
If you have questions about what Family Tree will be like or how it will work, you can log in to a special training website that offers online courses, how-to videos, informational handouts, and step-by-step training.
Get started with Family Tree today by watching the introductory video or reading about it on the training website. Family Tree will be open to everyone in the next few months.
RootsTech conference in Salt Lake City The Early Bird price for the full 3-Day Pass which gives you everything RootsTech has to offer is $149, discounted from the regular full price of $219
Students: One-day only pass for $89 and students can get a 3 day pass with their student ID for just $39
Getting Started 3 Day Pass for beginners: gives you access to over 30 classes in the Beginner track is just $39 for the early bird price, and the regular price will be $49
Getting Started one-day pass giving you access to a selection of fundamental classes for just $19
I will be at RootsTech 2013 teaching a variety of classes in addition to my booth in the exhibit hall, and some free demo classes I’ll be doing in the Demonstration Area of the Expo hall. So I hope you get RootsTech 2013 on your calendar because I look forward to seeing you there.
Ireland – National Archives launches new website
The National Archives of Ireland has launched a new genealogy website at http://www.genealogy.nationalarchives.ie/ which will initially host the 1901 and 1911 Censuses, Tithe Apportionment records from 1823-37, and Soldiers’ Wills from 1914-17.
New at ScotlandsPeople
Scottish wills and testaments from 1902-25 now online at the ScotlandsPeople at http://www.scotlandspeople.gov.uk/
Millions of Old Newspaper pages added to FindMyPast findmypast.com has just published millions of pages of historical newspapers from not only England, but also across Wales and Scotland as well. This collection contains local newspapers for the period 1710-1950. More than 200 titles are included. Go to http://www.findmypast.co.uk/search/newspapers
Ancestry.com launches newspapers.com On November 29, 2012 Ancestry.com Inc., announced the launch of Newspapers.com, a web site designed to offer a collection of more than 800 U.S. newspapers dating from the late 1700s into the early 2000s.
Comprising more than 25 million pages, Newspapers.com offers a historical and present-day newspapers ranging from the New York Times to small town and local newspapers throughout the United States.
According to Ancestry’s press release “The search capabilities on Newspapers.com are specifically designed for newspapers enabling users to easily search by keywords, location, time period and newspaper name.”
The yearly subscription rate is $79.95 for subscribers and $39.95 for Ancestry.com or Fold3.com members. Newspapers.com also offers a 7-day free trial that can be activated at www.newspapers.com.
Ancestry has launched a new Community Support site at Ancestry.com You can access Community Support by clicking on “Get Help” at the top of the Ancestry.com homepage. Once on Online Help, you will see a button for “Ask the Community” on the right hand side. That link will take you directly to Ancestry’s new Support Communities.
MyHeritage Buys Geni.com MyHeritage have just bought our long-term rival Geni.com – and also raised $25million in new funds. As a larger community, the users of MyHeritage and Geni.com will now receive matches with the other website family trees, and MyHeritage’s Record Matching, will benefit Geni’s users, who will get access to historical records never available before on Geni.com.
MAILBOX:
Jessica has a new blog and a question about photo storage: “…after about the 10th podcast in a row where you encouraged us to start our own blog, I finally got the message. I started my very own “geneablog” a couple of weeks ago. I only have three posts so far, but I’m pretty proud of it. Please check it out and let me know what you think. I’d love you to let your listeners know too, because that would be even more feedback! I am writing my blog from the perspective of my relentless quest to better understand the life of one particular ancestor of mine, William Park. I call it “Knowing William” and it writing it really makes me happy.” Visit her blog at http://williamparkfamilyhistory.blogspot.com/
“I recently listened to episode 119 where you talked to Michael Katchen from 1000memories. I went to the site, signed up, and uploaded pics to my first shoe box. In the interview I remember words like “social networking”, “memorials”, and “genealogy”. I am confused. All I saw on the site was my shoe boxes and some not-very-informative FAQs. I know it has been a while, but have they changed the whole premise of the website in less than a year?”
Lisa’s Answer: Congrats on your new blog! Remember posts can be short and sweet, and pack them with searchable keywords so other researchers can find you in Google Search.
RE: 1000Memories. They have indeed changed up the website since the interview. I agree with you, it seems watered down now, and not as obvious as to how to make the most of it. They seem to be focused on “simplicity.”
Barbara Shares A New Use for Google Alerts “My Great Grandfather, Edmund Charles Clark, was a builder in Bendigo, and many of his houses still stand in Wattle Street Bendigo today. I spent a lovely day photographing them, but I cannot go up and knock on all the doors however! So I have a cute way of finding out just what those houses look like today especially on the inside. I have an alert in Google for “Wattle Street, Bendigo” and it works a treat. Every so often one of the homes goes up for sale or rent, and one of the real estate websites has pictures of both inside and outside. These come up on my search and I get to see inside the homes that are still standing. One is up for rent at present and here are the pictures from Realestate.com.au of 172 Wattle Street. Isn’t it lovely? It is still much in original condition.
The Google alert function is really useful for genealogy, and I first found out about it from Genealogy Gems – so thank you very much for the gem.”
GEM: Maureen Taylor’s new gig – bringing revolutionary war history to film Pamela Pacelli Cooper, President, Verissima Productions at www.verissima.com
New Gem for Premium Members!
Sign in to your Membership and go to Premium Videos to view the brand new video Genealogy on the Go with the iPad (and tablets too!)
The iPad is built for hitting the road and is ideally suited for family history due to its’ sleek lightweight size, gorgeous graphics and myriad of apps and tools. In this class I will teach you “the tablet mindset”, the best apps for the tasks that genealogists want to accomplish, and my Top 10 list of iPad Tips and Tricks. By the end of class you will be able to turn your iPad into a family history powerhouse!
Welcome to this step-by-step series for beginning genealogists—and more experienced ones who want to brush up or learn something new. I first ran this series in 2008-09. So many people have asked about it, I’m bringing it back in weekly segments.
Episode 40: How to Start a Genealogy Blog, Part III: Step by Step
In the last two episodes you’ve been hearing from experienced genealogy bloggers about family history blogging. I hope it piqued your interest and got you thinking about the possibility of doing it yourself. As we’ve discussed, it’s a great way to share your experiences with other researchers and potentially connect with long lost relatives.
Well in today’s episode I’m going to walk you through setting up your own family history blog step-by-step. By the end of this episode you could have your own family history blog up and running and sharing your enthusiasm about genealogy with the world. How does that sound? Are you willing to give it a try? And even if you’re not looking to start blogging today, listen in and plant the seeds for the future.
From the Mailbox:
A long-time listener wrote in this last week about the recent blogging episodes:
“The Transcript software mentioned by Denise Levenick looks great – I downloaded and installed it this morning. I am giving a brief software demonstration at the Greater Portland Chapter of the Maine Genealogical Society’s 30th Anniversary Celebration tomorrow and I am going to let people know about this product.
Episode 38 and Episode 39 have really got me thinking about starting my own blog. It won’t be easy with my 50 hours plus a week civil engineering job, but your podcasts have motivated me. Thank you!” -Will Haskell, Listener to All Your Podcasts
Transcript software is really cool: download the most recent version for free here. And that’s just one example of the kind of great tech tips that Denise Levenick blogs about at The Family Curator Blog!
Follow-up: when republishing this episode, we were curious about whether Will ever started a blog. He did! It’s very cool! Find Will’s Genealogy Blog at http://wchgenealogyblog.blogspot.com/.
Also, listener Anne-Marie had some questions about how to make progress with her Maw-gee research, specifically how to track down their immigration records. She wrote in again to say that she’s going to follow up on our suggestions and let us know what she finds. But she also had some comments about my interview with genealogy blogger the Footnote Maven (Episode 38):
“I have begun listening to Family History and Genealogy Gem podcasts from the beginning again. When I listened the first time I was so novice that I did not always understand what I was hearing. It’s great to have this audio reference guide.”
How to Start a Genealogy Blog: Step by Step
Now before we get started on created your blog let me just say that there are probably countless websites for setting up blogs and certainly countless ways to go about it. My goal in the approach that I’m going to take is to get you up and running in a short period of time for free. This is a great way to get your feet wet, see if it’s for you, and if you decide to get more elaborate with it later you can always do that.
1. Decide what the purpose of your blog is.
When it comes to a genealogy themed blog there are still lots of options – so here are some ideas:
A Research Log
A Surname Focus
Family Traditions, Family Recipes, Photos
Genealogy News
Focus on a certain record type
Provide beginner education
Interviews with relatives
History of an ancestor’s home or community
Have a general all purpose blog
Follow a pattern for each day
And remember the Footnote Maven’s good advice – You can’t be an expert in everything, so don’t even try. To me a good way to stay out of that trap is to stay narrowly focused. If you find yourself having to be an expert in everything you’re blog theme is probably too broad. And of course, be yourself. Do what you do best!
2. Use Blogger (http://www.blogger.com) to create your blog. It’s free, and easy to use.
Blogger is owned by Google so if you already have a Google account than you’re one step ahead of the game. If not that’s the first thing you’ll need to do. Then click “Create Your Blog Now.”
Note: As on any website, the organization and features of Blogger change over time. The following description was current at the time of publication. Use this following descriptions and concepts to guide you through the current version of Blogger.
Name your blog.Of course, the name should reflect what your blog is about, but it’s also good to think of one that is catchy, and one that you can get the URL address for. The URL name you pick has to be something that isn’t already being used, so it might take a few tries.
How to Name Your Blog:
Type in the Title Field
Type the URL you want in the “Blog Address URL” field
click the Check Availability link to see if it is available
Type in the word verification code
Click the CONTINUE button.
3. Select a Design Template:
Scroll through the design templates and pick one you like
Click the select button
Click the CONTINUE button
You’ll get a page that says Your Blog has been created!
Click the orange arrow that says START BLOGGING.
There are a couple of more things we’ll want to do with our blog before we get to the business of actually posting blog articles. First let’s just get familiar with the blog dashboard. This is sort of the “behind the scenes,” an area your readers will never see, but where you will actually do your blogging.
There are 4 tabs along the top: Posting, Settings, Layout and Monetize.
Blog Tune Up: From the Posting Tab….Click the SETTINGS tab. Type up a short description of the blog.
Vocab Word: KEYWORDS
Keywords label your blog so that when readers go searching for a blog to read they will find it. So some good keywords for this new blog that I’m creating would be
Genealogy
Family history
Family tree
Blog
How to
Keywords can be single words or a short keyword phrase such as “family history” which readers will very likely be searching for. Blogger allows you 500 characters.
The rest of your options on this Basic Settings page are mostly about how your content will be labeled and found on the internet. You can take a look through the options but in most cases you will want to leave them on their default settings. When you’re done just click the SAVE SETTINGS button at the bottom of the page. And for right now you can leave all of the other types of settings as is as well. There are about 9 different categories within the Settings Tab that you can tweak, but the default settings on these are just fine for now.
4. Add at least one gadget. Click the LAYOUT tab. I love working with this area because this is where you get to customize the layout and the types of gizmos and gadgets that are on your blog. We don’t want to overdo it but there are some really good ones you’re not going to want to miss.
Blogger will automatically add a couple of gadgets to the sidebar of your blog. They are:
Followers – people who use blogger who subscribe to your blog’s RSS feed.
Blog Archive – This gadget automatically archives your older blog posts.
About Me – This is just a place where you can tell your readers a little more about yourself and include your email address if you wish.
To see what other types of gadgets you can add just click the Add A Gadget link in top side box. That will bring up a window with lots of choices for you:
Search Box
Text
Photos
Slide show
Video Bar
Polls
Lists
RSS feed
Subscription Links
HTML / Javascript
Each one of these is very easy to use and pretty self-explanatory. But I recommend not overloading your blog. Only include, at least to start, the items you really think your readers would get some value from. Otherwise it can just be annoying distraction that gives readers a reason to leave your blog.
How to Add a Picture Gadget to Your Blog:
Cick the plus sign on the right hand side of the page for the PICTURE gadget.
This will bring up a page call CONFIGURE IMAGE.
Give the image a title
Type a Caption
Link to an image on the web OR upload from your computer hard drive.
(To upload from your computer make sure the “From your computer” button is selected and then just click the BROWSE button. Navigate your way to the location of the photo on your computer’s hard drive and select it.) Once the image appears that means it has been successfully uploaded to Blogger.
(If you want to link this image to another website, then you will want to type in the address in the LINK field.)
Click the orange SAVE button and we’re done.
Now you will be back at your dashboard in the Layout mode. You will see that the top box on the side is now labeled as the title you gave your image.
Click the blue PREVIEW button at the top and a preview window will open showing how your blog currently looks and it will include the image you just uploaded.
5. Rearrange Your Gadgets on Your Blog. Hover your mouse over the gadget and your cursor will turn into a cross with arrows. Click and grab the gadget and drag it where you want it and drop it in place. Click the PREVIEW button to see how that looks.
Genealogy Blogging Summary
We’ve made a lot of progress on our blog in a very short amount of time. Take some time this week to take the steps we took in this episode:
Decide on the theme or focus on of your blog
Get a Google Account and create your Blogger blog account with your chosen name and secure the URL address to go with it.
Pick your design template
Add at least one gadget from the choices provided
And move the gadgets you have so far around until they are in the order you want.
Next week we will finish up this family history blogging lesson with adding a few more gadgets and details, doing a bit of pre-planning for our blog posts, publishing your first article, and then talking about how your readers will subscribe to your blog.
Finally, here’s a link to genealogy expert (and blogging guru) Amy Coffin’s blog post, “Another Jones Surprise or Why Genealogists Should Blog.” Next week’s episode will include handouts on Amy’s great ideas for up to a year’s worth of genealogy blog posts by societies or individuals—you won’t want to miss that!
This blast from the past episode comes from the digitally remastered Genealogy Gems Podcast episodes 11 and 12 (originally recorded in 2007). They are now interwoven with fresh narration and updated show notes. Topics include: Google Images; Top 10 Tips for finding Graduation Gems in your family history; Display your family history with an easy to create Decoupage plate.
Did you know you can use Google to help identify images, to find more images like them online, and even to track down images that have been moved to a different place online? Find these great Google tech tips in this episode, along with 10 tech-savvy tricks for finding an ancestor’s school records. You will also hear how to create a family history photo decoupage plate: a perfect craft to give as a gift or create with children.
This “blast from the past” episode comes from the digitally remastered Genealogy Gems Podcast episodes 11 and 12 (originally recorded in 2007). They are now interwoven with fresh narration; below you’ll find all-new show notes.
Google Image searches: Updated tips
Click here to watch a short new tutorial video on using Google Images to find images for your genealogy research.
Conduct an initial search using the search terms you want. The Image category (along with other categories) will appear on the screen along with your search results. For images of people: enter name as search term in quotes: “Mark Twain.” If you have an unusual name or if you have extra time to scroll through results, enter the name without quotation marks. Other search terms to try: ancestral place names, tombstone, name of a building (school, church, etc.), the make and model of Grandpa’s car, etc.
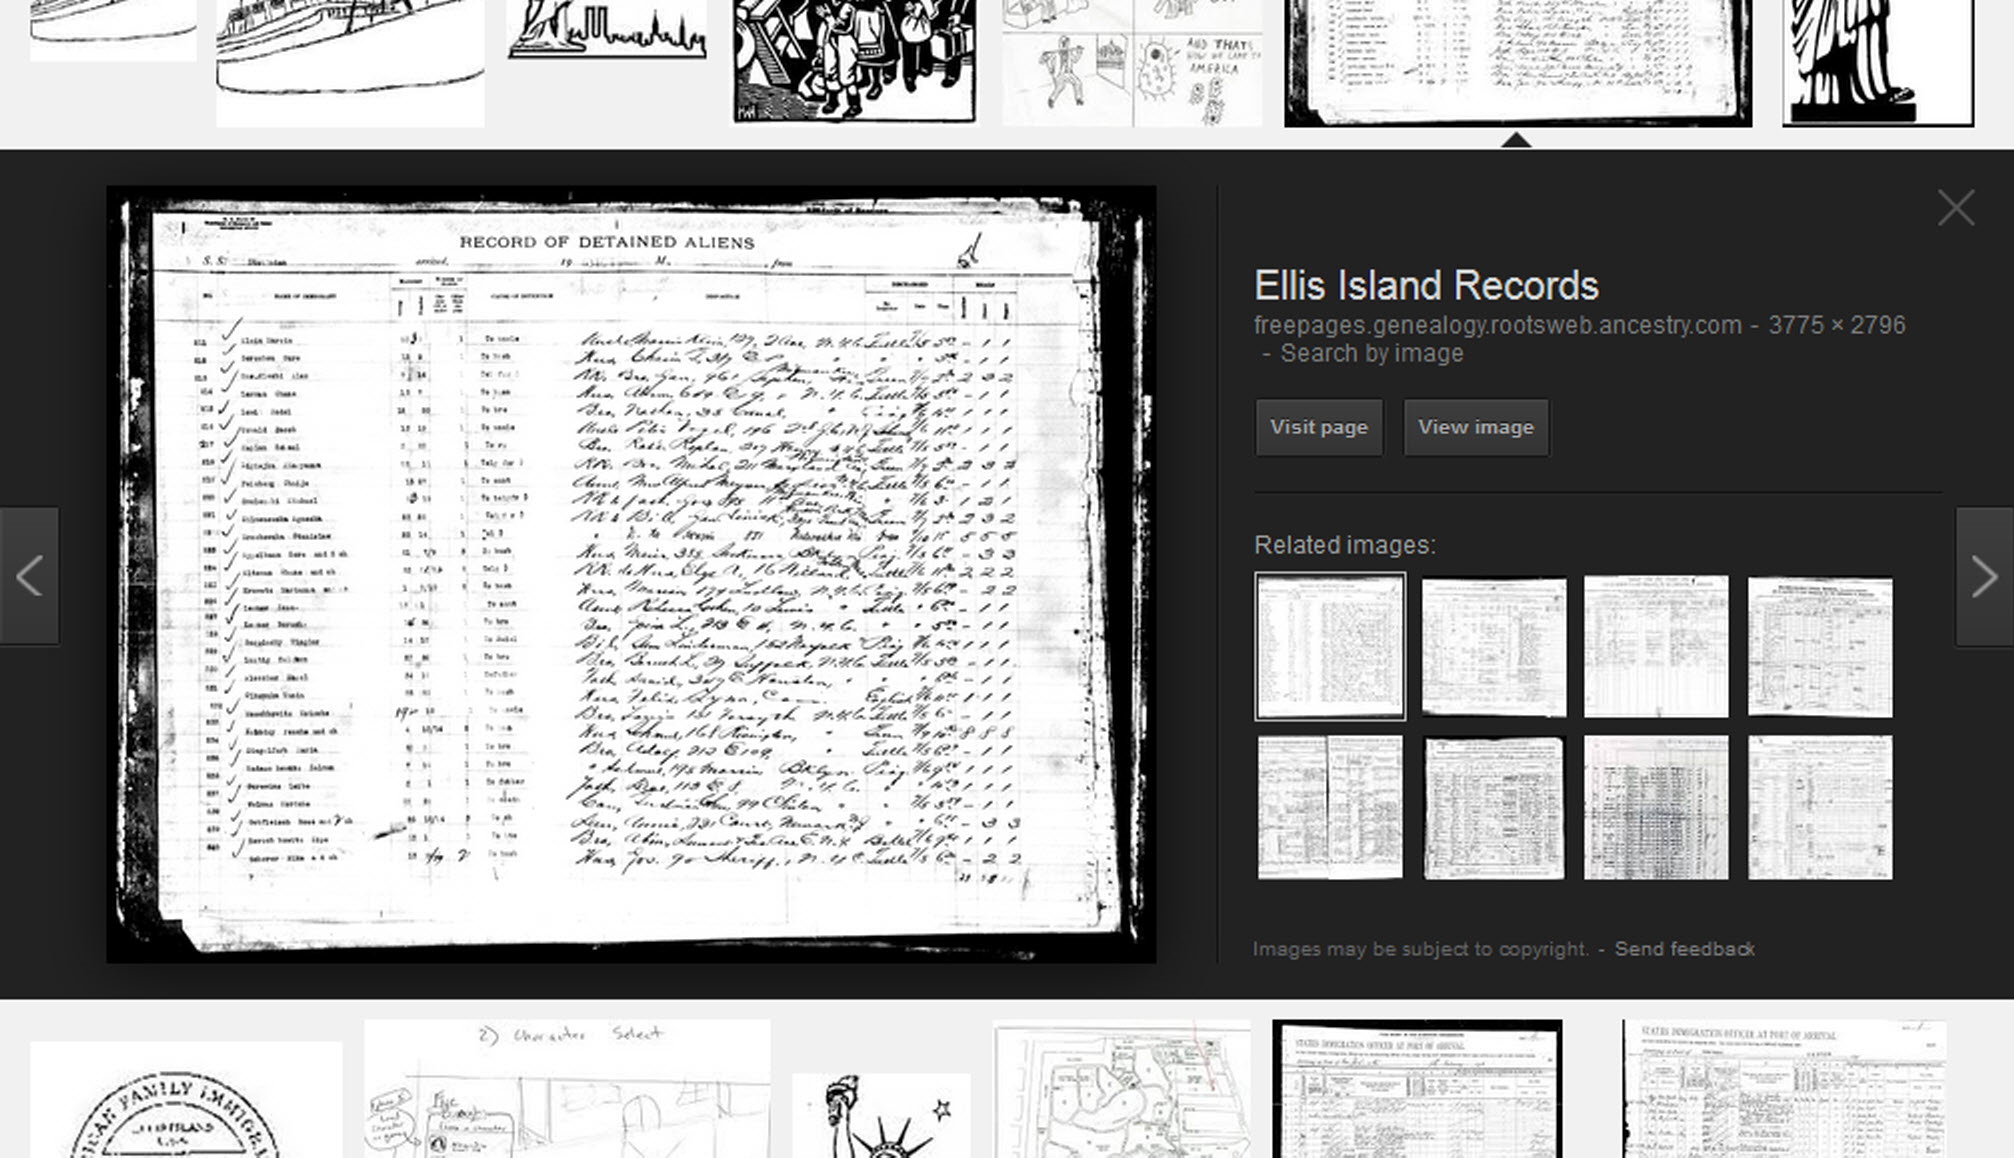
Click on one of the image thumbnails to get to a highlight page (shown here) where you can visit the full webpage or view the image. If you click View images, you’ll get the web address.
To retrieve images that no longer appear at the expected URL: Click on View image to get the image URL. Copy the image’s URL (Ctrl+C in Windows) and paste it (Ctrl+V) into your web browser to go to that image’s page. When you click through, you’re back in Web view. The first few search results should be from the website with the image you want. Click on a link that says “cache.” A cached version is an older version of the website (hopefully a version dated before the image was moved or removed). Browse that version of the site to find the image.
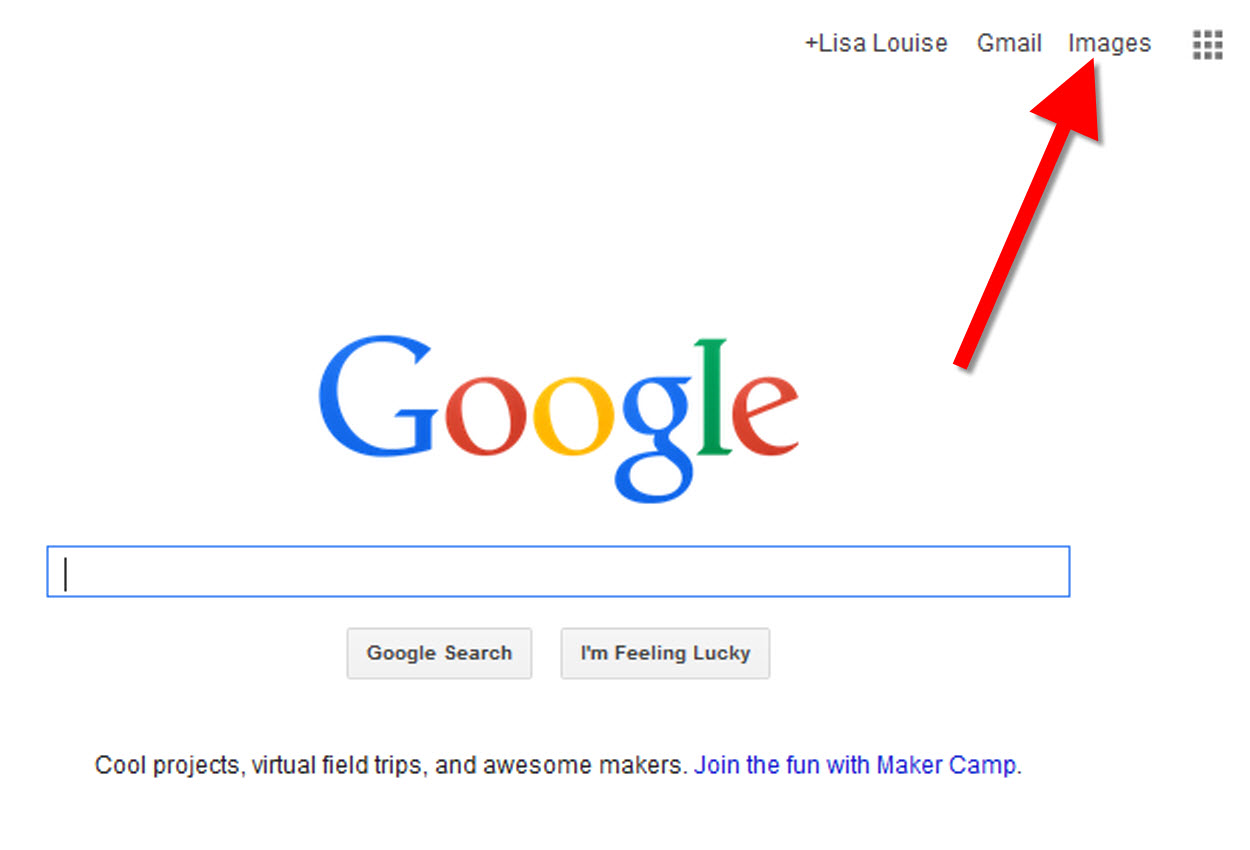
NEW Tip: Use Google Chrome to identify an image and find additional images showing the same subject, such as a place, person or subject.
From the Google home page, click Images.
In the Google search box, you’ll see a little camera icon. Click on it.
If you have an image from a website, insert the URL for that image. If you have an image on your computer, click Upload an image. Choose the file you want.
Google will identify the image as best it can, whether a location, person, or object, and it will show you image search results that seem comparable.
Click hereto watch a free video tutorial on this topic.
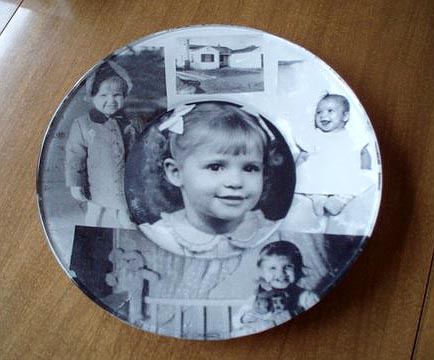
GEM: Decoupage a Family Photo Plate
Supply List:
Clear glass plate with a smooth finish (available at
kitchen outlet and craft stores)
Sponge craft brush
Decoupage glue
Fine paper-cutting scissors (Cuticle scissors work well)
Small bottle of acrylic craft paint in a color you would like for the back
A flat paintbrush
Painter’s tape
Brush-on clear acrylic varnish for a glossy finish on the back of the plate
A selection of photos (including other images that complement the photos)
Assembling your plate:
Lay out your design to fit the plate
Add words if desired. You can draw directly on the copy or print it out and cut it to fit.
Put an even coat of glue on the front of each photo. Don’t worry about brush strokes, but be careful not to go over it too many times which could cause the ink to run.
Apply the photos to the back of the plate, working in reverse order (the first images placed on the plate will be in the foreground of the design). Glue the edges firmly. Turn the plate over to check the placement of images. Smooth using craft brush.
Brush glue over the back of each photo.
Turn the plate around so you can see the image from the front and work out the air bubbles.
Continue to place the images until the entire plate is covered. Let it dry 24 hours.
Use painters’ tape to tape off the edges before you apply the acrylic paint to the back of the plate. Paint the back and let dry. Apply a second coat. Let dry.
Apply an acrylic varnish for a glossy finish on the back. Let dry.
Lisa Louise Cooke uses and recommends RootsMagic family history software. From within RootsMagic, you can search historical records on FamilySearch.org, Findmypast.com and MyHeritage.com. And it is in the works for RootsMagic to be fully integrated with Ancestry.com, too: you’ll be able to sync your RootsMagic trees with your Ancestry.com trees and search records on the site.
Keep your family history research, photos, tree software files, videos and all other computer files safely backed up with Backblaze.com/Lisa, the official cloud-based computer backup system for Lisa Louise Cooke’s Genealogy Gems.
GENEALOGY GEMS BOOK CLUB
Our current book is Everyone Brave is Forgiven by Chris Cleave. Follow the story of Mary North, a wealthy young Londoner who signs up for the war effort when the Great War reaches England. Originally assigned as a schoolteacher, she turns to other tasks after her students evacuate to the countryside, but not before beginning a relationship that leads to a love triangle and long-distance war-time romance. As her love interest dodges air raids on Malta, she dodges danger in London driving ambulances during air raids in the Blitz.
This story is intense, eye-opening and full of insights into the human experience of living and loving in a war zone and afterward. Everyone Brave is Forgiven is inspired by love letters exchanged between the author’s grandparents during World War II.
Click here for more Genealogy Gems Book Club titles
GEM: Top 10 Tips for finding Graduation Gems in your family history
Establish a timeline. Check your genealogy database to figure out when your ancestor would have attended high school or college.
Consult family papers and books. Go through old family papers & books looking for senior calling cards, high school autograph books, journals and diaries, senior portraits, fraternity or sorority memorabilia and yearbooks.
Search newspapers. Look for school announcements, honor rolls, sports coverage, end-of-year activities and related articles. Updated tips and online resources:
Ancestry.com has moved the bulk of its historical newspaper collection to its sister subscription website, Newpapers.com.
Search your browser for the public library website in the town where your ancestor attended school. Check the online card catalogue, look for a local history or genealogy webpage, or contact them to see what newspapers they have, and whether any can be loaned (on microfilm) through interlibrary loan.
Search the Library of Congress’ newspaper website, Chronicling America, for digitized newspaper content relating your ancestor’s school years. Also, search its U.S. Newspaper Directory since 1690 for the names and library holdings of local newspapers.
Contact local historical and genealogical societies for newspaper holdings.
Consult the websites of U.S. state archives and libraries: click here to find a directory of state libraries
State historical and genealogical societies. In addition to newspapers, state historical and genealogical societies might have old yearbooks or school photograph collections. For example, the Ohio Genealogical Society library has a large (and growing) collection of Ohio school yearbooks. Local historical and genealogical societies may also have school memorabilia collections.
RootsWeb, now at http://www.rootsweb.ancestry.com. Check the message board for the county and state you’re looking for. Post a message asking if anyone has access to yearbooks or other school info.
TIP: Use Google site search operator to find mentions of yearbooks on the county page you’re looking at. Add site: to the front of the Rootsweb page for the locale, then the word yearbook after it. For example:
Yearbookgenealogy.com and the National Yearbook Project, mentioned in the show, no longer exist as such
US GenWeb at www.usgenweb.org. Search on the county website where the school was located. Is there anyone willing to do a lookup? Is there a place to post which yearbooks you’re looking for?
Call the school, if it’s still open. If they don’t have old yearbooks, they may be able to put you in touch with a local librarian or historian who does.
TIP: Go to www.whowhere.com and type the school name in “Business Name.” Call around 4:00 pm local time, when the kids are gone but the school office is still open.
ebay: Do a search on the school or town you’re looking for to see if anyone out there is selling a yearbook that you need. Also search for old photographs or postcards of the school. Here’s my extra trick: From the results page, check the box to include completed listings and email potential sellers to inquire about the books you are looking for.
TIP: Don’t be afraid to ask ? ebay sellers want to sell! And if all else fails, set up an ebay Favorite Search to keep a look out for you. Go to and check out Episode #3 for instructions on how to do this.
MyHeritage.com is the place to make connections with relatives overseas, particularly with those who may still live in your ancestral homeland. Click here to see what MyHeritage can do for you: it’s free to get started.
FREE NEWSLETTER:
Subscribe to the Genealogy Gems newsletter to receive a free weekly e-mail newsletter, with tips, inspiration and money-saving deals.
Disclosure: This article contains affiliate links and Genealogy Gems will be compensated if you make a purchase after clicking on these links (at no additional cost to you). Thank you for supporting Genealogy Gems!
It’s a common Pennsylvania genealogy brick wall: “My ancestors are from PA—but I don’t know where!” Pennsylvania expert Jim Beidler has strategies that may help narrow down the needle-in-a-haystack problem of identifying your ancestor’s home county. Here, we also add...