Here’s our link for purchasing your copy of Snagit (screen clipping tool) Thank you for using our link. Use coupon code GENE15 to get 15% off.(We will be compensated at no additional cost to you, which makes the free Elevenses with Lisa show and notes possible.)
You’re going to learn:
What Snagit does and the problems it can solve for you as a genealogist!
How to screen capture using Snagit
Amazing advanced new features you didn’t know Snagit had and how to use them.
How to do scrolling and panoramic screen clipping (perfect for family trees, historic maps, long web pages and so much more.)
How I specifically use it for my genealogy research.
Add my YouTube channel to your “Favorites” list on YouTube:
Click here to add my channel to your YouTube favorites. Clicking the red “Subscribe” button at the Genealogy Gems YouTube channel will add my channel to your YouTube library which makes it super easy to return to my channel and Elevenses with Lisa any time you’re on YouTube.
How to Use Snagit
One of the things that we all work really hard to do is solve family history mysteries. And as we do that, we are finding all kinds of goodies. But the trick is that we have to capture them. Right? If we don’t, then we may end up losing the trail.
Last week, we talked about citing the sources that we find. This week, we’re going to be capturing our findings in a very visual way, and actually incorporating those source citations. And we’re going to be doing it with the tool that I really absolutely use every single day. And that’s Snagit.
The Image-Capturing Challenges that Genealogists Face
To understand the value of a tool we need to make identify the problems we face and see how it solves them. Here are some of the challenges genealogists face when it comes to capturing images:
We don’t need or want to save the whole page. (Why waste all that ink printing it or storage space saving it?) We may not want to download or copy an image from an unknown website. (No one wants to accidentally put a virus on their computer!)
The page in its entirety is blurred when printed. (This often happens with newspaper pages.)
We need to capture a very long or wide page that can’t be displayed in its entirety on the screen.
We want to annotate or add a citation to the source image.
It takes extra time to save to items to your computer and then add them to other documents in other programs.
Do you identify with some of these challenges? I sure do.
Let’s say that you find an article, a document, or something else, and you want to add an annotation. Maybe you want to add the source citation, a watermark, or just notes to yourself directly onto the image.
It would be time-consuming to clip the image with perhaps the free snipping tool that comes on your computer and save it to your hard drive, and then pull it into another program to annotate it. I don’t know about you, but there’s never enough time for family history so anything that we can do to save time, means we’re going to be able to spend more time with ancestors.
The solution is using Snagit.
Snagit Functionality
Here are just some of the things that Snagit can do:
“Capture” items that appear on your screen
Create videos with audio (Create > Video from Images)
Edit images (You can edit clipped and imported images and photos. You can also send screen shots automatically when using your computer’s snipping tool.)
Convert text on an image to typed text (Grab Text)
Create documents using templates (Create > Image from Template)
“Share” items to other programs with one click.
I have found that snag is so robust, and it has so many different options, I still can’t exhaust all the things that it offers me. But it’s also simple. It’s simple in the way that you use it. It certainly solves simple, everyday problems. And most importantly, it is a program that I can use not just for genealogy, but also for my business and personal use. I like to have tech tools that serve me across the board, if possible, because it takes time to get up to speed on any program. If you’re just getting programs that are only for genealogy, then you end up needing a second program to be able to do similar things in other parts of your life. Why not find tech tools that can serve you across the board. That’s what certainly Snagit does. So, while I’m focusing on showing you genealogical applications for using Snagit, just know that if you’re new to family history, or you stumbled across us this article, and you don’t do genealogy, you’re going to be able to use Snagit for just about everything.
How to Get Started with Snagit
Purchase the software
Download and install
Open it and let it run in the background so you have easy access from your task bar
Yes, there may be a snipping tool built into your computer, and you can use Print Screen. Snagit can blow them away.
How to Capture a Screen Image with Snagit
Display the desired page on your screen
Click the orange Snagit icon in your task bar (Snagit should be running in the background on your computer.) This is the Capture If you don’t see it, click the blue Snagit icon to open the editor and then click the red circle Capture button at the top of the program. After your first capture, the orange Capture icon will then be open and available in your task bar.
Select the Image tab
Set the Selection to Region
Click the large red Capture button
Use your mouse to draw a box around the desired area. You may see flashing arrows. If you click one you will be ablet to scroll that direction to capture more of the page.
When you release your mouse the image will appear in the Snagit editor.
Sometimes we find an item that is larger than is visible on the screen. The page may scroll side to side or up and down. Use Scrolling capture to capture everything in one piece.
How to Scrolling Capture with Snagit
Display the desired page on your screen
Click the orange Snagit icon in your task bar
Select the Image tab
Set Selection to Scrolling Window
Click the large red Capture button
You will see flashing arrows. Click the arrow pointing in the direction that you want to scroll in Snagit will automatically scroll down and capture. Click Stop at any time if you don’t want to capture the entire page.
When you release your mouse the image will appear in the Snagit editor. You can then trim all sides by simply grabbing the handles and dragging.
In some situations you will need more flexibility in your scrolling. Panoramic capture allows you to select the region and then scroll manually, capturing exactly what you want to capture. Think of it as image capture and scrolling capture merged together. Panoramic capture allows you move both up and down and side to side.
How to Panoramic Capture with Snagit
Display the desired page on your screen
Click the orange Snagit icon in your task bar
Select the Image tab
Set Selection to Panoramic
Use your mouse to draw a box around the desired area
When you release your mouse a panoramic capture bar will appear. Click the Start button to being your panoramic capture.
Click in the captured image area and drag the image as needed. The more precise you are in your movement the better the final image will be. You can move in any direction.
When you release your mouse the image will appear in the Snagit editor. You can then trim all sides by simply grabbing the handles and dragging.
Panoramic captures work great for large items like maps, online family trees and newspaper articles just to name a few things. If you zoom out in order to capture these types of items in their entirety you will end up with a blurry item when you zoom in for a closer look. Panoramic solves this problem.
Let’s discuss a few more options for capturing hard to clip items like newspapers. Sometimes, the article you need is continued on a different page or column. With Snagit you can capture the individual pieces and then combine them.
How to Combine Captured Images with Snagit
Capture each section of the article individual using Image Capture (Region)
In the Snagit editor press Control / Command on your keyboard and click each item you want to be included in the combined image.
Press Control + Alt + C on your keyboard or at the top of the screen click Create > Image from Template.
Select the desired page layout. Custom Steps or Steps Portrait works well for articles.
Click on any items (such as numbered steps) and press delete on your keyboard to remove them.
The combined image can then be saved to your computer or shared to another program.
Editing and Highlighting Images
There are many ways to annotate and edit images (both captured and imported) in Snagit including adding:
arrows
text (perfect for adding source citations directly onto the image
call outs
shapes
stamps (Images on images)
lines
squiggles and drawing
step by step numbering
You can also modify images by cutting out portions, blurring and erasing areas, and even magnifying an area on the image!
Snagit Advanced Features and Strategies
Once you’ve mastered the basics there are many more ways to use this tool to power-up your genealogy research. Here are a few more ideas we covered in the video.
How to Grab Text from an Image with Snagit
Option 1 – Grab text from existing image:
Select the image in the editor so that it is displayed in the editing area
In the menu Edit > Grab Text. This will grab all of the text that appears in the image. If you only want a portion of it, click the Selection tool at the top of the screen and draw a box around the area you want to grab the text from.
The converted text will appear in a pop-up window
Copy the text to your computer’s clipboard by clicking Copy All.
Paste wherever you want the text to appear (another document, etc.)
Option 2 – Grab Text While Clipping:
Display the desired page / item on your screen
Click the orange Snagit icon in your task bar
Select the Image tab
Set the Selection to Grab Text
Click the large red Capture button
Use your mouse to draw a box around the desired area. You may see flashing arrows. If you click one you will be ablet to scroll that direction to capture more of the page.
When you release your mouse the image will appear in the Snagit editor. The converted text will appear in a pop-up window
Copy the text to your computer’s clipboard by clicking Copy All.
Paste wherever you want the text to appear (another document, etc.)
Grab Text from Windows Not Easily Copied
We’ll use the example of copying the titles of computer folders into an Excel spreadsheet. Open your file explorer and navigate to the desired folders. Since a mouse can’t be used to copy all the names in one swoop, we will use Option 2 – Grab Text While Clipping instructions above.
Create Videos with Snagit
You can compile separate images into a video and add voice narration.
In the editor select Create > Video from Images
Click to select the first image in the tray
Click the microphone button in the video recording bar if you want to record narration.
Click the Webcam button if you want to appear on screen
Click the red Record button to begin recording.
Click each image in the order desired for the amount of time you want it to appear on the screen.
Press the Stop button when done.
How to Create a Timeline with Snagit Templates
In the editor add images either by importing (File > Import) or capturing
Select the images to be include by holding down the Control / Command key and clicking on them
Create > Image from Template
Select the timeline template
Add a title and captions as desired
Click the Combine button
Productivity with Snagit
One of my favorite features of Snagit is how easy it is to share items to other programs directly instead of having to save them first to my computer. It’s easy to do. Simply select and display the image to be shared and in the menu go to Share > and select the program.
Beginning German genealogy research starts with a key question: “What does ‘German’ really mean?” A Legacy Tree Genealogists expert responds with a story about ancestors whose German identity in the U.S. census seemed to keep changing—and why that was so. Thanks to...
Your RootsTech questions answered here! Attending RootsTech 2018 in Salt Lake City, Utah for the largest genealogy conference in the world can be a bit overwhelming. First-time attendees have questions and we have answers. Learn what to expect, where to go, and other...
The ideal genetic genealogy interface creates a seamless transition between genetics technology and genealogical research findings. Most currently available tools are either DNA technology without much genealogy, or genealogy without much DNA technology. AncestryDNA is really pioneering the genetic and genealogical integration with its newest AncestryDNA product update.
The goal of genetic genealogy is to aid your traditional research by verifying known connections and providing clues to as yet unknown ancestors. DNA was never meant to replace traditional research methods, nor has it ever claimed that ability. Rather, it is meant to aid your traditional research by verifying known connections and providing clues to as-yet unknown ancestors.
I admit, I dream of a future technology so precise that it pinpoints the locations of ancestors and defines our exact relationships to others. While we are not there yet, many have experienced a genetic test’s power to obliterate previously-held beliefs about relationship and heritage, and create new intricate and personal relationships where before there were only blank spaces. In this sense, genetic genealogy can be viewed as a kind of police force of the genealogy world, righting wrongs and taking names. But I digress.
For now, the ideal must remain a seamless transition between genetics technology and traditional research results, so that the two so completely complement each other that we can’t see where one stops and the other begins. Yet the two worlds are often separated by a chasm of misunderstanding and just plain ignorance. Of the three testing companies, two are making mediocre efforts at best to try to help you incorporate your genetics into your genealogy. They are basically dishing out a serving of genetics, offering a vending machine of genealogy snacks and calling it a full meal.
With one exception.
AncestryDNA has put genetic and genealogical integration at the forefront of its product. They are the only company making a serious effort to integrate your genetics and your genealogy. To be successful, they need two things: tons of people and their genealogy. The more people test, the better the database becomes. Not just in terms of the matches you find, but also in terms of statistics and the power that numbers have to solve complex problems, like relatedness.
So, how do they get more people interested in genetic genealogy?
This reminds me of my early days at Relative Genetics, one of the first genetic genealogy companies. I was fresh out of college and tasked with training our CEO, CFO, QA director, and marketing director about what exactly it was that we did as a genetic genealogy company. None of these men had any experience in genetics or genealogy. In those meetings as we were trying to figure out ways to grow our company in an unknown industry, I felt like I was the constant downer to the party. As a scientist I had been trained that there are no absolutes. Whenever we talk about outcomes it is always in terms of “most likely” or “less likely” and to never, ever say “always.” So when they would get excited about an idea and propose wording for an ad campaign, I was always reining them in.
After reading a recent announcement by AncestryDNA, I feel like their marketing department had a meeting on the day their scientific advisor was out sick and without his or her corralling, they started a stampede.
Which, of course, was exactly what they wanted.
In their press release, Ancestry’s Dr. Ken Chahine, SVP and GM of AncestryDNA said, “It is effectively a shortcut through time—you take the test today and we tell you who your ancestors were, for example, in the 1700s. You don’t need to research records or build a family tree — AncestryDNA now transports you to the past.”
Which is exactly what people want to hear, especially non-genealogists who are curious about their past, but don’t have the tools or know-how or interest in doing the actual genealogy work.
But is it true? Is genetic genealogy a short cut through time?
“Absolutely,” says the marketing team.
“Sometimes, and that depends on factor A, and factor B and situation C and…” say the scientists.
And they are both right. The trick is to hear them both as you review these kinds of new advances in genetic genealogy.
What makes the “absolutely” true is that one of the dreams of genetic genealogy is to use the DNA of living people today to actually reconstruct the genetics of our ancestors. So that their actual DNA profile is known. Then it will be easy to identify their descendants as we will be able to see immediately what part of our DNA came from which of our ancestors. Ancestry has demonstrated their ability to do this in a large scale study of the descendants of a 19th-century American and his two successive wives.
Now, time for the “Sometimes.” This full genome reconstruction hasn’t been done yet for your grandparents, or great grandparents. Right now the best we can do is use your DNA to link you to living individuals, then rely on your traditional genealogy to help you find your common ancestor. Ancestry is trying to help you do that using their DNA circles, and now with their New Ancestor Discoveries.
Remember that to be included in a DNA circle you have to have a “ticket” to the party, meaning both your genetics and your genealogy match with at least two other people in the database and a circle is created around the host of the party, who is your common ancestor.
With New Ancestor Discoveries, we are letting those with just a genetic ticket into the party. Meaning that if you share DNA with two or more people in a DNA Circle, the host of that circle is named as an ancestor who mightbe on your pedigree chart.
Did you notice how I said “might?” That this newly discovered ancestor MIGHT be in your pedigree chart?
As an idea, New Ancestor Discoveries is VERY EXCITING, don’t you think? To be able to find out using both genetics and genealogy that a particular person living 100 years ago might just be the one who belongs in that blaring blank space on your pedigree chart? And it will be. But right now, Ancestry needs to work out some bugs, starting with a stronger acknowledgement that the ancestor listed in the Discoveries is by no means an absolute, but just a hint.
In coming posts I will share with you how I am using the New Ancestry Discoveries to discover more about my genealogy, even if it isn’t exactly in the way Ancestry intended. For now, learn more by reading my recent posts: from the left side of the Genealogy Gems home page, search on the category “DNA.”
And click here to visit my website and learn more about how I can help you navigate the exciting world of genetic genealogy.
We probably spend more time staring at our web browser than we do staring into the eyes of our loved ones. Since that’s the case, wouldn’t it be nice to be looking at a browser tab that not only makes you more productive but also inspires you? Well, you can and today I’ll show you how in the Chrome browser.
Plain Jane Chrome Browser Tabs
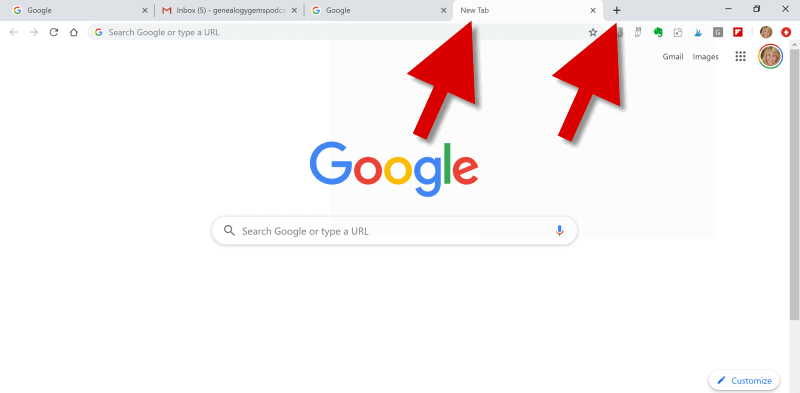
Normally when I click the plus sign on the right end of my browser tabs it opens a new tab that isn’t much to look at:
(Image above: Clicking the Plus sign opens a new browser tab.)
Well, recently I have been customizing the “New Tab” on my Chrome web browser, and the results have been helpful and enjoyable.
Now I find myself smiling each time I open a new browser tab. There, looking back at me, are ancestors. They are happily picnicking in a meadow under shady trees. They look relaxed in their white cotton shirts, sleeves casually rolled up, and glass bottled soda in hand.
(Image above: Chrome new browser tab with custom image.)
This sepia tone photo was taken early in the 20th century. It not only inspires me to keep up the genealogical search I am on, but also to take a chill pill when I hit a stubborn research brick wall.
Keep reading and I’ll show you how to add your own custom image to Chrome’s New tab.
Benefits of Customizing Chrome’s New Tab
My NewTab features more than just an old family photo. It also increases the speed of my online navigation by serving up the websites I need and use most often.
Notice the website shortcut icons I’ve added to the bottom of the page (image below.) With one click I’m on my way to search for historic newspapers at the Library of Congress Chronicling America website, or peruse the latest records at MyHeritage.
(Image above: Website shortcuts)
Customizing the New tab on your Chrome web browser can also increase your search speed.
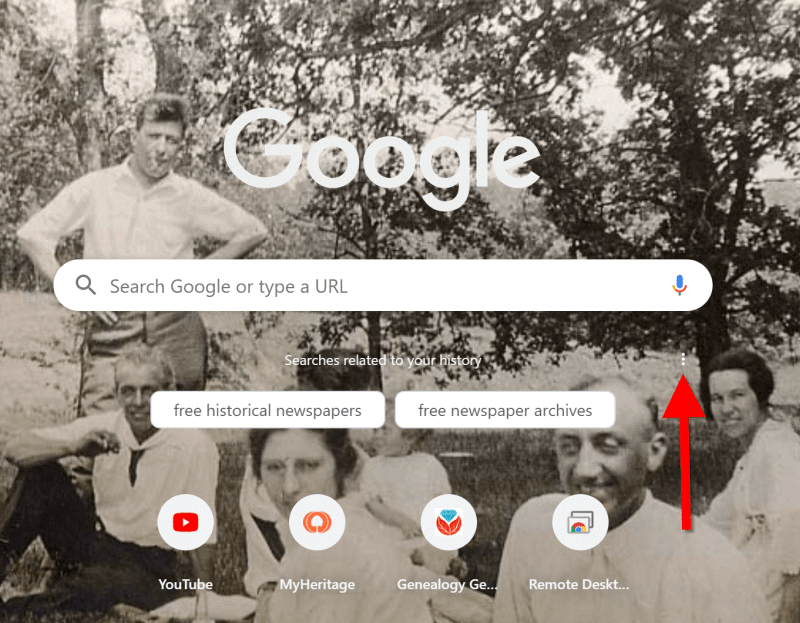
Notice the suggested related searches that fall between the search query box and the customized website shortcuts. Google has the ability to suggest additional searches based on my most recent previous search.
(Image above: Related searches suggested in Chrome’s New Tab.)
So why would this be beneficial?
Envision yourself conducting a Google search for a particular record collection. You receive the search results, and several look promising. You may even click through to one of those results and start reviewing the page. But as you read, it occurs to you that there may be a better way to state your query that could deliver better results. Or perhaps you wonder if you’re using the best terminology.
Rather than losing the search you’ve already run (and that website you’ve already started reading), you open a New web browser tab. With a customized New Tab, Google will start you out with some suggestions for additional searches. These aren’t just random. Google takes into account the most popular type of searches on the topic and the terminology or keywords that it has determined would retrieve good results.
Is it perfect? No. But suggested related searches can give you a jump start, and lead you to results you might not have otherwise found.
Google’s Customization versus a Browser Extension
Now before I show you how to customize your New Tab, you may be wondering why I’m not just using a browser extension to do the customization.
Yes, there are a variety of Chrome browser extensions that allow you to change the New Tab page. But the answer to this question comes down to security. Browser extensions have the potential to leak your private information. It’s always best to stick with the Google customizations if possible.
Since we don’t spend that much time on the New Tab page, the features we are about to customize should be all we need. However, if you decide to use a browser extension, I encourage you to do your homework to do your best to determine if the extension is trustworthy.
How to Add Your Own Image to the Chrome Browser New Tab
Probably the most difficult part about customizing the background of the New Tab is selecting the photo!
I spent more time on picking my photo than I did actually setting it up. But don’t fret too long about it. It’s so easy to change the image that you can change it on a daily basis and rotate images if you just can’t make up your mind. Let’s get started:
1. Click the Plus sign
At the top of your browser, click the plus (+) sign on the far right to open a New TabYou can also open a New Tab by using the keyboard shortcut Ctrl + T.
And here’s a tip: Keep the tab that this article appears in open so that you can easily jump back and forth between the instructions and the customization page.
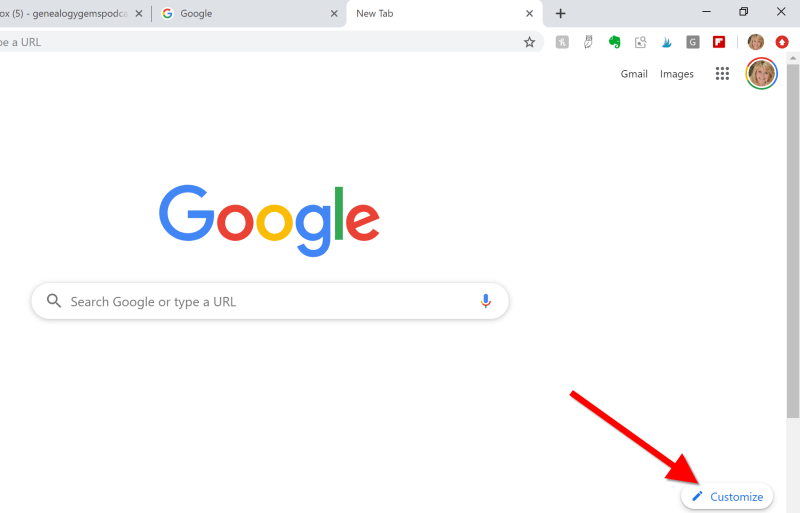
2. Click the Customize button
You’ll find the Customize button in the bottom right corner of the page.
(Image above: On the New Tab, click the Customize button.)
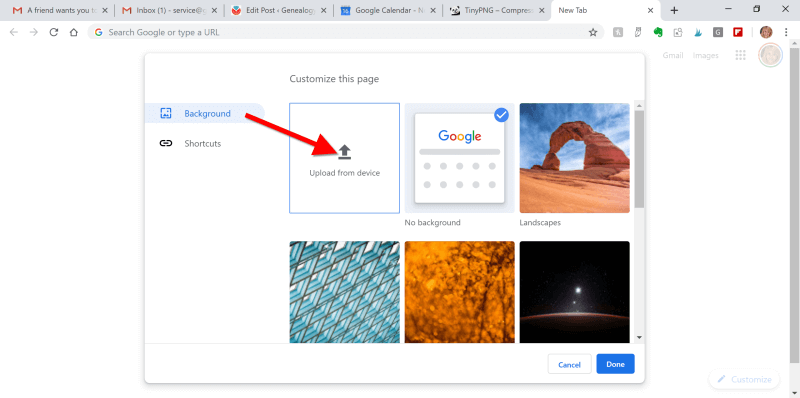
3.Upload the image
Select Background and click Upload from device:
(Image above: Upload image to the Chrome browser)
4. Find the Image
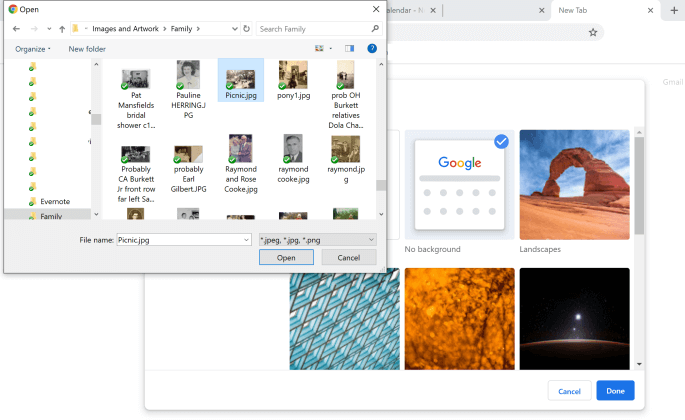
An Open dialog box will pop-up. Navigate to the desired image on your hard drive.
(Image above: Navigate in the “Open” dialogue box to the image that you want to use as your custom New Tab background.)
5. Select and open the image
Click to select the image and click the Open button. The image will now fill the screen. Don’t worry, you haven’t uploaded your photo into the public Google search engine. You are only customizing your Google account, and only you can see the photo.
Landscape images work the best for the New Tab page background. If you have a Portrait shaped photo, try cropping it to more of a landscape shape before uploading.
(Image above: Chrome new browser tab with uploaded image.)
If you want to change it back to plain or swap photos, simply click the customize icon in the bottom right corner that looks like a pencil.
How to Add Shortcuts to the NewTab
Now that you have your family looking back at your from your New browser tab, let’s add shortcuts to your favorite websites.
1. Click the Plus sign
Click the “Add Shortcut” plus sign beneath the search field.
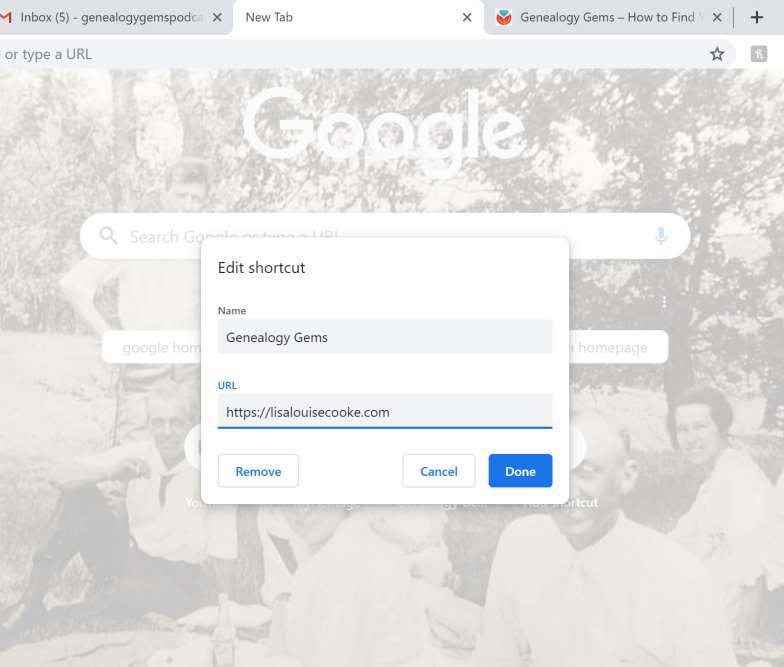
2. Add the name and URL
Open a new tab, navigate to the desired web site, and then copy the URL in the address bar. Go back to the tab with the customization page, and in the Edit Shortcut window, type the name of the website, and paste the URL you just copied.
(Image above: type in the website name and URL.)
3. Click the Done button
Once you click the Done button, you will see your new shortcut below the search field.
4. Repeat
Repeat the process to add additional website shortcuts.
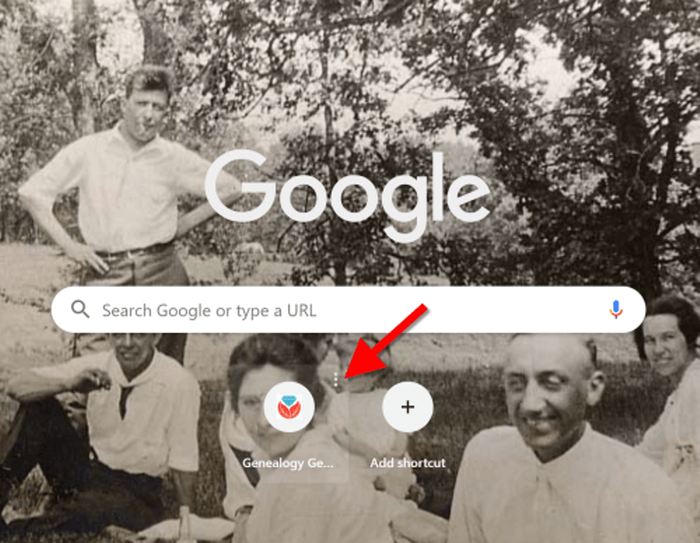
5. Edit Shortcuts
If you want to change one of the shortcuts that you’ve added, hover your mouse over it and click the three vertical dots in the upper right corner of the icon.
(Image above: Hover your mouse over the shortcut and click the three vertical dots to edit.)
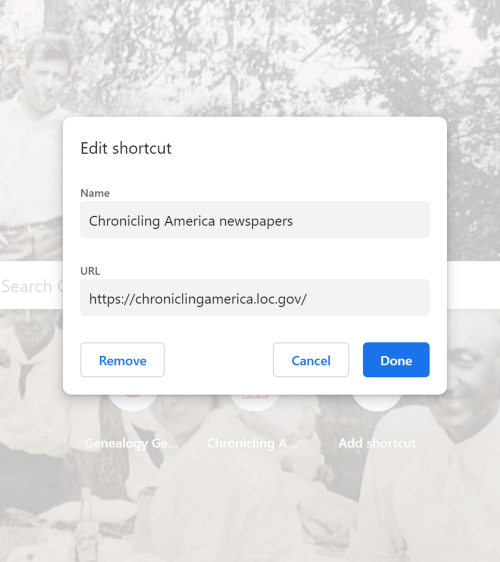
Then you will have the option to edit or remove the shortcut.
(Image above: Edit shortcut dialogue box.)
Related Search Prompts on Chrome’s New Tab
As I mentioned earlier in this article, Google will provide related search suggestions when you open a new tab. You fill find them between the search query box and the shortcuts.
These can be helpful in providing you additional keywords worth searching. Google bases these prompts on what people usually search for. Here’s an example of the related searches that appeared when I searched for Historic Newspapers:
(Image above: Related searches suggested in Chrome’s New Tab.)
These search suggestions will change as you search for different things using Google.
How to Remove Related Search Prompts
Not everyone appreciates Google’s efforts to be helpful. If you would rather see more of your background photo and not the related search prompts, they are easy to remove.
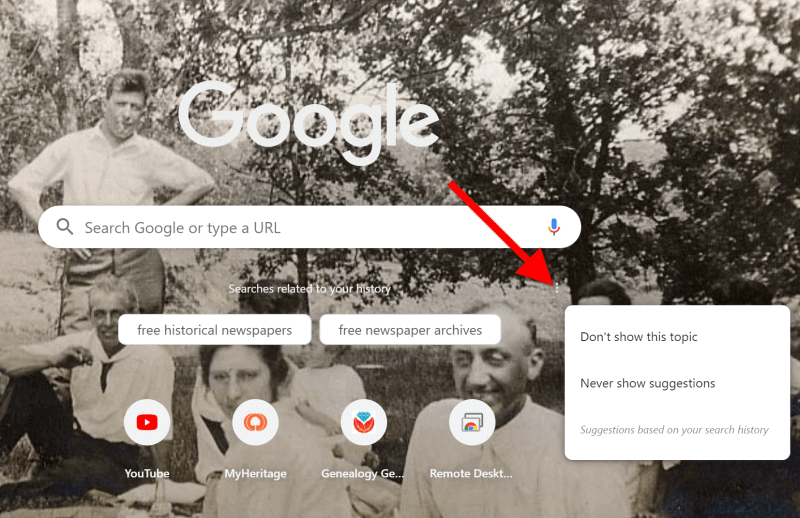
Simply click on the three vertical dots just to the upper right of the prompts:
(Image above: Click the three vertical dots.)
In the pop-up balloon you have two options:
Don’t Show This Topic tells Google not to show the topic appearing on the tab again. In my example, I would not use this because I expect to be searching for historic newspapers again in the future. But if my search were just a one time thing, or the search prompts were completely irrelevant, then I would let Google know I don’t want to see this topic in the future by selecting this option.
Never Show Suggestions tells Google to never show suggestions on the New Tab again.
Make your changes in the pop-up balloon.
How to Return to the New Tab Default Settings
I love having a customized New Tab to greet me each time I click the plus button. However, there may be a time when, for whatever reason, you will want to return the New Tab to its original state. That’s easy enough to do! Here’s how to remove or change the background image:
Click the pencil icon in the bottom right corner of the screen. This will take you back into Customize mode.
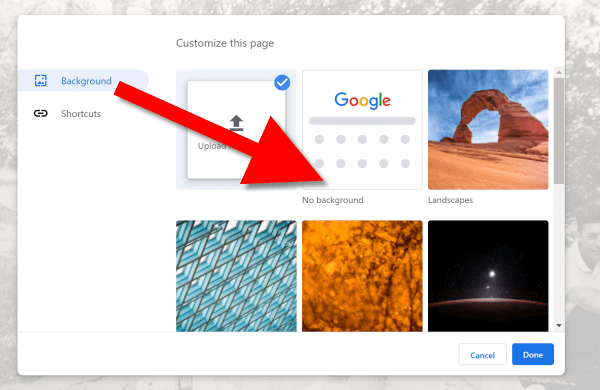
If you don’t want any background image, click No Background. If you would like something completely different, you can also select from a collection of photos provided by Google:
To remove the background image, select Background > No Background
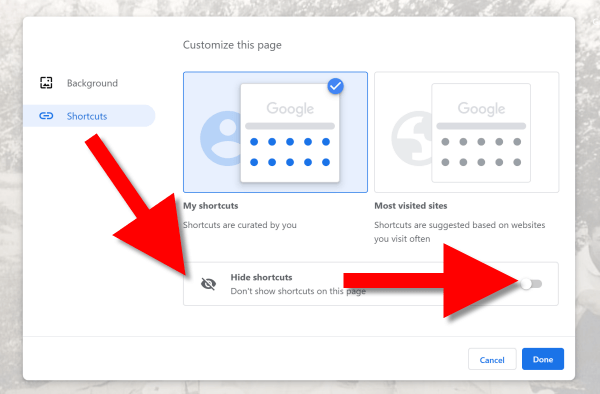
In this same pop-up dialogue box you can also remove your shortcuts in one swoop. Click Shortcuts and then Hide Shortcuts, and then click Done:
More Googly Ideas
I hope you’ve enjoyed this simple way to spice up Chrome’s New browser tab. You’ll find tons of exciting ideas on how to use Google more effectively for genealogy and family history in my book The Genealogist’s Google Toolbox.
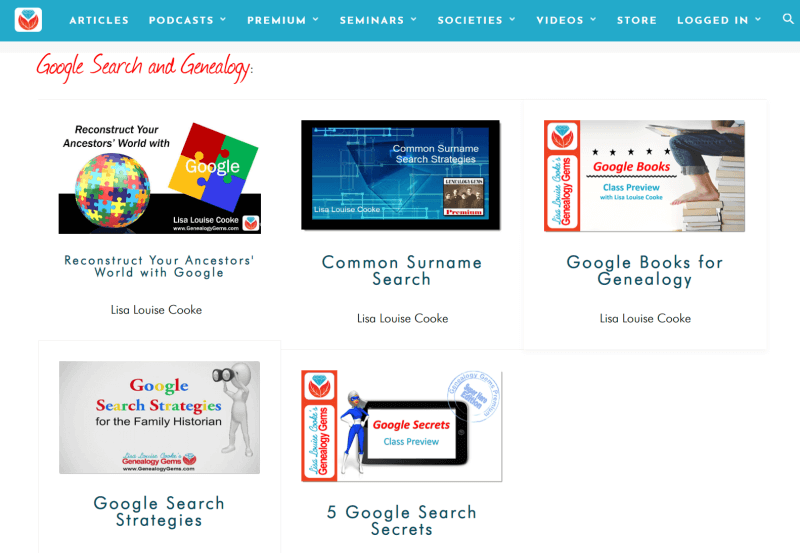
If you’re a Genealogy Gems Premium eLearning member, check out my current full-length Google search video classes. (Image below.) P.S. Don’t forget to download the PDF handout for each class!