Ellis Island Resources for the Family Historian 9/23/10
“Mama arrived with 4 year old Martha gripping her hand tightly. She said she looked feverishly around for Papa, and spotted him across the room. She ran to meet him and gave him a kiss, which she normally would never have done in public!”
That was the scene my Grandma described as Louise and Gustaf reunited near a wooden column outside the Registry Room at Ellis Island aptly known as “The Kissing Post.” Many public displays of affection took place there after long journeys across the ocean.
Approximately 12 million immigrants were processed through Ellis Island between 1892 and 1954. It seems like only yesterday that the long dilapidated buildings were finally restored and reopened to the public. They have become one of the most popular tourist destinations in New York City, welcoming over 35 million visitors to date.
This month marks the 20th Anniversary of the Immigration Museum at Ellis Island which first opened on September 10, 1990.
According to a recent Ellis Island press release , “Just half a mile from the Statue of Liberty in New York Harbor, the museum’s exhibits highlight the growth of America during the peak immigration years of 1880-1924. The galleries illustrate the Ellis Island immigrant reception process, the immigrants’ arrival and settlement throughout the United States and feature their “Treasures From Home” – the cherished personal objects, photographs and papers they brought with them from their homelands. And the American Immigrant Wall of Honor® celebrates the immigrant experience with the inscription of the names of over 700,000 individuals and families who have been honored by their descendants.”
Of special note is the Ellis Island Oral History Archive, which was created by the Foundation and contains the reminiscences of over 1700 individuals who either immigrated through or worked at Ellis Island during its heyday as the country’s largest immigration processing center. If you are lucky enough to visit in person, you can listen to excerpts from these oral histories through the museum’s popular audio tour. You’ll walk the corridors vividly reliving the immigrant experience as if you were a “new arrival.”
If an in-person trip is not on your horizon any time soon, don’t fret. More than 1,700 first-hand life story audio recordings of Ellis Island immigrants are now available online for the first time free at Ancestry.com.
“As immigrants created new lives in the U.S., the stories of their homelands and their remarkable journeys to America were often lost,” said Christopher Tracy, senior vice president of global content for Ancestry.com. “We are thrilled to offer people the opportunity to hear the voices of their ancestors sharing stories of their lives.”
The oral histories were originally recorded by the National Park Service starting in the 1970s, and contain first-hand accounts recalling the lives these immigrants left behind, their reasons for leaving and their incredible and often-trying journeys to America. In addition to oral histories from immigrants, the collection also includes recordings from former Ellis Island/Statue of Liberty workers, and military personnel who were stationed on Ellis Island.
“To our family it is important that we in the U.S. know the origin of the people who came to this country, settled here and made it what it is today. It makes us very proud to know that our mother was part of this,” said Yvonne Rumac, daughter of oral history participant Estelle Belford, who immigrated to the United States from Romania via Ellis Island in 1905.
And if you are interested in learning more about your own immigrant ancestors here are some resources for you:
Ancestry boasts the world’s largest online collection of U.S. immigration records. www.ancestry.com/immigration.
(Comprised of more than 170 million records, the Ancestry.com U.S. Immigration Collection includes lists of passengers who immigrated by ship to America between 1820 and 1960, including those who came through Ellis Island; more than 7 million citizenship and naturalization records; border crossings, passport applications and more to help reconstruct our ancestors’ journeys and early lives in America. Ancestry.com has also added nearly 2 million new U.S. naturalization record indexes.)
The FamilySearch Wiki
A brain trust of some of the best researchers out there, the FamilySearch Wiki allows you to search on keywords to learn more about a vast array of topics including immigration. Much of the information comes from the experts who work at the Family History Library in Salt Lake City. You get the benefit of their immigration research knowledge from the comfort of your own home.
https://wiki.familysearch.org/en/Main_Page Then search for the records themselves on the free FamilySearch Beta website
Stephen P. Morse’s One Step Pages
If your search at the EllisIsland.org website doesn’t retrieve your ancestors head on over to Stephen Morse’s One Step Pages. There you will find dozens of links to search resources including the Ellis Island Gold Form for arrivals between 1892 and 1924. Even the folks at Ellis Island refer researchers to Morse’s site. Listen to my interview with Stephen Morse on Genealogy Gems Podcast episode #10
Family History: Genealogy Made Easy Podcast Episodes on Immigration and Naturalizaton
Genealogist Steve Danko covers immigration and naturalization in depth in episodes 29, 30, and 31. Steve even offers up some little known tips about deciphering some of the crytic notes researchers often find on passenger lists.
Family History Episode 40: How to Start a Genealogy Blog, Part III: Step by Step
Family History: Genealogy Made Easy Podcast
with Lisa Louise Cooke
Republished July 15, 2014

Listen to the free in podcast in your favorite podcast app.
https://lisalouisecooke.com/familyhistorypodcast/audio/fh40.mp3
Download the Show Notes for this Episode
Welcome to this step-by-step series for beginning genealogists—and more experienced ones who want to brush up or learn something new. I first ran this series in 2008-09. So many people have asked about it, I’m bringing it back in weekly segments.
Episode 40: How to Start a Genealogy Blog, Part III: Step by Step
In the last two episodes you’ve been hearing from experienced genealogy bloggers about family history blogging. I hope it piqued your interest and got you thinking about the possibility of doing it yourself. As we’ve discussed, it’s a great way to share your experiences with other researchers and potentially connect with long lost relatives.
Well in today’s episode I’m going to walk you through setting up your own family history blog step-by-step. By the end of this episode you could have your own family history blog up and running and sharing your enthusiasm about genealogy with the world. How does that sound? Are you willing to give it a try? And even if you’re not looking to start blogging today, listen in and plant the seeds for the future.
From the Mailbox:
A long-time listener wrote in this last week about the recent blogging episodes:
“The Transcript software mentioned by Denise Levenick looks great – I downloaded and installed it this morning. I am giving a brief software demonstration at the Greater Portland Chapter of the Maine Genealogical Society’s 30th Anniversary Celebration tomorrow and I am going to let people know about this product.
Episode 38 and Episode 39 have really got me thinking about starting my own blog. It won’t be easy with my 50 hours plus a week civil engineering job, but your podcasts have motivated me. Thank you!” -Will Haskell, Listener to All Your Podcasts
Transcript software is really cool: download the most recent version for free here. And that’s just one example of the kind of great tech tips that Denise Levenick blogs about at The Family Curator Blog!
Follow-up: when republishing this episode, we were curious about whether Will ever started a blog. He did! It’s very cool! Find Will’s Genealogy Blog at http://wchgenealogyblog.blogspot.com/.
Also, listener Anne-Marie had some questions about how to make progress with her Maw-gee research, specifically how to track down their immigration records. She wrote in again to say that she’s going to follow up on our suggestions and let us know what she finds. But she also had some comments about my interview with genealogy blogger the Footnote Maven (Episode 38):
“I have begun listening to Family History and Genealogy Gem podcasts from the beginning again. When I listened the first time I was so novice that I did not always understand what I was hearing. It’s great to have this audio reference guide.”
How to Start a Genealogy Blog: Step by Step
Now before we get started on created your blog let me just say that there are probably countless websites for setting up blogs and certainly countless ways to go about it. My goal in the approach that I’m going to take is to get you up and running in a short period of time for free. This is a great way to get your feet wet, see if it’s for you, and if you decide to get more elaborate with it later you can always do that.
1. Decide what the purpose of your blog is.
When it comes to a genealogy themed blog there are still lots of options – so here are some ideas:
- A Research Log
- A Surname Focus
- Family Traditions, Family Recipes, Photos
- Genealogy News
- Focus on a certain record type
- Provide beginner education
- Interviews with relatives
- History of an ancestor’s home or community
- Have a general all purpose blog
- Follow a pattern for each day
And remember the Footnote Maven’s good advice – You can’t be an expert in everything, so don’t even try. To me a good way to stay out of that trap is to stay narrowly focused. If you find yourself having to be an expert in everything you’re blog theme is probably too broad. And of course, be yourself. Do what you do best!
2. Use Blogger (http://www.blogger.com) to create your blog. It’s free, and easy to use.
Blogger is owned by Google so if you already have a Google account than you’re one step ahead of the game. If not that’s the first thing you’ll need to do. Then click “Create Your Blog Now.”
Note: As on any website, the organization and features of Blogger change over time. The following description was current at the time of publication. Use this following descriptions and concepts to guide you through the current version of Blogger.
Name your blog. Of course, the name should reflect what your blog is about, but it’s also good to think of one that is catchy, and one that you can get the URL address for. The URL name you pick has to be something that isn’t already being used, so it might take a few tries.
How to Name Your Blog:
- Type in the Title Field
- Type the URL you want in the “Blog Address URL” field
- click the Check Availability link to see if it is available
- Type in the word verification code
- Click the CONTINUE button.
3. Select a Design Template:
- Scroll through the design templates and pick one you like
- Click the select button
- Click the CONTINUE button
- You’ll get a page that says Your Blog has been created!
- Click the orange arrow that says START BLOGGING.
There are a couple of more things we’ll want to do with our blog before we get to the business of actually posting blog articles. First let’s just get familiar with the blog dashboard. This is sort of the “behind the scenes,” an area your readers will never see, but where you will actually do your blogging.
There are 4 tabs along the top: Posting, Settings, Layout and Monetize.
Blog Tune Up: From the Posting Tab….Click the SETTINGS tab. Type up a short description of the blog.
Vocab Word: KEYWORDS
Keywords label your blog so that when readers go searching for a blog to read they will find it. So some good keywords for this new blog that I’m creating would be
- Genealogy
- Family history
- Family tree
- Blog
- How to
Keywords can be single words or a short keyword phrase such as “family history” which readers will very likely be searching for. Blogger allows you 500 characters.
The rest of your options on this Basic Settings page are mostly about how your content will be labeled and found on the internet. You can take a look through the options but in most cases you will want to leave them on their default settings. When you’re done just click the SAVE SETTINGS button at the bottom of the page. And for right now you can leave all of the other types of settings as is as well. There are about 9 different categories within the Settings Tab that you can tweak, but the default settings on these are just fine for now.
4. Add at least one gadget. Click the LAYOUT tab. I love working with this area because this is where you get to customize the layout and the types of gizmos and gadgets that are on your blog. We don’t want to overdo it but there are some really good ones you’re not going to want to miss.
Blogger will automatically add a couple of gadgets to the sidebar of your blog. They are:
- Followers – people who use blogger who subscribe to your blog’s RSS feed.
- Blog Archive – This gadget automatically archives your older blog posts.
- About Me – This is just a place where you can tell your readers a little more about yourself and include your email address if you wish.
To see what other types of gadgets you can add just click the Add A Gadget link in top side box. That will bring up a window with lots of choices for you:
- Search Box
- Text
- Photos
- Slide show
- Video Bar
- Polls
- Lists
- RSS feed
- Subscription Links
- HTML / Javascript
Each one of these is very easy to use and pretty self-explanatory. But I recommend not overloading your blog. Only include, at least to start, the items you really think your readers would get some value from. Otherwise it can just be annoying distraction that gives readers a reason to leave your blog.
How to Add a Picture Gadget to Your Blog:
- Cick the plus sign on the right hand side of the page for the PICTURE gadget.
- This will bring up a page call CONFIGURE IMAGE.
- Give the image a title
- Type a Caption
- Link to an image on the web OR upload from your computer hard drive.
- (To upload from your computer make sure the “From your computer” button is selected and then just click the BROWSE button. Navigate your way to the location of the photo on your computer’s hard drive and select it.) Once the image appears that means it has been successfully uploaded to Blogger.
- (If you want to link this image to another website, then you will want to type in the address in the LINK field.)
- Click the orange SAVE button and we’re done.
- Now you will be back at your dashboard in the Layout mode. You will see that the top box on the side is now labeled as the title you gave your image.
- Click the blue PREVIEW button at the top and a preview window will open showing how your blog currently looks and it will include the image you just uploaded.
5. Rearrange Your Gadgets on Your Blog. Hover your mouse over the gadget and your cursor will turn into a cross with arrows. Click and grab the gadget and drag it where you want it and drop it in place. Click the PREVIEW button to see how that looks.
Genealogy Blogging Summary
We’ve made a lot of progress on our blog in a very short amount of time. Take some time this week to take the steps we took in this episode:
- Decide on the theme or focus on of your blog
- Get a Google Account and create your Blogger blog account with your chosen name and secure the URL address to go with it.
- Pick your design template
- Add at least one gadget from the choices provided
- And move the gadgets you have so far around until they are in the order you want.
Next week we will finish up this family history blogging lesson with adding a few more gadgets and details, doing a bit of pre-planning for our blog posts, publishing your first article, and then talking about how your readers will subscribe to your blog.
Finally, here’s a link to genealogy expert (and blogging guru) Amy Coffin’s blog post, “Another Jones Surprise or Why Genealogists Should Blog.” Next week’s episode will include handouts on Amy’s great ideas for up to a year’s worth of genealogy blog posts by societies or individuals—you won’t want to miss that!
Free Records at the Genealogy Center Website
The Genealogy Center: Elevenses with Lisa Episode 31
If you’re looking for a wide array of free online genealogical records for your family history, look no further than then Allen County Public Library’s Genealogy Center in Fort Wayne, Indiana. It’s the second largest genealogy library in the country. In addition to the in-house collection, the Genealogy Center offers a vast amount of free digitized resources through their website and partnerships with other websites.
I invited Allison Singleton, Senior Librarian at the Allen County Public Library Genealogy Center in Fort Wayne, Indiana to the show. She is taking us on our tour of the website and sharing her tips and strategies for finding genealogy gems. Watch the video and follow along the highlights with the show notes below:
What is the Genealogy Center?
The Genealogy Center has one of the largest genealogy research collections available, incorporating records from around the world. The staff specializes in genealogy and is always available to help. Visit the Genealogy Center at the Allen County Public Library in Fort Wayne Indiana.
About the Genealogy Center Brochure
What Does the Genealogy Center Website Offer?
There’s a lot to explore at the Genealogy Center website. Let’s start with the top-level menu on the Home page. Here we’ll find links to important resources such as:
- Donations
- Genealogy Community
- Life StoriesPathfinders
Let’s take a closer look to a few in addition to other free resources available through the large colored buttons on the home page.
Genealogy Community
The Genealogy Community is the place to ask questions, sign up for their e-newsletter, and follow them on social media. They are extremely active on Facebook. You can also learn more about and get in touch with the staff of seasoned family history librarians.
PathFinders
PathFinders is a great place to start your family history search. It provides very small snapshots of what the Genealogy Center has in their collection for any given location or topic. Snapshot categories include:
- State Snapshots
- Subject Snapshots
- International Snapshots
Click on the logo from any page to return to the website’s Home page.
Free Databases at the Genealogy Center Website
The Genealogy Center does not interlibrary loan materials. Their collection is reference only. The website is the perfect place to plan your next visit. That being said, much of their invaluable collection has and is being scanned by Internet Archive and FamilySearch. If it is out of copyright, they work to get it online. So there’s plenty to find from the comfort of your own home.
You can find their Free Databases by clicking Resources on the home page and then Free Databases. These are all searchable and include digitized images that can be viewed from home.
In the Free Databases section you’ll find gateways to other specific areas including African-American and Native American. These provide an excellent place to start your research.
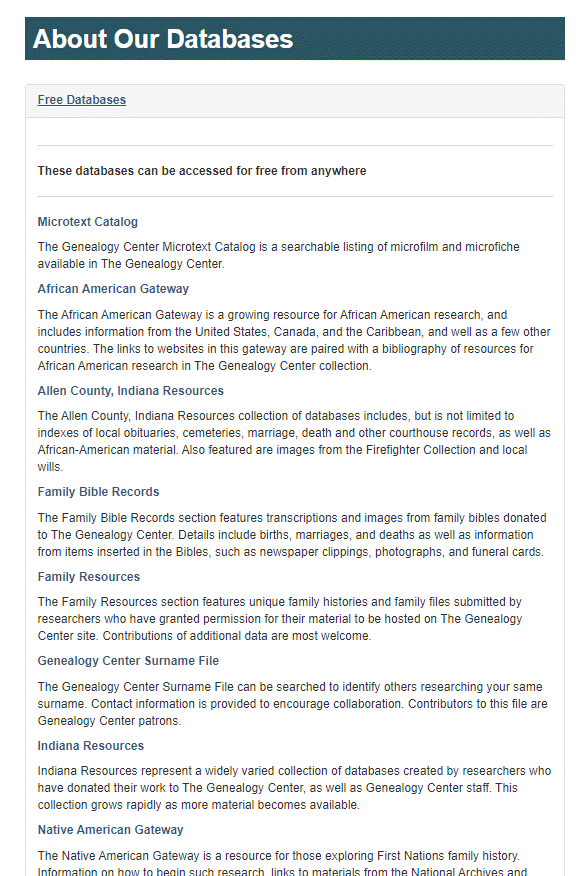
Free databases at the genealogy center
Family Bibles at the Genealogy Center Website
Navigation: Our Resources > Free Databases > Family Bibles
The Genealogy Center actively collects scans of family bible records pages.
Learn more about researching family Bibles for family history in Elevenses with Lisa episode 29.
Watch episode 29 of Elevenses with Lisa to learn how to find and analyze your family bible for genealogy
Donations
You can donate more than just money to the Genealogy Center. They are also looking for research donations. Donating is a great way to make your genealogy research materials easily accessible to your family and other researchers. You’ll find Donations in the main menu on the Home page.
- Donated digitized materials are freely available online on their website.
- They are actively digitize records.
- You can even bring your materials into the library and they will digitize them. You can then keep the originals.
- You can also send in your own digitized scans.
Military Records at the Genealogy Center Website
Navigation: Our Resources > Free Databases > Our Military Heritage
They are actively collecting military information for inclusion in their collection. The collection includes many unique items donated by other family historians.
Copyright and Usage
The materials on their website are under copyright. You can view one page at a time. However, you can copy and print like you would if you were visiting the library. Include a source citation including the donor name. If in doubt about usage, contact the Genealogy Center.
Searching for Genealogy Center Content
The website is new (in 2020) so Google may not pick up everything in search. Use the website search field to search the entire collection.
Allison’s Catalog Search Tips:
- When search the Allen County Public Library catalog, don’t use common words such as county and city.
- Also, don’t use the plural form of words. For example, use directory not directories.
- After running the search, on the left side of the page under “I only want” filter your results to only the Genealogy Center by clicking Branch and then
- If an item is digitized, you will see a Web Link under More Info.
Lisa’s Search Tip: Use Control + F (PC) or Command +F (Mac) to quickly find words in a long list on a results page.
On-Site Databases at the Genealogy Center
You can only access on-site databases while in the library. No library card is required. The library does not offer an online subscription service.
Getting Help Online for Offline Resources
Navigation: On the homepage click Genealogy Community > Ask a Librarian. Here you can send brief questions and requests.
Family History Archives
Navigation: Click Family History Archives on the Home page and you’ll find links to other websites hosting Genealogy Center digitized content. Partners include:
- FamilySearch (Public Access)
- The Internet Archive (over 110,000 items)
- Linkpendium
- WeRelate
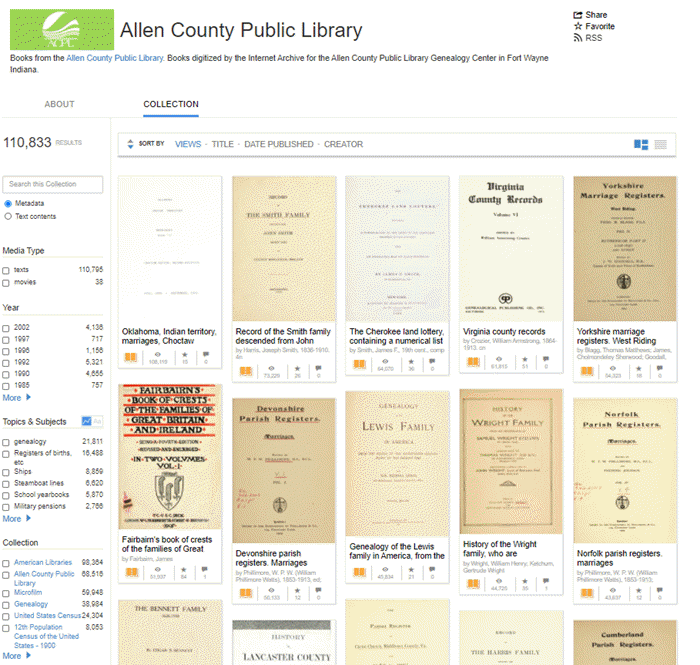
Over 110,000 Free records at the Internet Archive from the Allen County Public Library Genealogy Center
City Directories at the Genealogy Center
City Directories are a wonderful way to fill in information between census years. The Genealogy Center has the largest collection of city directories in the country. They are in both book form and microfilm.
The city directory collection cover across North American and even includes some international directories.
Compiled Family Histories at the Genealogy Center
Compiled family histories help you stand on the shoulders of other accomplished researchers. They have approximately 70,000 physical books. There are also family histories digitized and on the website. Search for the surname and include the word family. On the results page, filter down to Branch > Genealogy.
Free Consultations and Paid Professional Services
Navigation: Home > Our Services > Consultations.
The Genealogy Center offers free (yes, you read that right!) 30-minute consultations with a Genealogy Center librarian. Consultations are held by Zoom, phone or email. You don’t even have to be a library card holder! Prepare well to get the most from your consultation.
You can also hire staff at the Genealogy Center to do more extensive research for you. Another option is to request a list of local professional researchers. Visit Our Services > Forms > Research Form
PERiodical Source Index (PERSI)
Navigation: Home > Our Resources > Onsite Databases > PERiodical Source Index (PERSI)
PERSI offers a very wide range of periodicals, some of which are very unique and niche. The PERSI index is hosted by Findmpast. Search the index for free from home at Findmypast. Some of the items require a subscription.
Allison provided some excellent insider strategies for searching PERSI:
- Articles are indexed by title.
- Don’t search by keyword or “Who”.
- Most people aren’t named in the article titles. Focus on location.
You can order the articles from the Genealogy Center. $7.50 for each form which includes up to six articles. Go to Our Services > Forms > Article Fulfillment.
Resources
Get My Free Genealogy Gems Newsletter – click here.
Bonus Download exclusively for Premium Members: Download the show notes handout.
Become a Genealogy Gems Premium Member today.