Betty has at least 130 good reasons to use Google Books for genealogy! She used this powerful Google tool to find her ancestor’s name in a book–which led to a treasure trove of his original letters in an archive. Here’s what happened–and how to try this with your own family history research.
You’ve heard me say that Google Books is the tool I turn to every day. Now, you may be thinking, “But my ancestors wouldn’t be in history books!” Resist the temptation to make assumptions about sources, and about your ancestors. With over 25 million books, Google Books is more likely to have something pertinent to your genealogy research than you think. And as I often tell my audiences, those books can include source citations, providing a trail to even more treasures.
Why to Use Google Books for Genealogy: Success Story!
At the National Genealogical Society conference this past spring, Betty attended my class and then stopped by the Genealogy Gems booth to share her story. I recorded it, and here’s a transcription:
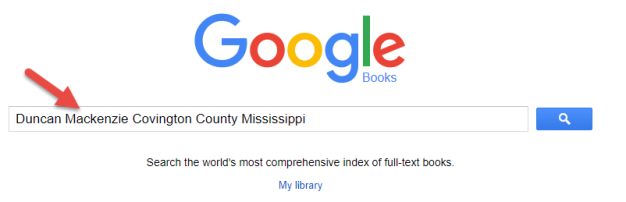
Betty: I was stuck on my Duncan Mackenzie ancestor, so I put his name in Google Books, because when you’re stuck, that’s what you do!
Lisa: Yes, I do!
Betty: So, up popped this history of Mississippi, it was sort of a specific history, and it said Duncan Mackenzie had written a letter to his brother-in-law in North Carolina from Covington County, Mississippi. And of course I already had my tax records and my census records that placed him in Covington County. This was in the 1840s. I thought, this just couldn’t be him! Why would any of my relatives be in a book? [Sound familiar?]
So, finally, weeks later, it occurred to me to go back and look at the footnotes in the book, and I found that the letters could be found in the Duncan McLarin papers at Duke University. So, I didn’t even think to even borrow the microfilm. I just told my husband, “next time you go East for work, we need to go by Duke University.” So I set up a time, and I went, and it WAS my great-great-grandfather who wrote those letters! I have now transcribed 130 letters from that collection. They let me scan them all, and I’ve been back again to scan the rest of the legal papers.
Lisa: So, an online search into Google Books not only help you find something online, but it led you to the offline gems!
Betty: And it just changed my life! Because I spend all my time on these letters. It’s distracted me from other lines! [LOL! I get that!]
How to Use Google Books for Genealogy
Are you ready to put Google Books to work in your own research and discover some genealogy gems of your own? Here, I re-create Betty’s search for you, so you can see how to get started:
1. Go to Google Books (books.google.com). Enter search terms that would pertain to your ancestor, like a name and a place.
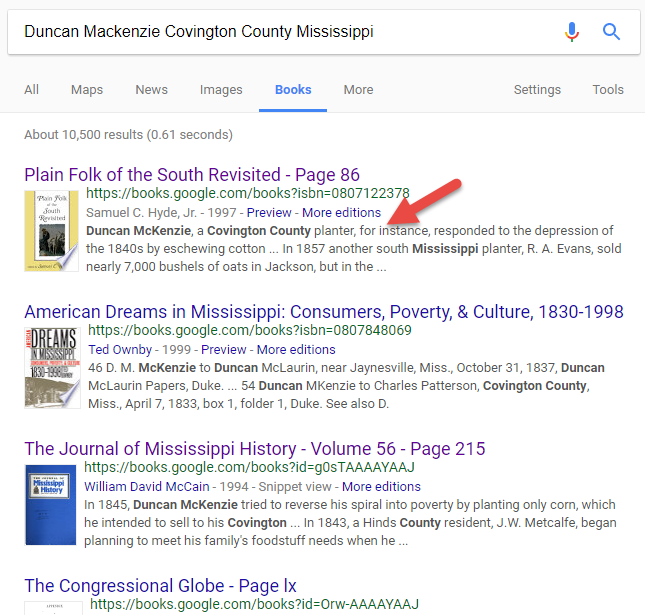
2. Browse the search results. The first three that show up here all look promising. Click on the first one.
3. Review the text that comes up in the text screen. As you can see here, Duncan McKenzie of Covington County is mentioned–and the source note at the bottom of the page tells you that the original letter cited in the book is at Duke University.
Learn More about Using Google Books for Genealogy
Learn more by watching my free Google Books video series at the Genealogy Gems YouTube Channel. Click the video below to watch the first one. (And be sure to subscribe while you’re there, because there are more videos to come!)
Then, watch the video below for a quick preview of my full one hour video class (and downloadable handout) called Google Books: The Tool You Need Every Day!, available to all Genealogy Gems Premium Members.
Show Notes: If you’ve created a MyMap in Google Maps, there’s a lot more that you can do with it if you import it into Google Earth. However, exporting it out of MyMaps as a KMZ that can be used in Google Earth isn’t really obvious. The good news is that it’s not hard to do. I’ll explain how and I’ll also show you how to import the KMZ file into Google Earth.
If you have several items in your MyMaps project, make sure that each item that you want to be included in the file that you’re exporting has a checkmark next to it. Whatever is checked is activated on the map display and will be included in your exported file.
Next, in the upper left corner of Google MyMaps, you’ll see three vertically stacked dots. When we click that, you’ll get a menu that includes Download KML. KML and KMZ are file extensions that are supported by Google Earth.
You’ll also see View Map in Google Earth in this menu. If you click that the MyMaps project will open in a new web browser tab in the web version of Google Earth. You don’t want that because the web version does not have all the features that are available in the free downloadable software version of Google Earth.
Click to select Download KML. KML stands for Keyhole Markup Language. This is a geographic file. The difference between KML and KMZ is that KML is typically a single item while a KMZ is a zipped file potentially containing several items. Each placemark and data item added to your project is a single item. When you have several like in our example project, you will want to export it as a KMZ. So even though the menu says Download KML, go ahead and click it.
When you click it you’ll get a pop-up menu with two options:
Keep data up to date with network link KML (only usable online).
This will include all your data. If any of that data is coming from another source on the cloud and that source updates, your data will update in Google Earth.
Export as KML instead of KMZ. Does not support all icons. This can zip your project as a .KMZ but it might not transfer all your icons, particularly those that might be coming from another source on the cloud.
In many cases, either of these would be fine. But when in doubt, I select Keep data up to date with network link KML so that all my project data will remain current.
After you make your selection, your file will be exported to your hard drive. You can select the destination where you want it saved. It will be a KMZ file because there are multiple items that have been zipped into one package.
How to Open an Exported MyMaps KMZ File
On a PC you will see the downloaded KMZ file in the bar at the bottom of your screen. If you click the up arrow you can open the location on your hard drive where the file was saved. You can also click Open. That opens the KMZ in a program that can read it like Google Earth if it’s already installed on your computer. The easiest way to open the file is to simply double-click it. Your computer will automatically detect that you are opening a KMZ file and it will automatically launch your Google Earth software, and open and display the file in it. It may take a few extra moments to load and run because it’s trying to do two things at once, and Google Earth is a pretty robust program.
There are three panels in Google Earth:
Search (where you enter names, addresses and more to fly to locations in Google Earth),
Places (your Google Earth files and folders These are private and are not published by Google.)
and Layers (data that can be streamed from cloud sources.)
Your project file will be in the Temporary Folder of the Places Panel. Google places opened files in the Temporary folder because it doesn’t know whether you just want to look at it one time, or you want to keep it. When you want to keep a file, you will need to drag and drop it onto MyPlaces at the top of the Places panel, or into a folder you have created.
Also, Google Earth doesn’t autosave. So it’s important to save your work before you close the program. Otherwise, your file will be lost. To save your file, in the menu at the top of the screen select File > Save > Save MyPlaces.
How to Display a MyMaps File in Google Earth
There is a small arrow next to your project file in the Places panel that indicates it is a nested project folder. Click the arrow to display the contents of this zipped container. Inside is the actual MyMaps project folder or the project. Continue to click arrows to reveal the nested content. Now that you can see the individual items, you can now work with them.
To display the entire project on the screen, double-click the main project file (not one of the nested items). Click only to highlight it. Don’t click the linked title because that will only display the descriptive text you included in your original MyMaps project.
Everything that you saw in MyMaps is now in Google Earth. You can check and uncheck items within the project in the Places panel depending on what you want to be displayed on the screen.
How to Add Content to a MyMaps File in Google Earth
You can easily add additional content to your project. Click to select the project, then add content such as a Placemark. If you selected the Keep data up to date with network link KML option when you exported your file, you won’t be able to add items to the existing folders that came over from MyMaps. However, you can add individual items or new folders by selecting the top-level project.
The beauty of working with the project file in Google Earth is that you can now add content from the Layers panel, some of which was not available to you in MyMaps. You can also add additional items from the Toolbar at the top of the Google Earth screen.
Learn More about Google Earth for Genealogy
Get the book:
The Genealogist’s Google Toolbox, 3rd edition by Lisa Louise Cooke. This book includes 7 full chapters on Google Earth for genealogy.
More Videos and Show Notes Articles on Using Google Earth for Genealogy:
Visit the Maps & Geography category on the Video & Show Notes page on the Genealogy Gems website.
Thom learned how to use Google Earth for family history after watching my free Google Earth for Genealogy video, and then made a landmark discovery: his ancestors’ pond, business and a photo of his family at work.
This Using Google Earth for Family History success story was recently sent in by Thom, a young genealogist who blogs at The Millennial Genealogist. Be sure to click on the picture that goes with his story–it’s really neat.
Thom’s Google Earth Story
“I am writing to share with you a TOTAL (and entirely unexpected) success in using Google tools for my research.
By way of introduction, I am a young genealogist (age 21) from Massachusetts. I recently discovered your podcast and have been working through the archived episodes on my daily 1.5 hour commute.
I watched your Google Earth presentation last weekend, and had some time to try your tips out after work today.
My curiosity having been piqued, I began exploring the map. I know that two sets of my second-great-grandparents, Bert Barrett and Grace Freeman, and James Adams and Elizabeth Todd, all lived near Oldtown Church (presently the First Congregational Church). I zoomed in:
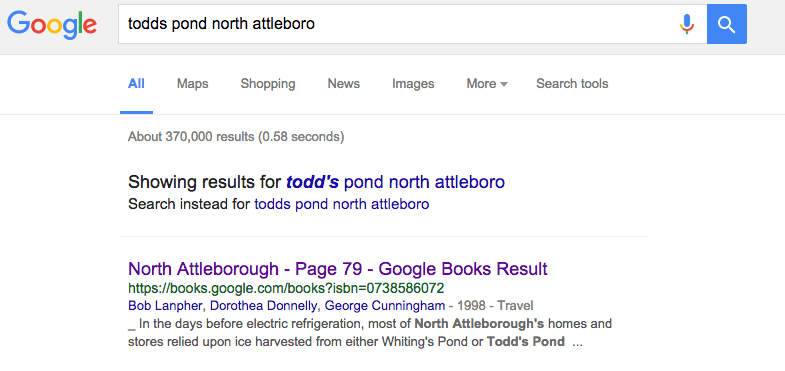
Looking at Google’s current street names, Oldtown Church is right by the intersection of Mt. Hope and Old Post (you’ll note the small cross). Now keep following Mt. Hope Street – do you see what I see? Todd’s Pond! I just knew this couldn’t be a coincidence. So I went straight to Google again:
And the very first result, a page within a Google Book on the history of North Attleboro, was astonishing:
“In the days before electric refrigeration, North Attleborough’s homes and stores relied upon ice harvested from either Whiting’s Pond or Todd’s Pond (depicted here).
By the time this 1906 photograph was taken, farmers George, Henry, James, and William Todd found selling ice more profitable than farming and founded the Oldham Ice Co.
Todd’s Pond was located on the westerly side of Old Post Road near the corner of Allen Avenue. The Oldtown Church is visible in the background.”
Mentioned by name are great-great-grandmother Elizabeth’s four brothers, George, Henry, James, and William Todd. What a spectacular find!
I plan to reach out to the local museum that prepared the book to see if they can provide a better copy, and even additional media should I be so fortunate.
In short, I wanted to take a moment to say THANK YOU so very much! Had I not been exploring Google Earth at your suggestion, I’m not sure if I ever would have ever noticed “Todd’s Pond.”
The Power of Google Used for Genealogy
I hope you are using Google Earth for family history! Paired with Google Books and the rest of rest of Google’s genealogy tool box, it can help you unearth fascinating facts about your family history.
Here’s an image I found (using Google Images) that shows the process of harvesting ice, a profession long gone with the age of modern refrigeration.
The ice trade around New York; from top: ice houses on the Hudson River; ice barges being towed to New York; barges being unloaded; ocean steamship being supplied; ice being weighed; small customers being sold ice; the “uptown trade” to wealthier customers; an ice cellar being filled; by F. Ray, Harper’s Weekly, 30 August 1884. Public domain image, Wikimedia Commons. Click to view.
Resources for Using Google Earth for Family History
In my book, The Genealogist’s Google Toolbox, I’ll teach you how to use Google Earth for family history, along with Google Books, Google Images and more.
Both are packed with step-by-step instructions and examples from my own family history research to inspire you. Google and all its powerful tools are FREE. Why not invest some time in learning to harness its power?
More Google Earth for Family History Success Stories
Click below to read more Genealogy Gems articles on how you can use Google Earth for your family history research:

 Thom learned how to use Google Earth for family history after watching my free Google Earth for Genealogy video, and then made a landmark discovery: his ancestors’ pond, business and a photo of his family at work.