Wish someone could read your Kindle e-book to you? Your iPhone can. Here’s how to turn a Kindle ebook into an audiobook. For free.
Turn eBook into AudioBook
I love to read. But when I’m on the road, doing chores or working out, it’s easier to listen to books. Sometimes I purchase an audio format or find one at my local library. But audiobooks are pretty expensive, and they’re not always available for the books I want.
So what if I have an e-book already on my Kindle and I want my iPhone to read it to me? It can.
Here’s how to turn a Kindle ebook into an audiobook on an iPhone 5s:
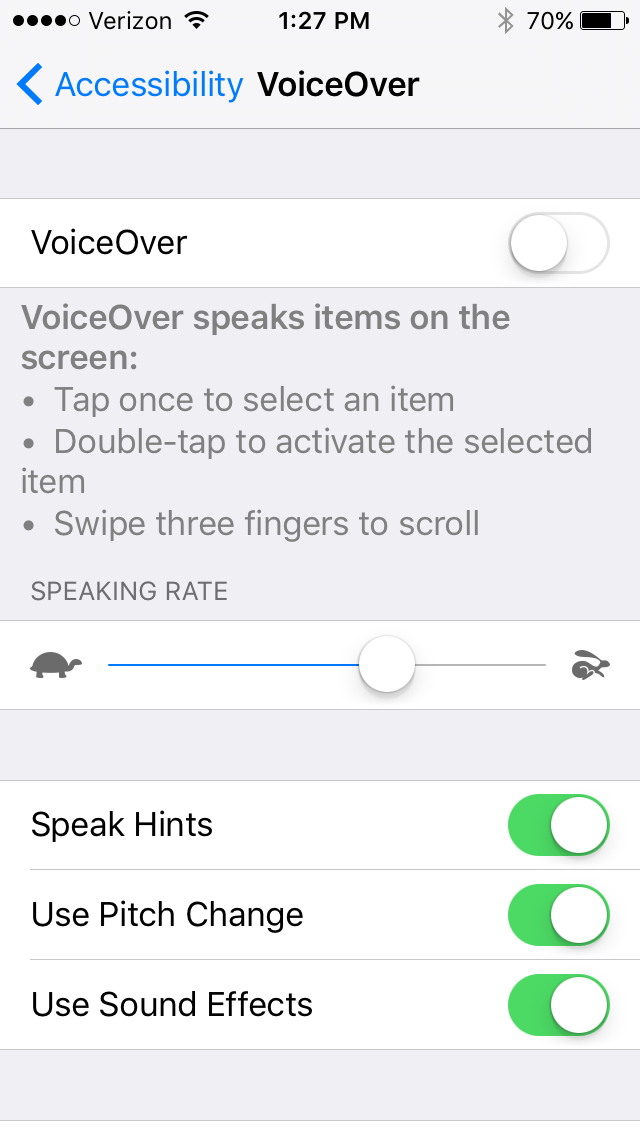
1. Customize VoiceOver settings. On your iPhone, go to Settings > General > Accessibility.
2. Set the reading speed. On the VoiceOver screen, go down to the Speaking Rate bar and adjust it to a speed you like: toward the turtle image for slower, and toward the running rabbit for faster.
3. Choose the reading voice. On the same screen, you can select the voice you want to hear. Choose Speech. Under Default Dialect, you can choose among several English-speaking reading voices, categorized under U.S., Australian, U.K., Irish and South African English. Or tap “Add New Language” to enable one of many other languages.
4. Open your Kindle app (or download it here).
5. Choose a book from your Library. Or go to Amazon.com, select Kindle Store under the All Departments dropdown menu on the search bar, and search for titles (or search “Kindle free books” for free Kindle books to read). You should also check with your local library about borrowing Kindle ebooks.)
6. Open the book. Tap the book and swipe left to page forward through the front matter until you want to start reading.
7. Ask Siri to “turn on VoiceOver.” You can also do this manually by going back to Settings > General > Accessibility. Once you turn on VoiceOver, it reads everything to you. I find it annoying and more difficult to navigate in the iPhone with VoiceOver on, so I don’t enable it until I am ready to use it. After Siri confirms that VoiceOver is enabled, press the Home button once to return to your Kindle book.
8. Start the audio reading. A black border will appear around your Kindle book page. A voice will start to give you instructions. Swipe down with two fingers to begin reading continuously (beginning with the current page and continuing through the book until you stop.
9. Double tap the screen to stop reading and bring up the menu options.
If you’re used to audiobooks read by actors and professional readers, you’ll miss their polished performances. But the voice works for me in a pinch, when I just want to listen to an e-book I already have on my Kindle.
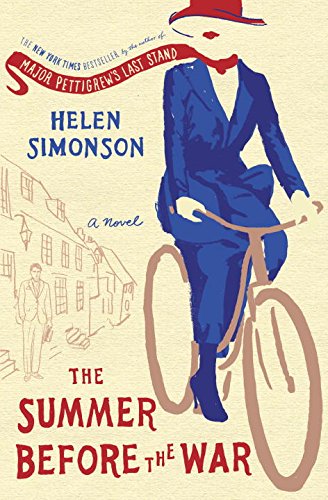
Why not try this with the current Genealogy Gems Book Club featured title, The Summer Before the War by Helen Simonson? Click on the book title to order the Kindle e-book. It’s a perfect summer read: a light-hearted romance with colorful characters and a compelling historical backdrop at the outset of World War I.
In this blog and video series I’m showing you how you can create captivating videos about your family history quickly and easily with Animoto. In this final installment we will put the finishing touches on your video and produce it.
In Episode 1
…we laid a foundation for the family history video that you are going to create. Watch Episode 1 here.
You may notice when you previewed your video that the timing needs a little adjustment because its moving a little too fast or too slowly. You can fine tune the speed at which the images are shown and the length of the song by clicking the Gear icon in the upper right corner of the editor (just above the images). In the pop up window you can trim the song and slide the lever to change the pace. When you’re done, click Save and preview the video again to see the changes. Sometimes adding or subtracting images will also help perfect the pace.
Settings
Before you produce your video, be sure to click the Settings button and take a moment to review the title of your video, how your name appears as the producer, and add a date if you want. You can also add a description, which I highly recommend because it helps the people you share the video with understand what they are about to see.
Call to Action
Another really cool feature in the settings is the Call to Action button. A Call to Action invites your viewers to do something, such as:
visit your family website or blog
visit your family Facebook group (which is a really neat idea, especially when you’re organizing a family reunion)
complete a questionnaire about the family history
There are so many ways to engage your viewers! Animoto allows you to add a Call to Action button to your video at the end that you can link to any where you want to take them on the web.
To add your Call to Action, click to check box for Show Call-to-Action button. Then type in a name to label your button such as Visit our Family Reunion Facebook Page. In the field next to URL, type in or copy and paste the website address. For example: www.genealogygems.com. Click the Save button, and your call to action will appear on your video.
Producing Your Video
After making your edits and previewing your video one last time, you’re ready to produce it. Click the Produce button, which will take you to the Produce Video page. Here you have one more opportunity to edit the title, producer name, date, and description.
On the side bar you can select the resolution size of your video. Producing your video can take a few minutes and depends on the length of your video. The good news is that Animoto will conveniently send an email to notify you when it is ready.
Your final produced video will appear on its own page where you can view it again. You’ll see another link along the side for Video Settings. Click it and you will find additional settings that can now be customized. One important setting is Privacy Options, which lets you to designate whether or not you want to allow viewers to comment on your video or be able to share it on social media. When you’re done, click Save to go back to the video page.
Sharing your Family History Video
Your family history video is now ready for sharing, and there are loads of options available. You can share by:
Email
Facebook
Twitter
sharing a link to the video
uploading it to YouTube
You can also post it on your own website by copying the Embed code and pasting it into the source code of a webpage on your website. Click the More button and you’ll find many more social media options for sharing your video. I would also highly recommend that you download a copy of the video as well to your computer for permanent storage.
Continuing with Animoto
Once your free trial is over you will have to subscribe to Animoto if you wish to continue creating videos. There are many options to choose from so you can find the one that fits your needs.
If you only need to make one or a couple of videos at a time, you could do all your planning before making a purchase. Then you can purchase one month’s Personal use of Animoto. If you have several or ongoing projects, purchasing the 1 year subscription saves quite a bit compared to the monthly subscription. Plans include unlimited HD video creation and sharing. Click this link to go to Animoto and click Pricing at the top of the page for all your options.
Think of the Possibilities!
You could create videos for:
weddings
birthdays
holidays
graduation parties
family reunions
retirement parties
genealogy society events
your genealogy website or blog
tutorials and classroom teaching
your facebook page
…the possibilities are endless! Click here to start your free Animoto trial. And I’d LOVE to see your family history videos! Comment below and include a link to your video.
Welcome Rock Island Illinois Genealogical Society You’re in the right place to find your family history. Download Handout Newsletter Signup Scroll down for discounts and more information. Get Started with My Free Genealogy Ebook Simply click...

 book. It’s a perfect summer read: a light-hearted romance with colorful characters and a compelling historical backdrop at the outset of World War I.