Show Notes: The FamilySearch Wiki is like a free encyclopedia of genealogy! In this FamilySearch Wiki tutorial, discover the wealth of information the Wiki has to offer, and learn the secrets to navigating it with ease. We’ll also cover the number #1 reason people get frustrated when searching the Wiki and how to overcome it.
Watch the Video
RootsTech has set the class video to “private”. You can watch it on their website by going to the video page in their on-demand library. You may need to sign in to your free FamilySearch account in order to watch it.
Enjoy this special free tutorial video which was originally presented at the RootsTech conference. Download the ad-free Show Notes cheat sheet for this video class. (Premium Membership required.)
What is a Wiki?
A wiki is a website that
Allows collaborative editing platform for users
doesn’t require HTML editing
has links to both internal and external resource pages
The FamilySearch Wiki is a lot like Wikipedia. It’s basically an encyclopedia of information. But the exciting part is that it’s specific to genealogy. This means you don’t usually have to worry about including the word genealogy in your searches.
What Does the FamilySearch Wiki Do?
The FamilySearch Wiki is focused on providing information for genealogy research such as:
how to find data
where to find data
how to analyze and use the data
What are the sources of Wiki content?
Original material was added from the old Family History Library research outlines.
User added material in their areas of genealogical expertise. The Wiki is constantly being updated by LDS missionaries and other volunteers as new material is discovered or released.
Don’t worry about Contributor info.
You’re going to see many things about wiki creation and management. Not everything is relevant to you when just wanting to find information. In fact, the majority of the Help section is geared to people creating, editing and maintaining pages. Don’t worry about being a contributor. Enjoy being a user.
2 Ways to Access the FamilySearch Wiki
Going directly to https://www.familysearch.org/wiki. Although you can sign into your free FamilySearch account on this page (in the upper right corner) it isn’t necessary in order to use it.
Logging in at the FamilySearch website. In the menu under Search click Research Wiki. By logging in and you’ll have access to additional features like participating in discussions, posting and creating watchlists.
The FamilySearch Wiki focuses on records, not ancestors.
Keep in mind that the purpose of the Wiki is to explain where genealogical materials are located and how to get access to them. The Wiki does not have individual ancestor information. If you want to find records, start by deciding specifically what kind of records you want. Identify when and where the ancestor lived at the time the record was created. Then head to the Wiki to figure out what records are available and where they can be found.
The Wiki links to:
Materials that available at FamilySearch.org or any other online genealogy website.
Materials that are not available at FamilySearch.org or any other online genealogy site.
Materials that were previously unknown or newly made available online.
Strategies and techniques for finding and researching genealogical records.
Types of Searches
Topic Search: When searching for information on a specific topic such as probate records, type the topic into the Search box. As you type, a list of pages with the topic word or words in the title appears below the Search box. If one of the listed pages is the desired topic, highlight and press enter. If you don’t pick from the drop-down list you will get a results list of every page that includes the topic.
Vital records Search: FamilySearch recommends using the Guided Search for info on vital records.
Location Search in the search box: When only the name of any country, state in the U.S., province in Canada, or county in England is typed in the Search box you will be taken directly to that Wiki page. For example: If Texas is searched the result is the Texas, United States Genealogy page.
Page Title: If you happen to know the exact title of the Wiki article you want, type it in the Search Box.
How to Overcome the #1 Search Problem
Many people will search for something like marriage records, Randolph, County, Indiana, and they will get a list of results. The results don’t look as clear-cut as Google results, and they may not all be on topic. This is where we can get lost. I think probably the number one reason why people give up on the wiki is they get these kinds of search results. They realize, wait a second, this isn’t even Indiana, it’s talking about Kentucky! Why am I getting all these? It can be frustrating.
This happens because we tried to do it ourselves, with our own keywords. Remember, like most search engines, they’ve indexed their content to make it searchable, so that means they’ve already decided how they want to talk about a particular topic. Rather than just addressing marriage record first, the wiki focuses on the location. Where is this marriage record? So, focus first on the place unless you are just looking for general information on a general genealogy topic such as genealogy software.
Pre-filled suggestions will appear as you type because the wiki is going to suggest what it has in the format it has it. Again, you may want to first go to the country, state or county-level page and then look for the record type.
If you’re looking for marriage records but you don’t see them listed it might be that the word marriage isn’t the keyword the wiki uses. Or it might be that the type of record you’re looking for is a state or federal record.
Don’t be discouraged if you don’t see what you want listed in the table of contents. It may just be a keyword issue. Let the work that they’ve already done in organizing their materials guide you. You’ll be more successful and also avoid frustration. The FamilySearch Wiki is just too good of a resource to miss.
Use Google site search to search using Google’s engine and search operators!
Map Search
Generally speaking, the map is the best way to search for records and information that is rooted in a location. Start by clicking the button for the continent, such as North America. From there, select the county from the menu, such as United States, then drill down by state. This will take you to the Wiki entry for that state.
Location-based FamilySearch Wiki Pages
If you’re really new to research in a particular location, start with the guided research link on the location’s wiki page. You may also see links to research strategies, record finder, and record types.
Getting Started section – links to step-by-step research strategies and the most popular records.
The county pages are where the real magic happens because many records such as birth, marriage, death, and court records are typically available at the county level. There you’ll find out how to contact or visit the current county courthouse. Look for Boundary Changes on the page. Use your computer’s Find on Page feature by pressing Control + F (PC) or Command + F (mac) on your keyboard to more quickly find words like Boundary on the page.
Exploring Record Collection Pages
Many record collections have their own page on the Wiki. As you type, these pages will populate in the drop-down list. Example: German Census Records. Take a moment to read through the page and you’ll discover some important information that will save you time and headaches, such as:
When censuses were taken
National versus local censuses and their various levels
Censuses in areas where boundaries have changed over time
Various types of census forms we may encounter
The purpose behind the creation of census records in Germany
The kind of information we can expect to find in the German census
Other types of records containing similar information
Resource articles (including a handout from a past RootsTech)
Wiki articles describing online collections
There are a couple of actions we may want to take before going on to search for records. Here are a few:
Click on the Category to see what else is attached to this category – in this case we see some example images that are helpful in interpreting German census forms.
Click the Cite this page link in the left column if we plan to reference the page elsewhere.
Click Printable Version in the left column if we want a printable or PDF version of the page.
Explore related pages by clicking the What links here link in the column on the left. Notice it also shows if there are any other users watching the page.
Learn more about using Family Search
Videos at Lisa Louise Cooke’s Genealogy Gems YouTube channel:
Genealogy Gems Premium eLearning Membership – FAQ If you want inspiring and entertaining genealogy education on-demand, Premium eLearning is for you! World-renowned speaker Lisa Louise Cooke has built this program to be accessible for all ages, all skill levels,...
Show Notes: A compiled history is kind of like standing on the shoulders of the giants of genealogy that came before you. OK, so maybe they weren’t giants, but they did document what they found and they published it so that you can benefit from it. This means that rather than having to start from scratch, you can look at the research that’s already been done. This provides you with clues and information that you can track down and verify for yourself to add to your family tree. In this week’s video, I’m going to show you one of my favorite collections of compiled family histories at Ancestry, and the search strategies you’ll need for success.
A compiled history is kind of like standing on the shoulders of the giants of genealogy that came before you. OK, so maybe they weren’t giants, but they did document what they found, and they published it so that you can benefit from it. This means that rather than having to start from scratch, you have the opportunity to take a look at the research and the work that’s already been done by somebody else before you. This provides you with clues and information that you can track down and verify for yourself to add to your family tree.
Just like online family trees, not every compiled family history is well documented or well sourced. However, they can still be a great help.
Compiled Family Histories at Ancestry
So, where do we find compiled histories? One of my favorite places to find them is at Ancestry.com. They have a particularly terrific record collection called North America Family Histories 1500 to 2000. It’s not going to pop up in your regular search results. You’ll find it through Ancestry’s Card Catalog. It contains nearly a thousand privately published family history books containing over 4 million records. They focus particularly on the 18th and 19th century families, especially with Revolutionary War and Colonial ties. But you’ll also find some European family histories included, and particularly those with some nobility connections, which can take families are way back in time.
Today I’d like to introduce you to this exciting collection. Whether you need a little rejuvenation of your own family history, or you’re just getting started, either way compiled histories are a tried-and-true record collection that all genealogists should use.
How to Find the Collection
On the Ancestry.com homepage on desktop, in the menu click SEARCH > Card Catalog. It’s important to understand that a small percentage of the total records at Ancestry are delivered to you through hints. Therefore, it’s important not to just rely on hints, and take advantage of the entire card catalog. It’s really the best place to go when you know the title of a collection, like this one. You can type in the entire title or just a few keywords, pull up the collection and then search only within that collection.
Record collections have different searchability. Some may have an index, some may not, and some are just browsable. When searching, keep in mind that any deviation from the actual words in the title can cause it not to appear in the results. If you don’t see what you expected to find, double check your keywords. Even something like whether a word is singular or plural and affect the results. If you don’t have a specific title in mind, but you just want to browse, try a variety of synonyms, or reduce the number of words.
On the results page, you can hover over the title to get a little overview description. Click the title and you’ll find two ways to search the collection: the Browse this Collection column and the Search form.
Browse this Collection Column
Have fun and explore the collection using the Browse this Collection column. Select the first letter of a family surname, and then under Subject you’ll see an alphabetical listing of books with surnames. Click the title of a book to view the entire digitized compiled family history.
This brings up an important point. the Browse feature is just for the titles themselves. So, when you look for a surname, don’t be discouraged. If you don’t see it listed. It’s very possible that a branch of your family by that surname could be included in a book that is focused on a different surname.
The Search Form
The search form allows you to get really specific in your search with a variety of search parameters. It can also find names within a book regardless of whether the name appears in the title or description. Try it out for yourself. Get a feel for home many people appear in the collection with a particular surname, or with a first and last name. From there you can narrow down further.
Each result includes a View Record and a View Image icon. View Record provides you with some details about that person to help you determine if it’s your relative. You’ll find a variety of details depending on the amount of information available in the book. Take a moment to learn a little more about the book by clicking the Source tab. Investing a few moments up front to get familiar with the source that you’re looking at can be extremely helpful. It’s going to give you some context about who wrote this book, what it covers and possibly where a physical copy can be found. Click Learn More and scroll down the page. There you’ll find more specific information about what you might be able to find within the pages of the compiled family history. In addition to names, compiled histories may include birth date and place, baptism date and place, marriage date and place, death date and place, burial date and place and name of parents and spouses.
It’s also very handy on the search form that Ancestry will auto-populate people from your family tree based on the surname you enter so that you can fill in their information and search with one click.
Navigating within a Compiled Family History at Ancestry.com
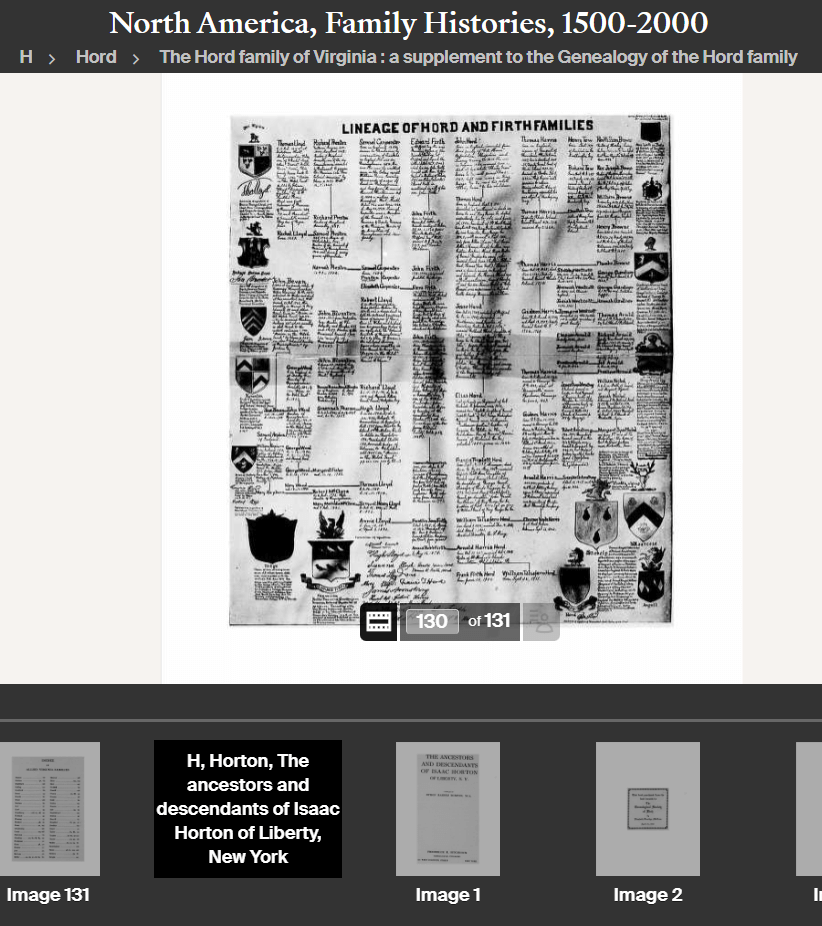
Click the View Image icon on any search result to gain access to the digitized book. The scanned page will be zoomed in to the place on the page where the person you searched for is located. Adjust your view with the Zoom in and out tool on the right side of the screen.
Example of a page from a compiled family history at Ancestry.
At the bottom of the screen, you’ll find the filmstrip. This displays all of the individual pages of the book in order. If you want to dedicate the entire screen to the book page, click the filmstrip X to close it. If you want to return to the filmstrip, click the filmstrip icon.
The current image number (not necessarily the same as the page number) will be displayed. Learn more about the book by going to the title page. The easiest way to do that is to type “1” in the image number box and click Go. The title page and the pages immediately following it can provide you with important source information. You may also find introductory pages including the background of the author, how the book is organized and instructions on how to interpret the content within the book.
Oftentimes, at the end of the book, you will find an index. Again, the easiest way to get there is to look at the total number of pages of the book listed in the film strip bar, and then enter that number into the image field and click Go. This will jump you to the end. Use the left and right arrow keys to navigate as needed.
Improving Ancestry Images
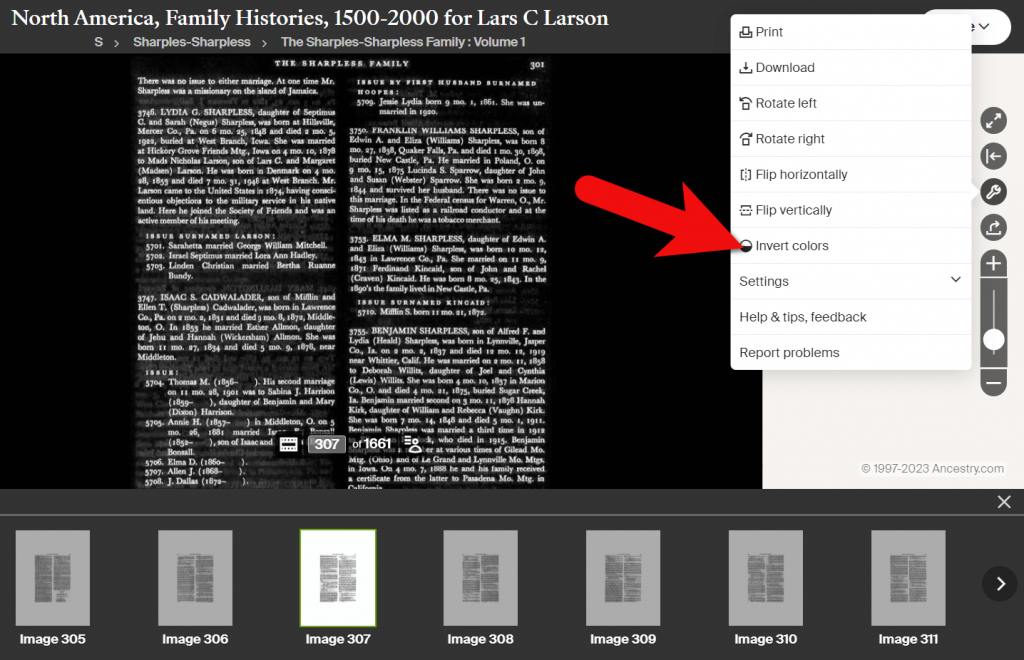
Depending on the condition of the book and the quality of the original scanning, some books may have pages that are a little unclear or muddy-looking. You can improve the look of these pages. Click the Tool Menu icon on the right side of the screen. Here you’ll find several options. For improving the way the image looks.
If a page has a horizontal image or photo turned vertically, use the Rotate Left and RotateRight tools.
To make the page easier to ready, try Invert Colors. Black type on a white page then becomes white type on a black page which often makes it much easier to read.
Tools Menu > Invert Colors
Downloading a Compiled Family History at Ancestry
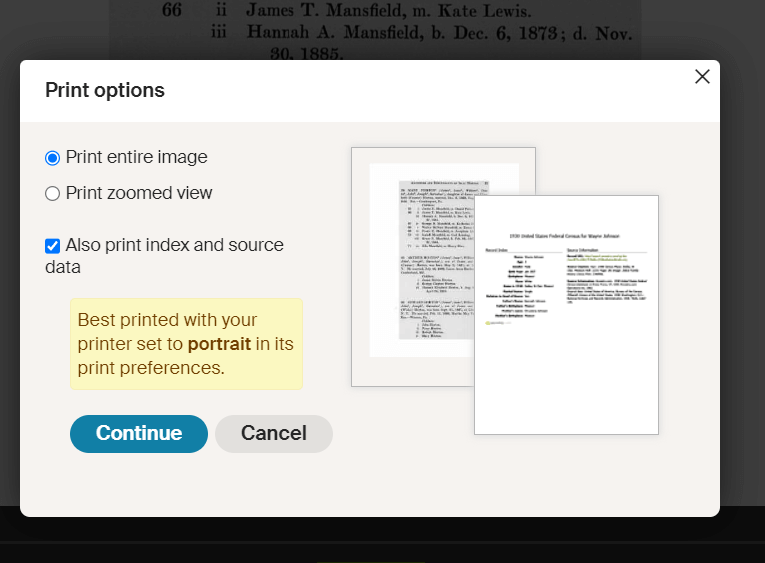
You can print or download pages from the compiled family histories at Ancestry. Having a digital version means you can read it offline and even if you no longer have an Ancestry subscription. In the Tools menu, click Download to click the current page you are viewing as a JPEG.
To print the page on paper or save it as a PDF, select Print in the Tools menu. A big advantage of the Print option is that you can opt to Also print index and source data. This will give you the page, the information specific to the person you searched for that was indexed by Ancestry, and the source information.
Use the Print to PDF function so that you can include the indexed information and source details.
Explore More Compiled Family Histories
The North American Family Histories Collection 1500-2000 at Ancestry is such a wonderful goldmine of information. If you dig into this collection, it’s going to whet your appetite to track down more compiled family histories on other websites, in your library, and at the archives.
Genealogy Gems Episode 228 In this episode: More new feature enhancements announced by Ancestry.com Listeners Trisha and Betty share their stories with Lisa in person Lisa’s interview with Crista Cowan, The Barefoot Genealogist at Ancestry.com The Tombstone Tourist,...
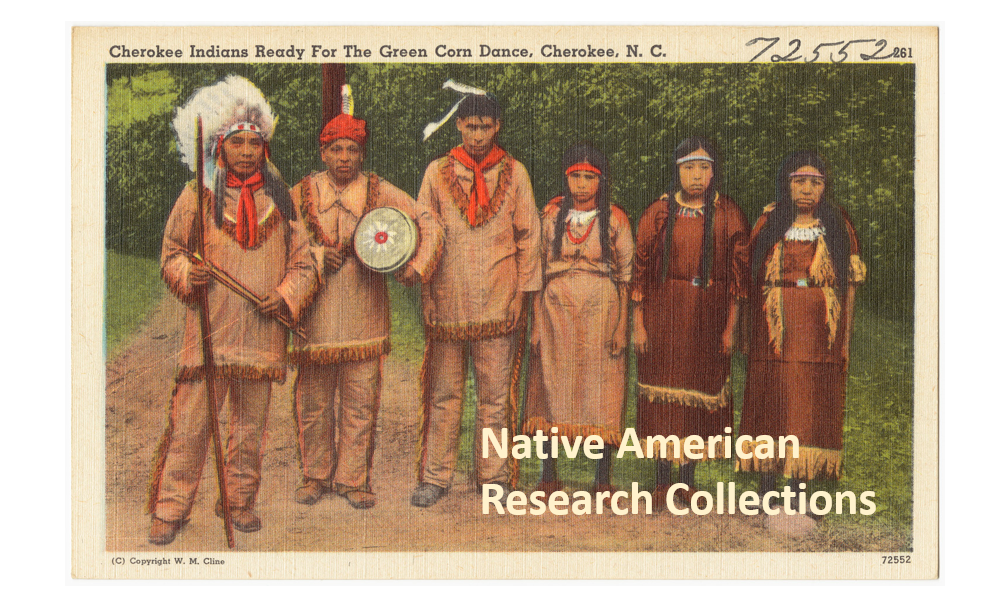
Many American families have a tradition of Native American ancestry. Now, Fold3.com has made access to their Native American records collections free between November 1 and 15th. Here are the step-by-step instructions you need to know to effectively navigate the Eastern Cherokee Applications collection at Fold3.com.
Original image provided by Boston Public Library via Flickr at https://www.flickr.com/photos/24029425@N06/5755511285.
Our Purpose
Our goal is to open the doors to using all types of available genealogical records, and provide you with the skills to explore them with confidence. Our Genealogy Gems team is excited to share with you the opportunity to utilize the free access to Native American records on Fold3.com. While it can be difficult and confusing to know how to navigate these important records, this post will provide you with information to get you started and to feel a little more comfortable jumping in! Now, let’s get started.
Eastern Cherokee Applications Collection for Native American Research
The Eastern Cherokee tribe sued the United States for funds due them under the treaties of 1835, 1836, and 1845. [1] Applicants, or claimants, were asked to prove they were members of the Eastern Cherokee tribe at the time of the treaties, or descended from its members. [To learn more about the lawsuits and allocations, read “Eastern Cherokee Applications of the U.S. Court of Claims, 1906-1909,” in .pdf form provided by the National Archives and Records Administration.]
The courts ruled in favor of the Eastern Cherokees and the Secretary of the Interior was tasked to identify the persons entitled to distribution of funds. The job of compiling a roll of eligible persons was given to Guion Miller.
It is interesting to note that the funds were to be distributed to “all Eastern and Western Cherokee Indians who were alive on May 28, 1906, who could establish the fact that at the time of the treaties, they were members of the Eastern Cherokee tribe or were descendants of such persons, and that they had not been affiliated with any tribe of Indians other than the Eastern Cherokee or the Cherokee Nation.” [Source: page 4, 3rd paragraph of NARA document Eastern Cherokee Applications of the U.S. Court of Claims, 1906-1909.]
The collection at Fold3 titled “Eastern Cherokee Applications” contains these applications submitted to prove eligibility. [Important: Because this act was about money allocation and individuals filling out these applications would have received money if approved, this may raise the question, “Did our ancestor have a reason to lie or exaggerate the truth so that they might be awarded funds?” Further, the Genealogy Standards produced by the Board for Certification of Genealogists (BCG) reminds us: “Whenever possible, genealogists prefer to reason from information provided by consistently reliable participants, eyewitnesses, and reporters with no bias, potential for gain, or other motivation to distort, invent, omit, or otherwise report incorrect information.” [2] In this case, those filling out the Eastern Cherokee Applications did have potential for gain. So, be sure to take any genealogical data, like names, dates, and places, with a grain of salt and find other documentation to back-up the facts.]
The first step in locating whether your ancestor applied is to check the index. If you are not a member of Fold3.com, you will first need to go to www.fold3.com. Click in the center of the homepage where it says, “Free Access to Native American Records.” Next, on the left you will see “Records from Archives.” Go ahead and click that.
From the list now showing on your screen, choose “Eastern Cherokee Applications.” Then click “learn more” at the bottom right of the collection description.
From the new screen, choose “Browse by title.”
Notice, there are two general indexes. The first choice is for surnames between the letters of A and K, and the second general index is for the letters between L and Z. The index is alphabetical by surname.
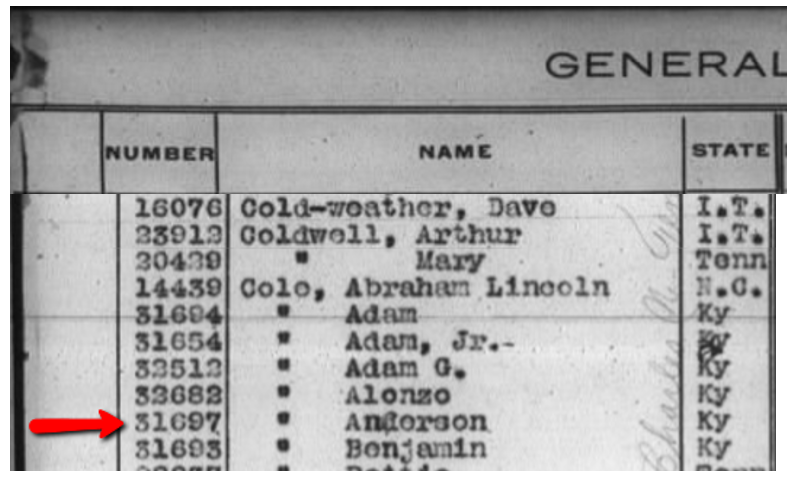
Scroll through the digital images of the index and find the surname of your targeted ancestor. For example, my ancestor’s last name is Cole.
You will see the state they were currently living in and a number listed to the left of each name. This number is what you will need to find the application of your ancestor. In the example here on the left, Anderson Cole’s number is 31697. Though the step of using this index could be omitted, I wanted you to know how to use it.
Anderson Cole’s name appears on the General Index of the Eastern Cherokee Applications.
Armed with this number as confirmation, let’s go back to the list of options and this order medication online for pain time, choose Applications.
Applications are broken down by the first letter of the surname, so in my case, I would click on the letter C and then from the new options list, click the appropriate indicator until I reach Anderson Cole.
Anderson’s application is eight pages, however applications vary in size from fewer than eight to several more.
From Fold3.com, you can see each page of the application. Some of the information you may find on the applications include, but is not limited to: name, birth date and location of applicant, names of parents and siblings, name of spouse and marriage date and place, tribe affiliation, Cherokee name, grandparents names, and residences.
The application was sent in to the Commissioner of Indian Affairs and then it was decided whether the applicant was eligible or not.
Lies and Rejection
Anderson Cole’s Eastern Cherokee Application was rejected but held genealogical data.
In Anderson Cole’s case, he was rejected. This is found on the very first page of the application. In other words, the commission did not find him able to prove his relationship with known members of the Eastern Cherokee tribe and therefore, he was not given any allotment of money. This rejection neither proves or disproves whether Anderson was of Native American descent. However, it does suggest that something in his lineage was questioned.
Further, when reviewing the information recorded on any genealogy record, we must ask the question, “Did this person have any reason to lie?” When money is on the line, lying is always a possibility. According to further research, it appears Anderson either lied, omitted details, or was seriously mistaken about many names and dates of close family members. Even then, there are some great hints within the pages of his application and I was happy to find it.
Additional Information in the Eastern Cherokee Applications
In addition to an application being filed for our ancestor, if the ancestor had children under the age of 21, they may have also applied in behalf of the child as a Cherokee Minor.
Anderson’s son, W.T. Cole, applied under the same application number as Anderson. I found his application in the last pages of Anderson’s file. This type of record is direct evidence of a parent/child relationship and can be a wonderful substitute when other vital records can not be located. However, direct evidence (which is anything that directly answers a specific question…like ‘who are the parents of W.T. Cole?’) does not have to be true. In this case, just because Anderson says his son is W.T. Cole, doesn’t mean it is absolutely true. We should always find other records or evidence to back up our findings.
How is the Roll of Eastern Cherokees Different from the Eastern Cherokee Applications?
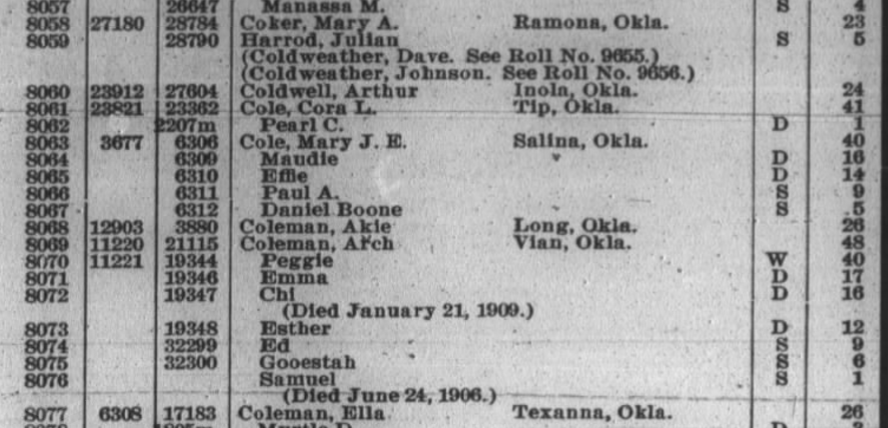
You may have noticed that besides the Eastern Cherokee applications and general index, there is also a record set titled “Roll of Eastern Cherokees.” Another name for this roll is called the Guion Miller Rolls. This is a roll, or list, provided by commissioner Guion Miller of all those who were approved to receive the allocated money. [We will be discussing the Guion Miller Roll Collection from Fold3 in a later blog post. Be sure to sign-up for our free newsletter so you don’t miss it!]
Anderson Cole and his son do not appear on this Roll of Eastern Cherokees. If however, your ancestor does, additional information on this roll could include application number, the names of minor children, ages of all parties, current residence, and a death date.
A partial page of the Roll of Eastern Cherokee found online at Fold3.com.
More on Native American Research
Using Native American collections for genealogy research can be challenging. We hope this has helped you to better understand the ins and outs for using the record collections at Fold3. For even more helpful tips, read:
Stay tuned as we bring you additional instructions for exploring the Guion Miller Roll and Indian Census Rolls at Fold3.com in the days to come. Sign up for our free Genealogy Gems newsletter for our upcoming posts on this important subject.
Article References:
[1] “The U.S. Eastern Cherokee or Guion Miller Roll,” article online, FamilySearch Wiki (https://familysearch.org/wiki/en/The_U.S._Eastern_Cherokee_or_Guion_Miller_Roll : accessed 1 Nov 2016).
[2] Genealogy Standards, 50th anniversary edition, published by Board for Certification of Genealogists, 2014, standard 39, page 24.
Disclosure: This article contains affiliate links and Genealogy Gems will be compensated if you make a purchase after clicking on these links (at no additional cost to you). Thank you for supporting Genealogy Gems!