Genealogy Gems Podcast Episode 238
The Genealogy Gems Podcast is the leading genealogy and family history show. Launched in 2007, the show is hosted by genealogy author, keynote presenter, and video producer Lisa Louise Cooke. The podcast features genealogy news, interviews, stories and how-to instruction. It can be found in all major podcasting directories, or download the exclusive Genealogy Gems Podcast app to listen to all the episodes and receive bonus content.
Click below to listen to this episode:
Podcast host: Lisa Louise Cooke
February 2020
Download the episode mp3
Do you love genealogy, mysteries and puzzle solving? Well in this episode we have not one but two tales of mystery.
The first has a Valentine’s theme centered around a mysterious love letter. Professional genealogist Kathleen Ackerman will be here to share how a love letter that was missing its last page took her on a genealogical journey full of surprises.
Our second story is a mystery full of twists, turns and murder that will ultimately resurrect your faith that what you think is lost, may still be found.
Genealogy News
Ancestry Lays off 6 Percent of Employees due to Consumer Slump
23andMe laid off 100 employees due to slowing DNA kit sales
Genealogy Gems Mailbox
Emails from Genealogy Gems Podcast listeners.
Frank recently wrote in saying that he listened to Genealogy Gems Podcast episode 227 and my conversation with Ran Snir, MyHeritage DNA Product Manager about their genetic genealogy tools The Theory of Family Relativity™ and AutoClusters. This got him thinking about his own test results and a frustration he has had trying to find matches and records in pursuit of this Galician roots.
Frank writes:
“Ancestry’s records are almost non-existent, except for some parish records, but this is the region from which Cuba and Argentina were populated, and the ultimate ancestry of Cubans in the US. I have done the AncestryDNA test but my matches are few and far between.
On the other hand, I have worked with a Spanish genealogist and have some records that go back to the 17th century. Is there any program like Ancestry, 23andme, or My Heritage, that can do Galician (Spanish) genealogy well.”
Regarding DNA matches and testing pools:
DNA companies test all types of people and because testers can download their results and upload them to other companies, their pools of people are becoming more similar. Generally, they don’t focus on particular groups. They just report the results based on the pool they currently have.
Regarding genealogy records:
Start with the FamilySearch Wiki page on Galicia includes links to records within each province.
Conduct a Google Search: Galician (Spanish) genealogy “Galicia”. Click here to see the Google search results.
Additional Resources:
The Genealogist’s Google Toolbox Third Edition by Lisa Louise Cooke available in the Genealogy Gems Store.

Available in the Genealogy Gems Store.
Lisa’s video classes and handouts on Google search are included in Genealogy Gems Premium Membership. Learn more here.
Click to learn more about Genealogy Gems Premium Membership.
From Linda:
“I am a regular listener to your podcasts. And I am the family historian. I recently received a trove of documents from my Uncle who had been working to chart the family for 25 years. He passed away last year. His most recent quest was to find as many old family pictures as possible and I have continued to reach out to distant relatives. I enjoyed the recent podcast about the New York photographer website and hope it will help me identify people in some of these very old pictures.
(Episode 236 – Interview with David Lowe, Specialist for the Photography Collection at the New York Public Library on a free tool they provide that can help you identify your old photos. Also a discussion of how to find unindexed records at Ancestry.com.)
My question: a friend of mine has inherited all of her family’s old family pictures. The pictures are from the late 1800’s. She doesn’t know who most of the people are. She is not interested in learning and apparently there aren’t any members of the family who have taken the role of family historian. Is there anything to do with these pictures other than to dispose of them? It makes me sad to know that no one is interested. When I learned a branch of my family tree had tossed all of their old family pictures, I felt awful and it has taken me some time to accept that I might not ever find replacements for this branch.”
There are ways to make real progress identifying photos. I’m going to be covering more of this on upcoming episodes. I would start by asking your friend to write down states / counties / towns where she thinks her family lived, as well as her direct ancestors as far as she knows (even if it’s just grandparents or great grandparents.) With some basic genealogical info on the most recent members of the family and some possible locations, you could then post at least some of the photos on Deadfred.com.
This is a site where people search on families and locations and other identifying information to find unidentified photos of their family members. Many, many photos have made their way to family historians through DeadFred.
If you don’t have time to post them on DeadFred, and you do know the county where some of the photos came from, you could offer to donate them to the local genealogical society. They might be willing to take them, and their volunteers might be willing to do it.
I agree with you, it would be such a shame to toss them because you can be sure there is someone out there who would treasure them and may even hold answers.
![]() The free podcast is sponsored by MyHeritage
The free podcast is sponsored by MyHeritage
GEM: The Scrapbook Mystery

1973: Bill with his dad about six months before he died. (Courtesy of Bill Compton)
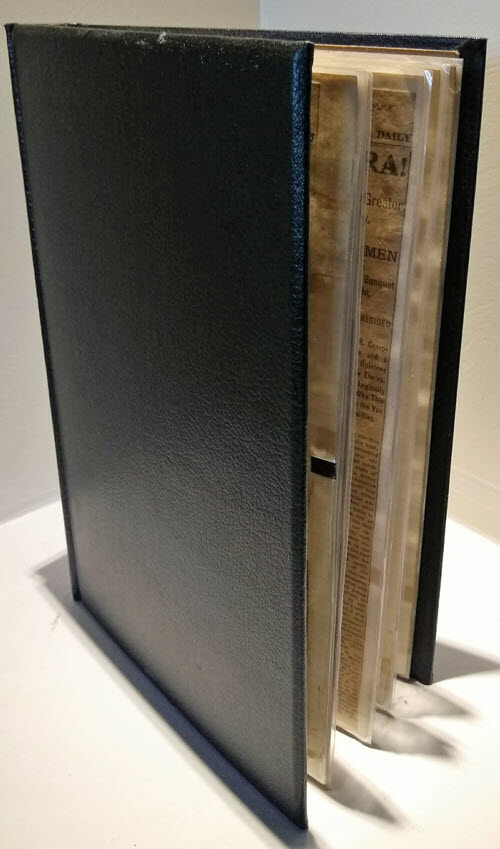
The Compton Scrapbook (courtesy of Bill Compton.)
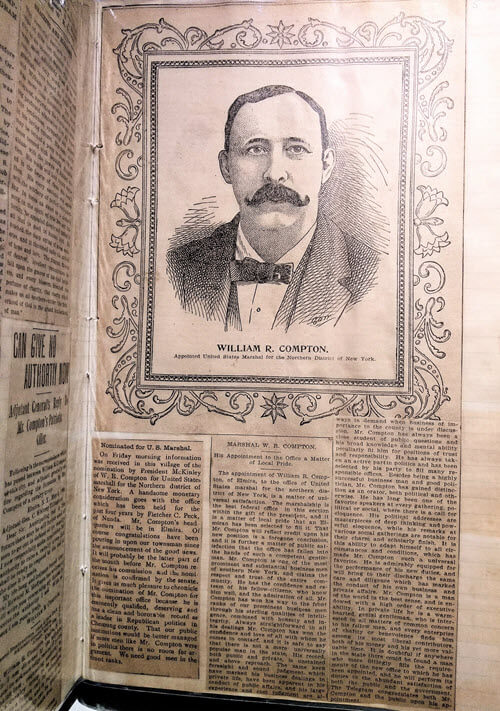
Article featuring William R. Compton in the Scrapbook (Courtesy of Bill Compton)
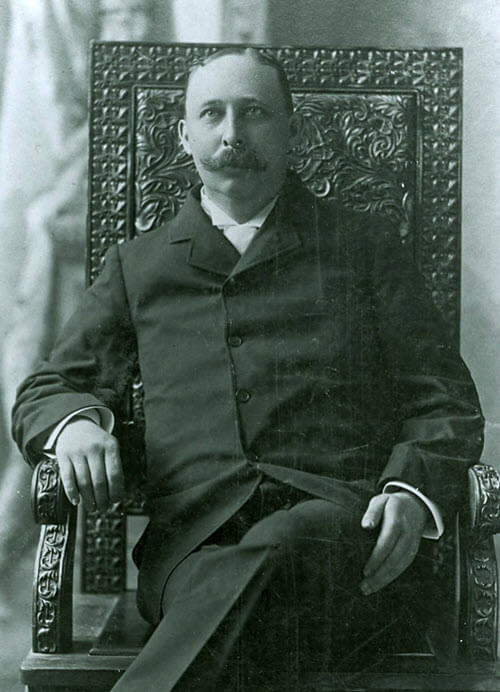
William R. Compton, US Marshall (Courtesy of Bill Compton)
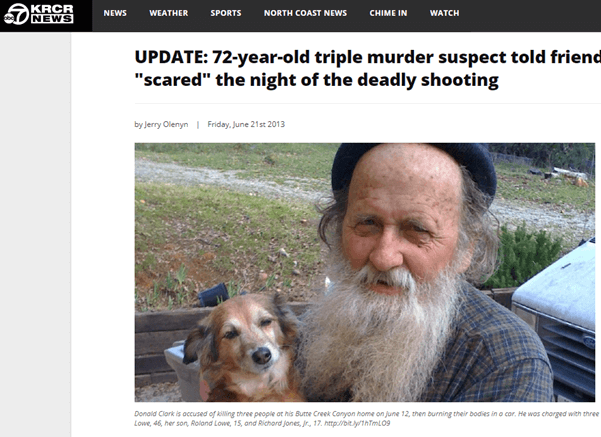
Donald Clark featured in the news
Read the news about the murder that occurred on the property where the scrapbook was found:Centerville Fire contained on property where triple murder suspect Donald Clark lived
Resources Discussed:
Learn more about how to blog about your family history. It may just lead to a treasure like it did for Bill. Here is a collection of articles at Genealogy Gems on family history blogging.
Learn more about how to set up your own blog by watching the videos on how to blog at my Genealogy Gems YouTube channel.
The free podcast is sponsored by RootsMagic
GEM: The Love Letter
Kathleen Ackerman graduated from Brigham Young University with a Bachelor of General Studies: Family History degree in April 2012. She now has her own research company, Finding Ties that Bind. She is also working on a Master’s Degree in Genealogy, Paleography and Heraldry from the University of Strathclyde in Scotland.

Kathleen Ackerman
Kathleen is the director for the Cave Creek Arizona Family History Center. She loves to help others as they learn about their family history. For seven years, she served as the Treasurer and British Institute Director for the International Society for British Genealogy and Family History. Besides her volunteer and school work, she spends most of her free time either working on her husband’s English and Scottish lines or playing with her granddaughter.
“In 2010, my mother found three pages of a letter addressed to “Mamie” among my grandparent’s things. My grandmother has passed away and my grandfather did not remember who Mamie was or why they had the letter. My mom sent me the letter in hopes that I could figure it out.”
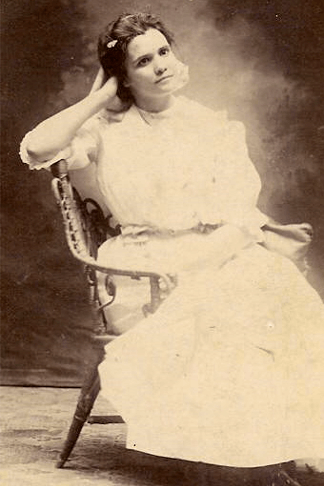
Miriam (Mamie) Smith Patelzick 1891-1911 (Photo courtesy of Kathleen Ackerman)
The last page which may have contained the writer’s signature was missing. This is where Kathleen’s search began.
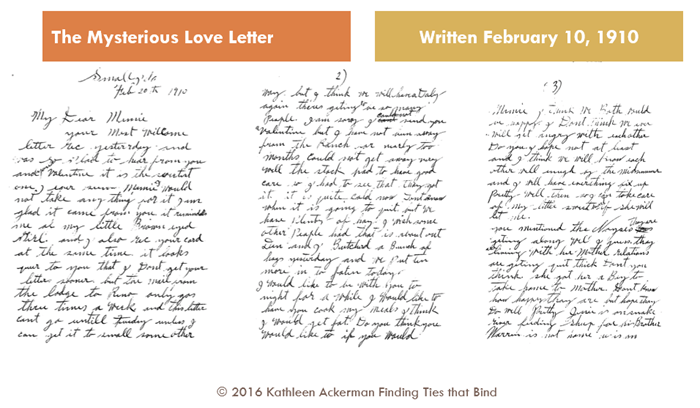
The first three pages of the love letter. (Courtesy of Kathleen Ackerman)
Kathleen turned to census records from the time period, and Google Maps to verify where Medicine Lodge was in comparison to Small, Idaho, the place from which the letter was sent. No such town could be found.
She then turned to old maps to see if the town had once existed. She used maps on the David Rumsey Historical Map Collection website. She found a map of Idaho from 1909, that showed Small, Medicine Lodge river and Reno (all mentioned in letter). They were all in Fremont County, Idaho. Her confidence that she had the right person grew.
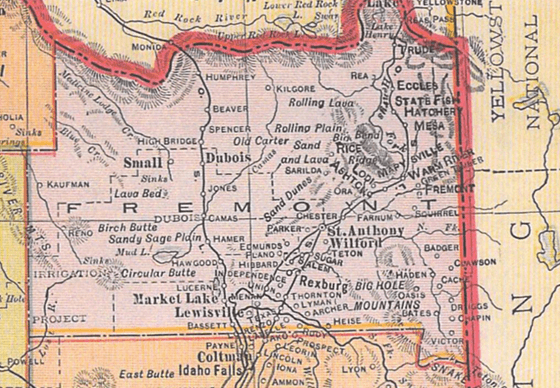
1909 Idaho map published by Geo. F. Cram, Chicago (DavidRumsey.com)
The search moved on into vital records. A marriage certificate for Mamie and William Patelzick in Dec 1910 was located.Perhaps they had eloped?
Spoiler Alert: If you haven’t listened to the episode yet. The next image reveals the writer of the letter.
Later, Kathleen’s mother surprisingly found the final page of the letter:

Found! The last page of the love letter. (Courtesy of Kathleen Ackerman)
A surprise indeed, and a mystery solved!
Thank you to Kathleen Ackerman for sharing her story! You can visit her at her website, Finding Ties that Bind.
Don’t wait another day. Get the computer backup that I use: www.backblaze.com/Lisa

Announcing the Next Generation of Google for Genealogy
The Genealogist’s Google Toolbox By Lisa Louise Cooke
Discover the answers to your family history mysteries using cutting-edge Google search strategies. A comprehensive resource for all of Google’s free tools, this easy-to-follow book provides the how-to information you need in plain English. You will first gain a strong foundation in how to search quickly and effectively. Then you’ll dig deeper into solving real-life challenges that genealogists regularly face. This book will show you how to flex your new Google muscles by mining each of the free tools to deliver satisfying and enlightening results. You will develop a mastery of Google that will serve you now and for years to come.
This book features:
- Step-by-step clear instructions and loads of images that help you easily follow along.
- Tips for searching faster and achieving better results to solve the real challenges that genealogists face.
- How to go beyond Google search by using the wide range of powerful free tools that Google offers.
- Cutting-edge technology like Google Earth to tell your family’s stories in new and exciting ways!
Click this image to order your copy of the book.
Download the Show Notes PDF in the Genealogy Gems Podcast app.
Family History Episode 42: How to Start a Genealogy Blog, Part 5
Family History: Genealogy Made Easy Podcast
with Lisa Louise Cooke
Republished August 26, 2014

Free podcast – available in all major podcast apps.
https://lisalouisecooke.com/familyhistorypodcast/audio/fh42.mp3
Download the Show Notes for this Episode
Welcome to this step-by-step series for beginning genealogists—and more experienced ones who want to brush up or learn something new. I first ran this series in 2008-09. So many people have asked about it, I’m bringing it back in weekly segments.
In today’s episode we finish a multi-part, step-by-step series on setting up your own family history blog. In episode 40 you decided what the purpose of your blog is, and we got you started with the free Blogger web site and picked out your blog name and set up the web address for it, and got the basic framework started. In episode 41 two seasoned bloggers inspired us with their posts.
In this episode I talk about adding a few more gadgets and details, doing a bit of pre-planning for your blog posts, publishing your first article, and then talking about how your readers will subscribe to your blog. You’ll also get great tips on how to create genealogy content that others looking for the same ancestors can find easily online.
Episode 42: How to Start a Genealogy Blog, Part 5
OK, let’s head back to the new blog we created in Episode 40. I named mine Blog Your Family History. (This is just a sample blog: my current blog is part of the Genealogy Gems website.) Please note: blogging platforms change over time. The features and layouts I mention have been updated. Just watch for similar features in newer versions of the blog platform.
So far I have the basic layout set up and I added the vintage photograph of the three ladies sharing some written correspondence. If you’re not signed in to your Google account, you’ll notice a link in the upper right corner of your blog page that says “sign in.” You’ll need to click that and enter your user name and password to get access to your blog dashboard – the area where you customize your blog and write your blog posts.
When you sign in you’ll be taken to the dashboard area for your blog. In my case I have a couple of blogs, so they’ll all be listed here in the dashboard. To get back to your blog just click the View Blog link for the blog you want to view. You’ll notice that when you get there the link in the upper right corner now says “sign out” so you know right now you’re signed in. To get back to the dashboard where we can continue customizing the blog, just click the Customize link in the upper right hand corner of the blog. So far we have a couple of “gadgets” or sections of our blog:
- the title area at the top;
- the blog posts box. In the case of the blog I’m creating here the gadgets run along the right hand side of the blog page.
- About Me
- the gadget with the photo I added
- A followers gadget showing other blogger readers
- the blog archive gadget – this is where readers can access blog posts that are over a month old.
So let’s add another gadget by clicking the Add Gadget link in the top gadget box and a window will pop up showing us out options. I’d like to add a search box so that my readers can easily find articles with keywords they are interested in. So just click the plus sign to add the Search gadget and a Configure Search Box window pops up so I can fine tune this gadget the way I want it. So I’ll keep the title as “Search this blog” since that’s pretty straightforward, and I’m going to just have it search this blog so I will keep that check box checked. And click the SAVE button and now I have a Search box on my blog.
So as you can see adding various gadgets to your blog is easy and you can customize them to appear the way you want. And remember you can rearrange them on your dashboard by just clicking and dragging them into the position you want. Once you get the elements of your blog the way you like them – at least for now, and you can certainly make changes any time you want – then it’s time to start blogging.
What to blog about?
Hopefully you’ve decided what you want to blog about – perhaps a specific line of your family, or maybe you’re going to just sort of journal what you work on each day. No matter what approach you take, there are a few things to keep in mind. First, each time you write an article and publish it to your blog page it’s called a “post.” Post is sort of interchangeable with article, and posting is another word for publishing – basically you’ve made the article available on the web.
When you do post an article you will want people—particularly other researchers—to be able to find it. You’ll have better success attracting readers who are researching the same families if you sort of put yourself in their shoes. Ask yourself, what will they be searching on? When someone goes to Google and starts looking for blogs about their family trees, they are using keywords to do that search.
So while you may have some very creative ideas for blog post titles, if you don’t include some of those important keywords (or at a minimum the surnames) they may never find you. And of course sprinkling keywords into your post will also increase its chances of being found. And when we talk about keywords, we’re also talking about key phrases, such as family history, or family tree. Other good keywords are genealogy, birth, death, research, location names, etc. Just the kinds of things you would search on if you were looking for people writing about your ancestors. Remember too that an ancestor’s name is also a keyword phrase.
It’s a good idea to mix it up because you never know how someone else will be searching. For example, I research my husband’s great great grandfather Senator C J Larson of Winthrop MN. So if I’m writing about him, I will use several variations of his name:
- C J Larson
- Carl Johan Larson
- Charles Larson
- Charles J Larson
- Senator C J Larson
And of course when I use these names in combination with Winthrop, Sibley County, Minnesota, I’m bound to be found by someone also researching him and his family.
Publish your first post
OK, well let’s get right to how to publish your first blog post. At your blog Dashboard (if you’re not there just click the link in the upper right corner that says Dashboard) and click NEW POST. This is like getting a new piece of paper. You’re new post is under the Posting tab and there’s a box where you can write your text and there are some formatting buttons along the top.
My advice is to bite off small chunks. People tend to read something that looks more like a magazine article rather than a novel. And it’s easier to focus in on one topic at a time. So you may want to make your first post a welcome message and explain to your readers what they’ll will be seeing in the future on your blog. I know, you don’t have any readers yet, but since all of your posts are archived, this post will be read tomorrow and two years from now. New readers can find you at any time, and they may very likely take a look at your first post.
The first thing to do is write your post title. I used to wait to title my posts until after I wrote them because writing them often brought to mind the perfect title. But the problem with that is that so often I would forget to go back and type a title in and I would end up publishing without the title. While you can go back and add the title later, it may show up in your readers RSS feeds including those who subscribe to your blog by email. So I find that it works best if I give it the best working title I can come up with, then I write the post, and then I can go back and change it if I want, but if I forget it will at least have a basic title.
Also, remember that your readers probably have many blogs they read – but they probably don’t READ them all, the probably scan the titles and click through to read the ones that sound interesting. So your title has an important job to do. Like the blog text it should contain keywords that will help the post show up in search results, AND it needs to catch your readers’ attention.
When I first started blogging I was always trying to come up with title that as clearly as possible explained what the post was about. But over time I realized that we don’t have to explain it all in the title. In fact, being a bit mysterious or intriguing with the title can entice the reader to click through and read. They’ll find out soon enough all the details of your posting, but your title sets the tone, and catches their curiosity. Of course I don’t advocate bait and switch – but have fun with your titles and use it to your best advantage. And now FINALLY it’s time to actually write your blog post! Of course you can unleash your creativity here, but I do have a few suggestions:
- Keep your paragraphs shorter rather than longer – it just makes them easier and quicker to read
- Incorporate those keywords and phrases
- A picture says a thousand words – add images whenever possible and I’ll show you how in just a moment
- Write in your natural voice. Typically blogs aren’t formal, and you will have an easier time writing if you write more like you speak. And that will come across as more genuine to your readers.
- Don’t bite off more than you can chew. If you have a lot to say on a particular topic, consider publishing your thoughts in a series of blog posts rather than one really long one. And I find that readers really like following a series.
Once you’ve got it written up, it’s time to a bit of formatting. In Blogger there are a few different fonts you can choose from. Just like in Microsoft word, you highlight the text you want to format and then select from the drop down menu which font, and font size you want. The default font and size might be just fine, but it’s nice to know you do have some flexibility. You can also bold and italicize text by highlighting the text and clicking either button. And like Word you can use Control-B on your computer keyboard for bold and Control I for italicize. You can also put your text in a different color. Again just highlight the text to be changed and click on the capital T button with the color boxes and click on the color you want.
Now a word about formatting. Remember when we discussed that it was a good idea to avoid blog template designs that had dark backgrounds with light type because they are hard on the eyes and difficult to read? Well, over doing text formatting is much the same. It can get hard on the eyes. It’s like the rule of thumb that says you don’t type in capital letters because it looks like you’re screaming at the reader.
Well, overdoing the formatting with a ton of bold and italics and colors just ends up looking chaotic and nothing really ends up standing out. So keep in mind that less is more and use it sparingly so that only the most important things stand out. And just like in Word you can select whether your text is left right or centered justified, or fully justified. And you can create numbered and bulleted lists simply by highlight the text and clicking one of those buttons. And you can also use the Block Quote feature to set text apart as a quotation by indenting it from both sides.
With all of these formatting features you will probably want to see what it will look like to your readers. And that will be different to a certain extent than how it looks here in the post editor. To see it as it will look when posted, click the Preview link in the upper right corner of the text box. When you’re in preview mode the link will then say Hide Preview and to go back to editing or what they call Compose mode just click that Hide Preview link.
Next is the Spell check button, which is something you’ll want to use every time you post. Thankfully if you make a spelling error you can fix it after it’s posted, but it’s so much easier just to run the spell check before you do. There are a couple of more things you can add to this text post to spice it up.
The next button is the Add Image button and it does just that, adds your images and photos. When you click the button an Upload Images window pops up where you can browse your computer hard drive and locate the image you want to add, or if you have a website you can type in the URL address for an image you already have hosted on your website and it will use that image. Keep in mind that Blogger has an 8 MB image size limit, so you might have to reduce some of your photos and save them as smaller files to be uploaded to Blogger. This is often the case when you’ve scanned old family photos at high resolutions that create quite large files.
Once you’ve told Blogger which image to use, you can also choose how you want it to appear on the page on the left, in the center or on the right with the text around it, or you can just leave it as None. And you can also choose whether it is Small, Medium or Large. When you’re ready to go just click the orange Upload Image button and in a few moments it will be processed and you can just click the Done button, the window will close, and your image will now be in your blog post. Again, if you want to see for sure how it will look to your readers just click the Preview link.
You can even upload a video to your blog post. It works much the same way. Click the video upload button. A window pops up and you click the Browse button to locate the video on your hard drive. Blogger will accept AVI, MPEG, QuickTime, Real, and Windows Media video files up to 100 MB in size which is typically about 10 minutes at most. They also have rules about the kind of videos you can upload and require you to click the check box to agree to their terms of service, and then you just click the orange Upload Video button.
Videos take a few minutes to upload, so at first you’ll see the Blogger Uploading Video screen on the video player. You’ll see down at the bottom that it is processing. Once your video appears on the screen then you’re ready to go. If you don’t want to wait while it finishes processing you can click the SAVE button on your post and check back later to make sure it’s complete before Publishing.
And finally, if you decide you want to remove the formatting from you text you can do so with the last button which looks like an eraser. It’s called Remove Formatting from Selection. So in the case of the text that I set apart as a quote, if I want to change it back to regular text, I just highlight the text with my mouse and click the Eraser button and it will go back to normal. If you happen to know HTML you can click the HTML tab and work with your blog post code to further customize it. When you’re done just click the Compose tab to go back to regular editing mode.
Once you have everything formatted, you’ve spell checked and you’ve reconfirmed your title, your ready to send it out to the world! Just click the orange Publish Now button and it will immediately be live on your blog. The next window will say Your blog post published successfully! And you can just click the View Blog link to open a new window and see your published post.
Edit your previous posts
Now if you’re like me then occasionally you’re going to want to go back and edit one of your blog postings. And thankfully that’s very easy to do. Just head back to your Blogger Dashboard and next to the blue New Post button which you would click to create another post, you’ll find the Edit posts link. Just click that and you will see the articles you’ve posted with the most recent one at the top. If you wanted to delete the post all together you just go to the right hand side and click the Delete link for that particular post. To edit the post click the Edit link on the far left side of the post title. This takes you write back into Compose mode and you can make any changes you want. When you’re done, just click the Publish button.
Schedule posts to publish in the future
Do you want to write several posts at once, and have them automatically publish one at a time—once a day, once a week, etc? There’s an easy way to set up your posts to publish in the future. At the bottom of the Text box you’ll see a link called Post Options, just click that. This will expand the box and give you some options. Here you can enter the date and the time that you want the post to go live online. Once you’ve typed that in then just click the Publish button. It won’t be live right now, but will be published at the date and time you specified.
When I first started using this feature I kept clicking SAVE and then wondering why my posts didn’t publish at the right time. But you have to click the Publish button even though you’re not publishing at that very moment. It’s a neat feature, and works great when you’re going to be away but want articles to be published each day. Or like when we talked about breaking up a long article into a series of short articles, you could create them all and then set them to publish once a day or whatever time frame you preferred.
Now you probably noticed that you could also check a box in the Post Options for allowing your readers to post comments. But the best place to set that up is under the Settings Tab. So go to your dashboard, and click Settings. This will take you to the Settings tab which offers a lot of options. Click on the Comments menu link and here’s where you can make your selections as to how you would like your readers to be able to interact with you and your blog. Instant communication and connection with your readers is one of the really unique aspects of blogging, and you’ll find that most folks who read genealogy blogs are interested in a civil conversation. So let’s go through the options here.
- Show: I usually have this set to show comments. But you can hide them if you want.
- Under Who Can Comment? I would recommend that you allow anyone to comment. After all, you don’t want to prevent that long lost cousin who finds your family history blog in a search to not be able to contact you.
- For Comment Form Placement that’s just a personal preference, but I find the pop up window is easy for readers to use.
- Another important feature among these settings is the Comment message. And then next you’ll find Comment Moderation. I would recommend that you always moderate your comments, at least to start. This means that when a reader leaves a comment you will have the opportunity to read it and approve it to be published in the Comments section of that blog posting. That way you can eliminate offensive comments. Honestly, I’ve never received anything objectionable, but occasionally I do get people who are fishing for business and simply post “I like your blog” so that they can then tell about their company and give their website address. There’s no harm in setting it to Always and you can change it later if you want.
- Then at the bottom of the Comments Setting I like to type in my email address so that I’ll be notified by email if someone leaves a comment that needs to be moderated. And you moderate and approve comments in your Blogger dashboard.
When you’re done just click the orange SAVE SETTINGS button. And again, you can change these settings any time you want. So how do you moderate reader comments? Well, just click on the Posting Tab, and there will be three options:
- New post
- Edit Posts
- Moderate Comments – just click that link. And if you have comments that need to reviewed and approved or deleted you can do it there.
Let readers subscribe to your blog
And finally, let’s talk about how your readers can subscribe to your blog. That’s the other really cool thing about blogging. Each of your new blog articles can be automatically sent to your readers who subscribe. It’s just like subscribing to a magazine. We subscribe to a magazine so we don’t have to go to the store every day to check to see if a new issue has arrived. Subscribing to a blog is the same idea but of course it’s free. And like magazines being delivered to your mailbox, blog posts can be delivered to your readers blog Reader, or email box.
Your readers subscribe to your blog through your RSS feed. RSS stands for Really Simple Syndication which just means an easy way to send out your posts. But you don’t have to know anything about RSS feeds. Blogger does it all for you and I’m really surprised how many bloggers don’t bother to make it easy for their readers to subscribe. Not everyone who wants to subscribe to your blog will quite know how to do it, or be an experienced blog subscriber. You will want to make it as easy as possible for them to get started. Here’s an easy way to do it.
- Go to http://www.google.com/webmasters/add.html. Here you can add an “Add to Google” button to your blog. That way your readers can easily add your blog to their iGoogle homepage or to Google Reader, a tool they can use to receive and read blogs.
- For Choose your content type select RSS.
- Under Promoting select one blog.
- Select the style of button you want to put on your blog
- Type your blog address into the box, which needs to be your rss feed. In my case, it’s http://blogyourfamilyhistory.blogspot.com/feeds/posts/default?alt=rss. You substitute your blog name in where mine is currently (your blog name in that link instead of blogyourfamilyhistory).
- Click the Generate HTML button. The html code you need to add your button will automatically appear in the box, and it’s already highlighted for you so all you need to do is Control C on your keyboard to copy the code to your computer’s clipboard, and then head back to your Blog dashboard.
- Click Layout.
- Click Add a Gadget.
- Click the HTML / Java Gadget. A window will pop up where you can type in a title such as “Subscribe to this blog.”
- In the big box press Control V to paste the HTML code that you copied into the box.
- Click the SAVE button.
- Back on your Layout page you’ll see at the top that you the “page element has been added” and now the top gadget is “Subscribe to this blog”
Want to see what it looks like? Just click the blue PREVIEW button at the top and it your blog will open up in a new window and there you will see the “Add to Google” button. Now EVERYONE can subscribe and follow your blog quickly and easily. Just close that window, and click the orange SAVE button on your layout page. Now click View Blog and try it out for yourself.
Note: I talk here about iGoogle, which is no longer available.
Add the blog to Google Reader to receive each new blog post when it’s published, and have a link to click through directly to the articles and the blog. It’s very convenient and keeps your blog on the minds and lists of your readers. Now you’re all set to go. You can post your articles, which your readers can follow. As you have more time you can fine tune the settings and layout of your blog. Have fun! Best wishes for connecting with other researchers around the world.
Blogging Tip:
In response to one of our recent tips, a reader named Sarah pointed out that there are services now to “slurp up” blogs and publish them into books. We’ll tell you about one service, but encourage you to shop around. At Sarah’s recommendation, we looked into Blurb.com. According to Blurb’s Web site, this online program works with several blogging platforms including Blogger, LiveJournal, TypePad and WordPress.com.
You can customize and edit your book in real time. The automatic slurp action imports and maps blog text, images and comments and then links it into professionally designed page layouts. What an exciting way to preserve your family history. What a great Christmas gift or Mother’s Day gift.
Once you are ready to publish your book, you can control the price by buying a hardcover, dust jacket, soft cover and other designs. These books can be up to 440 pages and as few as 40. Have a blog book within 10 days of ordering. Now, as you can imagine, this is a little pricey but still very, very reasonable. Prices start at just $12.95 for a 40-page softcover and go up from there. You get bookmaking software free!
How to Find Photos and Images in Old Newspapers with Newspaper Navigator
Elevenses with Lisa Episode 26 Video and Show Notes
Live show air date: September 24, 2020
Join me for Elevenses with Lisa, the online video series where we take a break, visit and learn about genealogy and family history.
Newspaper Navigator is a new free online tool for finding images and photos in old newspapers at Chronicling America. It doesn’t work the way the Library of Congress website works, so in this episode I show you how to navigate the Newspaper Navigator. It’s a fun session that will have you finding new newspaper gems in no time!
About LOC Chronicling America
Chronicling America is sponsored jointly by the National Endowment for the Humanities and the Library of Congress. It features free digitized historic newspapers spanning 1789-1963.
Newspapers Contain Imagery such as:
- Photos
- Drawings
- Maps
- Cartoons
- Advertisements
You may not find the newspaper that you need for your research in the Chronicling America digitized collection. In those cases, turn to the US Newspaper Directory. It catalogs newspapers published 1690-present. Click the US Newspaper Directory button on the Chronicling America website to search. The catalog will tell you where known copies of the paper can be accessed.
Uses of Newspaper Images
Most of the old newspapers featured in Chronicling America include images. And because these old images are in the public domain, they are an ideal complement to family histories.
If you are very fortunate you may find photos or images of your ancestors, their homes, or other things specifically about your family.
Newspaper images are also a wonderful source when you need a photo or image to represent an important idea or item when telling your family’s story, whether in a blog post, article, book, video, PowerPoint presentation or other medium. Example of this would include a photograph of a blacksmith shop in the 1890s in the area where your ancestor worked as a blacksmith, or an advertisement for a Sears home kit just like the one your grandfather built.
Chronicling America’s Newspaper Navigator
The Newspaper Navigator dataset currently consists of 1.5 million pieces of extracted visual content from 16,358,041 historic newspaper pages in Chronicling America.
The visual content was identified using an object detection model trained on annotations of World War 1-era Chronicling America pages, made by staff and volunteers.
This “visual content recognition model” detects the following types of content:
- Photograph
- Illustration
- Map
- Comics/Cartoon
- Editorial Cartoon
- Headline
- Advertisement
It also includes text corresponding to the imagery, identified by Optical Character Recognition (OCR).
Searching the Newspaper Navigator
You can search all images with captions. The results will be returned in a Gallery view featuring up to 100 images per page. This results format makes it very easy to quicky browse the images.
You can also switch to List view which lists the images along with the text retrieved by OCR.
How to Find Images Faster in Old Newspapers
Run a search in Newspaper Navigator of the word baseball and then run the same search in Chronicling America. A comparison of the results highlights the between Chronicling America and Newspaper Navigator when it comes to finding images in old newspapers.
Word Searched: baseball
Results returned:
Newspaper Navigator: 5,427
Chronicling America: 921,534
The search results returned by the Newspaper Navigator are solely focused on photos and images. This means you have a fraction of the number results to review. Another big advantage of Newspaper Navigator over Chronicling America is the size of the image. Newspaper Navigator gives you just the large image to review, while Chronicling America shows you a thumbnail of the entire page with images so small that you must click and load the page to analyze them.
Images appear much smaller at Chronicling America and require you to click through to the page for closer examination.
Start by running a keyword search. (example: Blacksmith). On the results you can filter the results by Location and Years. Because the search currently doesn’t support Boolean operators or other types of search operators, you may need to run a few different versions of the same search to get a complete picture of the potential results. We’ll talk more about search strategies in just a moment.
Once you find an image you want, click to open it. The pop-up box offers these four buttons:
- Download Image – Downloads a high-resolution copy to your hard drive.
- Cite this – Generates a source citation that is automatically copied to your computer clipboard. Then you can simply paste it as needed. You can also cite the dataset by including the image URL, plus a citation to the website such as “from the Library of Congress, Newspaper Navigatordataset: Extracted Visual Content from Chronicling America.” According to the website, all images are in the public domain and free to use. Learn more about Rights and Reproductions at https://chroniclingamerica.loc.gov/about/.
- Learn about this newspaper – Takes you to the Chronicling America catalog listing for the newspaper from which the image comes.
- View Full Issue – Takes you to the complete newspaper issue at the Chronicling America website.
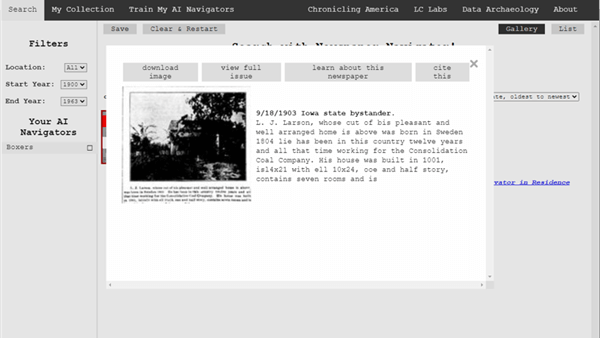
Click the buttons to select the options
My Collection at Newspaper Navigator
You can gather and save collections of the newspaper images you find using Newspaper Navigator. Start by running a search. On the results page click to select the desired images, then click the Save button. This will generate a URL for that collection and copy it to your clipboard. Since Newspaper Navigator doesn’t currently allow you to log in and return to your past searches during different sessions, I suggest pasting the URL into a research log for future reference.
Train My AI Navigators at Newspaper Navigator
A unique feature of the Chronicling America Newspaper Navigator is the ability to “train” the site to search for you. It does this through machine learning.
Elevenses with Lisa Episode 26
How to Train My AI Navigator:
- Run a search
- Click to select desired images
- Click Save to save the collection of images
- Click Train My AI Navigators
- Newspaper Navigator will deliver a new set of images based on your selected images. On that page, select additional images that you want by clicking toward the top (+) of the image.
- Click unwanted images by clicking toward the bottom (-) of the image.
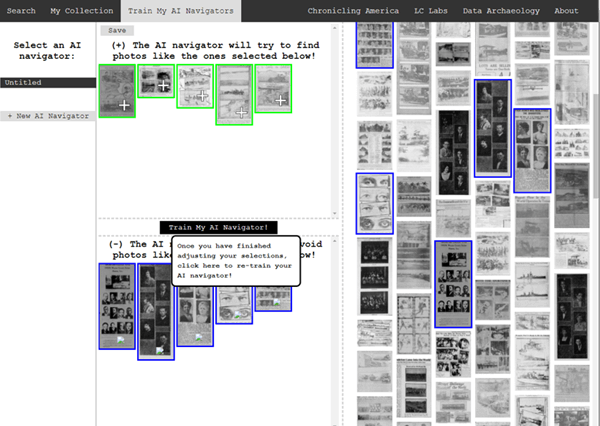 Click to select the images you don’t want the AI Newspaper Navigator to find.
 - Click Train My AI Navigator again
- Continue adding and subtracting images as needed to further train the system
- Type a name for this training session in the Name My AI Navigator The saved AI Navigator name will appear in the Select an AI Navigator column
- Click Save to generate a URL for this training session and paste into your research log.
- Click + New AI Navigator to create a new training session spring boarding from the first
- Click Clear & Restart to start a new search
Newspaper Navigator Search Strategies
Newspaper Navigator doesn’t, as of this writing, support Boolean Operators or offer an advanced search field. Here are some strategies that can help you have more success in searching the site:
Don’t use search operators, use variations
Even a space between initials can make a difference.
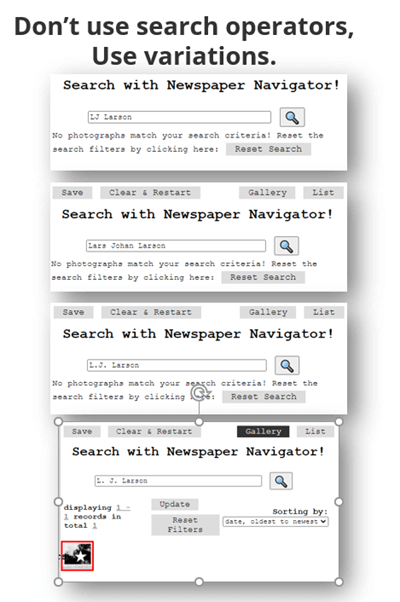
Each variation has the potential to deliver a different result in newspaper images.
Search Locations
Considering how many variations there can be to a name, when searching for ancestors try searching first on the name of their town or location. If there are still quite a few results, you can then filter to only newspapers from their state. I search the town name first because an article may appear in a newspaper from a different state. In the case of my search for McMinnville, I received a small, manageable results list. Had it been large and included both McMinnville, TN and McMinnville, OR, filtering to just Oregon would be helpful.
Test your search theories
Analyze your results and try variations based on what you are learning about what Newspaper Navigator is focusing on.
Search for word strings
In testing my search theories, I learned that Newspaper Navigator did not do well with multiple words that do not appear right next to each other. Therefore, I tried to find word strings that pertained to my family that I could search for such as the name of a business: Consolidation Coal Company.
Search for Photos
Another interesting search you can run is the word Photo. On the results page filter to the state and years that apply to your research.
Use List View to Find on Page
When dealing with a large number of results, List View can help speed up the review process. List View also displays the text generated by OCR. While not perfect, it can be helpful. Use your computer’s Find on Page feature (control + F on a PC, Command + F on Mac) and type in a keyword such as a surname. This will take you instantly to all occurrences of that word in the text on the page. Click the next page and run it again.

Find images quickly by word search in the List View
Learn More About Machine Learning
In the menu click Data Archaeology to learn more about machine learning and the Newspaper Navigator project.
Resources
 Premium Video & Handout: Getting the Scoop from Old Newspapers. (Not a Premium member yet? Learn more here.)
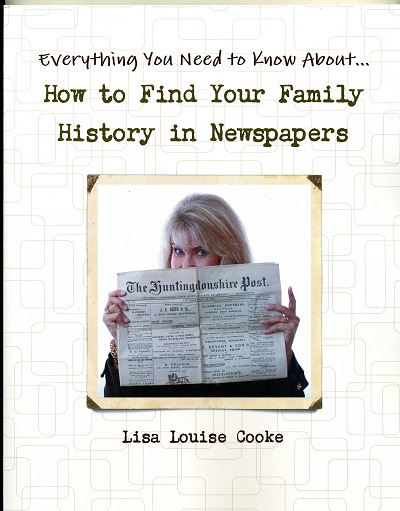
Book: How to Find Your Family History in Newspapers
Bonus Download exclusively for Premium Members: Download the show notes handout
Please Support this Free Show
If you’re enjoying the show, you can help others benefit from it too by leaving a comment below. Your comments…
- helps me understand what matters to you.
- helps others gather new ideas and encourages them to give the show a try.
- tells Google / YouTube that this show is interesting and worth sending other people to through the search results.
- provides great potential content for future episodes.
Clicking the red subscribe on our Genealogy Gems YouTube and then giving this video a thumbs up below the video
By leaving a comment (what you enjoyed, questions you have or what you’d like to see in the future) below this video after the show’s over or at the bottom of the show notes page if you’re watching on my Genealogy Gems website.
Answers to Your Live Chat Questions
One of the advantages of tuning into the live broadcast of each Elevenses with Lisa show is participating in the Live Chat and asking your questions.
Bert asks: Are some newspapers only available for a fee on websites such as Ancestry
Lisa’s Answer: Yes, several genealogy websites have exclusive collections of digitized old newspapers. You can usually search or browse the site for free to determine if they have newspapers from the location and time frame that you need before you make a purchase. Here are some of my favorites that I’ve had good success with:
Genealogy Bank
MyHeritage
Ancestry
British Newspaper Archive (a goldmine for anyone with British ancestors!)
We are compensated if you make a purchase after using our links above (at no additional cost to you.) Thank you for supporting this free show by doing so!
Christine asks: (What is the ) newspaper navigator date range?
Lisa’s answer: Here’s a break down of the dates:
Chronicling America covers 1789 – 1963 (digitized newspapers)
Newspaper Navigator covers 1900 – 1963 (photos in digitized newspapers)
U.S. Newspaper Directory at Chronicling America covers 1690 – present (catalog, only some are digitized and those are part of Chronicling America.)
Rachel asks: I have an ancestor that was in the social pages all the time in our local newspaper in the 1800’s. I thought it would make a great book or video, any ideas on how to showcase them the best?
Lisa’s answer: I love both of those ideas and I cover many more in my Premium Membership video Inspiring Ways to Captivate the Non-Genealogists in Your Life. Personally I have found that short photo books and short videos that tell one story are received the best by family members. They both offer opportunities to share and highlight items from newspapers. Learn more about quickly and easily making family history videos by watching Elevenses with Lisa episode 16. And I strongly encourage Premium Members to watch these two videos:
Video Magic: Creating Brilliant Videos Quickly & Easily with Lisa Louise Cooke (creating videos)
Share Your Own Life Stories More Meaningfully with Sunny Morton. (writing books)
lagomcurt asks: Are local small-town papers included in the collection?
Lisa’s answer: Yes.
June asks: When you download it ask what to save as. What is your suggestion?
Lisa’s answer: I think you’ll find that JPEG is currently the only option in the Save as Type drop-down menu.
Sharon asks: Does Chronicling America have foreign language newspapers in America?
Lisa’s answer: Absolutely! Searching in the language will help retrieve items.
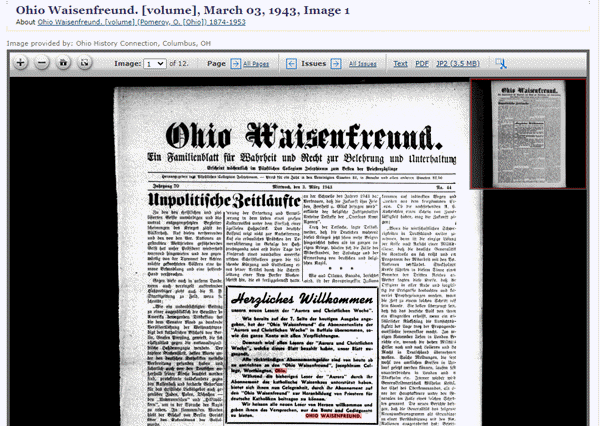
Ohio Waisenfreund newspaper at Chronicling America
Pat asks: Does it have Irish American newspapers?
Lisa’s answer: Chronicling America does have Irish American newspapers. If they were published between 1900-1963 then they will be searchable by Newspaper Navigator. I would also recommend searching all newspapers (online and offline) by clicking the U.S. Newspaper Director button at Chronicling America. Then search by ethnicity (Irish) and Material Type (online.) You will find that some are linked to other websites where they can be found online. If you see an image of a newspaper on the catalog page, then you know it is available on Chronicling America in a digital format.

Search for Irish newspapers online at US Newspaper Directory
Mark asks: Can the wash out pictures be enhance with the new MyHeritage Photo with the sharping feature and colorization to make it a better final experience with images?
Lisa’s answer: Yes indeed. Because the original quality will be poor and with low dots per inch (dpi) it likely won’t improve the way an original photo would. However enhancing and coloring just takes a few seconds and definitely improves the image. Even better, it often makes the print much more readable. I use it on documents too. Click here to try MyHeritage.
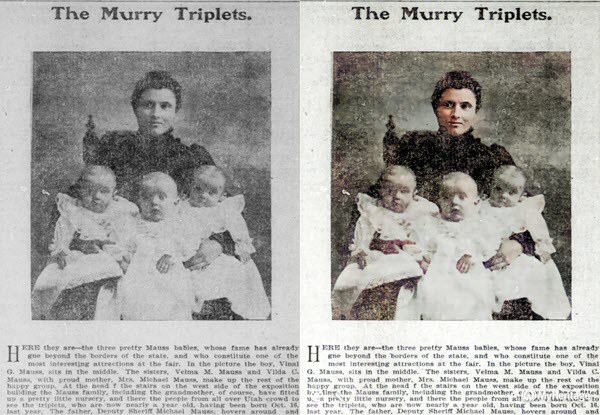
Newspaper photo enhanced and colorized with MyHeritage
Kathy asks: If you do a search in English, will it find the search term(s) in newspapers that were written in German?
Lisa’s answer: No. You will need to search in German to pick up on any German text. However, if the image itself is similar, My AI Navigator should pick it up.
Lucinda asks: Who is in your necklace and the photo behind you, Lisa?
Lisa’s Answer: It’s my maternal grandmother’s high school graduation photo.
Please Leave a Comment or Question Below
I really want to hear from you. Did you enjoy this episode? Do you have a question? Please leave it below. You can also call and leave a voice mail at (925) 272-4021 and I just may answer it on the show!