“In my grandmother’s final days battling brain cancer, she became unable to speak and she filled dozens of index cards with random letters of the alphabet. I’m beginning to think that they are the first letters in the words of song lyrics, and would love to know what song this was. This is a crazy long shot, but I’ve seen Mefites [other site users] pull off some pretty impressive code-breaking before!” Then she posted the “code” from one of the cards.
Within 15 minutes someone solved part of the puzzle: a section of the code was the first letters of the prayer from the New Testament, “Our Father who art in heaven, hallowed be thy name….”
Have YOU ever been faced with indecipherable notes left behind by a family member? What family history mystery do you wish an online community could help you solve? Share this on the Genealogy Gems Facebook page and leave your answers.
More and more people are blogging about their family history. Here’s why!
When it comes right down to it, many of us want to write up our family stories, but we don’t really want to write or publish a 300-page book. Blogging your family history in short snippets is a perfect alternative! Why?
1. Its shorter, flexible format is much less intimidating for many people. You don’t have to lay out a book or fill hundreds of pages. You can write a little bit at a time, as your time and mood permit.
2. A blog is like your own family history message board. Every word you write is searchable by Google–which means others researching the same family lines can find and connect with you.
3. A family history blog can help bust your toughest brick wall. I’ve heard and shared countless stories here at Genealogy Gems from readers and listeners of how just “putting it out there” on a blog led to someone contacting them with a treasure trove of new information about their family tree.
4. Writing a narrative about your research will help you identify gaps in your research. Sometimes errors or bad assumptions you made will jump out at you.
5. Your kids and grandkids are (or will be) online. They will more likely want to read quick and easy stories on the go on their smart phones and tablets. Putting your research out there on a blog provides them with an easy way to digest the family heritage and subscribe to it, since blogs can be delivered to their email inbox or to a blog reader.
6. Because there are no excuses. You can start a blog for free. There are no rules, so you can decide how often and how much you write at once.
7. If you leave the blog online, it will still be there even when you’re not actively blogging. You will continue to share–and you may continue to attract relatives to it.
Resource:
Start a family history blog with this free series from our Family History Made Easy podcast (an online radio show)
Part 1: What to Consider when Starting a Genealogy Blog. The “Footnote Maven,”author of two popular blogs, talks about the process of starting a genealogy blog. She gives great tips for thinking up your own approach, finding a unique niche, commenting on other people’s blogs and more.
Part 3: Step by Step on Blogger.com. How to create your own free family history blog on Blogger.com. Learn tricks for designing a simple, useful blog and how NOT to overdo it!
Final tips:Wrap-up and inspiration. In this concluding episode, learn how to add a few more gadgets and details to your blog; pre-plan your blog posts, publish your first article, and how to help your readers subscribe. You’ll also get great tips on how to create genealogy content that others looking for the same ancestors can find easily online.
SHARE! Invite someone you know to start a family history blog by sending them this post. They’ll thank you for it later!
Listen to the Family History: Genealogy Made Easy podcast by Lisa Louise Cooke. It’s a great series for learning the research ropes and well as refreshing your skills.
Originally published 2009 Republished January 21, 2014
Welcome to this step-by-step series for beginning genealogists—and more experienced ones who want to brush up or learn something new. I first ran this series in 2008-09. So many people have asked about it, I’m bringing it back in weekly segments.
Connecting with someone who knows about our ancestors can really boost our research results—and even create new relationships among living kin. But it’s not always easy to send that first email or make that call.
In today’s episode we talk about the skill of “genealogical cold calling.” Relationships are key to genealogical success and by following 14 genealogical cold calling strategies you will find your research relationships multiplying. We’ll chat with my cousin, Carolyn Ender, who has conducted hundreds of telephone interviews. She has a knack for quickly connecting with folks she doesn’t know over the telephone in ways that put them at ease and bring to light the information that she’s looking for.
But first, we do some follow up with an email from a listener about family trees. Then, I share a little story that puts into practice what we’ve learned so far in this podcast series.
14 Steps to Genealogical Cold Calling Success
#1. Identify the person you want to call.
#2. Locate the person’s phone number. Below are some great websites for locating people you don’t know. The list is updated from the one given in the show. And Whowhere.com now has an app for Android, iPhone and other mobile devices. Check it out
Don’t forget to search the entire metro area, not just one city. Try just searching their first name particularly if it’s not a really common first name. Try and track down their number through other relatives or researchers. If all else fails consider posting on a message board for the surname
#3. Prepare ahead for making the call.
Every tough job gets just a little easier when you do your homework first. Follow these tips:
Take into account a possible difference in time zones.
Choose a time when you are not too rushed
Do a brief review of the family you are researching so it’s fresh in your mind
Make note of specific questions you would like to ask.
Have your genealogy software program open or your written notes at your fingertips.
#4. Get up the “nerve” to call.
Remind yourself how valuable this person’s information could be to your research. If he or she is quite elderly, remember that none of us will be around here forever so you need to make the call today! Say to yourself: “I can do this. This is important!” And be positive and remember, all they can do is say “no thank you.”
#5. Introduce yourself.
Give your first & last name & tell them the town and state where you live. Then tell them the family connection that you share, and tell them who referred them to you or how you located them before launching into why you’re calling or what you want.
#6. Overcome reluctant relatives.
Be ready to share what you’ve learned, and to share your own memories of a relative that you have in common. Mention something of particular interest in the family tree that might pique their interest.
If they are very hesitant you could offer to mail them some information and offer to call back once they’ve had a chance to look at it. That way they can sort of get their bearings too.
#7. What to do during the call
You’ll want to take notes during the phone call. Try a headset which will help to free up your hands for writing. Handwriting is preferably over typing.
Take the opportunity to not just get new information but also to confirm information that you already have–just to make sure it’s correct.
If you have a way to record the call, you don’t have to take notes and focus all of your attention on the conversation, and then transcribe the recording later. If you want to record, ask permission: in some places, it’s illegal to record a conversation without permission and it’s common courtesy to say you’re taping them. But it might put off a stranger; perhaps taping could wait until a second call.
#8. Leave a detailed voice mail message if there’s no answer. Stateyour name and that you would like to talk with them about the family history. Leave your phone number and tell them that you will call them back. Consider leaving your email address and suggesting they email you with a convenient time to call back.
Be sure and keep track in your genealogy database each time you call and what messages you leave. Having a log of calls and voice mail messages you’ve left will help you keep track.
#9. “Must-ask” questions.
“Do you or anyone else in the family have any old family photographs, or a family Bible?
(Reassure the person that you would only be interested in obtaining copies of any pictures or mementos they might have.)
“Do you know anyone else in the family who has been doing family research?”
“May I have your permission to cite you as a source in print in the future?”
“Is it OK with you if I keep in touch from time to time?”
#10. Wrap up the call.
Ask for their mailing address and email address.
Offer to give them your address and phone number.
Let them know you would be pleased to hear from them if they come across any other information, pictures, etc.
#11. Document the call.
Sit down at the computer or your notepad right away and make detailed notes about the phone conversation while it’s fresh in your mind. Include the person’s name, address, phone number and date of conversation. Make notes regarding any items you think may be questionable to remind you to go back and do more research on those points. At the bottom of the page list the ACTION items that come to mind that you want to follow up on based on the conversation. Enter their contact information into your genealogy database as well as your email contact list.
#12. Enter new information Into your genealogy database.
This is a must. Do it right away while it’s on your mind.
#13. Create an action item list.
Create action items based on what you learned. Ask yourself “What are the logical next steps to take considering what you’ve learned through this interview?” The call is not the end result, it’s a step in the research process, and it can really help to make this list now, and while it’s fresh in your mind.
#14. Follow up.
Send the person a written note or email thanking them for taking the time to talk with you. If the person mentioned that they would look for pictures or would look up something in a family Bible etc., mention in your note that you would still be interested in anything they can help you with and that you would be glad to pay any copying expenses, postage etc. Offer to provide copies of your information or copies of pictures you have etc. You never know: they might catch the genealogy bug and become your new research partner!
Next, put their birthday on your calendar and send them a card on their next birthday. It’s another way of keeping the connection going and expressing that you really do appreciate all their help. Try this service: Birthday Alarm.
Occasionally make a follow up call to check in and see how they are doing, share any new family items she’s come across recently, and ask if they have they heard or found anything else.
Family History: Genealogy Made Easy Podcast with Lisa Louise Cooke Republished June 18, 2014
Listen to the Family History: Genealogy Made Easy podcast by Lisa Louise Cooke. It’s a great series for learning the research ropes and well as refreshing your skills.
Welcome to this step-by-step series for beginning genealogists—and more experienced ones who want to brush up or learn something new. I first ran this series in 2008-09. So many people have asked about it, I’m bringing it back in weekly segments.
Episode 36: Your Genealogy Questions Answered, Part 1
Today’s show is all about YOU! This episode is made up completely of your emailed questions, comments and stories. I couldn’t do this podcast without you, and I definitely want it to be a two way conversation. Joining me on today’s episode to read your emails is my daughter, Lacey Cooke.
Question: When do I use the GPS (genealogical proof standard) method? How do I know whether what I’ve found meets the genealogy research standard? Do I need a research report for every ancestor? When do I use the research worksheet? – Jenna in Kansas City
Answer: First, put priority on your direct ancestors. I write up research reports on each direct ancestor, but only after I’ve done the bulk of the research on them. Use the research worksheet when you have conflicting or unclear information that needs to be worked over a little more thoroughly. Learn more about navigating your research with the genealogical proof standard in the Family History Made Easy Podcast, Episode 20 andEpisode 23.
Question: I need help finding a newspaper article on the killing of my great-great grandfather Thomas Leonard Frazier that originally appeared in The Deseret News in Salt Lake City, Utah. I didn’t cite the source when I first found it! – Kent Frazier
Answer: I found the article you’re looking for at GenealogyBank.com. Online newspapers are scattered all over the internet. I started at GenealogyBank because they have a lot and I have a subscription. If you have trouble finding newspaper article, review the episodes below. You may also want to try regional and state archives, public libraries, genealogical and historical societies and large genealogy or university libraries.
Comment: I just listened to Family History Podcast Episode 33 about hard buy medicine online gurgaon drive file organization, including organizing photos files, and I just listened to Genealogy Gems Podcast Episode 18 (not currently available online) on how to identify old photos by the cars that appear in them. My sister recently sent me a batch of old family photos, including one with the van in which I learned to drive. I decided to organize them according to your suggestions and it’s worked really well. I have one more suggestion: add a caption to each photo’s metadata. It’s like writing about the photo on the back of it.
To add a caption in Windows, right-click on the file, then click Properties. On a Mac, click on the File icon and then in the Finder menu, click on Get Info. I’m using Windows Vista, so this comes up with a window that has three tabs on it: General, Security and Details. Go to the Details tab and click to the right of the fields that are listed there to enable editing. On my computer, there are fields for Title, Subject, Tags and Comments as well as Authors, Date Taken and Date Acquired. There are a number of other fields that can be edited on this screen that have to do with the photographic equipment that was used, so scanned photos from your grandparents’ Kodak Brownie cameras can be updated too. The fields that I fill in are Subject, Tags and where known, the Authors and Date Taken. The Tags field can be very useful for the computer’s search function. If these fields are not available from the operating system itself, most modern photo editing software has functionality that will let you edit these same fields from within the photo software [for example, in Adobe Photoshop, this is under File -> File Info]. –Sean Lamb
In Genealogy Gems Premium Podcast Episode 25, I interviewed Ken Watson who talked about tagging photos with actual GPS (global positioning) coordinates in meta-tags.
Russ provides this link to his blog post about applying my hard drive organization strategies and incorporating Family Tree Maker software. For hard drive organization, see Family History Podcast Episode 32 and Episode 33.
Question: I’ve been doing genealogy for a couple of years on and off. I found your two podcasts and I’m almost caught up on Family History Made Easy. (Next will be the “Genealogy Gems” podcast!) Is there a “best practice” for which name should be used for a woman’s record? Maiden or married? Also, will you recap what a primary source is? –Bob Callahan
Answer: When I started the podcast, I wondered whether having two podcasts was overkill. I’m getting great feedback telling me that’s not the case! A primary source contains genealogical data collected at the time of the event reported by someone of authority and/or who was at the event and has first-hand knowledge. You may have several primary sources for each fact, like a family Bible and a government or church record for a birth or death. (A secondary source for that might be a birth announcement in a newspaper. The reporter obviously wasn’t there and doesn’t have firsthand knowledge of the event. If that’s all you have, dig a little deeper.)
As for your question about women’s names, a woman is listed in on a family tree with the name she was born with: her maiden name. She will be connected to any spouses later in life, and you can get her married name from there. They may appear in records with any of their surnames. A death record on Ancestry.com may have her listed by her married name, but in your family tree you should have her by her maiden name.
Comment: Let me first say that I am a new listener and have been on a Genealogy Gems and Family History Made Easy Podcast marathon! For the past month, I have listened to almost all of your podcasts and have gleaned quite a bit of information…to the point that it has almost overloaded my brain. But that is a good thing because I have a lot of new ideas for expanding the tree that my grandmother started forty plus years ago…
I just listened /watched the Premium Members Video for organizing your hard drive (available only to Premium Members). I have one more suggestion. It’s on how to copy multiple folders with the same name into your surname folders.
When setting up the surname folders and the sub-folders that go inside each, you set up one set of folders inside of one of the surname folders that are brand new with no documents inside of them. Then highlight each of them by first clicking on the first folder inside the surname folder, press and hold the shift key and click on the last folder and then right click on one of the highlighted folders and click copy from the drop down list. Then click and open the next surname folder, right click inside the folder and then click on paste from the drop down folder. –Eric Gomes
This is a GREAT suggestion! I constantly move multiple files at a time, but completely forgot that this can be done with file folders.
Question: Do you have any suggestions on what to look at when checking out and deciding on a society to join? –Eric Gomes
Answer: It depends on what your goals are. If your goals are camaraderie, education, involvement and community service, involve yourself with a local society. Go visit! See how welcoming they are, what kinds of programs they offer and whether they meet your needs. Don’t be shy about meeting the president and asking for a recent copy of their newsletter. Test drive it to see what’s a good fit for you.
If you’re trying to learn about where your ancestor lived, look for a society closest to that area. Look for societies near and far at the Federation of Genealogical Societies website on the Find a Society page. Or Google the name of the city and/or county/province and the keywords “genealogy society” to find what you’re looking for. Coming up dry? Contact a reference or local history/genealogy librarian at a local library or someone at a local historical society to ask for a recommendation.
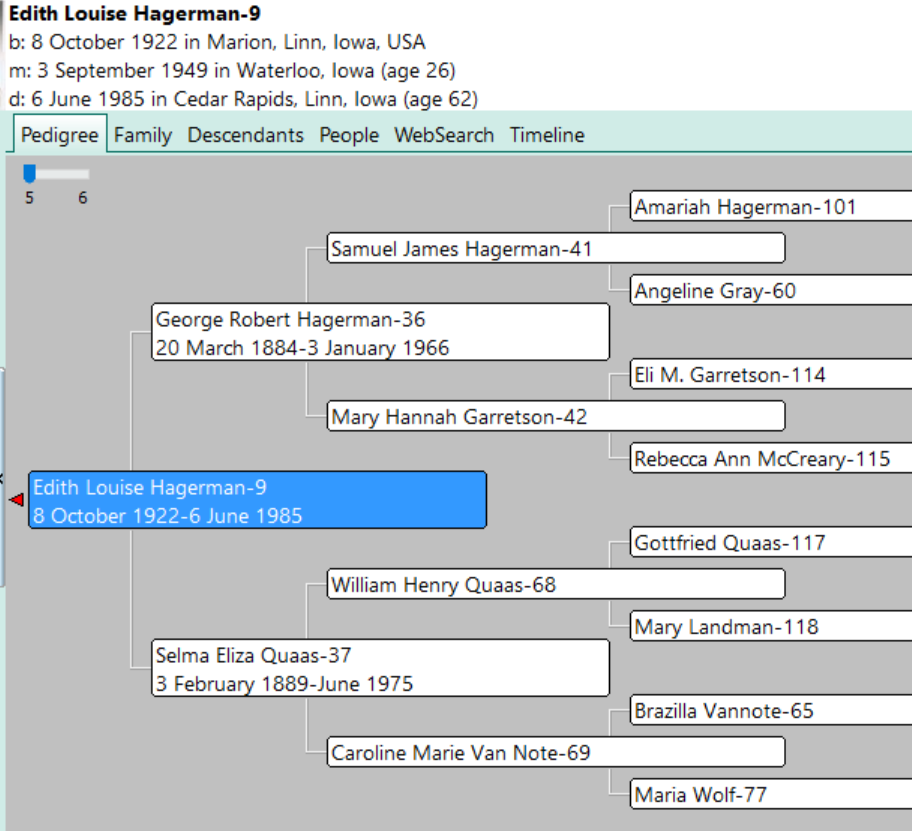
A GEDCOM file is a universal type of file that genealogists use to move data from one genealogy software program to another. Using these helpful tips below, you can open genealogy files your family members send to you, or share your data with others.
When and Why You Would Need to Open a GEDCOM File
A Genealogy Gems reader recently wrote:
I recently signed up for [the Genealogy Gems] newsletter. I received a CD from a relative with family history information that was set up through Family Tree Maker. I am currently not subscribed to any of the genealogy sites. My question is, how can I retrieve this information [from the CD.] Can you help?
The answer to the question is: Use another program to open the GEDCOM file from the CD. Let me show you how easy it is to open and create GEDCOM files.
GEDCOM Basics
GEDCOM is an acronym standing for Genealogical Data Communication. It is a universal genealogy file that allows you to exchange genealogical data between different genealogy software programs.
Because it is “universal” in nature, a GEDCOM file can be read by many different types of genealogy software. That means, if you are using RootsMagic, you can still share all the data you have collected with your cousin who uses Family Tree Maker, and she will not have to type in all the names, dates, and places manually.
Occasionally, not all the information included in a GEDCOM file will transfer perfectly. There are differences in how that information is interpreted and some things, like notes and sources, may be affected. However, for the most part, much of it will transfer correctly.
How to Open a GEDCOM File
Our reader needs to open a GEDCOM file contained on the CD he was sent. To do this, he must have a program on his computer that will read a GEDCOM file. There is an option I would like to share with you.
RootsMagic is a downloadable software for both Mac and PC users. (And, it is the one we here at The Genealogy Gems Podcast use! That’s why we accepted them as a sponsor of the podcast.)
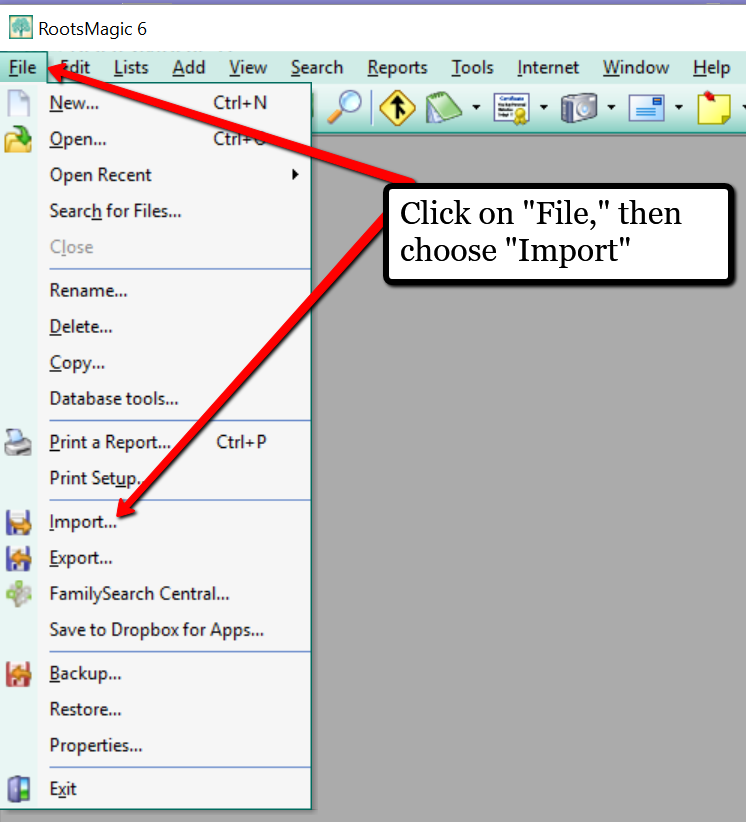
Once you have downloaded RootsMagic to your computer, open it. At the top left corner, click on File and from the pull-down menu, choose Import.
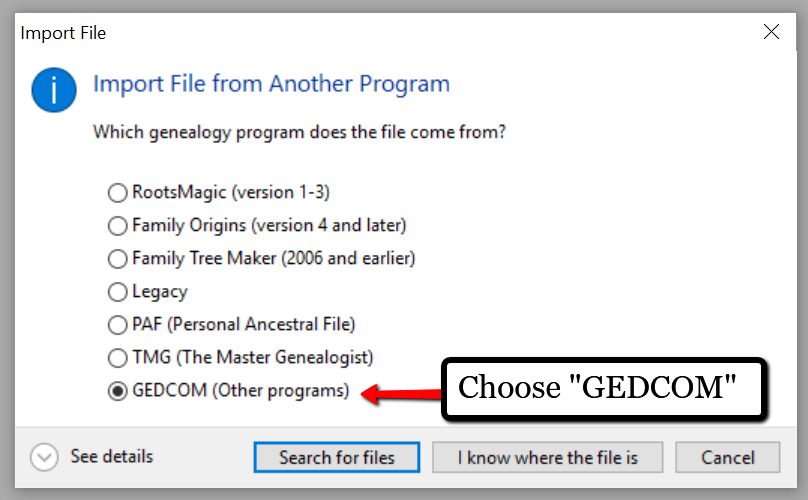
Now, a new pop-up window will open and ask from what source you would like to import from. You will notice several options, but for our reader’s question, he will choose the GEDCOM option.
Then, choose I know where the file is, and the file explorer window will appear. In this case, our reader would click on the CD that he has loaded into his computer’s disk drive, and follow the prompts to open the GEDCOM file. All that information his relative sent him will be slurped into RootsMagic and he can easily look through the pedigree of his family.
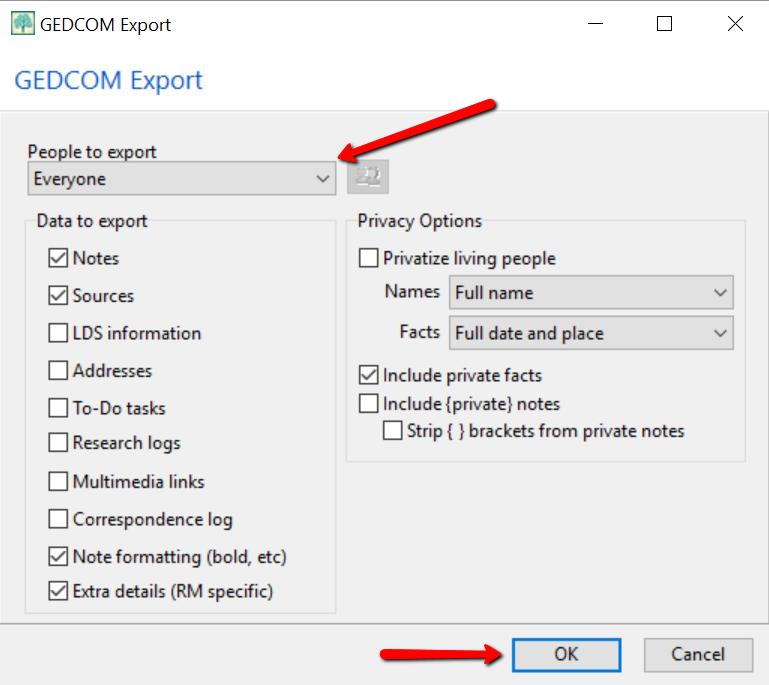
Creating a GEDCOM to Share with Others
RootsMagic also allows you to create a GEDCOM file. This is what you would send to your relatives when they would like to have a copy of the family tree.
To do this, open RootsMagic. Click on File, as we did before, and this time choose Export from the pull-down options.
The export box will pop-up. You can choose what you wish to have included in this export. I typically choose Everyone, but you can do yours by family names by clicking on the down arrow next to Everyone and choosing Select from list.
Once you have clicked OK, the GEDCOM file is ready to be saved to your computer. Save the file on your desktop or somewhere you will be able to locate it again. Remember to name the file and pay attention to where you are saving it!
Creating a GEDCOM from Ancestry.com
If you have stored your genealogy data at Ancestry.com, you may be interested to know that you can create a GEDCOM file for your family tree there as well. It’s just a matter of signing into your Ancestry account, locating the Tree Settings, and then clicking Export. I found a nice article outlining the steps on how to do that here.
Protecting Your GEDCOM Files
Creating a GEDCOM is also a great way to save or backup your hours and hours of family history research. One of the saddest tales of genealogists everywhere is losing their computer or printed family files with all that work!
GEDCOM files can be saved to a hard drive, saved to an external unit, emailed, put on a thumb drive, or uploaded to the Cloud. You can also invest in a company like Backblaze, the official backup of The Genealogy Gems Podcast, that will automatically backup all your files. (Read more about Backblaze, here.) All of these methods protect you and your genealogy.
More on Protecting Your Genealogical Data
Learn more about Backblaze, The Genealogy Gems Podcast’s first choice when it comes to backing up precious genealogy research and personal files. Read the article’s below and determine if Backblaze is the answer you’ve been looking for.
 Everyone’s families have a little bit of mystery in their past–or a lot!
 - Ethel_Merman_NYWTS.jpg. Licensed under Public Domain via Wikimedia Commons - https://commons.wikimedia.org/wiki/File:Ethel_Merman_NYWTS-restored.jpg#/media/File:Ethel_Merman_NYWTS-restored.jpg)