RootsMagic, the makers of award-winning family history software, now offers free guides for users of PAF (Personal Ancestral File, the free family tree software that is becoming obsolete), FamilySearch Family Tree and their own RootsMagic software.
“RootsMagic for PAF Users: A Quick Start Guide” is a 16-page, full-color booklet that guides PAF users through the transition to RootsMagic. It addresses common questions and is available as a free download here.
In addition, RootsMagic hosts several tutorial videos on its own You Tube channel, RootsMagicTV.com. Dozens of short videos are organized by the most popular and recent videos and by topic: installing and using RootsMagic; using RootsMagic with PAF; and using RootsMagic with FamilySearch’s Family Tree.
If you’re a RootsMagic user (or are thinking about becoming one), check these out.
Here’s how to make a family history interview video. We’ll walk you through an easy and quick process that will result in a professional quality video that you’ll be proud to share with your family and generations to come.
My husband Bill does not enjoy being on camera, and if I add an interview to the scenario, I have an even bigger challenge on my hands. Does that sound like anyone in your family?
Getting a family member to sit down and answer questions about their life or an ancestor they remember can be an uphill battle, but the climb is worth it. Each one of us has a very unique view of the world. Even though we may remember the same person, our memories and feelings will be distinctly individual, and therefore are worth capturing.
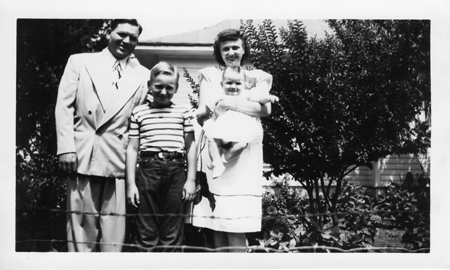
Father’s Day is just around the corner, and we have a new granddaughter joining our family next month. Now seemed like the perfect time to quickly cobble together an interview video with Bill sharing his memories about his dad. I shared some old photos with him and captured his memories. Take a look:
Maybe you’ve been thinking to yourself, ‘Right now just isn’t a good time.’ But guess what! ‘Right now’ is always the ideal time to capture the memories of living relatives. Don’t wait for the opportune moment to present itself, because it might never come. Right now is the perfect time for you to ask questions and record memories that might otherwise have been lost forever.
If you’ve got a few extra minutes to prep for a more polished interview, follow my recipe for creating a video your family will savor for generations to come.
Even though we may remember the same person, our memories and feelings will be distinctly individual, and therefore are worth capturing.
Ingredients for a Family History Interview Video
(Note: I only endorse products that I love and that’s why I’ve accepted Animoto as a sponsor. That means I was compensated for this post. This post also contains affiliate links and I will be compensated if you make a purchase after clicking on my links. Thank you, because they help support the free Genealogy Gems Podcast.)
To create a video like mine, which in total took me about 1 hour from start to finish to create, you’ll need:
a smart phone or tablet (I used my iPhone 7 Plus to capture video of Bill answering my questions. The iPhone has a terrific camera built in, but any mobile device with a camera will do.)
old family photos (I saved mine to a Dropbox folder that I could access on my iPad)
an Animoto slideshow subscription (test drive Animoto with a free trial if you want to get the feel of it before subscribing.)
a short list of questions pertaining to the photos
a willing interviewee (that was my hubby, although I use the term “willing” loosely here)
Pull together everything before you bring in your interviewee. That way, they won’t start off the interview bored or frustrated while you get things ready. We definitely want to get this off on the right foot!
Setting the Stage
Find a comfortable chair for your interviewee and then place it in front of an attractive background in the room. To get a feeling of depth and a nice focus on my subject, I placed my chair in the center of the room so that the background was in the distance. This setup puts the focus on the person you are interviewing and not the items right behind him.
Lighting can make a big difference in the feel of your video, but it doesn’t have to be fancy. Notice that I kept the background fairly unlit, and then turned on a nice soft lamp on one side of Bill. On the other side, out of camera view, I brought in a second light so that both sides of his face would be lit.
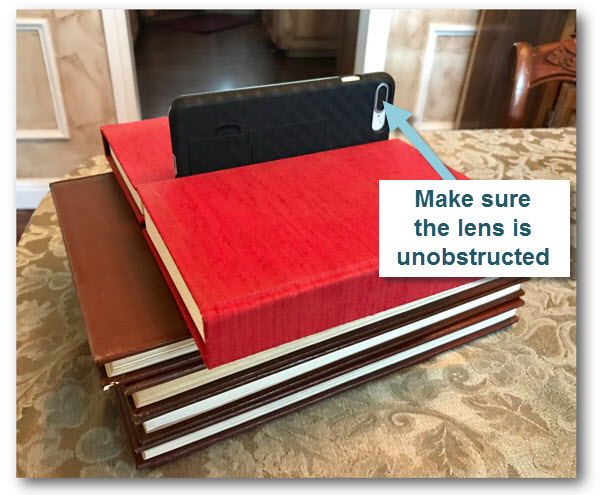
Set up a small, portable tripod on our coffee table in front of my subject and mounted my smartphone (I like this one, which was less than $12). If you don’t have a tripod, just stack up a couple of books on the table to get to the right height, and then use a book on either side of the camera to keep it stable.
The video viewer side facing you as the interviewer
The lens side facing your interviewee
Position a chair for yourself behind the camera, and off to one side. Stay within reaching distance of your camera so that you can turn it on and off between questions. You will want to be off to one side so that your subject is looking at you and not the camera when they answer your questions during filming.
‘Right now’ is always the ideal time
to capture the memories of living relatives.
Start the Interview
Bring your subject in, and get them comfortable in their chair. Have a glass of water nearby for them. Chat with them for a moment about how they are doing, the weather, or whatever else comes to mind (except family history – save that for the video) to sort of warm them up. Explain that they don’t need to worry about the camera, but instead should just focus on talking to you.
To ensure an easy to understand video, encourage them to repeat back the question in their answer because your audio won’t be part of the interview. For example:
You: “What was your mom like when you were a child?” (showing a photo of them and their mom)
Them (OK) : “She took great pride in her home, and she insisted we take our shoes off before entering.”
Them (BETTER) : “When I was young, my mom took great pride in her home, and she insisted that we take our shoes off before entering.”
Folks usually get the hang of it after a couple of tries. Finally, ask them to wait just a beat before they begin talking and to avoid talking over you. Again, the goal is to only capture the audio of the interviewee.
Armed with your list of questions, bring out the first family photo (I did this on an iPad where I had the photos saved in my Dropbox app). On your phone, tap the Camera app to open it, set it to Video, and pressed the big round record button. Move back to your off camera position, and show the first photo and ask your question. Don’t worry about the beginning or the end of the Q&A being messy with getting situated because you will trim that off later in Animoto. After they complete their answer, press the button on the screen to stop recording. It is much easier to work with short video clips rather than one long continuous recording for a number of reasons:
It’s easier to move small video clips from your phone to your computer
Video clips up to 450 MB can be uploaded to Animoto (that’s typically just a little over 4 continuous minutes of video)
One question per clip makes it much easier to move them around in your project to get the exact order you want
It’s easier to interject photos between clips when the questions are individual video clips
Pull up the next photo, press Record, and ask your second question. Repeat for each question and answer. If you go longer than about 20 minutes total, it’s a good idea to stop and ask them how they are doing. Ask if they are agreeable to continuing. Be sensitive to their time and comfort. Remember, people before genealogy.
Post Production of Your Family History Interview Video
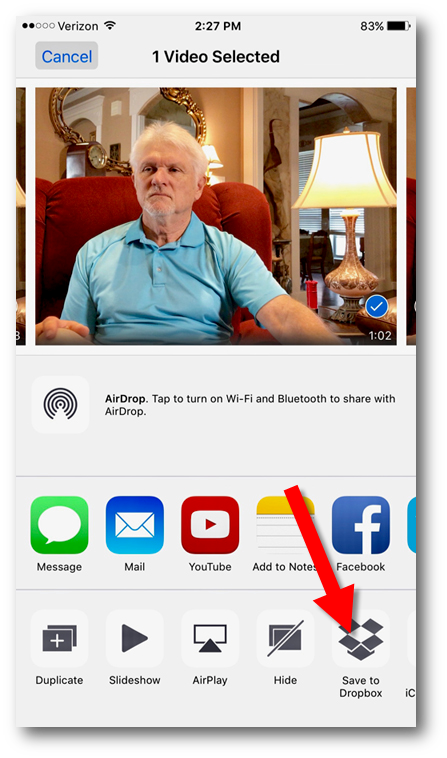
Step 1: In the Camera app, tap Share and Save to Dropbox
As a podcaster, pre- and post-production takes up much more of my time than recording. But with Animoto, your post-production time will be really quick. Here are the steps to creating your finished video:
Step 1: In the Camera app, Share your videos to your computer via a cloud sharing service.
Step 2: On your computer go here to Animoto, sign in and click the Create button to start a new Slideshow video project. (For 10 seconds or shorter video clips you can create your video right on your phone in the Animoto app. But in the case of this type of interview, answers will be longer and you’ll want to use the website.)
Step 3: Select a Style and the Song that will play in the background.
Step 4: On the project page, click Add pics & videos, and upload the video clips and photos. Adjust the length of each video clip as desired, eliminating unwanted portions.
Step 5: Arrange the content in the desired order. I chose to show the answer first, and follow it up with the photo.
Step 6: Add Text if desired. You can add text to photos, or individual ‘title cards’ at the beginning, middle, and end of your video.
Step 7: Click Preview to review your video and make any needed adjustments.
Step 7: Preview one last time and click Produce to render your finished video.
Step 8: Download a copy of the video to your computer, and make sure your computer is backed up! (I use Backblaze.) The ability to download HD quality videos from Animoto for archiving is a HUGE reason why I love it so much.
I’ve got three quick tutorial videos here for you to watch if you feel like you need some help with your first project.
Remember, people before genealogy.
Need more inspiration?
I’ve been having a blast creating Animoto videos about my husband’s family. It’s been a great way to get my non-genealogist husband involved and really interested in family history. Here are two more videos I created about his family:
Using your mobile device for genealogy is a great idea, but with that convenience takes some additional know-how. Back-up your mobile device images in a few simple steps and you’ll never say, “I lost my photos on my phone!”
“I lost my photos on my phone!!”
This is NOT what you want to hear from a dear friend who is also a genealogist. So my heart sank when Genealogy Gems Contributor Amie Tennant’s email dropped into my inbox.
Amie wrote:
“I spent 6 hours researching at a cemetery and archives in a far away location. You won’t believe this, but when I got home I realized my smartphone wasn’t working. I had taken all the tombstone images with it, all the document copies were made with it, all my notes were on it. And I hadn’t even had time to back it up.”
That’s the problem, unless you back up as you go, you can’t be sure that just an hour later it won’t all be gone. These days you’re more likely to snap photos of records with your phone than a camera. But with that convenience comes the need for a new game plan to keep those precious images safe.
Back-up Your Mobile Device Images: The Plan
I put together an immediate email to Amie with a restoration and preservation game plan. If, like Amie, you are using your smartphone and mobile devices more and more, you’ll want to put this plan into place too.
First, I advised Amie to visit her phone store (for example, The Apple Store if you have an iPhone) and see if they could retrieve the lost photos and data. You never know unless you ask!
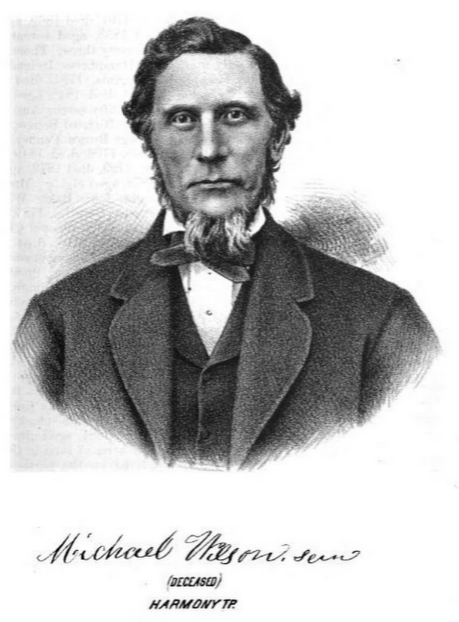
Image of Amie’s 4th great-grandfather she was able to retrieve.
Next, it’s important to consider automatic back-up options. Automatic back-ups are great, which is why I love BackBlaze. But BackBlaze is back up for your computer. The BackBlaze app on your phone only gives you access to those computer files, and doesn’t back up your phone.
One option is to back-up manually as you go. In other words, as soon as you snap that image of a record, save it to a Cloud storage service such as Google Drive or Dropbox. You could even activate Cloud back-up so that it happens automatically, though with the size of image files, you would likely need a paid subscription service to allow for adequate storage space. However, if you are going to continue to use your phone as a genealogy tool, it may be well worth the investment. Let’s look more closely at these two options:
Free Manual Option: If cost is an issue, you can save your photos to a free Dropbox account at the time you take the photo, and then move to more permanent storage on your computer at a later time.
1. Take the photograph
2. Tap the photo in my iPhone’s Photos app
3. Tap Edit and do a quick edit to clean it up (improve contrast, rotate so that it is right side up, crop to get as close-up as possible)
4. Tap Done to close the editor
5. Tap the Share icon and tap Save to Dropbox
6. Select the folder in Dropbox where I want to save the image and tap Save
However, it would definitely be faster and simpler to have your phone automatically backing up to the Cloud.
Low Cost Automatic Option: If your phone is going to be one of your genealogy tools, then automatic cloud back-up may be worth the low cost of around a dollar a month.
Personally, I am not a fan of iCloud even though I have an iPhone. I just don’t find it very user friendly to work with. Setting up your photos and videos to automatically back up to your Google Photos library via Google Drive is another option. Again, since photos and videos do take up a lot of space you’ll likely need to invest in a low cost monthly storage plan. Click here to learn more, or Google search Google Drive Plan Cost (or substitue the name of the service you are considering)for current plans.
Bottom line: There are several Cloud services available for our smartphones and mobile devices, so there’s sure to be one that’s right for you. Where ever your images find their final resting place, make sure it has Cloud back-up.
Amie’s Response to the Plan
I quickly sent the plan to Amie. She responded by saying:
“Thank you, Lisa! It was devastating. You were right, a nice man at the phone store was able to restore them! But, I don’t ever want to have this happen again. When I set up my new phone, a Samsung Android, I noticed a setting that said something like “automatic save to Google drive” and it would sync your images. So I clicked it “on” but now I can’t find where I did that! Any ideas?”
Troubleshooting Backing-up Your Mobile Device
When people shoot me a question, my usual response is “Just Google it!” I Googled Automatic backup of android phone and got several great hits on the results list.
One article on Android Fact.com was particularly helpful. (Read the full article here.) Remember, it can get pretty expensive to be instantly uploading images with your cell phone carrier. I suggest clicking Wi-Fi Only to ensure that uploading only takes place when you are connected to Wi-Fi.
I regularly emphasize backing up important documents that live on your computer. But let’s face it: If you have a smartphone, it would be oh, so sad to have to say “I lost my photos on my phone!” So don’t wait—back up your smartphone or mobile device today.
Smartphones and other mobile devices offer a plethora of editing tools. It is well worth the investment of a few extra seconds to clean up and maximize images as you go. This is particularly true of records that need to be clear for future reference or printing.
Try applying a filter to your images for maximum readability. I like the Noir filter in my iPhone’s Photos app editor.
One of the most important things we do as genealogists is share! We share research findings, family stories, trees, heirloom photos and more. These days, sharing online is often the way to go. It’s fast, it’s relatively organized, it gets things into the hands of those who want them and (often) it’s free!
To wrap this series of blog posts on collaborating, I offer 4 ways to share genealogy online (in addition to Dropbox and Evernote, which we discussed in previous posts).
1. Attach scanned documents, photos and stories to your online tree.Whether you keep a tree at MyHeritage, Ancestry, FamilySearch or another site, beef it up with everything you have. That only enriches the body of knowledge out there and gives others a leg up on the next bit of research. You can also include links to applicable notes in Evernote.
2. Post gravestone photos and other burial information at online cemetery sites.BillionGraves and Find A Grave are the two big ones, of course. These sites provide searchability and a platform for collaboration between descendants.
3. Post meaty queries that show what you know and what your questions are.RootsWeb and USGenWeb are two enormous sites, organized by location and topic, where you can post questions about people, places and more. Check out this page on how to write a good query and this Cyndi’s List portal to various message boards. TIP: Remember to include all important related keywords, name and location spellings, and dates in your messages so they are easily found by your long lost cousins using Google!
4. Publish your research. Genealogy newsletters, magazines and journals of all levels (from the local to the national and beyond) want your well-researched, well-written research. What’s a chunk of research you could share? Look for publications that are indexed in PERSI, the Periodical Source Index, because other genealogists are most likely to find your work when it’s indexed there. Of course, family history websites, blogs and books are all great ways to publish your research, too. Just get it out there!
As the online genealogy community continues to grow, our opportunities to grow bigger, better family trees also grow. So my question to you is: What do you have to share? And have you begun?
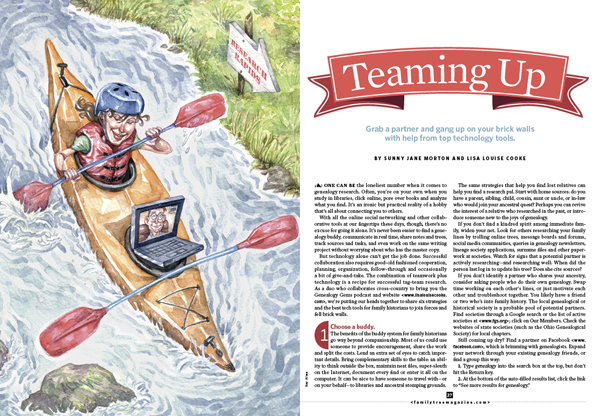
Check out the magazine article that inspired this series of posts on collaborating. It’s “Teaming Up,” and it appears in the December 2013 issue of Family Tree Magazine. Sharing genealogy files is just one topic we cover. The article itself was a cross-country collaboration between myself and Genealogy Gems Contributing Editor Sunny Morton. To write it, we relied on a lot of the same tips and tools we recommend!
Finally, check out my previous blog posts in this mini-series on collaboration:
In this installment of the Collaborative Genealogy blog post mini-series I’m going to share one of my favorite ways to organize and share family history data and source material: Evernote.
Evernote is a free software, website and app that can hold both research content and the source citation information that goes with it. You can pull data from websites and Evernote will often automatically capture information about the site you got it from. You can upload images, scanned documents and other multimedia content. And of course you can use it to keep track of non-electronic sources, too.
Research teams using Dropbox put themselves on the same page–literally. It’s easier to be sure you’re looking at the same sources. It’s easy to add notes like data you’ve abstracted from the source (or that seems to be missing from the source). It’s easy to tag data: every source that cites an ancestor can be tagged with her name. That way, when you are ready to analyze or write up someone’s life story, every piece is there. No more hunting for sources you knew you had somewhere!
My recent post provides two tips for using Evernote and introduces my Evernote for Windows for Genealogists Quick Reference Guide “cheat sheet” (click here for U.S. and here for international shipping). It’s been so popular since its release that we sold out for a while, but it’s back in stock. This 4-page laminated guide offers at-a-glance training and reminders so you can be up to speed quickly using Evernote for genealogy.
Want to learn more about using Evernote? Click here for tips and complete resources on getting started in Evernote, like a complete video mini-series that walks you through the process of signing up for your free Evernote account, downloading the desktop app, getting and using the web clipper….There’s so much you can do with Evernote and I show you how!
For more on collaborative research (including more on Evernote for genealogists), check out the December 2013 issue of Family Tree Magazine. It’s got an article I’ve co-written with Genealogy Gems Contributing Editor Sunny Morton.
Check out my other blog posts in this series on collaboration:
 “RootsMagic for PAF Users: A Quick Start Guide” is a 16-page, full-color booklet that guides PAF users through the transition to RootsMagic. It addresses common questions and is available as a free download here.
 (Note: I only endorse products that I love and that’s why I’ve accepted Animoto as a sponsor. That means I was compensated for this post. This post also contains affiliate links and I will be compensated if you make a purchase after clicking on my links. Thank you, because they help support the free Genealogy Gems Podcast.)
 Find a comfortable chair for your interviewee and then place it in front of an attractive background in the room. To get a feeling of depth and a nice focus on my subject, I placed my chair in the center of the room so that the background was in the distance. This setup puts the focus on the person you are interviewing and not the items right behind him.


 source material: Evernote.