by Lisa Cooke | Apr 9, 2016 | 01 What's New, Source Citation, Trees

How to name sources in RootsMagic 7 is a matter of personal preference. My preference? Simply and consistently!
Helen recently transitioned from Mac Family Tree 7 to RootsMagic 7. She sent me this question about how to name sources in RootsMagic:
“I stripped out all sources from my old file before exporting the GEDCOM because I wanted to start fresh with a consistent system in RootsMagic 7. I have watched their webinars for sourcing and understand the basic how-to. I’d love to hear your strategy for naming your sources… say census records. If the names are too general, then you have a lot of data entry for each incident. But if the name is too specific, your source list gets very long very quickly. Do you add ID numbers to your sources?
Thanks to Helen for the question! Naming your sources in RootsMagic is really a personal preference, so the first rule of thumb is not so much about what you call them, but rather that you do so consistently. If you have a naming convention that you follow that works, having a very long list won’t be as intimidating.
I used to number my sources long ago in my old database software. Actually that software did it automatically which I really liked, mainly because I put that number in the name of the digital file for the corresponding record image. RootsMagic 7 allows us to attach our images, so that is no longer an issue.
Here’s an example of my simple approach to naming sources:
Record type > Year > Surname > First name (head of household)
Example: Census 1940 Moore Jay Bee
This way, all census records are grouped together in the source list. The date gives me a time frame of reference (i.e. it is Jay Bee Moore my grandfather rather than his grandfather), Surname, then head of households first name.
If the source is about Jay Bee himself, it works. The source may also mention his wife Pauline, and his son Ronald, but I don’t need to take up space including all of those name in the file name. I know that if I need a source for where Pauline was in 1940, I would find her under her husband Jay Bee. This mirrors my hard drive organization methodology, which I teach in my Genealogy Gems Premium videos.
What if there’s another related family on the same page of that census? This is where personal preference comes in. I save that same census page to the other family’s surname folder on my computer as well. Yes, it is a duplication (and I rarely duplicate effort), but in this case it works for me and I’m consistent. I find it fits better with my hard drive organization, and saves me time down the road when I’m working with a particular family. I could have named the source “Census 1940 Kings Co CA ED16-20 p6,” which is indeed one single unique page of that census but that just isn’t as helpful to me later for retrieval.
Remember, these are your sources, and you can do with them as you please. You are the only one who will be working with them. Again, I’m sharing a process that works well for me. And I always keep my eyes open for new and better ways to do things like this, but even when I find them, I weigh them against the question, “Do I really want to invest the time in changing this that I would have invested in research?” Usually the answer is “No!” unless my way has a proven flaw that will cause me more grief in the end.
There are lots of other ways to do it out there. You know me, I often turn to Google for answers. If you have a question, chances are someone out there has had it too. Google can help you quickly tap into answers. A Google search of how to name sources in Rootsmagic leads to a web page called Organizing Source Names in RM5. It’s a discussion forum where someone posted a similar question. There are a couple of very viable options offered and great discussion about how to decide what works for you. This is one reason I like and recommend RootsMagic, which is a sponsor of the free Genealogy Gems podcast–because they provide so many helpful tutorials with their software. Another great resource is a blog series by Randy Seaver (click the label “RootsMagic”) on how to enter a new source and create a citation.
More Gems on Family History Software
Keeping Up with Online and Master Family Trees
“Is That Software Expired?” Why I Wouldn’t Use Obsolete Family Tree Maker Software
How to Download and Backup Your Ancestry Data: Why To Keep Your Master Tree at Home
by Lisa Cooke | Apr 15, 2019 | 01 What's New, FamilySearch, Records & databases |
Browse-only databases at FamilySearch are easy to use and may hold the key to the genealogy brick wall you have been working on.
Don’t be scared off because the records haven’t been indexed. Guest blogger Amie Tennant Bowser show you how to take advantage of these great records!

New Genealogy Records Come Online Every Week
Each week, we report on the latest genealogy records to have come online.
Sometimes in our weekly record update articles we include databases from the free FamilySearch website that are not yet indexed. These collections are referred to as browse-only. Have you ever been disappointed when you realized the database you are most interested in is only able to be browsed?

The highlighted genealogy records in these collections are browse-only
You may be thinking, “Good grief! I can’t possibly browse thousands of records!” and we don’t expect you to. In this article we are going to share strategies that you can use to zero in on the genealogy records you want to browse.
Browse Only Records Versus Indexed Records
Most folks search for genealogy records at FamilySearch by typing in some key information at the home page. It might be just the first and last name, and the place where that ancestor lived. Here’s an example:
When you use this method, you are only searching for records that have been indexed.
Indexed records are great because they have already been reviewed by one of the thousands of FamilySearch volunteers. They use online software on the FamilySearch website to download images of historical documents. Then, they read the information on the image and transcribe the information.
A second, more experienced volunteer then reviews the transcribed information to ensure accuracy before it is submitted to the website where they can be searched. It’s a huge effort to help genealogists more easily search the online records.
So, it’s important to understand that not all digitized record images that are on the FamilySearch website have been indexed. This means there may be countless records that will not be retrieved by a name search.
Unindexed records can only be browsed until they are indexed. So as you can see, there is a very good chance that there are records on the site that apply to your family, but you won’t find them through the search engine.
Instead, you need to go in the virtual “back door” to locate these records. Follow along with me and I’ll show you how.
How to Find Browse-Only Records at FamilySearch
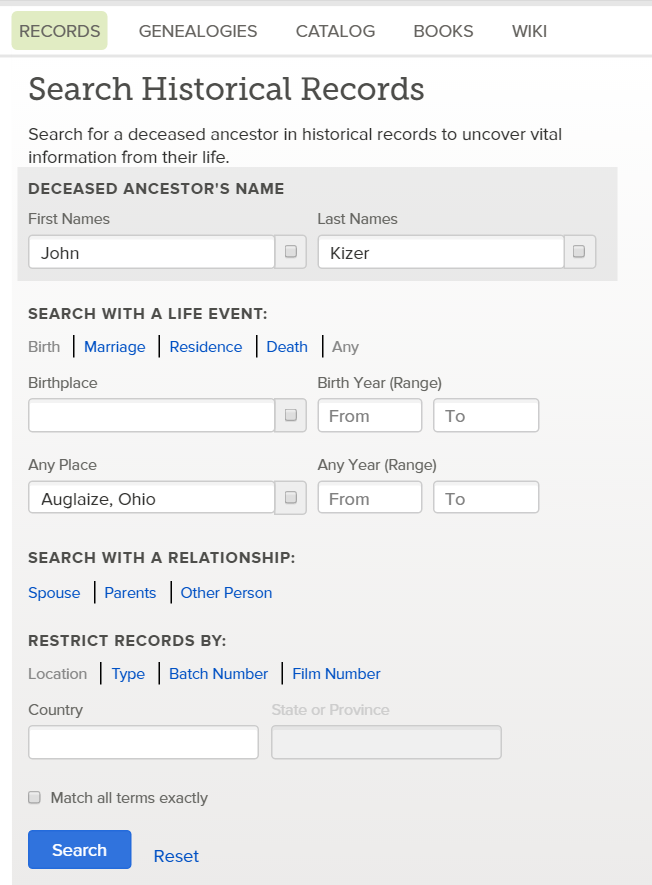
Let’s imagine you want to search probate records in Auglaize County, Ohio.
You would click the little map in the vicinity of the United States and choose “Ohio” from the pop-up box.
At the Ohio research page, you could do a general search of the Ohio collections. Again, this is only searching records that have been indexed.
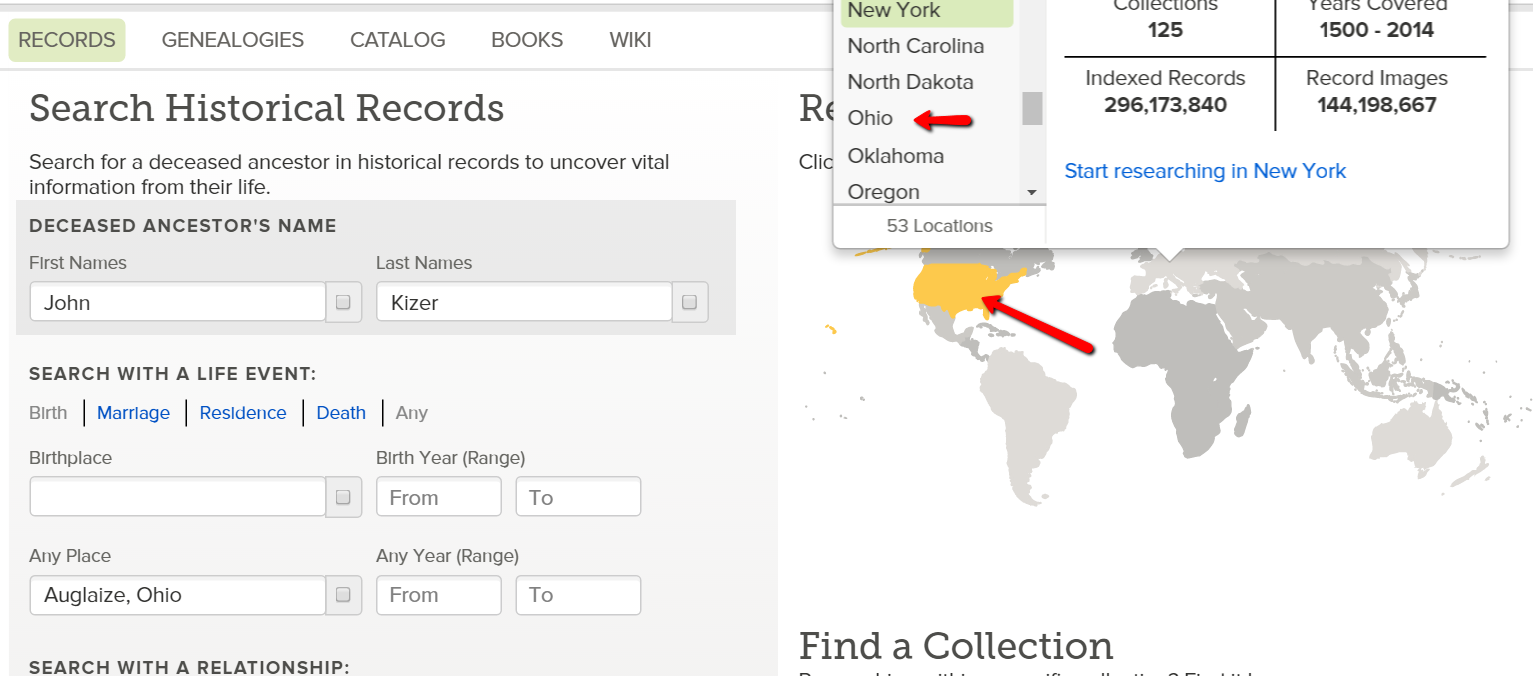
Instead of using this method, scroll down until you see “Ohio Image Only Historical Records.” Look at all these databases you might have missed!
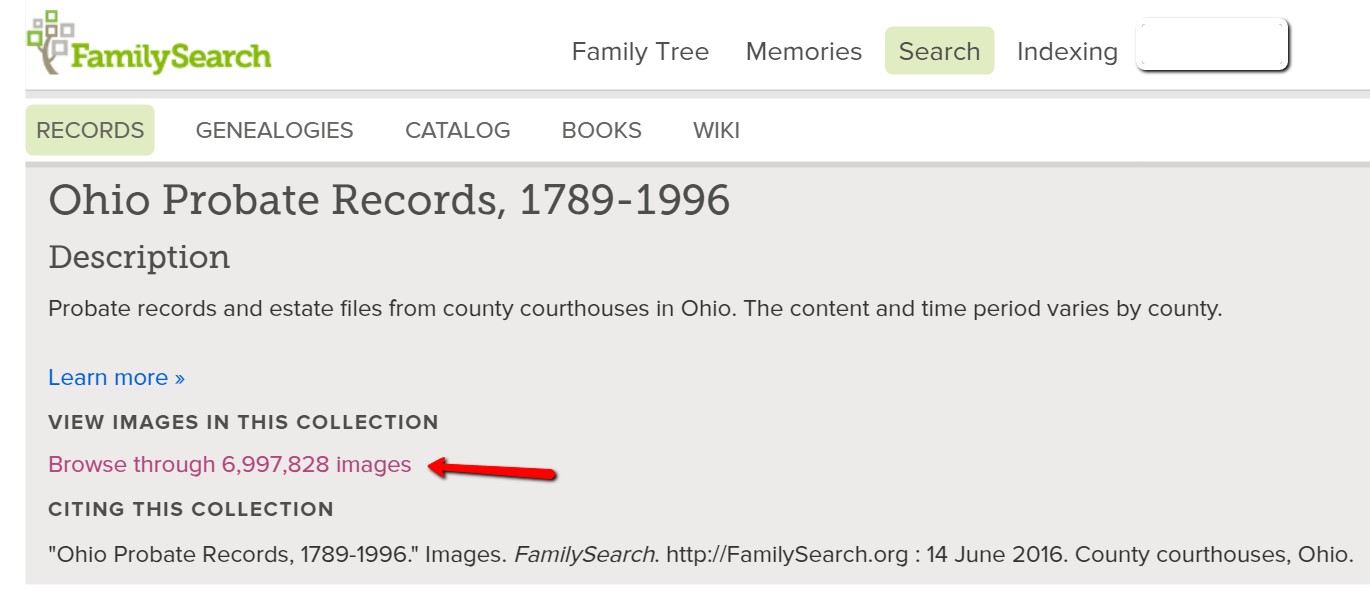
For our example, continue to scroll down until you see the database titled “Ohio Probate Records, 1789-1996” near the bottom. Click on it.
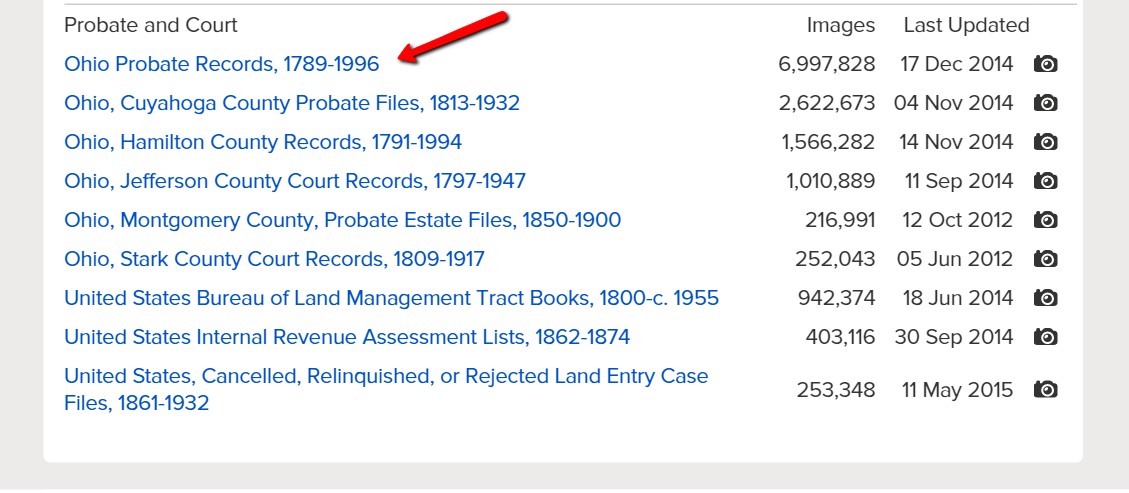
You will notice right away that there is no way to “search” this database.
Many people give up at this point, after all, who has time to search nearly 7,000,000 records. Click on it anyway!
The next screen has been broken down by county name. Choose the desired county name. In this case, I’m selecting “Auglaize.”
You are then directed to a page listing the volumes of records for Auglaize county that have been digitized.
In this example, we are seeing bonds, settlements, wills, estates, and so much more:
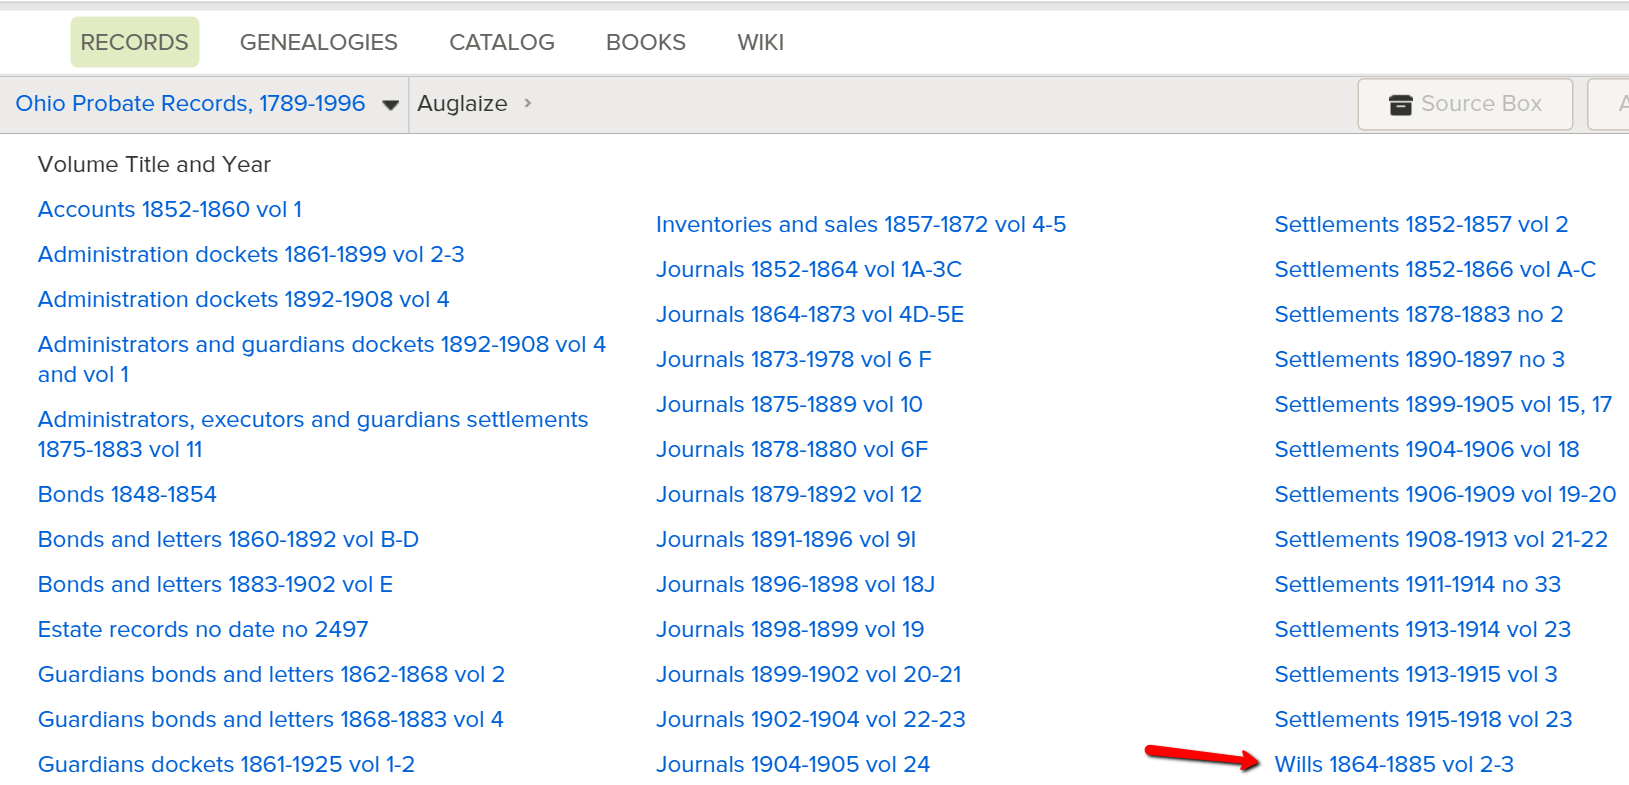
It is as if you are standing in the courthouse probate office surrounded by volumes and volumes of the records you need.
Select the volume you want to search by clicking the title.
“Open” the pages of the book and search like you would as if you were flipping the pages of a book or scrolling through a roll of microfilm.
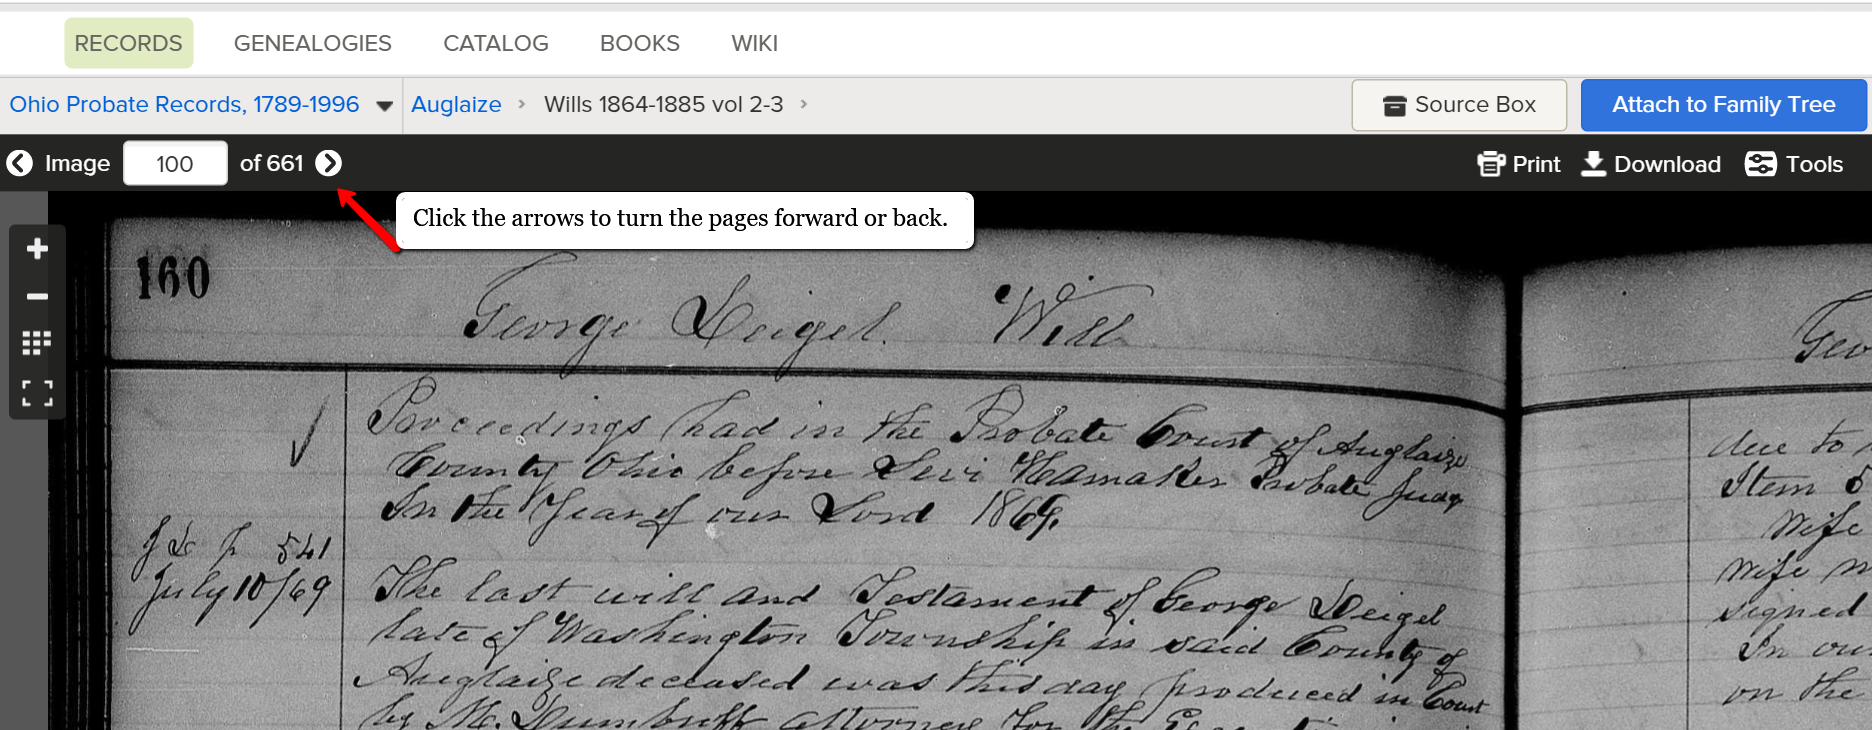
Click the arrow at the top of the screen to scroll through the pages.
Friends, we want you to get excited about all the new records that are coming online, even if they are browse only databases. If you like this tutorial, share this tip with your genie friends so they can do it too.
More Genealogy Gems on Records and Databases at FamilySearch
For more tips and tricks to help you in your genealogy journey, sign-up for our newsletter by entering your email address on this page.
If you’re looking for more genealogy records to mine, here are some of our articles. These will help you not only find new records, but also use other valuable genealogy indexes:
by Lisa Cooke | Feb 15, 2017 | 01 What's New, African-American |
Not all people of color were enslaved prior to the emancipation. In fact, many were freed long before that. Researching free people of color can be quite complex. Tracing my own family line (who were free people of color) continues to be a real learning process for me. However, don’t let the challenges deter you from exploring this rich part of your heritage. In this “Getting Started” post, we discuss the manumission process, “negro registers,” and more for tracing your free people of color.
Who are Free People of Color?
[Note: Throughout our post, we will be using terminology that was used at the time the records were created.] A ‘free negro’ or ‘free black’ was a fairly recent status in the U.S. which differentiated between an African-American person who was free and those who were enslaved prior to emancipation. If a person was referred to as a ‘free negro’ or ‘free black’, that meant the person was not living in slavery. It is a fascinating and little know fact that, as Ancestry Wiki states, “one in ten African-Americans was already free when the first shots were fired on Fort Sumter.”
Step 1 for Tracing Free People of Color: Censuses
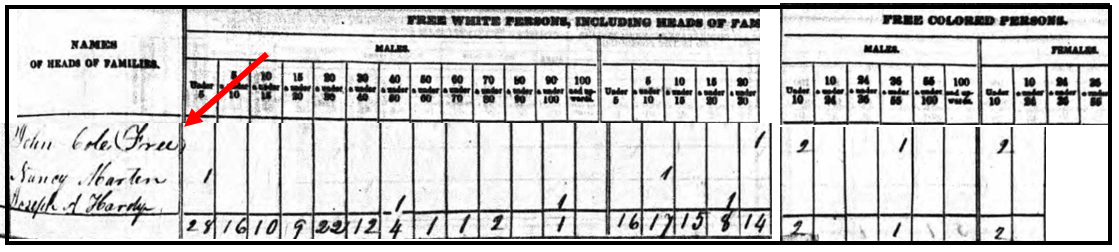
Sometimes, the story of your ancestors being free people of color was passed on through oral traditions. In my own family, our “line of color” was not talked about. Instead, my first clue was when I found my ancestor in the 1840 population census listed as free. I also found that one woman (presumably his wife) was marked in the column for “free white persons,” but John and the children were marked as “free colored persons” in this census. This was the first step to identifying my ancestor as a free person of color.
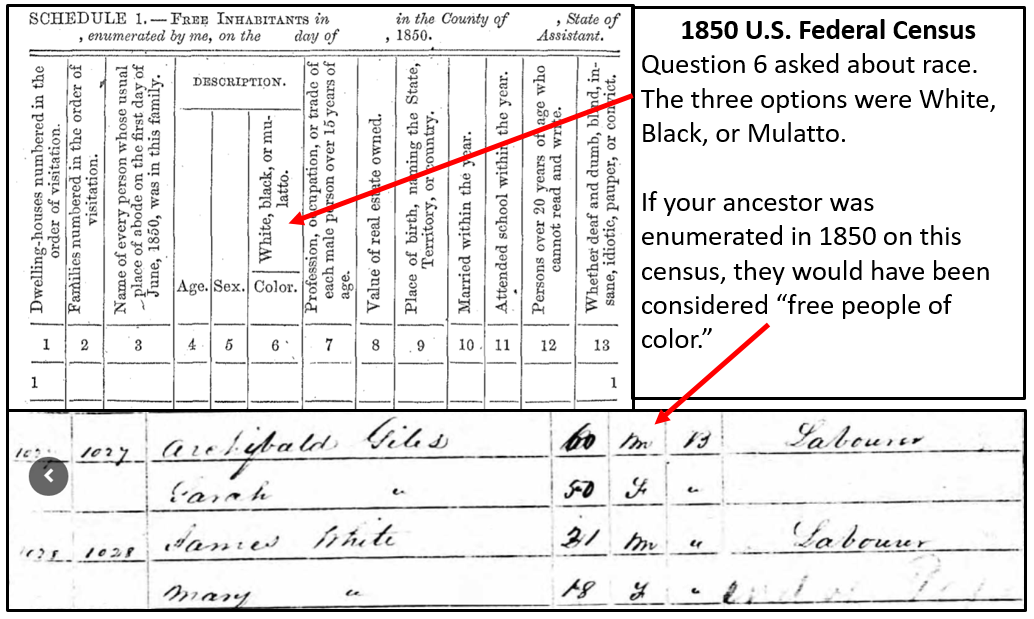
Let’s see another example. The 1850 and 1860 U.S. Federal Censuses included two population schedules. One enumerated free inhabitants, and the additional schedule, referred to as a Slave Schedule, was for making an enumeration of those persons who were enslaved. [We will discuss this further, below.]
If your ancestor appears on the 1850 U.S. Federal Census for free inhabitants, they are considered free, even if their race was listed as “Black.” An example of a Black man enumerated on the 1850 census is shown in the image below. Archibald Giles is recorded as “Black,” but appears on this census for “free inhabitants.” Therefore, he would be considered a free person of color.
If your targeted ancestor does not appear on either the 1850 or 1860 population schedule for free inhabitants, they might have been enumerated on the slave schedules of 1850 or 1860.
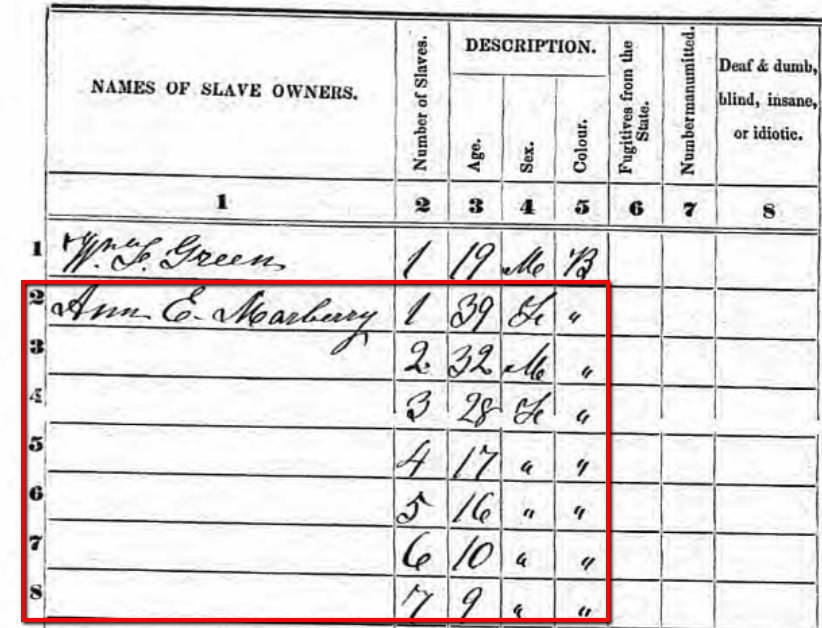
1850 Slave Schedule for Henry County, Tennessee. Snapshot via Ancestry.com.
You can check the 1850 Slave Schedule and the 1860 Slave Schedules at Ancestry.com. The 1850 census is also available at Findmypast, MyHeritage, and FamilySearch.
In this example to the left, you will see a portion of the Henry County, Tennessee Slave Schedule for 1850. Notice, only the heads of household or the “owners” were listed by name. Slaves were not named, but rather listed by age and sex under the names of their “owners.”
Step 2: The Manumission Process
Once you have identified that you have free people of color in your family tree, the next step is to determine how they became free. Many free people of color came from families that had been free for generations. This could have been due to a manumission of an ancestor or a relationship between an indentured white woman and a black slave. I make mention of this relationship between races because it is helpful to remember that the status (whether free or enslaved) of the child was based on the status of their mother. If the mother was free, then the child was free. If she was a slave, then the child was enslaved. [1]
Manumission was a formal way in which slaves were set free. There are many reasons why a slave owner may have released or freed his slaves. In some cases, slave owners would free their mistresses and children born to her. In one case, I found the following comment made by the slave owner, “I give my slaves their freedom, to which my conscience tells me they are justly entitled. It has a long time been a matter of the deepest regret to me…” And thirdly, it was possible for a slave to obtain their manumission through the act of “self-purchase.”
If the mother was free, then the child was free. If she was a slave, then the child was enslaved. [1]
Private manumission through probate. A private manumission decree could be made in a last will and testament. You can find these manumissions in wills, estate papers, or in probate packets. Many of these county level probate records have been microfilmed or digitized and are easily accessible online.
Sometimes, a manumission in a will would be contested. When this happened, a long paper trail of court documents may have been created. A thorough search of all of these proceedings may offer a wealth of genealogical data and clues.
Usually, manumission papers included the name of the slave owner, the name of the slave, and the reason for manumission. In the case of the slaves of John Randolph of Roanoke [Virginia,] his slaves were not named individually in his will written on 4 May 1819. Instead he stated, “I give my slaves their freedom, to which my conscience tells me they are justly entitled. It has a long time been a matter of the deepest regret to me, that the circumstances under which I inherited them, and the obstacles thrown in the way by the laws of the land, have prevented my manumitting them in my lifetime, which is my full intention to do, in case I can accomplish it.”[2]
John freed over five hundred slaves, and though each of them was not listed by name in his will, a codicil at the end of the will did name two of his slaves when he asked that Essex and his wife Hetty “be made quite comfortable.”[3]
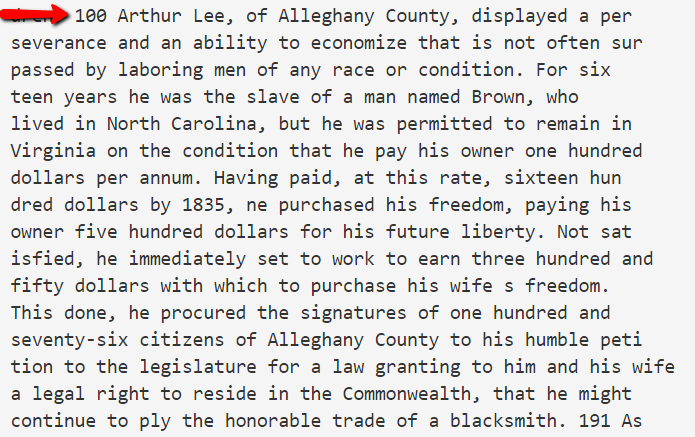
Record of Arthur Lee purchasing his freedom.
Manumission through self purchase. Self-purchase may seem impossible; however, many slaves were not required to work on Sundays for their masters.[4] On this day, men and women could hire themselves out to do work for others. With frugality, they could save their earnings to buy their freedom or the freedom of their loved ones, though this was very, very difficult.
As you can see in this example of Arthur Lee, he was able to pay for his freedom and the freedom of his wife, though it took many years. This type of record could be found in a published book, a record listed in notarial books of the county, civil minutes books, or other courthouse holdings. It is important to speak with a knowledgeable person in your targeted area about where you should look. A knowledgeable person may be those working with the local historical or genealogical society, or a head of the local history department of the public library.
Step 3: “Negro Registers”
If you do not find the manumission in a last will and testament, perhaps due to a courthouse fire or other loss, you may have luck searching the county records where your free people of color later settled. Free people of color were often required to register, using their freedom papers, when they relocated to a new area. These types of records are called ‘negro registers’ or ‘records of free negros.’
Newly freed people carried with them their freedom papers which were given to them when they were manumitted. Once they relocated, they would register with the county clerk. They would need to show the county clerk these freedom papers and a record was made in the register. The record may include the name of members of the family, ages, and most recent place of residence.
The book titled Registers of Blacks in the Miami Valley: A Name Abstract, 1804-1857 by Stephen Haller and Robert Smith, Jr. provides the following information about registers of freed people:
“From 1804 to 1857, black people in Ohio had to register their freedom papers with the clerk of courts of common pleas in the county where they desired residency or employment. State law required this registration, and clerks of court were to keep register books containing a transcript of each freedom certificate or other written proof of freedom (see Laws of Ohio 1804, page 63-66; 1833, page 22; 1857, page 186). Few of these registers have survived to the 20th century.”[2]
Though this author says that only a few of the registers have survived, I found some microfilmed registers listing the names of free people of color who had settled in Miami County, Ohio at the local historical society archives. Again, it is important to ask those people who would be most knowledgeable, and in this case, it was the historical society.
In conclusion, we understand that tracing both our enslaved and manumitted ancestors is often a difficult task. We also know there is much more to learn and share for the best techniques to researching these lines. We encourage you to review some of the additional sources below. Please let us know what other resources have been most helpful to you in researching your free people of color in the comments section below. We want to hear from you!
Source Citations
[1] Kenyatta D. Berry, “Researching Free People of Color,” article online, PBS, Genealogy Roadshow, accessed 1 Dec 2016.
[2] Lemuel Sawyer, A Biography of John Randolph with a Selection From His Speeches, New York: 1844, page 108, online book, Google Books, accessed 20 Dec 2015.
[3] Ibid.
[4] History Detectives Season 8, Episode 10, PBS, online video, originally aired 29 Aug 2010, accessed 1 Dec 2016.
Additional Reading
by Lisa Cooke | Jan 23, 2017 | 01 What's New, Adoption |
Adoption and genealogy often cross paths. More and more genealogists are having to navigating between both birth family and an adopted family pedigrees. Our easy, step-by-step instructions will show you how to merge these two pedigree charts into one with FamilySearch Family Tree and Ancestry.com.
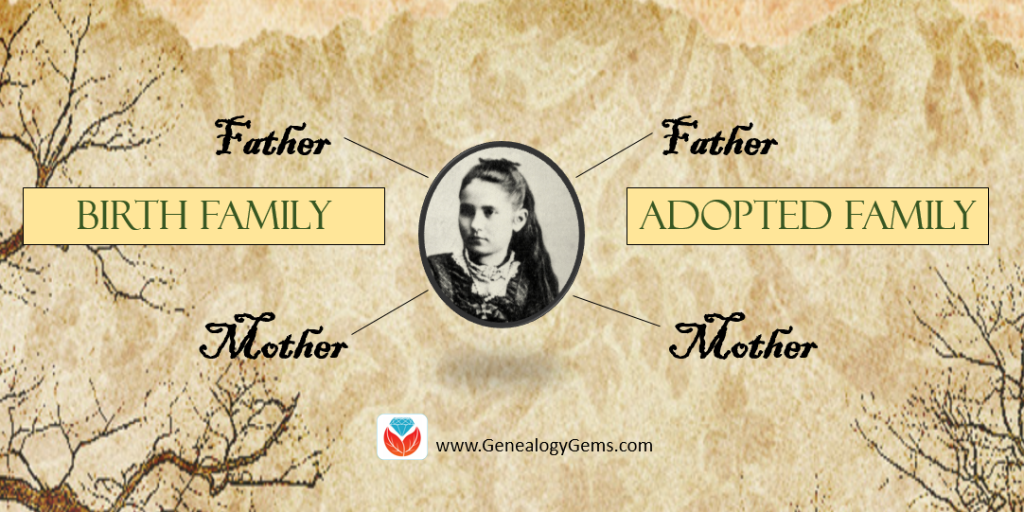
Creating a Birth and Adoption Line with FamilySearch Family Tree
Anyone can create a family tree at FamilySearch.org for free. You need to create your free account first. If you need more instruction on how to get started with a family tree on FamilySearch, click here.
For those of you who already have a FamilySearch family tree you work with, here is how to include both a birth line and adopted line.
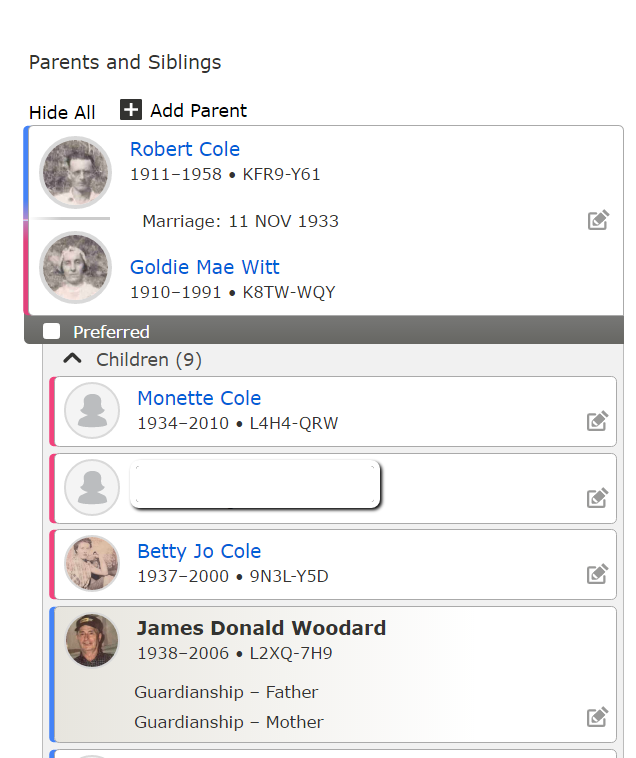
In this example below, James Donald Woodard was raised by Robert Cole and Goldie Witt, but is the natural son of Elmer Woodard and Margaret Cole.
Step 1: From the pedigree view, click on the person you would like to have two pedigrees for. Then, choose “Person” to get to the individual’s person page.
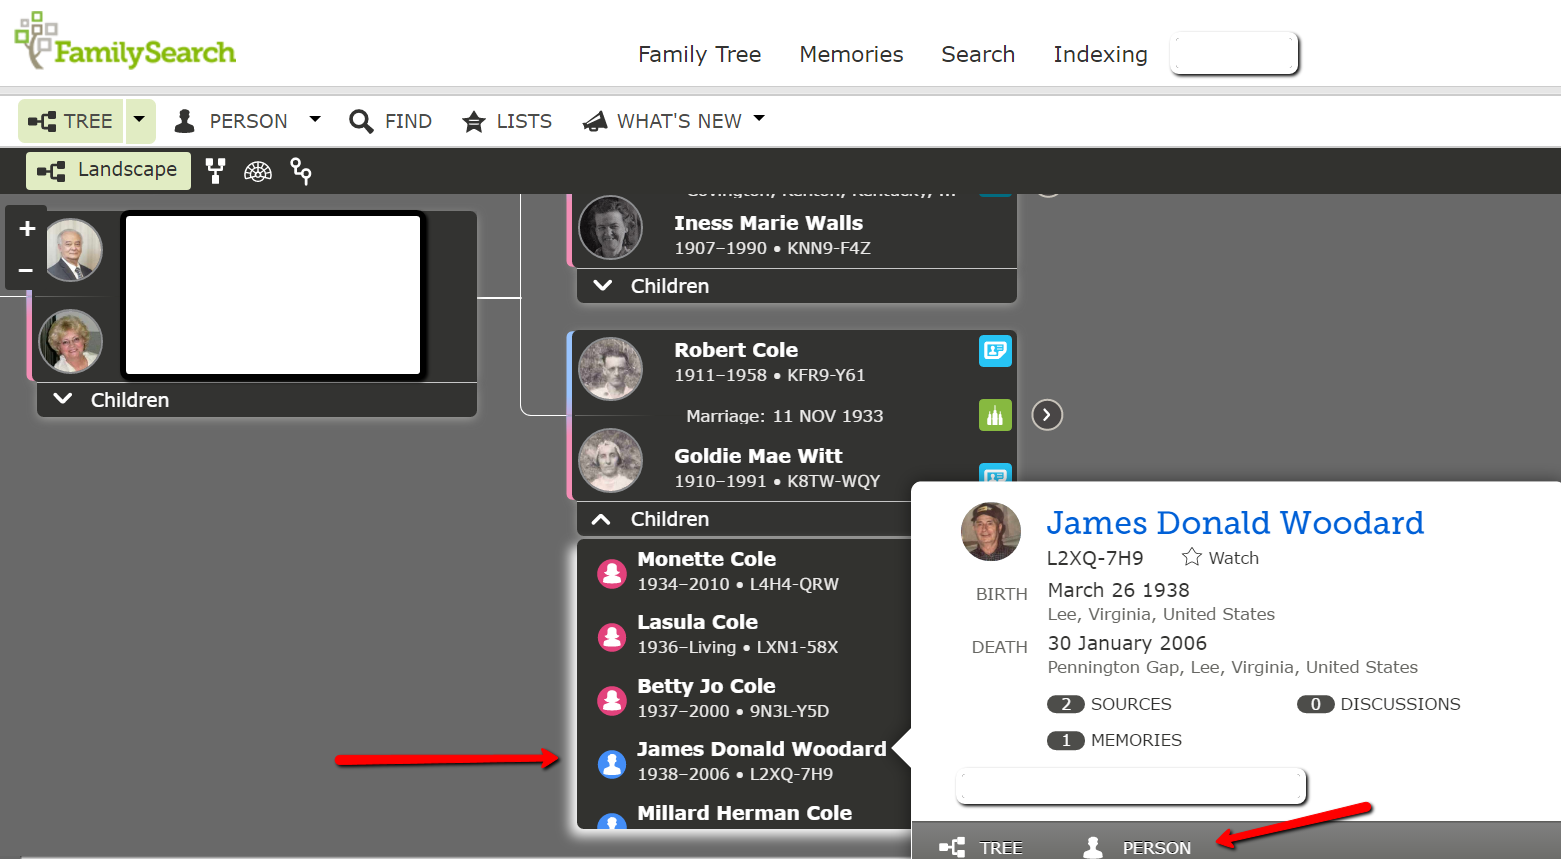
Step 2: At James’ person page, scroll down to the “parents and siblings” section. Here, multiple sets of parents can be added by clicking on “Add Parent.” We can also indicate what type of relationship the parent has to the child (choices include: biological, adopted, guardianship, foster, and step) by clicking the little pencil icon at the right of James’ name under the parent couple. Lastly, whichever couple is marked “preferred” will be the parents that will show up in your pedigree view.
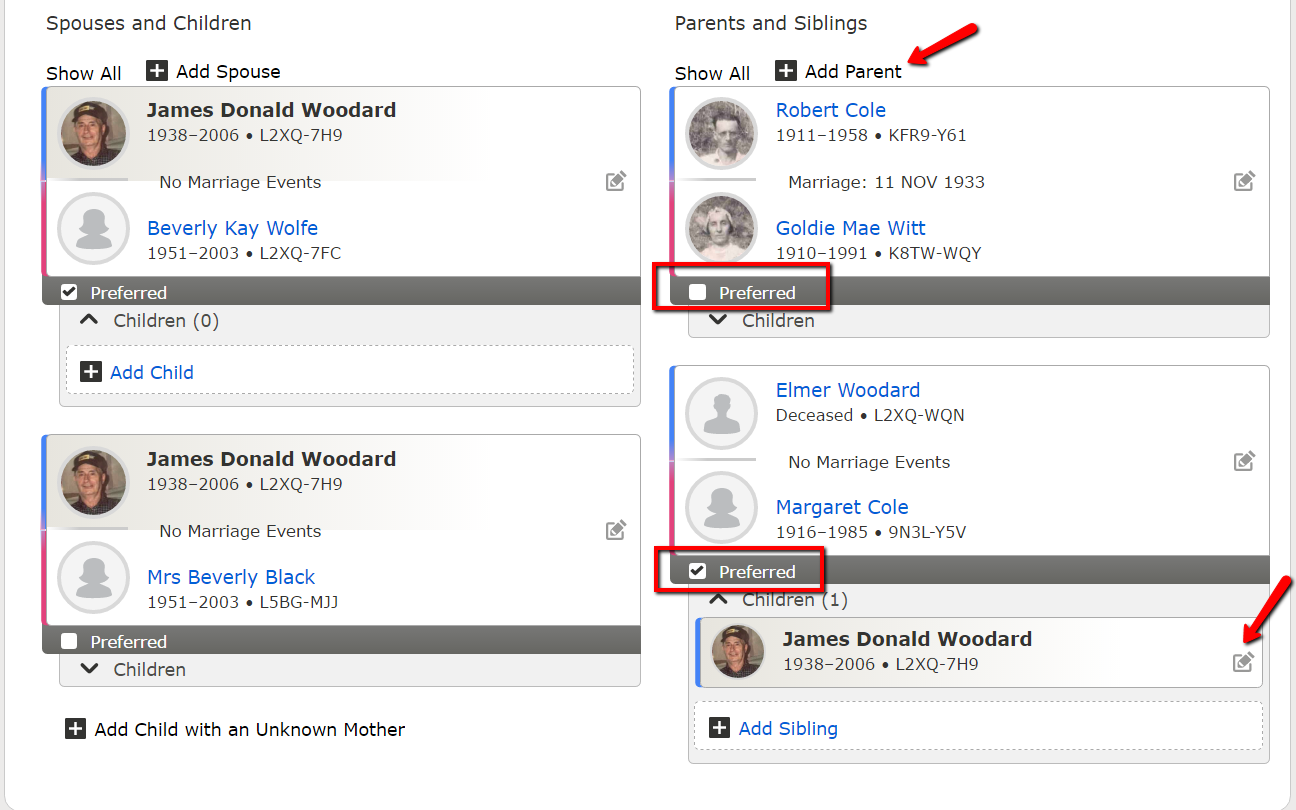
Step 3: Add a second set of parents for James by clicking on the “Add Parent” icon and follow the prompts to add the new parents by name.
Step 4: You will have James appearing as a child under each couple. Now, indicate the type of relationship James has with each couple.
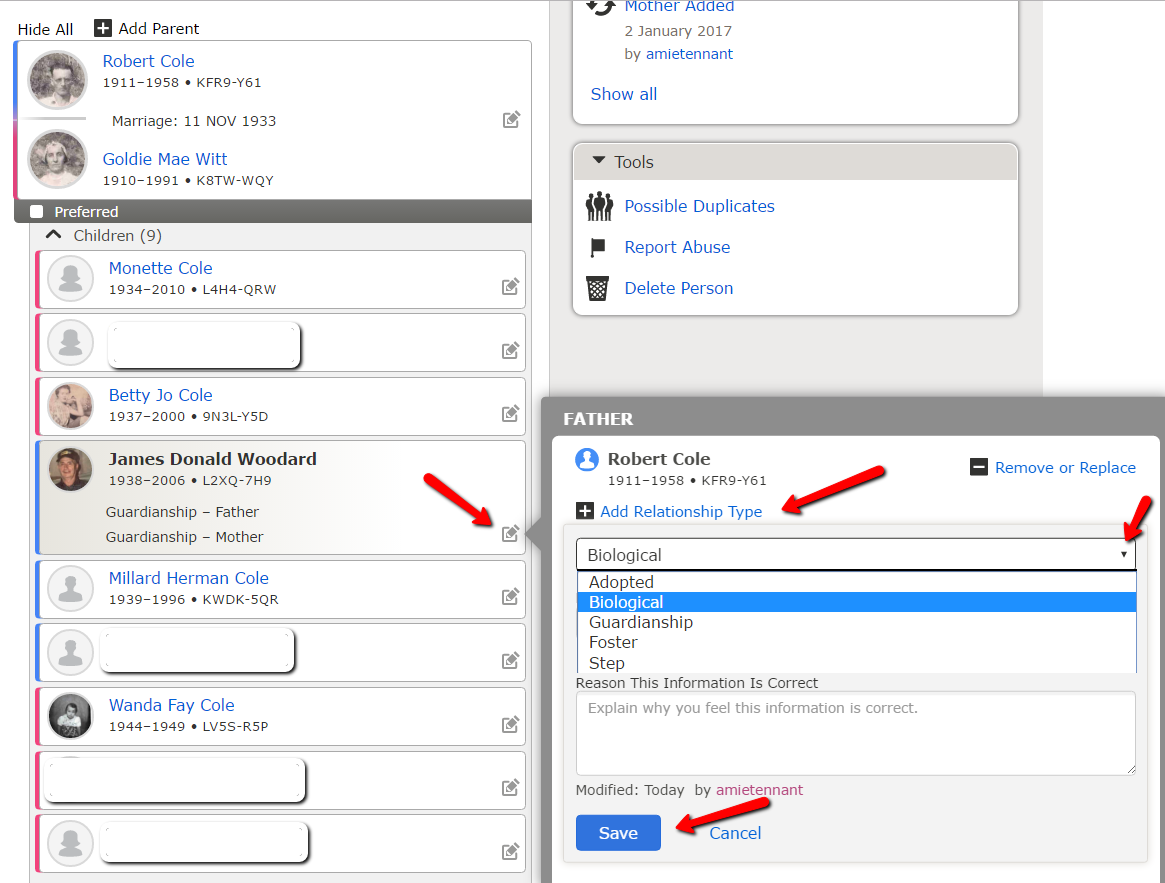
Find James in the list of children under Robert and Goldie.
Click on the little pencil icon in his box. A new window will pop-up. You will click on “Add Relationship Type” and then choose the appropriate relationship from the pull-down menu. When you are finished, click “Save.” You will need to do this for both the father and the mother.
You can see that James’ name appears under Robert and Goldie with the relationship noted. (When the relationship is biological, no notation appears.)
James now has two pedigree options. We can easily switch between the pedigrees for James by clicking the preferred button on whichever couple we would like to view. You can change the preferred couple whenever and how-many-ever times you want!
Creating A Birth and Adoption Line at Ancestry.com
Step 1: First, add one set of parents for the individual. You can do this in the pedigree view. Click on “Add Father” or “Add Mother” and fill in the fields for name, date of birth, etc.
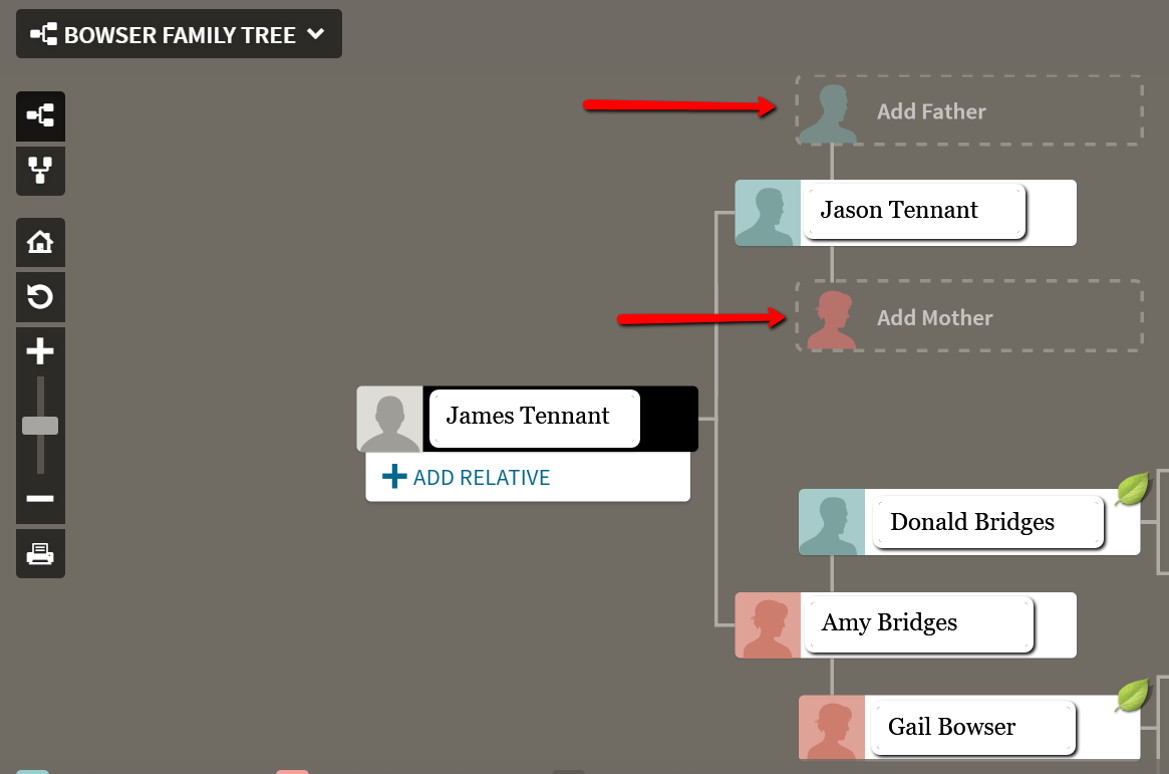
Step 2: Add a second set of parents for Jason by clicking on Jason’s name and choosing “Profile.” This takes you to a new screen that looks like this image below.
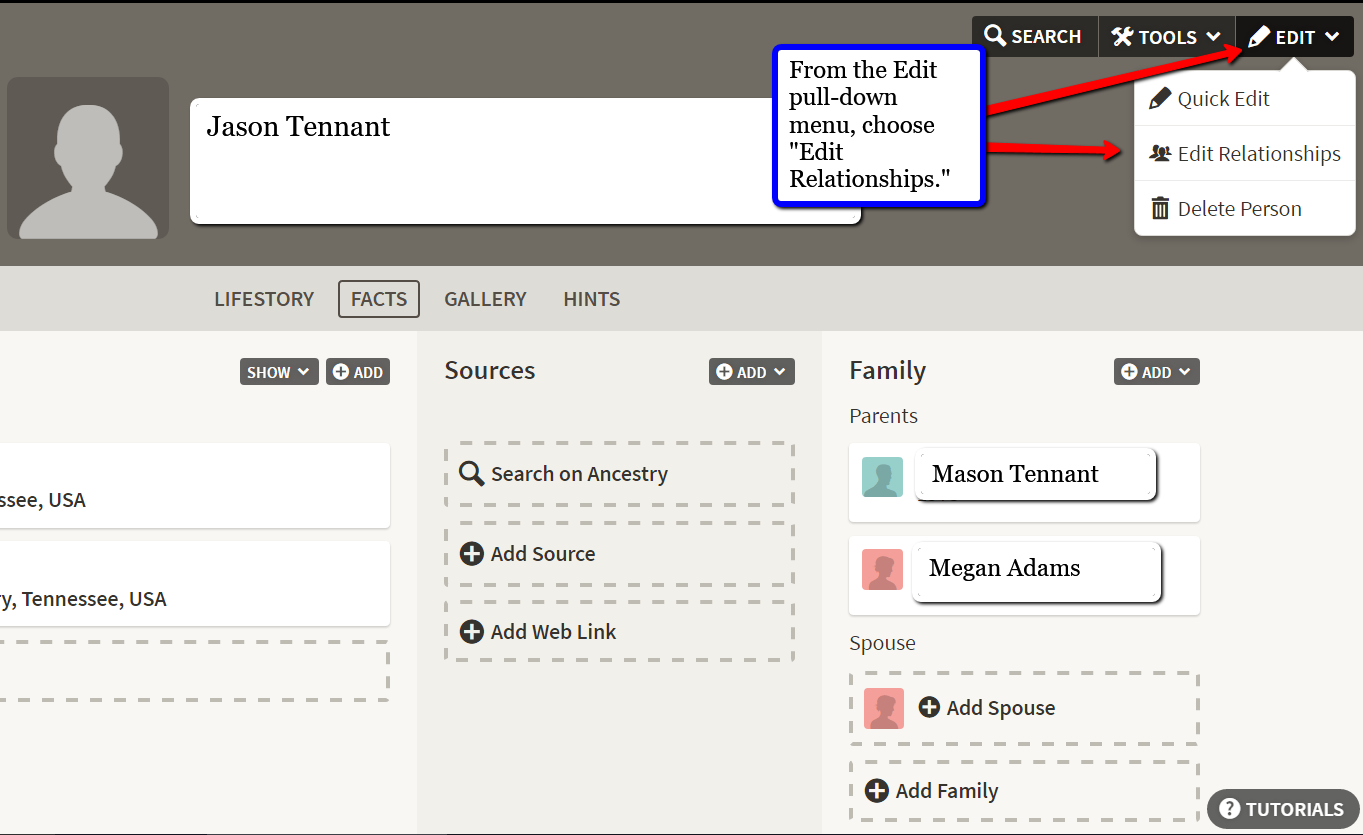
Step 3: This is Jason’s profile page. You can see his newly added parents, Mason Tennant and Megan Adams. Click the edit button at the top right of the screen and chose “Edit Relationships.”
Step 4: A pop-up window for relationships will appear. Here, you can mark the type of relationship between Jason and Mason. The choices are biological, adopted, step, related, guardian, private, and unknown. After you have chosen the appropriate relationship for the first father, click “Add Alternate Father.”

Step 5: Add the name of the second father and choose the appropriate relationship. You will then be able to choose which father you want to mark “preferred.” Do the same for the mothers.
If we want to see Jason’s birth or adopted family tree, we need only go to his profile page, click “Edit Relationships” at the top right, and mark one set of parents as “preferred.” Then, that couple will show up in the pedigree view.
Adoption genealogy certainly has it’s challenges, but creating a pedigree chart that includes both the birth and adoption lines, doesn’t have to be one of them! Let us know in the comments below how you have included both your birth and adoption lines into your family history. We love to hear from you.
More Adoption Gems
DNA for Adoption Research: Nice to Meet You!
Genealogy Gems Podcast episode 178: CeCe Moore Talks about Genealogy and Adoption (Listen for free)
DNA Testing for Adoptees: Advice from Your DNA Guide