Social history plays a significant role in successful genealogical research. The events of a particular time-frame shed new light on the lives of our ancestors and ultimately lead us to new finds. In this post, Gems Reader Trisha asks questions regarding her family’s ties to the Colored Farmers’ Alliance.
“The Colored Farmers’ Alliance.” NBC News. NBCUniversal Media. 29 July 2007. NBC Learn. Web. 22 January 2015.
Did a Member of the Family Belong to the Colored Farmers’ Alliance?
Our Genealogy Gems Editor, Sunny Morton, received the following email recently from Trisha:
I am researching my great-grandparents in Northeast Arkansas. The census records I have found so far list that my great-grandfather was a famer. So, I started looking up farming associations hoping that maybe he was a member and I could find out more information about him and possibly any relatives that lived nearby. I came across the Colored Farmers’ Alliance that was in existence from 1886- 1891 in the southern states, but I have only been able to find out basic general public information about this agency. Do you know if, or how, I can find an Arkansas member list or something similar? Any help or advice you can give me would be greatly appreciated.
The History of the Colored Farmers’ Alliance
The Colored Farmers’ Alliance was formed in 1886 in the state of Texas. A group of southern African-American farmers had been barred membership to the other Farmers’ Alliances and hoped by creating this group, they would be able to cooperatively solve the common problems of its members. The group also encouraged African-American farmers to become economically independent by purchasing homes and eliminating debt. [“Colored Farmers’ Alliance,” The Gilder Lehrman Institute of American History (https://www.gilderlehrman.org/history-by-era/populism-and-agrarian-discontent/timeline-terms/colore : accessed 28 Oct 2016).]
The organization took off and spread across the Southern United States. It’s peak membership was up to 1.2 million in 1891. However, the organization did not survive long. In 1891, the Colored Farmers’ Alliance called a general strike of African-American cotton-pickers and demanded a wage increase from 50 cents to $1 per hundred pounds of cotton. The strike failed and the group dissolved. [“Colored Farmers’ National Alliance and Cooperative Union,” Wikipedia (https://en.wikipedia.org/wiki/Colored_Farmers%27_National_Alliance_and_Cooperative_Union : accessed 28 Oct 2016).]
Pulling Together Some Answers
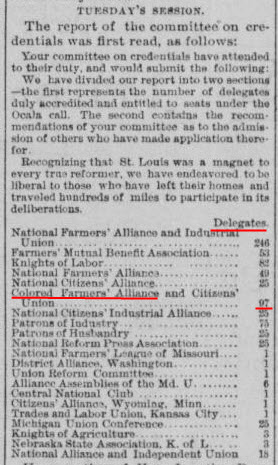
We pulled the whole team together for this one, and Sunny reached out to me regarding Trisha’s questions. In our initial research, we didn’t come across any references online to membership lists for any branch of the Colored Farmers’ Alliance, including Arkansas where Trisha’s ancestors lived. We did however find an article titled Preliminary research for writing a history of the Colored Farmers Alliance in the Populist movement: 1886-1896by Omar Ali, written May 11, 1998, which states:
“Little detail is known about individual members of the Colored Farmers Alliance, including its leadership.”
That may not be surprising considering that the organization was attempting to improve member’s situations and fight for better pay. It’s possible that members may not have wished to be named due to concerns about repercussions. It would be important to learn more about the organization and the political and historical environment in which it operated in order to determine the probability of membership rolls existing or surviving.
While not everything is online (by any stretch of the imagination,) the web is the best place to do further homework to track down offline resources. Trisha could start by contacting the Arkansas State Library, and then exploring these search results from WorldCat.org which include a variety of works on the subject. It would also be very worthwhile to spend some time digging into the wide range of online resources such as Google buy syphilis medication Books and the Library of Congress’ Chronicling America digital newspaper collection. Let’s do that now!
Google Books
A search of colored farmers alliance delivers several results on the topic. Use search operators to help Google deliver even better results, by putting quotation marks around the search phrase “colored farmers alliance.” This instructs Google to return only web pages that contain that exact phrase. You’ll find more Google search strategies in my book The Genealogist’s Google Toolbox, which also includes an entire chapter on using Google Books for genealogy.
Here’s an example of one book I found called The Agrarian Crusade: A Chronicle of the Farmer in Politics by Solon J. Buck (1920).
While I didn’t discover any references to actual member names beyond some of the leaders, Google Books certainly offers more depth and history on the Alliance.
Digitized Newspapers
Indian chieftain., March 03, 1892, Image 1 at the Library of Congress’ Chronicling America. (The Indian Chieftan was published in Vinita, Indian Territory [Okla.]) 1882-1902
While only a small fraction of newspapers published throughout history are digitized and online, what can be found offers a wealth of information. The Library of Congress’ Chronicling America offers an excellent cache of searchable newspapers for free. Subscription websites such as Ancestry’s Newspapers.com and Newsbank’s GenealogyBank offer real value if the newspaper you seek is held within their collections.
Since Chronicling America is free, that’s a good place to start. At the main search page, click the Advanced Search tab. On that page, you will have the option to search by state, publication, and dates. Under “Enter Search” fields, there are three options. Type the phrase colored farmers alliance into the “with the phrase” field. That will narrow the search results down to newpaper pages that include the entire phrase and will eliminate pages that have some or all of the words independent of each other. A search of all states for that phrase delivers over 325 digitized newspaper pages featuring articles that include that phrase.
At Newspapers.com, I found dozens of references as well, many from Arkansas newspapers. I also noticed that several individuals wrote and signed letters to the editor on the subject.
For more help on researching newspapers for genealogy, listen to my two part podcast series titled “Find Your Family History in Newspapers, Part 1 and Part 2.”
members named
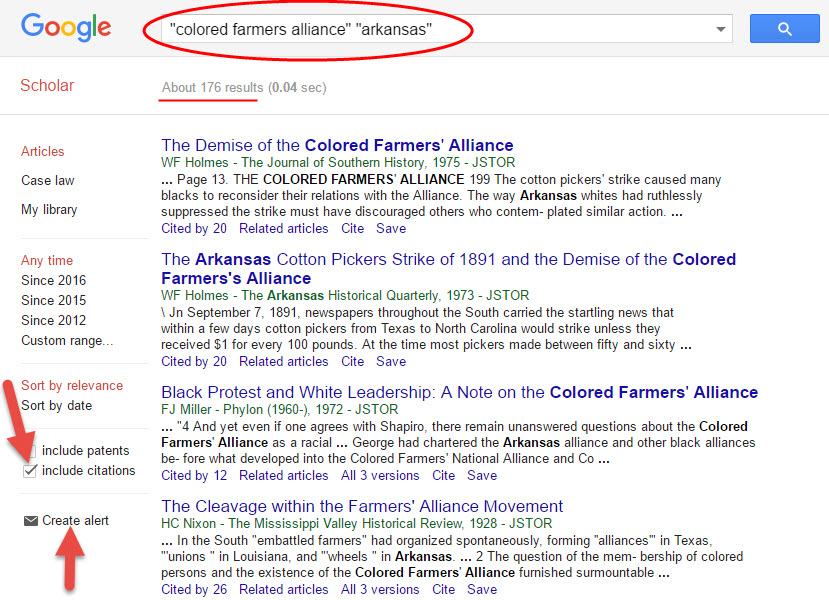
Google Scholar
Google Scholar offers not only well-researched works on a given subject, but also the ability to request only results with source citations. These citations not only help you weigh the accuracy and value of the paper, but provide intriguing new leads for research materials.
Using the same search operators as I did in Google Books, I retrieved over 175 results. To filter these results to only those with source citations, click the “include citations” box on the search page at the bottom, left side.
The savvy genealogist will also want to experiment with variations on the query by adding words and phrases such as members included, members list, list of members, and so on.
YouTube
Since I devoted another chapter of my book to using another free Google tool, YouTube, I would be remiss if I didn’t run a quick search at the video giant website. Here is a link to the video I found online.
It’s amazing what the family historian can discover from the comfort of their own computer. With so many valuable resources discovered through an online search, a well-prepared trip to the library or archive will prove even more fruitful.
Are you ready to start a genealogy blog (or improve one you already write)? Here’s a quick Q&A for you, prompted by questions by Genealogy Gems Premium member Kevin:
Q: “I am ready to start writing a blog but my typing is slow. Is there a dictation app (iOS) or software (Windows) that I could use to dictate my first drafts of my blog posts?
A: If you go to www.genealogygems.comand scroll down and enter “Dragon software” into the Amazon box and click “Go” it will pull up a great dictation program that might be just what you are looking for. (Using our Amazon box supports the free podcast – thank you!)
Q: Which blog site do you use and why did you select it?
A: I use Word Press for my website and blog. They have a free version at wordpress.com. Google also has Blogger which is free. I have a free series of videos on the Genealogy Gems YouTube channel about how to set it up. They are a few years old, but will give you the basic idea.
Q: Do you compose your blog posts directly on your site or do you type them in Word or some other word processing program then cut and paste them into your blog?
A: It’s best to compose them directly into a new post on Word Press or Blogger. Cutting and pasting out of Word will likely carry over unwanted formatting which can cause headaches.
Listen to the Family History: Genealogy Made Easy podcast by Lisa Louise Cooke. It’s a great series for learning the research ropes and well as refreshing your skills.
Ready to get inspired and tutored on genealogy blogging? Check out my FREE podcast series on how to start a genealogy blog. Click here to reach my Family History Made Easy podcast landing page, then start with episode 38 and continue through episode 42. You’ll learn step-by-step how-tos and you’ll be introduced to some inspiring blogs that WORK. We often hear about success stories from listeners who started a blog after hearing these episodes. (We’d love to hear YOUR success story, too!)
Every genealogist should know how to search the FamilySearch Catalog, a portal to nearly 750 million FREE historical record images you won’t find anywhere else on the site! These digitized records are being updated DAILY by camera teams who are digitizing...
Click the video player below to watch 10 Top Tips for Beginning German Genealogy now.
Episode 52 Show Notes
Researching ancestors in another country can be a little daunting. Challenges include foreign languages, moving boundaries, and spelling variations. This is certainly true for German genealogy.
If you’re new to German genealogy or your research has stalled, this episode of Elevenses with Lisa is for you. In fact, even if you don’t have German ancestors I think you will still find the principles and ideas covered very helpful.
Translator, author and German handwriting expert Katherine Schober shares her 10 Top Tips for Beginning Germany Genealogy.These tips are packed with tools and resources that you can start using right away.
Katherine Schober is a German / English translator, specializing in the old German handwriting. She is the author of “The Magic of German Church Records” and “Tips and Tricks of Deciphering German Handwriting”, as well as the creator of the online course “Reading the Old German Handwriting.” And this year she will be one of the featured speakers at this year’s virtual International German Genealogy Conference.
Click the video below to watch the show. Then scroll down below to get all of the show notes. Premium Members will find the downloadable ad-free show notes cheat sheet PDF in the Resources section at the bottom of the page.
Mentioned in this video:
International German Genealogy Conference July 17-24, 2021. Use special code EARLY until April 30 to get $50 off the package of your choice. Registration here
Reading the Old German Handwriting Course online with Katherine Schober Register for the course here
Use Coupon Code GEMS for 10% off the course.
1. Start with What You Know about Your German Ancestor
Resist the temptation to start searching online immediately. Take the time to talk to your relatives, starting with the oldest. Review family documents, photo albums and other materials around your home. You may be surprised how much you already have, and the light that other relatives can shed on the family tree. Every step of the way its critically important to document everything!
2. Look for Resources in America Before Jumping Over to Germany
Photos
Family Bibles (Watch Elevenses with Lisaepisode 29)
Census Records
Local church records
Passenger Lists (Watch Elevenses with Lisaepisode 34)
Records in Germany are kept at the local level. Make sure you have the right town in the right state.
Meyers Gazetteer About the Meyers Gazetteer from the website: Meyers Orts- und Verkehrs-lexikon des deutschen Reichs “is the most important of all German gazetteers. The goal of the Meyer’s compilers was to list every place name in the German Empire (1871-1918). It gives the location, i.e. the state and other jurisdictions, where the civil registry office was and parishes if that town had them. It also gives lots of other information about each place. The only drawback to Meyer’s is that if a town did not have a parish, it does not tell where the parish was, making reference to other works necessary.”
The Historic Gazetteerat The Genealogical Gazetteer provides “The precise identification of places is essential in genealogy. Unfortunately, too few researchers care in identifying places. The project “GOV” was initiated to help historians and genealogists with the management of place references and to provide high quality data for anyone.”
4. Identify Available Records for the Town in Germany
Matricula – find church registers (mostly books of birth, marriage and death) from various European countries (currently Austria, Germany, Poland, Serbia and Slovenia).
8. Search for Vital Records
Vital records began nationwide in 1876, though it may be possible to find earlier records in certain locales.
Some pairs of letters can find themselves interchanged in German words. Understanding which ones were commonly swapped can save you a lot of frustration as you attempt to interpret documents. Examples of commonly switch letters include B and P, and K and G.
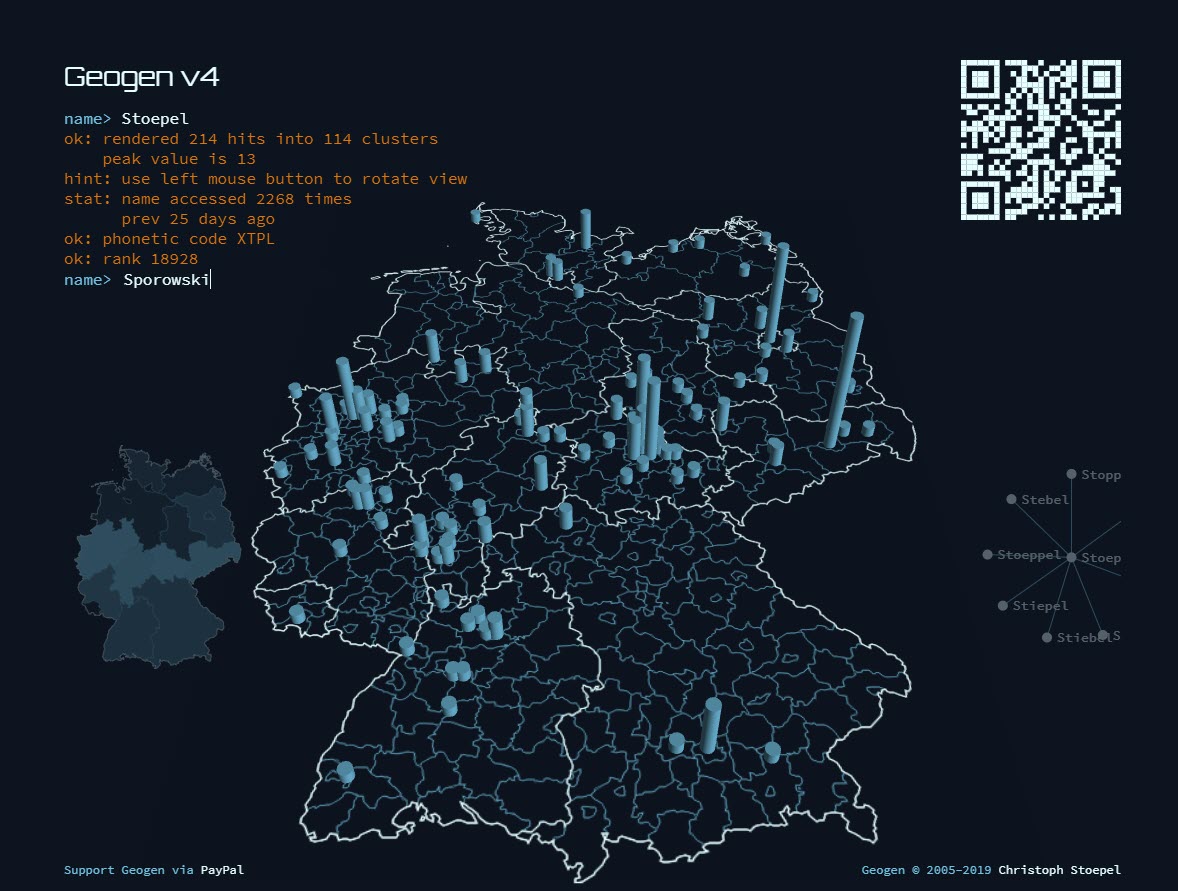
Geogen v4 offers genealogists a way to discover the areas of Germany where a surname appears most frequently. Type in your ancestor’s German surname and press Enter on your keyboard. Try variations that you have come across in records to compare the results.
Geogen v4 offers genealogists a way to discover the areas of Germany where a surname appears most frequently.
10. Use the Genealogy FAN CLUB
If you get stuck, use the FAN CLUB principle by looking at Friends, Associates, and Neighbors. These are the people who interacted with your ancestors in important ways. They will come in particularly handy when you run out of records for your German ancestor. By reviewing the records of those closest to your ancestor you may find new clues that can move your search forward and lead back to your family tree.
Katherine Schober is a German-English genealogy speaker, author, and translator, specializing in the old German handwriting. She is the author of “The Magic of German Church Records” and “Tips and Tricks of Deciphering German Handwriting”, as well as the creator of the online course “Reading the Old German Handwriting.” Katherine lives in St. Louis with her Austrian husband, and can be reached via e-mail at language@sktranslations.com or via her website, www.sktranslations.com.
Finding a birth father using DNA is possible but can be hit-or-miss with DNA alone. Read this story about how the experts at Legacy Tree Genealogists combined DNA testing results with historical research and family knowledge to help one woman find the...

 Premium member Kevin: