“Is That Software Expired?” Why I Wouldn’t Use Obsolete Family Tree Maker Software
As Family Tree Maker software nears the end of its product lifecycle, many may wonder how far past the “expiration date” they should use it. Here’s my take.
Ancestry.com recently announced that they will stop supporting Family Tree Maker, the popular desktop software that syncs with Ancestry.com trees online. Sales will end on December 31, 2015. Product support and major fixes for current users will end a year later. (Click here for full details.)
This means the clock is ticking for Family Tree Maker users to decide where to put their family trees. Or is it? Can you continue to use software after it’s officially “expired?” For how long? What risks do you take if you do?
Consider the “Best If Used By” dates we see on the food products we buy. There is currently still some life in this product, and will be for a year after they stop selling it. According to Ancestry, during 2016 “all features of the software, including TreeSync™, will continue to work, and Member Services will be available to assist with user questions. We will also address major software bugs that may occur, as well as compatibility updates.” So technically, the “Best if Used By” date is the end of 2016. But then what?
What Happens with Family Tree Maker after 2016?
The software will still function on your computer. But it won’t sync to your Ancestry online tree anymore, and there will be no upgrades to make it compatible with future computer hardware or software. So eventually, you’ll need to transfer everything out of Family Tree Maker software anyway to be able to keep up with evolving technology. That’s what happened to me with my first favorite genealogy software. When it was discontinued, I hung on to it for a long time, and honestly, I had no problem.
Eventually, however, the old software was no longer fully compatible with new operating systems and I had to upgrade. I took a risk in continuing to enter information into an obsolete system–and wouldn’t take it again in retrospect. When it finally did come time to transfer, I was gambling with whether my system had gotten so far behind the times that it would be too difficult or even impossible to transfer everything. (Think how much our data transfer technology has changed in recent years: from floppy disks, CD-ROMs, CDs and DVDs to flash drives and now cloud-based transfers.) And I also ran the risk that there might be license limitations to how many computers my old software could be loaded onto.
Our genealogy software contains thousands of pieces of linked pieces of data: names, dates, relationships, source citation information, digitized photos and documents and more. This is not something we could easily re-create and I for one would not want to have to redo all that research (or even just key it in). Even if GEDCOM files continue as a universal file type for genealogy software, the ability to export every piece of information exactly as you want it in GEDCOMs is not guaranteed. For example, consider that when you download a tree from Ancestry, according to their customer support pages,”Any pictures, charts, books, views, or similar items found in the original file will not be included in the [downloaded] GEDCOM. Vital information, notes, and sources are usually retained after conversion.”
Why continue to load your Family Tree Maker software with data you might not be able to fully retrieve when you want to?
If you’re a Family Tree Maker user, I’m not saying you should panic. You have time to do your homework and carefully consider the best next step for you. You could start using new family history software with a reliable cloud-based back-up service for your computer, so your files are fully protected. You could migrate to another cloud-and-software-sync model over at MyHeritage (their desktop software is free). Click here to read more about those options and see current offers by RootsMagic and MyHeritage.com for Family Tree Maker users.
Bottom line: “Best if Used By” usually indicates that the sooner you finish consuming a product and move on, the healthier and better your experience will be. That is an applicable analogy for Family Tree Maker users. Research your options and move on to another product so your family tree will continue to grow and be healthy!
More Gems for Family Tree Maker Users
Here at Genealogy Gems we care about you and your data. Here are more resources for you:
What Ancestry’s Retirement of Family Tree Maker Software Means for You
Best Genealogy Software: Which You Should Choose and Why
How to Download and Backup Your Ancestry Data
Using Wills and Probate Records in Genealogy Research
Using wills and probate records for genealogy can lead to unexpected “inheritances” of your own: clues about relatives’ identities, wealth, personal belongings, and family relationships. Wills can reveal great family stories, too: researcher Margaret Linford entertains her mother with them during trips to the courthouse. Here’s how wills can help your family history—and Margaret’s tips for finding and using them.
Using Wills and Probate Records in Genealogy Research
“Where there’s a will, there’s a way” to find out more about your family’s history.
Wills are legal records created to direct the settlement of a person’s property and other final affairs after his or her death. Probate (or estate) records are created after an individual’s death as part of the legal distribution of the estate and payment of debts. You’ll often find wills as one of many kinds of the documents included in probate records.
Wills and other probate records are valuable research tools, but are frequently neglected as sources of genealogical information. People often focus strictly on birth, marriage, and death records when searching out their family histories. If you rely solely on those records, your research will encounter many brick walls in the early 1800’s.
Probate records and land records were often the only official documents left behind to tell the stories of ancestors who lived prior to the legal requirement for the registry of births and deaths.
Wills of slaveholders can also be valuable tools in conducting African-American genealogical research. Before the Civil War, enslaved people were listed in wills because they were valuable property of slaveholders.
For instance, in the 1863 Smyth County property tax records, it is noted that Abijah Thomas owned 56 slaves, which were valued at $53,800. Some were given their freedom within wills, while others were transferred to other members of the family or sold. For instance, one of the first wills recorded in Smyth County is that of Hugh Cole.
Within his will, he says the following: “I bequeath to my beloved wife Martha Cole a negro girl named Amanda which she is to hold during her natural life.” The mention of an enslaved person in a will—along with any personal description of him or her—may be the only surviving document to mention that person by name.
Within another Smyth County will, recorded on February 20, 1835, a woman named Elizabeth Blessing left the following directive: “I will and desire that my negro woman Betty be free at my decease, and must see to her own support during her life, as I shall not make any provision for her out of any part of my estate.”
Information Found in Wills Varies
You can find just about anything in a will!
One organ, one compass, chain and plotting instruments, two chests, one hat rack, one music rack, one old United States map. These are some of the items found in the appraisement bill of the personal property belonging to the estate of Abijah Thomas, who lived in the well-known Octagon House in Marion, Virginia.
Here is a photo of that home, now in a dilapidated state, from a Wikipedia file image (click image for attribution.)
Also included in his personal property is a church bell. The story behind the bell is intriguing and illustrates the significance of the probate process.
Abijah Thomas utilized the bell at his foundry works in Marion, Virginia, to indicate shift changes. For decades, the oral history surrounding the bell indicated that he had donated it to the Wytheville Presbyterian Church before he died. The court documents reveal a different story.

Court document regarding the church bell
Since Abijah died intestate, the court appointed three men to appraise his personal property. During this process, the bell was valued at $75. It was sold on September 1, 1877, to the Presbyterian Church in the town of Wytheville, Virginia, as shown in the above list of items sold from his estate.
This document dispels the family myth surrounding the church bell. This is just one of many examples of the types of stories you find in probate records in courthouses all across the United States.
Genealogical Information May be Found in a Will or Probate Records
Wills and probate records can pass along unexpected genealogical wealth to you. You may find the following information in them: date of death (or approximate date of death), name of spouse, children, parents, siblings and their place of residence, adoption or guardianship of minor children, ancestor’s previous residence, occupation, land ownership, and household items.
Probate records also contain such interesting stories that they can even be read for entertainment!
Whenever I go on a research trip, I usually drag some poor, unsuspecting soul along with me. That person is usually my Mom. While she enjoys the scenery on our drive to different courthouses, she rarely enjoys the time spent at the courthouse.
Some of the research I do requires me to stay at the courthouse for several hours. That has posed a problem in the past since I haven’t known how to keep Mom occupied. But I have found the perfect solution. When we arrive at the courthouse, I find an old will book and let her start reading.
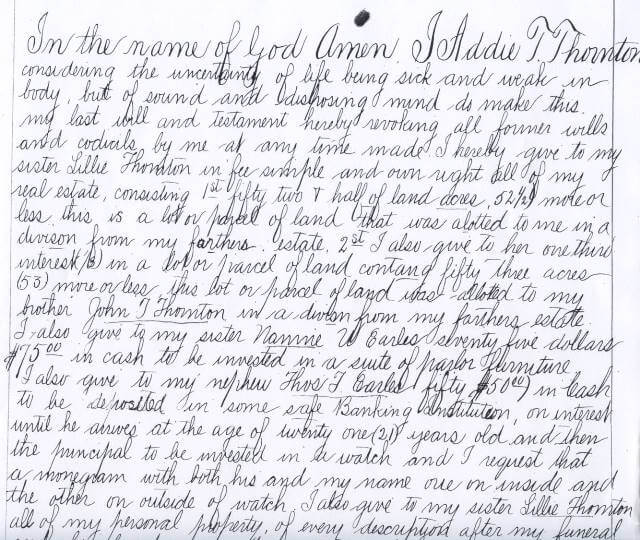
My mom enjoys reading the stories in these old—and sometimes tattered—books. One of her favorite stories came from a will in Henry County, Virginia. It is the will of Addie T. Thornton and reads as follows:
“I also give to my nephew Thomas T. Earles, fifty ($50) in cash to be deposited in some safe Banking Institution, on interest until he arrives at the age of twenty-one (21) years old and then the principal to be invested in a watch and I request that a monogram with both his and my name, one on inside and the other on outside of watch.”
Obviously, Addie Thornton cared deeply for her nephew, Thomas, and wanted to make sure he remembered her for the rest of his life.
Here’s part of Addie’s will, followed by a closeup image of the lines about the watch:
Stories like these are so much more meaningful than just a date of birth, marriage or death. Wills can help us know who these people were, how they lived and what was important to them during their sojourn here on earth. We can learn of their struggles and their successes. We can tell what their lives were like by reading through the lists of household items included in the inventories that are recorded.
And with stories like Addie’s bequest of the watch, we can also learn about ancestors’ personalities and how they expressed (or occasionally withheld) love for others through the final disposition of their belongings.
How a Will is Created
Before beginning probate record research, it is important to be familiar with the probate process and legal terminology associated with these records. It is estimated that, prior to 1900, about half of the population either left a will or was mentioned in one. Those who died having left a will are said to have died “testate.” Those who died without leaving a valid will died “intestate.”
A typical, legally-recognized will contains certain critical elements. It should be in written form and it must have signatures of the person leaving the will (“testator”) and witnesses, who attest to the validity of the document. A codicil is a document created by the testator to amend the will.
Once the testator dies, the will is presented to the judicial authority by a family member or executor/executrix (person appointed by the testator to see that his/her wishes are carried out), accompanied by a written application or petition for probate.
These petitions include names and addresses of the closest living relatives. The court then admits the will to probate and sets a hearing, providing an opportunity for interested parties to contest the will. The will is then recorded and the executor is given the authority to settle the estate. During this process, an inventory of the estate is made.
Some wills contain detailed information, regarding the testator’s final wishes. At times, these requests will shed light on relationships that might not otherwise be discovered. This was the case for a will on file at my local courthouse. Due to the nature of the requests made by the testator, I have changed the last name of the family to Smith. This wife was, obviously, upset with her husband and the circumstances of their marriage, providing clear details of her grievances for future generations.
“Since my husband has never made me a part of his family and has completely cut me out of ever living in Chihowie, Virginia [the husband’s hometown], or never provided me with a home or paid any of my bills and has broken all marriage contracts that we agreed to—I hereby decree that I be buried in Round Hill Cemetery at Marion, Virginia, where I own a lot—that my body or anything I own or possess will never be taken into Chilhowie or the Smith household.
My husband has never taken me into his own home, and furthermore stated, backed up by his nephew and his wife, whom he turned everything over to shortly after our marriage—that I would never own or live on a foot of the Smith ground, even though I have tried to build or buy or remodel a home in Chilhowie, Virginia, at my own expense.
“I give all books and material things pertaining to books to the Smyth County Library, Marion, Virginia, as I am sure that my family would not want anything to fall into the hands of anyone who has mistreated me.
“My husband has kept our marriage strictly on a time clock basis since his nephew and his wife moved back to Smyth County, and under their influence he comes at 6:30 or 7:00 p.m. (whichever is convenient to them) or later, and leaves promptly in the morning by 8:00 or 8:30 a.m., never calling during the day or show[ing] any sign of caring. He changed completely after they returned to Chilhowie to break up the marriage. Therefore, if I am still his wife, or otherwise, see that my wishes are carried out and that my remains and possessions remain in Marion.”
Where to Find Wills and Probate Records
The best place to search for a will is at the courthouse where your ancestor lived, if you can reasonably go there yourself.
Since the probate process is a function of state governments, the laws governing the maintenance of these records and their location will vary by state and should be researched before making a trip to the courthouse.
For example, in Virginia, probate records are maintained within the Circuit Courts and independent cities. In Massachusetts, probate records are found in county Probate Courts.
A useful resource for figuring out how U.S. probate records are organized state-by-state is free on the Ancestry.com wiki: Red Book: American State, County and Town Sources. Scroll down to click on the name of the state in question. Then go to the right side and click on the probate records link for that state to read about these records.
Once you have determined where the wills for your state/county are housed, the next step in the research process is to locate the Index for Wills. Even–perhaps especially–if you are unsure of the date of death for one of your ancestors, you may want to look through the index of wills (an example is shown here). Even when no specific death record exists, you may be surprised to find probate records that reveal the date of death, a list of heirs and more.
There will, most likely, be several index books, organized by year spans. These books serve as a compass, pointing you to any available probate records that may include your ancestors. The index is divided by devisor (the person making the will) and devisee (any person who is named in the will, as the recipient of property).
The research process will be incomplete if you do not conduct a search for your ancestors among the list of devisees. Even if you fail to find their names among the devisors, they could have inherited property from someone else.
Probate records include more than just the will of an individual. You may find letters of administration, lists of heirs, inventories, bills of appraisement, guardianships and other documents related to the settlement of an estate. In some counties, all these documents are found in the same collection. Other counties maintain these records in separate collections. It is important to understand the manner in which probate records are organized for your particular county.
The probate research process should not be rushed. Valuable records may be overlooked when time dictates the quality of your research. For this reason, it is important that you set aside ample time to comb through the probate records. If you find yourself confused about abbreviations or the location of records within the courthouse, there is usually someone in the records vault who would be happy to assist you. Never be afraid (or embarrassed) to ask for help.
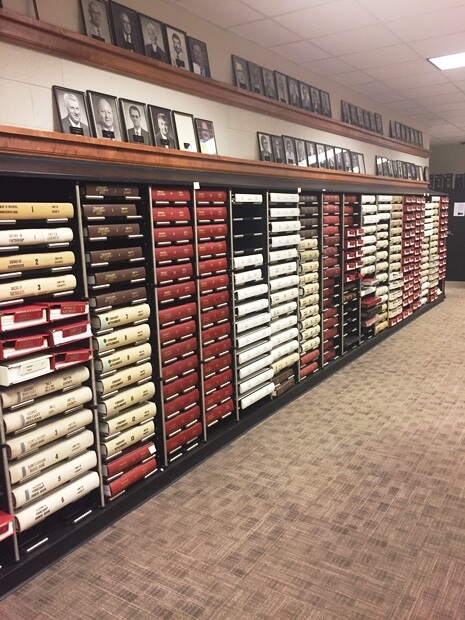
Fortunately for many of us who can’t easily get to every ancestor’s courthouse, there are some wills available online on genealogy websites, including two of the genealogy giants, FamilySearch and Ancestry.com.
For example:
- Subscription website Ancestry.com has made it a priority to curate an enormous collection of wills and probate records from all 50 states. At last count, this collection has more than 170 million records—and they keep adding to it.
- The free FamilySearch.org hosts millions of probate records from the U.S. and around the world (click here to browse their probate and court record collections). Many of these collections are marked “browse-only,” which means they are not yet searchable by name online. You just have to page through them. Click here for instructions on reading browse-only records on the site (it’s not that difficult—and did I mention they’re free?).
Additionally, libraries or genealogical societies in your ancestor’s hometown or county may have books with abstracts from local wills or other resources related to local probate record research.
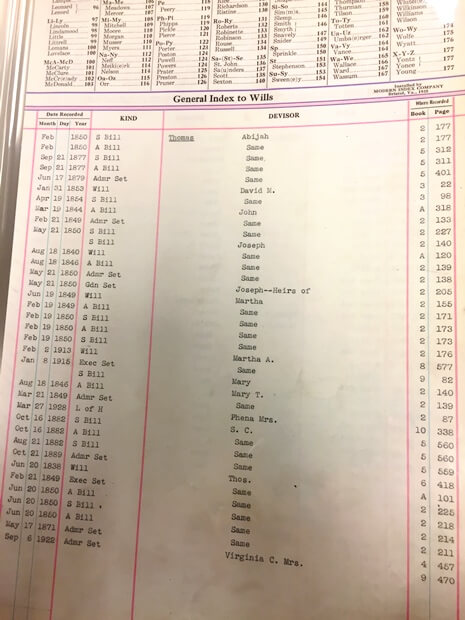
General Index to Wills
Well Worth the Effort
Finding the will of one of your ancestors is an amazing experience. Walking into the vault of a courthouse sometimes feels like walking into a time machine. As you read through the pages that tell of people who lived so long ago, you feel like for even just a small moment that you have gone back in time. You are sitting with them and hearing their stories whispered through the aging and brittle pages that have been left behind. They are all there just waiting to tell their stories. So take the opportunity to go to the courthouse and “meet” your ancestors through the one of the last—and perhaps one of the most revealing—documents they may ever have written: their wills.
Researching Wills and Probate Records: Your Next Steps
Take your genealogy research to the next level by planning a trip to a courthouse to retrieve records like wills and probate records. These articles and podcast episodes will help you get ready:
- Why you should be researching court records
- Success story: Genealogy research trip produced amazing family history find
- Premium Podcast Episode 128: Courthouse research tips (for Genealogy Gems Premium subscribers)
Disclosure: This article contains affiliate links and Genealogy Gems will be compensated if you make a purchase after clicking on these links (at no additional cost to you). Thank you for supporting Genealogy Gems!

Margaret Linford is a professional genealogist who specializes in the Mid-South Region of United States research and has logged over 20,000 research hours. Born and raised in Virginia, she has enjoyed traveling the world, and now lives in her childhood hometown with her husband and children. She enjoys teaching her children about heritage, taking them along on research trips and serving as President of the Smyth County Genealogical Society.
7 Important Reasons Why (and How) to Start a Family History Blog
Here are the reasons every family historian should be writing a family history blog–and how can you get started NOW.
Why Start a Family History Blog
Many of us want to write up our family stories, but with busy schedules, a 300-page book may not be in our future!
You don’t have to have a lot of time to write and share your family history. Blogging about family history is a perfect alternative. Blogs are just simple websites that present articles in chronological order beginning with the most recent. This is a great format for telling a story that travels through time.
Blogs also allow your readers to “subscribe” for free much like a podcast. In other words, your readers don’t have to remember to visit your blog and read the latest. Instead, they can receive email prompts when you publish new articles, or they can receive those new articles alongside their other favorite blogs and podcasts in a blog reader. Very convenient indeed!
Still not convinced it’s possible to start your own genealogy-themed blog? Here are 7 reasons why and how you can start a family history blog.
1. You can write a little bit at a time.
You don’t have to fill hundreds of pages or lay out an entire book. With a blog you can write as little as a paragraph at a time. There are no rules because it is your blog!
Over time, even a one-paragraph blog post, once a week, will eventually result in many pages. It’s a great way to pace yourself and still get your family’s story in writing.
2. Every word you write is searchable by Google.
Gone are the days of simply posting a query on a genealogy message board that only reaches genealogists.
By blogging about your family history, other people who are researching the same family lines can find and connect with you through their Google searches. You’ll be writing about the family they are searching for, so you’ll very likely be using many of the same keywords, dates and information that they will include in their search query. This means your blog should pop up high on their Google search results list!
Think of your family history blog as your own big message board. Your posts can be found by anyone in the world searching for the same information. The connection possibilities are endless. So essentially, family history blogs are your way to “fish for cousins.” This of it as “cousin bait!”
Blogs typically include a Comment section at the end of each of your articles, so encourage visitors to your blog to leave comments. Don’t worry, you can set your blog to only show the comments after you have reviewed and approved them.
3. You might bust your toughest brick wall.
I’ve heard and shared countless success stories here at Genealogy Gems from readers and listeners. By just “putting it out there” on a blog they have opened the door to a distant relative contacting them with a treasure trove of new information about their family tree.
“Your encouragement to blog genealogy has given me courage and a vehicle for which I can share the stories of our family’s common history. So, over the past month I’ve been posting digital images of each day (from my great grandfather’s) journal from 50 years ago, the transcription of the journal and an historical image that gives context to what he was writing about. I plan to include family photos and other documents as I expand this blog.”
– Chris C.
4. You’re more likely to spot your mistakes and missing links.
Have you ever told a story out loud and discovered in telling it that something in the story didn’t quite jive? A blog can help you tell your family’s story “out loud” too.
The process of writing up your family history discoveries can often reveal gaps, errors, or bad assumptions in your research. And that’s a good thing! Use it to your advantage to identify further research that needs to be done. But those items on your research to do list.
And don’t be afraid to let your reader know what your gaps are and where you’re stuck. They just might be able to help!
5. Your kids, grandkids, nieces and nephews, etc. are online.
Your descendants probably prefer to read quick and easy stories on-the-go on their smart phones and tablets, and a blog fits the bill perfectly.
Putting your research on a blog provides your relatives with an easy way to digest the family heritage. And of course they can subscribe to it, since blogs can be delivered to their email inbox or to a blog reader like Feedly.
Blog posts are also super easy to share to Facebook, which means your post can get even more traction.
Chris continues:
“The family response has been amazing. The cousins, siblings, aunts and uncles think it is cool and want to see more! They love the stories and can’t wait for subsequent postings so they can hear detailed history about (him) that they never knew about.
I believe this blog will be part of how our family begins healing and comes back together again.”
6. Because there are no excuses.
You can start a blog for free, so cost is not a barrier.
There are no rules, so you can decide how often and how much you write at once.
There is just one thing you have to do to successfully blog about your family history: begin.
7. Because your blog continues to share even when you aren’t researching.
The best news of all is that your family history blog will be out there working online for you 24 hours a day, 7 days a week.
Even when life gets in the way and you need to take a sabbatical from blogging and genealogy, your blog is still out there ready to be found. You will still be sharing your family’s story, and attracting relatives to it. And when you’re ready, your blog will be ready for you to add the next chapter.
How to Start a Family History Blog
Starting a family history blog isn’t hard. But some people find it intimidating. So I’ve created two entire series to help you get started.
 Click to watch this free series of videos on the Genealogy Gems YouTube channel These videos show you how to set up a family history blog. They are a few years old, but will give you the basic idea. You’ll see how to get started for free in Blogger, with your Google account.
(I use WordPress for my website and my blog. They have a free version at wordpress.com.) Need more encouragement? Click here to hear from other readers who are very glad they got started.
Learn More About Blogging on the Family History Podcast
 Click to listen to a free series from our Family History: Genealogy Made Easy podcast(an online radio show).
Starting with episode 38, you’ll learn:
Part 1: What to Consider when Starting a Genealogy Blog.
The “Footnote Maven,” author of two popular blogs, talks about the process of starting a genealogy blog. She gives great tips for thinking up your own approach, finding a unique niche, tips for getting people to comment on your blog posts and more.
Part 2: Insights from Popular Genealogy Bloggers.
We hear from two additional popular genealogy bloggers, Denise Levenick (author of The Family Curator and alter ego of “Miss Penny Dreadful” on the Shades of the Departed blog) and Schelly Tallalay Dardashti (author of the Tracing the Tribe blog).
Part 3: Step by Step on Blogger.com.
How to create your own free family history blog on Blogger.com. Learn tricks for designing a simple, useful blog and how NOT to overdo it!
Final tips: Wrap-up and inspiration.
In this concluding episode, learn how to add a few more gadgets and details to your blog; pre-plan your blog posts, publish your first article, and how to help your readers subscribe. You’ll also get great tips on how to create genealogy content that others looking for the same ancestors can find easily online.
Share the Blogging Adventure!
 Invite someone you know to start a family history blog of their own. Send them a link to this webpage or share it through social media. They’ll thank you for it later!
And if you have started a family history blog, please comment below and share your experience.

