Discover the essential search strategies that every genealogist should be using when searching for records at FamilySearch.org, the popular free genealogy website. In Elevenses with Lisa episode 64 Lisa Louise Cooke discusses:
Wild cards you can use when searching FamilySearch
Search strategies to help you get more results
Advanced Search strategies
Episode 64 Show Notes
FamilySearch.org is a free genealogy records and family tree website. You will need to be logged into your free account in order to search for genealogy records.
In this video and show notes I will outline strategies for searching for people by name in genealogy records. You can then apply these techniques to your genealogy research plan. Knowing what you’re specifically looking for will give you a better chance at success.
Elevenses with Lisa episode 64 – Share on Pinterest
Starting Your Search at FamilySearch
In the menu go to Search > Records (then use the form).
Start with a broad search.
Search results ignore the order of first names but will preserve name order if there are two last names.
Click the Exact Match box to start narrowing in on specific names and spellings.
Even if you are confident that you know exact names and places try variations. For example, add or remove a name and turn on and turn off Exact Match.
Strategies for Searching Names FamilySearch:
Add or remove middle names.
Try searching for nicknames.
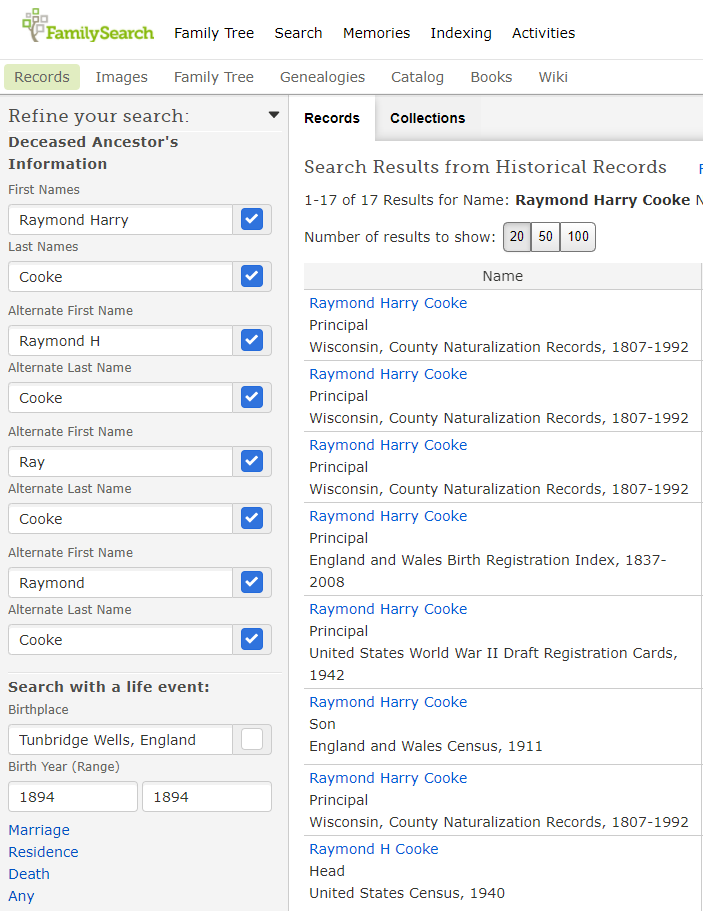
Try spelling variations. Use the AlternateName You can search up to four alternate names at a time. Try clicking the Exact Match box for each alternate name.
example of Alternate Name search at FamilySearch
Try spelling the name as it would have been spelled in the old country. (Example: Sporan / Sporowski / Sporovsky / Sporowski)
Use wildcards to help with search variations.
Asterisk (*) replaces zero or more characters.
Question mark (?) replaces a single character.
Use cluster research techniques by searching on relationships.
A few words about searching on relationships: Try searching only with your ancestor’s first name and a known relationship such as a spouse, parent or other relative. In addition to specific people, try searching for a surname associated with the family.
Over time the spelling of a last name can change in a family. It’s important, even if you receive initial successful results, to try all variations, including language variations.
In the case of women, records will be under the last name they were using at the time the record was created. Therefore, try searching for them using their maiden name and then their married name (or names if they were married multiple times.)
Try leaving the last name field blank. This can be particularly effective when searching for female ancestors. This strategy works well in conjunction with entering additional information, such as the names of the spouse or parents.
Try just surnames, unique first names, and Other Person
Pro Tip: Use Snagit to easily create a search log
Learn more about Snagit: How to Use Snagit for Genealogy (episode 61) Save 15% on Snagit with our exclusive discount coupon code: GENEALOGY15
Have you been using Snagit? Leave a comment
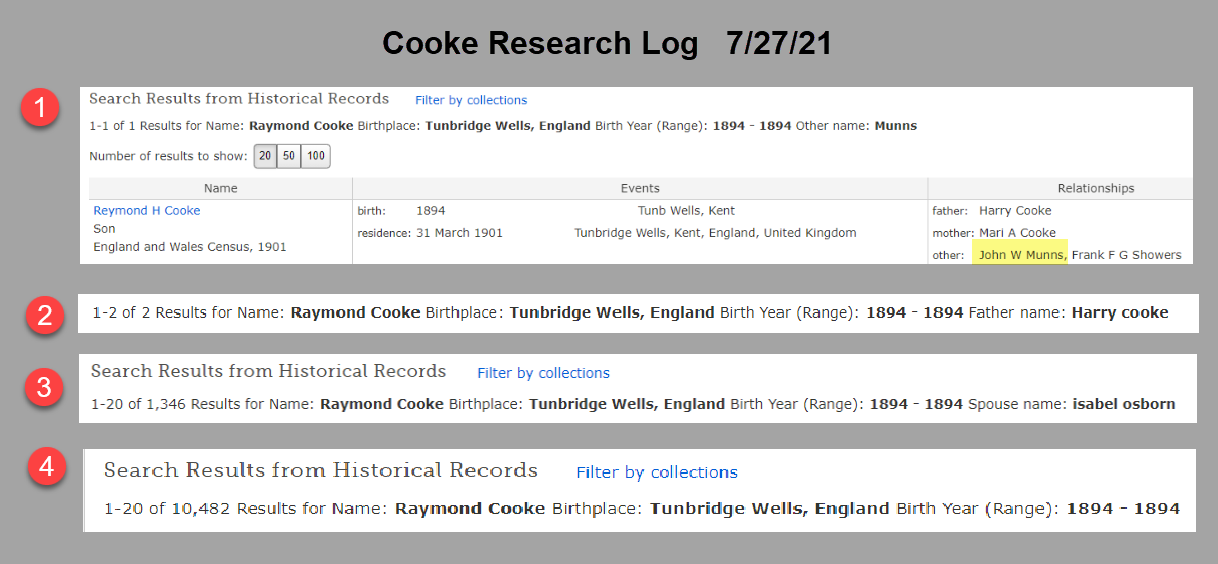
Here’s an example of a search log I created using Snagit. You can add custom text, symbols, highlighting and much more to create exactly the log that works for you.
Search log created with Snagit
Here’s how to quickly capture and keep a research log of your FamilySearch searches:
Run your search as usual.
Use Snagit to clip the number of results and the terms searched at the top of the results page. (Set Snagit to “Region” to precisely clip that portion of the screen.)
Continue searching and clipping. When done, go back to the Snagit Editor.
Click Control (Win) or Command (Mac) and click to select each clipping you made in order. You can also select all of your clippings by clicking to select the first clipping and then hold down the shift key on your keyboard and click the last clipping.
Right-click on the selected clipping to access the menu. Click Combine in Template.
In the pop-up Combinein Template box, select a template. I like to use Custom Steps for a research log.
Click the Next
Give your combined image a Title. (You can edit this again later.)
Select the font and canvas color as desired.
The NumberImages box will probably be selected. This will place a “step” number in front of each clipping showing the order in which you clipped. You can deselect this box if you don’t want to number your clippings.
Click the Combine
Edit the combined image as desired. You can click to select items to move and resize them. You may need to ensure you’re not in Text mode – click the Arrow at the top of the screen and then you’ll be able to click on items like the numbered steps and move them around. Grab the edges and drag them to crop if needed.
Save your image: File > Save As.
Search Strategy: Events
Try searching on known life events such as:
Birth
Marriage
Residence
Death
Any
Click the type of life event you want to include in your search. Enter the place and year range.
Life Events Search Tips:
Try your search with different events.
Try your search with no events.
Use the Residence option to find records identifying where a person was living. Some records contain an address or last place of residence. Birthplaces, marriage places, and death places are not the same as residence places.
Use the Any Event if you know a date and place for an event other than birth, marriage, death, or residence. For example, a search with an Any event can find dates of military enlistment or immigration.
Search Strategies: Places
In the place field try searching at a more or less specific place level. If you searched for a town, try the county, state, district or country.
Try using wildcards in place-names. (Enter * to replace zero or more characters. Enter ? to replace one character.)
Search Strategies: Years
In the year fields try adding a year before and a year after.
In the year fields, try searching with no years first, and then filter the results to narrow your search by year.
Advanced Search Strategies
Include multiple events in your search when you are looking for a record that likely contains all the events.
Death records – try searching with both birth and death events.
Birth record, include only a birth event, since birth records usually do not contain death information.
To search for a child’s birth records, enter the child’s name, then click Parents. Enter the parents’ names. If needed, try variations such as these:
Both of the parents’ full names.
The father’s full name only.
The mother’s full married name only; then her full married name only.
The father’s full name with the mother’s first name.
The mother’s full maiden name with the father’s first name.
To find all of the children in a family, leave the first and last name fields blank.
Then click Parents and conduct your search using only parents’ names. Try all the variations.
Searching for Marriage Records
To search for a marriage enter the name of one person in the first and last name fields. Click Spouses, and enter the name of the spouse. Try variations: the spouse’s first name and the wife’s maiden name. To limit your search results to marriage records only, click Type, and click the Marriage checkbox.
Search Best Practices
Have a specific search goal.
Start with a broad search. You do not have to enter information in all search fields. You often can get better results when you leave most blank, and then filter down.
FamilySearch doesn’t support Boolean Operators like Google does.
Expect records and indexes to contain errors, spelling variations, and estimations.
Try your search several times with variations.
Even if your ancestors had easy-to-spell names, expect spelling discrepancies. Anderson could be Andersen in some records. Try Anders?n in the Last Names search box.
Always look at the image, if possible. It often has more information than the index alone.
Filae’s French collection opens the door for non-French-speaking people to discover their family stories online.
40 million people in the world (excluding France) claim French descent. Here’s the latest press release from Filae:
Paris, France – September, 18, 2019 – Filae.com, the world’s largest online resource for accessing French official records, today announced the launch of its first foreign language international sister-site: https://en.filae.com
With more than 40 million people in the world claiming French heritage, the launch of an English language version of Filae.com gives all of them an unprecedented and exclusive access to more than 150 million images of French Census and Vital records (birth, marriage, death) which have been indexed by Filae.com.
As Elvis Presley, Alec Baldwin, Angelina Jolie, Jessica Alba, Kurt Cobain, Warren Buffett, and many other celebrities, 4% of the US population, 17% of Argentinians and 14% of Canadians have French roots!
“The launch of Filae.com is just the beginning of a more global strategy whose aim is to facilitate access to the largest resource of French records and to help people with French descent tracing back their ancestry whatever their language is and wherever they live! We are thrilled to share information we digitized and indexed with family history fans all over the world.” said Toussaint Roze, CEO and founder of Filae.com.
Starting as early as 1500, Filae’s French historical collection features records such as:
Parish registers,
Civil records,
Census and vital records,
Passenger lists,
Military records (Napoleonic wars, WWI, WWII),
Indexes provided by French societies,
Directories
and many other historical records (French revolution, etc.)
Filae.com also provides its users with easy-to-use tools to build their own trees or import their gedcom files, upload photos and documents and share them with other members.
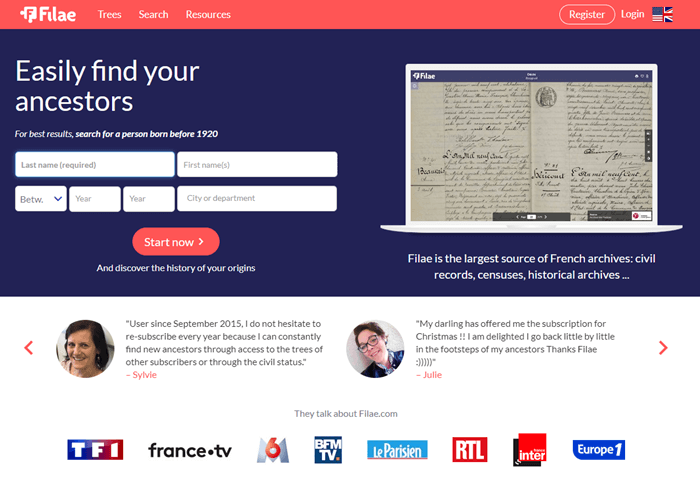
Here’s a look at the Filae website:
About Filae.com
Launched in December 2016, Filae.com is the first and largest resource for French digitized and indexed records online.
The service was created by Toussaint Roze, a French serial- entrepreneur dedicated to genealogy who previously created successful online services like notrefamille.com, genealogie.com and gedlink.
Filae.com hosts and indexes more than 150 million digitisations of French original records for the XVIIIth and XIXth centuries.
Browse-only databases at FamilySearch are easy to use and may hold the key to the genealogy brick wall you have been working on.
Don’t be scared off because the records haven’t been indexed. Guest blogger Amie Tennant Bowser show you how to take advantage of these great records!
New Genealogy Records Come Online Every Week
Each week, we report on the latest genealogy records to have come online.
Sometimes in our weekly record update articles we include databases from the free FamilySearch website that are not yet indexed. These collections are referred to as browse-only. Have you ever been disappointed when you realized the database you are most interested in is only able to be browsed?
The highlighted genealogy records in these collections are browse-only
You may be thinking, “Good grief! I can’t possibly browse thousands of records!” and we don’t expect you to. In this article we are going to share strategies that you can use to zero in on the genealogy records you want to browse.
Browse Only Records Versus Indexed Records
Most folks search for genealogy records at FamilySearch by typing in some key information at the home page. It might be just the first and last name, and the place where that ancestor lived. Here’s an example:
When you use this method, you are only searching for records that have been indexed.
Indexed records are great because they have already been reviewed by one of the thousands of FamilySearch volunteers. They use online software on the FamilySearch website to download images of historical documents. Then, they read the information on the image and transcribe the information.
A second, more experienced volunteer then reviews the transcribed information to ensure accuracy before it is submitted to the website where they can be searched. It’s a huge effort to help genealogists more easily search the online records.
So, it’s important to understand that not all digitized record images that are on the FamilySearch website have been indexed. This means there may be countless records that will not be retrieved by a name search.
Unindexed records can only be browsed until they are indexed. So as you can see, there is a very good chance that there are records on the site that apply to your family, but you won’t find them through the search engine.
Instead, you need to go in the virtual “back door” to locate these records. Follow along with me and I’ll show you how.
How to Find Browse-Only Records at FamilySearch
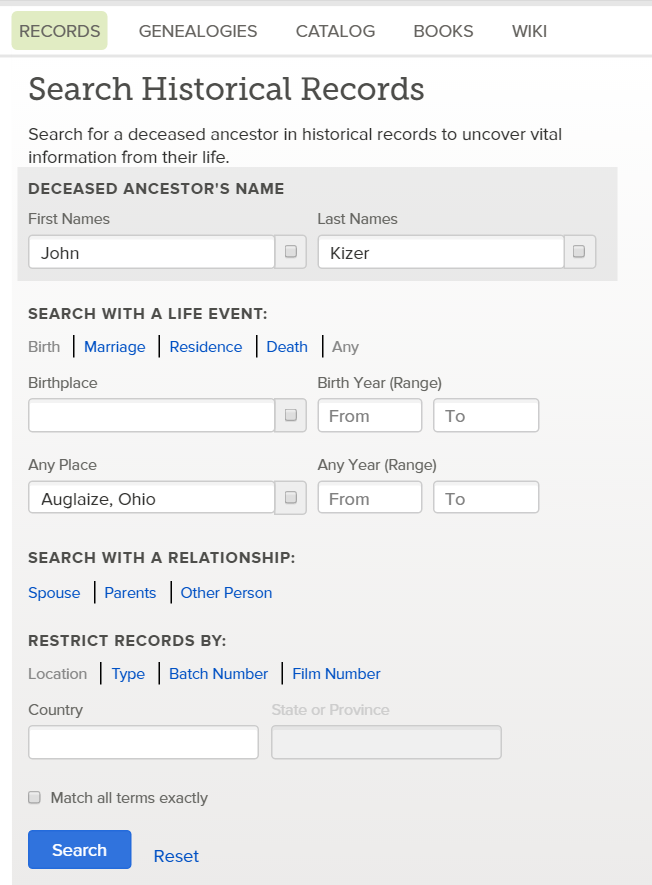
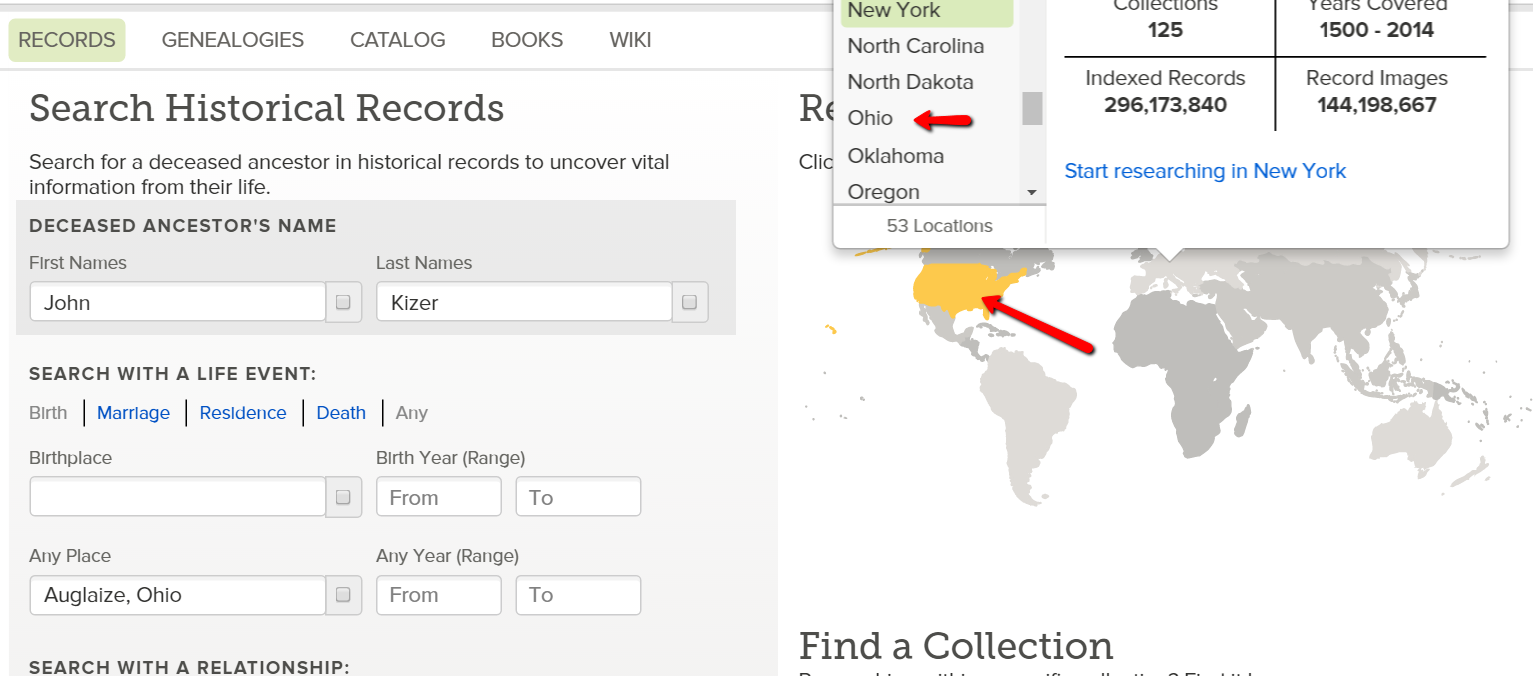
Let’s imagine you want to search probate records in Auglaize County, Ohio.
You would click the little map in the vicinity of the United States and choose “Ohio” from the pop-up box.
At the Ohio research page, you could do a general search of the Ohio collections. Again, this is only searching records that have been indexed.
Instead of using this method, scroll down until you see “Ohio Image Only Historical Records.” Look at all these databases you might have missed!
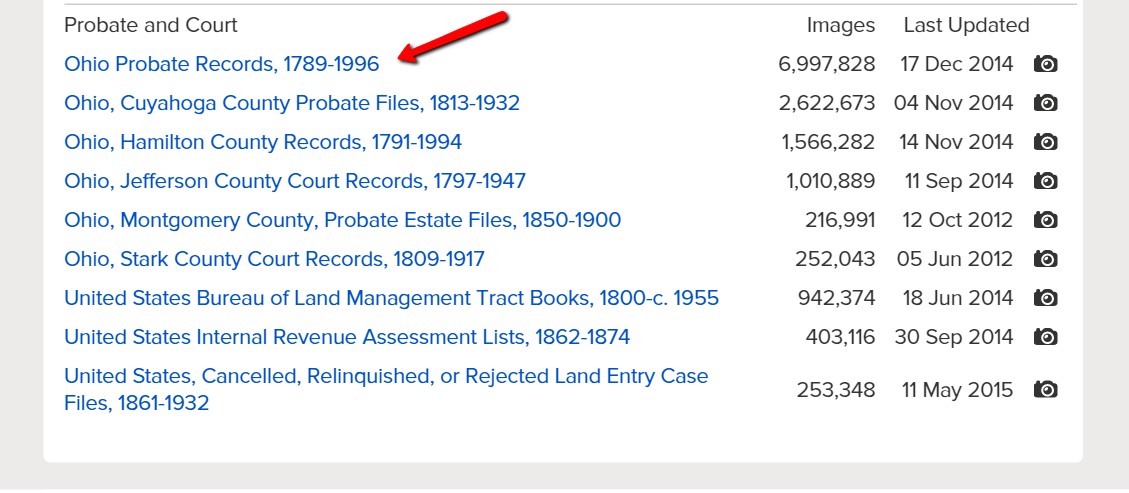
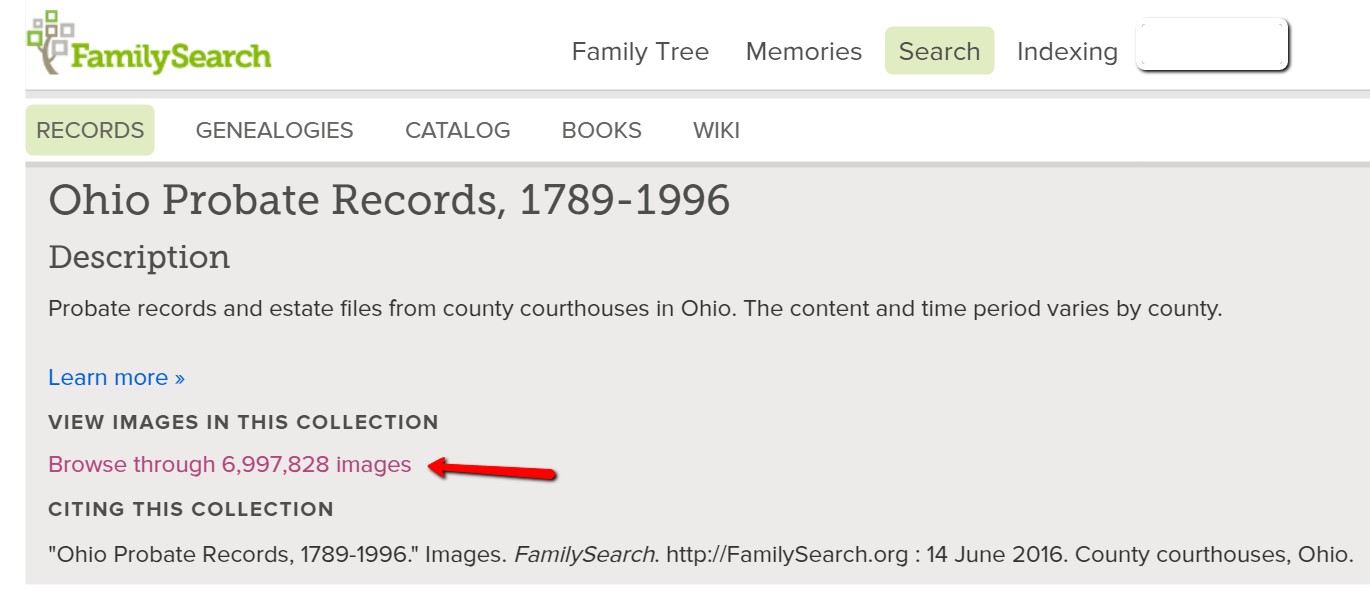
For our example, continue to scroll down until you see the database titled “Ohio Probate Records, 1789-1996” near the bottom. Click on it.
You will notice right away that there is no way to “search” this database.
Many people give up at this point, after all, who has time to search nearly 7,000,000 records. Click on it anyway!
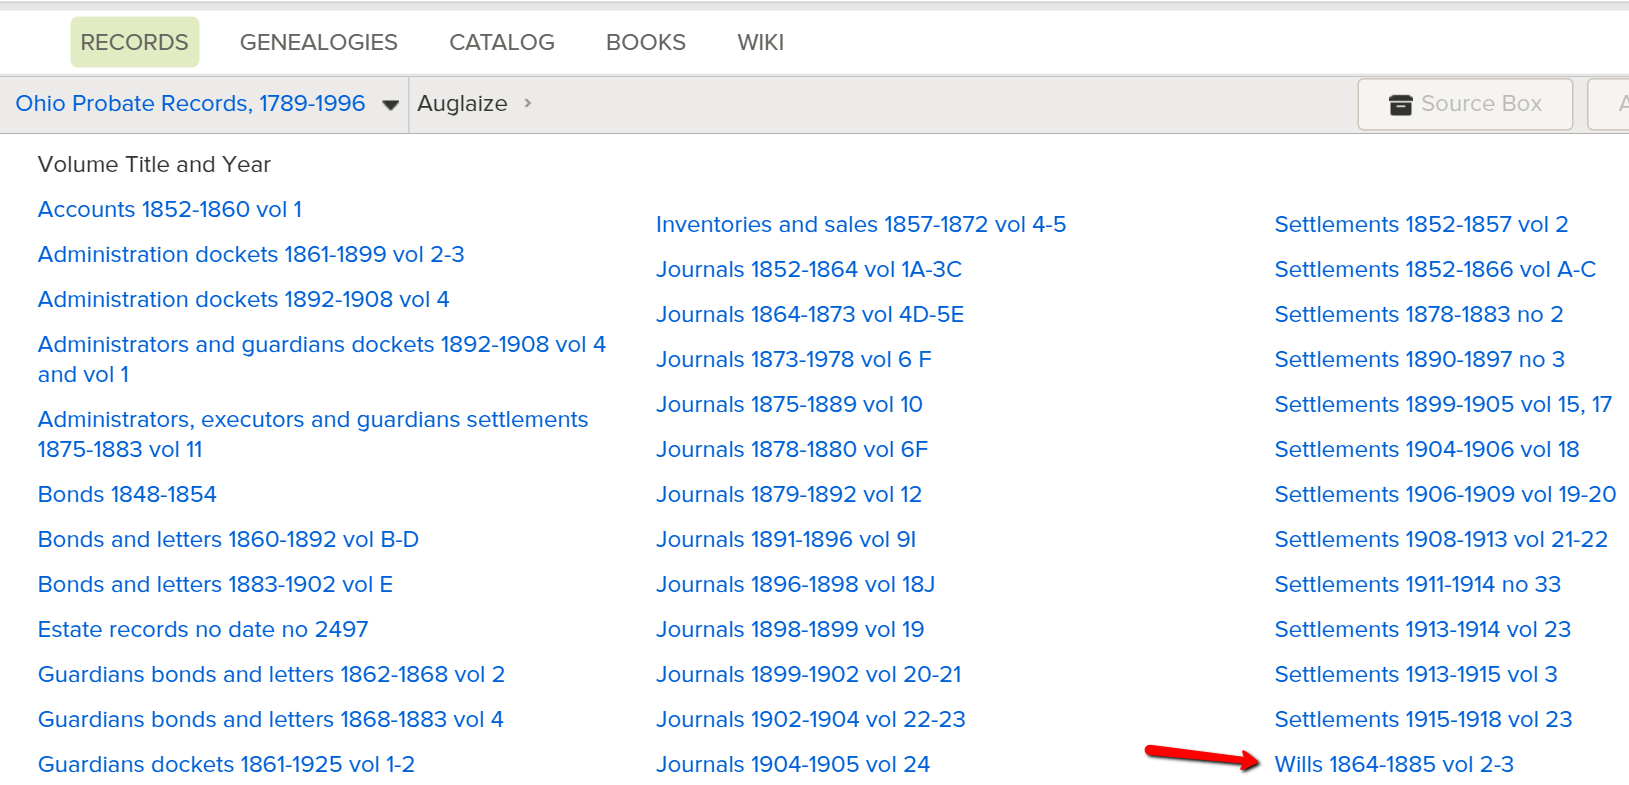
The next screen has been broken down by county name. Choose the desired county name. In this case, I’m selecting “Auglaize.”
You are then directed to a page listing the volumes of records for Auglaize county that have been digitized.
In this example, we are seeing bonds, settlements, wills, estates, and so much more:
It is as if you are standing in the courthouse probate office surrounded by volumes and volumes of the records you need.
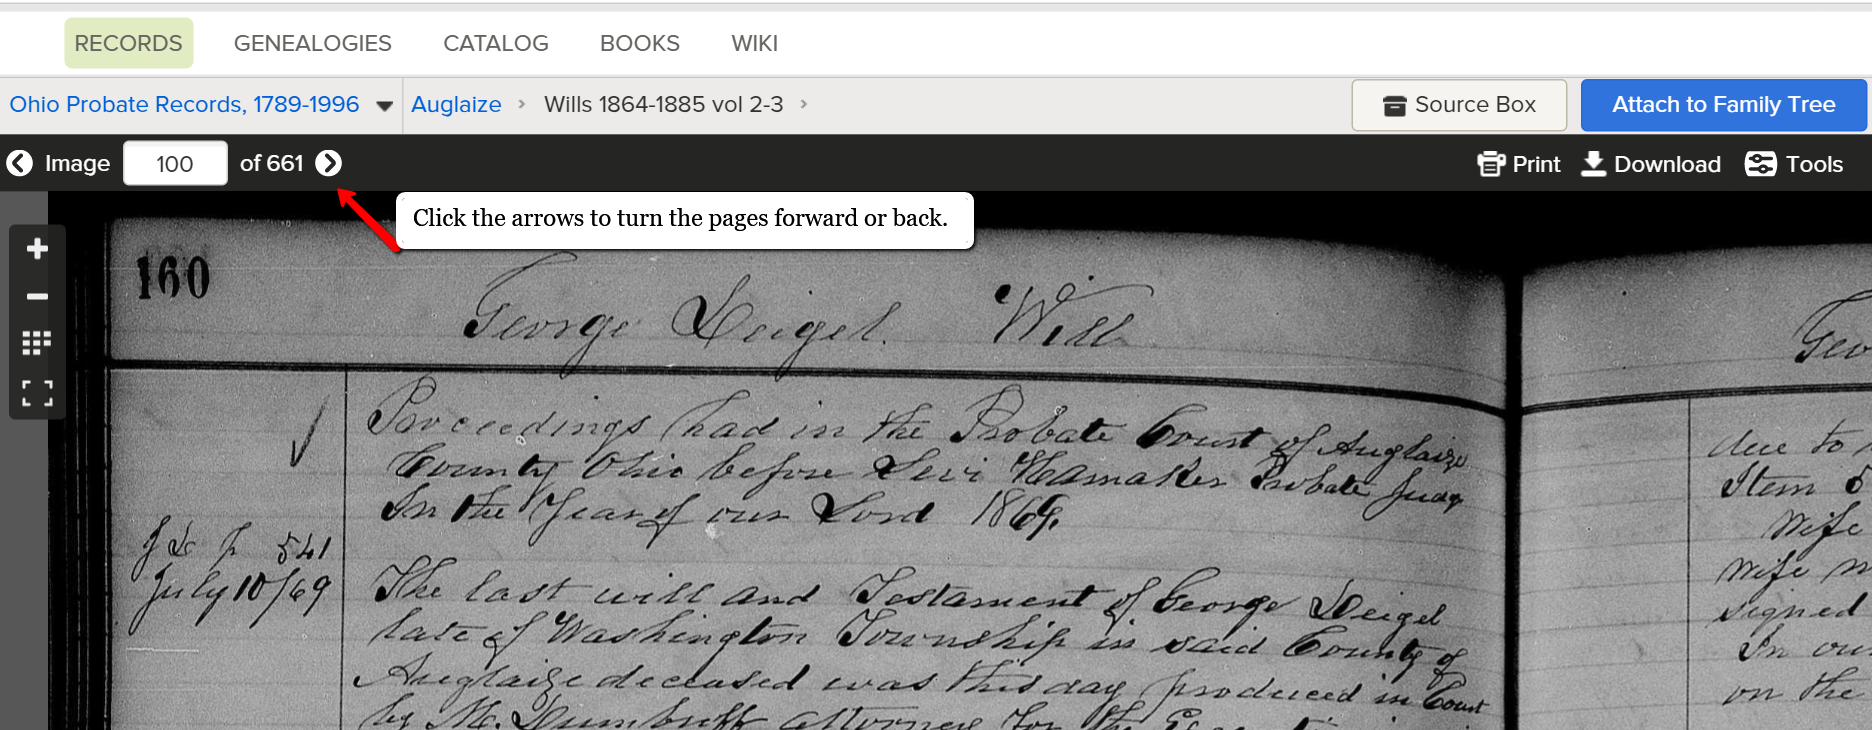
Select the volume you want to search by clicking the title.
“Open” the pages of the book and search like you would as if you were flipping the pages of a book or scrolling through a roll of microfilm.
Click the arrow at the top of the screen to scroll through the pages.
Friends, we want you to get excited about all the new records that are coming online, even if they are browse only databases. If you like this tutorial, share this tip with your genie friends so they can do it too.
More Genealogy Gems on Records and Databases at FamilySearch
For more tips and tricks to help you in your genealogy journey, sign-up for our newsletter by entering your email address on this page.
If you’re looking for more genealogy records to mine, here are some of our articles. These will help you not only find new records, but also use other valuable genealogy indexes:
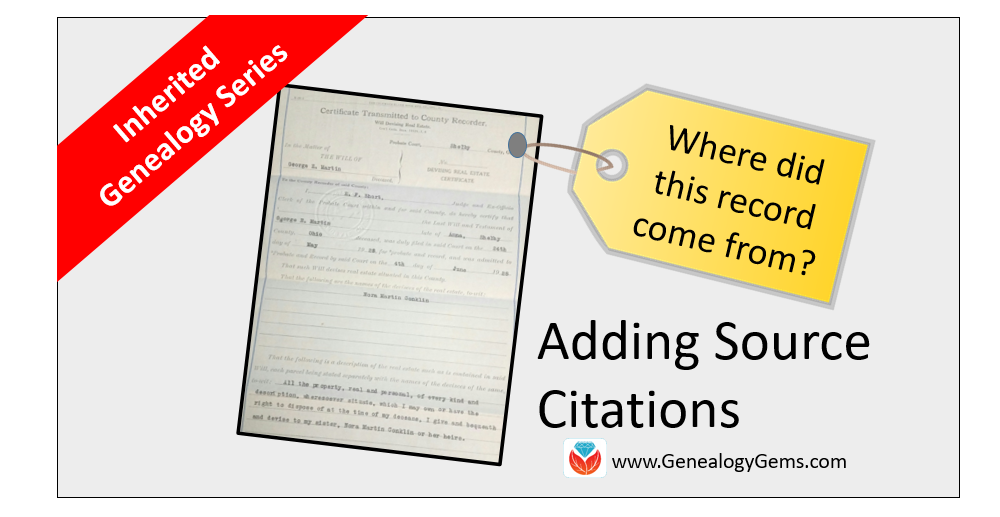
Adding Source Citations is our third post in the Inherited Genealogy Files series, and in this post, we answer a listener’s question.
We recently received this letter from a Genealogy Gems Podcast listener, Cristy. She says:
Thank you for your tip about starting from the present and working backwards. I was having a hard time knowing where to start. I had inherited a tree passed from my mom and my great-grandmother, that when combined with the information my husband’s aunt gave me [I had a] tree with almost 1200 names. But the information from my great-grandmother and my aunt does not have any sources and all of my mom’s sources got lost in our various moves over the years. She only had her old school database that just had the facts and no sources.
I determined that a genealogy book my mom used as a source for one of our lines [had been] copied [from] an older genealogy line that has been proven incorrect. So, my goal has been to re-find my mom’s sources and document everything. I didn’t know where to start. I have now made a second tree in my database keeping the original as a place to start and only putting what I have proved using actual sources and attaching the documentation as I go. Your episode on the Genealogical Proof Standard was really helpful. It will be a big help as I clean up my tree.
Finding Source Citations for Your Inherited Family Tree
Let’s first give a brief definition of source citation.
Source Citation: the information that tells your reader where you obtained a particular piece of genealogical data.
For example, a family tree should include a source citation for the birth date and place, the death date and place, and the marriage date and place…and that’s just the start.
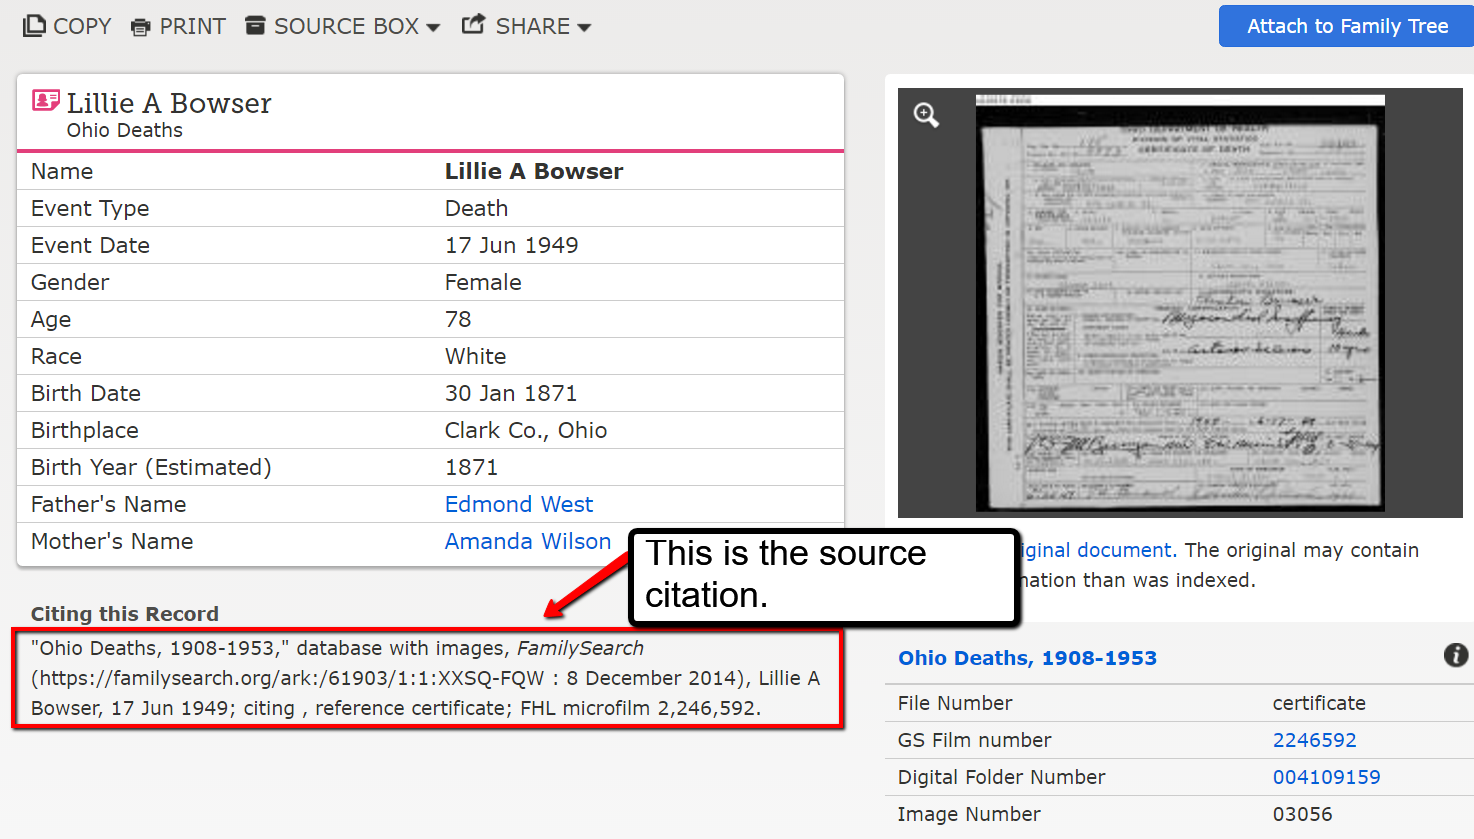
Finding source citations is really easy if you are using FamilySearch. Let’s say I used a death record I found online at FamilySearch as the proof of my ancestors death date. What is so wonderful about using FamilySearch.org for finding records is that it includes a source citation for you to copy and paste. Take a look.
You can highlight the source citation text and copy it into your genealogy software. A bonus is knowing that FamilySearch is free and easy to use.
Adding Source Citations for Genealogy to RootsMagic Software
As I mentioned above, you can take the source citation you found on FamilySearch and copy and paste it into your genealogy software. RootsMagic is the genealogy software we here at The Genealogy Gems Podcast use (and we are proud that they sponsor our free Genealogy Gems Podcast.) It is an easy-to-use and effective software for both PC and Mac users. (To learn more about using RootsMagic, read here.)
Using RootsMagic, let’s add a source citation to an event in a family tree:
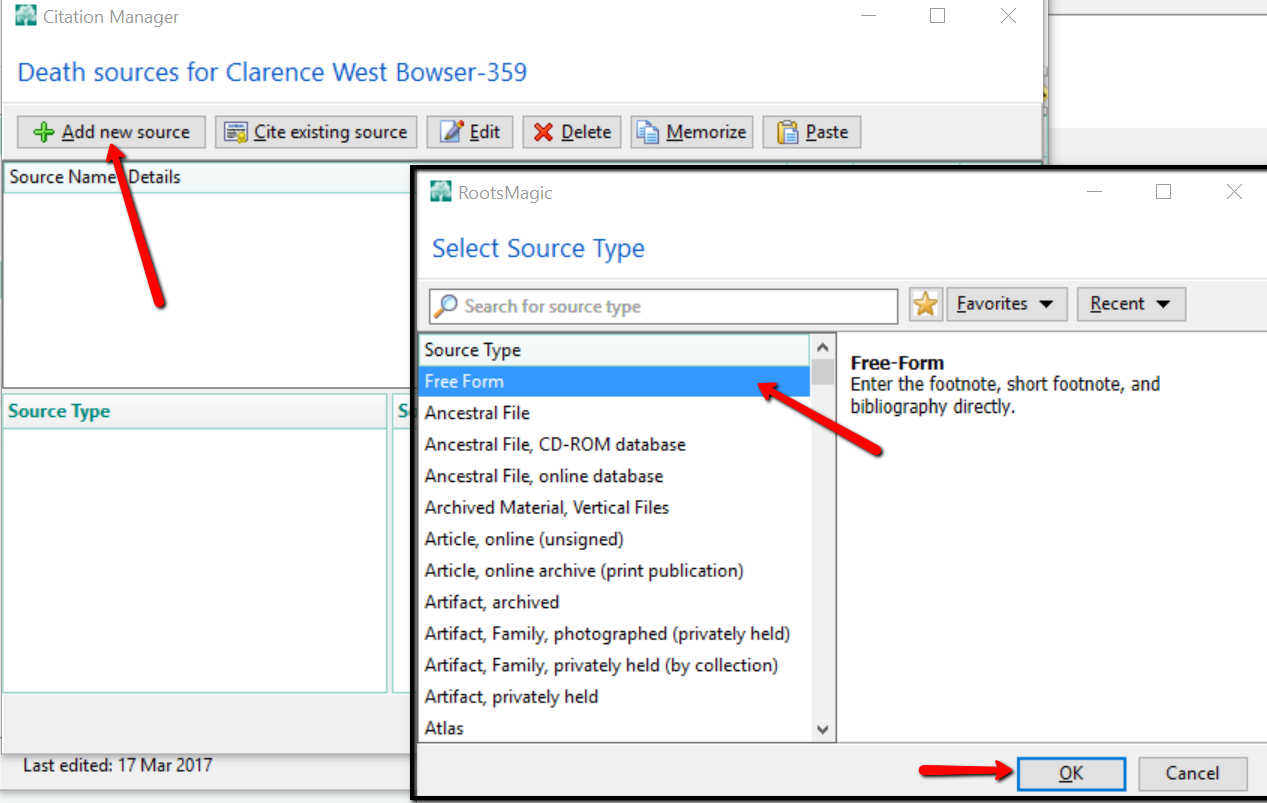
In this example above, we have double clicked on Clarence’s name and opened up the Edit Person window. We would like to add a source citation for Clarence Bowser’s death date and place. In the line for death, we click on the box in the source citation column. The source citation column is indicated by that little icon that looks like a record.
At the pop-up window, we click Add new source and from the options, choose Free Form and click OK.
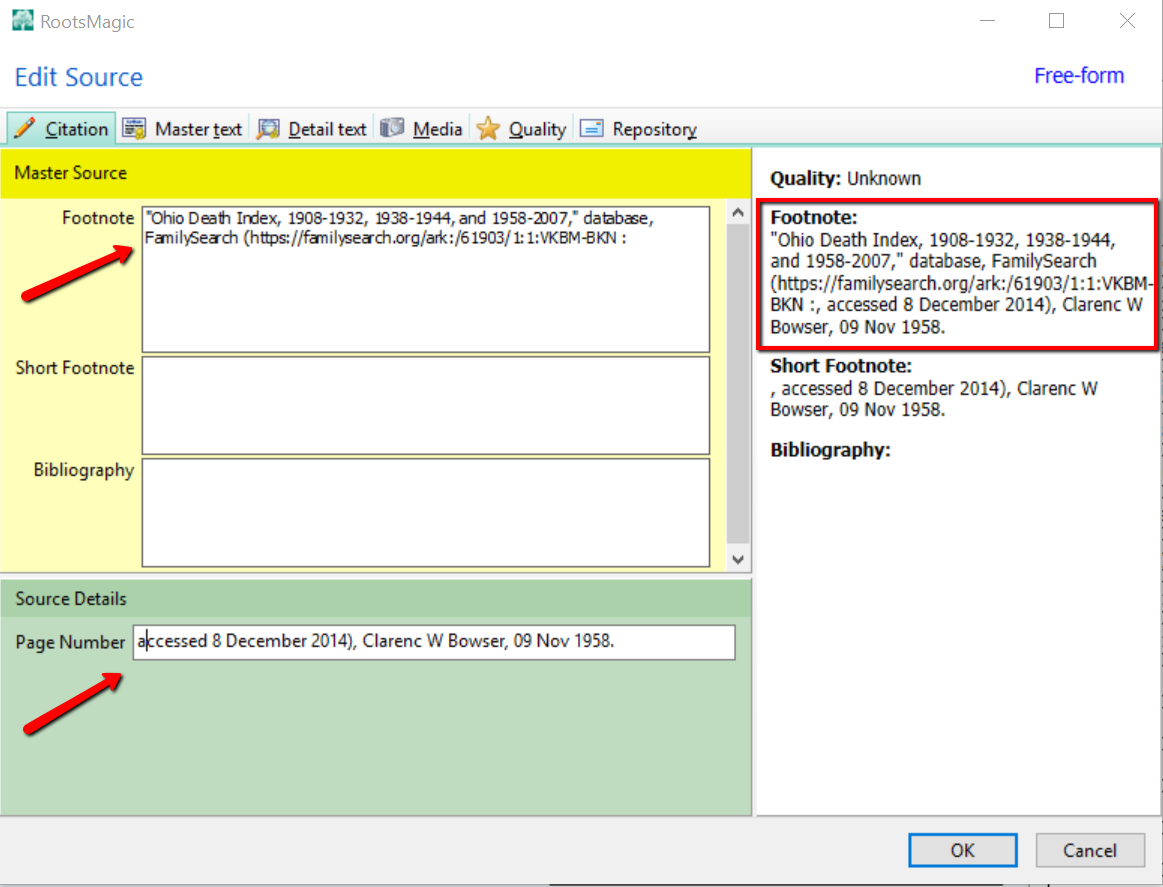
Now, let’s assume you copied the following source citation from a record you found at FamilySearch.org:
“Ohio Death Index, 1908-1932, 1938-1944, and 1958-2007,” database, FamilySearch (https://familysearch.org/ark:/61903/1:1:VKBM-BKN : accessed 8 December 2014), Clarence W Bowser, 09 Nov 1958.
The first part of the citation is the title of the collection and the location you found it. “Ohio Death Index, 1908-1932, 1938-1944, and 1958-2007,” database, FamilySearch (https://familysearch.org/ark:/61903/1:1:VKBM-BKN. That front half of the citation is going to go in the Footnote area of the next pop-up window. The remainder of the citation you copied is going to go in the Page field. Then click, OK.
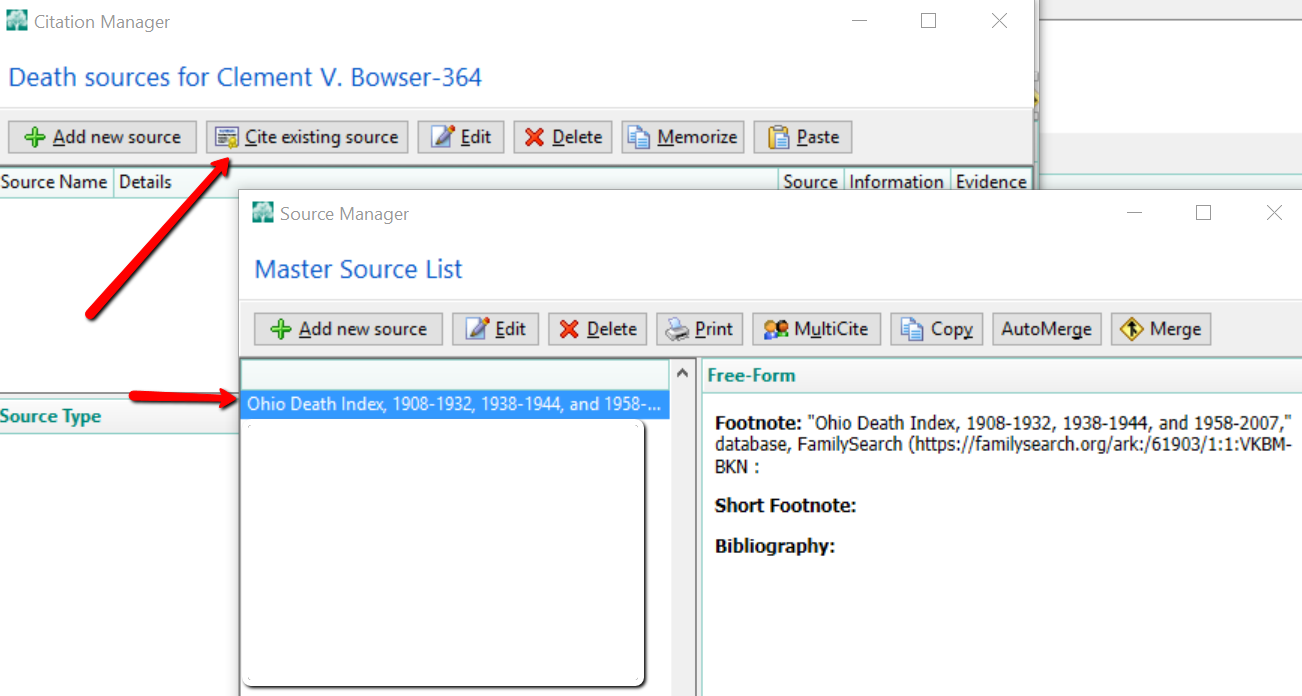
Notice, the entire footnote at the right of the screen looks like the one you copied from FamilySearch. You may wonder why on earth we separated the citation. Because, RootsMagic is going to remember you have a source citation from Ohio Death Index, 1908-1932, 1938-1944, and 1958-2007. The next time you find an ancestor’s death record in this index, you will not need to click Add new source. Rather, you will click Cite existing source, and choose the Ohio Death Index, 1908-1932, 1938-1944, and 1958-2007.
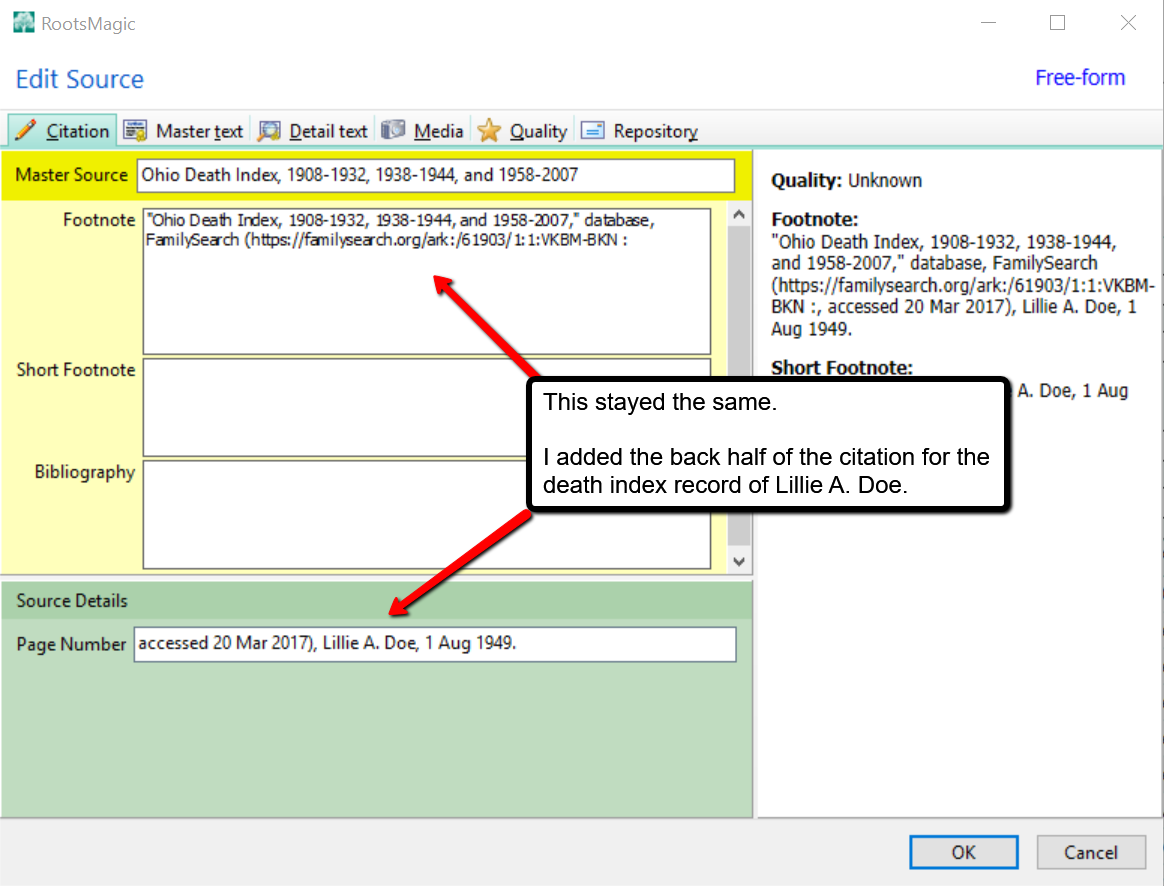
At the next screen, the Footnote field will already be filled out for you. All you need to do is fill in the Page field with the back-half of the new source.
More on Adding Source Citations for Genealogy
In addition to keeping your source citations on a genealogy software program, you may wish to clip the citation and add it to Evernote. Lisa Louise Cooke explains just how to do this in her article titled, “Cite Your Sources from FamilySearch with the Evernote Web Clipper.”
You can get loads more tips and tricks in our helpful Evernotefor Windows for Genealogists quick reference guide (also available for Mac users). Also, get a quick overview about this amazing product from this video clip on our YouTube Channel.