Doing genealogy research generates a wide variety of research notes: typed and handwritten, audio, photos, video, and screenshots of information on websites. If you want one tool to pull together your current research projects, Evernote might just be the answer. In this video and article you’ll learn the role that Evernote can play, what it is and how to set it up, and your options for using for free or as a subscriber.
Evernote for Genealogy Video Tutorial
In this video and article Lisa Louise Cooke will discuss:
What Evernote is and the role Evernote can play in your genealogy research
Use it for free or upgrade to get all the bells and whistles like OCR and use on all your devices. (We will be compensated if you use our affiliate link. Thank you for supporting this free show.)
Show Notes
In my recent videos on how to avoid research rabbit holes that keep you from your genealogy goals, I mentioned that I use Evernote to capture BSOs or bright shiny objects that are interesting but not what I’m working on at the moment. So in this video I’m going to explain what Evernote is, and how to get started using it.
Evernote puts all your notes in one place and offers an incredibly fast and easy way to retrieve them.
Evernote is a:
website
software program for your computer (Win & Mac) that you download for free from their website
mobile app (iOS & Android): search for Evernote in your device’s app store
a web clipper for your computer’s web browser
Benefits
Genealogy can get a big messy. Information can be gathered from countless sources and in a variety of forms. You could funnel things through a cloud service like Dropbox. However, because Evernote is a note taking app, it offers unique and super helpful features:
Create all types of notes
From all of your devices. Thanks to Cloud synchronization you can take a note on any device and always have access to the most current version. (Free mobile app)
Web clipping – It allows you to clip items from the Internet (rather than saving entire bulky web pages),
OCR technology makes notes (such as newspaper articles) keyword searchable (subscription)
Data like URLs and the date you created the note is automatically included
No total storage limit, just monthly upload
You can use it for free, and upgrade for all the bells and whistles.
Install the software on your desktop computer (Windows & Mac)
Download the web clipper to your browser (app store or Google it)
Download the free Evernote app to your mobile devices from the iTunes App Store or Google Play
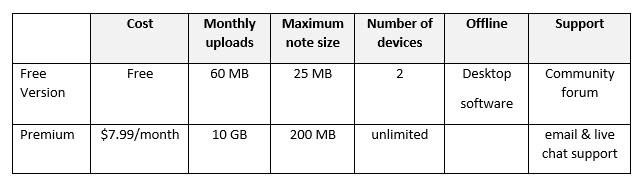
Features & Costs
(Subject to change. Visit evernote.com/compare-plans)
Evernote pricing plans comparison Sept. 2021 – See the website for the most current offer.
Software Home Layout
Evernote’s Home view gives you a summary of what you’ve got going on in Evernote. If Home is new to you and you don’t see it, simply head to the left Navigation menu and click Home.
Home gives you a place to sort of summarize what you’ve got going on in Evernote. It also allows you to add more personalization.
A fun way to personalize Evernote is by adding a background image. Click Customize in the upper right corner, and then click the Change Background button. Here you can add a preset image or add your own.
By default, Home comes with widgets such as:
Notes (highlighting your most recent notes, and Suggested notes based on your activity)
A Scratch Pad
Recently Captured items by type (web clips, images, documents, audio and emails)
While you’re in Customize mode, you’ll see additional available widgets like:
Calendar (allowing you to sync your Google calendar with Evernote)
Filtered Notes
Notebooks
Pinned Notes
An additional Scratch Pad
Shortcuts
Tags
Tasks
We’ll explore some of these further in a moment. But first, let’s create our first note!
All Notes View – SnippetView:
Left column = your files and organization
Center column = search for notes
Right column = the note you are currently working on
Change the layout by clicking the View Options icon (in SnippetView it appears at the top of the search column). This will give you a variety of layout options.
Change what appears or is hidden from view, and whether the view is dark or light by clicking View in the menu.
Notetaking 101
Create a note by clicking the New Note(+) button at the top of the screen.
Creating a new note is as simple as starting to type. Evernote saves your work instantly and without any extra effort on your part. Notes are saved in “the Cloud” on Evernote’s servers. This means all of your notes are automatically backed up. In addition, all of your notes will sync across all of your various computing devices. And Evernote facilitates sharing notes with others for research collaboration.
Click the Info icon at the top of the note to see the meta-data for that note. You can add and edit this information.
Types of Notes:
Typed
Sketched
Photos
Attachments
Video
Audio
Note Info has changed and can now be found by pressing Control + Shift + I on your keyboard, or clicking the More Actions (3 dots icon) in the upper right corner of the note and selecting Note Info.
Tagging is the Key to Organization
Add a tag based on important keywords associated with the note.
Examples of tags for genealogy:
Surnames (Cooke, Moore)
Record types (birth, census, land)
Locations (Indiana, Germany)
Time frames (1900-1909, 1910-1919)
Tasks (pending, add to database, follow up, etc.)
To tag a note, click Add Tag at the top of the note and select a tag from your list or add a new tag. Tags will appear in the left column. Click any tag in the left column to retrieve all notes with that tag.
Evernote Tasks
In June of 2021 Evernote added a Tasks feature. It operates just a little differently than how I’ve been using tasks. Evernote tasks are:
To Do Items
Note Specific (versus a tag which can retrieve all notes with that task)
Often Deadline Driven
Assignable to Others
Searchable
Where is the Trash?
You will find Evernote’s Trash bin at the bottom of the Navigation bar on the left.
Notebooks
Notebooks take organization a step further. I create notebooks sparingly. I use them to divide Evernote up into workspaces: Genealogy, Personal, Business, etc. I also use them for long-term and collaborative research projects that I may want to share with others. You can drag and drop notebooks on top of each other to create Stacks, although Evernote only allows one level of stacking.
How to create a new notebook:
In the menu select: File > New Notebook
Name the new notebook in the pop-up window
Select notebook type – usually you would set it up to synchronize, but you do have the option to have the notebook reside only on the computer it was created by selecting Local
The Cloud and Synchronization
Notes are saved on your computer and in the Cloud on Evernote’s servers. This means all of your notes are automatically backed up, and also accessible from your account on their website. Your notes will sync across all of your computing devices that have Evernote installed. There’s no need to manually sync with the new version. It happens automatically whenever you’re connected to the internet.
Web Clipping
As you visit webpages, you can clip just the portion of the page that you want to remember and keep rather than printing the page or bookmarking it. You can type the source citation directly into the note. Clippings appear as images in the note.
How to clip a screenshot using the computer software:
Right-click on the Evernote icon in your computer task bar.
Select Clip Screenshot.
Use the cross-hairs to draw a box around the desired content.
Release you mouse and you will see a quick flash on the screen indicating the content has been saved as a note in Evernote.
In Evernote click on the note to type additional information if desired.
How to download the free Evernote web clipper for your web browser:
Go to: evernote.com/webclipper
The download page will detect the browser that you are using and offer the correct web clipper. Click the download button.
The Evernote web clipper will install in your web browser (look in the upper right corner of your browser for the elephant icon.)
Sign into your Evernote account in the clipper.
Using the Browser Web Clipper:
When you visit a web page and find something that you want to clip, click the Evernote Web Clipper (elephant) icon in your web browser. The browser web clipper can save:
a full page (even the parts out of view)
an article
a simplified article (removing unwanted graphics and text not pertaining to the article)
a screenshot (where you precision clip with cross hairs)
a bookmark
As you clip you can select which notebook to file the note in and add any desired tags. It will also include the URL in the note header.
Search and Retrieval
Type a keyword into the search box and Evernote will locate and display notes that contain the keyword in the center column. This includes typed text from a website clipping or image, as in the example above. With a subscription, OCR technology makes it possible for you to search for words in Evernote to retrieve notes that include those words, both on the clipped image and in printed handwritten text.
These days we are all collecting more ebooks than ever before. We also have more devices than we’ve ever had before. Here’s a solution that gives you access to your ebooks from one convenient location no matter which device you are using.
The Advantage of eBooks
While you may love the feel of the pages of a book rifling through your fingers, there is a distinct advantage to collecting many of your genealogical reference materials and books ebooks. They don’t take up precious shelf space in your house!
However, I don’t live in a digital fantasy-land. I’m keenly aware that there are some challenges you may want to avoid:
purchasing an ebook and downloading it to one device, and then trying to figure out how to access it on your other devices
corralling your ebooks from different sources all together
having to pay for an app or web service to manage them
Don’t Reinvent the Wheel
If you’ve ever attended one of my genealogy classes, or watched one of my videos, at some point you’ve probably heard me say that I use Google Books on a daily basis for genealogy. I don’t say that just because the service provides access to over 25 million books, many of them fully digitized and searchable, and downloadable. It also provides you with your own personal library. Let’s take a look at how Google Books and Google Play Books work together to make that possible:
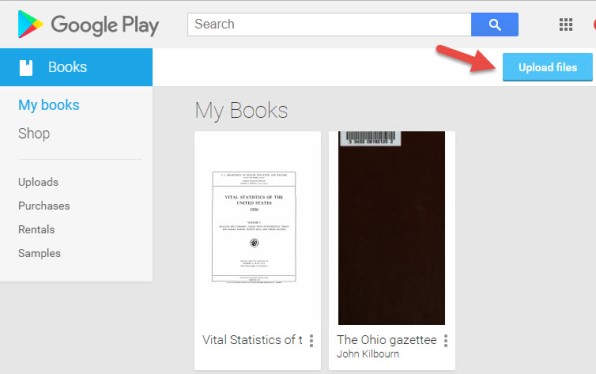
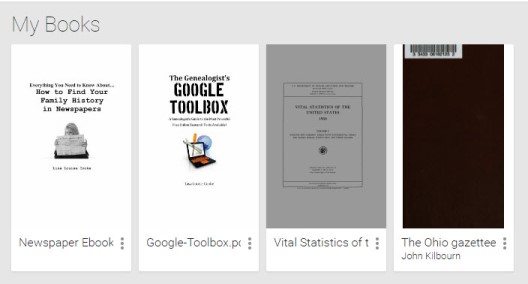
Google Books is a free and powerful service that also allows you to have your own library within it called My Library. As you search for and find ebooks to aid you in your genealogical research, you can save them to your library.
Google Play Books, is sort of the other side of Google Books. It is a vast ebook store that includes a feature called My Books. When you purchase an ebook, it is saved to your My Books. However, it also includes all ebooks that you have saved to your Google Books My Library. Even better, it allows you to upload your own ebooks! This makes it a central clearinghouse for all of your ebooks.
Here’s the bottom line. Think of My Books and My Library as the same thing in two different places: a personal library for your free, purchased and uploaded ebooks. The only reason they have different names is because Google Books has evolved over time into a book store as well. Don’t worry about that. Just know that whether you are searching through Google Books, or shopping in the Play book store, your library is right there with you, no matter what device you are using.
How to Start Using your Google Play Books Library
To get started, all you need is a free Google account, which you very likely already have. Go to https://play.google.com/books and sign in. In the menu on the left, click My Books. If you have ever saved a free ebook to your My Library in Google Books you should now see it on your screen.
This library is a place where you can save, upload, and access your digital books from any mobile device. This means everything is conveniently in one place, and accessible from all of your computing devices, both Apple and Android. You’ll have the freedom to read your favorite books on the go, and to access your digital genealogy research library at the drop of a hat.
Yes, there are some other services out there that could also do the job. But if you’re like me and don’t want to invest the time to learn and pay for yet another tech tool, Google Play Books is a great solution, because we are already using Google Books for our genealogy research.
How to Upload Your Own eBooks to Your Google Play Books Library
Let me walk you through the simple steps to putting this free tool to work for you:
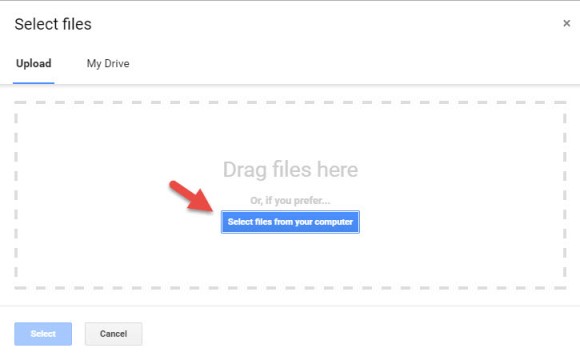
1. First, open your web browser and log in to your Google account.
4. Select your ebook files from your computer folders, or drag them into the box shown. You can also click on My Drive to select files from Google Drive. You can choose epub documents or PDFs.
Now, let me stop right here for a second and distinguish between doing this on a computer, and doing it on a tablet or smartphone. What I’m illustrating here is on a computer. I always recommend when you purchase ebooks to download them first to your computer, regardless of whether you plan on uploading them to Google Play Books. However, if you do want to do this on a tablet, for example, there are currently two options from which to pull your ebooks:
“My Drive” which is Google Drive, or
click “Select files from your computer” then tap “More” and select Dropbox.
Trust me, things will work more smoothly if you use your main computer as your hub for downloading, and then upload directly to your Google Books library.
Other things that are good to know:
It may take a minute or two to upload an entire book.
The cover will be the title page, not the actual dust-jacket cover you might be used to.
Currently, you can only search within books you obtain from Google (both free and paid), not the ones you upload.
You can upload 1,000 books into your Google Play Books library.
It’s private. Your books are only visible to you when you login to your Google account; you’re not sharing them with the world.
Your Google Books Library on Your Mobile Device
So now you have found free historical ebooks on Google Books (if you haven’t, take a moment and click here to read my article about using Google Books) and saved them to your Google Books My Library. Then, you uploaded your own ebooks and PDFs to Google Play Books. The final step is to jump on all of your smartphones and tablets and head to the app store. Search for Google Play Books and download the free Google Play Books app to each device. Sign in to the app with your same free Google account, and you’ll have access to all of your ebooks. Your library can now travel with you in your purse or tucked into your pocket.
In the app, tap the three horizontal lines icon in the upper left corner, and then tap My Library. You’ll find your ebooks sorted under the following tabs:
All Books
Purchases
Uploads
Samples
By tapping the three uneven horizontal lines icon in the upper right corner, in each category you can sort your books by:
Recent
Title
Author
Those Pesky Variable Formats
eBooks come in several different formats. While I’m not covering in this article how to convert file types or deal with DRM protected books, there are resources available to help you do so.
The answer? Just Google It!
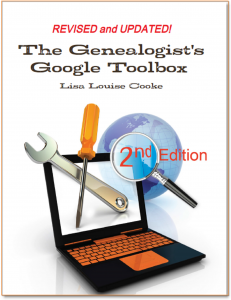
And if you need help figuring out how to effectively Google search, I have a book for that!The Genealogist’s Google Toolbox–the ultimate guide to using all of Google, including a full chapter on Google Books.
PDF – I Love You!
Many white-papers, scholarly works, and quick reference guides come in PDF format, and they upload like a breeze.
PDFs are so versatile, and they play ever-so-nicely with Google Play Books. It’s just another reason to love your Google Books library.
Stock Your Google Books Library
Are you feeling like your Google Books Library has room to fill? All of our quick reference guides are easy-to-upload PDFs, and all of the following genealogy resources are available as digital downloads in the Genealogy Gems store:
For a hand-picked list of novels and other great leisure reading for genealogy lovers, visit the Genealogy Gems Book Club page. I know you’re going to love our suggested best-sellers and best-kept-secrets about family, the search for identity, and fascinating stories in history.
VIDEO & SHOW NOTES: Video #4 of our 25 Websites for Genealogy Playlist. In this video, my guest presenter Gena Philibert-Ortega covers digital collection websites that are must-haves for family history research. You’ll find plenty of genealogy gems waiting for free at websites #18 through 22.
Websites 18 through 22 of our 25 Websites for Genealogy
Some of these websites will be new to you, and others are going to be very familiar to you. In talking about the familiar websites, I want to get you thinking about them differently, explain a little bit more about what you can do at these websites, and how to get the most out of them.
In this series of 25 Websites for Genealogy, we’re going to be looking at websites in different categories. Our third category is Digital Collection websites (#18 through 22).
At the DPLA you can search for public domain research materials that will benefit your genealogy research. It offers a searchable access to millions of items including photographs, manuscripts, books, sounds, moving images, and more from libraries, archives, and museums around the United States.
According to Lisa Louise Cooke, Google Books is the tool you should use every day for genealogy. It puts 25 million digitized and searchable free books at your fingertips.
Learn much more about how to get the most out of Google Books with these videos by Lisa Louise Cooke:
If you’re looking for new information about your family history, an important website to add to your research list is the Internet Archive. It’s a free website that attempts to archive the web, and that includes a vast array of genealogy materials!
Founded in 2008, the non-profit HathiTrust provides access to 18+ million digitized items in the HathiTrust Digital Library. Reading access varies depending on the item and whether you belong to a participating organization, but it’s definitely worth a look.
Finding German hometowns can be challenging. Guest blogger Camille Andrus, a professional genealogist specializing in German research and Project Manager at Legacy Tree Genealogists shares 3 free German genealogy websites to put your ancestors on the map in the former German empire and modern-day Poland.
Map of German Reich 1871–1918. from kgberger, Creative Commons license, Wikipedia.com;
Anyone tracing German ancestors quickly finds themselves puzzling over maps in a region that has experienced a lot of change. Camille Andrus of Legacy Tree Genealogists recommends these 3 free German genealogy websites to help you navigate the former German empire–from Pomerania to Prussia to Poland. Here are her picks and her explanations for using them.
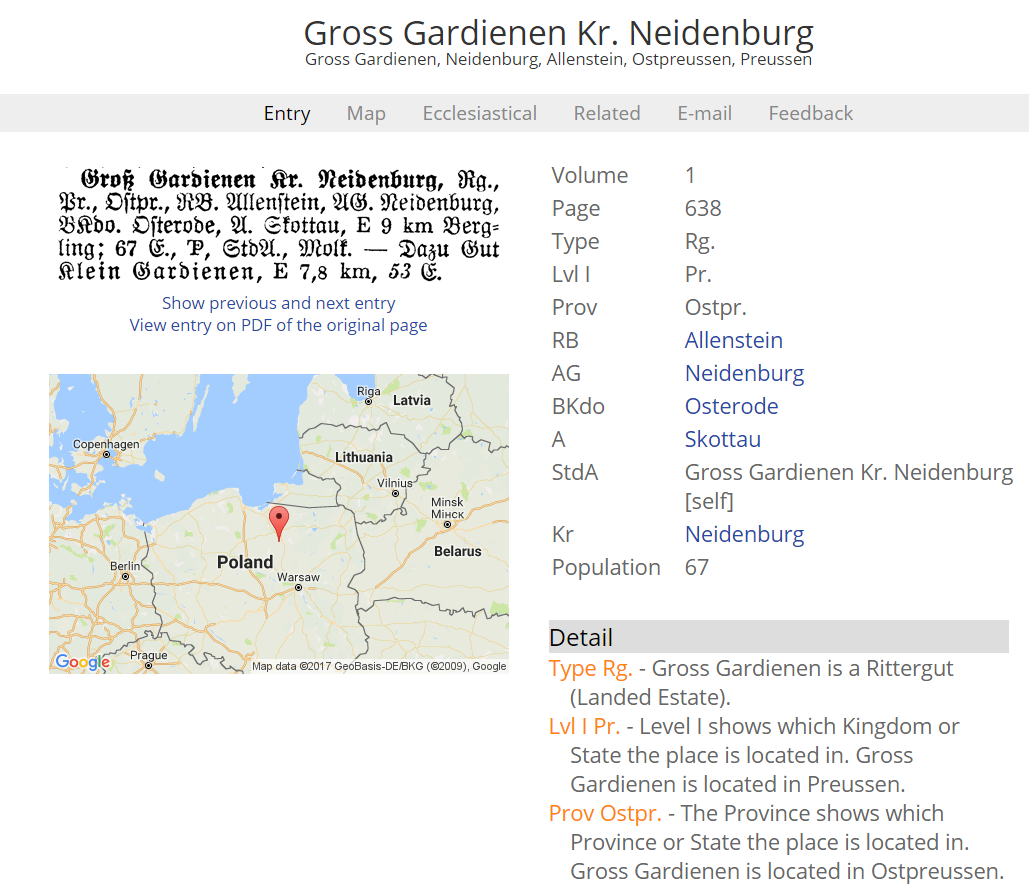
“For years, novice genealogists who found themselves embarking on the road of German genealogy were discouraged when needing to decipher an entry for their town in Meyers Orts- und Verkehrs-lexikon des deutschen Reichs (commonly known simply as Meyers or Meyer’s Gazetteer of the German Empire) due to the old German font in which the book was printed and the plethora of abbreviations that were used. To address this obstacle, the website www.MeyersGaz.org was created.
This online database not only explains the text and various abbreviations in the town entry that are found in the original printed version of Meyers, but also pinpoints the location of the town on both historic and modern maps, indicates the Catholic and Protestant parishes to which residents of the town would have belonged, and notes the distance from the town to all parishes within a 20-miles radius.
The database also allows users to search for a town using wildcards. This is especially useful when the exact spelling of a town is not known. For example, if the record on which you found the new town name indicated that the person came from Gross Gard…. where the second part of the word was smudged or illegible, you could simply put “Gross Gard*” into the database. In this case, the only two options would be Gross Garde in Pommern and Gross Gardienen in East Prussia. If you have a common town name such as Mülheim, you can filter the search results by province.”
“Kartenmeister is a database for towns which are found east of the Oder and Neisse rivers in the former German Empire provinces of East Prussia, West Prussia, Brandenburg, Posen, Pomerania, and Silesia. This area is now part of modern Poland. The database allows users to search for towns using either their German or Polish name.
Again, using Gross Gardienen as our example town, we learn that the Polish name for the town is now Gardyny and is located in the Warminsko-Mazurskie province. Like MeyersGaz.org, collaboration between users is encouraged. Individuals can enter their email address into a mailing list according to the town they are interested in and specify surnames they are researching in that town.”
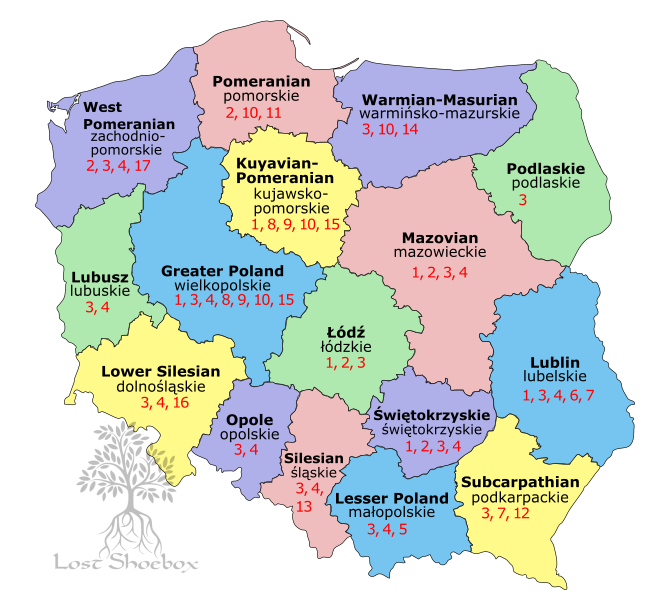
Map of Poland from Lost Shoebox shows where to find online records for each province.
“This website is an index to 17 websites focused on research in Poland. The list of websites corresponds with a map of Poland divided into its various modern provinces. Each number (representing a website) is listed on the map in each province for which it has records. Some websites are listed for nearly every province, while others show up for only one or two. The 17 websites featured on Lost Shoebox include either direct access to digital images, indexes to vital records, or lists of microfilms or other archival holdings.
If we were searching for records for Gross Gardienen or other nearby towns, we know from Kartenmeister that we would need to look in the Warminsko-Mazurskie province. The map shows the numbers 3, 10, and 14.” A corresponding key sends users to the appropriate websites.
“The third website on the list for the province brings us to the website for the Polish State Archive in Olsztyn. There are a plethora of digital images for both Evangelical church records and civil registration records available on this website.”
Camille Andrus is a Project Manager for Legacy Tree Genealogists, a worldwide genealogy research firm with extensive expertise in breaking through genealogy brick walls. Her expertise includes Germany, Austria, German-speakers from Czech Republic and Switzerland and the Midwest region of the U.S., where many Germans settled.
Here’s the latest news from the Federation of Genealogical Societies and their 2018 conference. FOR IMMEDIATE RELEASE 3 May 2018 – Austin, Texas Registration is open for the Federation of Genealogical Societies Annual Conference in Fort Wayne, Indiana 22-25...


 Camille Andrus is a Project Manager for Legacy Tree Genealogists, a worldwide genealogy research firm with extensive expertise in breaking through genealogy brick walls. Her expertise includes Germany, Austria, German-speakers from Czech Republic and Switzerland and the Midwest region of the U.S., where many Germans settled.