It’s time for the third part of our disaster planning process in honor of National Preparedness Month in the United States. Two weeks ago, I talked about assessing your home archive and research files and prioritizing the items you want to protect. Last week, we talked about making copies of important originals and other valuable items. This week:
PROTECT PRECIOUS ORIGINALS. After you’ve duplicated your originals, take steps to preserve them. How exactly you do this depends on what you’re protecting; how much time and money you’re willing to spend; and how you plan to store or display them. The core strategy is to store them in appropriate archival materials away from direct light and extremes in temperature and humidity. No damp basements or hot attics! But what materials constitute safe storage are different for paper items, different types of photos or cloth, and electronic items, so you need to do a little research. (Hey, we genealogists are good at that!)
Several resources can help you learn more about giving your family artifacts the protection they need, including:
Guide to Collections Care, a free e-booklet with top-notch archiving advice from Gaylord, an archival supply company.
Disclosure: This article contains affiliate links and Genealogy Gems will be compensated if you make a purchase after clicking on these links (at no additional cost to you). Thank you for supporting Genealogy Gems!
The latest tech news from Google Earth, FamilySearch and MyHeritage
Alice’s Story – genealogy research with blogger Julianne Mangin
Cemeteries – both for ancestors and their pets
Please take our quick PODCAST SURVEY which will take less than 1 minute. Thank you!
NEWS:
Google Earth News
Jennifer in California sent me a fascinating item recently , and she says “Thought you might get a kick out today’s blurb from Google, where they pat themselves on the back for what can be done with Google Earth. No argument from me; it’s amazing!”
So, what can be done with Google Earth besides all the family history projects that I teach here on the podcast and in the Premium videos? Well, Peter Welch and Weekend Wanderers in the UK are using Google Earth to find treasure!
FamilySearch.org, the free and massive genealogy website from the Church of Jesus Christ of Latter-day Saints has added a new way for you to add more memories to your tree.
In addition to photos you can now add audio both at the websiteand the FamilySearch FamilyTree and Memories apps which you can download from your mobile device’s app store.
So now as you’re selecting and uploading family photos to familysearch, you can also gather and record the stories that go with those photos. It’s sort of like being able to write on the back on the photograph, but in an even more personal way.
Your voice, and the voices of your relatives can now be part of your family’s history.
From the FamilySearch website: “Photos and audio attached to deceased ancestors can be viewed by other users on the FamilySearch Family Tree. To protect privacy, photos and audio attached to living people can be seen only by the person who added the memory unless that person shares the memory or album with another user.”
MyHeritage App update
Among the newly introduced features are Family Timelines, the ability to view family trees that you’re matched with, the ability to choose which information you extract from Smart Matches™, an improved research page, and more. Read all about it here
From Craig: “After finding my Paternal grandfather and great-grandfather, I looked for my Paternal GG Grandfather in the same area. No luck. I went to the R.B. Hayes library in Tiffin, Ohio and started looking at every page in the burial listing for the township I thought he would be in. And there he was – last name misspelled! (The “A” was changed to a “K”.) I was able to drive over to the cemetery and located his stone – still readable after his burial in 1885. I plan to go back to the area this summer to look for his wife, who was buried elsewhere (they were separated.) I wish I could get someone to update the lists with the correct spelling, to match the gravestone and census papers, but that seems impossible to do.”
From Ann:
“My brother Ray says we have visited more dead relatives than live ones. Trying now to visit the relatives above ground!”
From LeRoy:
Spent many hours walking, crawling, pushing through brush brambles and briers just to find and take pictures of tombstones. I regret only one such adventure. If I may. My sweetheart and I went to a small cemetery in New Jersey to gather family names and pictures for Billion Graves and our personal records. While I was taking pictures, my wife was clipping brush and bushes from the stone that identified her families plot.
We had a great day. I filled two clips of pictures and my sweetheart did a magnificent job on that stone. It was only a few hours later, when she started itching that I really “looked” at the pictures and realized that the brush that she cleared from that stone was poison ivy. Wouldn’t have been so bad, but when she found that I’m not affected by poison oak, ivy or sumac. She was not happy.
From Shirley:
I have recently started doing ancestry research and have been astounded at what I have found. No creepy tree stories. However, it is nice to know that some ancestors took special care to by buy family plots even though they knew eventually the girls might marry and want to be buried with their husband. I found it interesting that both my grandfather and my grandmother are both buried with their individual parents.
From Patsy:
Shirley’s story jogged my memory. My mother died in 1934 when I was 4 years old. She is buried in her father’s plot rather than my paternal grandfather’s plot. I have wondered for years why the burial was arranged that way and imagine all sorts of situations. Were the families feuding? Was one family more financially able to foot the bill. Did my paternal grandfather not like my father? Hmmmm………
From Sharon:
I checked out this book from the local library about a month ago. Decided I needed my own copy. All genealogist should read it. It is very informative & entertaining.
From Marinell:
About 5 years ago I found the farm on which my gr great grandparents were buried. The tall granite marker with the parents’ names had been knocked over, the foot stones stacked and several large rocks were around the monument and it was in the middle of a field that was being planted and harvested. We made contact with the owner and received permission to have it raised.
In the meantime, I found an obituary for a son who was buried on the family farm. I also found an article about a woman who did dowsing, contacted her and she agreed to come perform the dowsing. I was videoing it when my phone went totally dead! I had never had that happen and it was charged. Thirty minutes later it came back on mysteriously!
She found 2 adult women, 2 adult men and three toddlers. After further search I found another obituary for a grown daughter buried there and 3 toddler grandchildren who died in 1882. She said that the large rocks would have marked the graves. Sadly, they had totally desecrated the family cemetery. But I was excited to learn all I did and was startled by the phone totally dying.
We first talked to Julianne last year in Genealogy Gems Podcast episode 219. In that episode we explored the tragic story of Julianne’s ancestors, the Metthe family. It was a riveting case study of the twists and turns that genealogy can take us on.GEM: Checking in with Julianne Mangin
Julianne had originally been a bit of a reluctant genealogist. But after a 30 year career in library science, including 14 years as a librarian and website developer for the Library of Congress in Washington DC, she could couldn’t help but try to find the truther in the piecemeal stories that she was told by her mother.
Julianne has continued to research and write at her Julianne Mangin blog, and I thought it would fun to check back in with her and see what she’s been up to.
Her latest blog series is called Alice’s Story. It follows the path of discovery she followed to uncover the story of a previously unknown aunt.
The research began where most good genealogical research begins: at the end of Alice’s life and her death certificate.
Institutional Records – But with few records and no first-hand interviews available, Julianne turned to researching the institutions themselves to dig deeper into Alice’s experience. Resource: Genealogy Gems Premium Video: Institutional Records (membership required)
State Census Records can help fill in the gaps between the federal census enumerations. Search for “state census” in the card catalog:
“Copies of many state censuses are on microfilm at the Family History Library. The Family History Library’s most complete collections of state censuses are for Illinois, Iowa, Kansas, Massachusetts, Minnesota, Mississippi, New Jersey, New York, Rhode Island, and Wisconsin. However, censuses exist for the following states also:
Old Postcards are a great resource for images. Resources: Genealogy Gems Premium Podcast episode 16 and episode 76 feature strategies for finding family history on ebay. (Genealogy Gems Premium Membershiprequired)
Become a Genealogy Gems Premium eLearning Member Gain access to the complete Premium podcast archive of over 150 episodes and more than 50 video webinars, including Lisa Louise Cooke’s newest video The Big Picture in Little Details. Learn more here
Institutional Annual Reports – Julianne searched for annual reports to the Legislature for more details on the various institutions where Alice resided. Resources: Library of Congress Catalog WorldCat.org Google Books
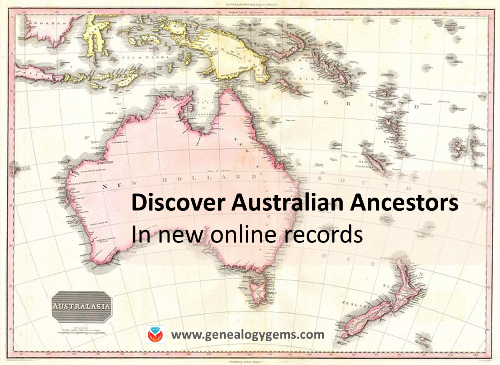
These new and updated genealogical records span three continents and date to the Middle Ages: Australia colonial portraits, New South Wales and Queensland; millions of new U.S. marriage records, a WWI online exhibit, Liverpool church records, a Romanian digital archive, German (Bavarian) civil registers, Confederate musters (GA), PA obituaries, and a Minneapolis newspaper.
Featured this week: Australia Colonial Portraits, New South Wales and Queensland
The State Library of South Australia announced a newly-digitized collection of more than 1,000 photographs of South Australian colonists. The original photos have been on display at the State Library. “In 2017 they have returned as facsimiles (along with new indexes and online catalogue records),” says a Facebook post. Click to explore the men’s photos or women’s photos online for free. Several people have already identified their ancestors in these collections, judged by comments on the Facebook post. Even better news: the images may be freely copied and used. The Library responded to a question about use with, “The images are well out of copyright. We just ask that you cite as appropriate.”
Subscription website Findmypast.com has posted new Australia content, too:
New South Wales Parish Registers, Christ Church Cathedral Newcastle. “The records span the years 1804 to 1900 and will reveal the names of your ancestor’s parents,” states Findmypast. “Currently the collection holds just over 5,000 baptisms, around 2,200 marriages records, and just over 3,300 burials. Some burials have also been transcribed from newspapers and other sources.”
1881 British Census, Crew and Passengers on Ships arriving in New South Wales. “Over 19,000 records….These records pertain to British and non-British passengers and crewmen arriving at Sydney from 1 January to 31 March 1881….Each record will reveal the individual’s age, status, nationality, occupation and details of their voyage.”
New South Wales, Closer Settlement and Returned Soldiers Transfer Files. “Over 19,000 records have been added….These land transfer records can help you determine the property dealings of your New South Wales ancestors and see if they were involved in transferring land ownership. The records also include files relating to returned servicemen from the First World War who took part in the soldier settlement scheme.”
Queensland School Pupil Index. “This database covers over 1.6 million names drawn from 1,022 Queensland schools,” says the collection description. “The earliest date of admission is 1864…. Schools range from large city schools with admissions in the thousands to one-teacher country schools with a total enrollment of only hundreds. Some schools have long ceased to exist; others are still functioning.”
Europe – Digital image archive
Just shy of a half million images from the cultural heritage digital archive Europeana are now part of the new Creative Commons (CC) search database. Now it’s even easier to discover and share images about an ancestor’s life–and to identify images you can re-use without copyright restriction.
“A tool for discovery, collaboration and re-use, CC Search enables users to search a variety of open repositories through a single interface to find content in the commons,” explains a Europeana blog post. “The new beta version of the project, which was released in early February, includes simple, one-click attribution, making it easier to credit the source of any image. CC Search beta also provides social features, allowing users to create, share, and save lists as well as adding tags and favorites to the objects in the commons….These records can all be used for commercial purposes, and are also open for modifications, adaption, or to be built upon. Click here to learn more about WWI and other genealogy-friendly content at Europeana.
Ancestry.com has published a new collection of Freilassing, Germany, Births, Marriages, and Deaths, 1876-1985. “This collection contains civil registry records from Bavaria,” states the collection landing page. “It includes births covering the years 1876-1899, marriages from 1876 to 1932, and death records for the years 1876-1985. Freilassing is a community in Berchtesgadener Land, Bavaria. It is situated immediately on the German border with Austria and is adjacent to the city of Salzburg. Until 1923, Freilassing was called ‘Salzburghofen’ and this is the name given in many of the records.”
Romania – Digital Archive
Thousands of documents from medieval Romania have been digitized and published online at Arhiva Medievala a Romanie. It’s the first collection of its kind for the country, says an article at Romania-Insider.com. Because of the age and content of these documents, they likely don’t have direct genealogical research value for most people. But anyone with Romanian roots might enjoy getting a sense of the country’s deep history.
United States: WWI, Millions of Marriages and More
A new online exhibit from the Library of Congress can help you better picture your U.S. ancestors’ experiences during and after World War I. “‘Echoes of the Great War: American Experiences of World War I‘ examines the upheaval of world war as Americans confronted it— both at home and abroad,” states the webpage. “The exhibition considers the debates and struggles that surrounded U.S. engagement; explores U.S. military and home front mobilization and the immensity of industrialized warfare; and touches on the war’s effects, as an international peace settlement was negotiated, national borders were redrawn, and soldiers returned to reintegrate into American society.”
Also in the U.S.: Findmypast has added over 6.7 million records to its U.S. marriage records collection. “New additions covering 127 counties across 18 states have been added to our collection of US marriages,” states a press release. “This is the first time ever these records have been released online, providing you with brand new opportunities to expand your family tree.” The 18 states with new records are Alabama, Arkansas, Connecticut, Delaware, Georgia, Iowa, Kentucky, Maine, New Hampshire, New Jersey, North Carolina, Ohio, Oregon, Rhode Island, Utah, Vermont, Washington and West Virginia.
More from across the U.S.:
Georgia: Confederate Muster Rolls. The Georgia Archives has digitized and published its collection of Confederate Muster Rolls. According to the site, “The majority of the company muster rolls in this series are from military organizations created by the State of Georgia during the Civil War for service within the state. These military organizations include the Georgia Army (1861), the Georgia State Guards (August 1863-February 1864), and the Georgia State Line (1862-1865). The Georgia Militia is referred to as Georgia State Troops. Some units were later turned over to Confederate service. There are also nearly 250 muster rolls from Georgia Volunteer Infantry.”
Minnesota: Newspapers.com now hosts the entire run of The Minneapolis Star Tribune, which dates to 1867. That’s more than 54,000 issues, among which are a 1976 headliner about a teenage star in the making: Prince. (See that article here for free, just because you can).
Source for our lead image: Click here to view map of Australia
Disclosure: This article contains affiliate links and Genealogy Gems will be compensated if you make a purchase after clicking on these links (at no additional cost to you). Thank you for supporting Genealogy Gems!
Like anyone else who sells a popular product, Ancestry.com is always tweaking little things to improve the user’s experience. They’ve been working on some updates, some of which you may have noticed on the site over the summer and some of which are rolling out gradually over the next couple of weeks:
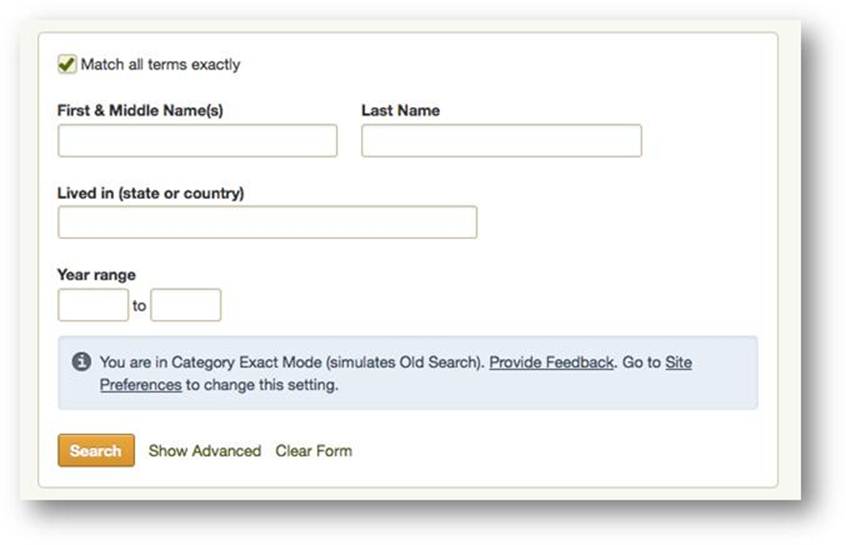
1. A simple search form with the check-box option to match all terms exactly.
2. Search results shown grouped by category. This is great–no more scrolling through lots of results when you’re looking for specific kinds of records. This sort feature also reminds us to check categories we may be overlooking, like city directories and local histories. These first two-features are opt-in: learn how to do it here and see what it looks like below:
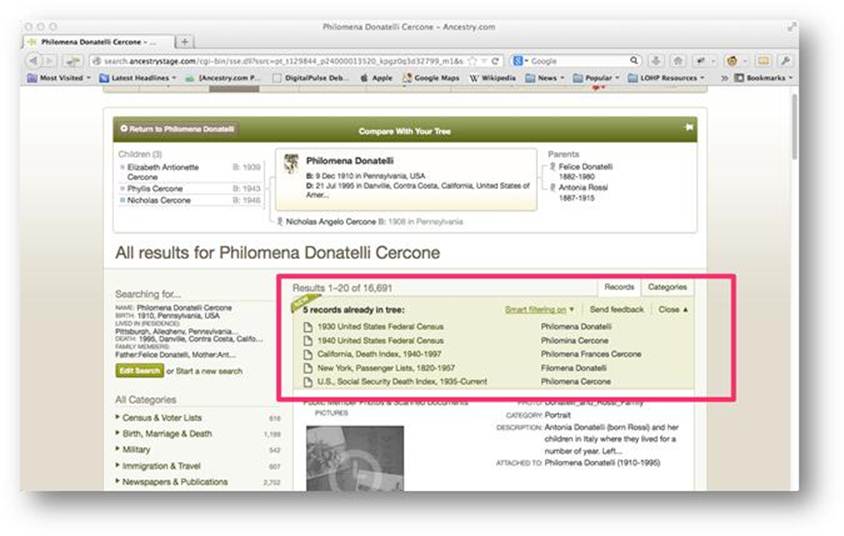
3. A summary box at the top of search results showing what you’ve already attached to your ancestor. The list is sorted alpha-numerically so you can see easily which records have been found and where there might be gaps (see what it looks like below). You can collapse this list if you want to give you more room to see the search results.
4. A filter that removes search results similar to types you already found for that ancestor. For example, if you already have a death record for someone, the filter will remove other death records. “Smart filtering” is an optional feature, so you can still choose to see the full list. Read more about it here and see it here:
Ancestry says they will provide plenty of feedback opportunities for these new features. Don’t be shy: tell them what you like (and what you don’t) and why!
 It’s time for the third part of our disaster planning process in honor of National Preparedness Month in the United States. Two weeks ago, I talked about assessing your home archive and research files and prioritizing the items you want to protect. Last week, we talked about making copies of important originals and other valuable items. This week:
 GEM: Genealogy Research with Julianne Mangin


