Resources
- Downloadable ad-free show notes (Premium subscription required Become a Genealogy Gems Premium Member today.)
In this episode, we’re going to be visiting two of the most pivotal states in the U.S. for genealogy research. These states played key roles in the development and expansion of the United States of America, and we’re going to explore a top online resource for each.
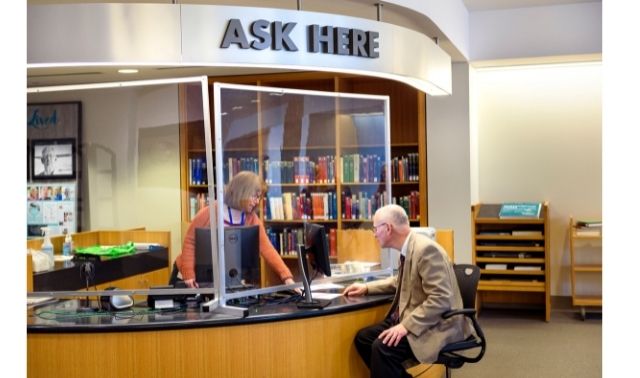
First up is the state of Pennsylvania, officially known as the Commonwealth of Pennsylvania. It was founded in 1681 through a royal land grant to William Penn, and established as a haven for religious and political tolerance. And since for over 300 years the port of Philadelphia was a major gateway for arriving immigrants, many many family trees include people who passed through Pennsylvania. One of the best and most important resources for records of interest to genealogists is the State Library of Pennsylvania, and we’ll be exploring it today with Kathy Hale, the Government Documents Librarian, and Amy Woytovich, the Genealogy Librarian at the State Library of PA.
Then we will head west to Ohio which joined the union back in 1803, and where many of our ancestors settled, or passed through on their way West. The Ohio Memory website is a rich source of historical materials that tell the story of this state and potentially many American families. Jenni Salamon, the Ohio Memory Digital Services Manager will be joining me to explain the depth of the available materials and provide insight into how to best navigate the website.
The library has been a federal repository library since 1858, and is one of the oldest in the country. The government printing office deposits materials here.
The State Library of Pennsylvania physical collection includes:
The State Library of Pennsylvania digitized items include:
Pennsylvania Documents
Example: a report for Pennsylvania of the 25th and 50th anniversaries of the Battle of Gettysburg. Includes information gathered at reunions including names, pictures, and more.
U.S. Government Documents – Serial Set
This collection includes reports to the legislature from agencies and institutions. Example: The Daughters of the American Revolution (DAR) were compelled to provide to Congress a yearly report of the names of people approved by DAR. These can be accessed through many libraries, the federal government or by contacting the State Library of Pennsylvania via email: Ra-reflib@pa.gov
Amy discusses research guides available on the website. However, here is the link to the topics she specifically mentions such as Cemeteries and Zeamer collection – recorded information about Cumberland County PA cemeteries.
These research guide pages include links to additional helpful websites.
At the top of the page look at the For General Public tab which will take you to all of the genealogy research guides. Visit the Genealogy page at the State Library of Pennsylvania.
The library’s collection of newspapers includes papers from all 67 Pennsylvania counties on microfilm. They do have a lot of digitized newspapers at the Pennsylvania Photos and Documents Collection at the Power Library.
You can find the Power Library by going to the libraries home page, and under the For General Public tab go to Our Collections > Power Library. Or visit the Power Library website at Powerlibrary.org.
Electronic Databases: you have to be a resident with a library card.
Digital Documents: you don’t have to be a Pennsylvanian to access this collection.
At the top of the Power Library home page on the right you’ll find Digital Docs and Photos.
There you will find many materials from Pennsylvania colleges including yearbooks. You can browse by subject area, with Genealogy being one of those areas.
At the time of the interview the library was not open for interlibrary loan and lookups. Check the website for the latest updates.
The library does loan its newspaper microfilm. Up to 5 reels of microfilm per request. Kathy says that if you find a newspaper article at Newspapers.com and you see the title, date and the page that an article is on, you can provide the information to the interlibrary load reference librarian at your local library and place a request for a scan of the article from the State Library of PA microfilm. The article can then be returned to you digitally through interlibrary loan. The digitized scan is yours to keep.
Amy’s Pick: Historic maps found at the library’s website Home > For General Public > Genealogy and Local History > Maps and Geographic Information. This includes Sanborn Fire Insurance Maps. Note: log in with a library card may be required. Contact the library with questions.
Kathy’s favorite collections include:
Usage rights and copyright are important considerations when utilizing library materials. Usage depends on the individual item’s copyright. It should be researched as much as possible. Check the meta data of digital images for copyright information.
“Think of Amy and I as your personal librarians.” Kathy Hale, Librarian
Contact State Library staff by phone at 717-787-2324 or by email at:
Learn More About the State Library of PA Collections
In episode 43 of Elevenses with Lisa we discussed genealogy records available for free at the Internet Archive. The State Library of Pennsylvania has been partnering with he Internet Archive to digitize many additional items from their collection. You can access these items for free at the State Library Internet Archive Collection. This collection includes a large number of World War I materials as well as a growing number of 19th and 20th century pamphlet volumes.
Maps for Genealogy
At the website go to Home page > General Public Tab > Our Collections > Search our Resources
On the map viewer page, click the thumbnail button (looks like a checkerboard) to see multiple pages at a time. You’ll find the Download button in the bottom right-hand corner. The Print button is in the upper right corner.
Cite your source: Go back to the result page, and scroll down. Click the red button called Cite This. This allows you to copy the source citation which you can then paste into other documents and programs.
Newspapers for Genealogy
The Library of Congress Chronicling America website has many Pennsylvania old newspapers, but it doesn’t include all of the newspaper that the library has in its collection. Here’s how to find old Pennsylvania newspapers at the State Library website:
This tip comes from my book The Genealogist’s Google Toolbox and my Premium Membership video The Genealogist’s Google Search Methodology.
Many websites have their own search engine. However, each search engine is only as good as it was programmed. If you can’t find what you want on a website like the State Library PA website, try using a Google site search. Site search tells Google to search for your search terms only on the website you specify. Here’s how to do it:
In my example in the video, you can see that Google found the one page mentioning the surname in a listing of microfilms much faster than I would have found it digging around and navigating the website itself. This page was not a card catalog entry so it would not have come up in a search of the catalog on the website.
On long pages such as in my example, I use Control + F (Windows. Command + F on Mac) to quickly find the surname on the page.

Website: https://ohiomemory.org
Special Guest: Jenni Salamon, Ohio Memory Digital Services Manager
If your family has any connection with the state of Ohio – and sometimes I think it’s hard to find anyone who doesn’t have at least one ancestor who did – then you’re going to love the Ohio Memory collection and website.
Even if you don’t have a direct connection with the state of Ohio, like all collections it’s worth taking a peek. Records don’t care about state lines, and many items in the Ohio Memory collection touch far beyond the Ohio border.
OhioMemory.org was featured in Family Tree Magazine’s 75 Best State Genealogy Websites list in a recent issue of the magazine. I host the Family Tree Magazine podcast, and recently had the opportunity to interview Ohio Memory’s Digital Services Manager, Jenni Salamon for that audio show. Since there’s so much to see at Ohio Memory I’m excited to share the video of that conversation.
Ohio Memory is the collaborative digital library program of the Ohio History Connection and the State Library of Ohio. Established in 2000. It was originally established as a bicentennial project they wanted a way to capture some of Ohio’s history and share it more broadly. Ohio turned 200 years old in 2003.
Ohio Memory worked with institutions around the state to build the online collection. They picked their favorite collections which were then digitized and made available as an online scrapbook. Initial submission by 260 institutions resulted in over 13,000 contributed items, and Ohio Memory continues to grow.
Most of the contributing organizations are public libraries, and some are university libraries. Other organizations such as historical societies, government institutions, special libraries, religious archives also contribute to the collection.
A wide-variety of materials make up Ohio Memory including:
All 88 Ohio counties are represented in the Ohio Memory collection.
Everything at Ohio Memory is digital and keyword searchable thanks to Optical Character Recognition (OCR). However, they do sometimes connect back to other catalog records.
When you use the search box on the home page you will be searching both the text and the metadata provided by the contributor. If you want to search just visual items (photos, images, etc.) select “exclude full-text sources.”
It’s important to use keywords relevant to the time period that you are searching. Restrict your format to what you want right from the homepage.
The newspaper collection of Ohio Memory does not overlap with the Library of Congress’ Chronicling America collection, but they are all part of the same story and collection. They have contributed a large amount of newspapers to Chronicling America over the years. At last count there are a million pages between the two collections.
Ohio Memory focuses on titles and time periods different from the content on Chronicling America. At Ohio Memory you’ll find deeper runs of newspapers and more recent newspapers. New newspaper content is being added regularly.
They also have some very early newspapers that are significant to Ohio history such as the Ohio State Journal which was the paper of record for Ohio during the 19th century. The Ohio State Journal collection covers 1830-1875 an important time period in Ohio’s growth and the Civil War.
The Lebanon Western Star newspaper from southwest Ohio near Cincinnati and Kings Island is another important newspaper. It covers Ohio history from a more rural area.
A lot of Ohio Memory’s public library partners have access to yearbook collections through their partnerships with local schools. Many have worked to digitize their materials and put them on Ohio Memory. Some are quite early, some more recent although not very recent due to privacy concerns.
Many of the yearbooks at Ohio Memory come from northwest and northeast Ohio. You’ll also find student histories from southwest Ohio from a couple of universities, as well as other related materials such as student photos.
Yes! They used to have one collection that was behind a pay wall. That was the Underground Railroad Wilbur H Siebert collection which features information about underground railroad activities in Ohio and beyond. It’s a strong resource for looking at research methods of the era, and the stories of how the underground railroad operated. That collection was opened up a couple of years ago and has remained free.
Videos, an FAQ and search guides are available to help you learn how to dig into the Ohio Memory website. You can also reach Ohio Memory by email for additional assistance.
They continue to digitize and add new materials based on their strategic goals. Recently they focused on President Warren G. Harding since it is the 100th anniversary of his election. They are continuing to add more content to that collection.
Ohio Memory has about 40 active partners around the state that are choosing items from their own collections for inclusion. Examples include Wood County in northwest Ohio, Mount Saint Joseph University and the Sister of Charity in the Cincinnati area. They welcome new partners every year.
While you may or may not find things specifically about your ancestors, Ohio Memory offers a wonderful opportunity to find things that help fill in their story and their community.
You are free to use items for educational and personal use without needing extra permission. If you’re a family historian and you are wanting to put a picture in a presentation for your family or you just want to keep it with your own research records, you are welcome to do so.
Jenni Salamon, Ohio Memory’s Digital Services Manager says that if you want to post something on social media, simply include a link back to the Ohio Memory site so others know where it came from Ohio Memory. If you want to use an item for a formal publication or commercial use, contact Ohio Memory. Copyright varies by item and research is required.
Fort Wayne, Indiana is the home of the second-largest free genealogy library in the country. Make your plans to visit today. Learn more at https://www.visitfortwayne.com
Learn more about the free genealogy resources atVisitFortWayne.com
Premium Members have exclusive access to:
Become a member here.
Don’t miss the Bonus audio for this episode. In the app, tap the gift box icon just under the media player. Get the app here.
The Genealogy Gems email newsletter is the best way to stay informed about what’s available with your Premium eLearning Membership. Sign up today here.
My genealogy research looks a lot like yours. Some family tree lines go back to pre-Revolutionary War. Other lines are richly researched well into the early 19th century.
And then there’s THAT family line. You know the one I mean. The one where the courthouse containing the records we need has burned down, or the records were microfilmed ages ago but are still sitting in the FamilySearch granite vault due to copyright issues. Or worst of all, it appears the needed records just don’t exist.
Don’t let these obstacles allow you to give up hope.
Every day, new records are being discovered and digitized. Records that have been languishing in a copyright stalemate might suddenly be cleared for publication. Or a cousin could contact you out of the blue and has the letters your grandmother sent hers. We never know when the records we’ve been waiting for, searching for, and yearning for, will bubble up to the surface.
Today I’m happy to share my story of a recent breakthrough that I never saw coming. Follow along with me as I take newly unearthed rocks and use tools to turn them into sparkling gems.
My one, agonizing family line that stops short in its tracks ends with my great grandfather Gustave Sporowski.
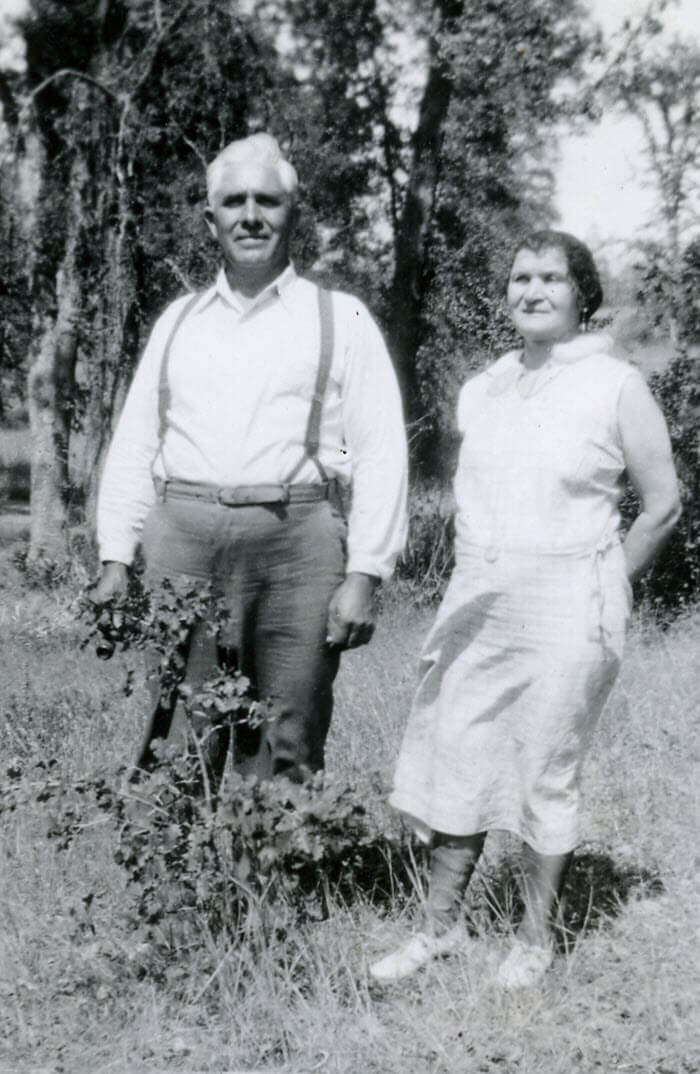
Gustave and Louise Sporowski (personal collection)
It’s almost embarrassing to admit. I’ve been at this nearly my whole life, and genealogy is my career for goodness sake! But there it is, a family tree with lovely far-reaching limbs except for this little stub of a branch sticking out on my maternal grandmother’s side.
I was about eight years old the first time I asked my grandma about her parents and their families. (Yes, this genealogy obsession goes back that far with me!) I still have the original page of cryptic notes she scratched out for me during that conversation.
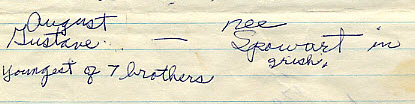
Excerpt from Grandma’s original notes. (Personal collection)
She had several nuggets of information about her mother’s family. However, when it came to her father Gustave, she only recalled that he was the youngest of seven brothers. No names came to mind. I’ve always felt that if I could just identify some of the brothers, one of them may have records that provide more details about their parents.
According to his Petition for Naturalization, Gustave Sporowksi and Louise Nikolowski were married in LutgenDortmund, Germany. This indicated that both moved west from East Prussia before emigrating. While I knew Louise’s immediate family were in the LutgenDortmund area as well, I had no idea whether Gustave moved there on his own or with his family.
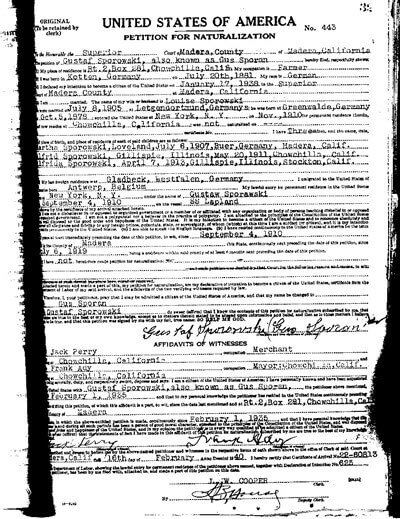
Gustave Sporowski’s Petition for Naturalization.
Gus (as he was later known) emigrated from Germany in 1910, landing at Ellis Island. He toiled in the coal mines of Gillespie, Illinois, and eventually earned enough money to move his wife and children west to California in 1918.
After filing his papers and years of waiting, he proudly became a U.S. citizen in 1940.
On that paperwork, he clearly states his birthplace as Kotten, Germany. You won’t find this location on a map today. In 1881, the year he was born, the area was East Prussia. I remember the hours I spent with gazeteers many years ago trying to locate that little village nestled just within the border of Kreis Johannisburg. Being so close to the border meant that he could have attended church there or in a neighboring district.
The records in the area are scarce, and today the entire area is in Poland.
Surprisingly, the records situation is quite the opposite with his wife Louise, also from East Prussia. She lived not far away in Kreis Ortelsburg, and the records for the church her family attended in Gruenwald are plentiful. I’ve managed to go many more generations back with her family.
And so, poor Gus alone sits in my family tree.
I periodically search to see if there’s anything new that has surfaced, but to no avail. I even hired a professional genealogical firm to review my work and suggest new avenues. I guess it is good news to hear you’ve pursued all known available leads, but it’s not very rewarding.
Over time, we tend to revisit tough cases like this less frequently. They become quiet. Digital dust begins to settle on the computer files.
And then it all changes.
I regularly make the rounds of the various genealogy websites, making note of new additions to their online collections. I typically publish the updates on a weekly basis here on the Genealogy Gems blog. It makes my day when readers like you comment or email, bursting with excitement about how one of the collections I mentioned busted their brick wall. I love my job.
This week I’m the one who is bursting!
It started simply enough. My third stop on my regular records round-up tour was Ancestry.com. The list of new records was particularly robust this week. The word “Germany” always catches my eye, and the second item on the list jumped out at me:
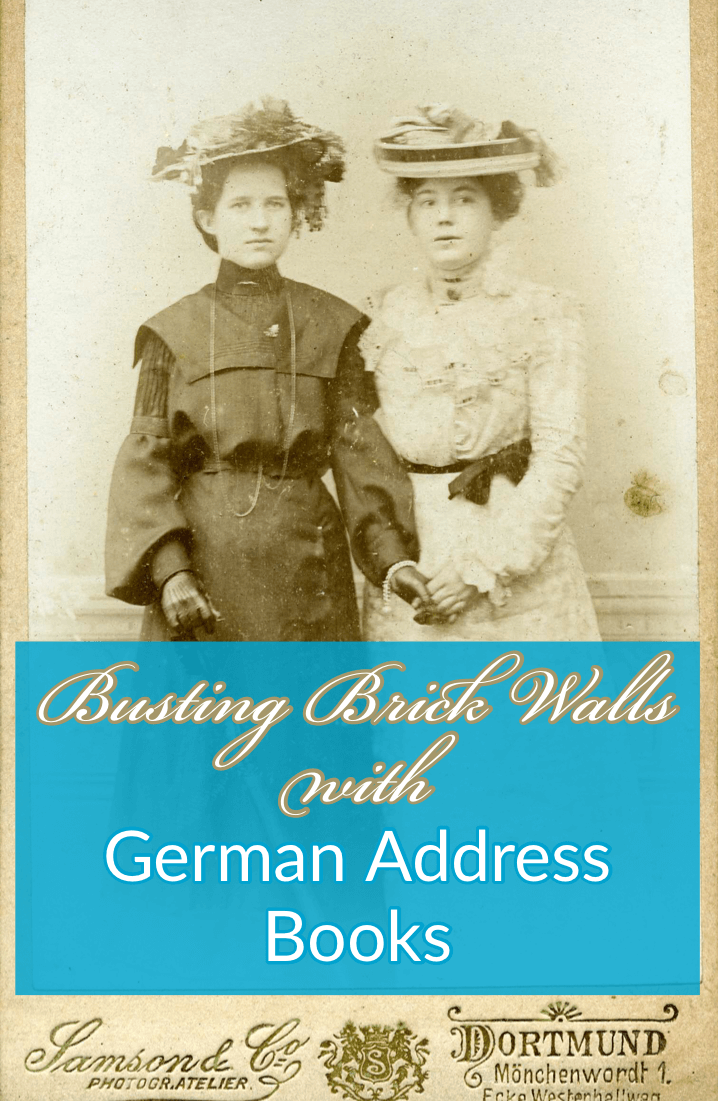
Germany and Surrounding Areas, Address Books, 1815-1974
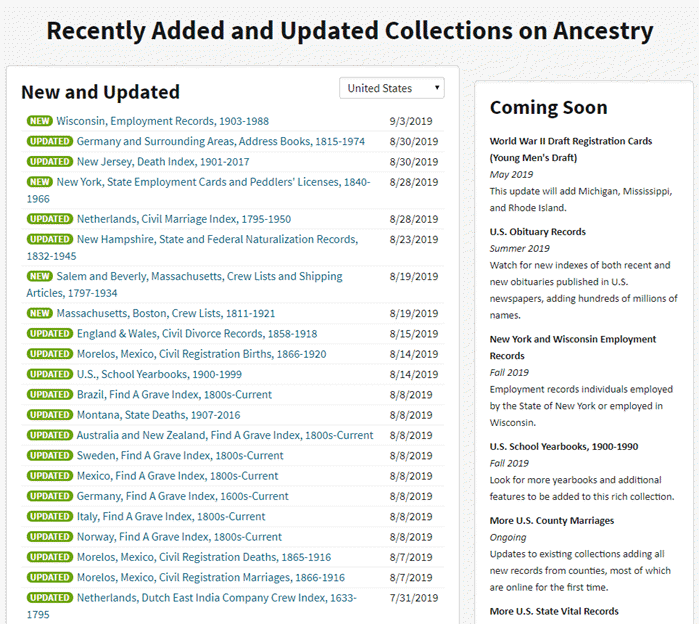
“Recently Added and Updated Collections on Ancestry,” Ancestry.com (http://www.ancestry.com : accessed 05 Sept 2019)
I should have had a healthy dose of skepticism that I would be fortunate enough to find anything. But to be perfectly honest, I felt instinctively that I would! Have you ever just had that feeling that your ancestors are sitting right there ready to be found? If you’ve been researching your family history for a while, then I’m guessing you have. Such a nice feeling, isn’t it?
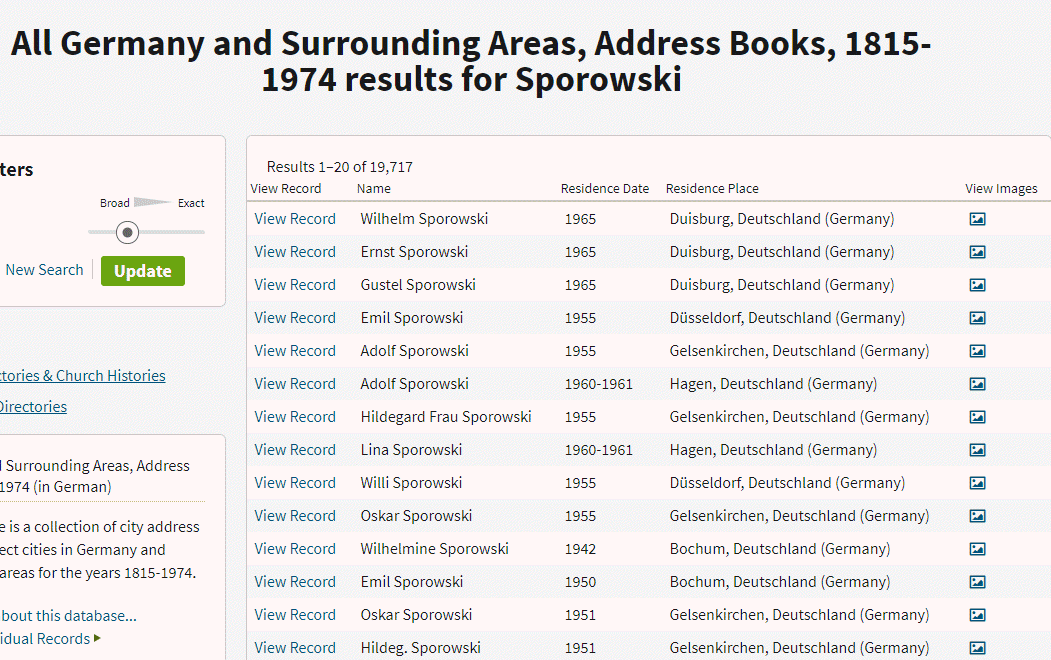
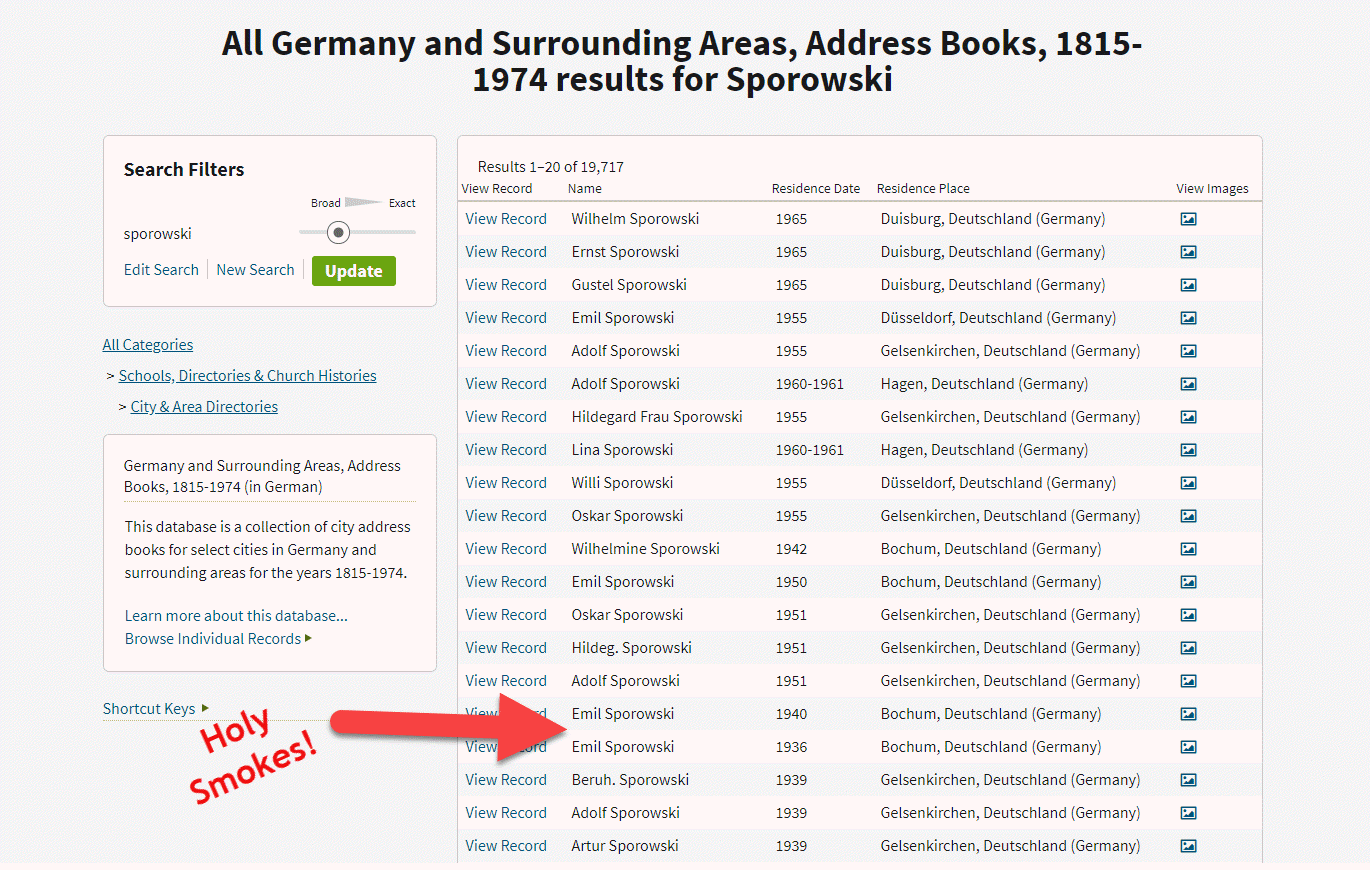
So, I clicked, and I simply entered Sporowski in the last name field and clicked Search.
Experience has taught me that there haven’t been a lot of folks through history with this surname, so I’m interested in taking a look at anyone who pops up in the results. And yippie aye oh, did they ever pop up!
“All Germany and Surrounding Areas, Address Books, 1915-1974,” Ancestry.com (http://www.ancestry.com : accessed 05 Sept 2019)
The results list include 31 people with the surname of Sporowski!
These names came from the pages of address books much like the city directories so common in the U.S. Since this collection was new to me, I took a moment to read up on the history.
______________________________
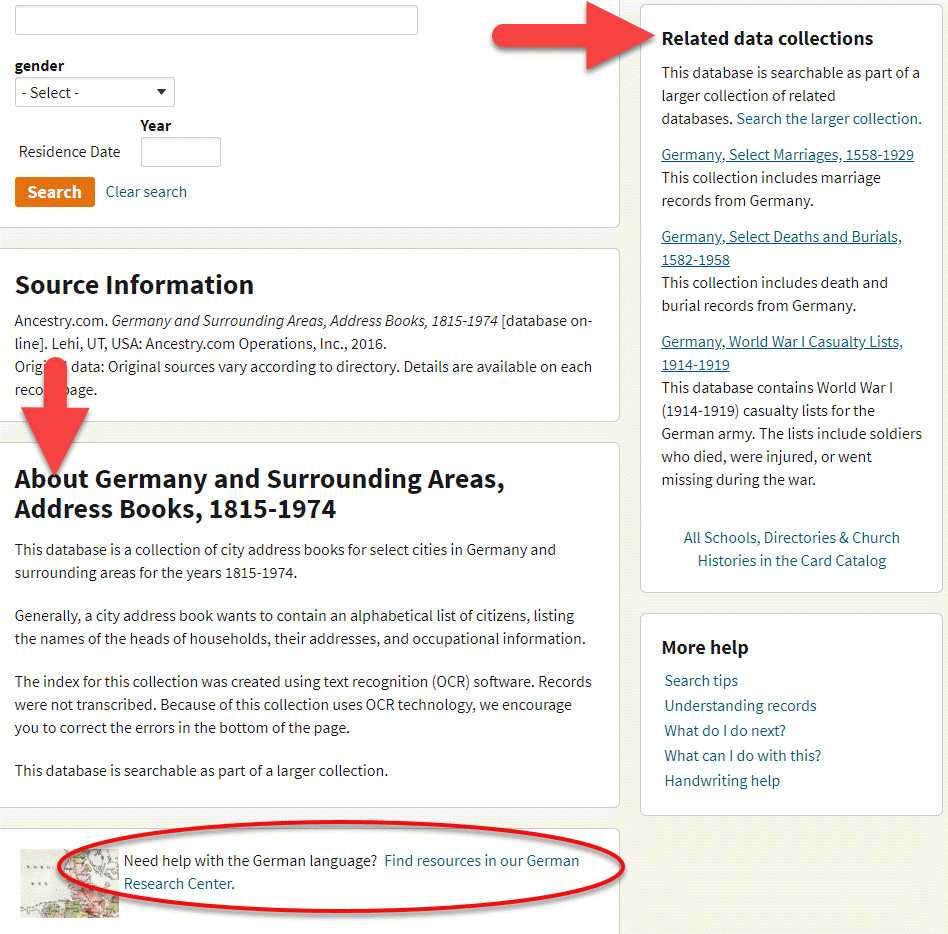
To truly understand what you are looking at when reviewing search results, we need to acquaint ourselves with the history of the collection.
Look to the left of the search results and click Learn more about this database.
It’s definitely worth clicking this link because the next page may also include a listing of Related Data Collections, some of which you might not be aware. These could prove very useful, picking up the pace to finding more records.
In the case of foreign language records, look for a link to the Resource Center for that country. There you may find translation help and tips for interpreting handwriting and difficult-to-read script.
Ancestry Help Features
______________________________
On the Learn more about this database page, I learned some important things about these search results.
First, not every citizen was listed. Only heads of households were included. This means that wives and children would not appear. I did find some widows, though, because they were the head of their household.
Second, Optical Character Recognition (OCR) was used on this collection. Ancestry suggests looking for errors and providing corrections. But this information about OCR also implies something even more important to the genealogist. We must keep in mind that OCR is not perfect. In this case, I planned on browsing the collection after reviewing the search results to ensure I didn’t miss anyone. This would include targeting people listed in the “S” section of directories for towns I might expect the family to be.
I was particularly thrilled to see the name “Emil Sporowski” on the list.
Several months ago I found a World War I Casualty list from a newspaper published in 1918.

On it was listed Emil Sporowski and he was from the village of Kotten. This was the first mention of Gustave’s birthplace in the record of another Sporowski that I had ever found. So, you can imagine my delight as I stared at his name in the address book search results.
“All Germany and Surrounding Areas, Address Books, 1915-1974,” Ancestry.com (http://www.ancestry.com : accessed 05 Sept 2019)
The icing on that cake was that he was listed in the address book of Bochum. That town name was very familiar to me because I had seen it on a few old family photos in Louise Sporowski’s photo album. Although the photos did not have names written on them, I could easily identify the folks who had the facial characteristics of Louise Nikolowski’s clan, and those sporting the large eyes with heavy lids like Gus.
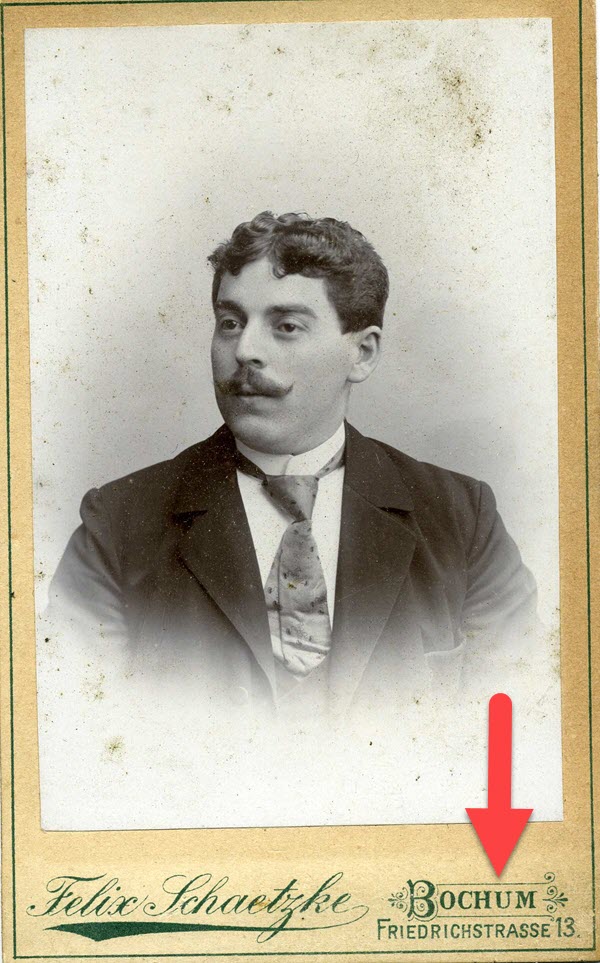
Photo from Louise Nikolowski’s photo album.
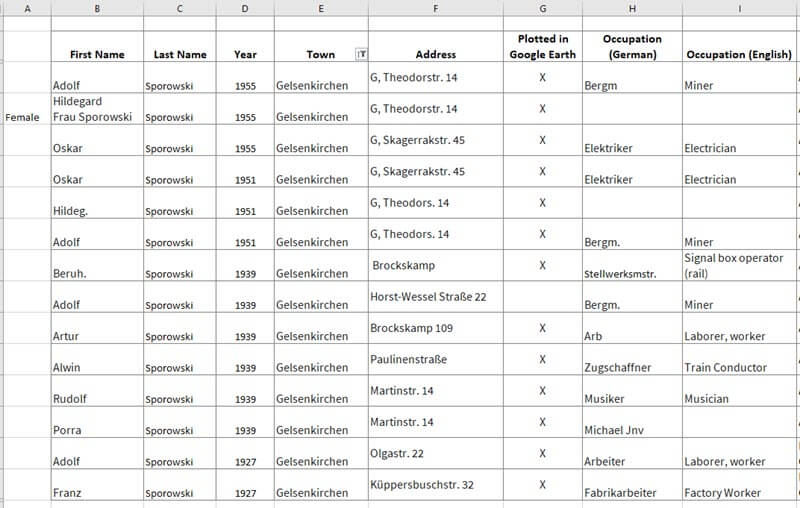
With one and a half pages delivering a total of 31 Sporowski names, I knew I had some work ahead of me to tease them apart. This got me thinking of Genealogy Gems Podcast episode that I’m currently working on, which features a conversation with professional genealogist Cari Taplin. When I asked Cari how she organizes her data, she told me that she uses spreadsheets. I’m not typically a spreadsheet kind of gal, but in this case, I could see the benefits. Spreadsheets offer a way to get everybody on one page. And with the power of Filters and Sorting you slice and dice the data with ease. My first sort was by town.
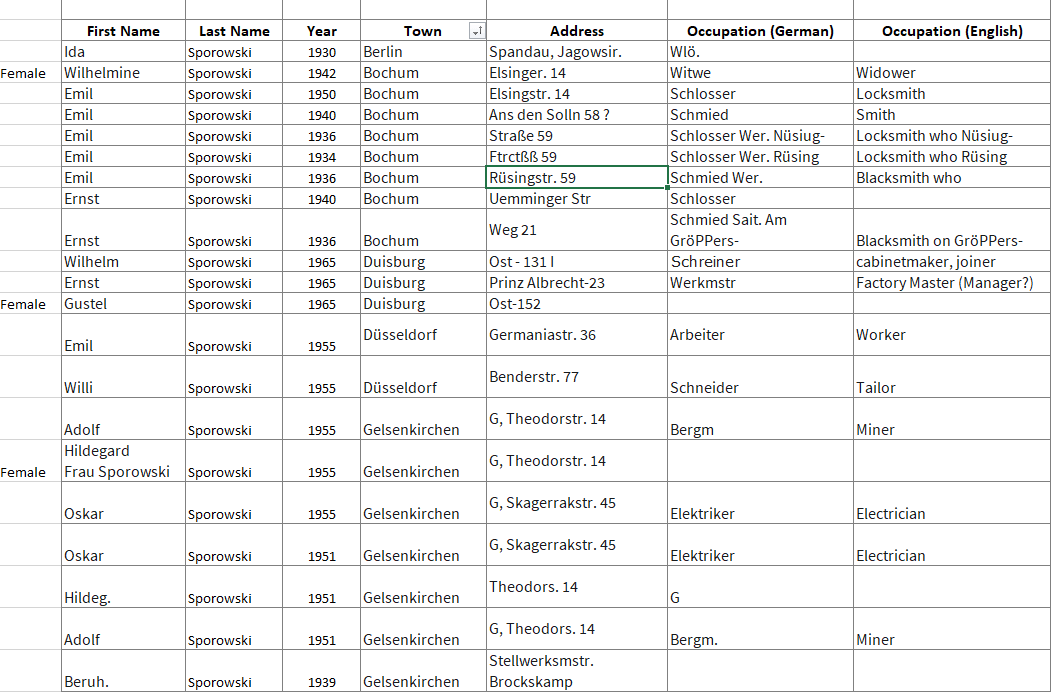
My Excel spreadsheet tracking German Address Books search results at Ancestry.com
______________________________
Click here to download the simple yet effective spreadsheet I used for this research project. If you find your German ancestors in this collection, it’s ready to use. Otherwise, feel free to modify to suit your needs in a similar situation.
______________________________
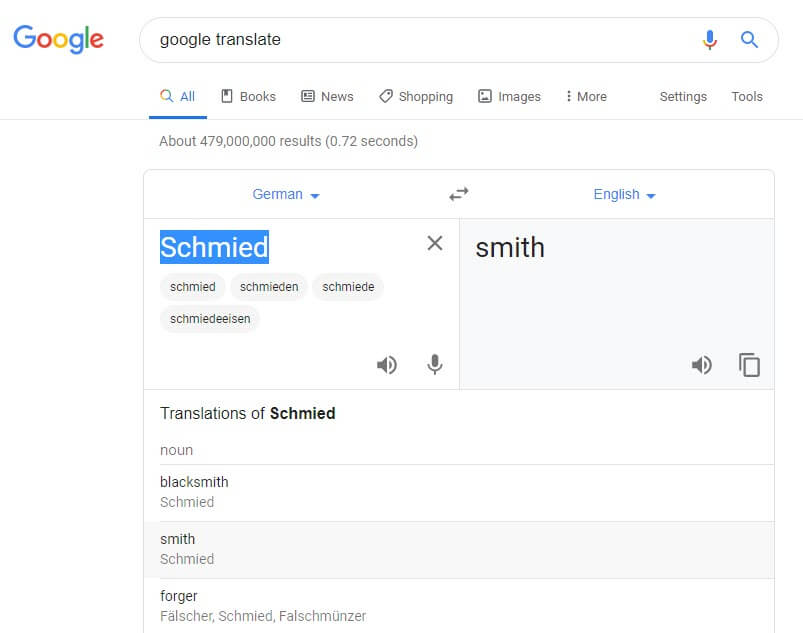
As you can see in the spreadsheet, these address books include occupations. For example, Emil was listed both as a Schmied and a Schlosser. A simple way to add the English translation to my spreadsheet was to go to Google.com and search Google Translate. Words and phrases can be translated right from the results page.
Translating the Occupation found in the German Address Books using Google Translate (Available at https://translate.google.com. Accessed 05 Sept 2019)
You can also find several websites listing German occupations by Googling old german occupations.
I quickly ran into abbreviations that were representing German words. For example, Lina Sporowski is listed with as Wwe .
A Google search of german occupations abbreviations didn’t bring a website to the top of the list that actually included abbreviations. However, by adding one of the abbreviations to the search such as “Wwe.” it easily retrieved web pages actually featuring abbreviations.
One of the top results was by friend of the podcast Katherine Schober and her SK Translations blog post called 19 Most Common Abbreviations in German Genealogy.
______________________________
Notice that I placed the abbreviation in quotation marks when adding it to my Google search query. Quotation marks serve as search operators, and they tell Google some very important information about the word or phrase they surround.
Click here to receive my free ebook including all the most common Google search operators when you sign up for my free newsletter (which is always chock full of goodies).
______________________________
Katherine was my guest on Genealogy Gems Premium Podcast Episode #151 available exclusively to our Premium eLearning Members. She’s also written a couple of articles for Genealogy Gems on German translation:
When to Use Google Translate for Genealogy–And Best Translation Websites for When You Don’t
Translating German Genealogy Records: 9 Top German Translation Websites
Deciphering Place Names Just Got Easier
I’ve written an article you may find helpful not only for translation but also to help you with pronunciation called How to Pronounce Names: Google Translate and Name Pronunciation Tools.
As it turns out, Wwe. stands for Widow. This tells me that Lina’s husband was deceased by 1961.
The most glorious things found in these old address books are the addresses themselves!
Google Earth is the perfect tool to not only find the locations but clarify the addresses. Many were abbreviated, but Google Earth made quick work of the task.
Unlike other free Google Tools, Google Earth is available in a variety of forms:
Each has powerful geographic features, but I always recommend using the software. The web version and app don’t have all the tools available in the software. All versions require an internet connection. You can download the software here.
In the Google Earth search box I typed in the address. Don’t worry if you don’t have the full address or if you think it may be spelled incorrectly. Google Earth will deliver a results list of all the best options that most closely match.
In my case, reliable Google Earth not only gave me complete addresses, but also the correct German letters.
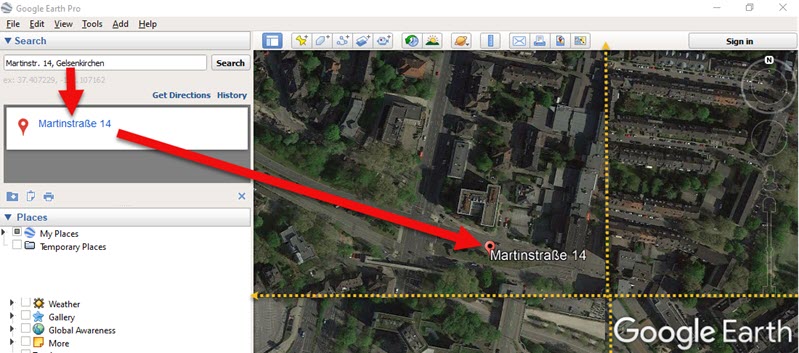
Finding the full name of the German address. (Map data ©2019 Google Earth software: accessed 6 Sep 2019)
Soon I found myself virtually standing outside their homes thanks to Google Earth’s Street View feature!
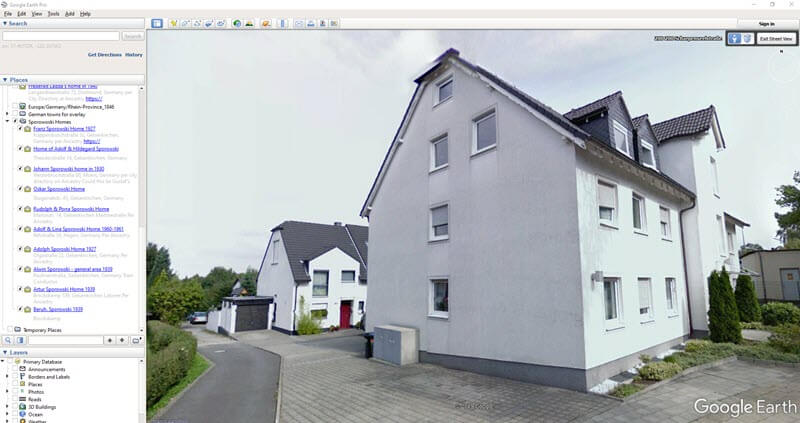
Home of my German ancestor found in Google Earth in Street View. (Map data ©2019 Google Earth software: accessed 6 Sep 2019)
Here’s how to use Street View in Google Earth:
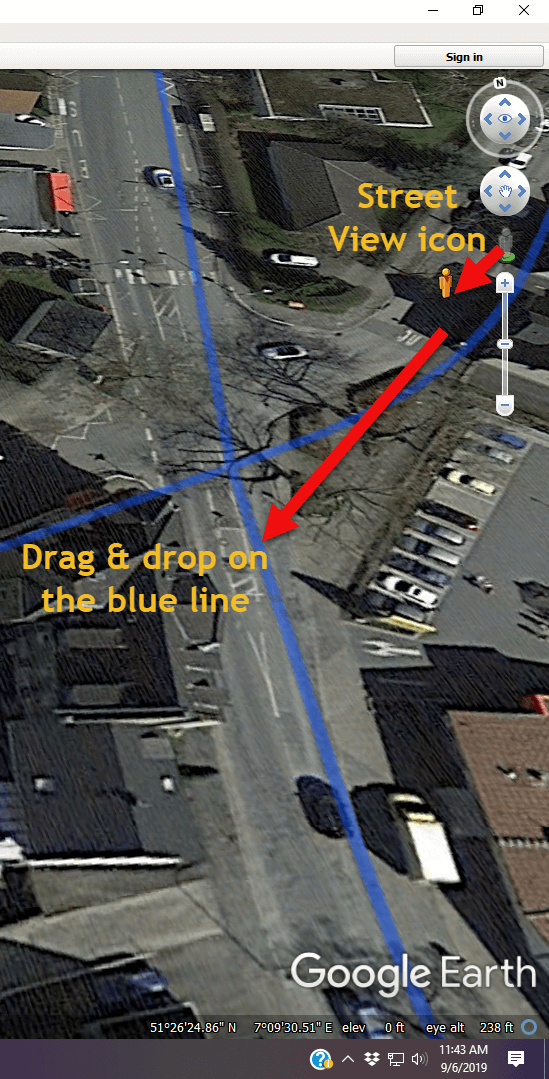
Using Google Earth Street View. (Map data ©2019 Google Earth software: accessed 6 Sep 2019)
I went through the entire list. As I found each location in Google Earth, I checked it off on the spreadsheet.
Addresses found in German Address Books at Ancestry.com marked in the spreadsheet
When you have several locations like this to plot, I recommend creating a folder in the Places panel in Google Earth. It’s super easy to do and will help you stay organized. Here’s how:
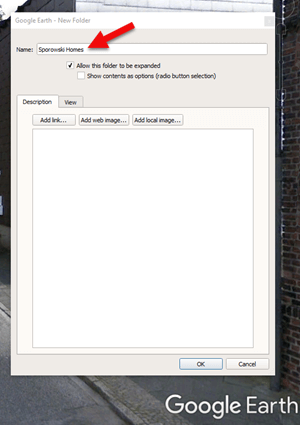
Creating a Folder for the German Addresses found at Ancestry.com (Map data ©2019 Google Earth software: accessed 6 Sep 2019)
It didn’t take long to build quite a nice collection of Sporowski homes in Germany!
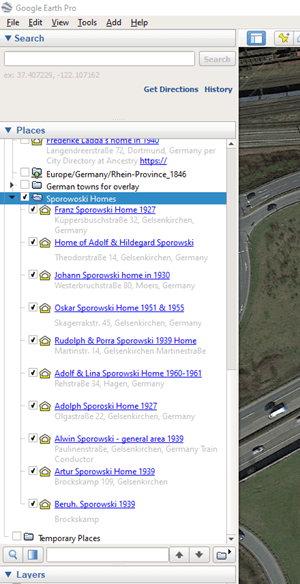
German addresses in the Places panel. (Map data ©2019 Google Earth software: accessed 6 Sep 2019)
The beauty of Google Earth as that you can start to visualize your data in a whole new way. Zooming out reveals these new findings within the context of previous location-based research I had done on related families. As you can see in the image below, all the Sporowskis that I found in the German Address books at Ancestry.com are clustered just five miles from where photos were taken that appear in Louise Sporowski’s photo album.
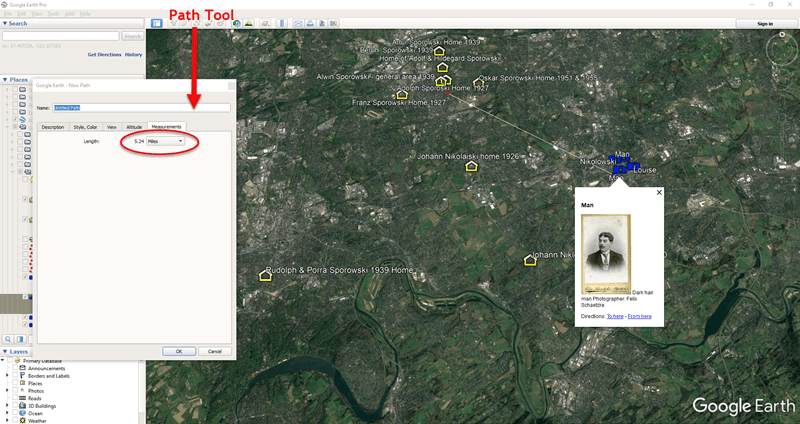
Data Visualization in Google Earth: My German Families found in Address Books. (Map data ©2019 Google Earth software: accessed 6 Sep 2019)
We’ve covered a lot of ground today, but this is just the beginning. There are additional sources to track down, timelines to create, photos to match up with locations, and so much more. In many ways, I’ve only scratched the surface of possibilities. But I need to stop writing so I can keep searching! 😊
I hope you’ve enjoyed taking this journey with me. Did you pick up some gems along the way that you are excited to use? Please leave a comment below! Let us all know which tips and tools jumped out at you, and any gems that you found.
