Has it been a while since you worked on your genealogy research? As passionate as we may be about genealogy, the reality is that a little thing called “Life” can get in the way!
Getting back into genealogy can actually be a bit daunting. Where did you leave off? Where should you start back up?
If it’s been months or even years since you had your hands in genealogy, you’re in the right place. In this video, we’re going to talk about how to pick up your genealogy after a hands-off spell so that you can quickly and efficiently get back on the trail of your ancestors.
Get your Genealogy Restart checklist in the Resources section.
And by the way, perhaps you haven’t taken a break, but you feel like you’ve gotten a little out of control and disorganized in what you’ve been doing so far. This process also works very nicely as a quick audit to help you get back on track.
How to Jump Back into Your Genealogy
Has it been a while since you worked on your genealogy research? As passionate as we may be about genealogy, the reality is that that little thing called life can get in the way.
In my case, my daughter got married earlier this year. There were plans to make, bridal shows to throw, and the wedding itself which meant planning a trip because it was a destination wedding. Needless to say, I didn’t work on family history for several months.
If it’s been months or even years since you had your hands in genealogy, you’re in the right place. In this article and companion video we’re going to talk about how to pick up your genealogy after a hands-off spell so that you can quickly and efficiently gets back on the trail of your ancestors.
Even if you haven’t taken a break, you might be feeling a little out of control and disorganized in what you’ve been doing so far. This quick genealogy audit can help you get back on track too!
Genealogy Restart Checklist
I love a good to-do list where I can have the satisfaction of checking things off and knowing that at the end of it I have accomplished something. Some of the things on this list may not apply depending on how long your genealogy hiatus has been. If that’s the case you get to check them off right away!
Step 1: Find Out Where You Left Off in Your Research
Do you remember where you left off the last time you were researching your family tree? If not, your search history is a great place to start. For example, if you used the popular genealogy website Ancestry.com you can pull up your past search history.
How to find your search history at Ancestry.com
At the Ancestry® home page you will see a box at the top that highlights the recently modified items in your family tree. According to one source at Ancestry.com, this “shows a list of last modified nodes in the tree. For a shared tree – any user who has access to the hint can modify the nodes and it will show up in that list. It (also) shows a hint leaf for the nodes that have at least one undecided hint.”
This could be a place to start, but I recommend reviewing Your Recent Searches if you want to pick up where you left off.
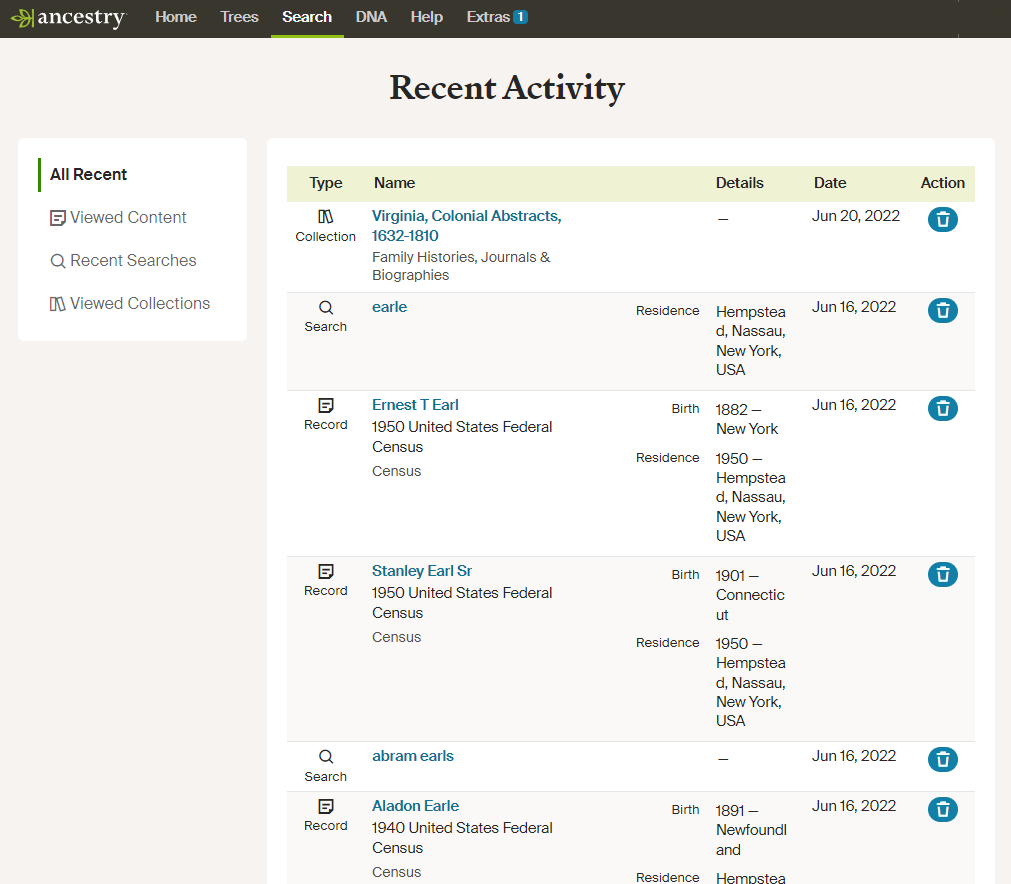
You’ll find your search history in the menu under Search. Click All Collections. Toward the top of the All Collections page you’ll see Your Recent Searches. It’s just above the map. You’ll see a few buttons listed for the most recent names you searched. Next, click the View All button to get a more comprehensive view of your activity history, starting with the most recent activity.
On the Recent Activity page, you’ll see the names you searched for and the details you included such as a place and time frame. Ancestry also tells you the date you ran the search.
Recent Search History page at Ancestry®
If you see searches in the list that you don’t need anymore, click the trash can button to delete them.
Notice over on the left that you are viewing Recent Searches, but you do have other options:
All Recent (activity)
Viewed Content (records you’ve viewed)
Viewed Collections (record collections you accessed)
All Recent provides the best overall picture of your past search history. This is a great tool for jogging your memory and helping you decide where to pick back up.
Review your activity history in your genealogy software.
You can also review your most recently activity in your genealogy database software.
In RootsMagic for example, in the menu go to Search > History or click the History tab at the top of the side bar on the left side of the screen.
Step 2: Identify Gaps that Need to be Filled
Many people enjoy focusing their research on their direct ancestors (grandparents, great grandparents, etc.) While you may have traced back many generations, you may have missed a few things along the way. This is a good time to start with yourself and work backwards through the direct ancestors in your family tree. Look for gaps in your timelines and information, and then start back up by researching to fill them in. Of course, you can also do with any relative that you want to learn more about.
Once you’ve identified the person you want to work on, create a research plan. If you’ve never created a research plan before, don’t worry, it doesn’t have to be complicated. You create and track it on paper, a spreadsheet or any number of notetaking programs. The important thing is that you identify:
your specific research question,
the records you think you’ll need to answer it
the locations where you think those records may be housed.
Step 3: Prepare for Genealogy Research Success Going Forward:
Since you’re picking your genealogy back up, this is the perfect time to check to make sure you’re set up for success going forward. These remaining items will help ensure that your new discoveries will be well-documented, organized, and protected from loss.
Genealogy software database
If you already have genealogy database software, open it up and see if there’s a newer version available. Look for Check for Updates in the menu.
If you don’t have a genealogy database software program on your computer, go get one now! We’re talking about a software program that you install on your computer. It’s a database specifically designed to record all the information you find. It keeps it organized and searchable, allows for source citations, photos, links, and more. It also gives you tremendous flexibility in running reports. This is something with which an online tree can’t compete. And most importantly all your data resides on your computer hard drive. This means it’s completely within your control and not subject to a paid subscription, or problems with a website such as the site being closed or sold off. The tree you build can be synced to an online tree if you wish to do so. Back in the old days (early 2000s) a database on your computer was the only option, and it remains your best option today.
Genealogy software is typically very affordable. You can even download Family Tree Builder at MyHeritage for free. If you’re willing to invest a few dollars there are several excellent programs to choose from such as RootsMagic, Family Tree Maker, Legacy, etc. I use RootsMagic but all of these programs have been around a long time and are great. The one you pick really depends which user interface you like, and to what extent you may want to sync your tree online.
If you don’t have a cloud backup program running on your computer, now is the time to get one. What’s the point of restarting your genealogy research if you’re going to risk losing everything if your computer is damaged or stolen? I’ve used Backblaze for years because it’s reliable, affordable, has an app, and automatically backs up all my files including video. There are several out there to choose from. The important thing is to pick one and get it installed on your computer. It will run automatically in the background, giving you peace of mind that your files are backed up offsite on the cloud in a secure location.
Status of Genealogy Website Subscriptions
Now that you have the tools you need to restart your genealogy research, it’s time to check genealogy websites. Did you have subscriptions to some of the popular genealogy websites like MyHeritage or Ancestry? Log in and go to your account to see if they are still active, and if they are, when they are set to renew. This will help you decide where to spend your time first. Start with the subscription that is up for renewal first. Then you can determine if you want to allow it to renew or cancel and try another genealogy website subscription to round out your research.
If you don’t have any current subscriptions, consider focusing first on familysearch, the largest free genealogy website. Then, depending on your research goals, you can select the paid subscription(s) that will support your research plan.
A Paper Filing System
While we don’t generate as much paper these days as we used to, some paper is inevitable. Don’t add to the paper clutter. If you don’t have a paper filing system in place, take a moment and set one up. Pick a filing system and stick to it. Then as you start your genealogy research you’ll always have a place to put things.
Filing Digital Content
The same goes for digital files as goes for paper files. Don’t jump back into your research without a filing system in place. It’s important to download the digital records you find so that you have access to them even when your subscriptions run out. Avoid a messy computer and commit to a digital filing system and filing name convention.
Were you citing your sources consistently when you last worked on your family history research? If not, STOP EVERYTHING and watch my video Source Citations for Genealogy. Citing your sources will save you headache down the road. You may discover that a previous conclusion was incorrect, and you’ll want to review the source where you got that information. A downloaded record usually doesn’t include specific details as to where you go it. Going forward, as you download records and add the details into your database be sure to also add the source citation.
With this in mind, familiarize yourself with the source citation tool in your genealogy program. If it looks daunting, don’t panic. Head to the menu and click Help, and then search for source citation. There you’ll find the instructions you need to once and for all get a handle on how to cite sources in your software.
Now’s the Time to Restart Your Genealogy
Don’t let the passing of time stop you from getting back into your favorite hobby. By following this checklist you will quickly get back into goal-oriented research and exciting discoveries about your family.
Here are the reasons every family historian should be writing a family history blog–and how can you get started NOW.
Why Start a Family History Blog
Many of us want to write up our family stories, but with busy schedules, a 300-page book may not be in our future!
You don’t have to have a lot of time to write and share your family history. Blogging about family history is a perfect alternative. Blogs are just simple websites that present articles in chronological order beginning with the most recent. This is a great format for telling a story that travels through time.
Blogs also allow your readers to “subscribe” for free much like a podcast. In other words, your readers don’t have to remember to visit your blog and read the latest. Instead, they can receive email prompts when you publish new articles, or they can receive those new articles alongside their other favorite blogs and podcasts in a blog reader. Very convenient indeed!
Still not convinced it’s possible to start your own genealogy-themed blog? Here are 7 reasons why and how you can start a family history blog.
1. You can write a little bit at a time.
You don’t have to fill hundreds of pages or lay out an entire book. With a blog you can write as little as a paragraph at a time. There are no rules because it is your blog!
Over time, even a one-paragraph blog post, once a week, will eventually result in many pages. It’s a great way to pace yourself and still get your family’s story in writing.
2. Every word you write is searchable by Google.
Gone are the days of simply posting a query on a genealogy message board that only reaches genealogists.
By blogging about your family history, other people who are researching the same family lines can find and connect with you through their Google searches. You’ll be writing about the family they are searching for, so you’ll very likely be using many of the same keywords, dates and information that they will include in their search query. This means your blog should pop up high on their Google search results list!
Think of your family history blog as your own big message board. Your posts can be found by anyone in the world searching for the same information. The connection possibilities are endless. So essentially, family history blogs are your way to “fish for cousins.” This of it as “cousin bait!”
Blogs typically include a Comment section at the end of each of your articles, so encourage visitors to your blog to leave comments. Don’t worry, you can set your blog to only show the comments after you have reviewed and approved them.
3. You might bust your toughest brick wall.
I’ve heard and shared countless success stories here at Genealogy Gems from readers and listeners. By just “putting it out there” on a blog they have opened the door to a distant relative contacting them with a treasure trove of new information about their family tree.
“Your encouragement to blog genealogy has given me courage and a vehicle for which I can share the stories of our family’s common history. So, over the past month I’ve been posting digital images of each day (from my great grandfather’s) journal from 50 years ago, the transcription of the journal and an historical image that gives context to what he was writing about. I plan to include family photos and other documents as I expand this blog.”
– Chris C.
4. You’re more likely to spot your mistakes and missing links.
Have you ever told a story out loud and discovered in telling it that something in the story didn’t quite jive? A blog can help you tell your family’s story “out loud” too.
The process of writing up your family history discoveries can often reveal gaps, errors, or bad assumptions in your research. And that’s a good thing! Use it to your advantage to identify further research that needs to be done. But those items on your research to do list.
And don’t be afraid to let your reader know what your gaps are and where you’re stuck. They just might be able to help!
5. Your kids, grandkids, nieces and nephews, etc. are online.
Your descendants probably prefer to read quick and easy stories on-the-go on their smart phones and tablets, and a blog fits the bill perfectly.
Putting your research on a blog provides your relatives with an easy way to digest the family heritage. And of course they can subscribe to it, since blogs can be delivered to their email inbox or to a blog reader like Feedly.
Blog posts are also super easy to share to Facebook, which means your post can get even more traction.
Chris continues:
“The family response has been amazing. The cousins, siblings, aunts and uncles think it is cool and want to see more! They love the stories and can’t wait for subsequent postings so they can hear detailed history about (him) that they never knew about.
I believe this blog will be part of how our family begins healing and comes back together again.”
6. Because there are no excuses.
You can start a blog for free, so cost is not a barrier.
There are no rules, so you can decide how often and how much you write at once.
There is just one thing you have to do to successfully blog about your family history: begin.
7. Because your blog continues to share even when you aren’t researching.
The best news of all is that your family history blog will be out there working online for you 24 hours a day, 7 days a week.
Even when life gets in the way and you need to take a sabbatical from blogging and genealogy, your blog is still out there ready to be found. You will still be sharing your family’s story, and attracting relatives to it. And when you’re ready, your blog will be ready for you to add the next chapter.
How to Start a Family History Blog
Starting a family history blog isn’t hard. But some people find it intimidating. So I’ve created two entire series to help you get started.
(I use WordPress for my website and my blog. They have a free version at wordpress.com.) Need more encouragement? Click here to hear from other readers who are very glad they got started.
Learn More About Blogging on the Family History Podcast
The “Footnote Maven,”author of two popular blogs, talks about the process of starting a genealogy blog. She gives great tips for thinking up your own approach, finding a unique niche, tips for getting people to comment on your blog posts and more.
In this concluding episode, learn how to add a few more gadgets and details to your blog; pre-plan your blog posts, publish your first article, and how to help your readers subscribe. You’ll also get great tips on how to create genealogy content that others looking for the same ancestors can find easily online.
Share the Blogging Adventure!
Invite someone you know to start a family history blog of their own. Send them a link to this webpage or share it through social media. They’ll thank you for it later!
And if you have started a family history blog, please comment below and share your experience.
We’ve all got genealogy brick walls in our research: family mysteries we have so far found unsolvable. In the new issue of Family Tree Magazine (May/June 2014), Lisa’s got a great article packed with 14 strategies for SOLVING those perplexing questions.
The article is “Warming Up a Cold Case,” and it’s got a fun criminal investigator theme. I won’t give all 14 of her tips away, but some of my favorites include re-examining old evidence, finding new witnesses and going on a genealogical stakeout. And one that made me laugh out loud: “Post wanted posters.” And then I just had to put my ancestor’s face on a wanted poster (right).
How do you really create a wanted poster for your ancestor? Lisa shares these ideas in the article:
1. Post their names on genealogy online message boards (like at Ancestry.com). But fill in those “wanted” details. Instead of height, weight and hair color, add what you know about their births, marriages, deaths, family relationships and residences.
2. Post your family tree online at any number of sites for free. Sites organize their trees in one of two ways. Ancestry.com, MyHeritage.com and others can i buy medication without insurance offer the individual tree model. You upload (or build on the site) and maintain your own tree. FamilySearch.org, WikiTree, Geni.com and WeRelate.org are community tree sites. You may work from a view of your own tree, but the site is merging your tree with others behind the scenes to create a single world family tree (each does this a slightly different way).
3. Start your own family history blog. Write keyword-rich blog posts that make it easy for Google searchers to find your ancestors there. Check out Lisa’s free four-part series on how to create a genealogy blog at the Genealogy Gems YouTube Channel. This link will take you to the 4 part video playlist.
Find the entire article in the May/June issue Family Tree Magazine. Even better: Genealogy Gems Premium Members can also watch Lisa’s one hour video class Brick Walls: Cold Case Investigative Techniques. Not a Premium Member yet? You’re missing out on 24/7 access for a year to some of her most popular classes on Google, Google Earth, organization, Evernote, newspaper research and more. Learn more about Genealogy Gems Premium Membership here.
UK suffragette records tell amazing stories about the women and men who fought the British government for women’s voting rights a century ago. Nathan Dylan Goodwin, the popular Genealogy Gems Book Club author, shares three of his favorite sources for discovering...
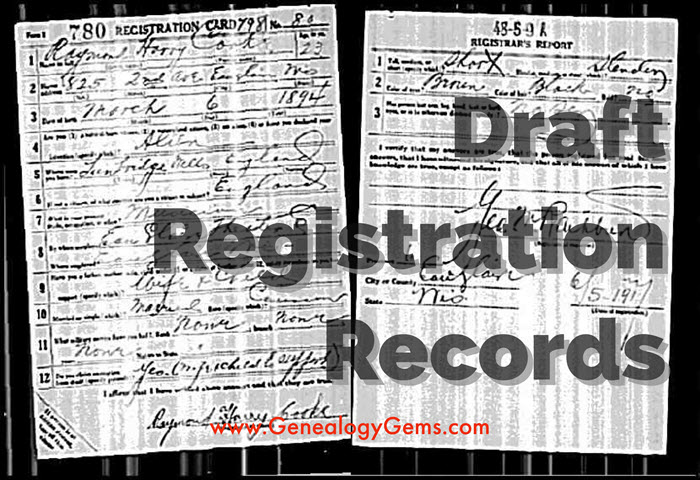
Do you have ALL your ancestors’ U.S. draft registration records–from the Civil War until after World War II? These documents may be filled with genealogy clues, whether your ancestor served in a war or not. Military expert Michael Strauss presents this roll call of U.S. draft registration records you’ll want to check!
Military records can lead genealogists to many new sources of information. One of the first records that you may come across (for our United States ancestors) that could provide unknown information are found in draft registrations. The records are civilian in scope, but can provide clues of prior military service or proof of current war conditions.
The National Archives holds custody overall for the bulk of the draft registrations from the Civil War to post-war World War II. The Archives organizes their records by grouping numbers. The Civil War draft registrations are found in two record groups, RG59 and RG110. Later draft registrations are found in RG147. In all cases, finding aids are available to locate and obtain copies.
Civil War Draft Registration Records
Recruiting poster, New York printed by Baker & Godwin, June 23, 1863. Public domain image hosted at Wikipedia.org (click to view).
Civil War draft records date back to the first national draft which was signed by Abraham Lincoln on March 3, 1863. This draft only applied to men residing in states under Union control. The draft includes several lists detailing information about men eligible to be drafted to fight for the Federal Army. This included consolidated lists for men between the ages of 20-45, which are grouped and divided into two classes of records. This list contains the name, residence, age, race, marital status, place of birth, any former military service, occupation, and remarks for each registrant. (Remarks might include ineligibility based on religious reasons or former service in the Confederate Army.)
Other registrations included medical exams, statements of substitutes, and case files of persons who were draft aliens. (Aliens were ineligible for military service and therefore contain files that document their nativity.) All of these are at the National Archives.
The last group of records includes the descriptive rolls that contain the name, age, physical descriptions, where born, occupation, when and where drafted, and remarks. The descriptive books are located at the regional branches of the National Archives and can be accessed by researchers, as these have not been filmed or scanned. Records are divided into two separate record groups: RG59 (Department of State) covered those men who were aliens and RG110 (Provost Marshal) has all the other lists of men being drafted.
The only Civil War draft registration records available online are the consolidated lists; click here to search them at Ancestry.com (subscription required). On the Confederate side, there are a limited number of draft records available, some at the National Archive and some in the custody of individual state archives.
World War I Draft Registration Records
For a number of years, there was no draft or draft registration. However, when the United States entered the war in Europe on April 6, 1917, the country was totally unprepared for overseas campaigning. This conflict forced our government to consider other means to recruit the tens of thousands of men it would take to wage this war. The Selective Service Act of 1917 authorized the President of the United States to increase the military establishment being passed by Congress on May 18, 1917. The Act directed the Provost Marshal General Office (P.M.G.O.) to select men eligible for military service.
All men were required to register, native-born or aliens. The draft is separated into three registrations:
The 1st draft registration was dated June 5, 1917 for men aged 21 to 31 and consisted of 12 questions.
The 2nd draft registration was dated June 5, 1918 for men who had turned 21 since the previous registration and included a supplemental registration on August 24, 1918 for men turning 21 after June 5, 1918. Each consisted of 10 questions.
The 3rd draft registration was dated September 12, 1918 and was intended for all men aged 18 to 45 years. It consisted of 20 questions.
Each registrant was required to provide their name, age, birth date, and birthplace (in 2 of the 3 registrations), occupation or employer, nearest family, and a summarized physical description.
WWI draft registration of Henry Fox. Image from Ancestry.com.
By the end of World War I, nearly 24 million men had registered for the draft (this number excluded registered enemy aliens and those already in the military). The original draft cards are at the National Archives branch in Morrow, Georgia. World War I draft registrations are available online at Ancestry.com, FamilySearch.org, Findmypast.com and fold3. FamilySearch is the only one with free access (a personal subscription or library access is required for the others).
World War II Draft Registration Records
The eve of World War II saw the passage of another conscription act. This act was the Selective Training and Service Act of 1940, and was the first peace time conscription in United States History. This act officially established the Selective Service System. The draft during World War II consisted of seven registrations. The “Old Man’s Draft,” or 4th registration, was for men born between 1877 and 1897, with the other six registrations intended for the younger adult men born after 1897:
1st: October 16, 1940, included all men 21-31.
2nd: July 1, 1941, for those men who reached age 21 since the first registration.
3rd: February 16, 1942, for men ages 20-21 and ages 35-44.
4th: April 27, 1942, for all men between the ages of 45 and 64. The registrants were not eligible for military service (this is the “Old Man’s Draft”).
5th: June 30, 1942, for all men between the ages of 18 and 20.
6th: December 10 – 31, 1942, for all men who had reached the age of 18 since the previous registration.
7th: November 16 – December 31, 1943, for American men living abroad between the ages of 18 and 44.
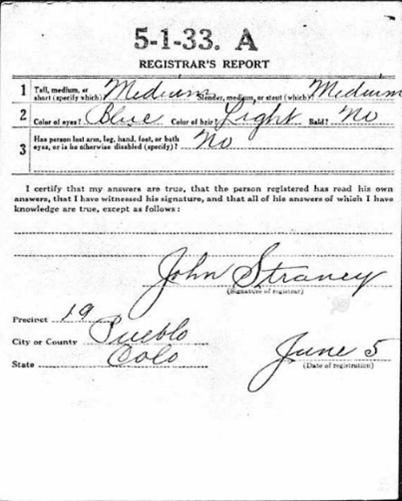
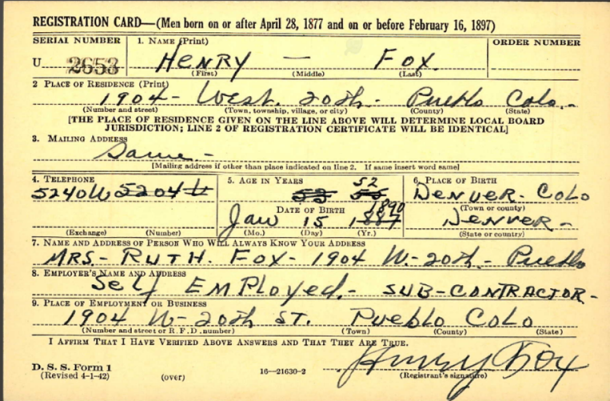
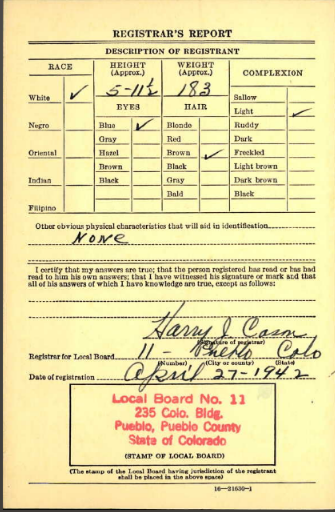
Registrants were required to provide their name, address, birth date, birthplace, and employer’s information, along with a contact individual who would always know the registrant’s information or address. The form also asked for the telephone number of the registrant in addition to a more complete physical description.
WWII draft registration of Henry Fox. Image from Ancestry.com.
Several of the states that recorded the “Old Man’s Draft” were lost. The National Archives no longer has these records available. These states include: AL, FL, GA, KY, MS, NC, SC, and TN.
Not all of the World War II Draft registrations are available online. Less the states above, view 4th registrations online at Ancestry.com, Familysearch.org (index and browse-only images) and fold3. The fold3 database includes 25 states and territories: AL, AK, AR, AR, CO, CT, DE, FL, GA, HA, ID, LA, MD, NV, NM, NC, OK, PA, UT, VA, WV, WY, and the District of Columbia and the Virgin Islands. (On Ancestry.com, the number of states is limited to AR, GA, LA, and NC.) Other states are in the process of being added. However, the remaining states are only available directly from the National Archives in St. Louis, MO.
Some of the other registrations are also available online for a selected grouping of states.
Expert tip: It is not uncommon to find men registered for both World War I and World War II draft registrations, which would depend on their ages.
Post-World War II Draft Registration Records
The draft and registrations didn’t cease with the conclusion of World War II. It was active from 1948 until 1973, when President Richard M. Nixon officially signed legislation that ended the draft. This was suspended in 1975, and five years later, in 1980, President James E. Carter again brought back into activity the Selective Service System. This came in response to the Soviet invasion of Afghanistan. To date, the Selective Service System still remains active, requiring all men to register within 30 days of their reaching the age of 18 years.
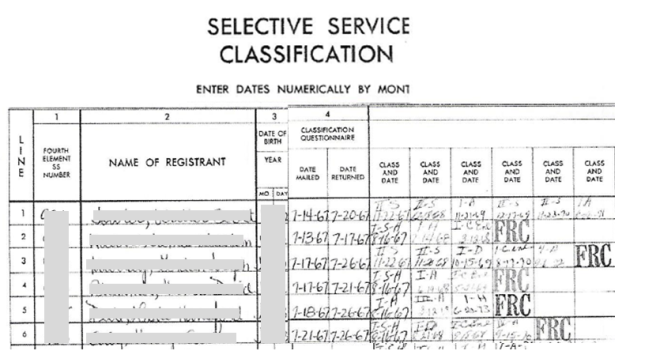
To gain access those records not online from World War II, and for the later registration cards for men for the Korean and Vietnam conflicts and for other years, researchers will need to contact the National Archives in St. Louis, MO. This office handles the original cards for all men born between April 28, 1877 and March 28, 1957. The National Archives fee schedule is in place to request the records by mail. A copy of the Draft Registration Card (SSS Form 1) alone costs $7.00, or order a copy of it along with the Draft Classification History (SSS Form 102) for $27.00. Click here to go to the National Archives’ webpage for ordering Selective Service records.
Draft Registration Records for Men Born after 1960
The law never required men to register who were born between March 29, 1957 and December 31, 1959. The National Archives doesn’t hold copies of records for men born after January 1, 1960. To gain access to draft registration for all other years, contact the Selective Service System directly. Click here for all the details.
Michael L. Strauss contributes the new Military Minutes segment on the Genealogy Gems Podcast. Listen to this segment in the free Genealogy Gems Podcast episode 207.
Disclosure: This article contains affiliate links and Genealogy Gems will be compensated if you make a purchase after clicking on these links (at no additional cost to you). Thank you for supporting Genealogy Gems!


 Michael L. Strauss contributes the new Military Minutes segment on the Genealogy Gems Podcast. Listen to this segment in the free