(This post contains affiliate links that help support our website.)
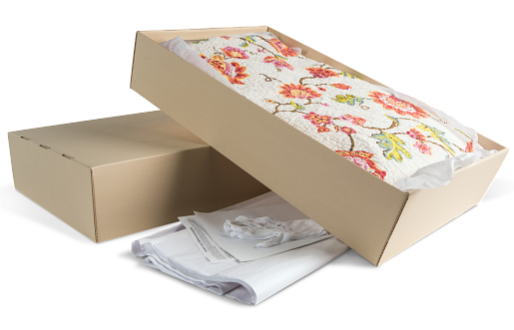
Family historians often end up with family heirlooms and documents that need archival storage.
In addition to the items you already have, you may find yourself receiving things from other relatives like family bibles, scrapbooks, and military uniforms.
The task of correctly archiving the family history can definitely get a bit overwhelming. However, with the right tools and supplies you can make a real difference in preserving your family’s treasures for future generations.
Denise May Levenick is the author of The Family Curator blog and writer for Family Tree Magazine and she joins me in episode 81 to share her top ten archival storage solutions for family historians.
Short on time? This week’s video is just 20 minutes and packed with the archival solutions you need. The video premieres on Thursday and features a live chat.
Watch the live premiere of this week’s video and participate in live chat with our Genealogy Gems YouTube channel subscriber family. (Subscribing to our channel is free. Click the red Subscribe button on the video page on our channel.)
1. Video Player (Live) – Watch the video premiere at the appointed time in the video player above. 2. On YouTube (Live) – Click the Watch on YouTube button to watch live at the appointed time at the Genealogy Gems YouTube channel. Log into YouTube with your free Google account to participate in the live chat. 3. Video Player above (Replay) – Available immediately after the live premiere and chat.
(Please note: This interview transcription has been minimally altered for ease of reading and clarity.)
Lisa: I’d love to talk about the archival supplies we need. Because obviously, to complete a task and do a good job of it, we got to have the right tools. That’s certainly true when it comes to archiving. You’ve got 10 of your top tools that I know that you’ve used as an archivist. What is number one?
1. Archival File Folders
Denise: The first thing has to be archival file folders. They are not terribly expensive. And really, what you want to do is put your item, whatever it is, in the highest quality folder or box or something to protect it right away. But since most of us have pictures and paper, a file folder really is a good place to start.
Lisa: That sounds great because often other family members are giving us things, and we may not have time to deal with it right then and there. It sounds like this would be a very safe place to put it.
Denise: It is. You can purchase them in a box of 50 or 100. If you have a lot of items or just 10 or a dozen folders, it really can scale to suit whatever the size of your archives might be.
We really do need to take that extra step and seek out acid-free, lignin-free archival file folders. The kind you buy at the office supply store are just not the quality you need to preserve your papers and your photos. You can actually cause more damage if you put things in those.
Lisa: Because there’s probably acids in those, right?
Denise: Right, because the regular office supply ones, particularly the kind that are just for regular office use, they have so much acid in them that they can cause your item to deteriorate even more.
Lisa: Okay, so number two I see here is flip-top document case. This sounds like a specialty item. What are we talking about?
2. Flip-Top Document Case
These boxes are so confusing when you’re shopping. The names of these document cases and boxes can be confusing. The one I use looks like a mini file folder box. That’s exactly what it is. Examples of the kinds of things you can store in them include old rolled up documents, military photos, and banquet photos. I have a process to flatten these, but meanwhile I needed to store them.
You can reuse this kind of a box for anything. It doesn’t have to just be file folders. But because it’s designed for file folders, it’s really perfect. It’s even got a little tag to pull it out on the shelf if you need to pull it out. There’s a place to add a label.
It’s about five inches wide. I like this size because when you get those file folders in there, it gets heavy and a lot of people store these up on shelves. They can be heavy to move down. I bought some real wide ones that are seven or eight inches. And man, those things are heavy! So, I recommend smaller ones.
Lisa: I have some items that are definitely odd sizes, or like you said they were originally rolled up and I haven’t flattened them out and decided what to do with them yet. So, this sounds great.
The third item on your list is oversized document or photo box. So, it sounds similar. We often have larger items we’re struggling with, and we don’t want to fold it up.
3. Oversized Document or Photo Box
Denise: No, in fact, you want to unfold the item, and let those folds relax.
The archival suppliers make a box that is large, larger than a shirt box. So it might hold a fully open newspaper. Or they work well for portraits or drawings or maps. They’re typically quite shallow. They won’t be necessarily a clamshell kind of opening like the boxes we just mentioned. It might be a lift off top. But you can use it for anything. And the reason it is shallow is you don’t want to put a lot of weight on the things that are on the bottom.
If you can afford it, buy large file folders that will protect your item, and then you put it in the box.
You should keep things like newspapers separate. You do not want to store newspapers with anything else other than newspapers because they’re so toxic. The newsprint is just full of acid. You want that isolated from everything else.
4. Newspaper Preservation Kit
Lisa: So that must be why number four is the newspaper preservation kit. I didn’t realize that there was one.
Denise: Yes, newsprint is a big offender.
When I visited the New England historic genealogical library in Boston, and I got a tour of their upstairs archives. It was so exciting. I felt like I was you know, in the inner sanctum. I was shown rows and rows of archival boxes. And then just stacks of items people have donated like Bibles and books and family papers. They all had to be processed and organized. The archivists there told me they will not accept donations of newspapers. Because they are so toxic, anything they touch will turn brown. And it just degrades everything around it. So ,you want to be sure to isolate your newspapers if you’re going to keep them.
What they do at the library is photocopy the newspaper onto acid free paper. Or they scan it and then print a copy on acid free paper and get rid of the newsprint.
Lisa: That sounds like a really clever way to deal with that problem. So even if grandma gives you her newspapers, and she’s also got other stuff with it, you don’t want to keep it that way. You need to separate it out.
Denise: If you really want to keep like an obituary because it’s an original paper or something, that would be a good case for encapsulating in between two sheets of archival plastic. You can encapsulate it and then you can put it right back in that Bible because it’s isolated.
Lisa: Alright, so next we have acid free tissue paper. What would you be using this for?
5. Acid Free Tissue Paper
Denise: I love this stuff! I keep a stack of it here at home.
One time my dad gave me a stereograph, you know the thing you hold up and there’s double pictures. He gave me one of those. It was my grandfather’s. It was in of all things an envelopes box. A crummy, terrible box. And it was wrapped in red tissue paper! Have you ever like gotten a drop of water on red tissue paper? It bleeds terribly!
In the box along with the stereo cards were photo cards. And, being my dad, (he’s very strict) it’s “my way or the highway.” So, I couldn’t really tell him anything.
I took the box and he said he wanted it right back. I had some acid free tissue paper, so I just took the red tissue paper out, and cushioned everything in that dumb non-archival box with the acid free tissue paper. I took some pictures of it and looked at the cards, and then I gave it back to him. It was in a lot better shape! So, if you have acid free tissue paper, you are golden when stuff like that happens.
You can also use it to stuff the sleeves of a military uniform or wedding dress. You can wrap a pair of baby shoes in it. You can use it between layers of photographs. It’s just really helpful to have on hand.
Lisa: It sounds like we definitely need a stack of it on hand at all times.
6. Acid Free Flip top Photo and Print Box
Lisa: So now we are onto number 6 and another box designed for an unique purpose.
Denise: These boxes are designed in different sizes and colors. It doesn’t matter what color they are. They’re made out of a heavier board. And actually, this little box will protect your contents against even mild changes in temperature and humidity. It’s a really good protection.
I use one that is five inches by seven inches. It’s designed to hold five by seven photos on edge. Putting them on their edge ensures that there isn’t pressure placed on them by the weight of things on top. These come in all sizes. You can get big ones that are more like a shoe box.
If you have a lot of photos, you can get dividers to use in the box. But this would also be fine. You could even use some acid free tissue and put a pair of baby shoes in there.
Lisa: Oh, yeah, absolutely.
Denise: The thing I like about these boxes is you can write on them, or you can add a label.
I cleaned out my parents homes after they died, if I came across a box like this, this says to me, “oh, there’s something special in there.”
Lisa: Yes. I totally agree with that! As I’m putting stuff together in my office, I’m thinking when I’m gone, I want something that signals to people “Keep this! Don’t toss this! This is important!” You’re kind of dressing it up and letting them give them a signal that this has been already taken care of so it needs to continue to be taken care of.
7. Archival Quality Albums
Well, number seven is archival albums. This one resonates with everybody. I mean, is there anybody who doesn’t have magnetic photo albums from 1970s, where we just struggled with things sticking and you can’t take it apart? I imagine an archival quality album would really help us with photos, negatives, letters and anything flat.
Denise: Right! The albums are designated archival quality. You want to look for a binder that is archival, as well as the inside pages. If you want to scrapbook, then you just want the paper and you would probably use photo corners. You could then write with an archival pen.
Something to be careful about is when you put a binder together. You might want to put it on a bookshelf, which is fine, but the dust can still get in from the top. Light and dust are the real enemy of things that you’re trying to preserve. So, buy a slipcover or keep them in your closet. That’s really the best place for these things because they’re protected from the light and the temperature that way.
Lisa: Good point. So, you’re saying that if you want them in your living room where people can pull them off the shelf and look at them, you will want to lay something over the top of the albums so that dust isn’t settling inside.
Denise: Yes. You know how the top of your books can get dusty!
Lisa: Exactly. I hadn’t thought about that with my photo albums. That’s a really good point.
Sometimes we have still have negatives. I know my husband inherited a lot of negatives from his side of the family. And, you know, we may or may not be ready to make prints out of all of them as soon as we get them, but we want to keep them What do you recommend for that?
8. Negative Preserver
You can use a box that is designed for negatives. It’s shorter.
Typically the 35mm negatives came in a little plastic sleeve, and that is good to use. A lot of times you can get archival supplies at a camera store. They use good quality, and I think they have something called a print file available.
Another option for negatives is binder sleeves. They’re a full page and they have little slots to put the negatives in, and then you put them in a binder that has sort of a clamshell closing. I have several of those and they work pretty well. They protect the edges of the negatives.
Lisa: Excellent!
9. Archival Slide and Media Boxes
Number 9 takes us into even more kinds of media with Archival Slide and Media Boxes. I know when I got all my VHS tapes digitized, I couldn’t bring myself to throw them away. So you’re saying that if we want to keep different forms and media, there are special boxes for that too?
Denise: Right. There are boxes that are acid free, like the ones I showed you that are sized for media and slides. You can get metal slide boxes that are pretty nice. I would avoid wooden ones. I have a few of those we inherited. But even metal ones I found at the thrift shops. People got rid of their old slide boxes.
The Kodak slide boxes that they came in aren’t bad. Slide carousels just take up a lot of space. Remember those carousels? But you can get them and they make boxes for all kinds of things. You don’t have to only use a box that is labeled a slide storage box. You can put it in something that fits.
Lisa: Good to know.
Denise: They also make them uniquely for the different types of films.
Lisa: Yes, I think I’ve got some home movie on every type of media ever created over the decades which is a good problem to have, but it’s a challenge.
Number 10 reminds me of when you and I first met gosh, probably a dozen years ago at least. And I remember talking to you about quilts. One of your specialties is really your knowledge of dealing with textiles. So often we’re thinking photos and paper but if we’re fortunate we might have a uniform, tablecloth, quilt or other textile. Tell us what this kit can do for us.
Denise: I love these! The archival boxes that I showed earlier are wonderful, but they’re heavy. Just the box itself. Imagine you have a full size bed quilt. You need a big box which is expensive and heavy.
The E flute is a kind of plastic. You’ve probably seen it used as packing material. It’s got little ridges. And it’s kind of translucent plastic stuff. That’s the best description I can think of, but it’s very lightweight. You can order one of these boxes, it comes folded or flat and you kind of assemble it. There are other types too.
Archival quilt storage solution box
I bought one for my quilts. The only trick is because the E Flute is translucent, it won’t keep the light out. I have a beautiful old velvet album quilt, and I have folded that inside a sheet and put that whole thing in the E flute box, and then stored it in a dark. I have a little archive space where I keep that kind of thing.
They make them different sizes and in kits. I really do recommend them.
Lisa: Well, that’s the next thing on my list. I have my husband’s father’s military uniform. Part of what was holding me back in storing it was getting the right kind of box. I was thinking it was going to be one of these really heavy big boxes. So, this sounds like a really nice alternative.
Denise, you’ve given us 10 fantastic archival heirloom solutions. It’s wonderful to hear that they’re available in such a wide variety. Thank you so much, my friend. It’s wonderful to see you and I really appreciate your sharing your knowledge with us.
Denise: Thank you. It’s been nice to talk with you again, Lisa. And hope to see you again sometime soon.
Not all people of color were enslaved prior to the emancipation. In fact, many were freed long before that. Researching free people of color can be quite complex. Tracing my own family line (who were free people of color) continues to be a real learning process for me. However, don’t let the challenges deter you from exploring this rich part of your heritage. In this “Getting Started” post, we discuss the manumission process, “negro registers,” and more for tracing your free people of color.
Who are Free People of Color?
[Note: Throughout our post, we will be using terminology that was used at the time the records were created.] A ‘free negro’ or ‘free black’ was a fairly recent status in the U.S. which differentiated between an African-American person who was free and those who were enslaved prior to emancipation. If a person was referred to as a ‘free negro’ or ‘free black’, that meant the person was not living in slavery. It is a fascinating and little know fact that, as Ancestry Wiki states, “one in ten African-Americans was already free when the first shots were fired on Fort Sumter.”
Step 1 for Tracing Free People of Color: Censuses
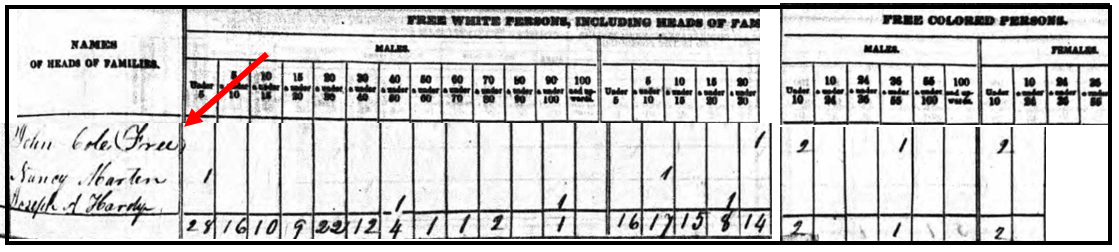
Sometimes, the story of your ancestors being free people of color was passed on through oral traditions. In my own family, our “line of color” was not talked about. Instead, my first clue was when I found my ancestor in the 1840 population census listed as free. I also found that one woman (presumably his wife) was marked in the column for “free white persons,” but John and the children were marked as “free colored persons” in this census. This was the first step to identifying my ancestor as a free person of color.
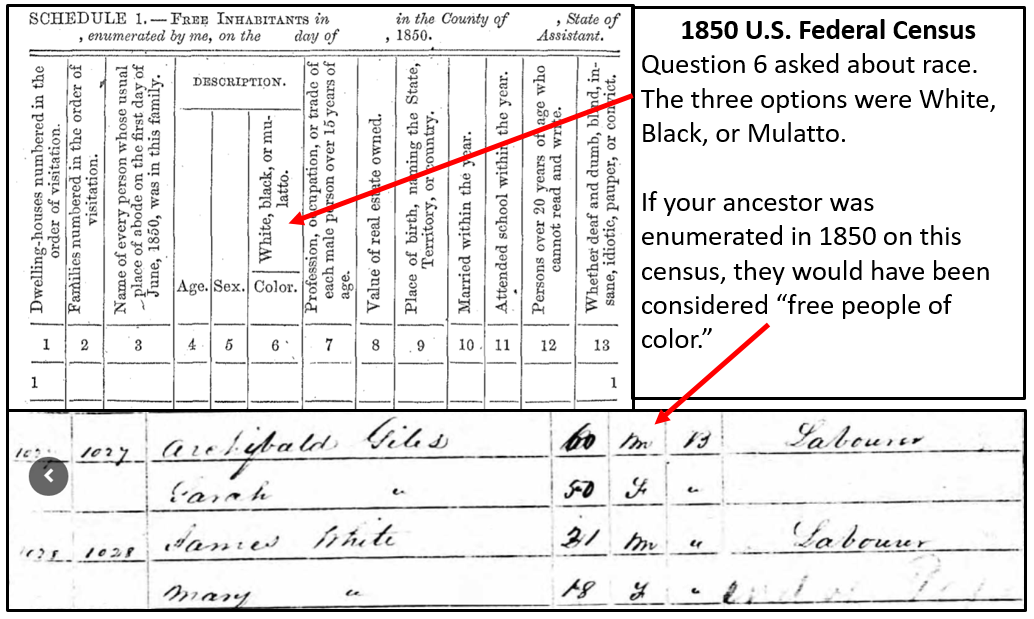
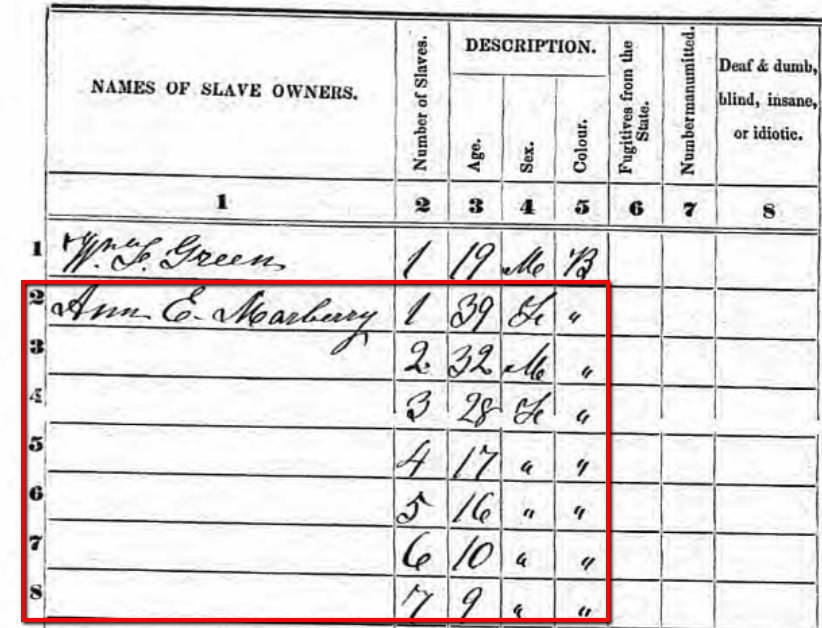
Let’s see another example. The 1850 and 1860 U.S. Federal Censuses included two population schedules. One enumerated free inhabitants, and the additional schedule, referred to as a Slave Schedule, was for making an enumeration of those persons who were enslaved. [We will discuss this further, below.]
If your ancestor appears on the 1850 U.S. Federal Census for free inhabitants, they are considered free, even if their race was listed as “Black.” An example of a Black man enumerated on the 1850 census is shown in the image below. Archibald Giles is recorded as “Black,” but appears on this census for “free inhabitants.” Therefore, he would be considered a free person of color.
If your targeted ancestor does not appear on either the 1850 or 1860 population schedule for free inhabitants, they might have been enumerated on the slave schedules of 1850 or 1860.
1850 Slave Schedule for Henry County, Tennessee. Snapshot via Ancestry.com.
In this example to the left, you will see a portion of the Henry County, Tennessee Slave Schedule for 1850. Notice, only the heads of household or the “owners” were listed by name. Slaves were not named, but rather listed by age and sex under the names of their “owners.”
Step 2: The Manumission Process
Once you have identified that you have free people of color in your family tree, the next step is to determine how they became free. Many free people of color came from families that had been free for generations. This could have been due to a manumission of an ancestor or a relationship between an indentured white woman and a black slave. I make mention of this relationship between races because it is helpful to remember that the status (whether free or enslaved) of the child was based on the status of their mother. If the mother was free, then the child was free. If she was a slave, then the child was enslaved. [1]
Manumission was a formal way in which slaves were set free. There are many reasons why a slave owner may have released or freed his slaves. In some cases, slave owners would free their mistresses and children born to her. In one case, I found the following comment made by the slave owner, “I give my slaves their freedom, to which my conscience tells me they are justly entitled. It has a long time been a matter of the deepest regret to me…” And thirdly, it was possible for a slave to obtain their manumission through the act of “self-purchase.”
If the mother was free, then the child was free. If she was a slave, then the child was enslaved. [1]
Private manumission through probate. A private manumission decree could be made in a last will and testament. You can find these manumissions in wills, estate papers, or in probate packets. Many of these county level probate records have been microfilmed or digitized and are easily accessible online.
Sometimes, a manumission in a will would be contested. When this happened, a long paper trail of court documents may have been created. A thorough search of all of these proceedings may offer a wealth of genealogical data and clues.
Usually, manumission papers included the name of the slave owner, the name of the slave, and the reason for manumission. In the case of the slaves of John Randolph of Roanoke [Virginia,] his slaves were not named individually in his will written on 4 May 1819. Instead he stated, “I give my slaves their freedom, to which my conscience tells me they are justly entitled. It has a long time been a matter of the deepest regret to me, that the circumstances under which I inherited them, and the obstacles thrown in the way by the laws of the land, have prevented my manumitting them in my lifetime, which is my full intention to do, in case I can accomplish it.”[2]
John freed over five hundred slaves, and though each of them was not listed by name in his will, a codicil at the end of the will did name two of his slaves when he asked that Essex and his wife Hetty “be made quite comfortable.”[3]
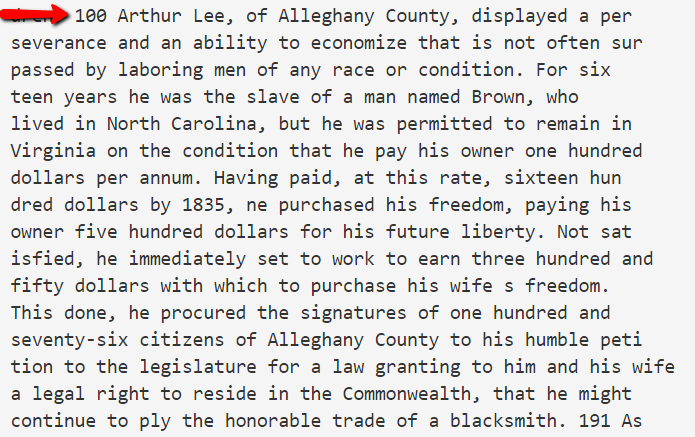
Record of Arthur Lee purchasing his freedom.
Manumission through self purchase. Self-purchase may seem impossible; however, many slaves were not required to work on Sundays for their masters.[4] On this day, men and women could hire themselves out to do work for others. With frugality, they could save their earnings to buy their freedom or the freedom of their loved ones, though this was very, very difficult.
As you can see in this example of Arthur Lee, he was able to pay for his freedom and the freedom of his wife, though it took many years. This type of record could be found in a published book, a record listed in notarial books of the county, civil minutes books, or other courthouse holdings. It is important to speak with a knowledgeable person in your targeted area about where you should look. A knowledgeable person may be those working with the local historical or genealogical society, or a head of the local history department of the public library.
Step 3: “Negro Registers”
If you do not find the manumission in a last will and testament, perhaps due to a courthouse fire or other loss, you may have luck searching the county records where your free people of color later settled. Free people of color were often required to register, using their freedom papers, when they relocated to a new area. These types of records are called ‘negro registers’ or ‘records of free negros.’
Newly freed people carried with them their freedom papers which were given to them when they were manumitted. Once they relocated, they would register with the county clerk. They would need to show the county clerk these freedom papers and a record was made in the register. The record may include the name of members of the family, ages, and most recent place of residence.
The book titled Registers of Blacks in the Miami Valley: A Name Abstract, 1804-1857 by Stephen Haller and Robert Smith, Jr. provides the following information about registers of freed people:
“From 1804 to 1857, black people in Ohio had to register their freedom papers with the clerk of courts of common pleas in the county where they desired residency or employment. State law required this registration, and clerks of court were to keep register books containing a transcript of each freedom certificate or other written proof of freedom (see Laws of Ohio 1804, page 63-66; 1833, page 22; 1857, page 186). Few of these registers have survived to the 20th century.”[2]
Though this author says that only a few of the registers have survived, I found some microfilmed registers listing the names of free people of color who had settled in Miami County, Ohio at the local historical society archives. Again, it is important to ask those people who would be most knowledgeable, and in this case, it was the historical society.
In conclusion, we understand that tracing both our enslaved and manumitted ancestors is often a difficult task. We also know there is much more to learn and share for the best techniques to researching these lines. We encourage you to review some of the additional sources below. Please let us know what other resources have been most helpful to you in researching your free people of color in the comments section below. We want to hear from you!
We all have cookbooks in our kitchen, many of which were handed down to us by our mothers and grandmothers. In addition to be overflowing with delectable recipes, they are often brimming with family history. Today I’d like to share with you a recipe mystery that followed me for years, and the bit of genealogical serendipity that solved it.
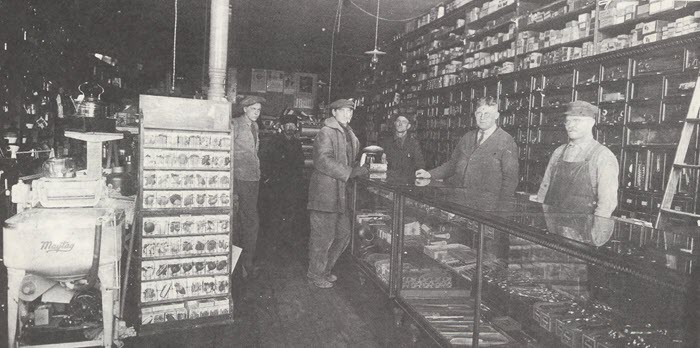
In it, I gave an example of some items I had found on Ebay from my husband’s Larson family. If you listen to the Genealogy Gems Podcast then you have heard me mention the Larson family. They hailed from Winthrop Minnesota and owned a hardware store and lumber business there for many years.
LJ Larson Hardware store
While I was taking questions toward the end of the presentation a woman in the front raised her hand. Her name was Harriet, and she said she was sure that she had a cookbook from Winthrop, Minnesota in her collection of books at home. She offered to send it to me and I gladly gave her my email address so we could connect.
Considering that Winthrop is such a small town, it make her statement surprising indeed! To provide perspective: Winthrop is about 1 square mile and the population hovers somewhere around 1300. So, I was surprised indeed to have someone in Pleasanton, California telling me that she had a cookbook that dated back to the early 20th century from this little town.
As promised, Harriett followed up with me by email. She asked for my address and told me that the book “looks a little worn but all of the pages are there. I hope it can be of some use to you. My sister taught either first grade or kindergarten there during World War 2 and that’s how it came in to her possession.”
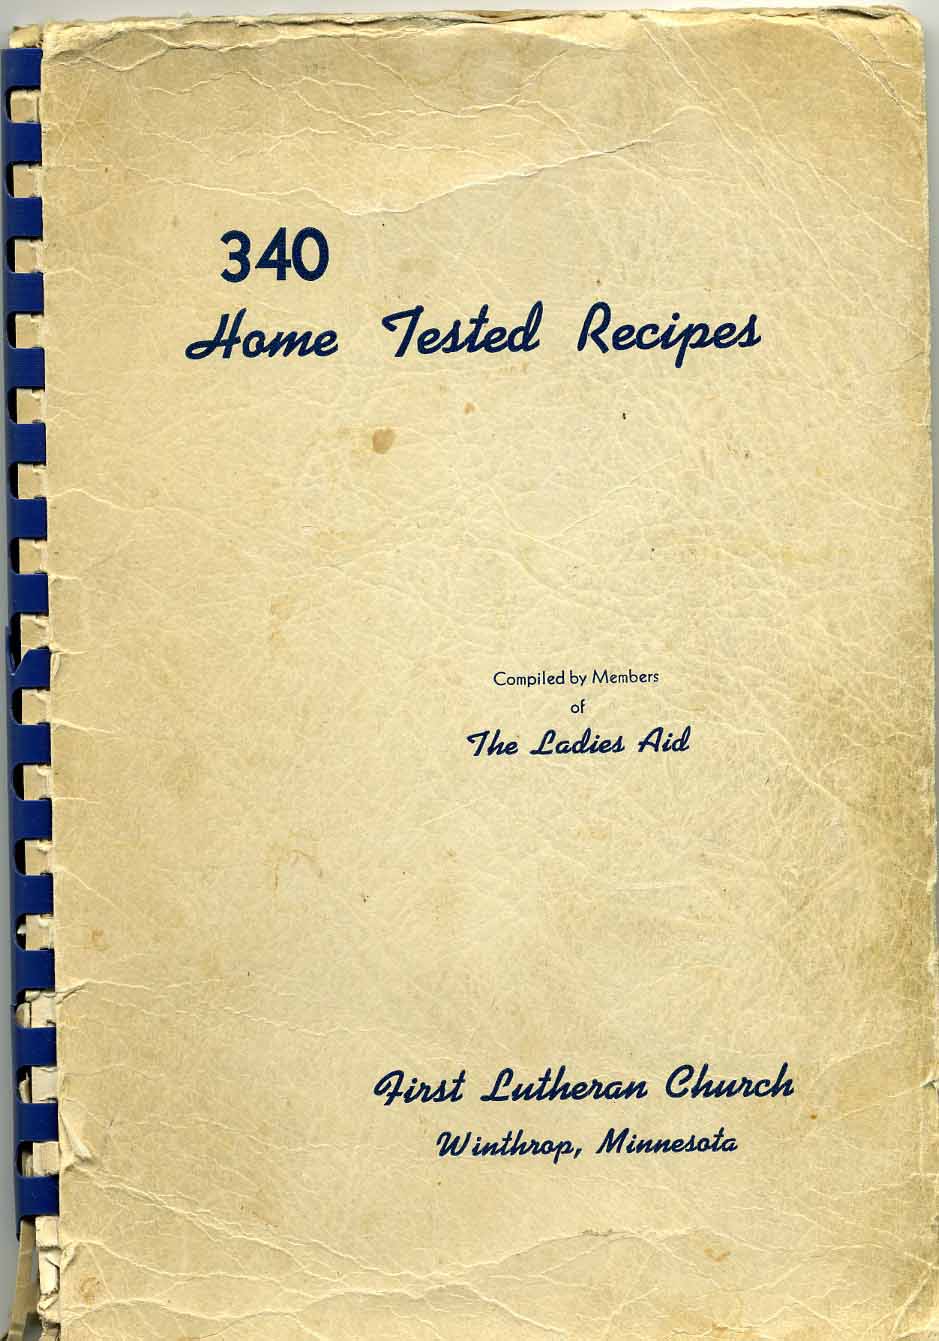
The Cookbook Filled with Family History
Harriett was a woman of her word because about a week later the 340 Home Tested Recipes cookbook compiled by members of The Ladies Aid of the First Lutheran Church of Winthrop, Minnesota was in my mailbox.
The Winthrop Cookbook
It continues to amaze and delight me how powerful just putting your family history “out there” is. By regularly mentioning real people and places in your own research, it so often leads to information and items that just seem to be waiting to be found. It’s what we call “genealogical serendipity” in genealogy circles.
But the genealogical serendipity didn’t end there. Not only did my husband’s ancestors contribute recipes to this little community cookbook, which of course I was thrilled to find – but there was a recipe in there that I had been in search of for over 25 years.
The Great Cookie Mystery
You see, when Bill and I got married, he shared his fond memories of a sour cream cookie his grandmother used to make. I’m an avid baker, so I checked with his mom to see if she had the recipe. Sadly, she didn’t.
Over the years I have tried to find a recipe for sour cream cookies in an attempt to recreate them. Every time I found one, I whipped up a batch. Bill would take a bite and shake his head saying they’ were good, but they weren’t like grandma’s cookies.
Bill enjoying baked treats with his Grandma Helen (Larson) Mansfield.
So as you can imagine, the first thing I looked for when I received this cookbook from the town where Bill’s grandma was born, was a recipe for sour cream cookies. There were many yummy-sounding treats to comb through like Pecan Sticks, Victoria Cookies, Father and Son Favorite Cookies, and Sorghum Cookies.
I got excited as I came across names I recognized from the family tree including Mrs. Sheldon S. Larson, the mother of a cousin we had the good fortune to finally meet two years ago when I presented a genealogy seminar in Minnesota at the Swedish Genealogical Society.
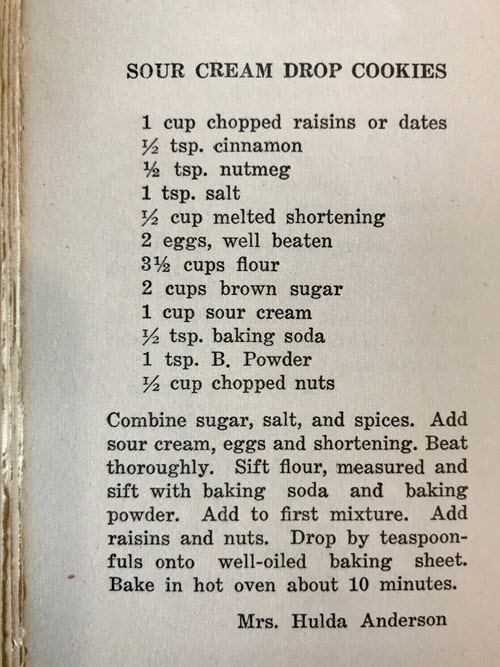
But the real thrill came when I made my way to page 42. There I found a recipe for Sour Cream Drop Cookies:
The infamous sour cream cookie recipe!
Surprisingly, the recipe wasn’t contributed by Bill’s grandma Helen (Larson) Mansfield or anyone named Larson. Instead it was submitted for inclusion in the cookbook by Mrs. Hulda Anderson. That fact didn’t deter me from trying it out. In a small town like Winthrop, recipes likely were regularly swapped and handed down through various families.
I immediately baked a batch and served them up to Bill. I’ll never forget his eyes as they lit up in excitement! He took a bite, and was ecstatic to once again be tasting Grandma’s sour cream cookies!
It may sound like a small victory in the scheme of thing, but for me it was a thrilling one, none the less!
I emailed Harriet and told her the good news and thanked her profusely.
I got a reply from her husband George. He wrote:
“I thought I would add a little amusement to the coincidence of the Sour Cream cookies. My father, George Anderson, Sr., was a salesman for American Steel and Wire, subsidiary of U. S. Steel, from the 1920s to the 1960s, traveling to every hardware store and lumber yard in southern Minnesota to sell fence, posts, nails etc. I don’t have any record of it, but I’m sure he would have called on your family’s hardware store in Winthrop. He knew all of his customers by first name, no doubt your in-laws included.”
Genealogy Serendipity never tasted so good!
A Genealogical Look at the Cookbook
I looked through the book carefully for a publishing date but none was to be found. However, there were several clues including the name of the church and the pastors name:
First Lutheran Church Lambert Engwall, Pastor
To put these clues to use, I headed to Google and searched the name of the church, the location and the name of the pastor: first lutheran church winthrop minnesota lambert engwall, pastor
Googling the church, location and pastor
The first result was just what I needed. The link to me to a Wikipedia page about the church:
The church in Wikipedia
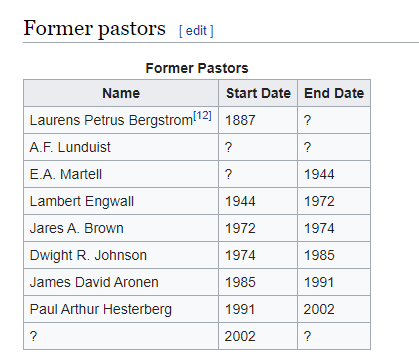
It was a fairly comprehensive page, and I was specifically looking for a list of pastors who had served at the church. To save time, I used Control + F (PC) to trigger a find on page search bar. I searched for “pastor” and was immediately take much further down the page to exactly what I wanted to know.
A helpful list of previous pastors
I quickly learned that Lambert Engwall served at this church in Winthrop, Minnesota from 1944 to 1972. Given that Harriett through it hailed from the World War II era when her sister lived there, and from the condition and style of the book, I feel confident it was published closer to 1944.
The next steps to learn more about the relationship between the Andersons and Larson include could include:
Reviewing the 1940 census for Winthrop, Sibley County, Minnesota, and mapping their homes in Google Earth.
conducting additional research into church and their available records include church meeting minutes.
A comprehensive search of the Winthrop News newspaper, with a particular eye on the social pages.
Share Your Genealogical Serendipity and Cookbook Stories
Have you experienced glorious instances of genealogical serendipity in your own family history quest? Do you have a cookbook that has been handed down to you that you treasure? Please leave a comment below and share your story!
Resources
Learn more powerful Google search techniques and ways to use Google Earth for genealogy in The Genealogist’s Google Toolbox by Lisa Louse Cooke (2020) available at the Genealogy Gems Store.
Book by the author
Learn more here about how to access the 50+ video classes that are a part of Genealogy Gems Premium membership.
Show Notes: The 1931 Canadian Census was released by the Library and Archives Canada on June 1 of 2023. These digitized images can (as of now) be browsed by general location. The challenge with this census, like with other census records when they first come online, is that there is no index. Creating the index that makes the census searchable by name and other identifying factors takes a while. So right now, the digitized images are available online to browse. Ancestry.com is partnering with the Library and Archives Canada and using its artificial intelligence technology to generate the index. Until that happens, I have four strategies for you that are going to help you find your ancestors right now. And you’ll be able to find them much faster than if you just browsed the images one by one. Once the index comes out, it’s not necessarily going to be perfect. They never are. So, these strategies can help you if you run into trouble finding someone in the 1931 Canadian census. And they’ll also help you better understand the information that you do see in the images.
My first strategy for finding your ancestors in the 1931 census of Canada is to check the earlier census records. Our goal is to identify the enumeration sub-district and the municipality where they lived. If we can find it in an earlier census, we can use that information to find them more quickly in the 1931 Canadian Census.
In my case, the person I’m looking for in the 1931 Canadian census is my husband’s great-grandfather, Harry Cooke. He emigrated to Canada in 1912, along with his second wife, Martha. I started my search for them by seeing if I could find them in a census record sometime after 1912, but prior to 1931.
Harry lived in Regina, Saskatchewan. So, I was able to use the Census of Prairie Provinces that was taken in 1926 in Saskatchewan, Alberta, and Manitoba. You can use the Census Search Tool at the Library and Archives Canada website to search those census records.
If your ancestors lived in other provinces, again, that Census Search Tool is going to help you find the most recent census records available for them.
In 1926 Harry Cooke was in sub-district number 8 and the municipality was Sherwood, so I made note of that. Also, while looking at that 1926 census, I found there is an area where it talks about where each household is located. They list the Township, Range and Meridian. So, I also made note of the township number listed, which in this case was 17. If your ancestors happen to live in a city, there may be a street address listed. Though many people came to Canada to work the land, so you may not be fortunate and find that information. But make note of the street address if it’s listed. Sometimes it’s written right across the Township, Range and Meridian columns.
Strategy #2 Check City Directories for Addresses
I really easy way to look for city directories is just to google it. I found the 1931 city directory for Regina by going to Google.com and typing in 1931, Regina city directory. The very first result was the city directory for Regina in 1931 at Internet Archive. I happen to have heard that there was a directory for 1931, so that’s why I searched for it specifically. If you don’t happen to know the year you can run a Google search for a time frame. Do this by entering the name of the town or the closest big city to where your ancestors lived in the search field. Add the phrase city directory, and then enter a number range. Google calls this search operator a numrange. Here’s an example:
Regina city directory 1912..1931
This type of search brings up links to web pages that mention Regina, the words city directory, and also a four-digit number that falls within the specified range, which for us would be the year that the city directory was published!
The Internet Archive has thousands of digitized and searchable city directories. Many genealogy record websites use The Internet Archive as their cloud hosting service for their records. They digitize everything and upload it to Internet Archive where they can host it, and then link to it on their website. So that is a great place to look.
However, it’s a good idea to run a Google search because that way you are going across the internet, and hopefully you’ll find the city directories that you need.
In my case, in 1931 Harry and Martha are still at 520 Osler Street. So that reinforces what I had found in the 1926 census.
Strategy #3 Search at the Library and Archives Canada website
At the time of this writing, without an actual index, we’re going to enter the province name, the city / district if you have it, and the sub-district.
In the case of Harry and Martha Cooke, I found them in 1926 in sub-district #8, so that was the first place I searched. However, in 1931 sub-district #8 was not associated with the municipality of Sherwood. In fact, it didn’t mention township 17 either, so it was very suspicious.
It is possible that enumeration sub-districts can change over time. This can happen because as a country grows, the population grows. District lines must be redrawn in a way that allows a single census taker (enumerator) to cover the area within a certain given amount of time. In a more populated city, that can mean that the sub-district actually shrinks a little bit, and there are more sub-districts added. However, the previous sub-district does give you a great starting point. It’s very possible that the person you are looking for is in a sub-district close to the original. So, you’ll just have to browse a little further. And that takes us to strategy number four.
Strategy #4 Browse the Records Faster Using Clues
You could go through each digitized page of the 1931 Canadian census one by one looking for your relatives. That took an especially long time when the records were first released on June 1 of 2023. On my computer each image took at least two hours to load…it was crazy! But it’s not surprising, because I’m sure everybody and their brother wanted to look at these records.
Thankfully, now it’s running much faster. But it could still take quite a long time to look page by page. There are a few more things that you can do to make the process much faster.
First, as you pull up each sub-district, keep track of your search with a research log. After checking the sub-districts before and after the one Harry Cooke was in in 1926, I went back to the beginning and started with sub-district #1. The very first image in each sub-district is going to be a title card that will include the township number, and the municipality covered in that sub-district. So, since you already located that in the earlier census record, you are going to be able to immediately tell if that group of images is worth going through.
If it doesn’t match, go on to the next sub-district. This is why a research log is important. Genealogy Gems Premium Members can download the worksheet in the Resources section at the bottom of these Show Notes. It’s just a really simple way to keep track of everything that you’re finding and make sure that you’re not covering the same base twice.
You might come across a title card that has the right municipality but not the right township number, or vice versa. I found that in one case while looking for the Cookes. Just make note of it on your worksheet, and keep moving, looking for an exact match.
If you find a sub-district that looks really promising, perhaps it includes the township or the municipality you need, take a quick look at image number two. This is the first page that shows people in the neighborhood. There are a couple of things to look for.
If you know that your ancestors were British, like Harry and Martha were, then you might expect them to be in a neighborhood with predominantly British people. That was really common. When our ancestors left their homeland and came to a new country, they oftentimes emigrated with other people from the country that they knew. They may have heard about the opportunity from those people. And once they arrived, they tended to congregate together. They lived together in communities and neighborhoods because they shared a culture and language. They could support each other and help each other.
One of the things that tipped me off that sub-district #8 wasn’t the right place to be searching for the Cookes was that it was comprised primarily of Russians, Austrians, Romanians, and Hungarians. Harry and Martha didn’t speak those languages, so I would not expect them to be there. Also, when I looked at the 1926 census, I made note of who his neighbors were. And indeed, it was a very predominantly British neighborhood. So that was a clue to me that even though I might have had the right township number, it didn’t mention the right municipality, and it certainly had a completely different makeup when it came to the neighborhood.
Also, as you’re reviewing the surnames and going down the list on the image, take a look at the township column. As you’ll recall, we made note of the township number and / or the address that we found in the earlier census. As you scan the surnames on the page, also check if the correct township number or address is showing up.
In my search, I saw a lot of different street names (not Osler St.). I don’t know Regina very well, so in another browser tab, I opened up Google Maps. I did a search for 520 Osler St., and then I selected “Directions” and entered one of the street names that I was seeing on the census. And sure enough, they were miles and miles apart. That’s another clue you’re not in the right area for browsing.
Our goal is to find our relatives as quickly as possible without spending hours reviewing pages that are not likely to include them. So, again, if you don’t find that exact match of Township and Municipality on the sub-district index card, look at these other factors to see if you’re in the right ballpark.
In the end, I am happy to say I found Harry and Marth Cooke pretty quickly. They were in sub-district number 11. The title card showed that it covered township 17 and the municipality of Sherwood. It was an exact match! They were on image number 18 residing in a very predominantly British neighborhood on Osler St., exactly where I would expect them to be.
1931 Canadian Census Search Wrap Up
The 1931 Canadian Census is full of valuable information about your Canadian relatives. While it take a little more time to search without an index, these strategies can help you do so faster. You can also apply (and tweak) these techniques to other types of searches where an index is unavailable, or your relatives aren’t showing up in the search results. And remember, if you find an address, look up the location in Google Maps to see it for yourself.