Genealogy at the State Library of Pennsylvania
One thing that many genealogists have in common is a connection to Pennsylvania. Perhaps one of your family tree branches extends back to the early founding of the Pennsylvania colony. Or it may be that one of your ancestors was one of the hundreds of thousands who arrived through the port of Philadelphia. Even if you don’ t have Pennsylvania ancestors the State Library of Pennsylvania has a lot to offer.
Genealogy at the State library of Pennsylvania
In this episode I’ll be sharing with you a video of my interview with two librarians from the State Library of Pennsylvania. We’ll discuss their collections and specifically what’s available through their website. After the interview I’ll show you some specific search techniques that you can use at the State Library of Pennsylvania website, including a trick that you can use with any state library website.
Elevenses with Lisa Episode 46 Show Notes
My special Guests from the State Library of Pennsylvania:
Kathy Hale, Government Documents Librarian
Amy Woytovich, Genealogy Librarian
State Library of Pennsylvania Website
Genealogy at the State Library of Pennsylvania
State Library of Pennsylvania Update
This interview was recorded in December 2020. Here’s the latest update (as of this writing) on the library closure and access:
- The State Library is currently closed to all visitors. However, staff is teleworking. People may send inquiries to ra-reflib@pa.govand staff will answer questions as best they can.
- Renovations have begun on our library in the Forum Building. There may be times we cannot get to the materials requested because of the construction.
- Interlibrary loan services are available, but patrons must check if their home library has the equipment and are open for patrons to use that equipment. The Library still ships all over the U.S.
- Watch their website for instructions on how to access the State Library of Pennsylvania when it does reopen to the public.
The State Library of Pennsylvania Background
The library has been a federal repository library since 1858, and is one of the oldest in the country. The government printing office deposits materials here.
The State Library of Pennsylvania Collection
The State Library of Pennsylvania physical collection includes:
- 30,000 volumes
- 100,000 reels of microfilm
- A million pieces of microfiche
The State Library of Pennsylvania digitized items include:
- County and family histories
- Local histories
- Small church histories from rural areas
- City directories
- Passenger lists
- Regimental histories (Revolution to Spanish-American War)
- Pension Lists
- Pennsylvania Published Archives (collection of military, government, marriage, immigration records from colonial times)
- The 1940 U.S. Federal Census
Pennsylvania Documents
Example: a report for Pennsylvania of the 25th and 50th anniversaries of the Battle of Gettysburg. Includes information gathered at reunions including names, pictures, and more.
U.S. Government Documents – Serial Set
This collection includes reports to the legislature from agencies and institutions. Example: The Daughters of the American Revolution (DAR) were compelled to provide to Congress a yearly report of the names of people approved by DAR. These can be accessed through many libraries, the federal government or by contacting the State Library of Pennsylvania via email: Ra-reflib@pa.gov
State Library of Pennsylvania Research Guides
Amy discusses research guides available on the website. However, here is the link to the topics she specifically mentions such as Cemeteries and Zeamer collection – recorded information about Cumberland County PA cemeteries. General Research Guides page. These research guide pages include links to additional helpful websites.
State Library of Pennsylvania website’s Genealogy Page
At the top of the page look at the For General Public tab which will take you to all of the genealogy research guides. Visit the Genealogy page at the State Library of Pennsylvania.
Newspapers at the State Library of Pennsylvania
The library’s collection of newspapers includes papers from all 67 Pennsylvania counties on microfilm. They do have a lot of digitized newspapers at the Pennsylvania Photos and Documents Collection at the Power Library.

Newspapers at the Power Library
The Power Library
You can find the Power Library by going to the libraries home page, and under the For General Public tab go to Our Collections > Power Library. Or visit the Power Library website at Powerlibrary.org.
- Electronic Databases: you have to be a resident with a library card.
- Digital Documents: you don’t have to be a Pennsylvanian to access this collection.
At the top of the Power Library home page on the right you’ll find Digital Docs and Photos:
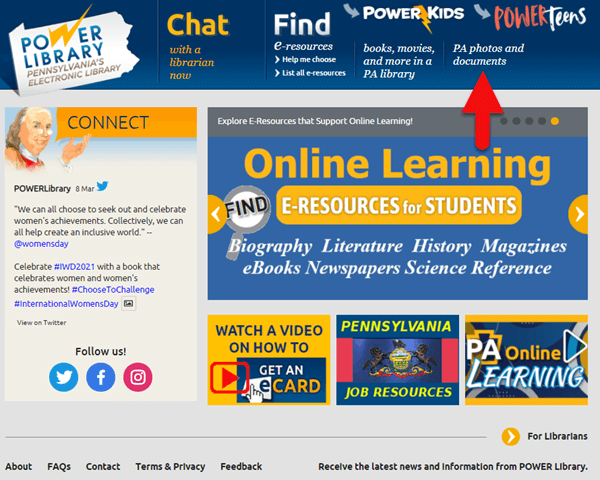
Pennsylvania Photos and Documents Collection at the Power Library.
There you will find many materials from Pennsylvania colleges including yearbooks. You can browse by subject area, with Genealogy being one of those areas.
Interlibrary Loan and Lookups
At the time of the interview the library was not open for interlibrary loan and lookups. Check the website for the latest updates.
The library does loan its newspaper microfilm. Up to 5 reels of microfilm per request. Kathy says that if you find a newspaper article at Newspapers.com and you see the title, date and the page that an article is on, you can provide the information to the interlibrary load reference librarian at your local library and place a request for a scan of the article from the State Library of PA microfilm. The article can then be returned to you digitally through interlibrary loan. The digitized scan is yours to keep.
The Librarians Favorite Collections
Amy’s Pick: Historic maps found at the library’s website Home > For General Public > Genealogy and Local History > Maps and Geographic Information. This includes Sanborn Fire Insurance Maps. Note: log in with a library card may be required. Contact the library with questions.
Kathy’s favorite collections include:
- Map Collection consisting of over 35,000 maps.
- The 5 generations from the Mayflower collection.
Usage of Materials
Usage rights and copyright are important considerations when utilizing library materials. Usage depends on the individual item’s copyright. It should be researched as much as possible. Check the meta data of digital images for copyright information.
How to Get Research Help from the State Library of Pennsylvania
“Think of Amy and I as your personal librarians.” Kathy Hale, Librarian
Contact State Library staff by phone at 717-787-2324 or by email at:
- Reference Questions: ra-reflib@pa.gov
- Law Reference: ra-law@pa.gov
- Interlibrary Loan: ra-ill@pa.gov
- Makerspace: ra-edmakerspace@pa.gov
Lisa’s Tips for Using the State Library of Pennsylvania Website
Maps for Genealogy
At the website go to Home page > General Public Tab > Our Collections > Search our Resources.
- Type in a location and the word map
- Use the filters on the right side of the page > Library > State Library
- Click to select a map
- Try filtering to Full Text Online
- Look for the Online Access link, just above Text Item Call Number.
On the map viewer page, click the thumbnail button (looks like a checkerboard) to see multiple pages at a time. You’ll find the Download button in the bottom right-hand corner. The Print button is in the upper right corner.
Cite your source: Go back to the result page, and scroll down. Click the red button called Cite This. This allows you to copy the source citation which you can then paste into other documents and programs.
Newspapers for Genealogy
The Library of Congress Chronicling America website has many Pennsylvania old newspapers, but it doesn’t include all of the newspaper that the library has in its collection. Here’s how to find old Pennsylvania newspapers at the State Library website:
- On the State Library website go to General Public > Research Guides > Newspapers
- Click the link to the Pennsylvania Newspaper Archive
- Browse by title or date, or use the drop-down menus
- On the viewer page, zoom into the desired article. Then click Clip/Print Image
- Right-click on the clipped image to save it to your hard drive.
- The Persistent link is the URL address to your clipping.
Google Site Search Tip
This tip comes from my book The Genealogist’s Google Toolbox and my Premium Membership video The Genealogist’s Google Search Methodology.

Available at the Genealogy Gems store.
Many websites have their own search engine. However, each search engine is only as good as it was programmed. If you can’t find what you want on a website like the State Library PA website, try using a Google site search. Site search tells Google to search for your search terms only on the website you specify.
In my example in the video, you can see that Google found the one page mentioning the surname in a listing of microfilms much faster than I would have found it digging around and navigating the website itself. This page was not a card catalog entry so it would not have come up in a search of the catalog on the website.
Learn More About the State Library of PA Collections
In episode 43 of Elevenses with Lisa we discussed genealogy records available for free at the Internet Archive. The State Library of Pennsylvania has been partnering with he Internet Archive to digitize many additional items from their collection. You can access these items for free at the State Library Internet Archive Collection. This collection includes a large number of World War I materials as well as a growing number of 19th and 20th century pamphlet volumes.
Resources
- Get My Free Genealogy Gems Newsletter – click here.
- Bonus Download exclusively for Premium Members: Download the show notes handout. (Not a Premium Member? Become a Genealogy Gems Premium Member today.)
Comparing Digitized Newspapers on Genealogy Websites: Why Findmypast.com Gets a Headline
When it comes to digitized newspapers on genealogy websites, Findmypast is a clear headliner. The site already hosts millions of U.S., British, and Irish newspaper pages–and their British collection is about to DOUBLE. Extra, extra, read all about it!
![]() Here at Genealogy Gems, we regularly compare features of leading genealogy websites, or as we refer to them, the “Genealogy Giants:” Ancestry.com, FamilySearch, Findmypast and MyHeritage. Today’s topic: digitized newspapers.
Here at Genealogy Gems, we regularly compare features of leading genealogy websites, or as we refer to them, the “Genealogy Giants:” Ancestry.com, FamilySearch, Findmypast and MyHeritage. Today’s topic: digitized newspapers.
It may surprise you to hear that digitized historical newspapers aren’t a big part of the collections at all four giant genealogy websites. In fact, only one site–Findmypast–offers access to millions of exclusive British and Irish newspaper pages and a major U.S. newspaper database (which is usually just available at libraries).
Why mention it now? Because a good thing just got better: Findmypast plans to double its British newspaper content over the next two years.
Digitized Newspaper Treasures at Findmypast.com
 Findmypast’s enormous genealogy collections focus on the countries of England, Scotland, Ireland, and Wales. Findmypast and The British Library have been working together for several years on The British Newspaper Archive, now home to more than 22.5 million newspaper pages dating from the 1700s. But what many people might not realize is that these same newspaper pages are also available to Findmypast subscribers.
You can search newspaper pages on Findmypast by name (first and last) and by other keywords, such as an occupation, street address, event or another word that might be associated with your family in newspaper articles. You can narrow the date range of papers searched and even target specific newspapers:
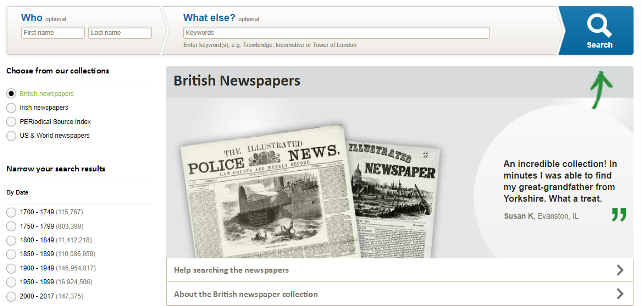

Original bound newspaper volumes at the British Library. Image from The British Newspaper Archive.
And it gets better. Findmypast just announced that over the next two years, it will nearly double its digitized newspaper collections! It is scanning over 12 million pages from the largest private newspaper collection in the UK: the Trinity Mirror archives. Over 150 local papers from across the U.K. are included. These pages have never been made available online, but will be on both The British Newspaper Archive and Findmypast. The project is already underway and moving along rapidly: up to 100,000 pages per week.
According to a press release, “The program builds on an existing partnership that has already resulted in the digitization and online publication of upwards of 160 Trinity Mirror titles, including significant coverage of both World Wars. Published online for the very first time, these war-time publications also included the Archive’s first national titles, The Daily Mirror and The Daily Herald.”
 TIP: If you are interested in accessing British newspapers, but not needing the full range of genealogy resources offered at Findmypast, consider purchasing PayAsYouGo credits from Findmypast. You can purchase 60-900 at a time and “spend” them to view individual search results, including newspapers. You can also subscribe separately to The British Newspaper Archive.
More Digitized Newspapers on Genealogy Websites
The other giant genealogy websites do offer some newspaper content–indexed, imaged, or both. Here’s a short summary of what you’ll find on Ancestry.com, FamilySearch, and MyHeritage:
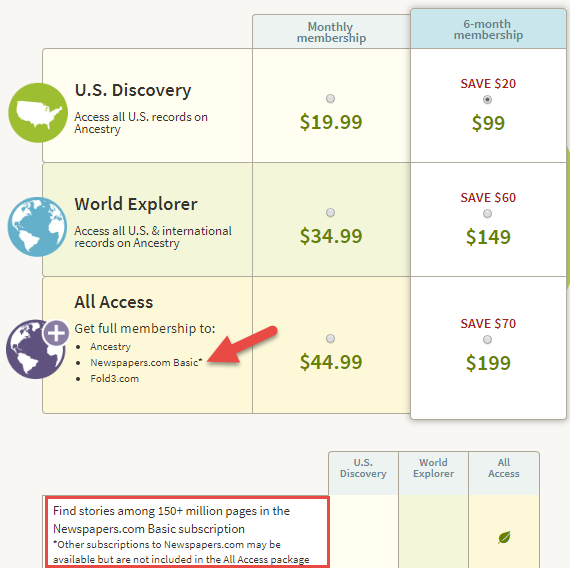
Ancestry.com’s subscription options.
Ancestry.com: This giant site does offer some digitized newspaper content, including images connected to indexed names in Historical [U.S.] Newspapers, Birth, Marriage, & Death Announcements, 1851-2003, Australia’s New South Wales Government Gazettes, 1853-1899 and Canada’s Ottawa Journal (Birth, Marriage and Death Notices), 1885-1980. But Ancestry.com’s biggest newspaper collections are mostly indexed obituaries (not images of the actual newspaper pages). Ancestry.com subscribers who want major access to digitized newspapers should consider upping their subscription to “All Access,” which includes Basic access to Newspapers.com.
FamilySearch: Millions of indexed obituaries are searchable by name on its free website, but it doesn’t generally offer any digitized newspaper pages. Of its billion+ historical record images, FamilySearch prioritizes more “core” genealogical records, such as vital records, censuses, and passenger lists.
MyHeritage.com: This site used to have access to NewspaperARCHIVE, the same U.S. newspaper database Findmypast currently offers, but it doesn’t now. It’s got new collections of Ohio (4.5 million pages from 88 sources) and New York (1.9 million pages from 56 sources) newspapers and access to the Jewish Chronicle [England]. But the bulk of its newspaper search results come from searching two other websites: Chronicling America and Trove, run by the national libraries of the United States and Australia, respectively. While it’s convenient to search them from MyHeritage if you are already using it, it’s not a reason to subscribe, as you can use those sites for free.
More Inside Tips on the Genealogy Giants
 Genealogy Gems is your home for ongoing coverage and insight into the four ‘genealogy giants’ websites. Click here to learn more and to watch the RootsTech 2017 world premiere of my popular lecture that puts these big sites head-to-head. Genealogy Gems has published my ultimate quick reference guide, “Genealogy Giants: Comparing the 4 Major Websites.” It distills that hour-long lecture (and I was talking fast!) into a concise, easy-to-read format that will help you know which websites are best for you to use right now.
Disclosure: This article contains affiliate links and Genealogy Gems will be compensated if you make a purchase after clicking on these links (at no additional cost to you). Thank you for supporting the free Genealogy Gems podcast and blog!