3 Things This Gems Follower Loves About the New Ancestry Site
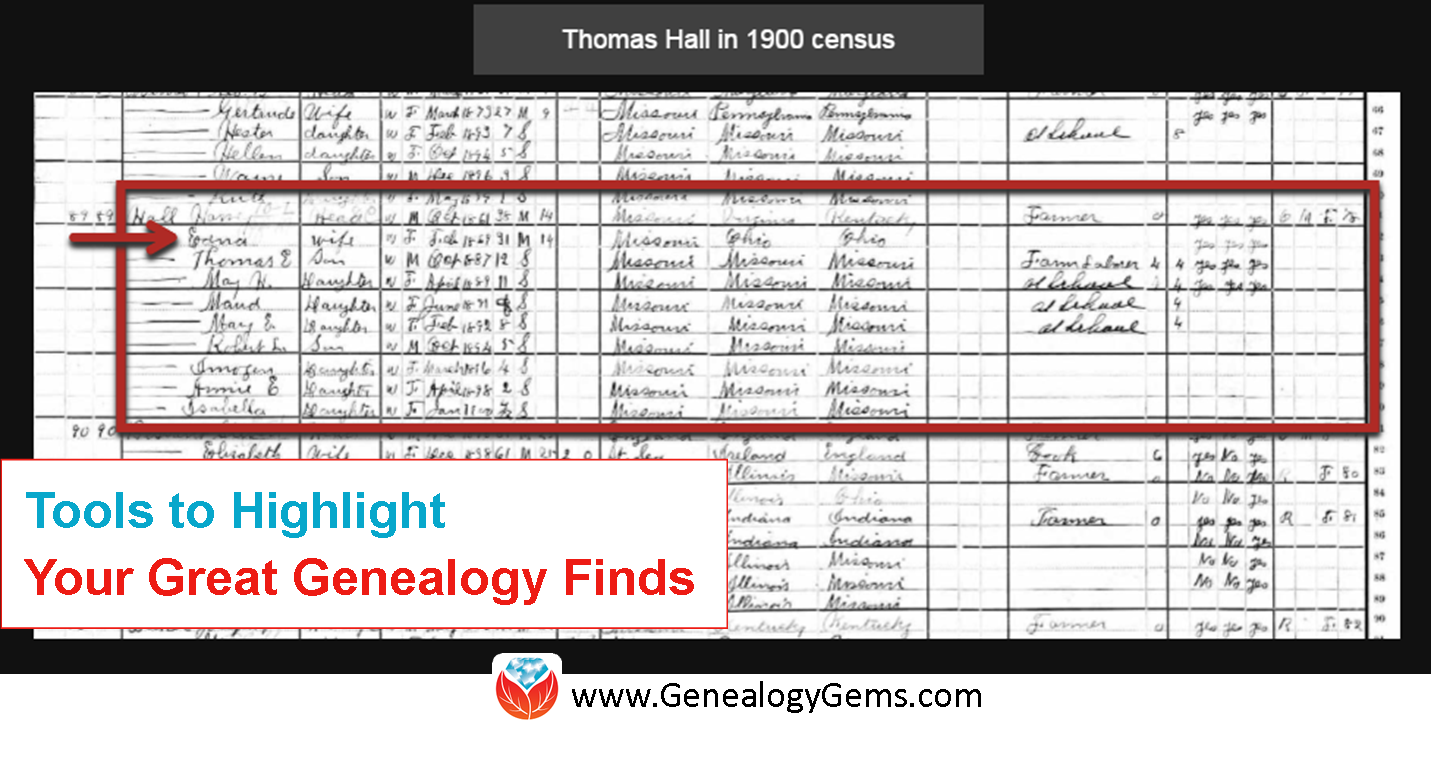
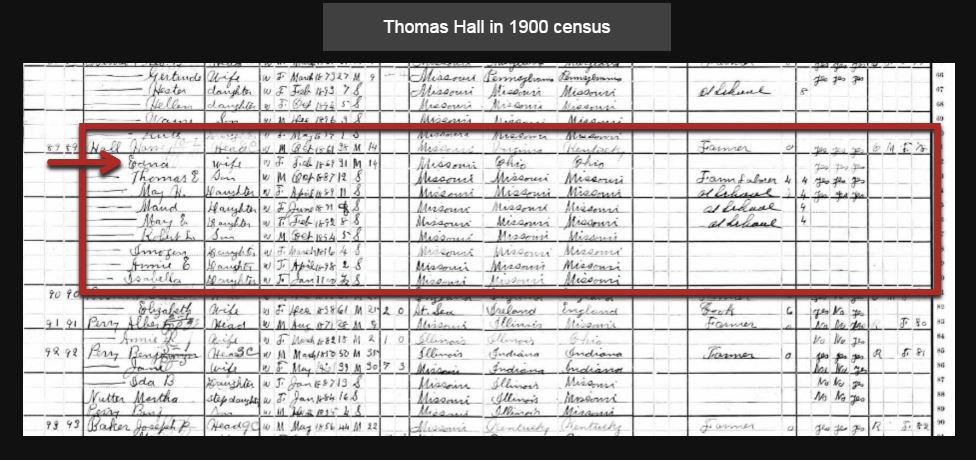
 Recently we reported changes in the Ancestry.com site, now available to all U.S. customers. Genealogy Gems follower Nora then emailed us with three things she loves about the new Ancestry experience, and her instructions for merging facts related to the same life event. Below are her comments; I’ve added screen shots for the sake of illustration that don’t pertain to Nora’s ancestors.
“I’ve been playing around with the new version of Ancestry.com, and have the following comments:
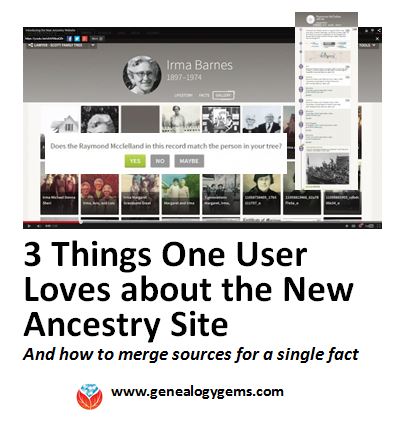
 1. YES, NO, MAYBE SO. “I LOVE that in the “hints”, it now asks you if the facts match your ancestor, and you have “Yes,” “No” and “Maybe” options.
In some cases, it is clearly not your ancestor, but sometimes you just aren’t sure. If you click “Yes,” you get the usual screen where you compare the items in the record to your tree and decide which points you want to use as “preferred” before you save the source to the individual in your tree.
If you click “No”, the hint gets put in the “Ignored” list. Yes, you could always go back and review these again, but you had to dig through all the entries that clearly did not relate to your ancestor. With the addition of “Maybe” there is now an “Undecided” list. If you think it is possible that this is your ancestor, but don’t yet have any additional information that would support an unconditional “Yes, save this to my ancestor” reaction, you can click “Maybe.” Then, when something else shows up in your research that supports that hint, you can search back through the “Undecided” list under hints for that ancestor, and maybe go ahead and save the info to them in your tree.
 THUMBS-UP ON LIFESTORY VIEW. “I quite like the LifeStory view, especially as it gives the option to remove items you don’t want to include. For instance, the 1860 U.S. Federal census shows my ancestor as residing in New York, NY. She was actually visiting her parents with her firstborn, a toddler son named for her father. Her actual home at the time was in California.
Because I entered the census info on Ancestry, her LifeStory suddenly included “current event” items for New York in the years between the 1860 and 1870 censuses. While these are appropriate in her parents’ records, they are not applicable to her, as she returned to California and her husband.
EASIER TO MERGE FACTS. “On each ancestor’s Facts tab, it is now so easy to combine duplicates of life events that came from different sources! I’ve been doing editing there and then syncing with my Family Tree Maker tree. The page shows the list of facts for the individual, the list of sources for that individual’s facts, and the list of immediate family members.
For the ancestor [mentioned] above, there were four separate marriage “facts.” All of the documentation of the marriage date came from other members’ trees. Two of these trees had the information entered in exactly the same format, so they were both linked to the same fact. The other three trees each had the information entered slightly differently from any of the other trees. In order to consolidate down to just one “fact” with multiple “sources,” I did the following:
- Chose which “fact” I wanted to keep (in this case, it was the one with the most detailed information about the event). I’ll call this the “Master Fact.” My “Master Fact” was showing one source. The “duplicate facts” were showing 2, 1, and 1 source respectively.
- Clicked on the first “duplicate fact.” This drew a connector line to the associated “sources.”
- Allowed my mouse to hover over the associated source, and clicked on the EDIT button that appears. At the top of the resulting screen, it listed the “facts” that this particular source is currently associated with. Below, it listed all the other “facts” for the individual.
- In the lower list, I clicked the plus sign next to the Master Fact that I wanted to keep. This associated the current “source” with the Master Fact.
- Next, in the upper section, I checked the “X” next to the “duplicate fact” that I intended to delete. This unlinked the current “source” from that “fact.”
- I repeated these steps for all the “sources” associated with the “duplicate facts.”
- Lastly, I went back to the Facts tab for this particular ancestor. My “Master Fact” was now showing 5 associated sources, and each of the “duplicate facts” showed no associated sources. I was able to click on each “duplicate fact,” select “Delete” from the “Edit” menu associated with that “fact,” and wind up with just the “Master Fact” for my ancestor’s marriage. Doing this really cleaned up the LifeStory view without having to “hide” a bunch of entries.”
Thank you, Nora! I appreciate hearing from you about the “gems” you’re finding in the new Ancestry site experience–and especially thanks for those instructions on associating several sources with the same life event.
![]() The free Genealogy Gems Podcast episode 180 has tips for backing up your Ancestry data (not just your tree, but sources and DNA), as does this blog post. Make sure you’re always backed up, whether your data lives online or on your home computer. I rely on Backblaze as the official Genealogy Gems backup data provider. Click here to learn why
The free Genealogy Gems Podcast episode 180 has tips for backing up your Ancestry data (not just your tree, but sources and DNA), as does this blog post. Make sure you’re always backed up, whether your data lives online or on your home computer. I rely on Backblaze as the official Genealogy Gems backup data provider. Click here to learn why