I started creating family history books a decade ago. These 6 strategies helped me share my genealogy research findings in books that made fascinating, affordable and easy-to-mail gifts.
My Dilemma: How to Share My Family History
Several years ago, I began sharing my family history research with my relatives. We don’t live close to them, so I had to mail whatever I shared.
Initially, I sent CDs full of digitized photos and documents, but they just didn’t get looked at like I had hoped. Individual items on CDs didn’t easily or smoothly tell a story.
Also, I think some of my relatives found the technology a bit intimidating back then. And many people just don’t care for viewing photos, documents or stories on a computer screen.
The Solution
I found that the solution to sharing with all family members was a good old fashioned book!
Books are still hard to beat for telling a story in words and pictures in an extremely easy to use way. Self-publishing little hardbound family history books helped me break up my research sharing into digestible chunks. And the best part? My family actually opened and read them them cover to cover.
Cover of the family history book I created about my Grandma.
But where to begin the family story, and where to end it? It’s tempting to tell the story of one generation in each book. But even this can become an overwhelming project, with an end product that is not as meaningful for your readers (lots of dates and names, without a lot of room for stories or photos).
I wanted my family to get to know our ancestors intimately. For me, that meant focusing on one person or one event instead of entire generations or families.
Where to Start
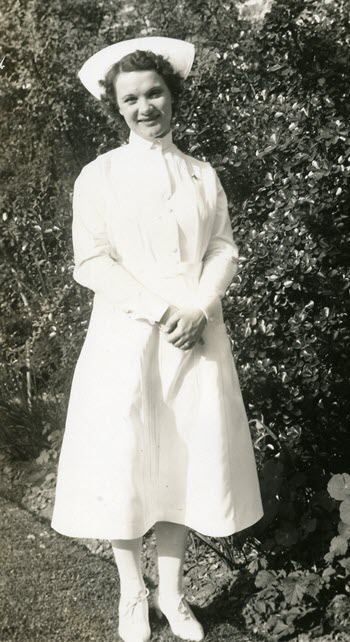
I started with my favorite ancestor: my grandmother.
I’ve transcribed many years of her diaries, which are full of her stories about years spent in nurse’s training. Those journal entries taught me so much and led me to some great discoveries about her life. They also dovetail beautifully with my collection of photos from that period.
So I decided that my starting point would be her graduation from high school and her decision to enter the nursing field.
Grandma was proud to be a nurse and I’m proud to tell her story.
By the time I had pulled everything together from 1930 to 1933, I had more than enough for a nice size book: “A Nurse in Training.”
Tips to Create Family History Books
It’s really important to create your book with your “customer” in mind: your family member who will be reading the book. So here are my top tips for making your book fascinating to your reader:
#1. Convey an overall theme
Review all the available material that you have. That will give you a sense of what stories you can tell and, hopefully, a sense of your ancestors’ goals, experiences and emotions.
In the case of “A Nurse In Training,” I wanted to communicate my grandmother as a young woman, taking on a new adventure away from home. Both funny times and deeply challenging times formed the foundation of this warm, caring woman’s successful career. And she just happened to meet her husband at the same time!
A page from “A Nurse in Training.”
You don’t need every scrap of research and every photo to get this theme across. It’s your job to be a sharp editor to pick out the critical pieces.
#2. Make it readable in one sitting.
Like it or not, if the book takes too long read, your relatives won’t. Strive to create a book that doesn’t look intimidating.
I create books that are 20 double-sided pages. People will be willing to pick up a thinner book off the coffee table. And if it’s well done, they’ll find that they’ve suddenly finished the entire book without once thinking of putting it down! Hopefully they’ll walk away with a real sense of having gotten to know that ancestor.
#3. Fill it with the best of what you have.
This goes back to conveying the theme and being a tough editor.
My grandma had many funny stories, but there just wasn’t room for all of them. I picked only the best of the best. Anyone who reads the book should hopefully come away with the fact that my grandma had a sense of humor and could laugh at herself.
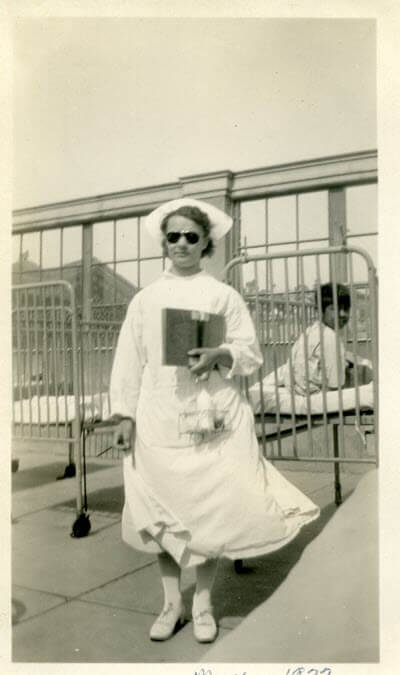
Grandma working the TB ward at San Francisco Hospital in 1933
I made sure some of the most compelling stories were at the beginning: if you can capture their interest in the first three pages, you’ll have them hooked for the entire book.
#4. Pack it with photos and graphics.
A picture is definitely worth a thousand words. And since words in a small book will be limited, photographs will be your best friend.
If you’re lacking in family photos, consult my Genealogy Gems Podcast episodes for countless ideas for finding appropriate images.
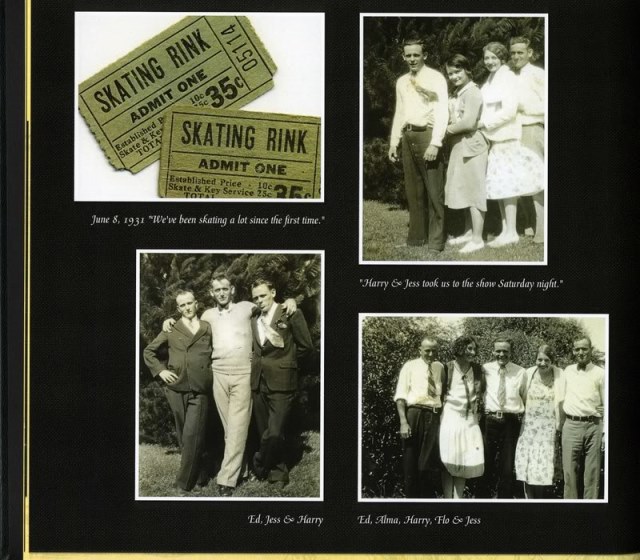
In A Nurse In Training, I included scanned images of skating rink tickets, programs and announcements from my grandma’s scrapbook and journal pages in my grandmother’s own hand. These types of items really add texture and interest to a book, and help the reader to see that you’ve really done your homework.
#5. Keep it in chronological order.
This seems obvious, but it’s easy to get side-tracked and start going back and forth in time. Believe me, for the reader’s sake, use dates and keep things in chronological order.
You as the researcher know this information backwards and forwards, but this is probably your reader’s first exposure to it. Be gentle with them and keep it straightforward and simple. Your reader will thank you.
#6. Choose quality!
High-quality glossy pages, good image quality and a hard cover binding all shout to the reader, “I’m worth your time! Read me!”
For example, I found a drawing of Dameron Hospital, which was part of my grandma’s story, but it was a low quality image and didn’t look good in the book. As much as I wanted to include it, I ended up leaving it out, and I’m glad I did. It wasn’t critical to my theme, and there were other ways to illustrate the hospital setting for the reader.
From Book to Movie: Create Your Own Family History Videos
My “Nurse in Training” book eventually became the basis for my very first family history videos. Watch them here–and see how I turned her own words into an illustrated narrative:
Next Step: Turn Your Family History Book Into a Movie
I created these before do-it-yourself video services like Animoto made it so easy. (And I think that’s why I appreciate them so much!)
If you’d like to put an ancestor’s story into video format but you’re not sure how, try writing it up as a short book first. By the time you’re finished, you’ll have an excellent start on your “screenplay.” You’ll also have a great little book to send loved ones as a gift. (If you do eventually turn that story into a short video, they’ll love it even more, because they’ll already know the story that they will see come alive on the screen.)
Click here to learn step-by-step how to create your own family history video.
One-Step Webpages by Steve Morse helps genealogists find relatives faster in the U.S. federal census. Steve Morse explains how to use his one-step tools for the 1950 census.
The 1950 US federal census is going to be released on April 1 of 2022. And getting the records fully indexed, and therefore searchable is going to take a little bit of time.
If you’re anxious to get digging into the records, you’re going to need to know a couple of things like where your ancestors lived. You’ll also find the enumeration district, or what’s called the ED number.
Thankfully, Steve Morris has developed a terrific free online tool at his One-Step Webpages website that can help you find those ED numbers.
00:54 Lisa: Wow, it’s a really big year for you! I imagine it is every 10 years or so when a new census record comes out, right?
01:03 Steve: Well, yes, we’re doing what we can to get ready (for the release of the 1950 U.S. Federal Census.) I’m trying to get the interfaces to tie into the actual census pages when they come online. So that’s been a big activity right now.
01:17 Lisa: Let’s talk about that. I want to talk about the website and how people can use it. And of course, I’d love to know even more about you. First of all, why do you call it One-Step Webpages?
The History of One-Step Webpages
01:33 Steve: That goes back to the origins of the site back in 2001.
The first major tool that I put up on the site was (designed for) researching the Ellis Island database. That database had just come online at that time. I was anxious to use it because there was some real answers that I had not been able to find up until then.
But when I got into it, I realized it was very difficult to use. And I saw that I could do everything they were doing in one step many steps on their website. So, without giving it too much thought, I put up my own tool, which was called Searching the Ellis Island Database in One-Step. I didn’t realize that by choosing that name, I become branded. All tools hereafter have that One-Step name now, and it became known as the One-Step website.
If I realized the significance of that choice of name, I might have gone with my second choice which was Searching the Ellis Island Database with Fewer Tears. And in which case, we would now have the Fewer Tears website! But we have the one we’re stuck with, the One Step website.
02:37 Lisa: Well, I’d say the One-Step site certainly does mean fewer tears, that’s for sure! I remember when you first launched it, I use it to find my great grandmother’s passenger list. Using your site I found that she was listed twice in 1910. The first time was in first class, and then also in second class. I have a feeling they found her in first class and moved her down to second class! But really, I found it because of your site and not the Ellis Island site. So, thank you.
And now of course, you’ve been creating One-Step tools for census records. I’d love to have you give us an overview of those tools. Tell us a bit about what’s on the website. And how can it help genealogists accomplish their goals?
Genealogy Tools at One-Step Webpages
03:24 Steve: Well, it’s whatever strikes my fancy!
I got started with Ellis Island passenger lists records because I was trying to find a particular relative, my wife’s great grandfather. A year later, the website was used quite a bit, and the census was coming out. I got notified by a fellow that I worked with that he was working on the 1930 census. He was he was a volunteer at the National Archives, and he realized that people were going to be coming into find their records, and he wasn’t going to be able to help them. The census was not indexed. It had to be accessed by enumeration district. And these Eds were not easy to obtain.
I realized that would be a fun thing to get into. So instead of being known as a one trick pony – you know, I had the Ellis Island stuff – what if I could do two things? Maybe the site would be a little more important. So, I got involved with the census work then.
Through this fellow that contacted me who I’d worked with, he found Joel Weintraub. So, then the three of us started working on this together.
There are other sections as well. Again, it’s whatever strikes my fancy. I have the vital records section. I have a section for creating your own One-Step search application. I have things that have nothing to do with genealogy at all. They’re all on the website.
So, over all there are 300 tools. I tell people just go through them and see which ones strike your fancy and use them. I know nobody’s going to like all 300 tools, that’s impossible. But hopefully each person will like a certain subset of them. And all those subsets together will be the entire website.
05:12 Lisa: Wow, I didn’t realize there were 300 tools on the website. That’s amazing!
About Steve Morse of One-Step Webpages
So, what’s your background? Are you a computer programmer? Do you do all the programming for the website?
05:26 Steve: Well, I have a PhD in electrical engineering, specializing in computer science. It was not computer science in those days. So, I been in the field ever since – my entire career. I’ve done research, development, consulting, writing, so forth.
The 1950 US Census Project at One-Step Webpages
05:42 Lisa: The 1950 census is just about here. When did you first start working on that?
05:48 Steve: Well, we finished the 1940 census in 2012. When the 1940 census went online, it was about a year later that we first started putting out the call for volunteers. By 2013, we started fetching volunteers to do the work for the 1950 census.
It involved looking at the various cities that we were going to support. We needed to have a list of all the streets in that city, and the EDS that each street pass through. And we did that by looking at the ED maps and using other tools as well.
Working with Joel Weintraub, we’ve had our team about 60 volunteers over the years. They weren’t all working at once, but in total, we had about 60 volunteers.
We set our sights a little higher for 1950 than for preceding years. I forget what the criteria was. But for 1950 we wanted to get every rural area that had a population of more than 5000. And we have succeeded in doing that.
So, we have all those cities index on the One-Step website. You can search any of those cities, by streets. Giving the streets and cross streets, you can get down to the enumeration district.
07:05 Lisa: Oh, that is fantastic!
You know, I just did a video (How to Find Old Rural Addresses on a Map) where we talked about how to take these rural addresses and using your tools, trying to help people figure out where their rural ancestors once lived.
I didn’t realize that there were so many people involved in creating the website. Is the National Archives pretty cooperative and kind of helping you gain access ahead of time?
07:36 Steve: No, we don’t have any access to the National Archives. We’ve had some questions from them. They’ve been very tight-lipped with the 1950 census. They’re keeping it very secret. Of course, the census pages are secretive, but even getting information as to how the census is organized or what have you. We’ve not been able to get much information out of them. We had a lot of cooperation with the 1940 census, but not so much with the census.
08:01 Lisa: Okay, interesting.
How to Find Enumeration District (ED) Numbers in One-Step
Well, we’ve talked a lot here on the Genealogy Gems channel about enumeration districts, or Eds, and the ED maps. But I would love to hear it from the one step man himself, how do we go about finding ED numbers?
For the large cities, use our tool and put in the street. That will give you all the enumeration districts that that street passes through.
Then, you put in the cross streets. That will narrow it down to just those EDs that are common to the street and cross street that you entered. Hopefully you can get down to one ED.
Rural areas are different. We used to have two separate tools, one for large cities and one for rural areas. And that was sort of cumbersome to explain to people, but we had the two different tools. So, I’ve since merged them into one tool with one user interface. (The Unified Census ED Finder)
If you put down the streets in the streets, you’re using it in a large city mode. And there’s a drop-down list of the cities. In the state you select the state. And under City if the city is not on that list, it means we don’t have the tables for that city. So, then you select Other and you type in the name of the of the city. In that case, we’re going to search the ED definitions instead of the street to ED maps. We have the ED definitions, and we search those to see which definitions mentioned the name of that city. And for all of those that are mentioned, we report back. Hopefully there won’t be too many these for a small town. And then you know where to search.
Enumeration District Definitions
How do we give you these ED definitions? Well, the National Archives has them on microfilm, but you can’t go searching on microfilm. So, we’ve had our volunteers actually transcribe all the ED definitions for 1940 and 1950 prior to 1940. For 1940 we did transcribe all the EDs, all the definitions from the microfilm. NARA came to us for 1940 and asked if they could have our transcriptions. They, of course, had the microfilm, but they didn’t have it transcribed. So, we said, ‘sure, absolutely.’ We were glad to give that to them. They haven’t come to us for 1950. I keep saying “yet”, but at this late date, I’m sure they’re not going to. I’m sure they’ve done their own transcriptions.
I haven’t seen their transcriptions. But I’d venture to say that ours are going to be better for the following reason. Since we’re using the transcriptions to search for small towns, and we want to get as many towns in the ED as possible. More Eds than are mentioned in the on the microfilm. So, what Joel has done with the volunteers, is to go through the ED maps and see what other towns are in each ED and add that to the definitions. So, I believe in that case, our ED definitions would be more robust than the ones that the National Archives is going to have on their website.
11:00 Lisa: It sure sounds like it. That’s an amazing undertaking, and what a difference it makes!
Using ED Numbers to Search the Census
So, the genealogist is really going to benefit by knowing the actual address because then they can use the cross streets that you have to really zero in on the exact enumeration district that the address falls within. Please tell folks how that helps when the records are released, and they want to start searching. How do they use that number?
11:33 Steve: Well, of course, we don’t have it up and running yet. But what we plan on doing is, once the census does come out, you would click on the ED number that you just found, and that will take you right to the census pages.
The pages are hosted on some other website, either on NARA’s website, or FamilySearch’s, or one of the large commercial websites whose name I’m not going to mention, because I’m not advertising for them, but you know what I’m talking about.
11:59 Lisa: So how long would that take you? I mean, when the records first get released, and everybody gets access to them? It sounds like kind of a manual job to link up digitized records with the website. Is that going to take a while?
12:16 Steve: You have to know what the structure of their site is, and how you can get onto their site with the ED number.
We’ve been talking with FamilySearch, and they’ve been very cooperative. We’re getting information from them as to how we can link into their site.
So, on opening day, they’ll be very busy ingesting all the material from the National Archives. And so hopefully, we’ll have that information ready before opening day. So, an opening day we can link right into their website. And then at the same time, I’ve also been trying to figure out the structure on the National Archives website and the large commercial website and link into those as well. But we anticipate FamilySearch will be the first one that we will link into.
Enumeration District (ED) Maps
12:58 Lisa: And of course I noticed that right now there are many different kinds of links that do work that are on the website. Tell folks about some of the extra items, the collateral items that they can actually access right now with the links from your website.
13:15 Steve: ED maps sounds like it’d be the best thing if you can get an ED map. Look at the ED map and see what the ED definition is what ED boundaries are so you know exactly what the correct ED is. Problem is the maps are not that easy to use. For one thing, they’re on the National Archives website. But it’s pretty hard to get to them from the National Archives website. You have to go to the catalog on their website, and then type in the correct string that will get you to the ED maps. And it’s not obvious what the string would be. And you can’t really navigate through them by from state to state.
What I’ve done on the One-Step website, is that I put up a tool to get the ED maps from NARA. But you get to it by entering a state and then the county, and then probably a town within the county. Entering all that information will then bring up the maps from NARA for that particular locality. Yes, it’s coming from NARA’s website, but it’s hard to get to from the NARA website. That’s why you can do it in “One-Step.”
14:18 Lisa: Yes, and I can attest to that. It’s much easier and absolutely wonderful to use.
How to Find Census ED Definitions
Maybe this is what you were discussing before, but I came across digitized pages on your website of the book that was describing each enumeration district in more detail. Is that what you were talking about when you mentioned the Census Definitions?
14:41 Steve: Yes, when he’s talking about the definitions, we have a tool that gets you to the microphone definitions. And another tool that gets you to the transcribed definitions. That’s what our volunteers did in transcribing what’s on the microfilm. So, we have tools for doing both of those.
Meaning of Census Occupation Codes
14:57 Lisa: Tell us a little bit about the codes. I know I saw occupational codes. And these are numbers that show up on the census records. If we’re wondering what they mean or the details behind those, your site can help us learn that as well. Tell us about that.
15:17 Steve: Well, for the most part, those codes don’t really tell you that much, although they do in certain cases.
They are codes that were added later by the Census Bureau to group different occupations together so they could get statistics as to how many people did various kinds of work. But you know, what your grandfather’s occupation was, it’s on the census page. So, the code will not tell you anything new, except for the following.
What if you couldn’t read what was written. It’s legible on the original, but on the microfilm copies you might not be able to read the occupation code. But, if you knew the code, you can then look up from the code to see what kind of occupations fell into that code. I have a tool that lets you decode the number that they added.
The census taker wrote down what the person said. The Census Bureau clerk’s later added a code to put people in certain categories. And then the One-Step tool lets you take that code and get back to what the actual occupation was.
You just might be curious to see what the Census Bureau thought about your ancestor if he had an unusual occupation. The example I give in my lectures is Donald Duck. His occupation was he was a trained duck. So, there’s no category “well-trained duck”. So, they had to put him in one of the standard categories. They assigned a number for that occupation. If you then decode that number it says, “hucksters and peddlers”. You now see what the census taker thought about your ancestor’s occupation.
16:59 Lisa: So, are there any other elements of the census or census records that you wish you had more time to work on or that you feel like you would want to add to your website? Or do you really feel like the One-Step webpages has reached the pinnacle of what’s possible with searching these records?
17:20 Steve: I can’t think of anything else. I think if I could, I would have done it.
17:24 Lisa: Exactly!
How to Prepare to Search the 1950 Census
17:27 Steve: With just one month ago (as of this recording), I think we’re in a good position right now. We’re ready to provide the tools that people will need on opening day.
I should mention, people should be using this before opening day to get their ED. They should have a list of the people they want to look up and get their addresses and then get the ED. Don’t leave that for opening day.
On opening day there will be an onslaught. In 2012 for the 1940 census, my website didn’t crash, but the National Archives website did. My website didn’t crash, but it flickered. I typically get between 100 and 250,000 hits a day, which is good considering this is a private website, it’s not a company, that’s a very respectable number. But in 2012, we got two and a quarter million hits! Obviously things have slowed down. So don’t leave it for opening day. Do it now. Get your ducks in a row, get all your ED numbers so on opening day, you can just dive in with the ED number and get right to the census page.
18:31 Lisa: Exactly. And in fact, in the video description for this video, here at the Genealogy Gems YouTube channel, I have some links to a few other videos we have here at the channel to help people get ready. I mean, there is so much that we can do even before the records get released to be prepared and get the most use out of them.
More Uses for the One-Step Webpages Tools
And of course, even after the records get indexed, and are fully searchable, the One-Step tools can still really help us, can’t they? I mean, particularly if you can’t find somebody or you’re just wondering if there are other entries for a person. They can still really prove to be helpful, right?
19:13 Steve: Yeah, even after it is indexed, the Location tools we have will still be very important. I’ll give you several examples as to when you would want to use the Location tools in spite of having a name index.
Your ancestor, your grandfather, came from a foreign country, spoke with a thick foreign accent, and had a long unpronounceable name. Well, the census taker probably got it wrong when he wrote it down. In that case, he had to take his best guess as to what he thinks your ancestor said. And then they had to transcribe all this. Then, another transcriber had to take their best guess as to what he thinks that the census taker wrote down. The census takers’ handwriting were sometimes of questionable quality. So, the chances of getting this right here are less and less. It’s like the game of telephone.
In most cases, you will find your ancestor by doing a name search. But there will be those cases and you’re going to run into them, when no matter how creative you are with the name search, you just won’t be able to find him. You have to do a location search. And that’s where the ED and other location tools come into play.
The other example that I give is when searching by location is useful. Let’s say you just bought a brand-new house and you’re very proud of your house. You want to find out who else lived in this house in prior years. We don’t know the names, but you do know the address. So, you want to find your house in the 1950 census, the 1940 census, 1930 census, and location tools are the only way you can do that.
20:41 Lisa: That’s fascinating. And it’s so true. I remember looking through the 1940 census at my Nikolowski family. The census taker had a hard time spelling Nikolowski but they also got the first name as “Vaulter” because my great grandmother’s saying “Vaulter” (in her accent) not “Walter”. And that’s exactly how he recorded it!
I just want to thank you, on behalf of all genealogists really, for making these kinds of tools available to us. You help us in so many ways be more successful.
More About Steve Morse and One-Step Webpages
We don’t get a chance to talk every day, so while I have you here, I just want people to get to know you. Is there something about you that maybe they don’t know? Or would be interested to know? Perhaps what you do in your spare time when you’re not creating One-Step tools.
21:33 Steve: My hobbies or electronics. My degree is in electrical engineering. It’s really computer science. So, I’ve always loved electricity and electronics, and I play around with that. And I’m a gadgeteer, I build things.
21:48 Lisa: Oh my gosh, well, I can only imagine what’s down in your basement…the kinds of things that you must be coming up with, how interesting!
Steve Morse, thank you so much. I encourage everybody to go visit https://stevemorse.org/. Thank you for being here on the show. It’s been an absolute pleasure!
22:07 Steve: Thank you for having me. It’s been a pleasure speaking to you as well.
(This post contains affiliate links that help support our website.)
Family historians often end up with family heirlooms and documents that need archival storage.
In addition to the items you already have, you may find yourself receiving things from other relatives like family bibles, scrapbooks, and military uniforms.
The task of correctly archiving the family history can definitely get a bit overwhelming. However, with the right tools and supplies you can make a real difference in preserving your family’s treasures for future generations.
Denise May Levenick is the author of The Family Curator blog and writer for Family Tree Magazine and she joins me in episode 81 to share her top ten archival storage solutions for family historians.
Short on time? This week’s video is just 20 minutes and packed with the archival solutions you need. The video premieres on Thursday and features a live chat.
Watch the live premiere of this week’s video and participate in live chat with our Genealogy Gems YouTube channel subscriber family. (Subscribing to our channel is free. Click the red Subscribe button on the video page on our channel.)
1. Video Player (Live) – Watch the video premiere at the appointed time in the video player above. 2. On YouTube (Live) – Click the Watch on YouTube button to watch live at the appointed time at the Genealogy Gems YouTube channel. Log into YouTube with your free Google account to participate in the live chat. 3. Video Player above (Replay) – Available immediately after the live premiere and chat.
(Please note: This interview transcription has been minimally altered for ease of reading and clarity.)
Lisa: I’d love to talk about the archival supplies we need. Because obviously, to complete a task and do a good job of it, we got to have the right tools. That’s certainly true when it comes to archiving. You’ve got 10 of your top tools that I know that you’ve used as an archivist. What is number one?
1. Archival File Folders
Denise: The first thing has to be archival file folders. They are not terribly expensive. And really, what you want to do is put your item, whatever it is, in the highest quality folder or box or something to protect it right away. But since most of us have pictures and paper, a file folder really is a good place to start.
Lisa: That sounds great because often other family members are giving us things, and we may not have time to deal with it right then and there. It sounds like this would be a very safe place to put it.
Denise: It is. You can purchase them in a box of 50 or 100. If you have a lot of items or just 10 or a dozen folders, it really can scale to suit whatever the size of your archives might be.
We really do need to take that extra step and seek out acid-free, lignin-free archival file folders. The kind you buy at the office supply store are just not the quality you need to preserve your papers and your photos. You can actually cause more damage if you put things in those.
Lisa: Because there’s probably acids in those, right?
Denise: Right, because the regular office supply ones, particularly the kind that are just for regular office use, they have so much acid in them that they can cause your item to deteriorate even more.
Lisa: Okay, so number two I see here is flip-top document case. This sounds like a specialty item. What are we talking about?
2. Flip-Top Document Case
These boxes are so confusing when you’re shopping. The names of these document cases and boxes can be confusing. The one I use looks like a mini file folder box. That’s exactly what it is. Examples of the kinds of things you can store in them include old rolled up documents, military photos, and banquet photos. I have a process to flatten these, but meanwhile I needed to store them.
You can reuse this kind of a box for anything. It doesn’t have to just be file folders. But because it’s designed for file folders, it’s really perfect. It’s even got a little tag to pull it out on the shelf if you need to pull it out. There’s a place to add a label.
It’s about five inches wide. I like this size because when you get those file folders in there, it gets heavy and a lot of people store these up on shelves. They can be heavy to move down. I bought some real wide ones that are seven or eight inches. And man, those things are heavy! So, I recommend smaller ones.
Lisa: I have some items that are definitely odd sizes, or like you said they were originally rolled up and I haven’t flattened them out and decided what to do with them yet. So, this sounds great.
The third item on your list is oversized document or photo box. So, it sounds similar. We often have larger items we’re struggling with, and we don’t want to fold it up.
3. Oversized Document or Photo Box
Denise: No, in fact, you want to unfold the item, and let those folds relax.
The archival suppliers make a box that is large, larger than a shirt box. So it might hold a fully open newspaper. Or they work well for portraits or drawings or maps. They’re typically quite shallow. They won’t be necessarily a clamshell kind of opening like the boxes we just mentioned. It might be a lift off top. But you can use it for anything. And the reason it is shallow is you don’t want to put a lot of weight on the things that are on the bottom.
If you can afford it, buy large file folders that will protect your item, and then you put it in the box.
You should keep things like newspapers separate. You do not want to store newspapers with anything else other than newspapers because they’re so toxic. The newsprint is just full of acid. You want that isolated from everything else.
4. Newspaper Preservation Kit
Lisa: So that must be why number four is the newspaper preservation kit. I didn’t realize that there was one.
Denise: Yes, newsprint is a big offender.
When I visited the New England historic genealogical library in Boston, and I got a tour of their upstairs archives. It was so exciting. I felt like I was you know, in the inner sanctum. I was shown rows and rows of archival boxes. And then just stacks of items people have donated like Bibles and books and family papers. They all had to be processed and organized. The archivists there told me they will not accept donations of newspapers. Because they are so toxic, anything they touch will turn brown. And it just degrades everything around it. So ,you want to be sure to isolate your newspapers if you’re going to keep them.
What they do at the library is photocopy the newspaper onto acid free paper. Or they scan it and then print a copy on acid free paper and get rid of the newsprint.
Lisa: That sounds like a really clever way to deal with that problem. So even if grandma gives you her newspapers, and she’s also got other stuff with it, you don’t want to keep it that way. You need to separate it out.
Denise: If you really want to keep like an obituary because it’s an original paper or something, that would be a good case for encapsulating in between two sheets of archival plastic. You can encapsulate it and then you can put it right back in that Bible because it’s isolated.
Lisa: Alright, so next we have acid free tissue paper. What would you be using this for?
5. Acid Free Tissue Paper
Denise: I love this stuff! I keep a stack of it here at home.
One time my dad gave me a stereograph, you know the thing you hold up and there’s double pictures. He gave me one of those. It was my grandfather’s. It was in of all things an envelopes box. A crummy, terrible box. And it was wrapped in red tissue paper! Have you ever like gotten a drop of water on red tissue paper? It bleeds terribly!
In the box along with the stereo cards were photo cards. And, being my dad, (he’s very strict) it’s “my way or the highway.” So, I couldn’t really tell him anything.
I took the box and he said he wanted it right back. I had some acid free tissue paper, so I just took the red tissue paper out, and cushioned everything in that dumb non-archival box with the acid free tissue paper. I took some pictures of it and looked at the cards, and then I gave it back to him. It was in a lot better shape! So, if you have acid free tissue paper, you are golden when stuff like that happens.
You can also use it to stuff the sleeves of a military uniform or wedding dress. You can wrap a pair of baby shoes in it. You can use it between layers of photographs. It’s just really helpful to have on hand.
Lisa: It sounds like we definitely need a stack of it on hand at all times.
6. Acid Free Flip top Photo and Print Box
Lisa: So now we are onto number 6 and another box designed for an unique purpose.
Denise: These boxes are designed in different sizes and colors. It doesn’t matter what color they are. They’re made out of a heavier board. And actually, this little box will protect your contents against even mild changes in temperature and humidity. It’s a really good protection.
I use one that is five inches by seven inches. It’s designed to hold five by seven photos on edge. Putting them on their edge ensures that there isn’t pressure placed on them by the weight of things on top. These come in all sizes. You can get big ones that are more like a shoe box.
If you have a lot of photos, you can get dividers to use in the box. But this would also be fine. You could even use some acid free tissue and put a pair of baby shoes in there.
Lisa: Oh, yeah, absolutely.
Denise: The thing I like about these boxes is you can write on them, or you can add a label.
I cleaned out my parents homes after they died, if I came across a box like this, this says to me, “oh, there’s something special in there.”
Lisa: Yes. I totally agree with that! As I’m putting stuff together in my office, I’m thinking when I’m gone, I want something that signals to people “Keep this! Don’t toss this! This is important!” You’re kind of dressing it up and letting them give them a signal that this has been already taken care of so it needs to continue to be taken care of.
7. Archival Quality Albums
Well, number seven is archival albums. This one resonates with everybody. I mean, is there anybody who doesn’t have magnetic photo albums from 1970s, where we just struggled with things sticking and you can’t take it apart? I imagine an archival quality album would really help us with photos, negatives, letters and anything flat.
Denise: Right! The albums are designated archival quality. You want to look for a binder that is archival, as well as the inside pages. If you want to scrapbook, then you just want the paper and you would probably use photo corners. You could then write with an archival pen.
Something to be careful about is when you put a binder together. You might want to put it on a bookshelf, which is fine, but the dust can still get in from the top. Light and dust are the real enemy of things that you’re trying to preserve. So, buy a slipcover or keep them in your closet. That’s really the best place for these things because they’re protected from the light and the temperature that way.
Lisa: Good point. So, you’re saying that if you want them in your living room where people can pull them off the shelf and look at them, you will want to lay something over the top of the albums so that dust isn’t settling inside.
Denise: Yes. You know how the top of your books can get dusty!
Lisa: Exactly. I hadn’t thought about that with my photo albums. That’s a really good point.
Sometimes we have still have negatives. I know my husband inherited a lot of negatives from his side of the family. And, you know, we may or may not be ready to make prints out of all of them as soon as we get them, but we want to keep them What do you recommend for that?
8. Negative Preserver
You can use a box that is designed for negatives. It’s shorter.
Typically the 35mm negatives came in a little plastic sleeve, and that is good to use. A lot of times you can get archival supplies at a camera store. They use good quality, and I think they have something called a print file available.
Another option for negatives is binder sleeves. They’re a full page and they have little slots to put the negatives in, and then you put them in a binder that has sort of a clamshell closing. I have several of those and they work pretty well. They protect the edges of the negatives.
Lisa: Excellent!
9. Archival Slide and Media Boxes
Number 9 takes us into even more kinds of media with Archival Slide and Media Boxes. I know when I got all my VHS tapes digitized, I couldn’t bring myself to throw them away. So you’re saying that if we want to keep different forms and media, there are special boxes for that too?
Denise: Right. There are boxes that are acid free, like the ones I showed you that are sized for media and slides. You can get metal slide boxes that are pretty nice. I would avoid wooden ones. I have a few of those we inherited. But even metal ones I found at the thrift shops. People got rid of their old slide boxes.
The Kodak slide boxes that they came in aren’t bad. Slide carousels just take up a lot of space. Remember those carousels? But you can get them and they make boxes for all kinds of things. You don’t have to only use a box that is labeled a slide storage box. You can put it in something that fits.
Lisa: Good to know.
Denise: They also make them uniquely for the different types of films.
Lisa: Yes, I think I’ve got some home movie on every type of media ever created over the decades which is a good problem to have, but it’s a challenge.
Number 10 reminds me of when you and I first met gosh, probably a dozen years ago at least. And I remember talking to you about quilts. One of your specialties is really your knowledge of dealing with textiles. So often we’re thinking photos and paper but if we’re fortunate we might have a uniform, tablecloth, quilt or other textile. Tell us what this kit can do for us.
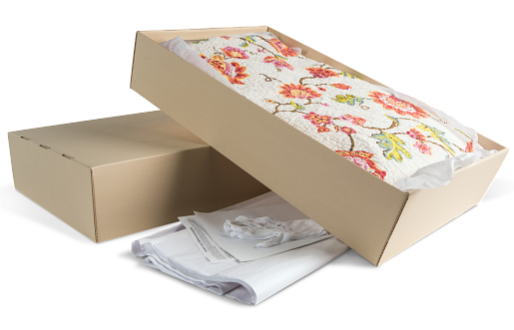
Denise: I love these! The archival boxes that I showed earlier are wonderful, but they’re heavy. Just the box itself. Imagine you have a full size bed quilt. You need a big box which is expensive and heavy.
The E flute is a kind of plastic. You’ve probably seen it used as packing material. It’s got little ridges. And it’s kind of translucent plastic stuff. That’s the best description I can think of, but it’s very lightweight. You can order one of these boxes, it comes folded or flat and you kind of assemble it. There are other types too.
Archival quilt storage solution box
I bought one for my quilts. The only trick is because the E Flute is translucent, it won’t keep the light out. I have a beautiful old velvet album quilt, and I have folded that inside a sheet and put that whole thing in the E flute box, and then stored it in a dark. I have a little archive space where I keep that kind of thing.
They make them different sizes and in kits. I really do recommend them.
Lisa: Well, that’s the next thing on my list. I have my husband’s father’s military uniform. Part of what was holding me back in storing it was getting the right kind of box. I was thinking it was going to be one of these really heavy big boxes. So, this sounds like a really nice alternative.
Denise, you’ve given us 10 fantastic archival heirloom solutions. It’s wonderful to hear that they’re available in such a wide variety. Thank you so much, my friend. It’s wonderful to see you and I really appreciate your sharing your knowledge with us.
Denise: Thank you. It’s been nice to talk with you again, Lisa. And hope to see you again sometime soon.
Show Notes: WorldCat.org just got a facelift. That means it’s time to revisit this library catalog website and do these 5 important things so you can effectively use it for your genealogy research.
Video Premiere with Live Chat
Show Notes: WorldCat
If you are interested in finding out more about your family history and you want to build out your family tree, you are going to need records and resources. That’s exactly what the WorldCat website provides.
WorldCat.org is a free website that provides access through its card catalog to millions of materials from libraries around the world. You’ll find items such as:
United States Civil War and other military records
Family Bibles, church histories, and records
Publications such as directories, handbooks, and magazines
Birth, marriage, death, wills, and obituary indexes
Microfilmed genealogy and local history collections
Newspapers from around the world
Photographs
Town histories
probate records
It’s important to keep in mind that not all libraries participate in WorldCat, and they can participate at different levels. Therefore, you’ll find different amounts of information about these different repositories.
The WorldCat website has received a facelift and now sports a new user interface, making it a great time to get reacquainted with this rich resource. Here are five things you should do right now to take advantage of WorldCat:
#1 Sign up for a free account or transfer your existing account.
To use all the features at WorldCat that we will be discussing you’ll need to have a free user account.
To create your WorldCat account, click the Create an Account link and follow the prompts.
If you already have a WorldCat account you will need to transfer it. Click the Sign In link and follow the prompts for transferring. You can transfer your favorited libraries and lists. However, because of the new website, the following data will not be transferred: profile picture, reviews, saved searches, watched lists, interests, and tags.
Transferring can take quite a while. Leave your browser open until it completes. In fact, when I transferred it never showed complete, so after about an hour I refreshed the page and attempted to sign in again. I was prompted to create a new password, which I did, and was then able to access my account and my transferred data did appear.
Sign into your account whenever you visit the site so that you can take advantages of the many features offered, including our next item, Lists.
#2 Create and Search Lists
Lists are a great way to organize the wide range of resources you can find through WorldCat. I like to create lists for surname and subject research.
How to Create a WorldCat List:
After you run a search you will receive a list of results. Click the List (bookmark) icon on any item
Click the List icon
The add Item to List box will appear. In this box you can add the item to an existing list or click the Create List button to create a new list.
Name the list, enter a description and indicate whether it is public or private.
Click the Create button to save the list.
You can find all your lists by clicking on your account icon (upper right corner on desktop) and select My Lists
In addition to creating your own lists, you can search the public lists of other WorldCat users. Click Lists in the menu to browser popular lists. To search for a list by keyword, go to the search bar and select Lists from the drop-down menu, and search by keyword. When you find a helpful list, click the Follow button.
You can have up to 50 lists with up to 500 items.
#3 Discover Libraries
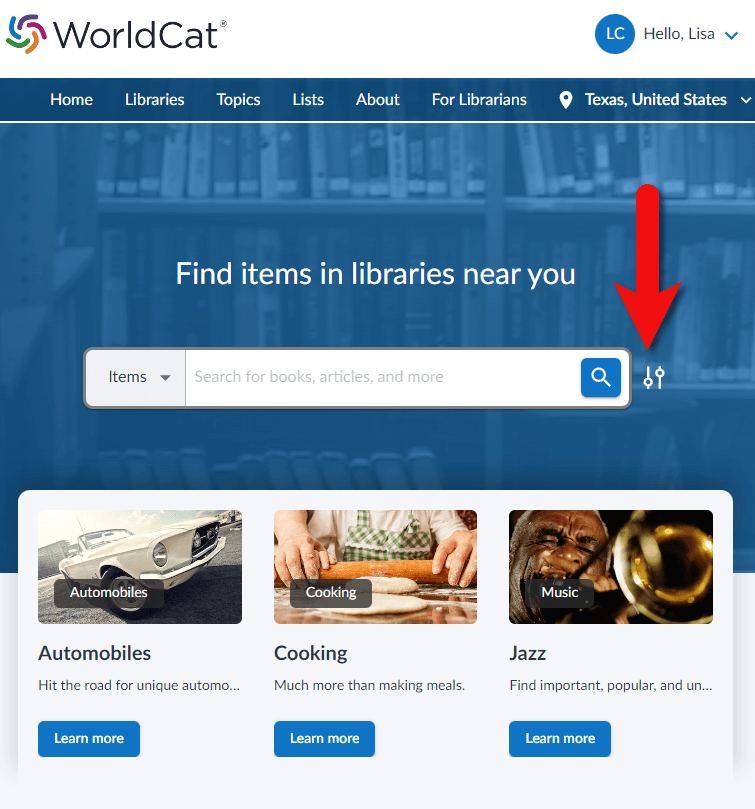
The best way to discover libraries near you is to add your location. Click the Update Location icon just under your account profile icon. Enter your town or zip code and libraries will be prioritized based on their proximity to you. If you’re going on a research trip, try changing the location to the zip code of the place you are traveling to, and then search for libraries and materials.
To browse libraries near you click Libraries in the menu. Add libraries to your list of favorite libraries by clicking the star icon on the library entry.
You can find your list of favorite libraries by going to the account icon and selecting Favorite Libraries.
#4 Use the Advanced Search Feature
The best way to search for items is to use the Advanced Search feature from the beginning. Click the Advanced Search icon to the right of the search box. (See image below)
Click the Advanced Search icon next to the search box
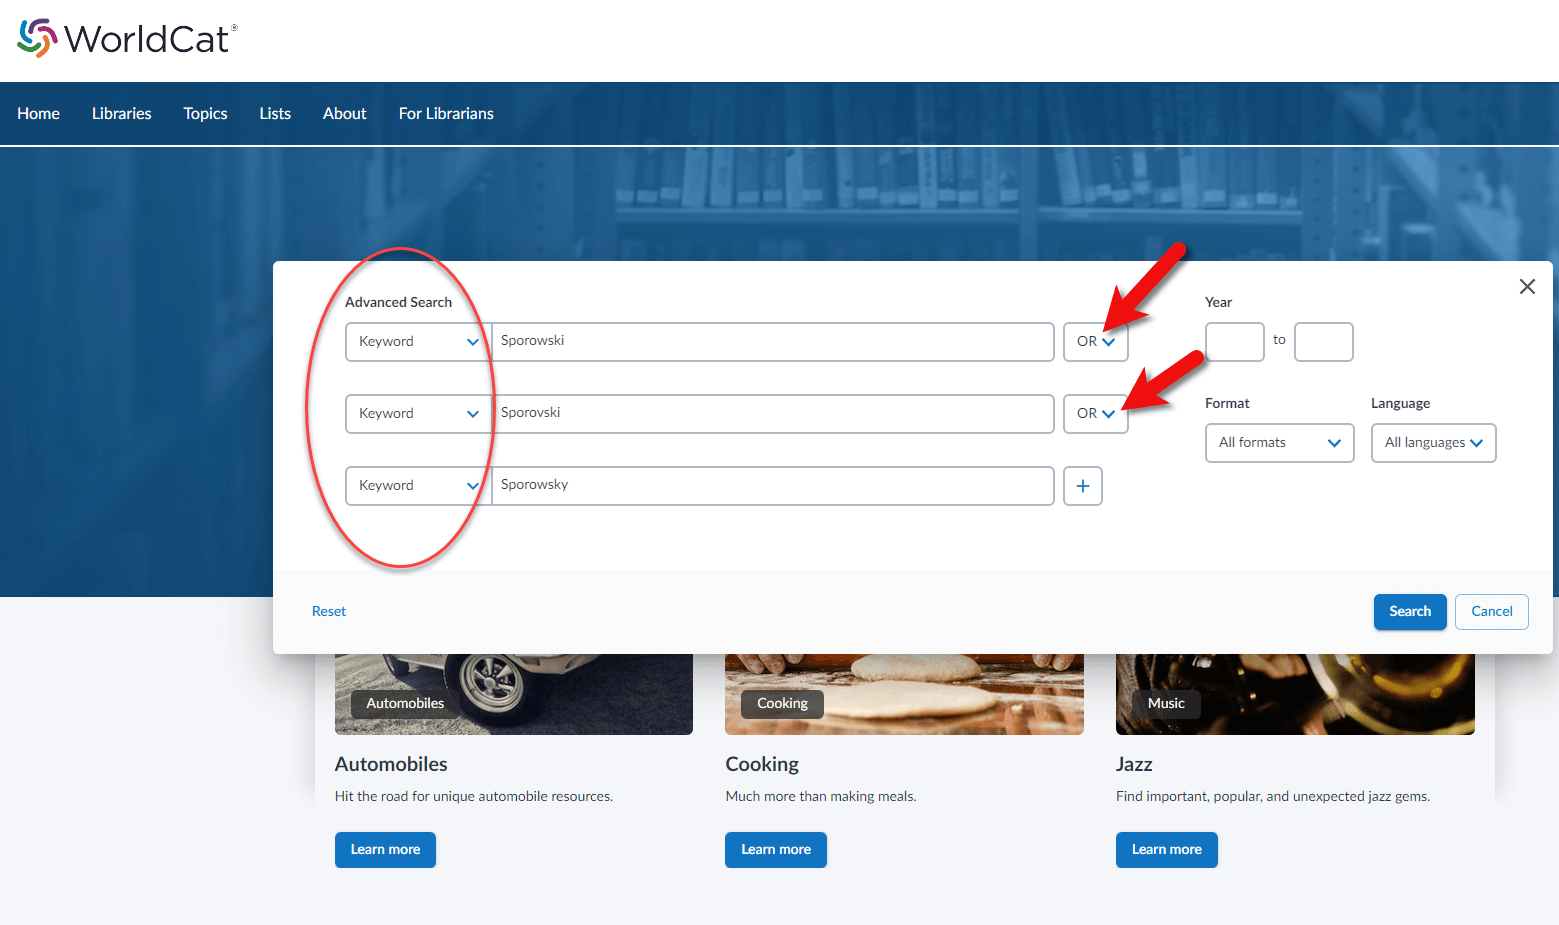
Start your search by selecting the type of thing you want to search from the first drop-down menu. For example, select Keyword and then type a word (such as a surname) in the field next to it. To the right of the field, select what you want done with that keyword, AND, OR, or NOT. This will include, exclude or make the keyword options. Then go to the next line and do the same thing. You can set up to three parameters.
Next add a year range if desired. For example, 1900 to 1950. Then select the type of materials you want in the results by clicking Format. For example, you could leave it on All Formats to receive all types of materials or select just Newspapers.
You can also narrow your search by language. Once you’ve made all your selections, click the Search button.
On the results page you have the option to adjust the filters in the left-hand column.
#5 Search Name Variations
As you search for family surnames, it’s important to understand that it will not automatically search for name variations. Either search for variations in separate searches or use the Advanced Search using the OR or the AND feature. (See example below)
How to search for name variations at WorldCat
More strategies for getting great search results at WorldCat
Search for family names by entering the family name followed by the word “family” (e.g., “Mansfield family”)
Search for specific people by entering the person’s full name (e.g., “Emily Mansfield”)
Search for organizations by entering terms to describe the organization (e.g., “Lutheran”)
Search for geographic locations by placing name in combination with the abbreviated and full state name (e.g., “Union City IN” and “Union City Indiana”)
You can then narrow your search by returning to the main search page and entering more specific search terms such as “Mansfield family bible”.
Include multiple search terms in one search (e.g., “Lutheran” and “Union City IN”)
Final Thoughts on the New WorldCat
Like with any change to a website, the new WorldCat takes a little getting used to, and there are a few bugs that still need to be worked out. However, by doing these 5 things you’ll have access to millions of rich resources that can help you climb your family tree.


 Next Step: Turn Your Family History Book Into a Movie