The free Ellis Island Passenger Search database is home to 65 million records of passengers arriving at the Port of New York from 1820 to 1957. Kathryn Marks, Manager at The Statue of Liberty-Ellis Island Foundation explains the best strategies for finding your ancestors’ passenger list records in the Passenger Search Database on the Ellis Island website. Along the way, you’ll learn some surprising facts about Ellis Island and these invaluable records that will have your genealogy jumping for joy!
Here’s a list of the type of information you may be able to find in passengers lists, depending on the year:
Name
Age
Place of Birth
Physical Description
Occupation
Last Place of Residence
Where they are going
Ship name
What Else You Can Find at the Ellis Island Passenger Search
Crew Manifests
Ellis Island Detention Records and Records of Special Inquiry
How to find Ellis Island records about detained passengers:
Find the manifest in the database.
Look to the left of the name for markings. X or SI stands for Special Inquiry indicates the person was probably held on Ellis Island. LPC: Likely to Become a Public Charge.
Detention records will tell you why they were detained. Detention records aren’t indexed. You can find them by locating the manifest first, and then scrolling through the carousel of images to find them at the beginning or end of the ship’s list.
Determine the length of your ancestor’s detention by counting the number of meals recorded.
Ellis Island Records Through the Years
Ellis Island records coverage: 1820-1957
Pre-Ellis Island AKA Castle Garden Era Records: 1820-1892
Before 1892: Castle Garden was the state-run immigration station. The federal government took over the process of immigration, they built Ellis Island in 1892.
Pre-1897: Records are technically customs records. That’s why they have a very limited amount of information. Manifests were destroyed in a fire in 1897.
Peak Years at Ellis Island: 1892-1924
After 1907: Passenger lists became 2-page documents containing approximately 30 questions.
1924: Ellis Island’s focus turned to detention and deportation. Therefore, most people wouldn’t have actually stepped foot on Ellis Island.
Ellis Island closure: 1954
Records available through: 1957
Records were created at the port of departure. Upon arrival, Ellis Island inspectors asked the passenger the same questions to make sure they were answered the same way.
How to Search for Ancestors at Ellis Island Passenger Search
Select from a variety of wild card searches. Kathryn recommends Close Matches, Sounds Like, and Alternative Spelling.
If you get too many results, click Filters, or use the Wizard or OnePageform. Kathryn recommends the One Page form.
On the One Page form, Kathryn recommends using age at arrival, year of arrival, port of departure and/or country of origin. Pad the years to allow for errors and deviations.
If you’re searching outside the peak year period, don’t use the filters. This is because the records after 1924 were indexed differently. Many passenger lists are only indexed by the year of arrival and are given a placeholder date of Jan. 1. Therefore, if you search for a month or day, you will not get results.
5 Search Strategies for Ellis Island Passenger Lists
Strategy 1: Start by running a broad search.
Strategy 2: Use the original ethnic name, because names were recorded at the port of departure. If you’re unsure of the first name, try entering just the first initial and checking the Contains wildcard. This often helps because the first letter of the name is often the same regardless of the language.
Strategy 4: Be persistent. There are many factors that could lead to not initially finding your ancestor.
Strategy 5: Consider other scenarios.
Name variations – try searching many variations.
Remember that the clerks may have spelled names phonetically.
Many passenger lists are handwritten so they may have been transcribed and/or entered into the database incorrectly.
Your ancestors may have arrived at a different port of entry, such as Philadelphia, Boston, or Baltimore. Many of those passenger lists are also available online.
More Ellis Island Search Tips:
Italian women travel with their maiden name. Children may be under either the father or mother’s last name.
Jewish people may be traveling under their Yiddish name.
Families are listed together. If you can’t find the head of the family, try searching for the children.
In pre-Ellis records names may be abbreviated. Example: Wm. for William, and women may be listed under their husband’s name, such as “Mrs. Adam Smith”.
Coming to the Ellis Island Passenger Search in the Future
The Statue of Liberty-Ellis Island Foundation is planning on expanding and adding the records of all the other ports to the database.
Alternative Search Tool for the Ellis Island Database
This week we’re going to revisit two more early episodes of Elevenses with Lisa that will help you be more productive and organized no matter what device you using for your genealogy research. I’m bringing these episodes out from behind the Premium Membership paywall and making them available for free this week. These will be presented back-to-back as Live Video Premieres on my Genealogy Gems YouTube channel. Part 1 and part 2 of this short series can be found in episode 68. In part 1 we covered what makes us vulnerable to getting distracted, and how a research plan can help. In part 2 we talked about how to deal with BSOs (bright shiny objects!) In this episode 69 we will cover parts 3 (Mobile Organization) and 4 (Online Productivity Strategies).
How Alice the Genealogist Avoids the Rabbit Hole Continued…
Part 1 and part 2 of this short series can be found in episode 68. In part 1 we covered what makes us vulnerable to getting distracted, and how a research plan can help. In part 2 we talked about how to deal with BSOs (bright shiny objects!)
Part 3
In episode 68 we covered:
1. Use a Cloud-Notetaking Service
Get a free Cloud note-taking tool and use it consistently. (Examples include Evernote, OneNote, and Google Keep.)
Use the website, software, and/or app to capture unexpected finds while researching. Both Evernote and OneNote work on all platforms.
Your notes in your account will synchronize between your devices (depending on the program and plan you choose.) You can add to your notes or work with them anytime, anywhere.
2. Schedule BSO Time
I use Google Calendar to stay organized and schedule my BSO time. Create a BSO calendar, and then schedule BSO time on your calendar. These will help you remember to follow up. Knowing you have set aside time in the future to explore the BSO helps you mentally let them go and stay on track with your research plan.
In this episode:
3. Mobile BSO Organization
Success comes from pairing your research plan and process with a great supportive research environment. We have a variety of “environments” we work within such as:
On paper at our desk
On our mobile devices
On our computer
Mobile Genealogy Organization
Let’s look at how we can set up a workflow for BSOs while mobile computing. My two favorite methods for capturing BSOs on a smartphone or tablet are 1) Cloud Notetaking, and 2) Home Screen “Bookmark Apps”.
Option 1: Cloud Notetaking
I’ll be using Evernote on an iPhone as an example. (You may see slight variations in the instructions depending on the service you use and your device.)
Evernote is a great choice if you want to easily sync and use your notes on all devices including your desktop computer and / or laptop computer.
Before you begin, you’ll need a free Evernote account at evernote.com. You’ll also need to download the free Evernote app from your device’s app store, and log into your account.
When you come across a BSO while researching online in a web browser (such as the Chrome or Safari app), here’s how to capture it:
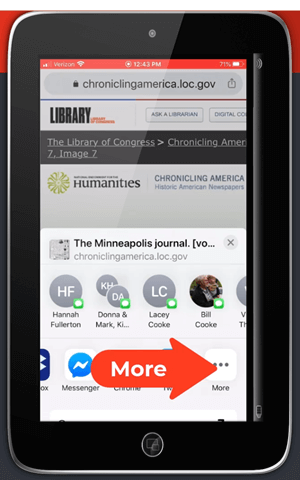
Tap the Share icon on the web page.
Select Evernote from the menu. If you don’t see it tap More for the complete menu of available apps. If you still don’t see it, make sure you have downloaded the app.
Tap More to find the Evernote app
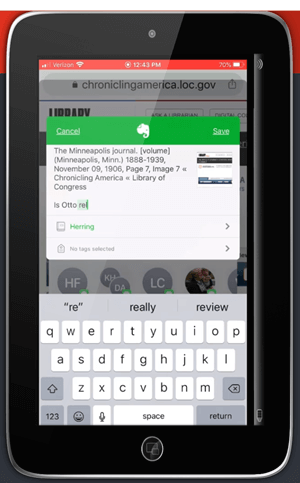
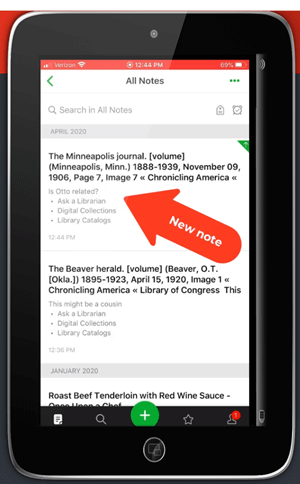
The app will open and should open a new note. Edit the note as desired.
Edit the BSO note
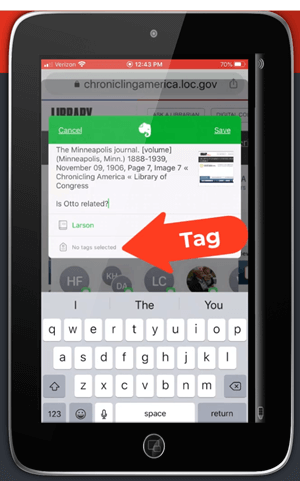
Tag the note with the “BSO” tag, as well as any other tags you find helpful.
Tag with the BSO tag
Tap Save.
The note is now saved to Evernote. If you are on WiFi, Evernote will synchronize so that the note will be available from any device signed into your Evernote account.
The BSO tagged note
Option 2: Home Screen “Bookmark Apps”
Keep in mind that these aren’t the same as “Bookmarks” found in your web browser apps. I call them “Bookmark Apps” because they do save a particular web page, and they look just like apps. In the menu this feature is called “add to home screen.” (see image)
Bookmark Apps are best for when you plan to do your BSO follow up on the same mobile device.
How to capture a BSO as a Bookmark App:
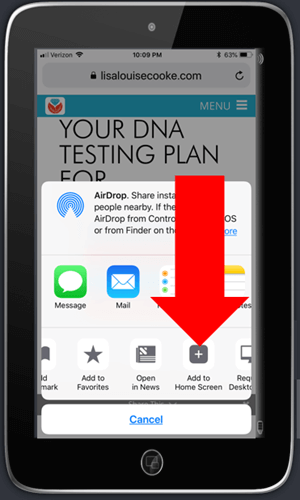
In your browser app, when you come across a BSO web page, tap the share icon.
Tap Add to Home Screen.
Tap Add to Home Screen
Edit the title so it will be easy to remember why you wanted to follow up on it.
Tap Add (iOS – this may be different on Android, or different browsers)
The web page “bookmark app” is now on your home screen.
Once you have created at least two BSO bookmark apps, you can then create a folder.
How to create a folder:
Move the bookmark app by pressing and holding it until it shakes.
Keep your finger on it and drag it onto the other BSO bookmark. This will create a folder.
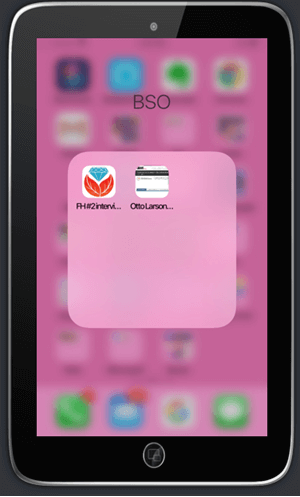
Name the folder “BSO”.
Press the home button to save.
Bookmark apps in the BSO folder
Now whenever you have some spare time you can tap the BSO folder and get back to one of those items that previously caught your eye.
How Alice the Genealogist Avoids Falling Down the Rabbit Hole Part 4
Creating a Supportive Computing Environment
The following tools are available for your computer desktop or laptop.
Restore Tabs
In addition to using Ctrl+Shift+T (Win) or Cmd+Shift+T (Mac) to restore a closed browser tab, you can also right-click on the new tab plus sign and select Reopen closed tab from the pop-up menu. You can do this multiple times and web pages will continue to open in the reverse-order that they were closed.
Turn Multiple Tabs into One and Save Memory with OneTab
Online genealogy research can leave you with a lot of open web browser tabs. While using multiple tabs allows you to jump back and forth between web pages and records, they can take up valuable computer memory.
You can dramatically reduce your memory usage with the OneTab extension available for both the Chrome and Firefox browsers. With one click, OneTab will combine your open tabs into a clickable list in one browser tab. You can even export the list for future reference.
Get OneTab in the Chrome Web Store here.
Get OneTab in the Firefox Web Store here.
Reduce Email Distractions
Gmail now has a Snooze feature which allows you to temporarily file an email until the date and time you select.
Snoozed emails will reappear in your Inbox at the scheduled time.
Retrieve snoozed emails at any time by clicking “Snoozed” in the menu on the left.
Get Back on Track with MyActivity
When you are signed into your Google account, MyActivity tracks the searches you conduct and the websites you visit. By visiting your MyActivity, you can search for and return to any previous activity. You can also turn it off. Go to MyActivity and click Activity Controls from the menu. Switch the slider to the off position. Visit MyActivity at https://myactivity.google.com/myactivity
Save Time by Previewing Your Google Search Results
Rather than clicking on each search result and loading the page (which also takes you away from the rest of your search results), use the Google Results Previewer web extension for Chrome. Once installed you can simply hover your mouse over a result link to reveal a preview of the page. Then you can decide whether to click through or preview additional results.
Click here to get the Google Results Previewer web extension for Chrome.