You can use Google Slides for genealogy to create one-of-a-kind presentations, a virtual scrapbook, or a virtual library list…and it’s free! Here’s how to take advantage of yet another awesome Google tool.
I was recently asked if there was a software program or app, something free perhaps, to share a slideshow or create a visual presentation. There is! It’s called Google Slides. Here’s how Lisa Louise Cooke, author of The Genealogist’s Google Toolbox, explains it:
Google Slides is an online presentation application, much like Microsoft’s Powerpoint. It’s part of Google’s free office suite of tools. As a genealogist, it provides the opportunity to create and visually share your family history.
It’s a Cloud-based service and that means you can access your presentations wherever you are and on any computing device. You will sign-in to Google Slides with your personal Google account. That means you will be able to keep everything private unless you decide to share it. Although it’s Cloud-based, you can use it offline too. Any new presentations you create or changes you make will be automatically updated when you get back online. You can show your presentation at the next family reunion or genealogy society meeting even if there’s no Internet access.
There’s a lot of potential for using this powerful tool for genealogy!
With that great introduction, I’d like to share a few unique examples of how a genealogist or a genealogy society could use Google Slides.
Google Slides for the Genealogist
Google Slides is an easy way to create a fun slide show of your ancestor photos. This can be shared at family gatherings or reunions right from your laptop. You can also share the presentation with a click-able link.
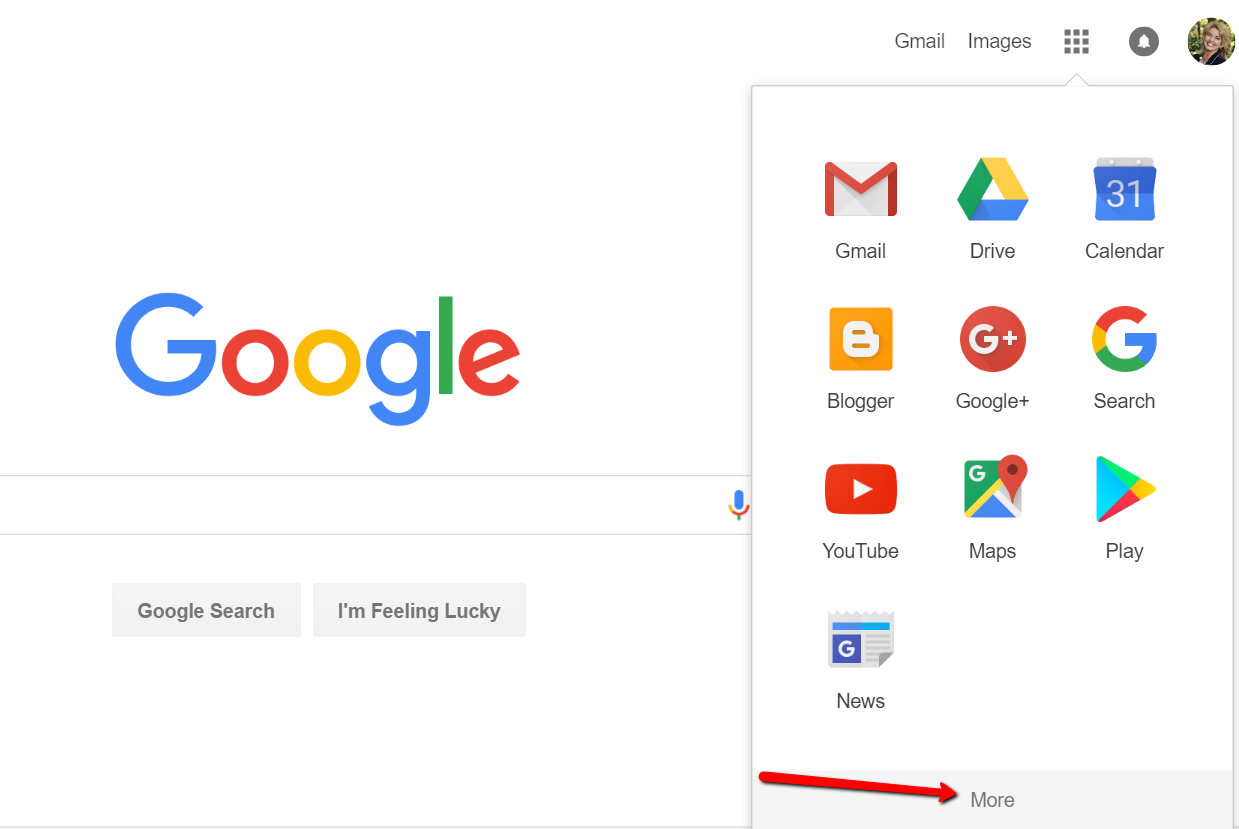
To begin, find Google Slides by going to Google.com and sign-in to your free Google account (or sign up if you don’t have one.) Click on the grid to the left of your sign-in avatar. This will bring down several options. If you don’t see Google Slides as an option, click More at the bottom.
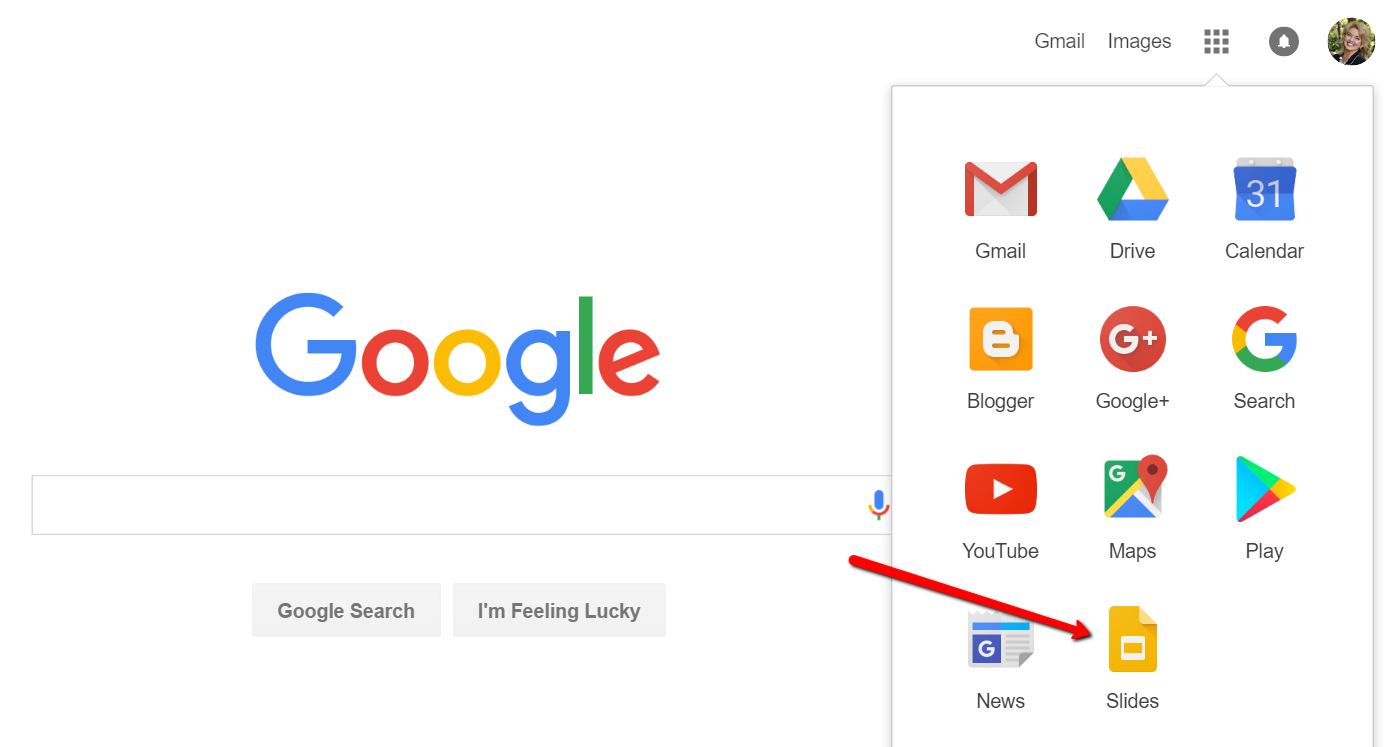
If you still don’t see Google Slides as an option, click on Even More from Google. This will take you to another screen of all sorts of Google goodies! Scroll down until you find Google Slides and click on it.
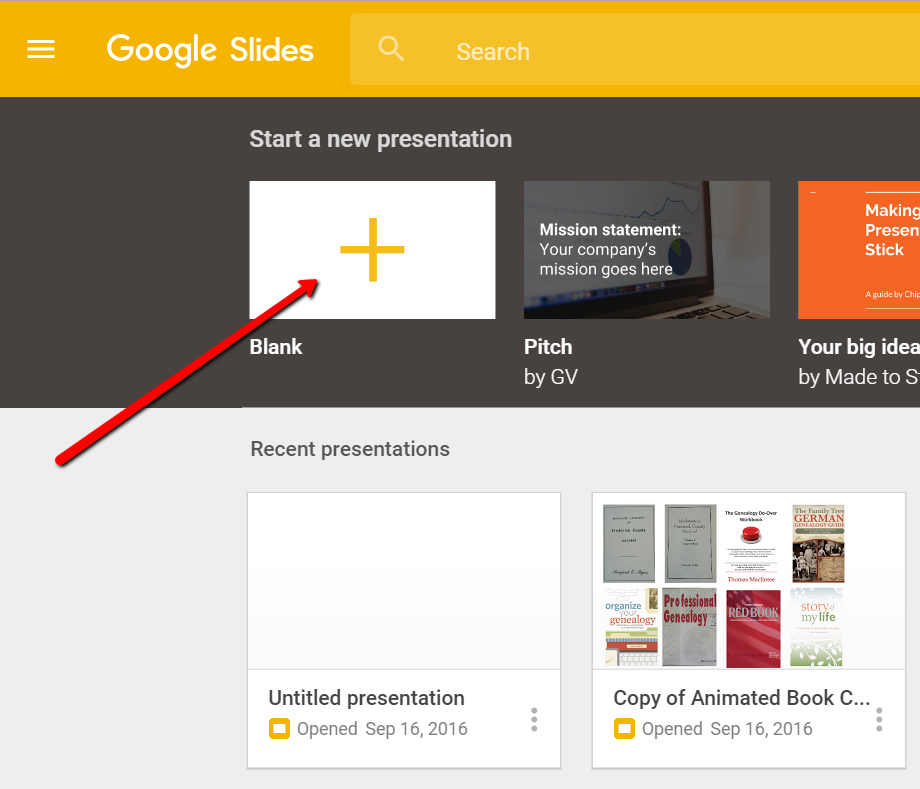
Once you have opened Google Slides, click the plus sign to begin.
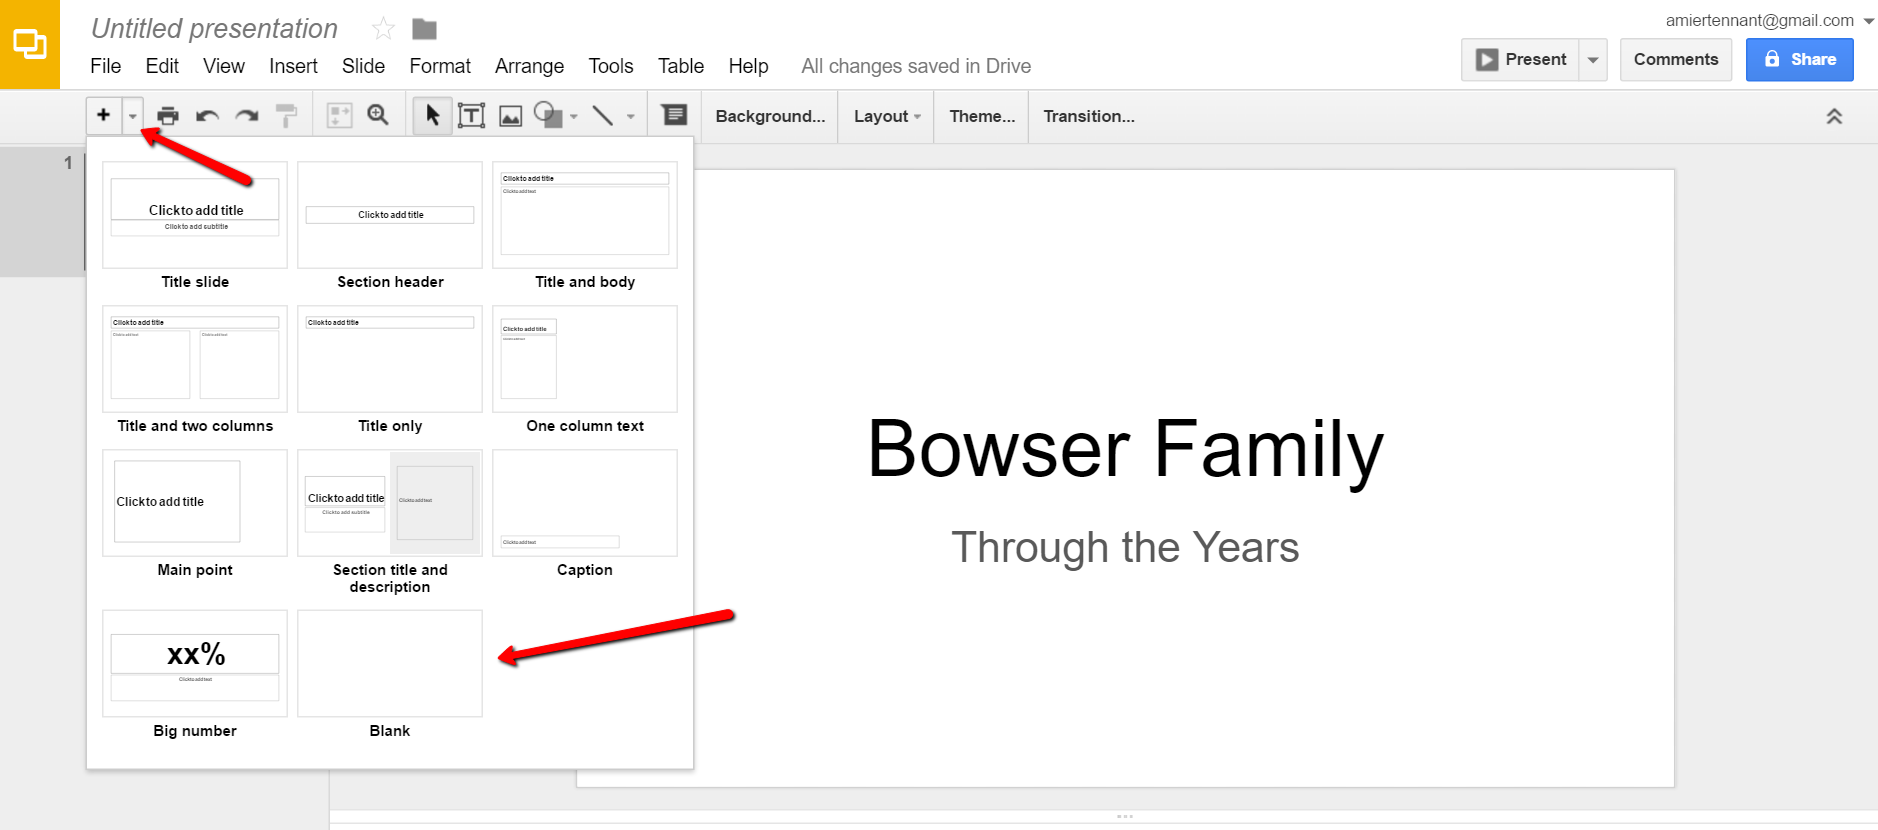
I added a title and then clicked the tiny arrow to the right of the plus sign to add a new blank slide.
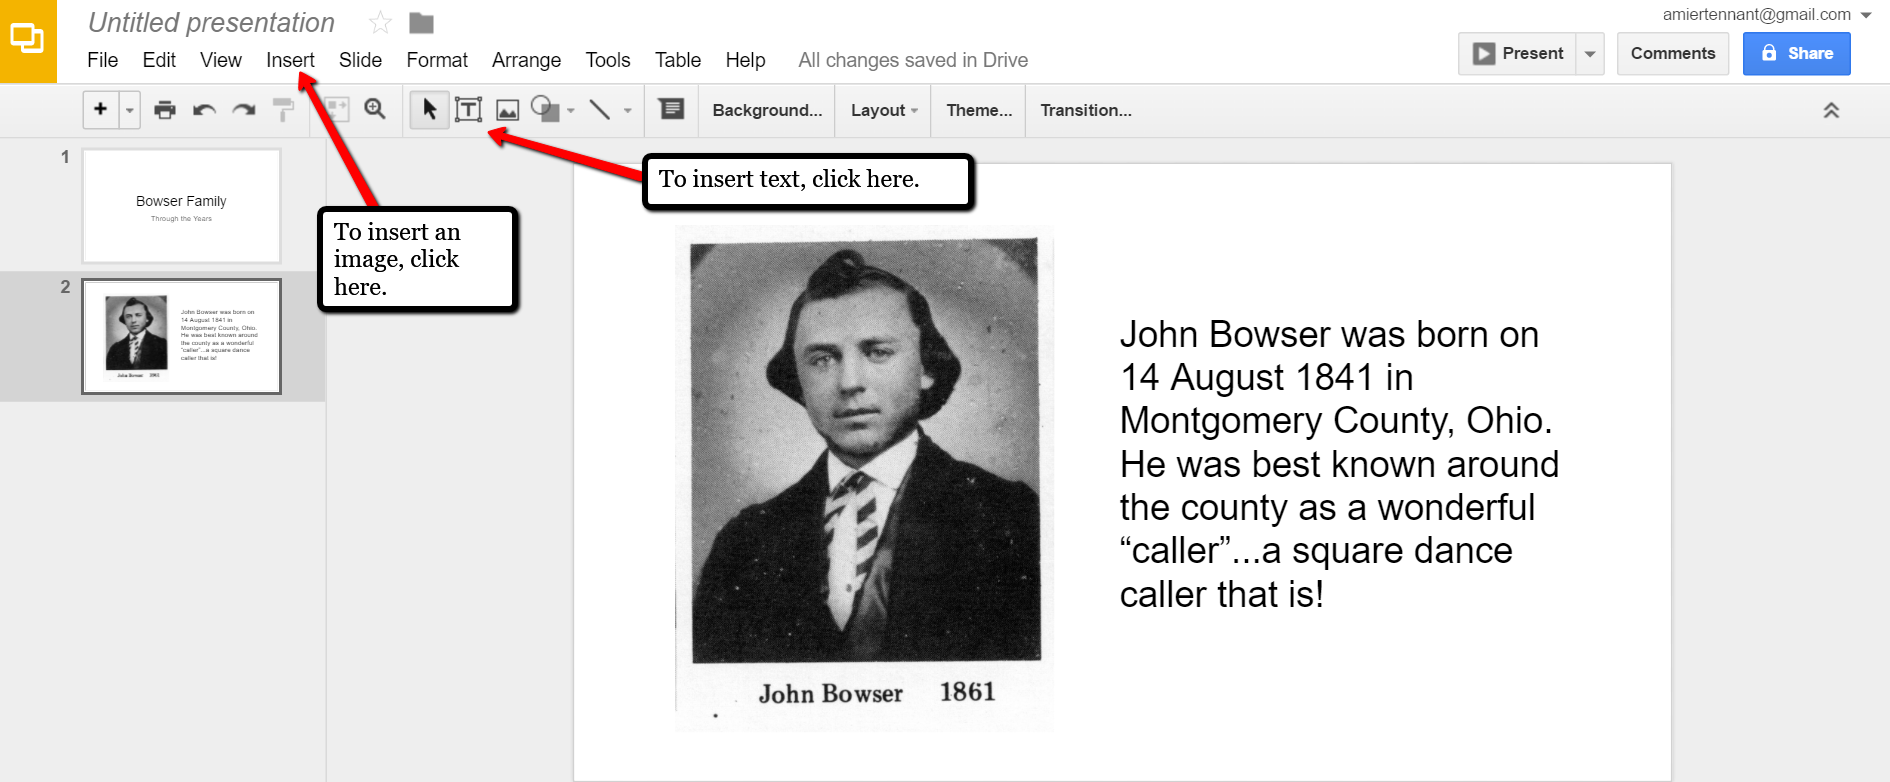
At the new slide and each additional slide, you can add a picture by first clicking Insert from the labels listed across the top, then choose Image. A pop-up window will appear and allow you to Choose an Image to Upload. You will then find the image you have saved on your computer and click Open.
Keep adding your slides until you have all of them created.
Sharing Your Google Slides Presentation
Like many of us, I like to share my ancestor photos with my family and friends. While at a family gathering of a small group, I just set my laptop up on the coffee table and we huddle around. Bring up your Google Slides presentation on your laptop or mobile device and click on Present at the top right of the screen. The computer does the rest and presents a slideshow for your viewers.
You might also wish to share your slides with family and friends far away. You can do this by sharing a link. To create a shareable link, click Share at the top right corner.
A pop-up window will appear. Click the little drop-down menu next to the words “can view.” This option allows you to choose whether you wish people to be able to edit, comment, or view only. I typically choose the “view only” option. Then, a shareable link is created for you. Click Copy link and paste that into an email directly to a family member, to your family history blog, in a Tweet, or in a Facebook post. Wa-la! You have shared your Google Slides presentation.
Create a Virtual Book Cover List with Google Slides
Another stellar way to use Google Slides for genealogy is to create a convenient virtual library list. A recent article found online gave me the idea of creating a library list using images of the covers of books.
For example, if you enjoy attending genealogy conferences and buying books for your society, you may get stuck wondering, “Do we already have that in our collection?” By creating a virtual book cover list, you won’t have to wonder anymore!
You will first need to begin this project by taking a picture of the covers of each of your books and saving the images to your computer or laptop. I took pictures, cropped them, and sharpened them up a bit with my smartphone. Then, I saved them to a file folder on my computer named Book Covers. [Tip:It would be an even better idea to save the Book Covers folder to your Google Drive!]
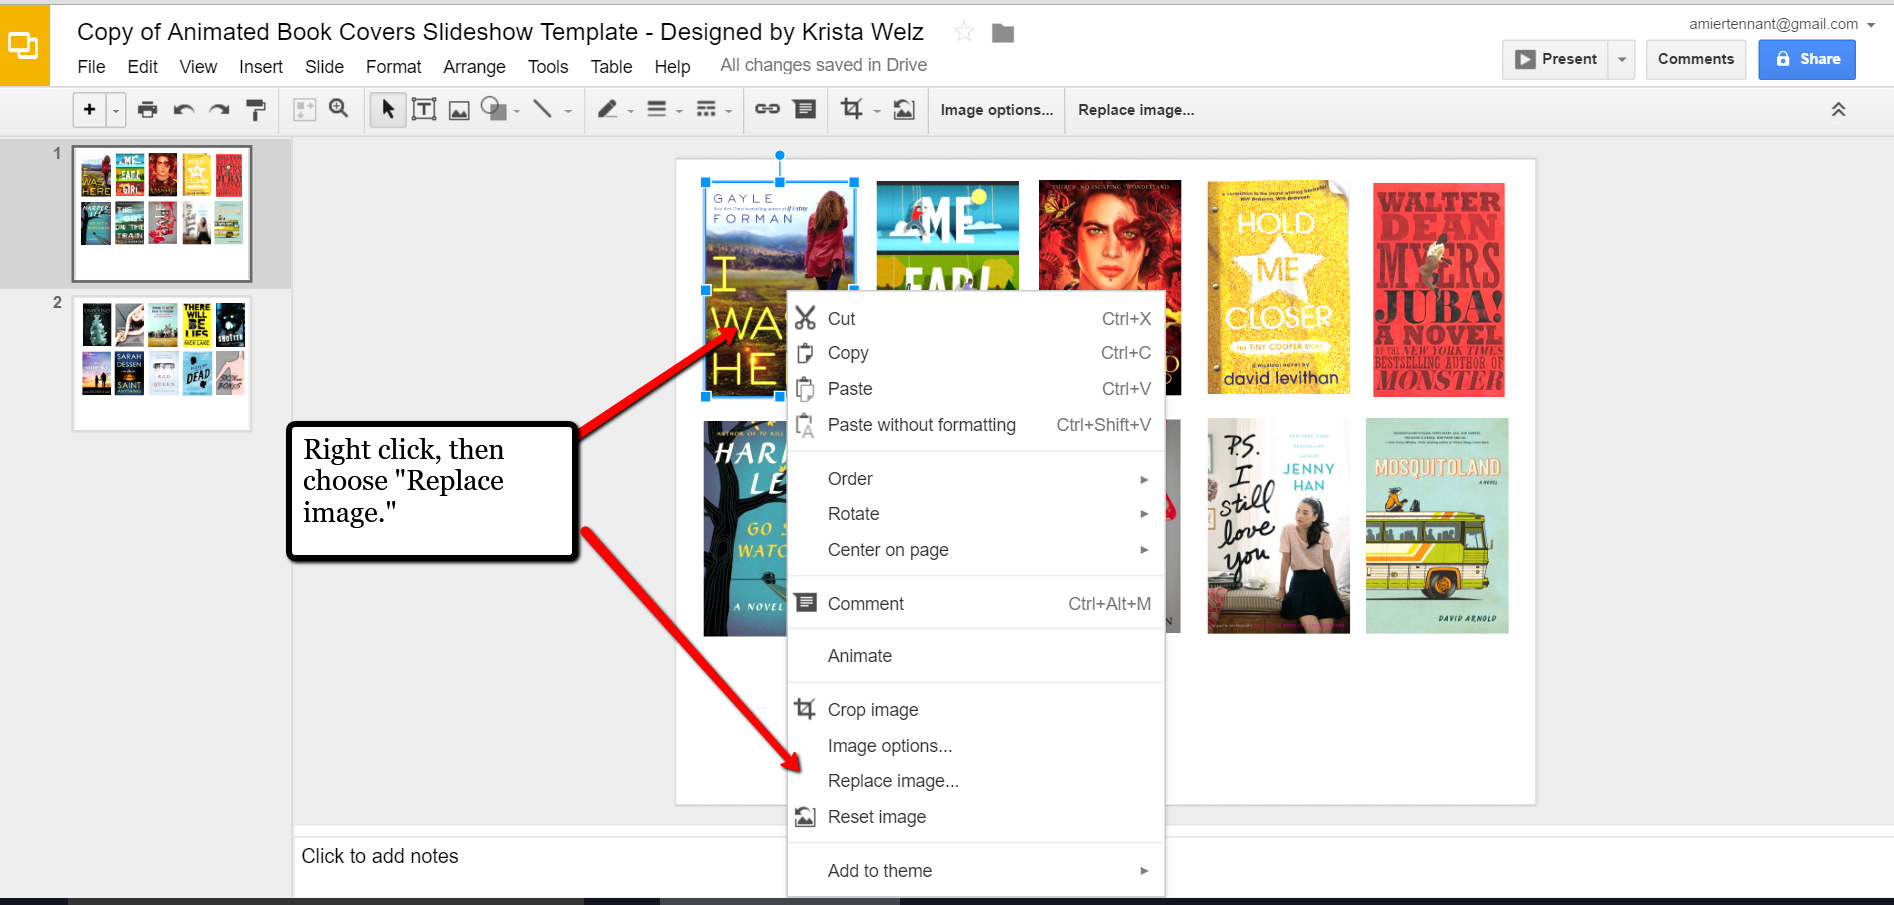
For something quick and easy, use the virtual book cover template here: Virtual Book Cover List Template. If you choose to use this link, when it opens, click Make a copy and Google Slides will open. Right click on any of the book cover images you see, a pop-up window appears. Choose Replace image and then find an image of one of your own book covers.
Once you have replaced each of the book covers with ones of your own, you can rearrange them with the click-and-drag method. You might want to put them in alphabetical order or perhaps categorize them by subject or place.
When you have finished, don’t forget to title it. There is no need to save it because Google Slides automatically saves for you. Google Slides is accessible from any of your devices and can even be viewed on-the-go from your mobile device. You’ll love this feature when you are trying to decide what books to add to your genealogy library.
How Can You Use Google Slides for Genealogy?
We are sure there are dozens of ways to use Google Slides for genealogy. Give Google Slides a try and if you think of another use for this wonderful tool, let us know about it in the comments below! Thanks for reading, friends.
Original air date: 10/1/20 Join me for Elevenses with Lisa, the online video series where we take a break, visit and learn about genealogy and family history.
Google Lens with Lisa Louise Cooke
What is Google Lens?
Google Lens is a free technology that Google says helps you ”search what you see.” It uses the latest in Optical Character Recognition (OCR) and artificial intelligence to accomplish tasks.
In this video and article we’ll discuss where you can get Google Lens and how to use it for a wide variety of tasks.
Hang on tight to your phone and let’s jump in!
Google Lens is in Google Photos
Google Lens is doing much of the work in Google Photos. It can detect the faces in your photos, and allow you to search by face. It can also detect objects and text, making it a super fast way to search the photos and images you store in Google Photos.
If you’re not interested in storing all of your photos on Google Photos, that’s OK. As a genealogist, you could still use it for more strategic purposes. You could use it just for family history photos and related genealogical images like documents and photos of tombstones. All of the content you add can then be quickly and easily searched for and found. It can even help you identify a known ancestor in other photos where you may not have recognized it was the same person.
We will talk about specific ways to use Google Lens in Google Photos. But first, let’s talk about all of the ways you can get your hands on Google Lens.
Where can I find Google Lens on my phone or tablet?
Google Lens is available on most mobile devices but not all. Some Samsung devices don’t currently support it. Here’s where you can find Google Lens.
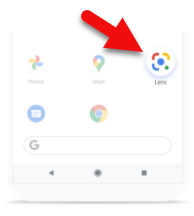
Google Lens is built into Google Photos – Download the Google Photos app to your phone. Pull up one of your photos and look for the Lens icon at the bottom of the screen. If it is there, your phone supports Google Lens.
Google Lens in the Google Search app – You will see the Lens icon in the search bar if your phone supports Google Lens.
The Google Lens app – On Android devices look for the Google Lens app in the Google Play app store.
Where can I find Google Lens on my computer?
Google Lens is primarily a mobile tool although Google Lens is built into the functionality of Google Photos. (It works behind the scenes – you won’t find a Google Lens icon.)
However, you can use your phone to user Google Lens to capture text and then send it to the Chrome browser on your desktop computer.
Using Lens in the Google Photos App
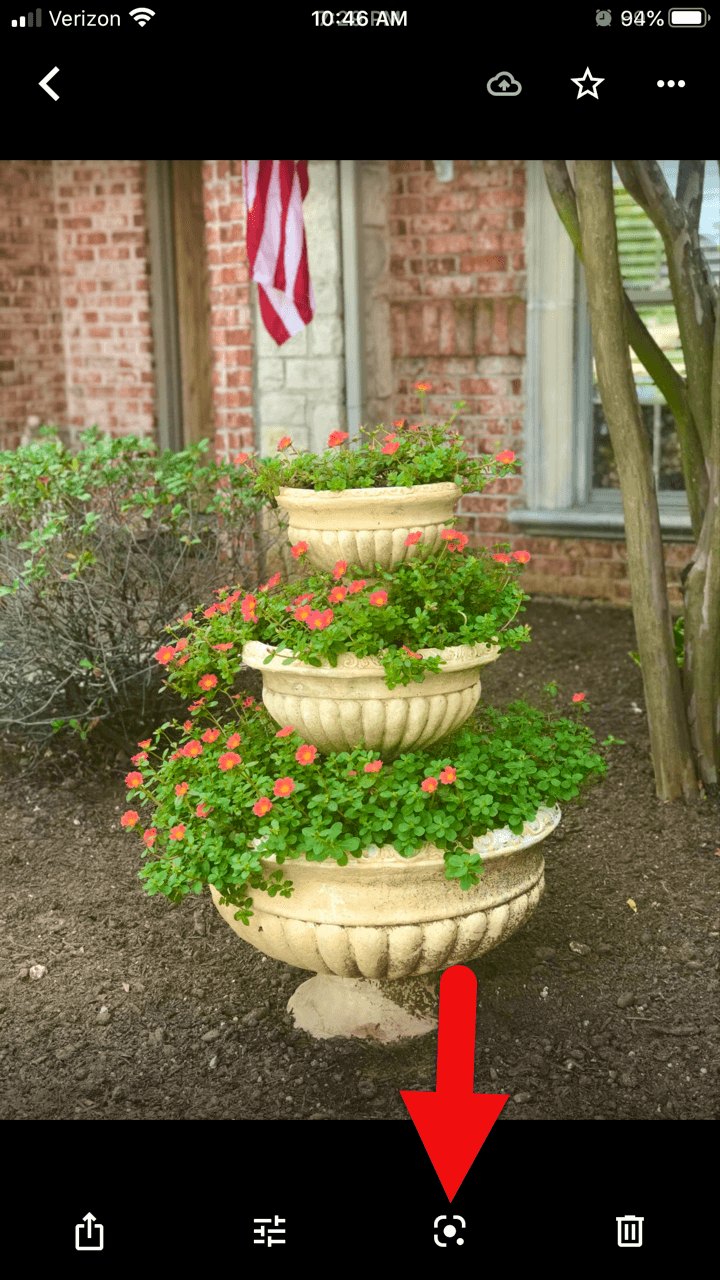
To use Google Lens on your photos in the Google Photos app, you’ll first need to give the app permission to receive the photos you take with your phone. You can then open the Google Photos app and select a photo. In this episode I used the example of a potted plant (Image A below).
(Image A) Google Lens in the Google Photos app
Tap the Google Lens icon at the bottom of the screen and you will receive search results that include the name of the plant, photo examples of the same plant, possible shopping options, and web pages providing more information about that plant.
Here’s another way you can use the Google Lens feature in the Google Photos app:
Take a photo of a business card. (I used Google’s PhotoScan app to do this. The app does a great job of removing glare and other distortions that can occur when you photograph something with your phone. You can download the free Google PhotoScan app from your device’s app store.)
Access the photo in the Google Photos app.
Tap the Google Lens icon.
Lens turns the information on the card into actionable buttons:
Add to contacts
Call now
search on the web
go to the website
Google Lens is in the Google Search app
On many mobile devices such as the iPhone (but not all devices) the Google Lens icon will appear in the search bar. If you’re not sure if you already have the Google Search app on your phone, go to the app store app on your phone and search for “Google Search.” You will see the app listed with a button that either says “Open” (because it is already on your phone) or “Install” (because it is not yet on your phone.)
You can also check to see if they app is on your phone by searching for “Google Search” in the search bar of your phone.
Here’s what the Google Search app looks like on a phone (Image B below):
(Image B) Look for the Google Search app on your phone.
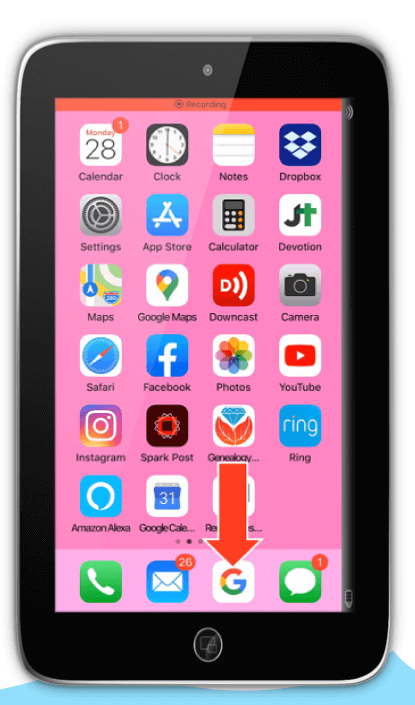
The Google Lens App
If you have an Android phone, search the Google Play store for the Google Lens app. Here’s what the app looks like (Image C below):
(Image C) Android users with phone’s supporting Google Lens will find the app in the Google Play app store.
What Google Lens Can Do
Once you start using Google Lens the possibilities for its use can seem endless. Here’s a list of the kinds of things Google Lens can do:
Shopping
Identify Objects
Copy Text from printed materials or objects
Search for Text on printed material or objects
Solve math problems
Read text to you
Translate text
How to Use Google Lens to Read a Book
Before you buy that next history book or go through the trouble of requesting it through inter-library loan, why not let Google Lens determine if it is already available for free online? This next tip works really well for old books that are likely to be in the public domain or printed before 1924.
Open the book to the title page
Open the Google Search app on your phone
Tap the Google Lens icon
Hold your phone over the title page
Tap the search button
If the book is available on Google Books, the title will appear along with a blue “Read” button
Tap the “Read” button to access, read and search the book on Google Books for free!
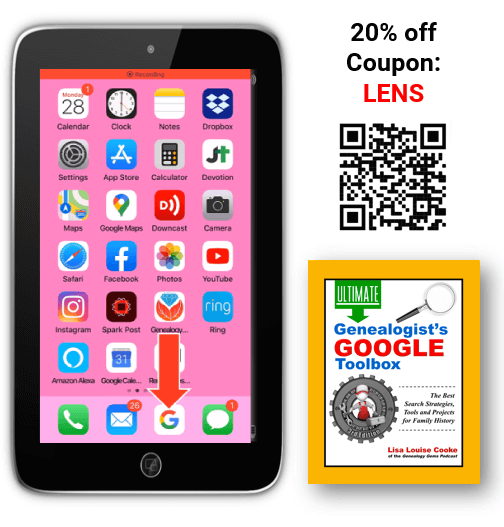
(Image D) Point your phone’s camera or Google Lens at the QR code
Open the camera on your phone and point it at the QR code above (Image D) to be taken to the book in the Genealogy Gems store. Use coupon code LENS to get 20% off!
One of the advantages of tuning into the live broadcast of each Elevenses with Lisa show is participating in the Live Chat and asking your questions.
From Rosalyn: Lisa are the old photos hanging on your wall the originals or copies? They are very nice. Lisa’s Answer: I always put copies in frames when I hang them on the wall because light can fade originals. They are all my family.
From Jn Rollins: Does it do the same identification for birds? Lisa’s Answer: I haven’t snapped a photo of a bird, but I’m sure it could. I used it on a photo of a bird, and it identified it perfectly.
From Susan: I have to download an app to get the lens icon? Lisa’s Answer: If you have an Android phone, you may be able to download the free Google Lens app from your app store. Otherwise, you will find the icon in the Google Search app or the Google Photos app on supported devices.
From Patriva: Is Google Go the same as Google Search? Lisa’s Answer: Google Go is a “lighter faster” search app. I think it may be geared more toward Samsung devices. I have a Samsung Tab and it doesn’t support Google Lens.
From Carrie: Does this work with the Google Chrome app? Lisa’s Answer: The Chrome app doesn’t have the Google Lens icon.
From Jn Rollins: I installed Lens a while ago on my Android phone, but when I open Google search the lens icon doesn’t appear next to the microphone icon. How can I change that? Lisa’s Answer: Some Android devices (like Samsung phones) don’t support Google Lens so you won’t see the icon. Check the app store to see if they offer the Google Lens app for your phone. However, I’m guessing it probably won’t be offered since it sounds like your phone doesn’t support Google Lens.
From Christine: I love this technology for speeding up research! But I have some reservations—what privacy are we giving away? How will Google use our search history? Lisa’s Answer: I would not use Google Lens for anything I consider “sensitive.” Go to the privacy settings in your Google MyActivity to learn more.
From Lynnette: Can you put the text into Evernote easily? Lisa’s Answer: Absolutely! Tap to copy the detected text, open an Evernote note, press your finger in the note and tap Paste to paste the text.
From Colleen: I see you are google searching. Does doing this with photos allow others to access my google photos when searching for an item? For example, the example you used with the purse? Lisa’s Answer: To the best of my knowledge your photos are not searchable by others online. However, it is possible that Google uses the image internally to “train” the machine learning. Go to the privacy settings in your Google MyActivity to learn more.
From Christine: Lisa, can this be used to compare photos to determine if they are the same person? Thanks for sharing all your wisdom! Lisa’s Answer: Yes! Watch my Premium membership video called Solving Unidentified Photo Album Cases.
From Caryl: Don’t know what a symbol is on a headstone? Now this would be oh so helpful!! Lisa’s Answer: Yes, indeed!
From Susan: I quickly took a photo of the book cover, so now I can get your book! Is it better to buy directly from you or go to Amazon? Lisa’s Answer: The book is available exclusively at my website: https://www.shopgenealogygems.com
From Debbie: Will FamilySearch’s app be independent, or will it work / integrate with Google? Lisa’s Answer: FamilySearch would not be integrated. However, as handwriting technology is developed I’m sure you’ll find it in use in both places.
Please Leave a Comment or Question
I really want to hear from you. Did you enjoy this episode? Do you have a question? Please leave a comment on the video page at YouTube or call and leave a voice mail at (925) 272-4021 and I just may answer it on the show!
If you enjoyed this show and learned something new, will you please share it with your friends? Thank you for your support!
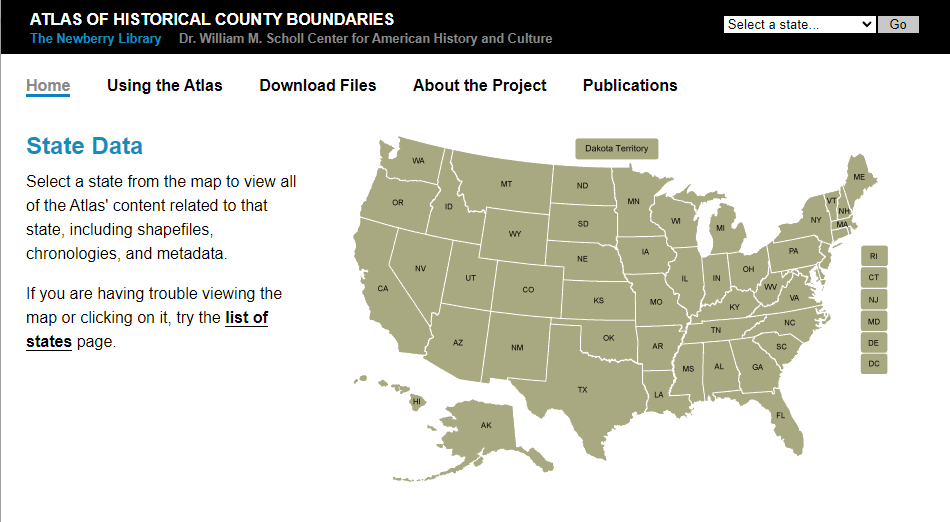
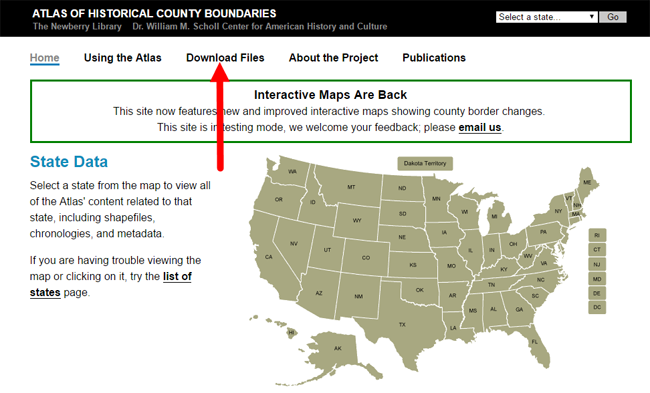
The online Atlas of Historical County Boundaries is a go-to resource for determining old U.S. county boundaries.
The atlas of historical county boundaries
How to find county boundaries with the Atlas of Historical County Boundaries in three steps
1. From the Atlas home page, click on the state of interest from the national interactive map.
2. From the state page, click on View Index of Counties and Equivalents. This will show you all current and past county names.
3. From this page, click on your targeted county. You’ll find a timeline of that county’s boundary changes.
Use the timeline to discover what county your ancestors belonged to at any given time. Perhaps you’ll discover you should actually be looking for an ancestor’s marriage record or probate in a parent county, one that existed there before the current county, or in a successor county later carved out of this one.
Google Earth Bonus: The Atlas of Historical Boundary Changes state pages include downloadable maps compatible with Google Earth and Google Maps. If you are not using Google Earth for genealogy yet, watch Lisa Louise Cooke’s free video to see how and why you want to use this amazing 3D map of the world for your family history! You can learn more about downloading the Atlas of Historical County Boundaries files to Google Earth in Lisa’s book The Genealogist’s Google Toolbox.
Learn More about Using Interactive Maps for Genealogy
Genealogical records and research for your Denmark ancestors has just gotten a little easier! New and updated genealogical collections for Danish genealogy have been added to FamilySearch. Also new this week, new and updated records for Sweden, Hungary, Britain, and Ireland.
Denmark – Census
It was truly a Danish delight when we heard the 1916 Denmark Census is now available at FamilySearch. Danish genealogy is just a bit easier with the availability of this census, especially when paired with the already published 1911 Denmark Census, also at FamilySearch.
This is an every-name index to the 1916 census of Denmark. This index was created by MyHeritage from images provided by the National Archives of Denmark. The collection at FamilySearch includes an index or abstract version in English and a digital image of the original.
This census was taken for the countries of Denmark, the Faroe Islands, Greenland, and the Danish West Indies, however, only the records for Denmark are available at FamilySearch. The enumeration for Denmark was divided into three sections with a different form for each of the sections: Copenhagen city, other cities, and rural areas.
This census names each individual in the home and includes: sex, calculated birth date and year, marital status, relationship to head-of-household, and residence.
Other genealogy record collections for Denmark can be found on FamilySearch, too. See the entire list here.
Sweden – Church Records
FamilySearch has four Swedish church record collections that have recently been updated. Church records are especially helpful when civil records such as birth, marriage, and deaths, are not available. Check out these four updated collections and their titles below.
The records are bound volumes of pre-printed forms with event information recorded by hand. From 1895 through 1906, the forms are one page per event, but beginning in 1907 each event occupies one row in a printed table, so there are multiple events recorded per page. The records are in Hungarian.
Civil registrations include birth, marriage, and death records. You may be able to find the following information in each of these groups:
Birth records:
Date and place of birth
Name of child
Gender and religion
Parents’ names and mother’s age
Parents’ religion
Signature of informant
Marriage records:
Date and place of marriage
Groom’s name, date and place of birth
Groom’s religion and occupation
Groom’s parents’ names
Bride’s name, date and place of birth
Bride’s religion and occupation
Bride’s parents’ names
Witnesses’ names and their residence
Additional remarks
Death records:
Name and age of deceased
Date, time, and place of death
Deceased’s residence and occupation
Deceased’s religion
Spouse’s name
Parents’ names
Cause of death
Signatures of informant
United Kingdom – 1939 Register
Like a census, the Register can tell you a lot about how your ancestors. You can find names, occupations, and more. The 1939 Register of more than 32.8 million records is now available at Findmypast.
The 1939 Register is pretty unique. It required people to explain exactly what they did. General terms, such as Foreman, Overseer, Doctor, Mill-hand, Porter or Farmer, were not acceptable. Instead, people were asked to be as specific as possible, giving details of the trade.
Additional information you will find on the Register includes:
Name
Full date of birth
Address
Marital status
Occupation
Ireland – Directories
Also at Findmypast, the Ireland, 19th Century Directories allow you to search more than 120 volumes of directories that contain more than 74 thousand records. Listings may include your ancestor’s occupation, place of business, or home address.
These directories were published annually, which means that you can easily track your ancestor year to year.
You will want to be aware that most of the details in the directories were collected six months before publication; therefore, all the listings are six months old.
The records are presented as PDFs (portable digital files). This feature allows you to narrow your search by publication, year and page number. After selecting an image, you can read through the whole directory by using the previous and next buttons at the top of the image.
Disclosure: This article contains affiliate links and Genealogy Gems will be compensated if you make a purchase after clicking on these links (at no additional cost to you). Thank you for supporting Genealogy Gems!
Are you ready to start a genealogy blog (or improve one you already write)? Here’s a quick Q&A for you, prompted by questions by Genealogy Gems Premium member Kevin:
Q: “I am ready to start writing a blog but my typing is slow. Is there a dictation app (iOS) or software (Windows) that I could use to dictate my first drafts of my blog posts?
A: If you go to www.genealogygems.comand scroll down and enter “Dragon software” into the Amazon box and click “Go” it will pull up a great dictation program that might be just what you are looking for. (Using our Amazon box supports the free podcast – thank you!)
Q: Which blog site do you use and why did you select it?
A: I use Word Press for my website and blog. They have a free version at wordpress.com. Google also has Blogger which is free. I have a free series of videos on the Genealogy Gems YouTube channel about how to set it up. They are a few years old, but will give you the basic idea.
Q: Do you compose your blog posts directly on your site or do you type them in Word or some other word processing program then cut and paste them into your blog?
A: It’s best to compose them directly into a new post on Word Press or Blogger. Cutting and pasting out of Word will likely carry over unwanted formatting which can cause headaches.
Listen to the Family History: Genealogy Made Easy podcast by Lisa Louise Cooke. It’s a great series for learning the research ropes and well as refreshing your skills.
Ready to get inspired and tutored on genealogy blogging? Check out my FREE podcast series on how to start a genealogy blog. Click here to reach my Family History Made Easy podcast landing page, then start with episode 38 and continue through episode 42. You’ll learn step-by-step how-tos and you’ll be introduced to some inspiring blogs that WORK. We often hear about success stories from listeners who started a blog after hearing these episodes. (We’d love to hear YOUR success story, too!)

 The Genealogist’s Google Toolbox


 Premium member Kevin: