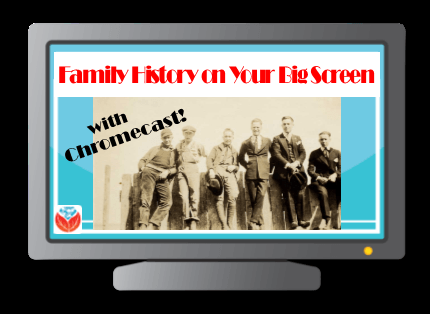
Here’s How You Can Bring Your Family History to a Big Screen: How to Use Chromecast
 Here at Genealogy Gems we love using Google for genealogy. Today we have another exciting Google resource that can transform how you share your genealogy with your family – because ultimately, genealogy is all about sharing your family’s story!
While the mobile device era has made communication and sharing easy and instant, sometimes it’s hard to really see the ‘big picture’ on our tiny screens. And crowding around the computer monitor isn’t much better. Chromecast by Google is a tool that allows you to stream content from your mobile devices and computers directly onto your TV!
You can share slideshows, photos, videos, and more while everyone is seated comfortably in the living room. If you are looking for an easy and inviting way for your family to enjoy all the hard work you put into constructing the family tree, Chromecast is for you. The Google Chromecast HDMI Streaming Media Player
currently sells for $35 and takes a mere 5 to 10 minutes to set up.

Even though I’m Lisa’s daughter, I am not a techie person at all, so if I can do it in just a few minutes without help, you can too!
How to Use Chromecast
After you’ve completed the initial set up, simply open the app you want to stream (YouTube, for example) and tap the Chromecast icon. Streaming is now enabled. (Chromecast primarily works over wifi, but Google recently announced that Ethernet cables are now available as an alternative.)
While streaming, you control the app functions on your mobile device or computer. For example, if you’re streaming a movie from the Netflix app on your iPad, you would play, pause, and make your selections directly on your iPad. If you want to switch back to viewing on your mobile device (or simply stop streaming), tap the Chromecast icon again.
Dozens of photo and video apps are compatible with Chromecast and all are listed on their website. Here are a few that I think genealogists will really enjoy, and they’re all available on both The App Store and Google Play:
 Photo Cast for Chromecast
Free
Premium Upgrades – $2.99 and up
 When you open the app, you can view all the photos and videos (including TV shows or movies you may have purchased) on your device. You can also create slideshows by picking individual photos or entire albums and adding songs from your music library. Then tap the Chromecast icon to instantly stream to your TV. It has four viewing modes available. Photo streaming has very little lag, but video streaming could take a little longer to load, depending on your wifi speeds. Multiple devices can stream to the same TV, and slideshows can continue to play on the TV while you use your mobile device for other tasks.
 Google Slides
Free
Google Slides is an ideal tool for Chromecast because it is linked directly to your Google account. I recommend using Google Slides from your laptop or desktop because you can pull pictures from your hard drive (or anywhere – you’re not limited only to the pictures on your mobile device). And personally I find I can work much more efficiently with a full mouse and keyboard for this kind of project. You can create a wonderfully detailed and multi-media slide show or presentation. Then, download the app to your mobile device and your presentations will be accessible there as well. I find streaming from your tablet works a little better than streaming from your computer, but you can still stream from a computer as long as it’s connected to wifi and is close enough to the TV to detect Chromecast.
![]() YouTube
YouTube
Free
 Chromecast offers you an easy and convenient way to watch videos from our Genealogy Gems YouTube channel and other favorites on your TV! Open the YouTube app and tap the Chromecast icon. Browse videos as usual. When you select one to watch, it will stream to your TV with no loss of video or audio quality. You can also create a TV queue, specifically for videos you want to watch on the big screen. Tap on a video and a pop-up will ask to either play it or add it to your TV queue. The best part? YouTube will continue to play your video on your TV even if you minimize the app on your device to do other tasks. Before you finish your viewing session, be sure to tap the Subscribe button at the Genealogy Gems YouTube channel so you’ll have easy access to all current and new videos.
Desktop Streaming
Streaming from your desktop browser is another great feature. Anything you are viewing on your browser (videos, audio, website content, etc.) can be projected to your TV. You will need the current version of the Chrome web browser, as well as the Chromecast extension installed. In my personal experience I found streaming video from my browser to be a bit slow and choppy, but results may vary based on browser settings and wifi speeds. It’s worth a try, and I wouldn’t be surprised if this technology continues to evolve and improve.
TIP: How to Update Chrome
Normally, Chrome updates automatically in the background when you open and close your browser. But here’s how to check if you have the most current version of Chrome:
- Open Google Chrome.
- In the top right, click the Chrome menu
- Click About Google Chrome.
- The current version number is the series of numbers beneath the “Google Chrome” heading. Chrome will check for updates when you’re on this page.
- Click Relaunch to apply any available update.
Another cool thing about Chromecast:
Once you have Chromecast set up, your devices will detect any Chromecast that is nearby, whether it’s yours or someone else’s. So if you’re at a family member’s home and they have Chromecast, you can stream from your device to their TV as well! Can you say “time to share the latest version of the family tree?”
Again, as a non-techie I found Chromecast to be very user-friendly, and a huge value for the price. There are loads of fun apps to explore (music, podcasts, interactive games, and even a karaoke app!). Happy streaming!
 P.S. If you decide to purchase Chromecast, will you please use this link? Purchasing through our site supports the free Genealogy Gems podcast and all the free content on our website.
Getting Help with a Genealogy Brick Wall
Sooner or later, we all hit genealogy brick walls: a point in our family history research where we can’t seem to make any further progress. When I hit a brick wall with great-grandpa Gus in Eastern Europe, I turned to Legacy Tree Genealogists. Here’s what their experts found that I hadn’t discovered for myself.
My Genealogy Brick Wall in Eastern Europe
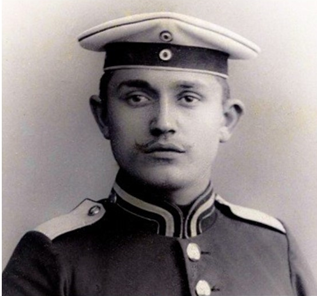
My great-grandfather Gustav Sporowski was born in Kotten, Kreis Johannisburg, East Prussia on July 20, 1881. His wife was born in Kreis Ortelsburg in 1878. I’ve found all of her church records, but have had no luck with his.
I’ve met so many people who get stuck researching in Eastern Europe, and East Prussia and the Belarus area in particular. (I strongly suspect that the Sporowski family came from the Sporovo lake region of Belarus). So I invited Legacy Tree Genealogists to take a look at Gus and suggest some next steps. I wondered what someone who specialized in Eastern European research might be able to tell someone like me, who knows how to genealogy but not-so-much in that part of the world.
Reviewing My Work
Legacy Tree Genealogists assigned me to a Project Manager, Camille Andrus, who reached out to discuss what I already knew and what I wanted to learn.

Camille Andrus, Project Manager, Legacy Tree Genealogists.
I requested their Discovery Research Plan, for which they just provide guidance about what record collections to consult and what methods or strategies to try. That way I can do the research myself (which I like doing!). I also asked Camille if she would write about her research process so I could share it with you. Here’s what she sent me:
We looked over Lisa’s work, and upon initial inspection everything looked great.
She had looked in the gazetteer (now available digitally at www.meyersgaz.org with maps of the area) and Lutheran church records. (Editor’s note: Learn more about using Meyers Gazetteer in the Genealogy Gems article 5 Expert Tips for Using Meyers Gazetteer for Your German Genealogy.)
She had searched the records for her ancestor’s supposed home parish. When that failed to yield results, she had done a partial radial search, searching records in several adjacent parishes. Check. Check. Check. She was following all of the integral steps, but still not having success.
What had she missed? What had she done wrong? The short answer — nothing. Her research was impeccable, and she was looking in the right places.
Getting Around the Genealogy Brick Wall
Camille had three specific suggestions for where to look next for great-grandpa Gus. At the end, she also offered some helpful reassurance. Here’s what she said:
1. Civil registration in East Prussia
After closer inspection of what Lisa had already tried, we saw several opportunities we could still pursue.
We looked up civil registration records available through a Polish archive, since what was East Prussia is now part of modern Poland.
German civil registration in East Prussia began in October of 1874 and is an important resource for researching individuals from this area.
The Meyers Gazetteer confirmed that Kotten (where her ancestor was from) belonged to Kreis Johannisburg in the German Empire province of East Prussia. This village belonged to the Monethen (Kreis Johannisburg) civil registration district.[1]
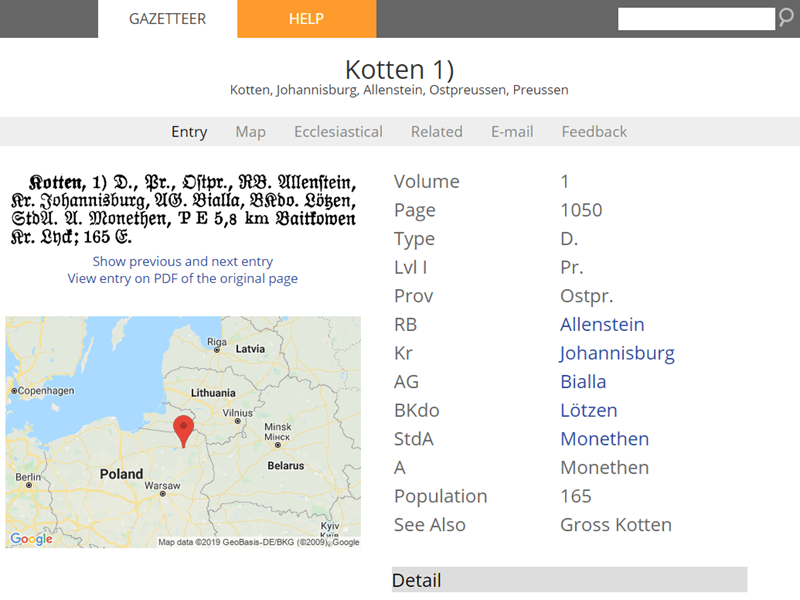
Using Meyers Gazetteer to find German places
The Olsztyn State Archive inventory lists several birth, marriage, death, and family books for the Monethen Civil Registration Office, but the books only cover the late 1930s and early 1940s. The whereabouts of the registers covering 1874 through the early 1930s are unknown.
It appears as though the records covering this time period have been lost or destroyed. This situation is not unusual for East Prussia, in general due to the numerous conflicts that have occurred in the area over time.
2. Church records in East Prussia
Another major resource for German genealogy research is church records.
The Meyers Gazetteer database noted that Protestant residents of Kotten attended church in the nearby town of Baitkowen (Kreis Lyck).[2]
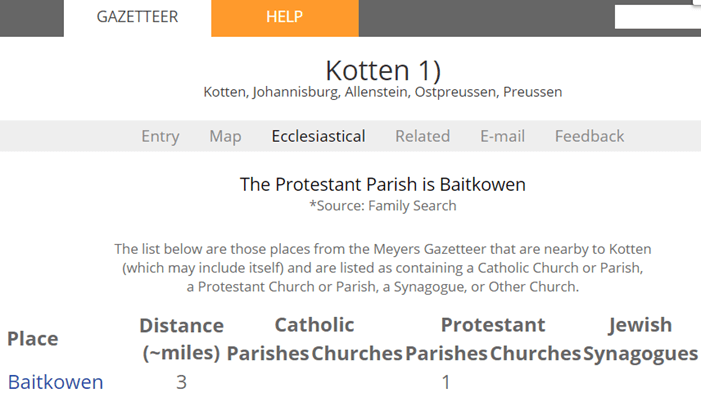
The church book inventory for Baitkowen revealed that the Protestant parish was established in 1891, a decade after the ancestor Gustav Sporowski was reportedly born. No sacramental registers for this parish are known to be extant. It should be noted that the Baitkowen parish was created from parts of the Lyck, Ostrokollen, and Drygallen parishes.[3]
The Protestant parish of Drygallen (Kreis Johannisburg) has extant baptismal records which are available on microfilm at the Family History Library for the years 1730-1821 and 1844-1875.[4] Lisa indicated that she had reviewed these files but did not find any Sporowskis.
The Lyck Landgemeinde (the congregation for parishioners living outside city limits) was founded in 1704, but there are no known extant baptismal records for this parish after 1808.[5]
3. Following up on clues
A key clue came from Lisa’s notes. She mentioned that Gustav and his wife were married in Lütgendortmund, a town hundreds of miles west of Gustav’s birthplace, before ultimately immigrating to the United States.
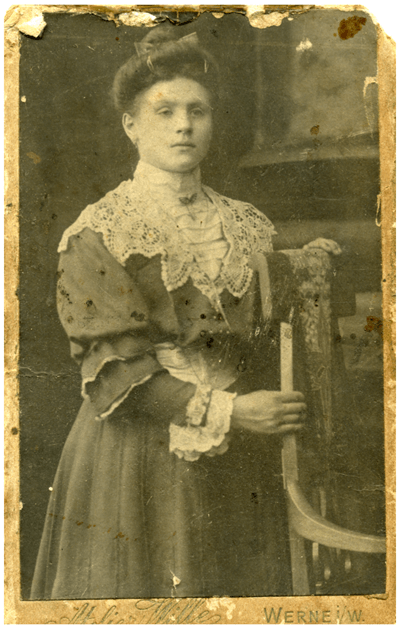
Louise at the time of her marriage
Luckily, their marriage occurred in a time when civil registration had been instituted. A search for marriage records showed there are civil registration records available for the town of their marriage, which are available at an archive in Detmold.
We were able to advise Lisa that further research should pursue this record, as it may list information about his parents.

The Protestant Bartholomew Church in Lütgendortmund, Dortmund, Germany. Von Smial – Eigenes Werk, FAL. Click to view.
The Bottom Line
The bottom line is if you feel stuck, it’s not necessarily because you are doing anything wrong.
Review the “checkboxes” of your research plan to ensure you aren’t missing any integral clues.
If after final review of methodology concludes that you’ve pursued every avenue, the lack of success may be attributed to gaps in the records or perhaps they have been lost completely. Other times all you need is one clue to put you back on the right track.
This is exactly the kind of advice I was hoping for: expert and specific!
Hire a Professional Genealogist for a Quick Consult or Project
If you have hit a genealogy brick wall in Eastern Europe (or anywhere else) and would like a professional to review your work, I recommend contacting Legacy Tree Genealogists. They have helped many clients like me to solve their family history mysteries, and would love to help you as well!
You can hire a genealogist like Camille through their Genealogist-on-Demand™ service. Receive research strategies and advice from a professional genealogist during your 45-minute consultation that will help you continue your own research. Your virtual genealogy consultation will allow you to have your questions answered in real-time by an expert–all from the comfort of your own home!
Need even more help? Here’s an exclusive offer for Genealogy Gems readers: Receive $100 off a 20-hour research project using code GGP100. To learn more about Legacy Tree services and its research team, visit https://www.legacytree.com.
Disclosure: This article contains affiliate links and Genealogy Gems will be compensated if you make a purchase after clicking on these links (at no additional costto you). Thank you for supporting Genealogy Gems!
[1] Search the Meyers Gazetteer, Kotten, Johannisburg, Allenstein, Ostpreussen, Preussen, http://meyersgaz.org/place/11050078, accessed August 2017.
[2] Search the Meyers Gazetteer, Kotten, Johannisburg, Allenstein, Ostpreussen, Preussen, http://meyersgaz.org/place/11050078, accessed August 2017.
[3] Ostpreussen, Genealogische Quellen, Kirchbuchbestände Kreis Lyck, ev. Baitkowen (Baitenberg), http://wiki-de.genealogy.net, accesesed August 2017.
[4] Ostpreussen, Genealogische Quellen, Kirchbuchbestände Kreis Johannisburg, ev. Drigelsdorf (Drygallen), http://wiki-de.genealogy.net, accesesed August 2017.
[5] Ostpreussen, Genealogische Quellen, Kirchbuchbestände Kreis Lyck, ev. Lyck Stadtgemeinde, http://wiki-de.genealogy.net, accesesed August 2017.
Registration for FGS 2018 Is Open
Here’s the latest news from the Federation of Genealogical Societies and their 2018 conference. FOR IMMEDIATE RELEASE 3 May 2018 – Austin, Texas Registration is open for the Federation of Genealogical Societies Annual Conference in Fort Wayne, Indiana 22-25...How to Create Captivating Family History Videos Episode 2
In this blog and video series I’m showing you how you can create captivating videos about your family history quickly and easily with Animoto.
In the First Episode
In episode 1 we laid a foundation for the family history video that you are going to create. Doing this will save you time and ensure a cohesive, well-told story. We also:
- defined your audience
- identified and outlined the story that you want to tell
- collected the content that you will include in your video
If you missed episode 1, you can watch it below:
Get a Free Animoto.com Account
The first thing to do is to go to Animoto here and sign up for a free trial account, which gives you the full power of Animoto Pro. No credit card is required. This trial period is the perfect opportunity to test drive Animoto and see just how easy it is to use. As I’ve said before, if you can click, drag, and drop, you can make videos with Animoto.
The videos you create during the trial will be watermarked, but still downloadable and shareable. If you decide to use Animoto beyond the trial period, there are several pricing plan options. You can purchase as little as one month for around $16 (check their site for current pricing). If you’ve done your prep work like we did in episode 1, you can create several videos in that time period.
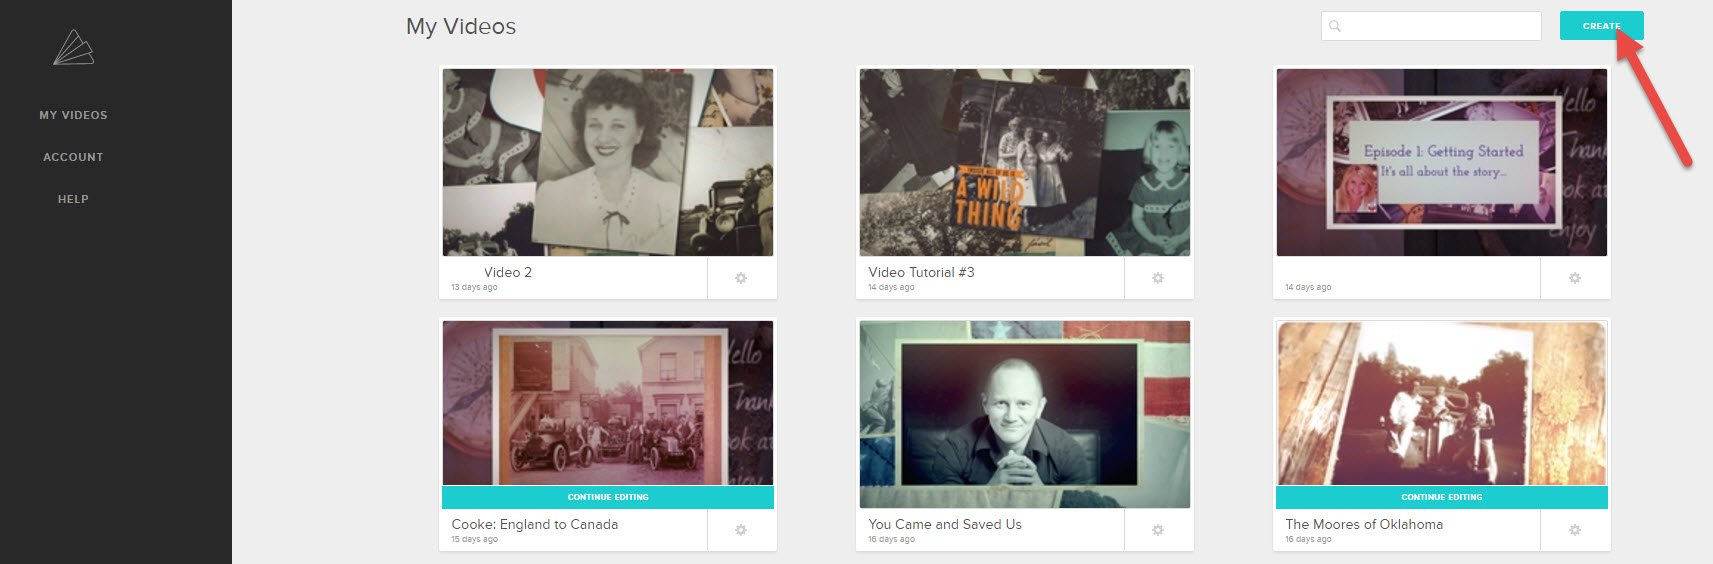
OK, I know you’re anxious to get going, so let’s create a video!
Create!
It’s super easy. Once you’re signed into your account, click the Create button.
Style
First up, select a style that fits your story. Here are some of my favorites for family history:
- Memory Box
- Antique Bouquet
- Remembrance
- Vintage Voyage
- Rustic
You’ll notice that some styles have a Premium banner. Those require a Premium subscription. However, if you’ve opted for a Personal level subscription you still have lots of wonderful styles to choose from.
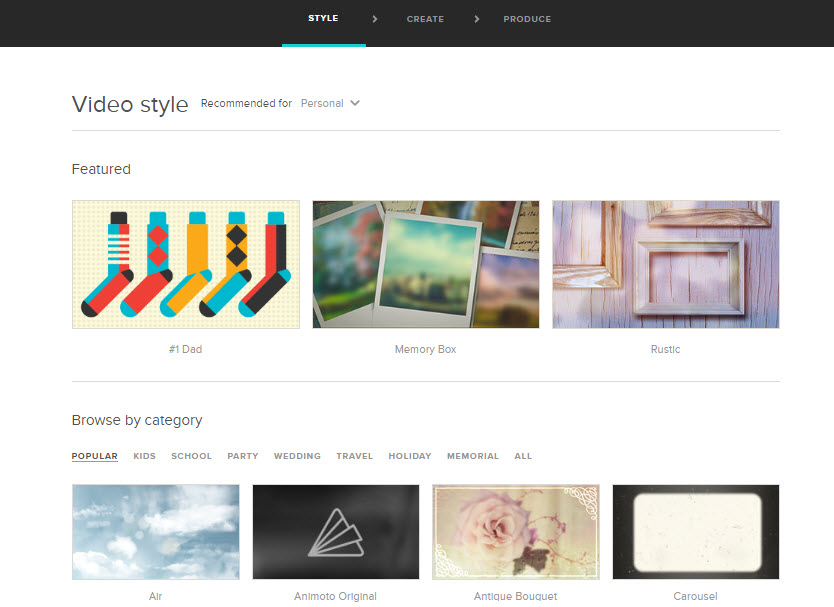
Click on a style that catches your fancy and watch a preview of what it will look like. When you find the one you want, click the Create Video button on that style page. This will load the Video Creator.
Music
The style you chose will include a song, but you can change that if you want to. To select a new song, click Change Song, and you can pick a song from the Animoto library.
You can also upload your own music mp3 file from your computer. (Remember to keep copyright in mind, and make sure you have the rights to use the song.)
But wait, you can add more than music! You can also upload an audio file, such as a family history interview, or even an mp3 file that you created that includes both music and words.
Adding Pictures & Video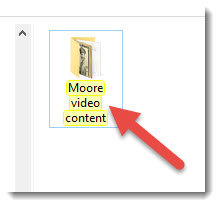
Now it’s time to add your photos, images, and video clips. Of course that’s easy because in episode 1 of this series you created an outline for your story, and you copied the files you wanted to use to illustrate that story into a folder on your computer. So you’re all set to go!
There are two ways to add files. From the menu, click Add Pics & Vids, or on the timeline click the plus sign in the empty box. In the pop up window you’ll find lots of options for imagery, including stock photos from Animoto. But for now, let’s add the images you put in the folder on your drive (see episode 1).
Under Your Computer click Upload Pictures and Video. Navigate your way to your content folder on your computer’s hard drive. Click to select the first image, and then you can select them all by holding down the shift key on your keyboard, and clicking the last image in the folder. Press Enter on your keyboard to add them to your project.
You can rearrange the order of your images and videos by dragging and dropping them with your mouse. If you decide to eliminate an image, simply click to select it and from the menu click Delete.
Text
Next, we’re going to add text to your videos, creating title cards. Again you can do this from the menu, or just click the plus sign in the empty box on the timeline, and then click Add Text.
In the pop up box you’ll type a title (or the main text) and then you have the option to add a subtitle. This is where the outline we created in Video 1 comes in so handy! When you’re done, click Save. And don’t worry because you can always go back and change any text at any time.
Title cards are great for the beginning and ending of your video and also for transitioning to different parts of the story.
Simply click and drag the cards into the order that you want them.
You can also add text captions to each of your images. Hover your mouse over the image and click Caption under the image. In the pop up window containing your image, click to place your cursor in the text area, type in the desired text, and then click Save.
Spotlighting an Item
You may have a few images or title cards that you want the “camera” to spend a little more time on, thereby spotlighting it. To create that effect, just click to the select the image or title card, and then click Spotlight in the menu. I particularly like to Spotlight title cards so that the viewer has plenty of time to read them.
Previewing
So let’s see how this looks so far, and to do that we’re going to click Preview Video. You can preview your video at any time during the production process.
A low resolution version of your family history video will be created in about 15 seconds. Then you can watch and see what little tweaks and changes you want to make. Click Continue Editing to head back to the timeline and keep working.
Next Steps
I hope you’re getting excited about your video projects. Next time we get together, we’re going to bring our projects down the homestretch and produce them into glorious shareable videos.
If you can’t wait and you want to jump in right now and get started, go for it! Click here to get started with Animoto.
Watch episode 2 below: