Resources
- Downloadable ad-free show notes (Premium subscription required Become a Genealogy Gems Premium Member today.)
In this episode, we’re going to be visiting two of the most pivotal states in the U.S. for genealogy research. These states played key roles in the development and expansion of the United States of America, and we’re going to explore a top online resource for each.
First up is the state of Pennsylvania, officially known as the Commonwealth of Pennsylvania. It was founded in 1681 through a royal land grant to William Penn, and established as a haven for religious and political tolerance. And since for over 300 years the port of Philadelphia was a major gateway for arriving immigrants, many many family trees include people who passed through Pennsylvania. One of the best and most important resources for records of interest to genealogists is the State Library of Pennsylvania, and we’ll be exploring it today with Kathy Hale, the Government Documents Librarian, and Amy Woytovich, the Genealogy Librarian at the State Library of PA.
Then we will head west to Ohio which joined the union back in 1803, and where many of our ancestors settled, or passed through on their way West. The Ohio Memory website is a rich source of historical materials that tell the story of this state and potentially many American families. Jenni Salamon, the Ohio Memory Digital Services Manager will be joining me to explain the depth of the available materials and provide insight into how to best navigate the website.
The library has been a federal repository library since 1858, and is one of the oldest in the country. The government printing office deposits materials here.
The State Library of Pennsylvania physical collection includes:
The State Library of Pennsylvania digitized items include:
Pennsylvania Documents
Example: a report for Pennsylvania of the 25th and 50th anniversaries of the Battle of Gettysburg. Includes information gathered at reunions including names, pictures, and more.
U.S. Government Documents – Serial Set
This collection includes reports to the legislature from agencies and institutions. Example: The Daughters of the American Revolution (DAR) were compelled to provide to Congress a yearly report of the names of people approved by DAR. These can be accessed through many libraries, the federal government or by contacting the State Library of Pennsylvania via email: Ra-reflib@pa.gov
Amy discusses research guides available on the website. However, here is the link to the topics she specifically mentions such as Cemeteries and Zeamer collection – recorded information about Cumberland County PA cemeteries.
These research guide pages include links to additional helpful websites.
At the top of the page look at the For General Public tab which will take you to all of the genealogy research guides. Visit the Genealogy page at the State Library of Pennsylvania.
The library’s collection of newspapers includes papers from all 67 Pennsylvania counties on microfilm. They do have a lot of digitized newspapers at the Pennsylvania Photos and Documents Collection at the Power Library.
You can find the Power Library by going to the libraries home page, and under the For General Public tab go to Our Collections > Power Library. Or visit the Power Library website at Powerlibrary.org.
Electronic Databases: you have to be a resident with a library card.
Digital Documents: you don’t have to be a Pennsylvanian to access this collection.
At the top of the Power Library home page on the right you’ll find Digital Docs and Photos.
There you will find many materials from Pennsylvania colleges including yearbooks. You can browse by subject area, with Genealogy being one of those areas.
At the time of the interview the library was not open for interlibrary loan and lookups. Check the website for the latest updates.
The library does loan its newspaper microfilm. Up to 5 reels of microfilm per request. Kathy says that if you find a newspaper article at Newspapers.com and you see the title, date and the page that an article is on, you can provide the information to the interlibrary load reference librarian at your local library and place a request for a scan of the article from the State Library of PA microfilm. The article can then be returned to you digitally through interlibrary loan. The digitized scan is yours to keep.
Amy’s Pick: Historic maps found at the library’s website Home > For General Public > Genealogy and Local History > Maps and Geographic Information. This includes Sanborn Fire Insurance Maps. Note: log in with a library card may be required. Contact the library with questions.
Kathy’s favorite collections include:
Usage rights and copyright are important considerations when utilizing library materials. Usage depends on the individual item’s copyright. It should be researched as much as possible. Check the meta data of digital images for copyright information.
“Think of Amy and I as your personal librarians.” Kathy Hale, Librarian
Contact State Library staff by phone at 717-787-2324 or by email at:
Learn More About the State Library of PA Collections
In episode 43 of Elevenses with Lisa we discussed genealogy records available for free at the Internet Archive. The State Library of Pennsylvania has been partnering with he Internet Archive to digitize many additional items from their collection. You can access these items for free at the State Library Internet Archive Collection. This collection includes a large number of World War I materials as well as a growing number of 19th and 20th century pamphlet volumes.
Maps for Genealogy
At the website go to Home page > General Public Tab > Our Collections > Search our Resources
On the map viewer page, click the thumbnail button (looks like a checkerboard) to see multiple pages at a time. You’ll find the Download button in the bottom right-hand corner. The Print button is in the upper right corner.
Cite your source: Go back to the result page, and scroll down. Click the red button called Cite This. This allows you to copy the source citation which you can then paste into other documents and programs.
Newspapers for Genealogy
The Library of Congress Chronicling America website has many Pennsylvania old newspapers, but it doesn’t include all of the newspaper that the library has in its collection. Here’s how to find old Pennsylvania newspapers at the State Library website:
This tip comes from my book The Genealogist’s Google Toolbox and my Premium Membership video The Genealogist’s Google Search Methodology.
Many websites have their own search engine. However, each search engine is only as good as it was programmed. If you can’t find what you want on a website like the State Library PA website, try using a Google site search. Site search tells Google to search for your search terms only on the website you specify. Here’s how to do it:
In my example in the video, you can see that Google found the one page mentioning the surname in a listing of microfilms much faster than I would have found it digging around and navigating the website itself. This page was not a card catalog entry so it would not have come up in a search of the catalog on the website.
On long pages such as in my example, I use Control + F (Windows. Command + F on Mac) to quickly find the surname on the page.

Website: https://ohiomemory.org
Special Guest: Jenni Salamon, Ohio Memory Digital Services Manager
If your family has any connection with the state of Ohio – and sometimes I think it’s hard to find anyone who doesn’t have at least one ancestor who did – then you’re going to love the Ohio Memory collection and website.
Even if you don’t have a direct connection with the state of Ohio, like all collections it’s worth taking a peek. Records don’t care about state lines, and many items in the Ohio Memory collection touch far beyond the Ohio border.
OhioMemory.org was featured in Family Tree Magazine’s 75 Best State Genealogy Websites list in a recent issue of the magazine. I host the Family Tree Magazine podcast, and recently had the opportunity to interview Ohio Memory’s Digital Services Manager, Jenni Salamon for that audio show. Since there’s so much to see at Ohio Memory I’m excited to share the video of that conversation.
Ohio Memory is the collaborative digital library program of the Ohio History Connection and the State Library of Ohio. Established in 2000. It was originally established as a bicentennial project they wanted a way to capture some of Ohio’s history and share it more broadly. Ohio turned 200 years old in 2003.
Ohio Memory worked with institutions around the state to build the online collection. They picked their favorite collections which were then digitized and made available as an online scrapbook. Initial submission by 260 institutions resulted in over 13,000 contributed items, and Ohio Memory continues to grow.
Most of the contributing organizations are public libraries, and some are university libraries. Other organizations such as historical societies, government institutions, special libraries, religious archives also contribute to the collection.
A wide-variety of materials make up Ohio Memory including:
All 88 Ohio counties are represented in the Ohio Memory collection.
Everything at Ohio Memory is digital and keyword searchable thanks to Optical Character Recognition (OCR). However, they do sometimes connect back to other catalog records.
When you use the search box on the home page you will be searching both the text and the metadata provided by the contributor. If you want to search just visual items (photos, images, etc.) select “exclude full-text sources.”
It’s important to use keywords relevant to the time period that you are searching. Restrict your format to what you want right from the homepage.
The newspaper collection of Ohio Memory does not overlap with the Library of Congress’ Chronicling America collection, but they are all part of the same story and collection. They have contributed a large amount of newspapers to Chronicling America over the years. At last count there are a million pages between the two collections.
Ohio Memory focuses on titles and time periods different from the content on Chronicling America. At Ohio Memory you’ll find deeper runs of newspapers and more recent newspapers. New newspaper content is being added regularly.
They also have some very early newspapers that are significant to Ohio history such as the Ohio State Journal which was the paper of record for Ohio during the 19th century. The Ohio State Journal collection covers 1830-1875 an important time period in Ohio’s growth and the Civil War.
The Lebanon Western Star newspaper from southwest Ohio near Cincinnati and Kings Island is another important newspaper. It covers Ohio history from a more rural area.
A lot of Ohio Memory’s public library partners have access to yearbook collections through their partnerships with local schools. Many have worked to digitize their materials and put them on Ohio Memory. Some are quite early, some more recent although not very recent due to privacy concerns.
Many of the yearbooks at Ohio Memory come from northwest and northeast Ohio. You’ll also find student histories from southwest Ohio from a couple of universities, as well as other related materials such as student photos.
Yes! They used to have one collection that was behind a pay wall. That was the Underground Railroad Wilbur H Siebert collection which features information about underground railroad activities in Ohio and beyond. It’s a strong resource for looking at research methods of the era, and the stories of how the underground railroad operated. That collection was opened up a couple of years ago and has remained free.
Videos, an FAQ and search guides are available to help you learn how to dig into the Ohio Memory website. You can also reach Ohio Memory by email for additional assistance.
They continue to digitize and add new materials based on their strategic goals. Recently they focused on President Warren G. Harding since it is the 100th anniversary of his election. They are continuing to add more content to that collection.
Ohio Memory has about 40 active partners around the state that are choosing items from their own collections for inclusion. Examples include Wood County in northwest Ohio, Mount Saint Joseph University and the Sister of Charity in the Cincinnati area. They welcome new partners every year.
While you may or may not find things specifically about your ancestors, Ohio Memory offers a wonderful opportunity to find things that help fill in their story and their community.
You are free to use items for educational and personal use without needing extra permission. If you’re a family historian and you are wanting to put a picture in a presentation for your family or you just want to keep it with your own research records, you are welcome to do so.
Jenni Salamon, Ohio Memory’s Digital Services Manager says that if you want to post something on social media, simply include a link back to the Ohio Memory site so others know where it came from Ohio Memory. If you want to use an item for a formal publication or commercial use, contact Ohio Memory. Copyright varies by item and research is required.
Fort Wayne, Indiana is the home of the second-largest free genealogy library in the country. Make your plans to visit today. Learn more at https://www.visitfortwayne.com

Learn more about the free genealogy resources atVisitFortWayne.com
Premium Members have exclusive access to:
Become a member here.
Don’t miss the Bonus audio for this episode. In the app, tap the gift box icon just under the media player. Get the app here.
The Genealogy Gems email newsletter is the best way to stay informed about what’s available with your Premium eLearning Membership. Sign up today here.
One thing that many genealogists have in common is a connection to Pennsylvania. Perhaps one of your family tree branches extends back to the early founding of the Pennsylvania colony. Or it may be that one of your ancestors was one of the hundreds of thousands who arrived through the port of Philadelphia. Even if you don’ t have Pennsylvania ancestors the State Library of Pennsylvania has a lot to offer.
Genealogy at the State library of Pennsylvania
In this episode I’ll be sharing with you a video of my interview with two librarians from the State Library of Pennsylvania. We’ll discuss their collections and specifically what’s available through their website. After the interview I’ll show you some specific search techniques that you can use at the State Library of Pennsylvania website, including a trick that you can use with any state library website.
My special Guests from the State Library of Pennsylvania:
Kathy Hale, Government Documents Librarian
Amy Woytovich, Genealogy Librarian
State Library of Pennsylvania Website
Genealogy at the State Library of Pennsylvania
This interview was recorded in December 2020. Here’s the latest update (as of this writing) on the library closure and access:
The library has been a federal repository library since 1858, and is one of the oldest in the country. The government printing office deposits materials here.
The State Library of Pennsylvania physical collection includes:
The State Library of Pennsylvania digitized items include:
Pennsylvania Documents
Example: a report for Pennsylvania of the 25th and 50th anniversaries of the Battle of Gettysburg. Includes information gathered at reunions including names, pictures, and more.
U.S. Government Documents – Serial Set
This collection includes reports to the legislature from agencies and institutions. Example: The Daughters of the American Revolution (DAR) were compelled to provide to Congress a yearly report of the names of people approved by DAR. These can be accessed through many libraries, the federal government or by contacting the State Library of Pennsylvania via email: Ra-reflib@pa.gov
Amy discusses research guides available on the website. However, here is the link to the topics she specifically mentions such as Cemeteries and Zeamer collection – recorded information about Cumberland County PA cemeteries. General Research Guides page. These research guide pages include links to additional helpful websites.
At the top of the page look at the For General Public tab which will take you to all of the genealogy research guides. Visit the Genealogy page at the State Library of Pennsylvania.
The library’s collection of newspapers includes papers from all 67 Pennsylvania counties on microfilm. They do have a lot of digitized newspapers at the Pennsylvania Photos and Documents Collection at the Power Library.

Newspapers at the Power Library
You can find the Power Library by going to the libraries home page, and under the For General Public tab go to Our Collections > Power Library. Or visit the Power Library website at Powerlibrary.org.
At the top of the Power Library home page on the right you’ll find Digital Docs and Photos:
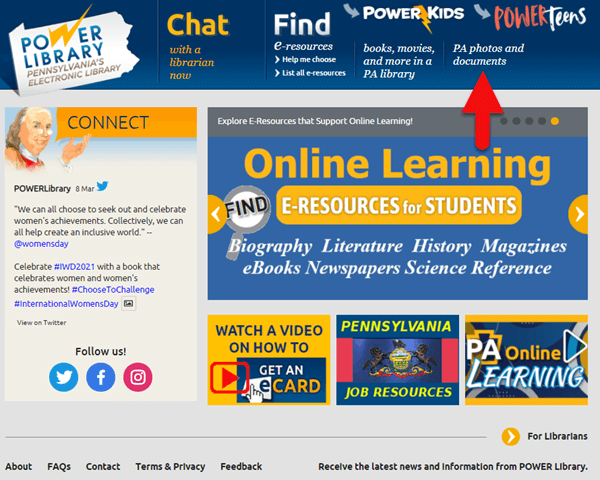
Pennsylvania Photos and Documents Collection at the Power Library.
There you will find many materials from Pennsylvania colleges including yearbooks. You can browse by subject area, with Genealogy being one of those areas.
At the time of the interview the library was not open for interlibrary loan and lookups. Check the website for the latest updates.
The library does loan its newspaper microfilm. Up to 5 reels of microfilm per request. Kathy says that if you find a newspaper article at Newspapers.com and you see the title, date and the page that an article is on, you can provide the information to the interlibrary load reference librarian at your local library and place a request for a scan of the article from the State Library of PA microfilm. The article can then be returned to you digitally through interlibrary loan. The digitized scan is yours to keep.
Amy’s Pick: Historic maps found at the library’s website Home > For General Public > Genealogy and Local History > Maps and Geographic Information. This includes Sanborn Fire Insurance Maps. Note: log in with a library card may be required. Contact the library with questions.
Kathy’s favorite collections include:
Usage rights and copyright are important considerations when utilizing library materials. Usage depends on the individual item’s copyright. It should be researched as much as possible. Check the meta data of digital images for copyright information.
“Think of Amy and I as your personal librarians.” Kathy Hale, Librarian
Contact State Library staff by phone at 717-787-2324 or by email at:
At the website go to Home page > General Public Tab > Our Collections > Search our Resources.
On the map viewer page, click the thumbnail button (looks like a checkerboard) to see multiple pages at a time. You’ll find the Download button in the bottom right-hand corner. The Print button is in the upper right corner.
Cite your source: Go back to the result page, and scroll down. Click the red button called Cite This. This allows you to copy the source citation which you can then paste into other documents and programs.
The Library of Congress Chronicling America website has many Pennsylvania old newspapers, but it doesn’t include all of the newspaper that the library has in its collection. Here’s how to find old Pennsylvania newspapers at the State Library website:
This tip comes from my book The Genealogist’s Google Toolbox and my Premium Membership video The Genealogist’s Google Search Methodology.

Available at the Genealogy Gems store.
Many websites have their own search engine. However, each search engine is only as good as it was programmed. If you can’t find what you want on a website like the State Library PA website, try using a Google site search. Site search tells Google to search for your search terms only on the website you specify.
In my example in the video, you can see that Google found the one page mentioning the surname in a listing of microfilms much faster than I would have found it digging around and navigating the website itself. This page was not a card catalog entry so it would not have come up in a search of the catalog on the website.
In episode 43 of Elevenses with Lisa we discussed genealogy records available for free at the Internet Archive. The State Library of Pennsylvania has been partnering with he Internet Archive to digitize many additional items from their collection. You can access these items for free at the State Library Internet Archive Collection. This collection includes a large number of World War I materials as well as a growing number of 19th and 20th century pamphlet volumes.