We are bringing you Irish historical photographs from Dublin this month in celebration of Irish heritage. Search these amazing photos of your ancestral homeland. Also this week, directories from Scotland, church records of the United Kingdom, and censuses for Canada and New York State.
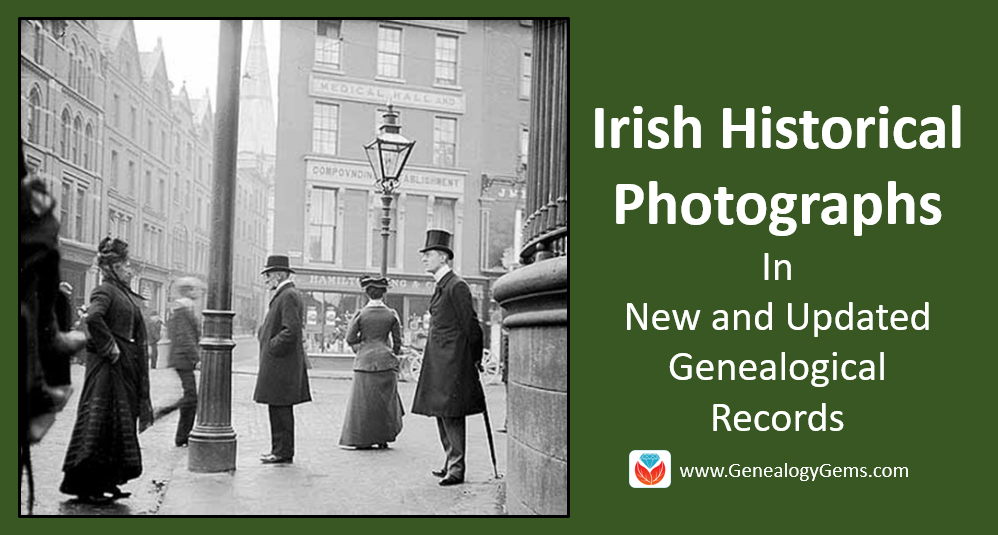
Ireland – Dublin – Irish Historical Photographs
The Dublin [Ireland] City Council has launched an online archive of over 43,000 Irish historical photographs and documents to their website. These amazing photographs can be searched by archive, date, or location for free. They show images of events like the Eucharistic Congress and the North Strand Bombing. There are also images of football games, bus strikes, and old Dublin streets.
These Irish historical photographs includes pictures of old documents and objects, too, with the oldest document dated to 1757!
You’ll love these two quick-guides by Donna Moughty on Irish genealogy. Guide #1 titled Preparing for Success in Irish Records Research will help you determine a birth place, differentiate between persons with the same name, and walk you through identifying helpful US records.
Guide #2 titled Irish Civil Registration and Church Records, will guide you through locating Protestant church records, civil registrations, and more. It will also walk you step-by-step through using the new online Civil Registration records.
Scotland Post Office Directories contains over 382,000 records and allows you to explore thousands of pages of directories to learn more about the life and work of your Scottish ancestors. This Findmypast collection focuses on a particular town or district although a number of national postal directories are also included. The majority comprise a description of the place along with lists of people by occupation. For example, you will find lists of magistrates, councilors, sheriffs, police officers, and merchants.
The records are do not contain transcripts, but do include a digital image. The detail you will find on each page will depend on the type and date of the directory.
In conjunction with these post office directories, there are some that are browse-image only. They have not been indexed at this time. These 598 volumes of the Scotland Post Office Directories Image Browse are an excellent source for family history and those who need to trace their ancestors on a yearly basis.
Canada – 1842 Census
The Lower Canada Census 1842 at Findmypast contains over 46,000 records. The Province of Lower Canada was a British colony on the lower Saint Lawrence River and the shores of the Gulf of Saint Lawrence between 1791 and 1841. It covered the southern portion of the modern-day Province of Quebec and the Labrador region of the Province of Newfoundland and Labrador.
Each search result will include an image of the original document and a transcript. The original returns were printed in French and English and transcripts may include occupation, language, residence, and the number of inhabitants at their dwelling. Images can provide detailed information about the local area such as number of inhabited and uninhabited buildings, the number of barley mills, tanneries, distilleries, the price of wheat since last harvest, and the price of agricultural labor per day.
United Kingdom – London – Russian Orthodox Church Records
Findmypast has added records to their collection titled Britain, Russian Orthodox Church in London. Over 13,000 records taken from volumes of birth, marriage, and death records from the Russian Orthodox Church in London in exist is this collection. The records further include correspondences, congregational records, and church documents. The majority of the volumes are written in Russian although a limited number of English-language records are available.
The Russian Orthodox Church records are available as a browse set only at this time. You will need to search the records by the document description such as Births, marriages, deaths, converts, and passports, 1888-1919 or Donations to St Petersburg Guardianship for Poor Clergymen, 1863. Then, search within the digitized volume to find your ancestor.
You will find numerous correspondences with other church leaders in London, America, Russia, and Japan, as well as documents related to religious doctrine. The facts found in each volume will depend on the type of record you are viewing. Birth, marriage, and death records will typically include the individual’s name, event date, and place, while birth and marriage records may also include the names of the individual’s parents.
United Kingdom – War Records
New records have been added to the Findmypast collection of Anglo-Boer War Records 1899-1902. This unique database of more than 470 sources may reveal the unit your ancestor served with and any medals, honors, or awards they won. The register also contains a completely revised casualty list of 59,000 casualty records.
Each record contains a transcript and may include the following information:
Name
Service number and rank,
Unit & regiment
Medals, honors or awards received
Memorials relating to death if applicable
United Kingdom – England – Births and Christenings
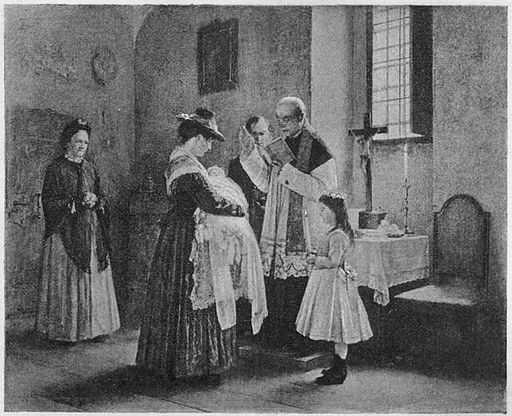
By Anton Laupheimer [Public domain], via Wikimedia Commons
Though this collection from FamilySearch has been available for awhile, they have recently added more records. The England Births and Christenings, 1538-1975 now totals over 68 million records. There are some important tips and known problems with this database. Before searching, be sure to read the details at the FamilySearch Wiki, here. As an example: In birth or christening records, if a surname is not listed for the child, the indexer often assigns the father’s surname to the child. This surname may not be correct. So if you are looking for a birth or christening, search by the given name of the child, adding parents’ names and as much locality information as is permitted.
United States – New York – State Census
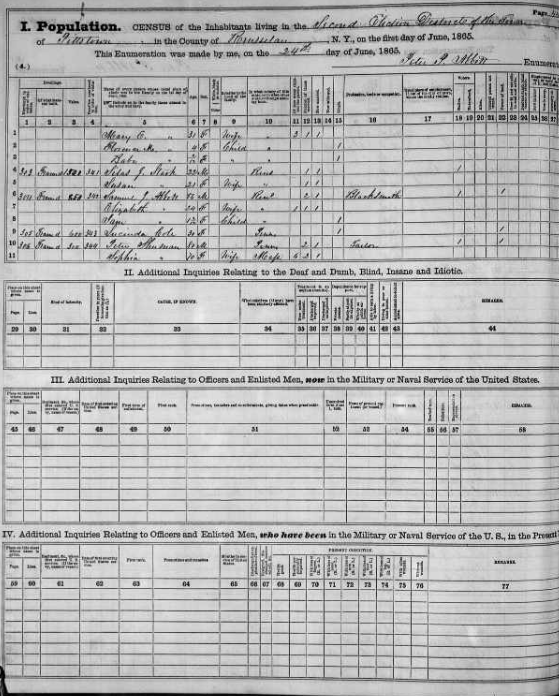
FamilySearch has added to the New York State Census of 1865 this week. State censuses are particularly helpful to researchers because they fill in the gap between federal censuses. Unfortunately, the following counties are missing:
Allegany
Clinton
Franklin
Genesee
Hamilton
New York
Putnam
Queens
Seneca
St Lawrence
Sullivan
Westchester
Wyoming
The population schedule includes the name, age, birthplace, and occupation of each household member as most censuses do.
However, this census also includes two military schedules with information of officers and enlisted men currently in the military and men who had served in the military. This census contains information on when and where the individual first entered the military, rank, how long they were in the service, their present health, as well as several other items.
Additionally, the census contains tables on marriages and deaths occurring during the year ending June 1, 1865. These tables contain typical marriage and death information, but can be a helpful resource for those who have been unable to find these records in traditional locations.
Lastly, a second table entitled deaths of officers and enlisted mencontains deaths of individuals which had occurred while in the military or naval service of the United States, or from wounds or disease acquired in said service since April, 1861, reported by the families to which the deceased belonged when at home. It includes the name of the deceased, age at death, if married or single, if a citizen, several items relating to military information, date of death, place of death, manner of death, survivors of the deceased, place of burial and any remarks.
Do you use digital archives in your genealogy research? You should! Check out these new digital archives relating to notable women in the U.S. and Sweden; Scottish WWI hospital records; the WWI Armenian genocide; Ohio; Irish-Americans; and African-American military...
Here’s our link for purchasing your copy of Snagit (screen clipping tool) Thank you for using our link. Use coupon code GENE15 to get 15% off.(We will be compensated at no additional cost to you, which makes the free Elevenses with Lisa show and notes possible.)
You’re going to learn:
What Snagit does and the problems it can solve for you as a genealogist!
How to screen capture using Snagit
Amazing advanced new features you didn’t know Snagit had and how to use them.
How to do scrolling and panoramic screen clipping (perfect for family trees, historic maps, long web pages and so much more.)
How I specifically use it for my genealogy research.
Add my YouTube channel to your “Favorites” list on YouTube:
Click here to add my channel to your YouTube favorites. Clicking the red “Subscribe” button at the Genealogy Gems YouTube channel will add my channel to your YouTube library which makes it super easy to return to my channel and Elevenses with Lisa any time you’re on YouTube.
How to Use Snagit
One of the things that we all work really hard to do is solve family history mysteries. And as we do that, we are finding all kinds of goodies. But the trick is that we have to capture them. Right? If we don’t, then we may end up losing the trail.
Last week, we talked about citing the sources that we find. This week, we’re going to be capturing our findings in a very visual way, and actually incorporating those source citations. And we’re going to be doing it with the tool that I really absolutely use every single day. And that’s Snagit.
The Image-Capturing Challenges that Genealogists Face
To understand the value of a tool we need to make identify the problems we face and see how it solves them. Here are some of the challenges genealogists face when it comes to capturing images:
We don’t need or want to save the whole page. (Why waste all that ink printing it or storage space saving it?) We may not want to download or copy an image from an unknown website. (No one wants to accidentally put a virus on their computer!)
The page in its entirety is blurred when printed. (This often happens with newspaper pages.)
We need to capture a very long or wide page that can’t be displayed in its entirety on the screen.
We want to annotate or add a citation to the source image.
It takes extra time to save to items to your computer and then add them to other documents in other programs.
Do you identify with some of these challenges? I sure do.
Let’s say that you find an article, a document, or something else, and you want to add an annotation. Maybe you want to add the source citation, a watermark, or just notes to yourself directly onto the image.
It would be time-consuming to clip the image with perhaps the free snipping tool that comes on your computer and save it to your hard drive, and then pull it into another program to annotate it. I don’t know about you, but there’s never enough time for family history so anything that we can do to save time, means we’re going to be able to spend more time with ancestors.
The solution is using Snagit.
Snagit Functionality
Here are just some of the things that Snagit can do:
“Capture” items that appear on your screen
Create videos with audio (Create > Video from Images)
Edit images (You can edit clipped and imported images and photos. You can also send screen shots automatically when using your computer’s snipping tool.)
Convert text on an image to typed text (Grab Text)
Create documents using templates (Create > Image from Template)
“Share” items to other programs with one click.
I have found that snag is so robust, and it has so many different options, I still can’t exhaust all the things that it offers me. But it’s also simple. It’s simple in the way that you use it. It certainly solves simple, everyday problems. And most importantly, it is a program that I can use not just for genealogy, but also for my business and personal use. I like to have tech tools that serve me across the board, if possible, because it takes time to get up to speed on any program. If you’re just getting programs that are only for genealogy, then you end up needing a second program to be able to do similar things in other parts of your life. Why not find tech tools that can serve you across the board. That’s what certainly Snagit does. So, while I’m focusing on showing you genealogical applications for using Snagit, just know that if you’re new to family history, or you stumbled across us this article, and you don’t do genealogy, you’re going to be able to use Snagit for just about everything.
How to Get Started with Snagit
Purchase the software
Download and install
Open it and let it run in the background so you have easy access from your task bar
Yes, there may be a snipping tool built into your computer, and you can use Print Screen. Snagit can blow them away.
How to Capture a Screen Image with Snagit
Display the desired page on your screen
Click the orange Snagit icon in your task bar (Snagit should be running in the background on your computer.) This is the Capture If you don’t see it, click the blue Snagit icon to open the editor and then click the red circle Capture button at the top of the program. After your first capture, the orange Capture icon will then be open and available in your task bar.
Select the Image tab
Set the Selection to Region
Click the large red Capture button
Use your mouse to draw a box around the desired area. You may see flashing arrows. If you click one you will be ablet to scroll that direction to capture more of the page.
When you release your mouse the image will appear in the Snagit editor.
Sometimes we find an item that is larger than is visible on the screen. The page may scroll side to side or up and down. Use Scrolling capture to capture everything in one piece.
How to Scrolling Capture with Snagit
Display the desired page on your screen
Click the orange Snagit icon in your task bar
Select the Image tab
Set Selection to Scrolling Window
Click the large red Capture button
You will see flashing arrows. Click the arrow pointing in the direction that you want to scroll in Snagit will automatically scroll down and capture. Click Stop at any time if you don’t want to capture the entire page.
When you release your mouse the image will appear in the Snagit editor. You can then trim all sides by simply grabbing the handles and dragging.
In some situations you will need more flexibility in your scrolling. Panoramic capture allows you to select the region and then scroll manually, capturing exactly what you want to capture. Think of it as image capture and scrolling capture merged together. Panoramic capture allows you move both up and down and side to side.
How to Panoramic Capture with Snagit
Display the desired page on your screen
Click the orange Snagit icon in your task bar
Select the Image tab
Set Selection to Panoramic
Use your mouse to draw a box around the desired area
When you release your mouse a panoramic capture bar will appear. Click the Start button to being your panoramic capture.
Click in the captured image area and drag the image as needed. The more precise you are in your movement the better the final image will be. You can move in any direction.
When you release your mouse the image will appear in the Snagit editor. You can then trim all sides by simply grabbing the handles and dragging.
Panoramic captures work great for large items like maps, online family trees and newspaper articles just to name a few things. If you zoom out in order to capture these types of items in their entirety you will end up with a blurry item when you zoom in for a closer look. Panoramic solves this problem.
Let’s discuss a few more options for capturing hard to clip items like newspapers. Sometimes, the article you need is continued on a different page or column. With Snagit you can capture the individual pieces and then combine them.
How to Combine Captured Images with Snagit
Capture each section of the article individual using Image Capture (Region)
In the Snagit editor press Control / Command on your keyboard and click each item you want to be included in the combined image.
Press Control + Alt + C on your keyboard or at the top of the screen click Create > Image from Template.
Select the desired page layout. Custom Steps or Steps Portrait works well for articles.
Click on any items (such as numbered steps) and press delete on your keyboard to remove them.
The combined image can then be saved to your computer or shared to another program.
Editing and Highlighting Images
There are many ways to annotate and edit images (both captured and imported) in Snagit including adding:
arrows
text (perfect for adding source citations directly onto the image
call outs
shapes
stamps (Images on images)
lines
squiggles and drawing
step by step numbering
You can also modify images by cutting out portions, blurring and erasing areas, and even magnifying an area on the image!
Snagit Advanced Features and Strategies
Once you’ve mastered the basics there are many more ways to use this tool to power-up your genealogy research. Here are a few more ideas we covered in the video.
How to Grab Text from an Image with Snagit
Option 1 – Grab text from existing image:
Select the image in the editor so that it is displayed in the editing area
In the menu Edit > Grab Text. This will grab all of the text that appears in the image. If you only want a portion of it, click the Selection tool at the top of the screen and draw a box around the area you want to grab the text from.
The converted text will appear in a pop-up window
Copy the text to your computer’s clipboard by clicking Copy All.
Paste wherever you want the text to appear (another document, etc.)
Option 2 – Grab Text While Clipping:
Display the desired page / item on your screen
Click the orange Snagit icon in your task bar
Select the Image tab
Set the Selection to Grab Text
Click the large red Capture button
Use your mouse to draw a box around the desired area. You may see flashing arrows. If you click one you will be ablet to scroll that direction to capture more of the page.
When you release your mouse the image will appear in the Snagit editor. The converted text will appear in a pop-up window
Copy the text to your computer’s clipboard by clicking Copy All.
Paste wherever you want the text to appear (another document, etc.)
Grab Text from Windows Not Easily Copied
We’ll use the example of copying the titles of computer folders into an Excel spreadsheet. Open your file explorer and navigate to the desired folders. Since a mouse can’t be used to copy all the names in one swoop, we will use Option 2 – Grab Text While Clipping instructions above.
Create Videos with Snagit
You can compile separate images into a video and add voice narration.
In the editor select Create > Video from Images
Click to select the first image in the tray
Click the microphone button in the video recording bar if you want to record narration.
Click the Webcam button if you want to appear on screen
Click the red Record button to begin recording.
Click each image in the order desired for the amount of time you want it to appear on the screen.
Press the Stop button when done.
How to Create a Timeline with Snagit Templates
In the editor add images either by importing (File > Import) or capturing
Select the images to be include by holding down the Control / Command key and clicking on them
Create > Image from Template
Select the timeline template
Add a title and captions as desired
Click the Combine button
Productivity with Snagit
One of my favorite features of Snagit is how easy it is to share items to other programs directly instead of having to save them first to my computer. It’s easy to do. Simply select and display the image to be shared and in the menu go to Share > and select the program.
Every genealogist has experienced the frustration of clicking on a link and discovering that the page is gone or the resource is now defunct. Things change rapidly as technology evolves, so it’s a problem that isn’t going away any time soon.
Genealogy Gems Podcast listeners often ask what to do when they run across a broken or defunct website in the show notes of older episodes of The Genealogy Gems Podcast. I’ve got answers for you today that can help you get back on track whenever this happens to you.
I received this email from a listener of the free Genealogy Gems Podcast, and it’s one I’ve received from lots of listeners and genealogists alike:
“As one of your podcast listeners who is working my way through past episodes, I am running into a bit of frustration that I am wondering if you, on someone else reading this, can help me on. I have tried to get to a couple of websites that guests of yours mentioned, with no success. (I’m listening to episodes from) 2010, where I am at now, (and that) may not be all that long ago for many, but it is an eon in internet terms.
Are you, or anybody else reading this, aware of any person or site tracking genealogy related websites that records/posts notations of name changes, buy-outs by other service providers, or just plain disappearances? You might have mentioned some in the interim, but I’m still a hundred episodes in arrears.”
That’s the wonderful thing about podcasts, you can listen when the episode is published or even a decade later. That’s because podcasts, unlike radio shows, are recordings that you can access whenever it’s convenient for you. But my listener is correct, things change quickly online, and that includes website links I refer to in the show notes web pages of older episodes.
How to Find Information When a Website has Disappeared
I love hearing that listeners are enjoying the free Genealogy Gems Podcast archive. We hear over and over that our listeners pick up something new each time they listen. However, I completely understand the frustration of encountering defunct websites and resources. What a bother they are!
Unfortunately with the speed at which online information changes, it’s just about as impossible to keep years of web content current (while still producing new content) as it is finding a genealogy record that burned in a courthouse fire!
The good news is that with a little persistence, you can probably locate where a source has moved to or find alternatives that may provide the same function. Paying attention to clues and details around the original source itself can lead you to alternatives that can accomplish the same goals or provide the same or similar information. And of course, tracking down information that’s gone missing is certainly a valuable skill in all areas of genealogy!
Here are a few great strategies to help you find information when a website has disappeared:
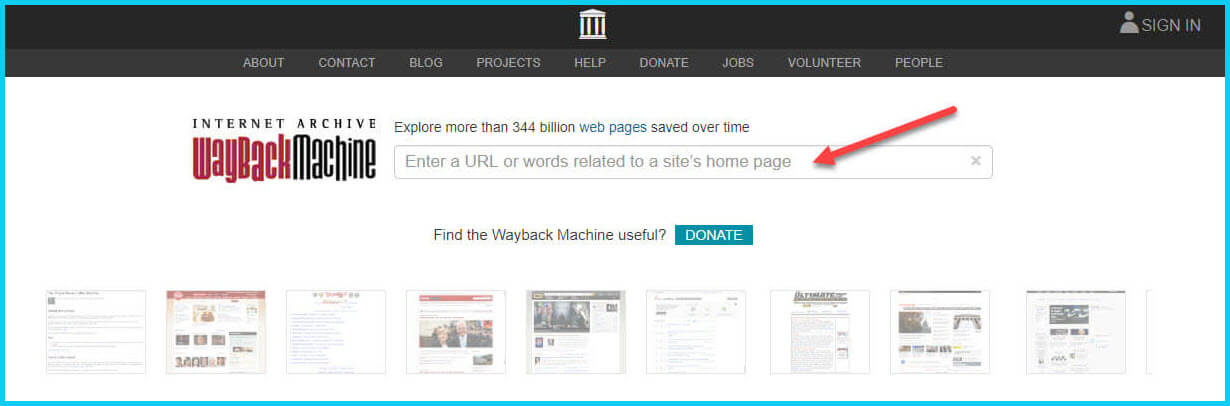
1. The Wayback Machine Can Find Defunct Sites
1) If you run across a link to a now defunct site, copy the website link. Next, go to the Internet Archive at https://web.archive.org and paste the web address that you copied into the Wayback Machine search field. Press enter on your keyboard to run the search on that address. You may very likely be able to retrieve a screenshot of the page.
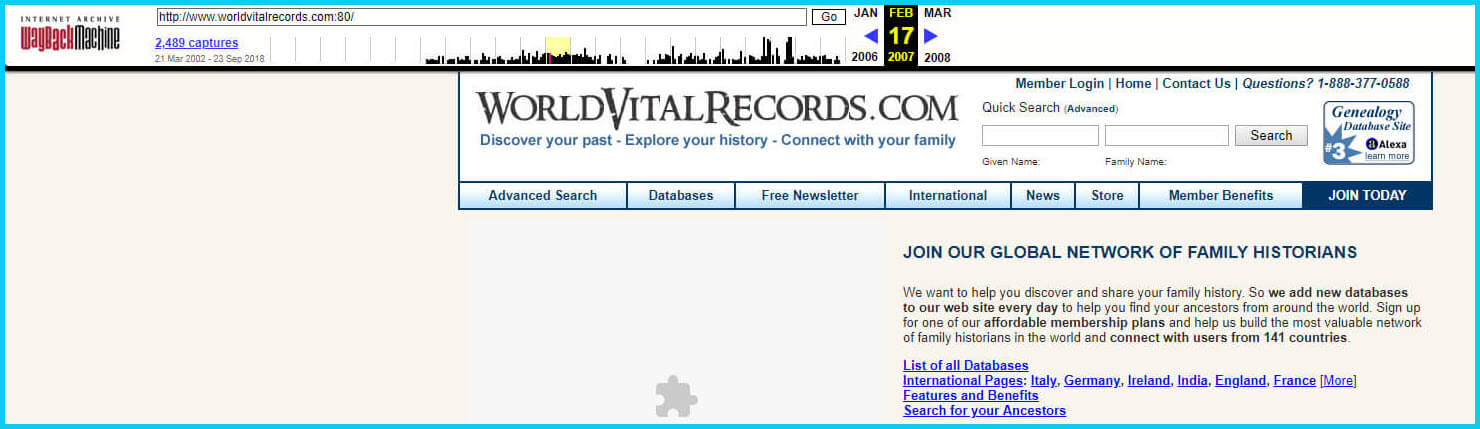
If you’ve been researching your family history for several years, you’ll probably recognize the screenshot of World Vital Records (below) at the Wayback Machine.
You may not gain access to everything that was there originally, but you’ll very likely glean clues that you can use to find the information you seek on another website using a Google search.
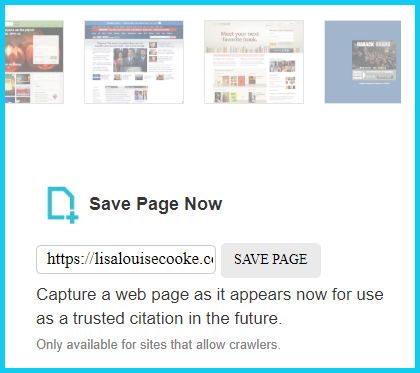
One of the features most recently added to the Wayback Machine is the Save Page Now tool. This helps you capture web pages and add them to the Wayback Machine at the time that you find them. That way, even if the site goes away, you’ll have a copy of the web page for future reference.
This tool works on any web page that allows “crawlers”, which most sites do. Crawlers are used by sites like Google and the Wayback Machine to index information and capture the pages.
To save a web page using the Wayback Machine, copy the web page’s address and paste it into the Save Page Now field. It will bring up the page in your browser and show you that it’s being processed and will be added to the Wayback Machine.
The page will be conveniently stamped with the date that it was captured. This is helpful because even though websites may stay online for years to come, the content on their pages may be changed over time. By using the Save Page Now feature and adding the web page to the Wayback Machine, you will be able to revisit the information that was on that page on that specific date well into the future, regardless of changes that may be made to it over time.
2. Google Your Question
You’ve heard me say it many times: Just Google it!And that certainly applies here. Google is great at finding alternative sources for the same information. No question is a dumb question when it comes to Google.
If you are running into a challenge with a defunct site or have a question, chances are someone else has had the same question! It may have been posted on a message forum, a blog post or the help section of a website. Google can help you find the question and the answers that were provided.
Let’s say you come across a link to the World Vital Records website in the syllabus of a class you took several years ago. (If you’ve been researching your family history for a while, then you probably remember this genealogy records website.) And imagine that when you type the link into your web browser, you discover that the link is broken and the website no longer exists.
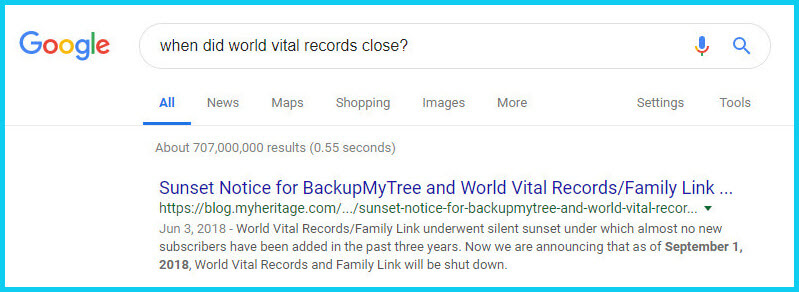
Here’s an example of what you could ask Google in order to find out what has happened to the World Vital Records website:
When did world vital records close?
Sunset notice for World Vital Records
Who acquired World Vital Records?
As you can see in the example search in the image above, the sunset notice for World Vital Records, which was acquired by MyHeritage, was issued in September of 2018. Click the link to the article to read up on all the details.
When faced with a broken link your first impulse may be to ask another person or someone you see as an expert on the subject. That can work too, but chances are they may just ask you “did you Google it?” That’s because, like it or not, Googling at the moment you have the question is much faster and provides you with the latest information.
Think of Google as asking your question to every single web page in the world – all at once. If the answer is out there, Google can probably find it.
3. Google the Content
As I said, the internet is growing and changing every day and it is very possible you may find the content is now available elsewhere.
Any good source that provides website URLs will usually include information about what you’ll find on that website. You can use that information to run a Google search. Your goal is to determine if the information you seek is available elsewhere from the same provider, or identify another website that references the same content.
Start by copying short phrases of key information and pasting it into the Google search box. Put quotation marks around the text. Quotation marks are a standard Google search operator and they will tell Google to search for web pages that include that exact phrase, sentence or paragraph. (Quotation marks also work on individual words such as surnames.) If you don’t get an exact search result, remove the quotation marks and place them just around the most important individual key words.
Here’s an example of how this works:
In Genealogy Gems Podcast episode 62 (published back in 2009) I talked with actor Darby Hinton about a new history-themed television series he was producing called Hintons Living History. The show notes include a link to the website devoted to the show. Clicking that link leads to an error page because the website has since been taken down. (For website publishers like myself, we are often faced with the decision between creating new content, or constantly combing through old published content to fix what is out of date. I think you will agree that continuing to create new content is preferable.)
Since the link no longer works, a Google search of the name of the television show in quotation marks (“Hintons Living History”) provides a plethora of information and videos to learn more about the show.
Obvious, But Not Always
While the solutions I’ve shared here may seem somewhat obvious, time and time again I’ve watched people get befuddled by running into broken genealogy website links. It’s totally understandable. In the excitement of the moment of finding something interesting, getting stopped in your tracks by a broken links creates frustration. Our brains tend to focus on that obstacle and frustration rather than the simple solutions that are available.
Now you have a game plan that you can use so that broken links will only be a blip on your genealogical research path.
This article was originally written in January 2019, and extensively updated August 6, 2019. Can you find the old version on the Wayback Machine?
 You’ll love these two quick-guides by Donna Moughty on Irish genealogy. Guide #1 titled Preparing for Success in Irish Records Research will help you determine a birth place, differentiate between persons with the same name, and walk you through identifying helpful US records.
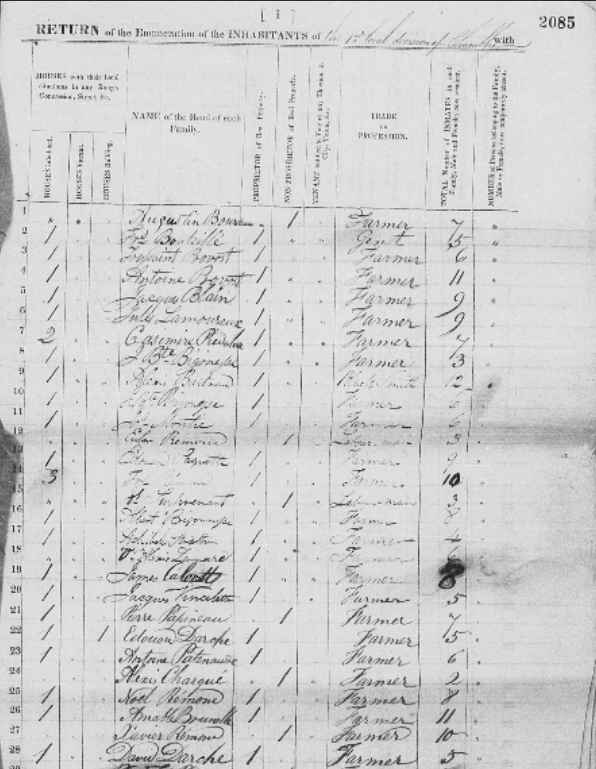
 The population schedule includes the name, age, birthplace, and occupation of each household member as most censuses do.
 About the Author: Lisa Louise Cooke