Resources
These show notes feature everything we cover in this episode. Premium Members: download this exclusive ad-free show notes cheat sheet PDF. Not a member yet? Learn more and join the Genealogy Gems and Elevenses with Lisa family here.

Now when you discover an ancestor’s record on Fold3.com, you can save it to your online tree at Ancestry.com.
According to Fold3.com’s press release: “Whenever you see a green ‘Save to Ancestry’ button above a document or on a Fold3 memorial page, you can link that document or page directly to someone’s profile on Ancestry.”
“You’ll be asked to log into your Ancestry.com account, and then you’ll see a drop-down list of your trees. Locate the tree you wish to save the document to, begin typing the name of the person to whom the record should be attached, choose the correct name from the list that appears, and then press save.”
Watch a tutorial video to learn more and see how it’s done.
Even if you don’t use Snagit, or if you’re a newbie or still deciding whether you want to use it, this video will give you tangible examples of what it can do for you. If you are already using Snagit, this session will definitely take your skills to the next level.
Use coupon code GENE15 to get 15% off. Thank you for using my link for purchasing your copy of Snagit. (We will be compensated at no additional cost to you, which makes the free Elevenses with Lisa show and notes possible.) Don’t worry if it initially shows as Euros in the cart. When you enter your address including country, it will convert the currency appropriately.
In Elevenses with Lisa episode 66 Lisa Louise Cooke will discuss how to use Snagit:
You can also watch at the Genealogy Gems YouTube channel.
Elevenses with Lisa episode 61 was a tutorial for beginners on how to use Snagit, and specifically how I use it for genealogy. I think it really resonated with genealogists because accurately and completely capturing the family information that we’re finding is absolutely essential for good source documentation. It’s one of the most important things we do as genealogists.
So, this video is sort of a “Part 2” session where we dig into more ways to use this amazing screen capture tool and I answer some of your most pressing questions.
Even if you use a different snipping tool, I’m going to give you tangible examples of how you can clip more effectively.
I received the following email from Anne W.: “I very much enjoyed your recent Elevenses with Lisa episode on how to use Snagit. I love the screen clipper on my Mac but this does so much more. I used your link to purchase Snagit and I have found the tutorials very helpful as I figure out how to use it on my Mac with my files. The first thing I did was go back to several newspaper pages I clipped recently in chunks and used Snagit to capture the whole page. It worked like magic! I would love to see another episode about the features of Snagit. Thank you for your regular and premium podcasts. I listen to both regularly. I have learned so much that I can apply to my genealogy research.”
Oh I love hearing how you’re using what we talk about here at Genealogy Gems! And yes, Snagit is fantastic for clipping those squirrely newspaper pages, and so much more!
Let’s get started – I’m excited to show you 5 more problem-solving screen capture projects that you can do with Snagit, and then we’ll wrap up with answers to your Snagit questions.
Bill in San Antonio, TX wrote me last week and told me about a problem that he was having with his online family tree at Ancestry It turns out that some ancestors had duplicate profiles. He didn’t put them there. He asked Ancestry about it but was getting what he called “boiler plate” answers that didn’t solve the problem.
In situations where you’re trying to communicate a complicated problem to someone else, or you’re just trying to work through it yourself, it can really help to visualize the problem, and Snagit can help you do that very effectively.
Bill says: “I am seeing duplicate FACTS in profiles of siblings, parents, and children of a person and cannot figure out where they originate. I go to the profile which seems to be generating duplicate information, but it is not there.”
As I read through all the details that he wrote up about the problem, I found myself getting confused. I asked his for access to his family tree so I could take a look and he wrote back
Bill went on to say, “The duplications I see are all in my tree. I have reviewed each of them to be certain that the data is not coming from a profile, even though it appears in duplicated form elsewhere.
Here is a screenshot of one such issue, showing two siblings with repeated data. Note that in each case, the birth location is slightly different, as in “Texas” vs. “Concho County, Texas”.
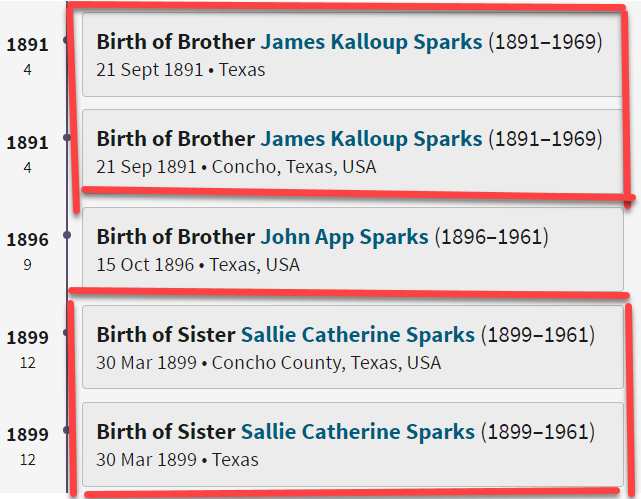
Ancestry Profile – problem of duplication
Bill had annotated his screen clipping to help me zero in on the problem. “(I used SnagIt for the screenshot — thanks for suggesting it!) I see this issue in other profiles, so your suggestions for solving it will be useful in other parts of the tree.”
Here are just three examples of ways you can highlight or call out an item in an image:
After you select and customization a style (such as a red outline shape) you will see that Snagit provides a “ghost” version of it in your list. It’s greyed out and ready to add. Simply click the plus sign to add the style to a theme. There are several themes available and you can create new themes.
I like to make it even faster to find the styles I use the most by adding them to my Favorites. It’s super easy to do. Just click the star on the style. You’ll find your Favorites in the star menu at the top of the screen.
As a side note, I do think this is a bug in Ancestry’s system. I recommended that he do the following to zero in on the problem:
Again, you can use Snagit to help work through things like this. Here’s how to see if you’re indeed looking at the same person: Right-click on each ancestor profile to open it in a new tab so you can compare and capture them. In this case it was Willie (the ancestor) and James and the duplicate of James. Each will have a URL address in your browser bar that will end in person/420009496764/facts. The number in red is the unique number for that person.
Had the tree number or person numbers been different, that would be the likely source of the problem. However, in Bill’s case, they are the same, so that’s more evidence that it’s a bug in Ancestry’s displaying of the information.
After screen capturing each profile they can be combined into one step-by-step document that can then be shared.
My guess is that at some point Bill viewed someone else’s tree or a hint that included this conflicting information, or he may have attached a record that had conflicting information, or rejected information from a record. In any case, some sort of action may have gotten “stuck” in the virtual stratosphere. The system has hung on to something it should not have. Bill says he’s finding more instances of this happening in the same tree, so it definitely needs to be addressed. It would be a shame to keep adding to the tree only to have that glitch continue to duplicate itself in other profiles.
I suggested looking through the records he has attached to James Kalloup Sparks to see if any of the attached records mention Concho, TX as his birthplace. I doubt there is one, but if there is, it is likely somehow linked to the problem.
It’s very odd that on Willie’s profile it shows James Kalloup Sparks’ birthplace as Concho in the duplication, but when you click that profile it doesn’t say Concho. It’s must surely be an Ancestry glitch.
If it were me, I would try downloading your tree and then creating a second tree by uploading it and seeing if the error still occurs. Here’s the Ancestry Help page.
Also, if by chance Bill was syncing his Ancestry online tree with genealogy software on his computer, there’s a possibility that could cause the problem.
Questions from Kelly: “Hi Lisa!, I would LOVE for you to create a very simple tutorial for adding in arrows and any text in “bubbles or boxes”. I have tried to do this and am missing something – I just LOVE Snagit but I am so technically challenged and would love to not become so annoyed when I am missing the simplest of steps.”
The most important thing to remember as you use annotations like text bubbles, shapes and text is you must select what you are working on. The font, color, sizing and other formatting features can be applied to every kind of annotation. You must select the item before applying the formatting.
If you’re ever confused about what “mode” you’re in, look at the top of the screen and note which tab is selected. In the example below, we are in “Shape” mode.
And if you try and try to make a change to an annotation and nothing seems to happen, you probably haven’t selected it. Click on the item to select it before attempting to make any changes.
If you want to move a item such as a shape or a selection of text, again you will need to click it to select it. You should see the “Move” selector handle that looks like this:
If you don’t or you’re having trouble, click “Move” in the toolbar at the top of the screen and then click on the item.
Most of the time if working with annotations or formatting them is presenting a challenge, it’s because the item hasn’t been properly selected before you begin.
Many of the most popular genealogy records websites offer a hinting feature that suggests records to you based on the information in your online family tree. Many of those “records” are quite unique. I recently came across a Photo Hint at Ancestry that was a screen capture of a story in a public Facebook group of the descendants of a particular couple. It was interesting information but I didn’t really want everything that was captured in the image. I used Snagit to capture and then edit the image the way I wanted it so I could then save it to my computer. This included erasing or removing unwanted areas. The following Snagit features can help you accomplish this easily:
Answers to your questions from episode 61 which was my beginning tutorial on Snagit. If you haven’t used it before stick with us in this video to see all the cool things it can do and then go back and watch that episode which is perfect for beginners.
Pat M.: Will OCR work for non-English newspapers?
Answer: Snagit doesn’t translate, but the OCR will Grab non-English text. Learn more here. You can then copy and paste it into Google Translate.
SHB: Don’t see Evernote on the list, how easy is it to save to EN?
Answer: If you have Evernote installed on your computer you should see it in the Share list. You can also download Evernote to add it as a Share destination. In fact, there are loads of programs you can download.
Cyndy B.: Are all these features in older versions?
Answer: No, like all software, each version introduces additional features.
SHB: Curious about printing… if you print a long article, will it print out readable?
Answer: Yes! You can set the resolution. And use Print Preview to make adjustments so it prints exactly the way you want it.
CA Sanders: if I bring a photo into Snagit and work with it will save IN Snagit, not in my original placement…so I would have to “save” or “move” to the folder it was in to begin with my changes.
Answer: After making your edits, use File > Save As to save it in the desired format to the desired location on your computer hard drive. You can also save it to replace the original if that’s your goal.
B Latham: How do we keep the SnagIt program up to date? It sounds as if other viewers here are saying they purchased the program a few years ago and may be outdated. Isn’t there a way to keep it up to date?
Answer: Yes, you can buy a maintenance plant that will include future updates at a reduced fee. Use our link and discount code, and the option will be available at checkout.
Barbara C.: For 2 different laptops, would we need to purchase Snagit twice?
Answer: TechSmith software is licensed per user, so how many computers can I install it on?
Each user may install and use one copy of the software product on up to two computers for their sole use, provided only one computer is in use at any given time. This includes home and work, or a laptop and desktop.
Here’s our link for purchasing your copy of Snagit (screen clipping tool) Thank you for using our link. Use coupon code: GENE15 (We will be compensated at no additional cost to you, which makes the free Elevenses with Lisa show and notes possible.)
These show notes feature everything we cover in this episode. Premium Members: download this exclusive ad-free show notes cheat sheet PDF. Not a member yet? Learn more and join the Genealogy Gems and Elevenses with Lisa family here.
The manufacturer price is going up August 31, 2021. Now’s the perfect time to get your official Elevenses with Lisa mug.
Click here to sign up now and you get your free bonus ebook.
Leave a Comment or Question Below
Show Notes: The FamilySearch Wiki is like an encyclopedia of genealogy! It’s an invaluable free tool that every genealogist needs. However, many folks get frustrated when they try to search the Wiki. In this week’s video premiere I’m going to help you navigate with ease.
Video and Show Notes below
You’ll learn:
Downloadable ad-free Show Notes handout (Premium Membership required)
(00:42) There are two ways to access the FamilySearch Wiki. The first is to visit the website direction at https://www.familysearch.org/wiki. This will take you to the home page of the Wiki. Although you can sign into your free FamilySearch account on this page (in the upper right corner) it isn’t necessary in order to use it.
The second way to access the Wiki is to go to the FamilySearch website. You will need to log into your FamilySearch account or sign up for a free account if you don’t already have one. Once you’re signed in, then in the menu under Search click Research Wiki. This will take you to the same FamilySearch Wiki home page. However, you will see that you are signed in and able to use some of the additional features like participating in discussions, posting and creating watchlists.

On the FamilySearch website: Search > Research Wiki
(01:21) On the home page, what you see a map of the world. This is a great way to search the Wiki because in genealogy, it’s really all about location. We need to know where geographically we want to search for ancestors, and from there we can narrow down the timeframe. Typically, you’ll have a sense of at least in which country you need to be researching. So, the map is typically the best way to start.
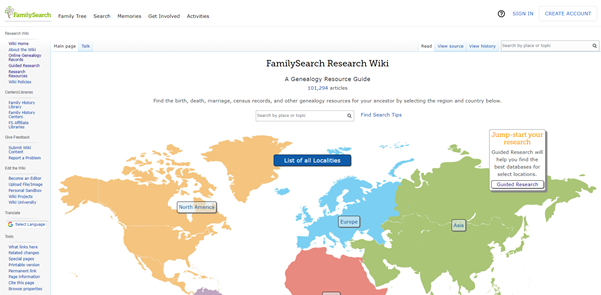
The FamilySearch Wiki Home Page
You’ll notice also on the home page, there is a search by place or topic search field. You could bypass using the map, and just start by typing in a place. If you do, you’ll notice that it starts to prompt you on the kinds of things that are commonly searched for. This could be kind of nice if you are really focused on a particular thing such as Italian census records. You can just start typing Italy and see if census is one of the prompts. If it is, simply click it and it will take you right there.
However, generally speaking, the map is the best way to search for records and information that is rooted in a location. Start by clicking the button for the continent, such as North America. Notice that if you go to click on the map itself, it isn’t an interactive map. You’ll need to actually click the button.
From there, select the county from the menu, such as United States, then drill down by state. This will take you to the Wiki entry for that state.
You’ll notice that the FamilySearch Wiki is a lot like Wikipedia. It’s like an encyclopedia of information. But the exciting part is that it’s genealogy specifically! This means you don’t usually have to worry about including the word genealogy in your searches.
Oftentimes, our research ends up taking us to a new location where the next set of great grandparents came from. If we’re not familiar with that location, let alone familiar with what’s available from a genealogical standpoint, that can pose a real challenge. You might be asking questions like when did they start recording birth records? Or did that state conduct a state census? Every state, every country, and every county has different types of records available.
Start your orientation over on the right-hand side of the wiki page. There you’ll typically find an overview box.
(04:15) This is a great place to quickly see what’s available here, and what you could dig into further. If you’re really new to research in this particular area, you might want to start with the guided research link. You may also see links to research strategies, and a record finder.
In the next section of the box you’ll find record types. This is going to be different depending on the area that you’re researching. For example, if they don’t happen to have any military records available you might not see that listed under record types. You should expect to see the most commonly used records included in the list. Click the link to the page for more information on that type of record. It will provide more details on record availability, and where you access the records.
Further down the box you’ll find links to background information on the area. It’s really easy to skim over this in excitement over records. But if you don’t want to get stuck at a brick wall, getting to know the place that you’re researching can make all the difference. Learning the background of an area can help you prepare the right questions to ask. It can help prevent you from looking for something that doesn’t exist or that wasn’t applicable to that area. You may find links to more reading, gazetteers and maps, migration patterns, periodicals, and the law. Understanding the law is going to help you understand why records were created, and who they affected. For example, if your ancestor was under 18 there might be certain records that don’t apply to them. Understanding the parameters of who was affected by the law will help guide you through the records themselves.
Next you’ll see cultural groups that you might expect to find in this area, and links to more specific information about researching them.
Under Resources you’ll find links to archives, libraries, societies, and the family history centers that are available in this particular area.
At the top of the main part of the page you’ll find the Getting Started section. Here you’ll find links to beginning step-by-step research strategies and some of the most popular records for that location such as vital records.
(08:35) You might be wondering who is putting this information together. Well, it starts with experts at the Family History Library in Salt Lake City. These are people who have worked the reference desks and found answers to thousands of patron questions.
(09:22) Back on the state landing page scroll down further to the map of counties. Navigating by location is still important, even when we’ve narrowed it down to the state. Unlike the map on the homepage, you can hover your mouse over each county and click.
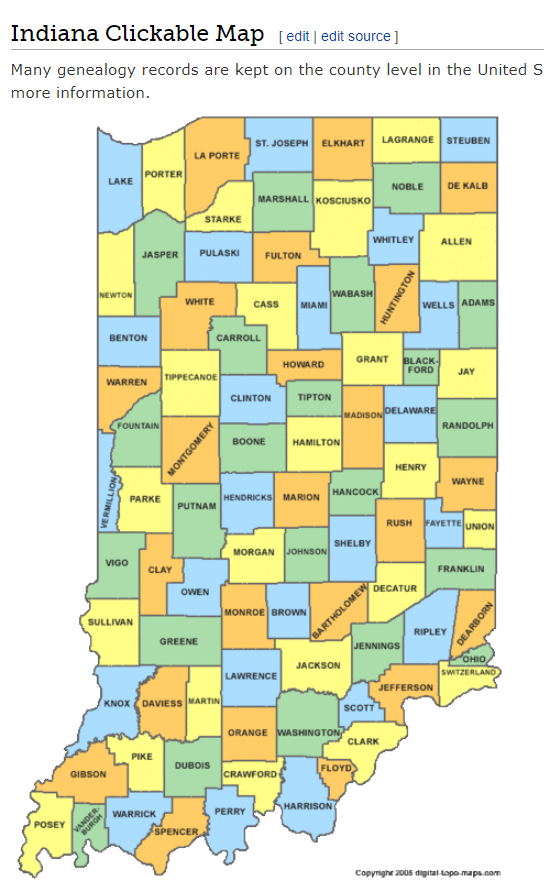
County map on the state wiki page
The county pages are where the real magic happens because many records such as birth, marriage, death, and court records are typically available at the county level. Here you’ll find out how to contact or visit the current county courthouse.
One of the most common questions new genealogists ask is “should I be looking at the county where the town is located today, or the county that it was when my ancestors lived there?” Counties certainly do change over time. The answer to the question is that we go to the county at the time that are ancestors lived in the area. In fact, the Wiki page provides the history, or genealogy, of the county. Look for Boundary Changes on the page.
Because these pages are often quite long and dense, use your computer’s Find on Page feature by pressing Control + F (PC) or Command + F (mac) on your keyboard. This gives you a nice little search box at the top of the page. Type in a keyword like Boundary and it will highlight all the locations on the page where the term appears. This is a great way to make quick use of the Wiki. This is also a good trick to use when you don’t see the record type or keyword that you’re looking for in the page’s table of contents. It may be called something else there, but if you search the page for your keyword, it should find it for you. An example of this is that you may not see Birth Records in the TOC because they list Vital Records. However, in the Vital Records section further down the page they definitely mention birth records.
(14:45) Here’s another reason the wiki is so helpful, and it makes things go so quickly. Remember, we talked about that location is key, but also timeframe. Well, if we are looking for genealogical records, we don’t want to look for a record in this county before they actually started creating those records. The wiki typically provides a nice little chart on each county page showing then some of the most important civil records such as birth, marriage and death were first created.
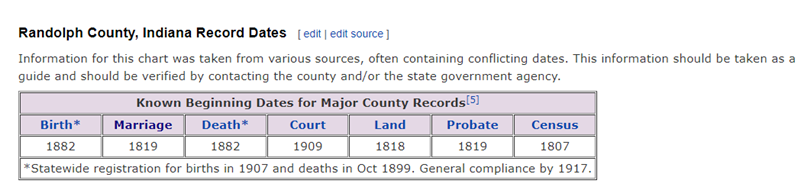
County record dates at FamilySearch Wiki
Often times civil records began much later than church records. Sometimes you will see an asterisk indicating when statewide registration for these civil records began and then another date indicating when general compliance was enforced. All of this is guiding us to success in finding genealogy records, and it’s saving the headache of investing time looking for records that did not yet exist.
(17:42) Further down the page you’ll find links to places. These may link to town pages on the Wiki, but more likely they will take you to Wikipedia where this information already exists. There will be a small icon indicating that the link will open in a new tab and take you to another website.
Next you’ll likely see a Timeline section which gives you a sense of when the first people settled in the county and who those people were. Again, it provides you more context to better understand the records.
In addition to all these individual records, many of them linked over to FamilySearch, Ancestry or MyHeritage, we see Research Facilities. Why is that so important? Because not all records are going to be online. When we’ve exhausted online records and resources we need to go offline, and there are lots of resources here on the wiki to work with: county archives, family history centers in the local area, libraries, museums, and genealogical societies. The wiki provides contact information and links to their website where you may be able to see a listing of what they have onsite so you can plan your visit.
Other website links may take you sites like USGenWeb which is a fantastic free genealogy website. It’s organized by location much like the FamilySearch wiki website. Drill down to the state and then the county. You may also see links to the State Archive, or the state’s Memory project, and, of course, the FamilySearch catalog.
(22:01) The wiki really should be one of your first stops when you’re going to be starting research in a new area. Let’s wrap up with a quick conversation about the wiki’s search box. You could go ahead and put a topic in there. Many people will come in here and they’ll type in marriage records, Randolph, County, Indiana, and they will get a list of results. They don’t look as clear cut as Google results, and they may not all be on topic. This is where we can get lost. I think probably the number one reason why people give up on the wiki is they get these kinds of search results. They realize, wait a second, this isn’t even Indiana, it’s talking about Kentucky! Why am I getting all these? It can be frustrating.
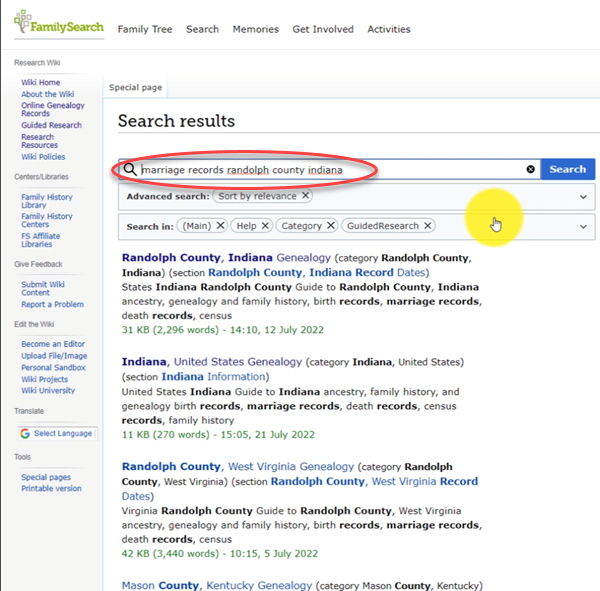
The wrong way to search at the FamilySearch Wiki
This happens because we tried to do it ourselves, with our own keywords. Remember, like most search engines, they’ve indexed their content to make it searchable, so that means they’ve already decided how they want to talk about a particular topic. Rather than just addressing marriage record first, the wiki focuses on the location. Where is this marriage record? So, focus first on the place unless you are just looking for general information on a general genealogy topic such as genealogy software.
Pay attention to the pre-filled suggestions as you type because the wiki is going to suggest what it has in the format it has it. Again, you may want to first go to the country, state or county level page and then look for the record type.
What if you’re looking for marriage records but you don’t see them listed? Well, it might be that the word marriage isn’t the keyword the wiki uses. Or it might be that the type of record you’re looking for is a state or federal record. That’s another reason why the find on page feature (Ctrl + F) is so helpful. Don’t be discouraged if you don’t see what you want listed in the table of contents. It may just be a keyword issue. Let the work that they’ve already done in organizing their materials guide you. You’ll be more successful and also avoid frustration. The FamilySearch Wiki is just too good of a resource to miss.
Videos at the Genealogy Gems YouTube channel:
Visit the Genealogy Gems website. There you’ll find videos, articles and podcast episodes and you can sign up for my free weekly email newsletter.
Downloadable ad-free Show Notes handout for Premium Members.