“This is really the first time a DNA testing company has so fully integrated genetics and genealogy. We can now find cousins in the database who do not share our particular genetics, but who do share some of the genetics of our common ancestor. This is huge.” -Diane Southard, Your DNA Guide
I blogged a couple of weeks ago about some changes taking place over at AncestryDNA. You will recall that they are planning to slash your match list to allow only “invited guests” to your personal DNA party. (Read that post to be reminded why this is a good thing.)
Ancestry has officially announced the launch of this feature update and reports that on average users will see an 80% reduction in the number of matches shown. I had a chance to look at the new site before it launched and one of my favorite features is the question mark that appears next to your match. Clicking on the question mark on your match page will bring up a menu of references to help you better understand the inner workings of matching at Ancestry, including those confidence levels that are a part of every relationship prediction. In this table below you can see that ancestry has tried to give you some fairly solid guidelines by which to assess the quality of your matches. You will want to focus on those matches with a confidence score of “High” or above to have the best chance of genealogical success. But an update to the matching feature is only the beginning of the new features at AncestryDNA. Today Ancestry announced “DNA Circles,” a tool that helps you identify others who share common ancestors with you. The new “DNA Circles” feature has the potential to impact the way you do genetic genealogy at Ancestry. Here’s why: Autosomal DNA (the kind that Ancestry is testing) has a spotty inheritance pattern. On average we only have half of the DNA of each of our parents, only 25% of our grandparents, only 12.5% of our great grandparents and so on. This means that AncestryDNA and its competitors (Family Tree DNA and 23andMe) are only able to genetically identify 50% of your genetic 4th cousins. This means that there could be 50% MORE people in these databases that you are actually related to, people that should have been invited to your DNA party, but didn’t have a ticket. Now with DNA Circles, there is a metaphorical “after-party.” After parties are “hosted” by one of your relatives. Ancestry searches your pedigree and that of your matches back 7 generations looking for suitable hosts. An ancestor qualifies as a host if they have two or more descendants who hold an invitation. At this after-party you can meet some of these long lost cousins that, while related to you, lost their ticket to your DNA party. After-party invitations are provided to those who meet three very important qualifications:
They have their DNA attached to their PUBLIC family tree.
AND that PUBLIC family tree has the name of the hosting ancestor on it.
AND this person shares DNA with at least one other person who also meets the above two criteria.
Here’s an example. Below is an image of the new AncestryDNA home page. You can see I am a part of two DNA Circles (some of you will be much more popular and invited to several after-parties. For me–just the two for now). Let’s take a closer look at my DNA Circle hosted by my paternal 5th great grandfather Minus Griggs (who knew the guy liked parties?!). Clicking on the DNA circle brings up this page where there are three things I want to show you:
This is your relationship to the host.
This is a list of the individuals who have passed the three criteria listed above and have been invited to this after-party.
This is the innovative part. You see that the first two matches (after me–I am listed first) have only “Tree Match” in this column. This means that these two people, both descendants of our host, Minus Griggs, didn’t ever appear on my DNA match list. We do not share enough DNA to be considered genetic relatives. However, the third member of the circle has the “DNA Match” designation, meaning that this match DOES appear on my match page. In fact, this is my ONLY DNA match in the circle (there are three others not shown here). That means that this DNA circle has connected me to FIVE other cousins. All because I share DNA and genealogy with the third member of this circle, and he shares DNA and genealogy with everyone else.
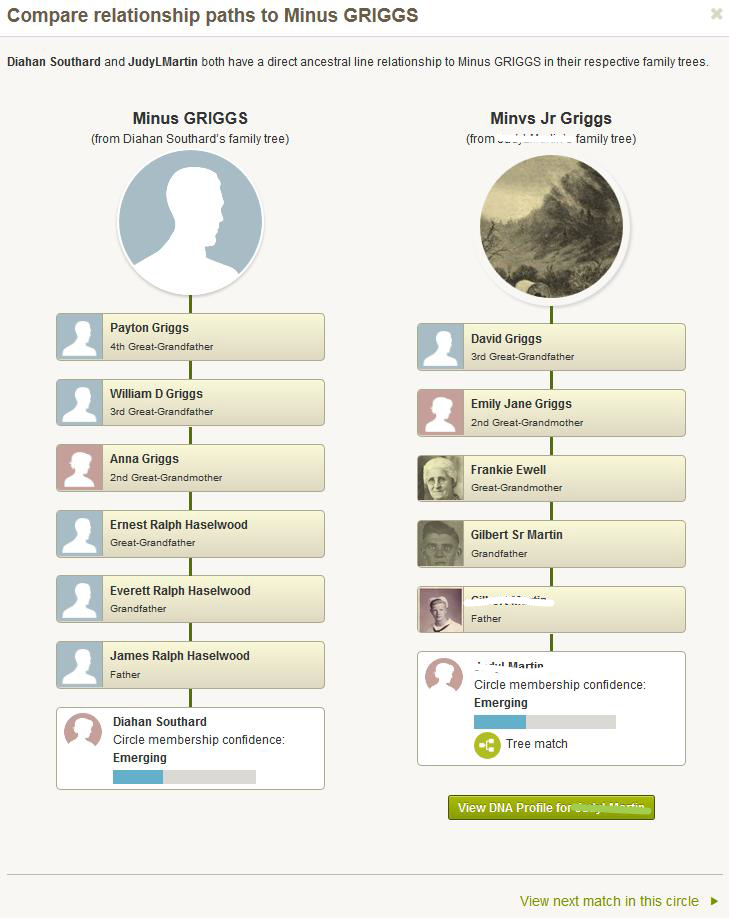
I can click on each circle member to see exactly how Ancestry THINKS we are related. This is my first opportunity to DOUBLE CHECK this relationship that Ancestry has handed me, to be sure that both my match and I really did receive tickets to the same after party.
Here is what that page looks like for me and one of my matches.
This is really the first time a DNA testing company has so fully integrated genetics and genealogy. We can now find cousins in the database who do not share our particular genetics, but who do share some of the genetics of our common ancestor. In my opinion, this is huge.
There is one catch, and it is going to be a big one for some of you. In order to see your DNA Circles, you have to be an Ancestry.com subscriber.
Even though I am excited about these changes, I can’t help but hope for just one step more. In order to identify these DNA Circles, Ancestry has identified pieces of DNA that can be fairly reliably assigned to a particular ancestor. There are likely others in the Ancestry database who have these pieces of DNA, we can call them partial tickets to the after-party, but who are lacking the second requirement: a pedigree documenting a relationship to that ancestor. I hope in the future the folks at Ancestry will honor those partial ticket holders, and allow them to the after-party, so we can sit around with our peanuts and pretzels and figure out how we are all related. Until then, I am going to enjoy the two after-parties hosted by my two generous ancestors.
Ready to walk through the process of using DNA for your genealogy? Let me be your guide! Check out my quick guides (left) Purchase each guide individually or pick up the bundle of all 4 for the best deal!
Visit my website to learn about expert consultations with me. You’ll get customized guidance on which tests to order and how to maximize your results for your genealogy research.
In this episode, we’re focusing on early Virginia genealogy.
In our first segment, I’ve invited a professional genealogist to join us to help pave the way for tracing our ancestors back to Virginia just prior to the Revolutionary War. Jeri Satterwhite-Dearing specializes in early Virginia research in her work as a professional genealogist with Legacy Tree Genealogists. In this podcast episode she explains some of the biggest challenges you’ll face when researching early Virginian ancestors, the records you should be looking for, and some of the best resources.
In the second segment, I’ll cover a list of the best websites for Virginia Genealogy.
Fort Wayne, Indiana is the home of the second largest free genealogy library in the country. Make your plans to visit today. Learn more at https://www.visitfortwayne.com
Formerly known as Virginia Heritage, this website is a “consolidated database of finding aids that provides information about the vast array of manuscripts and archival materials housed in Virginia and West Virginia.”
From the website: “Part of the online presence of the Library of Virginia, the state archives and reference library. The Library maintains vast and varied collections of print materials, manuscripts, archival records, newspapers, photographs and ephemera, maps and atlases, rare books, and fine art that tell the history of the commonwealth and its people.”
From the website: “The Virtual Jamestown Archive is a digital research, teaching and learning project that explores the legacies of the Jamestown settlement and “the Virginia experiment.” As a work in progress, Virtual Jamestown aims to shape the national dialogue on the occasion of the four hundred-year anniversary observance in 2007 of the founding of the Jamestown colony.”
Listen to my Free Podcast in iTunes or at www.GenealogyGems.com
I always enjoy being a presenter at the cutting-edge Family Tree Magazine Virtual Genealogy Conference. This time around I’m teaching Best Apps for Genealogy! And today I am giving away one free virtual conference registration to a lucky Genealogy Gems reader. Read through the following article about the Virtual Genealogy Conference to learn how to enter. And do it today because you must be entered by midnight (Pacific) tonight Sept. 10:
8 Great Reasons to Attend a Virtual Genealogy Conference
Family Tree University’s Fall 2013 Virtual Conference Sept. 13-15 offers unique benefits
Have you ever missed a genealogy conference session you wanted to attend because the room was too full, or because the time conflicted with another session of interest? Or heard how great a session was after the fact, and lamented that you didn’t choose it?
That’s just one of the problems solved by Family Tree University’s Virtual Conferences. These three-day online workshops are the only genealogy conferences where attendees can completely customize the program to suit their schedule. Attendees can watch 16 pre-recorded 30-minute classes at any time, in any order they choose.
Attendees of the Winter 2013 Virtual Conference, Sept. 13-15, will enjoy the following unique benefits:
» All sessions can be downloaded for later viewing—allowing you to watch favorite sessions again or save certain classes to view after the conference ends, so you can make the most of the real-time interaction during the weekend.
» PDFs of the presentation slides from each class are available to download, too, eliminating the need to take copious notes or copy down website URLs.
» The conference takes place entirely online, allowing attendees ultimate flexibility for participating. It’s the only conference where you can show up at 2 a.m. in your pajamas if you want to! Log in anywhere you have a computer and an internet connection, from your favorite armchair to your favorite coffee shop. You can even squeeze in a live chat during Daughter’s soccer game.
» An FTU Virtual Conference also provides programming from nationally known genealogy presenters, including D. Joshua Taylor, Lisa Louise Cooke and many more. You don’t have to miss out if you can’t afford a hotel room or have physical limitations that make an in-person conference impractical.
The Virtual Conference also offers perks provided by in-person conferences:
» An exhibit hall with booths showcasing genealogy products and services
» A virtual swag bag of free downloadable genealogy goodies
» Daily contests for great genealogy prizes
» Opportunities to chat with and ask questions of experts, as well as make new friends of genealogy buffs just like you
To view the program and register for the Fall 2013 Virtual Conference, visit http://www.familytreeuniversity.com/virtual-conference (save 20% on registration with coupon code FTU0913 at checkout!). Enter my giveaway by sharing this blog post on Facebook or Twitter by midnight tonight with hashtag #GENEALOGYGEMS. You’ll find social media sharing buttons at the top of the post, or just copy and paste the URL address of this specific post (click the post title to be sure and grab the specific address) and include #GENEALOGYGEMS. The winner will be announced here on this blog on Wed. Sept. 11 and must email their contact information to me as instructed in the post. Good luck, and I hope to see you at the Virtual Conference!
No purchase necessary. Void where prohibited. Entries must be received by midnight Sept. 10, 2013 as directed.
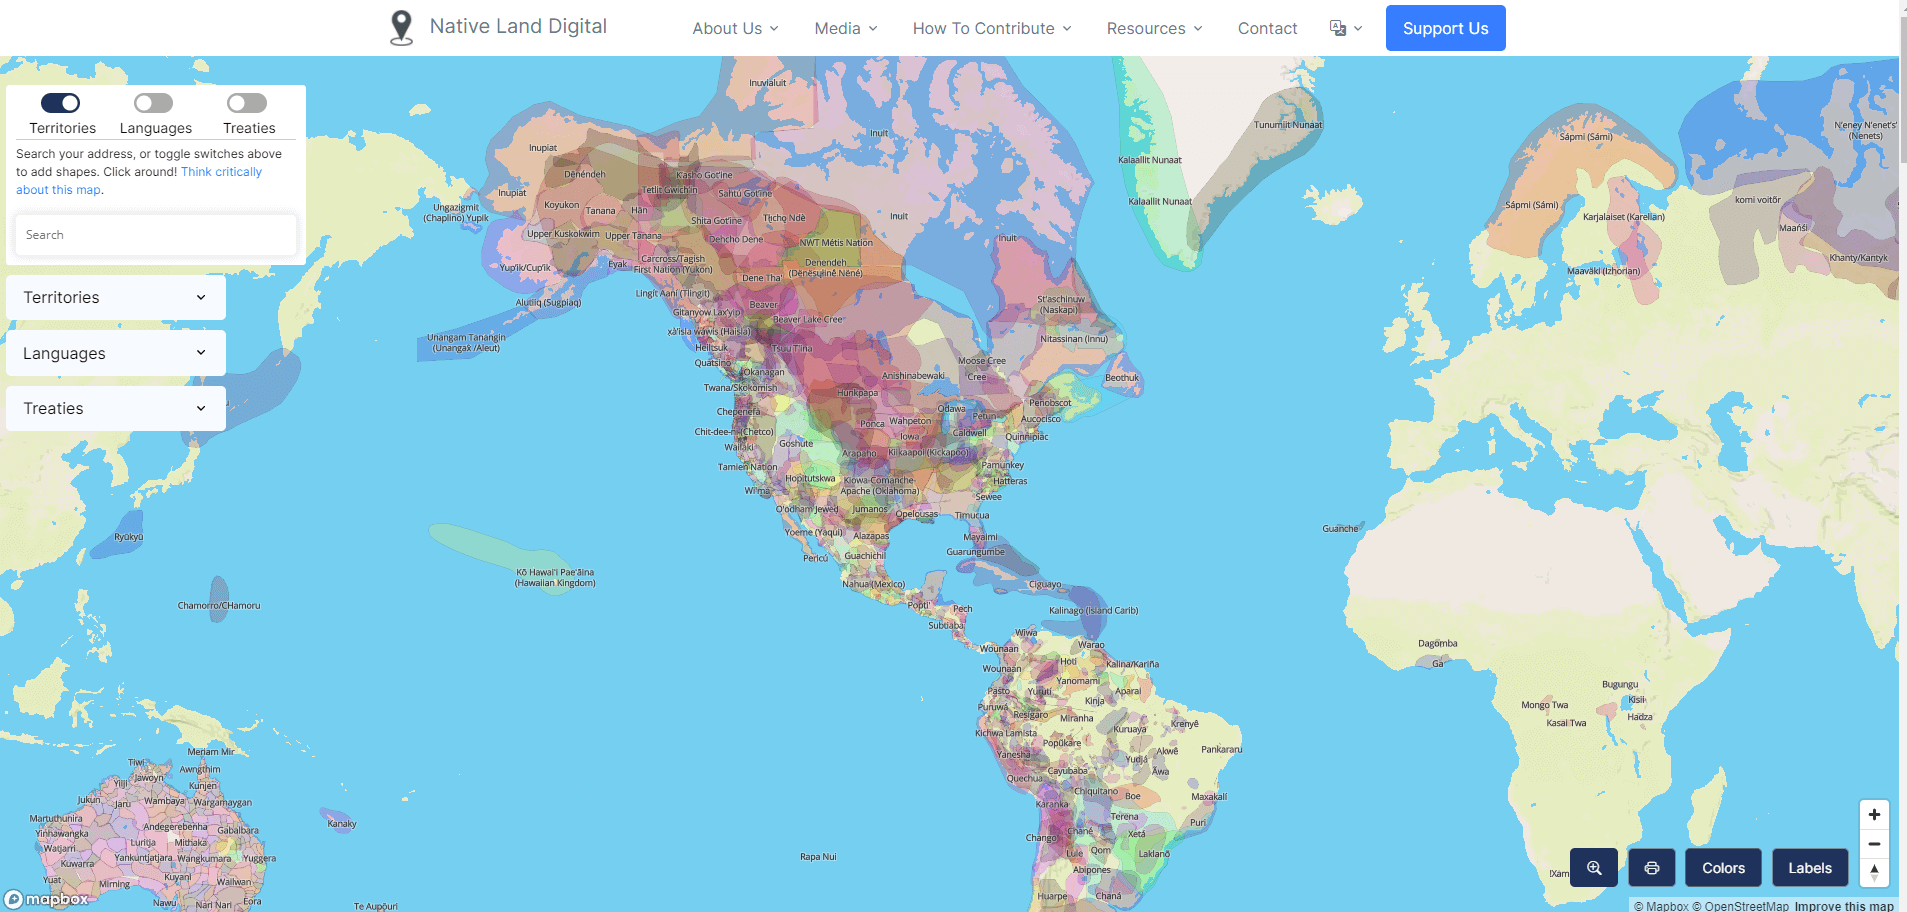
Native American genealogy research follows the same path that all good genealogy research does, but it also includes some unique records along the way. It’s a fascinating journey, and in Elevenses with Lisa episode 76 professional genealogist Judy Nimer Muhn (Lineage Journeys) joins Lisa Louise Cooke to pave the way. Judy will discuss:
Tribal and personal naming conventions
Tribal-specific resources
How geography impacts research
Native American genealogical records
and more…
Episode 76 Show Notes
Native American genealogy research follows the same path that all good genealogy research does, but it also includes some unique records along the way. It’s a fascinating journey, and in Elevenses with Lisa episode 76 professional genealogist Judy Nimer Muhn (Lineage Journeys) joins Lisa Louise Cooke to pave the way. Judy will discuss:
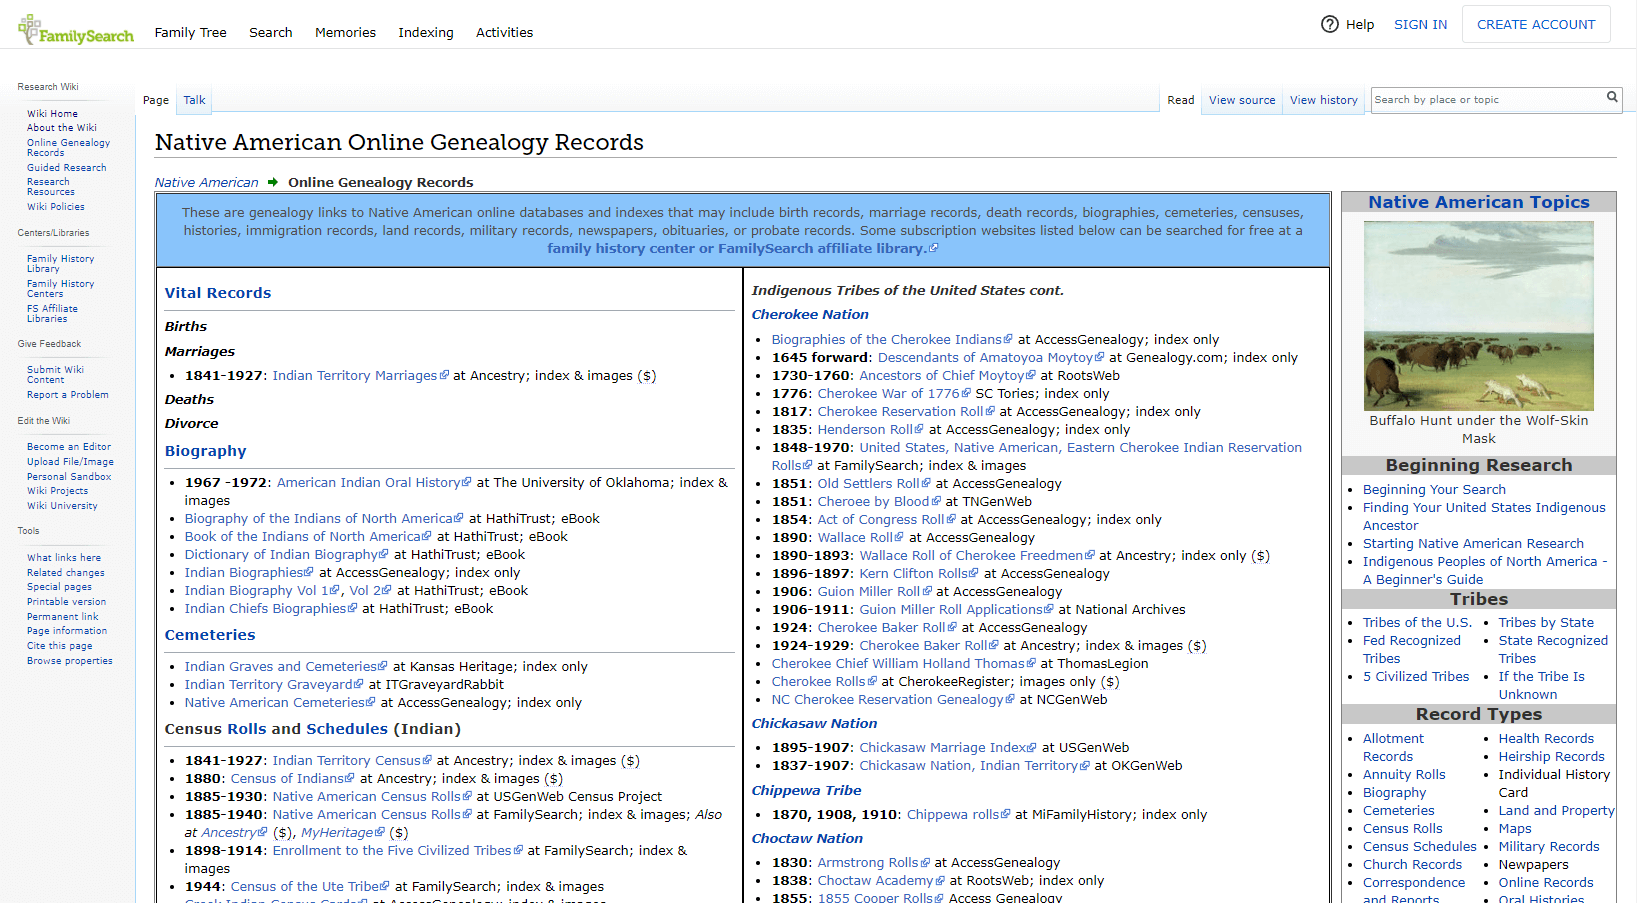
From the Article: “Native people were largely excluded from the federal census until at least 1860.”
Native American Research at FamilySearch Wiki
National Archives
Article by James P. Collins called Native Americans in the Census, 1860-1890 which will help you understand what you may be able to find during that time period.
Here you’ll find many resources including newspapers, photos and reports to congress and oral histories.
Judy found materials deep within the Library of Congress website using Googling strategies from my book The Genealogist’s Google Toolbox available exclusively at the Genealogy Gems Store.
Three ways to watch: 1. Video Player (Live) – Watch live at the appointed time in the video player on the show notes page. 2. On YouTube (Live) – Click the Watch on YouTube button to watch live at the appointed time at the Genealogy Gems YouTube channel. Log into YouTube with your free Google account to participate in the live chat. 3. Video Player above (Replay) – Available immediately after the live premiere and chat.
 to allow only “invited guests” to your personal DNA party. (Read that post to be reminded why this is a good thing.)
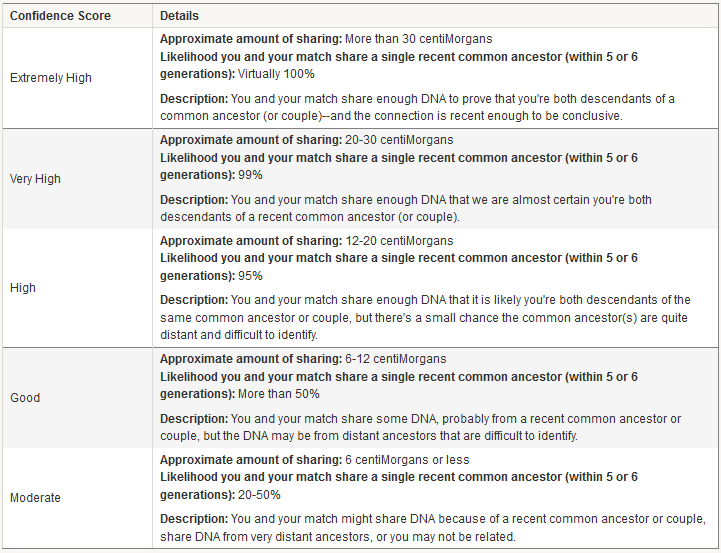 But an update to the matching feature is only the beginning of the new features at AncestryDNA
 Clicking on the DNA circle brings up this page where there are three things I want to show you:
 This is really the first time a DNA testing company has so fully integrated genetics and genealogy. We can now find cousins in the database who do not share our particular genetics, but who do share some of the genetics of our common ancestor. In my opinion, this is huge.
  Ready to walk through the process of using DNA for your genealogy? Let me be your guide! Check out my quick
  guides (left) Purchase each guide individually or pick up the bundle of all 4 for the best deal!