Many of us may have a relative or ancestor who served in the military. We invite you to pay tribute to these heroes and honor their legacy by learning more about them through military records.
The MyHeritage collection consists of 57 million records and includes draft, enlistment, and service records, pension records, and other military documents from North America and around the world, dating back to the American Revolutionary War in the late 18th century.
MyHeritage Facebook Live Events
MyHeritage is also hosting 2 Facebook Live events about military records in the coming days:
Searching Military Records on MyHeritage
Tune in TODAY, May 20 at 1 P.M. EDT to learn how to leverage MyHeritage’s vast collection of military records to learn more about your family history.
Breaking Through Brick Walls with Military Records
On May 24 at 1 P.M EDT, you’ll learn how to use military records to break through brick walls in your genealogy research.
Lisa Louise Cooke, MyHeritage Facebook Live, June 3, 2 P.M. EDT
Topic: Fabulous Photo Discoveries at MyHeritage
Speaker: Lisa Louise Cooke
Description: Lisa Louise Cooke, founder of the genealogy research website Genealogy Gems, will illustrate the incredible potential of MyHeritage’s Photo Discoveries™ feature.
U.S. Yearbook Records Now Free and in Color
Following the release of the highly popular MyHeritage In Color™, we’ve colorized the entire MyHeritage U.S. Yearbook collection on MyHeritage. This collection includes 290 million names in 36 million yearbook pages, spanning from 1890 through 1979. You can now see colorized versions of your ancestors’ black and white yearbook photos next to the originals. To celebrate this moment, we’re offering FREE access to our U.S. Yearbooks through May 23, 2020.
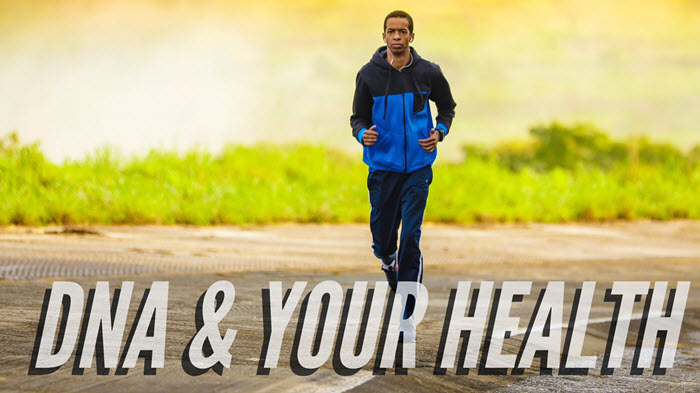
DNA health reports are becoming a more common option for those who test their DNA for family history. Should you order a DNA health report? Here are the ones Diahan Southard recommends most. Her top pick is inexpensive, available to all testers, and promises confidentiality for your genetic data.
DNA Health Reports May Have Saved a Life
At Rootstech 2017 I was sitting at my booth answering questions and talking with many of you about your experience with genetic genealogy. A woman came up to the booth and exclaimed, “You saved my son’s life!”
She went on to explain that she had come across my booth at a previous RootsTech and engaged me in a discussion about using this kind of genetic genealogy test to find out more about a person’s health. I explained that while the focus of these genetic genealogy companies is to further our ancestral research, the DNA that they test does contain some health information. In fact, 23andMe used to offer a full health report as part of their service, but the FDA decided they better regulate that sort of thing, and put the kibosh on it. I told her that while 23andMe is slowly edging back into that arena, you can find out some interesting personal health information today, using the results from any of your genetic genealogy testing company.
How to Get DNA Health Reports
1. Download your results. The first step is to download your raw DNA data from wherever you were tested. Just as Lisa Louise Cooke is always encouraging us to be the owners of our own family tree data, we should be the owners of our own genetic data, too. Save a copy of your raw data to your computer. You can find instructions here on my website.
2. Choose a DNA health report provider and upload your DNA. A growing number of companies offer these reports. Within the genealogy industry, 23andMe sells them and recently Family Tree DNA began offering them to existing customers (more on that coming soon).
But the DNA health report provider I recommend the most is Promethease.com. Their service is available to anyone with a DNA sample–you don’t need to test with any specific company. It’s easy and inexpensive: just $5. This report will tell you about various aspects of your health, including your predisposition to certain diseases and ailments, as well as your likely response or sensitivity to certain drugs. And the site promises confidentiality and impartiality, which are crucial in this age. The Privacy statement reassures users, “At no time is your DNA data shared – or sold – to any external party, period. We also do not sell any products like vitamins or supplements.”
Editor’s note: the following paragraph was updated on January 3, 2018: Promethease now offers the option to keep your raw DNA on the site and obtain updated health reports for free at any time. Click here to read more about these options. An email sent to Promethease customers on January 3, 2018 explains, “We added this infrastructure so we could use de-identified stored data to better assess the accuracy of the raw data produced by different companies, platforms and technologies. This will also allow us to provide the best, independent assessment of true vs. false data in future Promethease reports and add new features.” The email also reminded users that updated reports are valuable because the genetic database that fuels the reports “doubles almost every year, and Promethease’s interface is always improving to enable better searching, filtering and exporting options.”
Here’s a screenshot of part of a sample report:
If you would like to read more about Promethease, I suggest reading over the ISOGG wiki page, paying special attention to blog posts by legal and genetic genealogy experts. There is also a Facebook group to ask and answer questions about Promethease.
One more option for DNA health tests that I want to bring to your attention: Livewello. At Livewello you can combine your own personal exploration of your genetics with the tracking of your family’s health. Livewello offers resources about these ailments and predispositions, as well as support groups and chat rooms for you to explore and ask questions. It does have a fee of $19.95 to join, and some of the feature reports do require a monthly subscription fee.
3. Remember that DNA health reports are in their infancy. It is critical to remember that research hasn’t even begun to scratch the surface of the complex way our genetics interact with other factors in order to make our bodies work. So whatever you see on these kinds of reports, take it for what it is: just information, not some kind of crystal ball. If you see something concerning, you may want to consider talking to a genetic counselor.
This woman at my booth found out some interesting information on Promethease, then consulted the professionals already involved in her son’s care, ultimately changing the course of his treatment, and she believes, saved his life.
As more and more people get genetic testing completed, more and more tools are becoming available to track your personal health history. Whatever you decided to do, please remember that your raw data contains your own personal information that does identify you uniquely from anyone else on the planet. While you shouldn’t be afraid to try new tools and explore your personal genomics, it is very important to read the privacy information of each company carefully to be sure you know what you are consenting to when you are uploading your data. Most companies are fastidious about privacy, but many are also involved in research endeavors, including pharmaceuticals, so please be aware before you upload.
As the genealogists in the family, we are the keepers of many important truths and documents, and certainly, that includes our important health information.
Your DNA is Part of Your Story
Watch this free webinar with Your DNA Guide Diahan Southard to learn more about the role your DNA plays in your story. Get inspired, get informed–and get digging into your DNA! Click on the video below to watch it now.
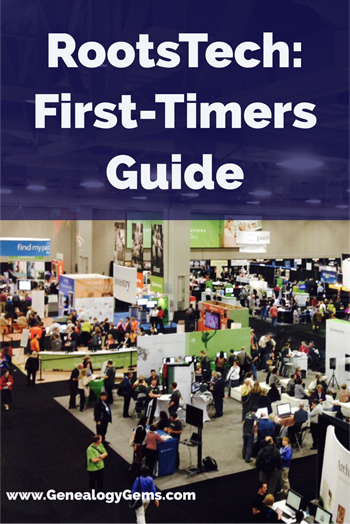
It’s time for genealogists to start making plans for the RootsTech 2020 conference to be held in Salt Lake City, Utah.
I’ve been attending and speaking at RootsTech since 2011, the second year that the conference was held. It’s been so rewarding to be a part of the evolution of this event! This 10th anniversary in 2020 promises to top them all.
I’ll be delivering four presentations this year:
Reconstruct Your Ancestors’ Stories with Google
Genealogy in Your Ears: Podcasters Talk Podcast
3 Cool Cases Solved: How to Identify Your Photos (premiering at RootsTech!)
The 2020 Genealogist’s Google Search Methodology
Each year holds new surprises and opportunities to connect with your fellow genealogists. Below is the recent RootsTech press release providing all the details on registration. And here’s a tip: If you’re travelling from out of town, book your accommodations right away. Some hotels have already sold out.
RootsTech crowds enjoy the many attractions of the popular annual event.SALT LAKE CITY (18 September 2019)—
FamilySearch International has announced that registration for RootsTech 2020 Salt Lake City is now open.
RootsTech is a popular 4-day annual family history and technology conference where individuals and families are inspired to discover, share, and preserve their family roots, heritage, and stories.
The 2020 conference will be held February 26–29, 2020, at the Salt Palace Convention Center in Salt Lake City, Utah. For more information, visit rootstech.org/salt-lake. Discounts are available for early registrations.
In 2019, RootsTech attracted over 20,000 attendees from 38 different countries and all 50 states.
RootsTech 2020 will celebrate its 10th anniversary and the distinguished honor that it is the largest genealogy conference of its kind in the world.
The conference will feature a full lineup of inspiring and well-known keynote speakers, over 300 informative sessions, including hands-on computer workshops taught by industry professionals; interactive activities and helpful exhibitors in the expo hall; and entertaining events—all designed to inspire and empower personal family discoveries.
Conference Details
The theme for RootsTech 2020 will be “The Story of YOU.” Many of the classes, keynote address, and venue décor will reflect this theme.
“At RootsTech, we believe that the stories we’re creating and preserving today are just as important as the stories of our ancestors,” said Jen Allen, event director. “Reflecting on and celebrating each of our personal journeys is an important part of family history that we are excited to explore at the 2020 conference.”
RootsTech 2020 will also introduce learning forums—new class sessions covering a variety of specialized topics including: records access and preservation, innovation and technology, and DNA. One of these forums will be offered on Wednesday, Thursday, and Friday.
RootsTech 2020 will officially begin on Wednesday, February 26 with class sessions beginning at 8 AM MT. Wednesday’s general keynote session will begin on the main stage at 4:30 p.m. Steve Rockwood, CEO of FamilySearch International, will be the featured keynote speaker.
General keynote sessions on Thursday, Friday, and Saturday will begin on the main stage at 11 AM MT and will lead directly into the lunch hour.
Early bird discount pricing is available for a limited time on 4-day passes at just $169 (a $130 discount on regularly priced passes). Single day RootsTech passes are also available for $99. Both one-day and full conference passes include access to the popular expo hall and keynote sessions. Early bird pricing ends October 11, 2019.
Family Discovery Day at RootsTech 2020
Registration for Family Discovery Day is also now open.
The event takes place on Saturday, February 26, 2020, and is designed for families and members of The Church of Jesus Christ of Latter-day Saints.
This free 1-day event includes inspiring messages from Church leaders; engaging classes for families, youth, and young single adults; and evening entertainment to inspire and help families make family history connections.
My kids and their friend having fun at RootsTech
Family Discovery Day attendees will also have access to all the interactive activities and exhibitors found in the RootsTech expo hall. Event details, including speakers and class sessions, will be made available soon at RootsTech.org.
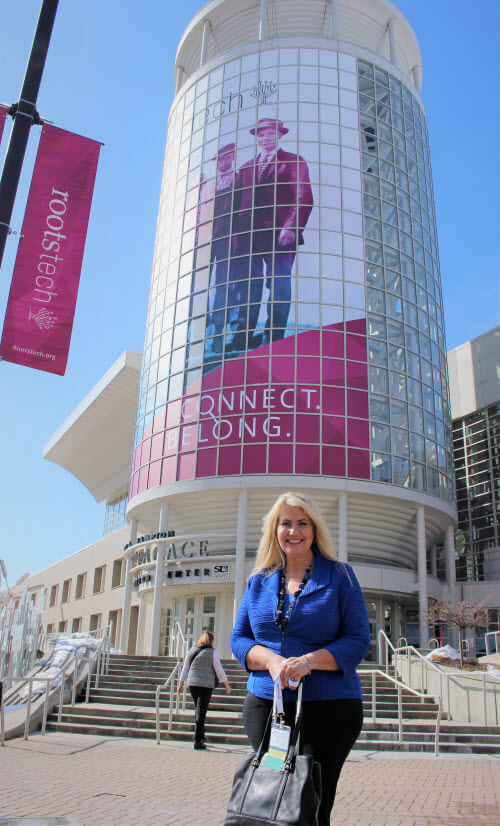
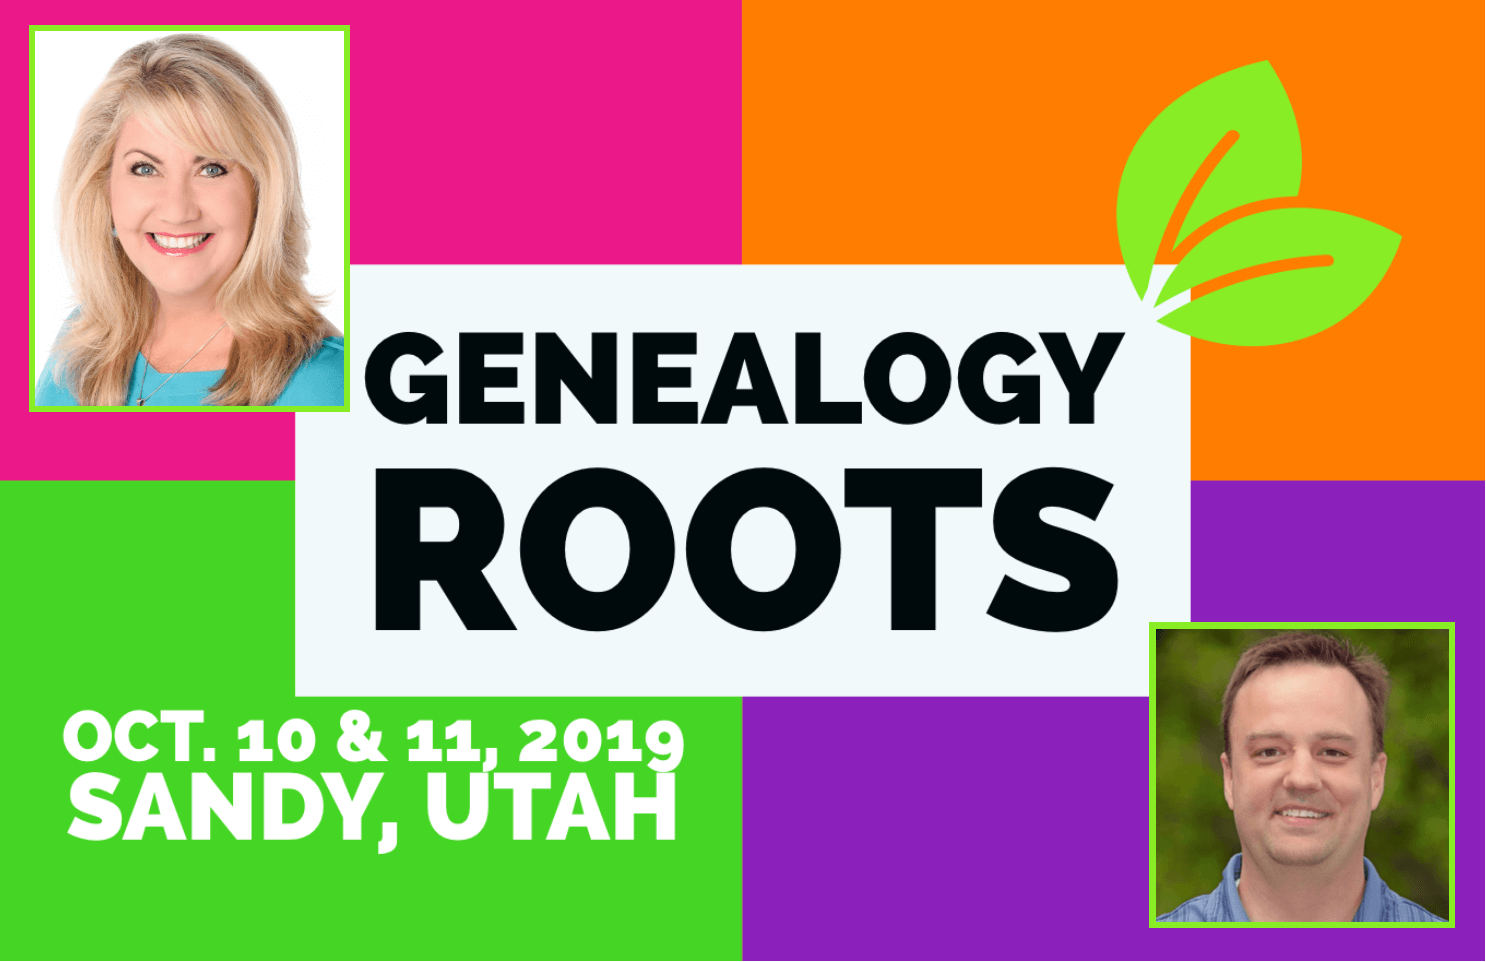
If you enjoy a more intimate genealogy event setting, consider joining me at Genealogy Roots. It’s two days of genealogy education with me and my special guest Geoff Rasmussen of Legacy Family Tree Webinars. It’s coming soon: October 10 & 11, 2019 in Sandy, Utah, just 25 minutes south of the Family History Library in Salt Lake City. Learn more and get the early-bird special on tickets here.
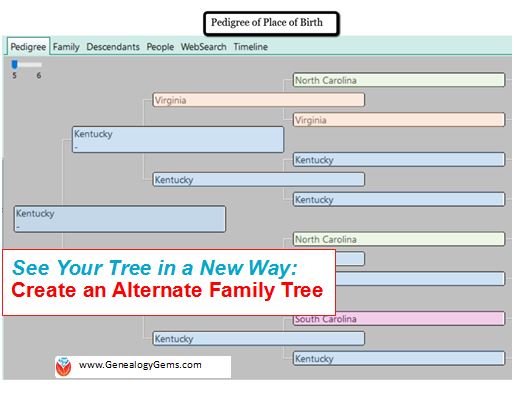
Use an “alternate family tree” to emphasize unique or interesting patterns in your family history, such as eye or hair color, birthplace, age at death, or adoption. Here’s how to do it–and WHY.
Alternate family trees are popping up all over social media and genealogy blogs. Have you seen them? Some trees emphasize the age at death, cause of death, or birthplace for each individual.
There can be tremendous value to creating trees like these. Recognizing patterns can help tear down brick walls. Imagine a pedigree chart with birth places instead of names. It’s a new way to see migration patterns. I also love the a-ha moments I have! For example, the time I realized my hair and eye coloring likely came from my maternal great-grandmother who I have a special connection with.
I can share these quick “did you know” revelations with my relatives on social media (totally shareable images!) or at family reunions. Images are often more powerful than words because they are easy to glance over. Your family won’t be able to resist taking a look, and most importantly, sharing your tree images with other family members. Shared images can generate new information when shared with the right relative. Hey, here’s an idea: you could even blow up your alternate family tree to poster size for the next family reunion!
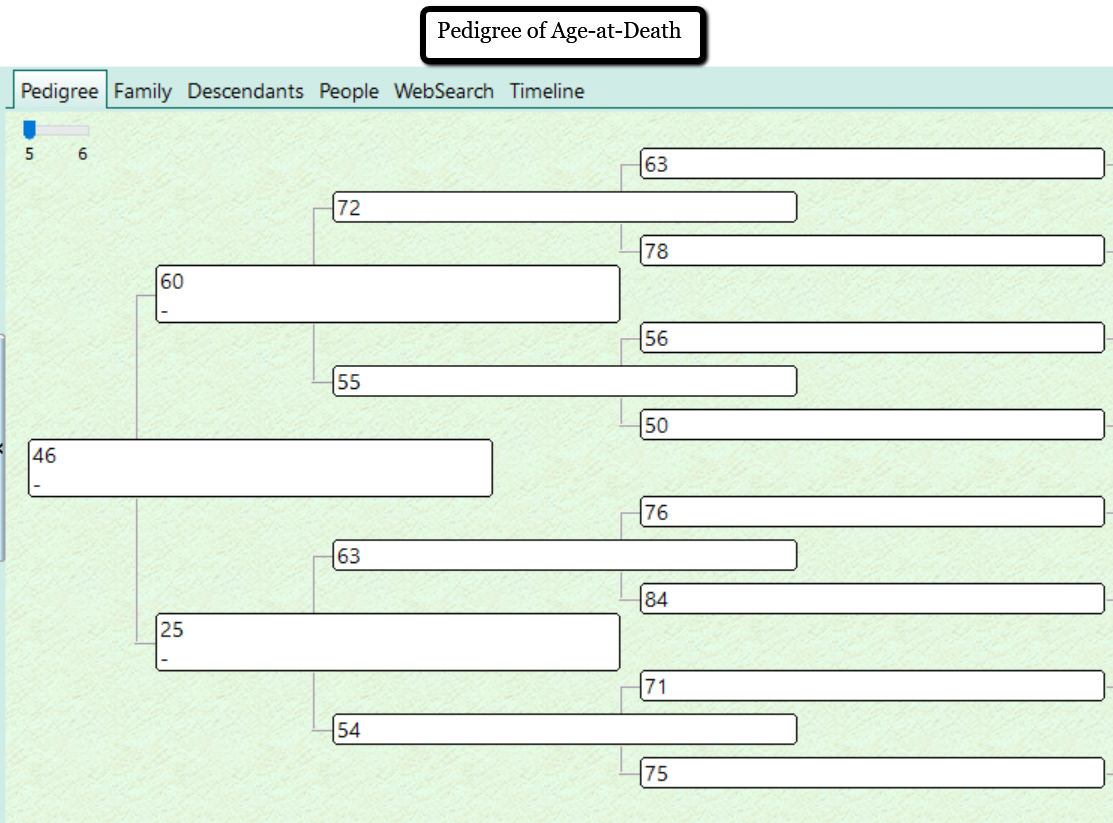
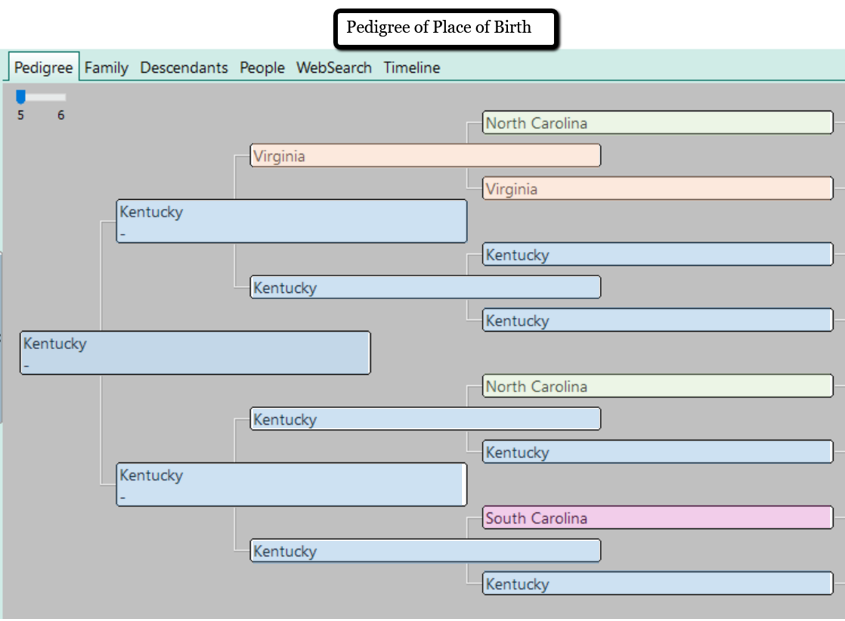
Take a look at these examples of my own alternate family trees for age at death (left) and birthplace (right).
Other alternate family trees may focus on occupations, schooling, or color of eyes or hair.
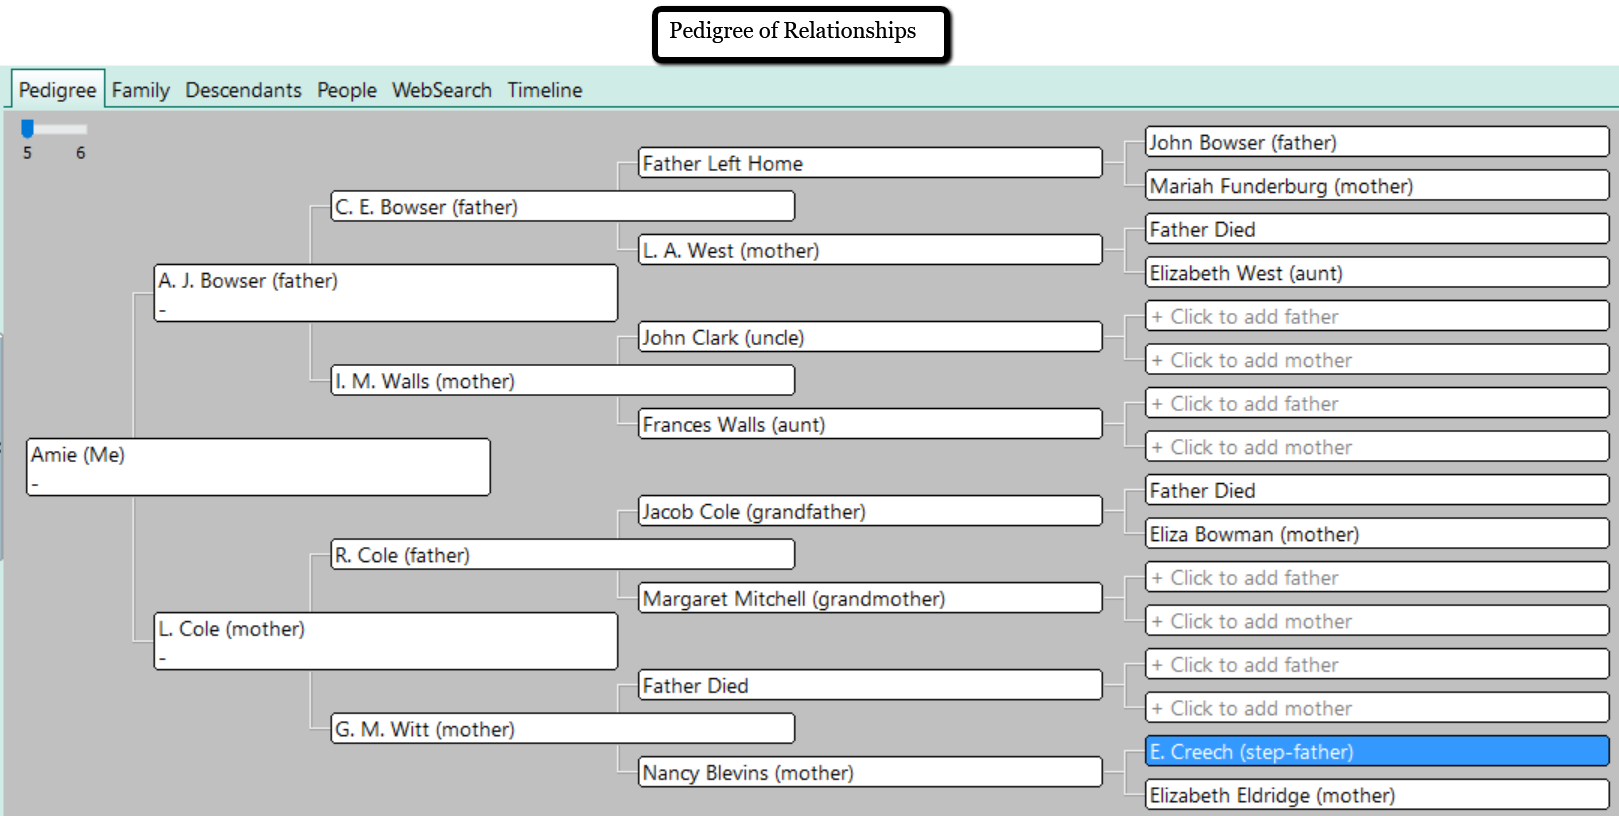
I was inspired to create an alternate family tree that had significance to my own immediate family. We have a lot of adoption in our family tree. My three children are adopted, my husband is adopted, and several of my great-grandparents were raised by other family members. This is a unique perspective. Blood lines are important, but even more important are those people who influenced my family the most as caregivers.
I created a pedigree that indicates who, if anyone, the father and mother figures were. Take a look:
Did you notice that every set of my great-grandparents had one or more parent die or abandon them? I was shocked to see this significant ancestral dynamic. I had never considered the likely effect of such a family tree. It was fascinating!
How to Create an Alternate Family Tree
The easiest way to create an alternate family tree is to use a genealogy software program. I use RootsMagic. RootsMagic is a genealogy software program for PC and Mac computers. (Note: To use RootsMagic on your Mac computer, you will need to use the MacBridge add-on.) You can purchase the full version of RootsMagic for $29.95 or you can use the RootsMagic Essentials for free!
There are two ways to make an alternate family tree using RootsMagic. You can start from scratch or use the wall chart report.
Starting from Scratch
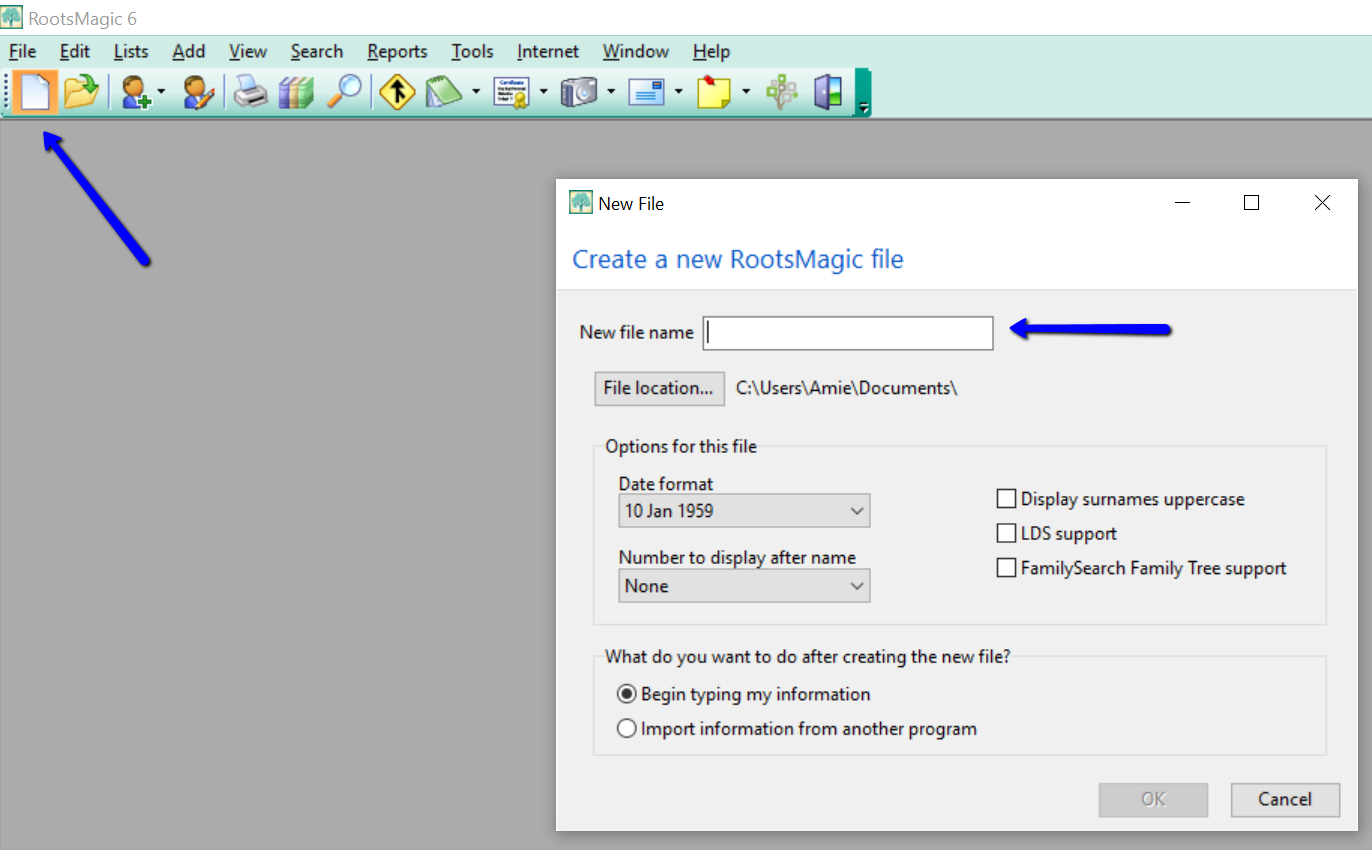
To start a new pedigree:
click the “blank sheet of paper” icon at the top left. Name your tree with a title that will indicate its purpose. (Example: Age-at-Death Tree)
Instead of using the names of your ancestors, use whatever alternate pieces of information you wish in the name fields.
Now, you simply click “Reports” across the top and choose “Pedigree.” You can generate the report and print out your new alternate tree.
Using an Existing Tree
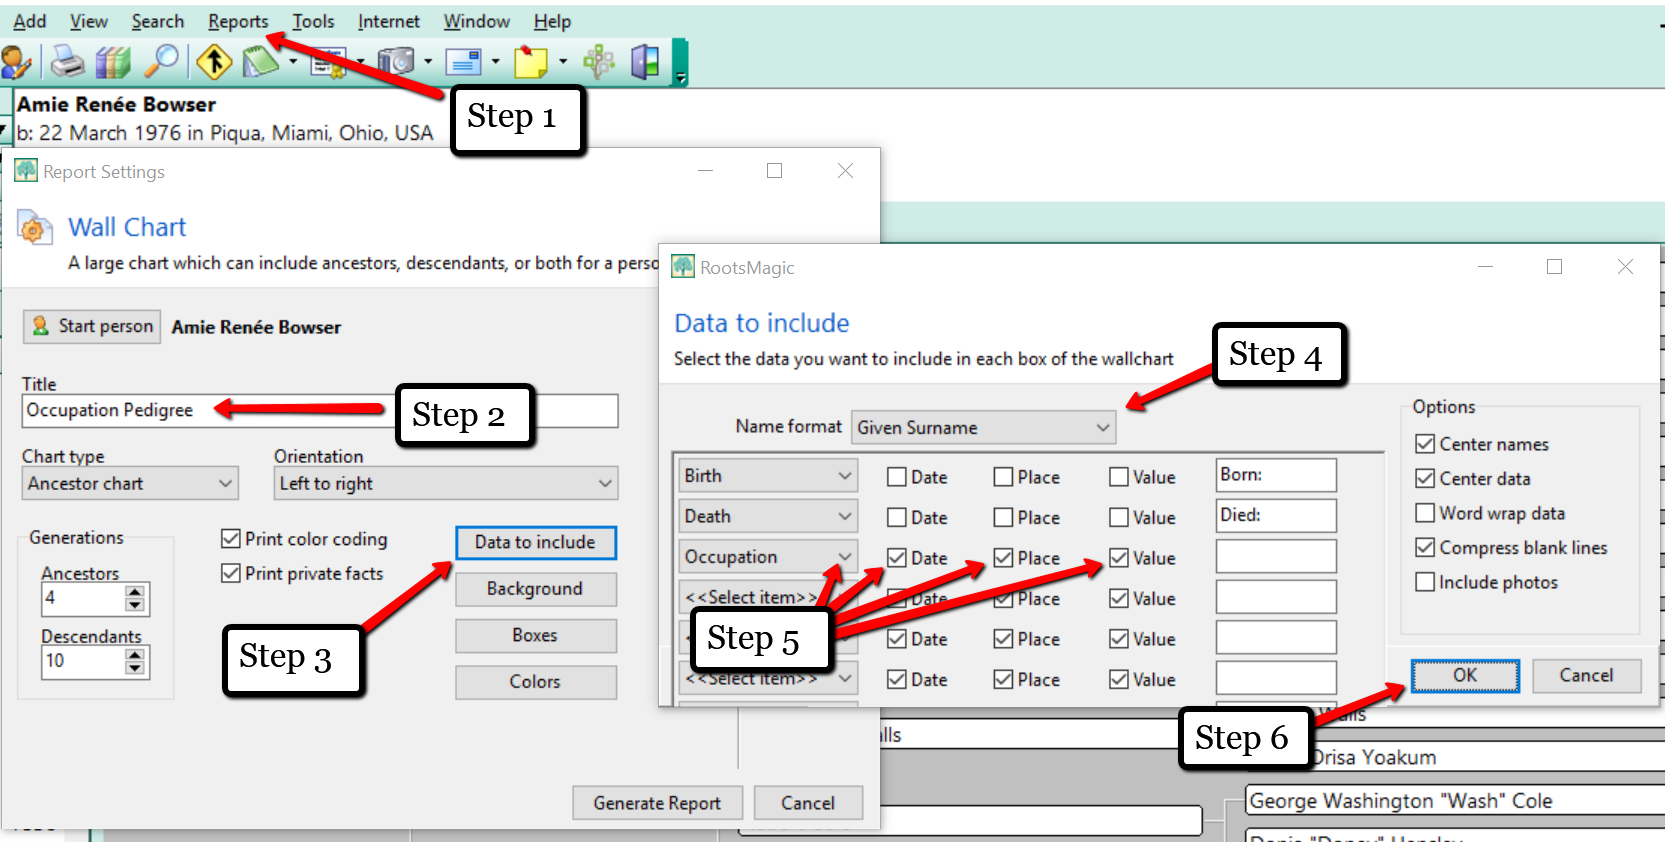
If you already have your tree on RootsMagic, you can use the Wall Chart feature to create trees with unique data.
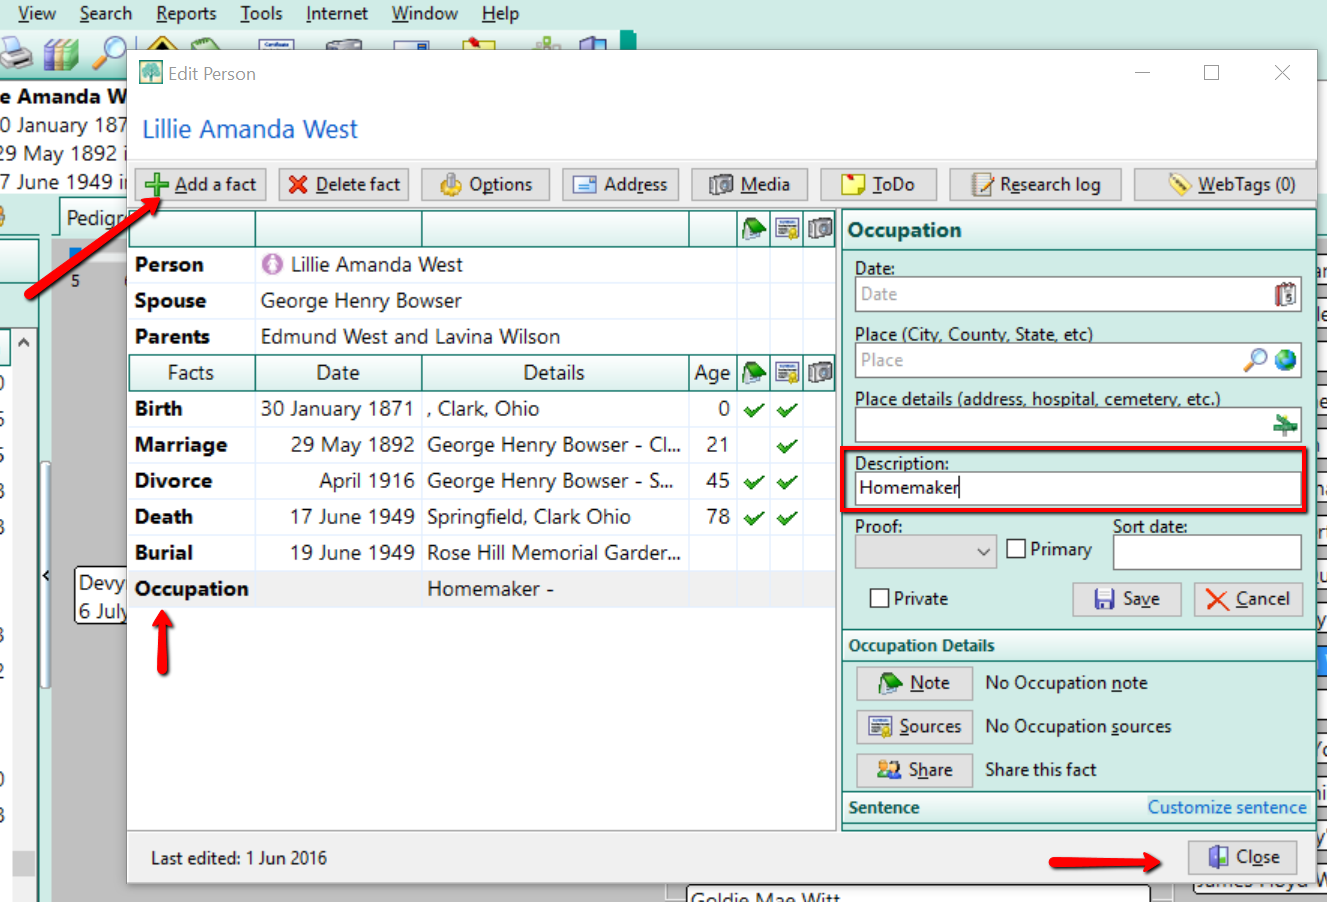
As an example, if I wanted to create an occupation family tree, I would first need to enter that data for each person by clicking on the individual and then “Add a Fact.” From the drop-down list, choose “occupation.” Type in the occupation in the description field at the right and click “Save.”
Add the occupation to each individual and when you are ready to print your alternate family tree, simply take the following steps in the image below.
After taking these six steps, it is time to “Generate Report.” You will be taken to a new screen where you will see your creation.
Once you have completed your alternate tree, it’s a great idea to print it and lay it out in front of you. You might ask yourself, “What does this information tell me?” The interpretation of the data will be unique for everyone. Maybe your “Cause of Death Tree” will make you think, “Oh no! I should really be watching my heart health!”
I hope that you will take the opportunity to create an alternate family tree or two today. Genealogy Gems Premium website members who like this idea will also want to listen to Genealogy Gems Podcast #136, due out later this month. In that episode, Your DNA Guide Diahan Southard goes in depth on the value of gathering family health history.
How does this view of your family tree make you feel?
We love to hear from you so leave your feelings or comments below,
and please feel free to share your alternate family tree on our Facebook page!
Show Notes: Getting your old home movies into shape so that they can be easily enjoyed by audiences today can seem daunting, but it doesn’t have to be. With the right video editing tool and a little bit of know-how you can turn digitized home movies into family history fare for all your relations. It’s time to get your home movies out of the closet and onto a screen near you.
Video and show notes
In this video, I’ll show you how to edit digitized home movies in my favorite video editing software program, Camtasia by Techsmith. (Use our affiliate link now through 8/26/22 to get 20% off Camtasia and / or Snagit. We will be compensated which helps support free videos like this one.)
If you already have another program, you can still follow along and learn best practices for great edited home movies that are easy to share and enjoyable to watch.
Don’t have old home movies? You can also use Camtasia to create videos using static images and photos.
Discounts:
Larsen Digital: I got my family video (and audio) tapes digitized at Larsen Digital, a family-owned business that cares about family history. Click here to get 15% off on your Larsen Digital order when you use our exclusive coupon code GenGem.
Camtasia: Use this link to Camtasia and our coupon code GENE15 to get 15% off for a limited time. (Note: Maintenance and asset add-ons are optional and can be opted out of if desired during checkout. Discount applies to Snagit as well! )
Watch the video How to Edit Home Movies:
Show Notes
Have you gotten some of your old home movies digitized, only to have them just sit on your computer. It’s it can happen really easily. It’s certainly happened to me. And in this video, what I’m going to do is show you how easy it is to edit your old home movies yourself, so that you can get them cleaned up and ready to share with your family.
I had a ton of movies that I got digitized a couple of years ago, and they just sat on my computer. Now, all I can say is I’ve been busy making videos for this channel. I guess that’s my excuse for not getting around to them.
Larsen Digital Exclusive Discount on Digitization
Recently, I found another batch of videotapes. I found VHS, High 8, and I even had an audio tape that needed to get digitized. So, I sent it off to my favorite place, Larsen Digital, a family-owned business that cares about family history. Click here to get 15% off on your Larsen Digital order when you use our exclusive coupon code GenGem.
Larson has done an amazing job getting my tapes digitized in the past. They send them back quickly, and you get them on DVD as well as mp4. Larsen Digital is graciously offering all of us a great discount on digitization. If you haven’t gotten your tapes done yet, they will take care of it for you.
When you get those mp4 videos back, they can be fairly large files. That’s because some of those VHS tapes can be six hours long. Therefore, we need to do some editing. If we don’t, they’re going to be really unwatchable. Typically, we have lots of stops and starts and fingers in front of cameras and blank spots on our videos. On our tapes we had lots of chunks where we had filmed TV shows. Then we started filming home movies again! So, home movie videos typically need to be cleaned up because our relatives are not going to want to sit around and watch six hours of random, chaotic stuff.
As family historians it is our job to edit the video into something watchable and enjoyable. The good news is these days it’s not a hard job thanks to the great tools that are available. I’m going to explain how I use my favorite video editing tool called Camtasia. In the video, I’ll show you how easy this is to do. I think if you see it, you will feel like this is something you can do. I really enjoyed editing my own films.
Camtasia Software Discount
Use this link to Camtasia and get 20% off now through 8/26/22. After that you can use our exclusive coupon code for 15% off: Gene15 (works on Snagit too!)
Camtasia is definitely a terrific product and easy to use. I use it to create my Genealogy Gems videos, and I also use it for home movies and all kinds of other projects. If you have your own video editing tool already and maybe you just haven’t gotten started working on your home movies, I think you’re still in the right spot because I’m going to show you how quick and easy it can be to get these tapes cleaned up and made usable. If you don’t happen to have home movies, you might still want to keep watching because Camtasia does a terrific job taking photographs, images, other pieces of content you can add narration and music and all kinds of stuff making your own version of home movies.
Step 1: How to Import video files into Camtasia
In Camtasia you will see the media bin, I’m going to import my media which is my mp4 video file.
You can see on the left side that there are lots of different things we can do. We’re going to touch on the most important for you for editing your home movies. Whatever you have selected, that’s what shows in this column just to the right of the menu. Make sure you’re in Media. (You can also import media through the menu at the top of the screen.) Click the ImportMedia button and navigate to your video file on your computer and open it. This will bring it into the Media bin.
Step 2: How to Select the Correct Project Size in Camtasia
The second step is to select your project size based on what it is you want to do. It’s really important to think about what is going to be the final purpose of the video. Do you want to be able to Airplay this up onto your TV screen on a big screen and be able to see it? If so, then you’re going to need a pretty high-resolution (large) file. Or are you really interested in getting lots of fun clips that you can share out on social media? If that’s the case, you don’t need as big of a file to be able to have it viewed on a mobile device or on the web.
Camtasia makes it super easy for you to find the right project size. At the top, click the down arrow next to the percentage number (called Canvas Options) and select Project Settings. Here you can see the current project size. What we want to do is pick from the standardized dimensions for the product (output) that we need. Here are some examples:
Social media: 1280 by 720 px. That’s a very standard size that would look great on anybody’s tablet or phone.
Full size computer screen or TV: 1920 by 1080 px (HD). That’s a very standard format
You probably don’t have 4k home movies. If you sent your tapes to a very specialized company, they might have the ability to give you 4k output. But it’s really overkill for what you’re trying to do. Typically, the 1080 HD is going to be what you want.
When you click to select the size, it is populated in width and the height. Click Apply. Now you have that exact project size. I think probably one of the biggest mistakes I made early on in my editing career was not checking project size as the first step.
Step 3: Drop the Video onto the Timeline
Next, we’re going to bring the whole movie onto the timeline where can then edit it.
When we hover our mouse over the video in the media bin, we can see all the different shots (this is called scrubbing,) When you start to drag the video out of the bin blue lines appear around the screen areas where the video can be place: the video canvas at the top of the screen and the Timeline at the bottom of the screen where the editing actually is done.
If when you drag the video into your project it looks smaller than the canvas, that means the film is a lower resolution (size) than the project size you selected. You don’t want to get too far apart in those two things. If I had a very small film (low quality) I might want to think about making my project size a little smaller because I don’t want it to look blurry when it’s done. Typically, I think you’ll find that your video file will be a standard size and will fit pretty nicely.
Using Multiple Tracks in Camtasia
I usually drop video directly onto the timeline. The reason is because usually I’ll end up adding stuff additional content to the timeline, and that’s where tracks come into play.
Your project will have two tracks at first. However, you can add many more by clicking the plus sign. Each track gives me the ability to have a piece of content on there. So, I might have my home movie on track one, narration audio on track two, annotations (text) on track three, etc. Each track gives me the chance to have different pieces of content so that I can edit them without cutting up the other items. It’s really convenient having each item on its own track.
Moving Content on a Track
You can easily move your video around on the timeline to position it exactly where you want it. Click on the content (in this case the home movie file) and drag it to the desired location. You’ll see that Camtasia will sort of allow you to “snap” items into the best position. For example, pushing the video up to the beginning of the timeline (the zero mark).
Editing a Video in Camtasia
How do you know where you’re going to be editing? Well, that’s where the playhead comes into play. The playhead is the marker on the timeline that shows us where we are at any point in the video. You can drag the playhead across the video – called scrubbing – to review it.
If you want to see your entire video on the timeline, you will likely need to zoom out. Click the minus sign to zoom out, and the plus sign to zoom in. Keep clicking until you can see the entire bar of video. Hover your mouse on the video and you can see how long it is. My video is 32 minutes, and seven seconds. So, this is the whole film that I’m going to work on. As we do our editing, we’re going to want to be zoomed in because we want to be really precise with our cuts and clean up.
Initial Types of Editing
So, what kind of editing would you be doing? Well, first and foremost, I like to go through and just clean up stuff that I don’t want things like blank spots, damaged footage, and mistakes in filming. As you scrub through the video look for these areas.
Clean-up makes watching home movies much easier on the viewer. Everything comes back to the experience of the viewer that you want to share your videos with. If you want to share home movies with your family, you got to make them easy to watch, right? We want to make them enjoyable. We don’t want them getting seasick or bored. That way when they watch the finished films, they’re going to really enjoy them. And they’re going to want to see more and talk about family history.
Scrub very slowly until you see something you don’t want. Zoom in a little bit more if necessary to see exactly where you want to make your cut. On the playhead grab the red handle and drag it. Then drag the green handle. This identifies the area you want to cut. Press play and the grey playhead will jump to the beginning of the section you marked and play it for you so you can make sure it’s what you want to cut. Review and adjust the handles as needed.
To cut the section, click the Cut button with the scissors icon. (Control X) Review the section one more time to ensure you like the cut. You will see a stitch mark where you made you cut.
These small cuts may not seem like much, but when you do this throughout a 32-minute film, you may end up with a 20-minute film that’s much more watchable.
Adding Transitions to Video in Camtasia
One of the other things that you might want to do to make your video even more watchable is to create some transitions between scenes or clips. To do this, bring the playhead back to the stitch mark where you made your cut, and zoom in to make sure you’re right on top of it. Click the video to select it so that Camtasia knows this is the content you are working on. In the menu on the left, click to select Transitions.
There are many to choose from, however most people don’t really enjoy watching lots of wild crazy transitions. It can actually make them feel seasick. It’s better to go with something simpler and smoother. The whole point is to make it enjoyable and watchable for your family members. I really like Fade, and Fade to black. You can add these to your Favorites bin by clicking the Star. That will save you time, so you don’t have to dig through all of the Transitions every time.
Use Fade when cutting within the same scene or clip.
Use Fade to black when cutting between two different scenes or clips.
Place the playhead on the stitched cut, and then click the Split button. Now you can drag the transition onto that spot on the timeline. Camtasia will create a standard-length transition, but you can adjust it by dragging the transition. Move the playhead to a spot just before the transition and press play (or tap your keyboard’s space bar) to review it.
You can change the transition by dragging and dropping a different transition onto it. It will turn red indicating that you are changing it.
Camtasia Undo / Redo
You can undo or Redo in the menu at the top of the screen under Edit.
How to Create a Video Clip
If your film is a hodge-podge of different scenes or a mix of TV shows and home movies (like some of my VHS tapes were) then you’ll want to create clips of just the sections you want so that you can use them in another project. It’s easy to Produce / Export clips from your full-length video without creating a new project.
How to create a clip:
Zoom in on the desired area
Drag the green and red playhead handles to identify the desired clip.
Right-click on the area and select Produce As
This brings up the Camtasia production wizard. Select the desired production size. In other words, you can export the clip at any resolution you choose. It doesn’t have to be the same as your project size that you selected when you started.
Name the clip and save it to the desired location on your computer hard drive.
Click The clip will display on your screen when it’s done.
Additional Content that can be Added to Your Home Movies
Music and Audio files
You can import audio files such as MP3 and WAV into your media bin and then drop them onto a new track in your project. These files can be edited much like you edit video. You can get free music MP3 files from YouTube. Sign in with a free YouTube (Google) account, click on your account icon in the upper right corner of the screen and select YouTube Studio. In the studio, scroll down the menu on the left side of the screen and select AudioLibrary. Here you can search for and download music tracks.
Voice Narration
If you have a microphone hooked up to your computer you can narrate all or just sections of your home movie. This is a great feature particularly when working with older silent home movies. Select VoiceNarration from the menu on the left, and then click the Start Voice Recording button. The recorded narration will appear on a new track on the timeline. You can even write your script and then copy and paste it into the Voice Narration tool.
Annotations
Annotations are a great way to provide more information about what the viewer is watching. For example, you can add text boxes to the video. Choose from a wide range of annotations. Drag and drop the annotation on the timeline. Drag the edges of the annotation to make it the desired length. Click on it to select it and then you move it anywhere on the timeline. When selected, you will see the annotation Properties on the right side of the screen which allow you to customize it. (Font, color, line thickness, etc.)
Our final step here is going to be to export this video. Now, clearly, I haven’t finished on my editing, I’m going to finish up my editing and we’ll come back and we will export the video as a finished cleaned-up film.
Step 4: Save and Export (Produce) a Video in Camtasia
After my initial clean up my 32-minute video is now 19 minutes and four seconds. I’ve saved my family from 12 minutes of video that just wasn’t worth watching and might have gotten them discouraged about watching home movies.
Now it’s time to save your work. In the menu go to File > Save As. Hopefully, you have already created a folder on your computer where you know you’re going to keep your project and all your content. That way, you can work on it again later if you want to make more changes or export more clips.
Next, we’re going to produce the actual edited film. Another way to say it is that we are going to export the edited video. In the menu go to Export and then select where you want to send your video. You can upload directly to locations such as Vimeo or YouTube or Google Drive. If you want to export to your computer select Local File. You will again get the wizard. The wizard is going to remember the last export you did, so be careful to review that and change it if desired. Select MP4 and then click Next and select the folder on your computer and click Finish. Depending on the size of your video, it may take several minutes to render.
Edit Your Home Movies: Wrap Up
I hope that helps you feel empowered to get started editing your home movies. It’s really worth doing and it doesn’t have to be that time-consuming. The trick is to just set aside a little bit of time every week and start doing it right away because they’re not doing anybody any good sitting on your computer where they can’t be seen. Let’s get him out in front of our family and share that family history.
 How to Get DNA Health Reports
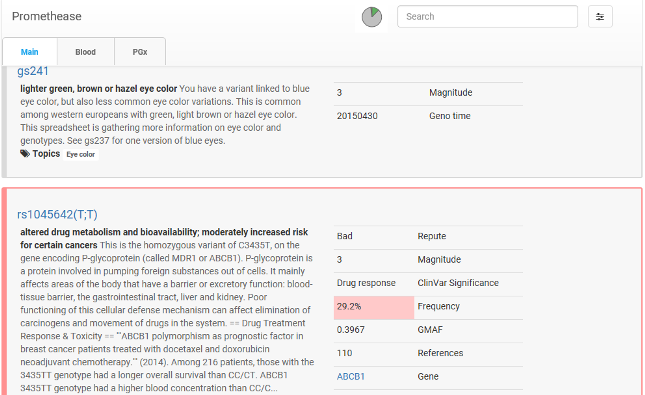

 Use an “alternate family tree” to emphasize unique or interesting patterns in your family history, such as eye or hair color, birthplace, age at death, or adoption. Here’s how to do it–and WHY.