Show Notes: Have you ever wondered what it takes to be a Forensic Genetic Genealogist. Dr. Claire Glynn joins me to talk about the field of investigative genetic genealogy, criminal cold cases solved, and the new Forensic Genetic Genealogy certificate program she has developed at the Henry C. Lee (notable for his work on the OJ Simpson case and many others) College of Criminal Justice and Forensic Sciences at the University of New Haven.
Fort Wayne, Indiana is the home of the second largest free genealogy library in the country. Make your plans to visit today. Learn more at https://www.visitfortwayne.com
Don’t miss the Bonus audio for this episode. In the app, tap the gift box icon just under the media player. Get the app here.
Get the Free Genealogy Gems Newsletter
The Genealogy Gems email newsletter is the best way to stay informed about what’s available with your Premium eLearning Membership. Sign up today here.
Obituaries and death indexes feature prominently in recently-updated collections at Ancestry.com. These collections take us around the world: from Australia to the U.S., Canada, England, Scotland, Ireland and Wales, then to Germany and The Netherlands.Featured:...
Fort Wayne, Indiana is the home of the second largest free genealogy library in the country. Make your plans to visit today. Learn more at https://www.visitfortwayne.com
Don’t miss the Bonus audio for this episode. In the app, tap the gift box icon just under the media player. Get the app here.
Get the Free Genealogy Gems Newsletter
The Genealogy Gems email newsletter is the best way to stay informed about what’s available with your Premium eLearning Membership. Sign up today here.
Doing genealogy research generates a wide variety of research notes: typed and handwritten, audio, photos, video, and screenshots of information on websites. If you want one tool to pull together your current research projects, Evernote might just be the answer. In this video and article you’ll learn the role that Evernote can play, what it is and how to set it up, and your options for using for free or as a subscriber.
Evernote for Genealogy Video Tutorial
In this video and article Lisa Louise Cooke will discuss:
What Evernote is and the role Evernote can play in your genealogy research
Use it for free or upgrade to get all the bells and whistles like OCR and use on all your devices. (We will be compensated if you use our affiliate link. Thank you for supporting this free show.)
Show Notes
In my recent videos on how to avoid research rabbit holes that keep you from your genealogy goals, I mentioned that I use Evernote to capture BSOs or bright shiny objects that are interesting but not what I’m working on at the moment. So in this video I’m going to explain what Evernote is, and how to get started using it.
Evernote puts all your notes in one place and offers an incredibly fast and easy way to retrieve them.
Evernote is a:
website
software program for your computer (Win & Mac) that you download for free from their website
mobile app (iOS & Android): search for Evernote in your device’s app store
a web clipper for your computer’s web browser
Benefits
Genealogy can get a big messy. Information can be gathered from countless sources and in a variety of forms. You could funnel things through a cloud service like Dropbox. However, because Evernote is a note taking app, it offers unique and super helpful features:
Create all types of notes
From all of your devices. Thanks to Cloud synchronization you can take a note on any device and always have access to the most current version. (Free mobile app)
Web clipping – It allows you to clip items from the Internet (rather than saving entire bulky web pages),
OCR technology makes notes (such as newspaper articles) keyword searchable (subscription)
Data like URLs and the date you created the note is automatically included
No total storage limit, just monthly upload
You can use it for free, and upgrade for all the bells and whistles.
Install the software on your desktop computer (Windows & Mac)
Download the web clipper to your browser (app store or Google it)
Download the free Evernote app to your mobile devices from the iTunes App Store or Google Play
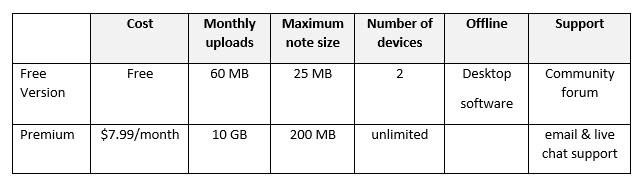
Features & Costs
(Subject to change. Visit evernote.com/compare-plans)
Evernote pricing plans comparison Sept. 2021 – See the website for the most current offer.
Software Home Layout
Evernote’s Home view gives you a summary of what you’ve got going on in Evernote. If Home is new to you and you don’t see it, simply head to the left Navigation menu and click Home.
Home gives you a place to sort of summarize what you’ve got going on in Evernote. It also allows you to add more personalization.
A fun way to personalize Evernote is by adding a background image. Click Customize in the upper right corner, and then click the Change Background button. Here you can add a preset image or add your own.
By default, Home comes with widgets such as:
Notes (highlighting your most recent notes, and Suggested notes based on your activity)
A Scratch Pad
Recently Captured items by type (web clips, images, documents, audio and emails)
While you’re in Customize mode, you’ll see additional available widgets like:
Calendar (allowing you to sync your Google calendar with Evernote)
Filtered Notes
Notebooks
Pinned Notes
An additional Scratch Pad
Shortcuts
Tags
Tasks
We’ll explore some of these further in a moment. But first, let’s create our first note!
All Notes View – SnippetView:
Left column = your files and organization
Center column = search for notes
Right column = the note you are currently working on
Change the layout by clicking the View Options icon (in SnippetView it appears at the top of the search column). This will give you a variety of layout options.
Change what appears or is hidden from view, and whether the view is dark or light by clicking View in the menu.
Notetaking 101
Create a note by clicking the New Note(+) button at the top of the screen.
Creating a new note is as simple as starting to type. Evernote saves your work instantly and without any extra effort on your part. Notes are saved in “the Cloud” on Evernote’s servers. This means all of your notes are automatically backed up. In addition, all of your notes will sync across all of your various computing devices. And Evernote facilitates sharing notes with others for research collaboration.
Click the Info icon at the top of the note to see the meta-data for that note. You can add and edit this information.
Types of Notes:
Typed
Sketched
Photos
Attachments
Video
Audio
Note Info has changed and can now be found by pressing Control + Shift + I on your keyboard, or clicking the More Actions (3 dots icon) in the upper right corner of the note and selecting Note Info.
Tagging is the Key to Organization
Add a tag based on important keywords associated with the note.
Examples of tags for genealogy:
Surnames (Cooke, Moore)
Record types (birth, census, land)
Locations (Indiana, Germany)
Time frames (1900-1909, 1910-1919)
Tasks (pending, add to database, follow up, etc.)
To tag a note, click Add Tag at the top of the note and select a tag from your list or add a new tag. Tags will appear in the left column. Click any tag in the left column to retrieve all notes with that tag.
Evernote Tasks
In June of 2021 Evernote added a Tasks feature. It operates just a little differently than how I’ve been using tasks. Evernote tasks are:
To Do Items
Note Specific (versus a tag which can retrieve all notes with that task)
Often Deadline Driven
Assignable to Others
Searchable
Where is the Trash?
You will find Evernote’s Trash bin at the bottom of the Navigation bar on the left.
Notebooks
Notebooks take organization a step further. I create notebooks sparingly. I use them to divide Evernote up into workspaces: Genealogy, Personal, Business, etc. I also use them for long-term and collaborative research projects that I may want to share with others. You can drag and drop notebooks on top of each other to create Stacks, although Evernote only allows one level of stacking.
How to create a new notebook:
In the menu select: File > New Notebook
Name the new notebook in the pop-up window
Select notebook type – usually you would set it up to synchronize, but you do have the option to have the notebook reside only on the computer it was created by selecting Local
The Cloud and Synchronization
Notes are saved on your computer and in the Cloud on Evernote’s servers. This means all of your notes are automatically backed up, and also accessible from your account on their website. Your notes will sync across all of your computing devices that have Evernote installed. There’s no need to manually sync with the new version. It happens automatically whenever you’re connected to the internet.
Web Clipping
As you visit webpages, you can clip just the portion of the page that you want to remember and keep rather than printing the page or bookmarking it. You can type the source citation directly into the note. Clippings appear as images in the note.
How to clip a screenshot using the computer software:
Right-click on the Evernote icon in your computer task bar.
Select Clip Screenshot.
Use the cross-hairs to draw a box around the desired content.
Release you mouse and you will see a quick flash on the screen indicating the content has been saved as a note in Evernote.
In Evernote click on the note to type additional information if desired.
How to download the free Evernote web clipper for your web browser:
Go to: evernote.com/webclipper
The download page will detect the browser that you are using and offer the correct web clipper. Click the download button.
The Evernote web clipper will install in your web browser (look in the upper right corner of your browser for the elephant icon.)
Sign into your Evernote account in the clipper.
Using the Browser Web Clipper:
When you visit a web page and find something that you want to clip, click the Evernote Web Clipper (elephant) icon in your web browser. The browser web clipper can save:
a full page (even the parts out of view)
an article
a simplified article (removing unwanted graphics and text not pertaining to the article)
a screenshot (where you precision clip with cross hairs)
a bookmark
As you clip you can select which notebook to file the note in and add any desired tags. It will also include the URL in the note header.
Search and Retrieval
Type a keyword into the search box and Evernote will locate and display notes that contain the keyword in the center column. This includes typed text from a website clipping or image, as in the example above. With a subscription, OCR technology makes it possible for you to search for words in Evernote to retrieve notes that include those words, both on the clipped image and in printed handwritten text.
FOR ANDROID USERS: How to Get the Premium Feed on Your Android Mobile Device
Recommended app:Podcast Addict for Android, available in the Google Play Store.
Follow these steps to set up the Premium Podcast using the Podcast Addict app for Android. Examples shown below are on a tablet, so keep in mind that it may look slightly different on your device.
1. Download the Podcast Addict App
Podcast Addict app
Google Play Store
On your device, go to the Google Play Store and download the Podcast Addict app.
(*Note: If you’ve never used the Google Play store you may be required to set up an account, including payment information. This is unrelated to Genealogy Gems, but necessary in order to download apps from the Google Play Store.)
Recommended app:Podcast Addict for Android, available in the Google Play Store.
Follow these steps to set up the Premium Podcast using the Podcast Addict app for Android.
NOTE: Examples shown below are on a tablet, so keep in mind that it may look slightly different on your device.
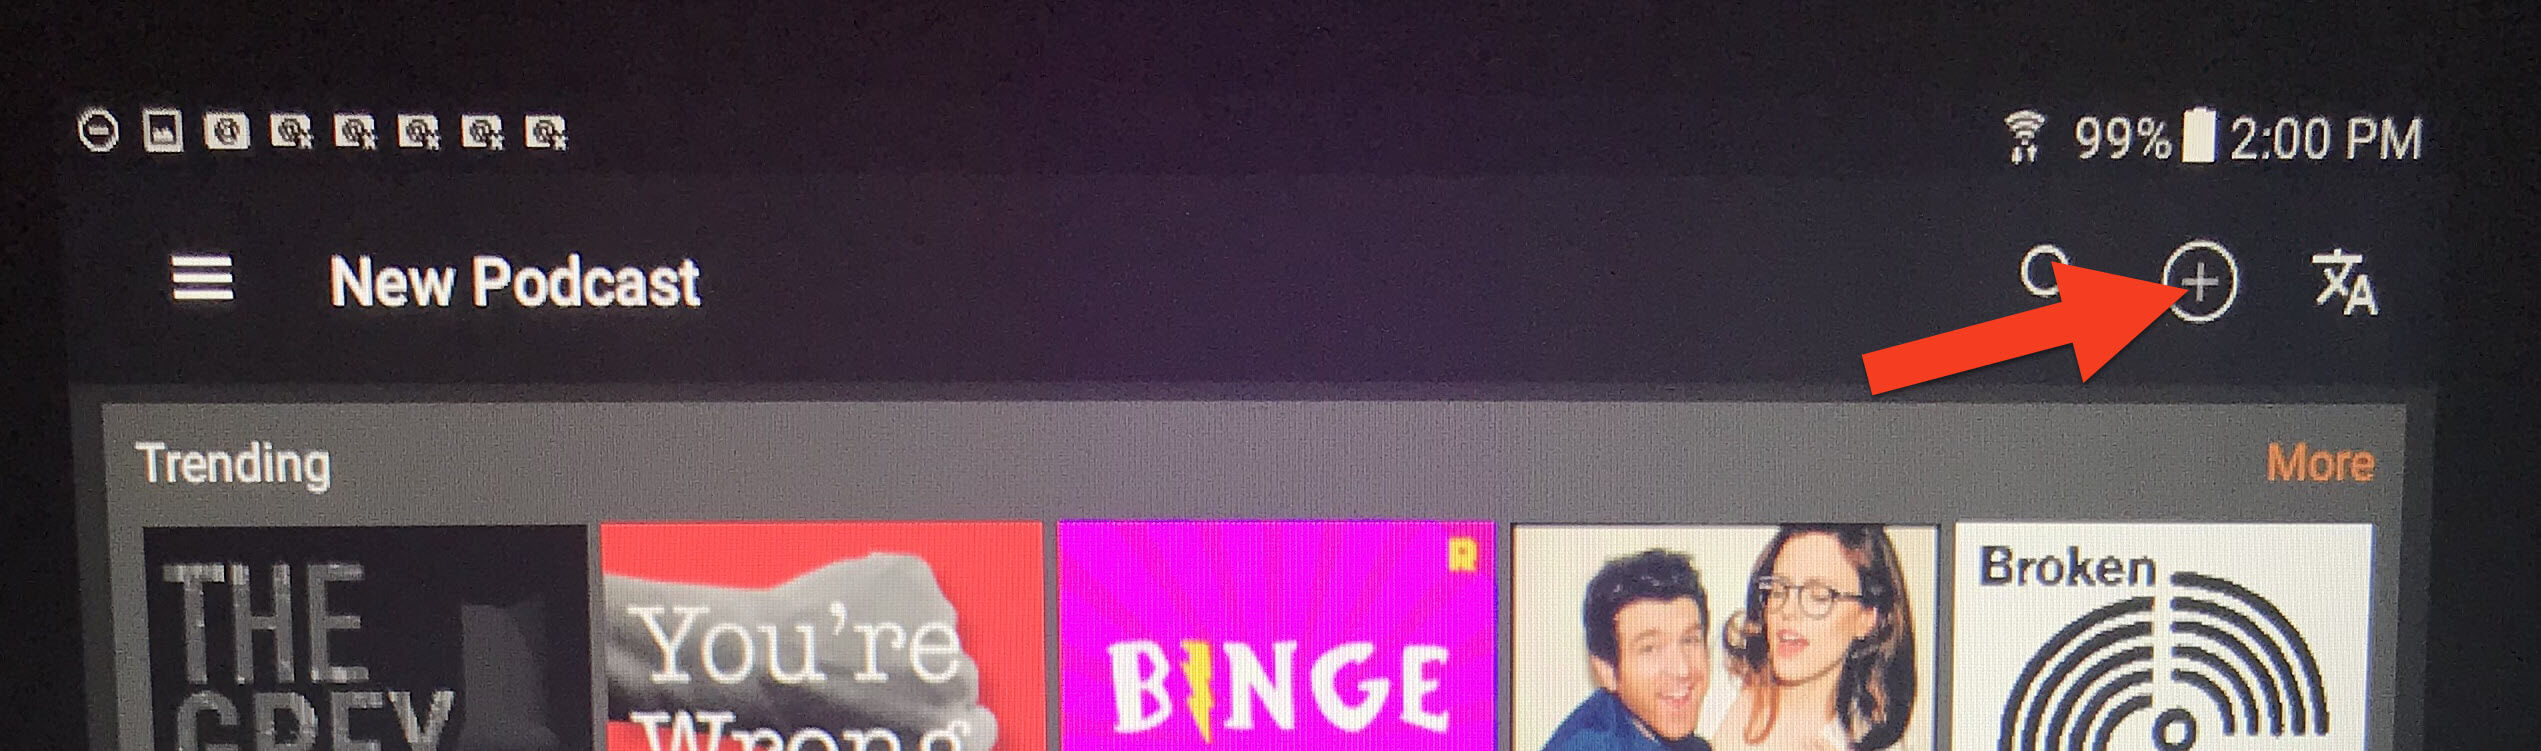
2. Add the Genealogy Gems Premium Podcast Feed
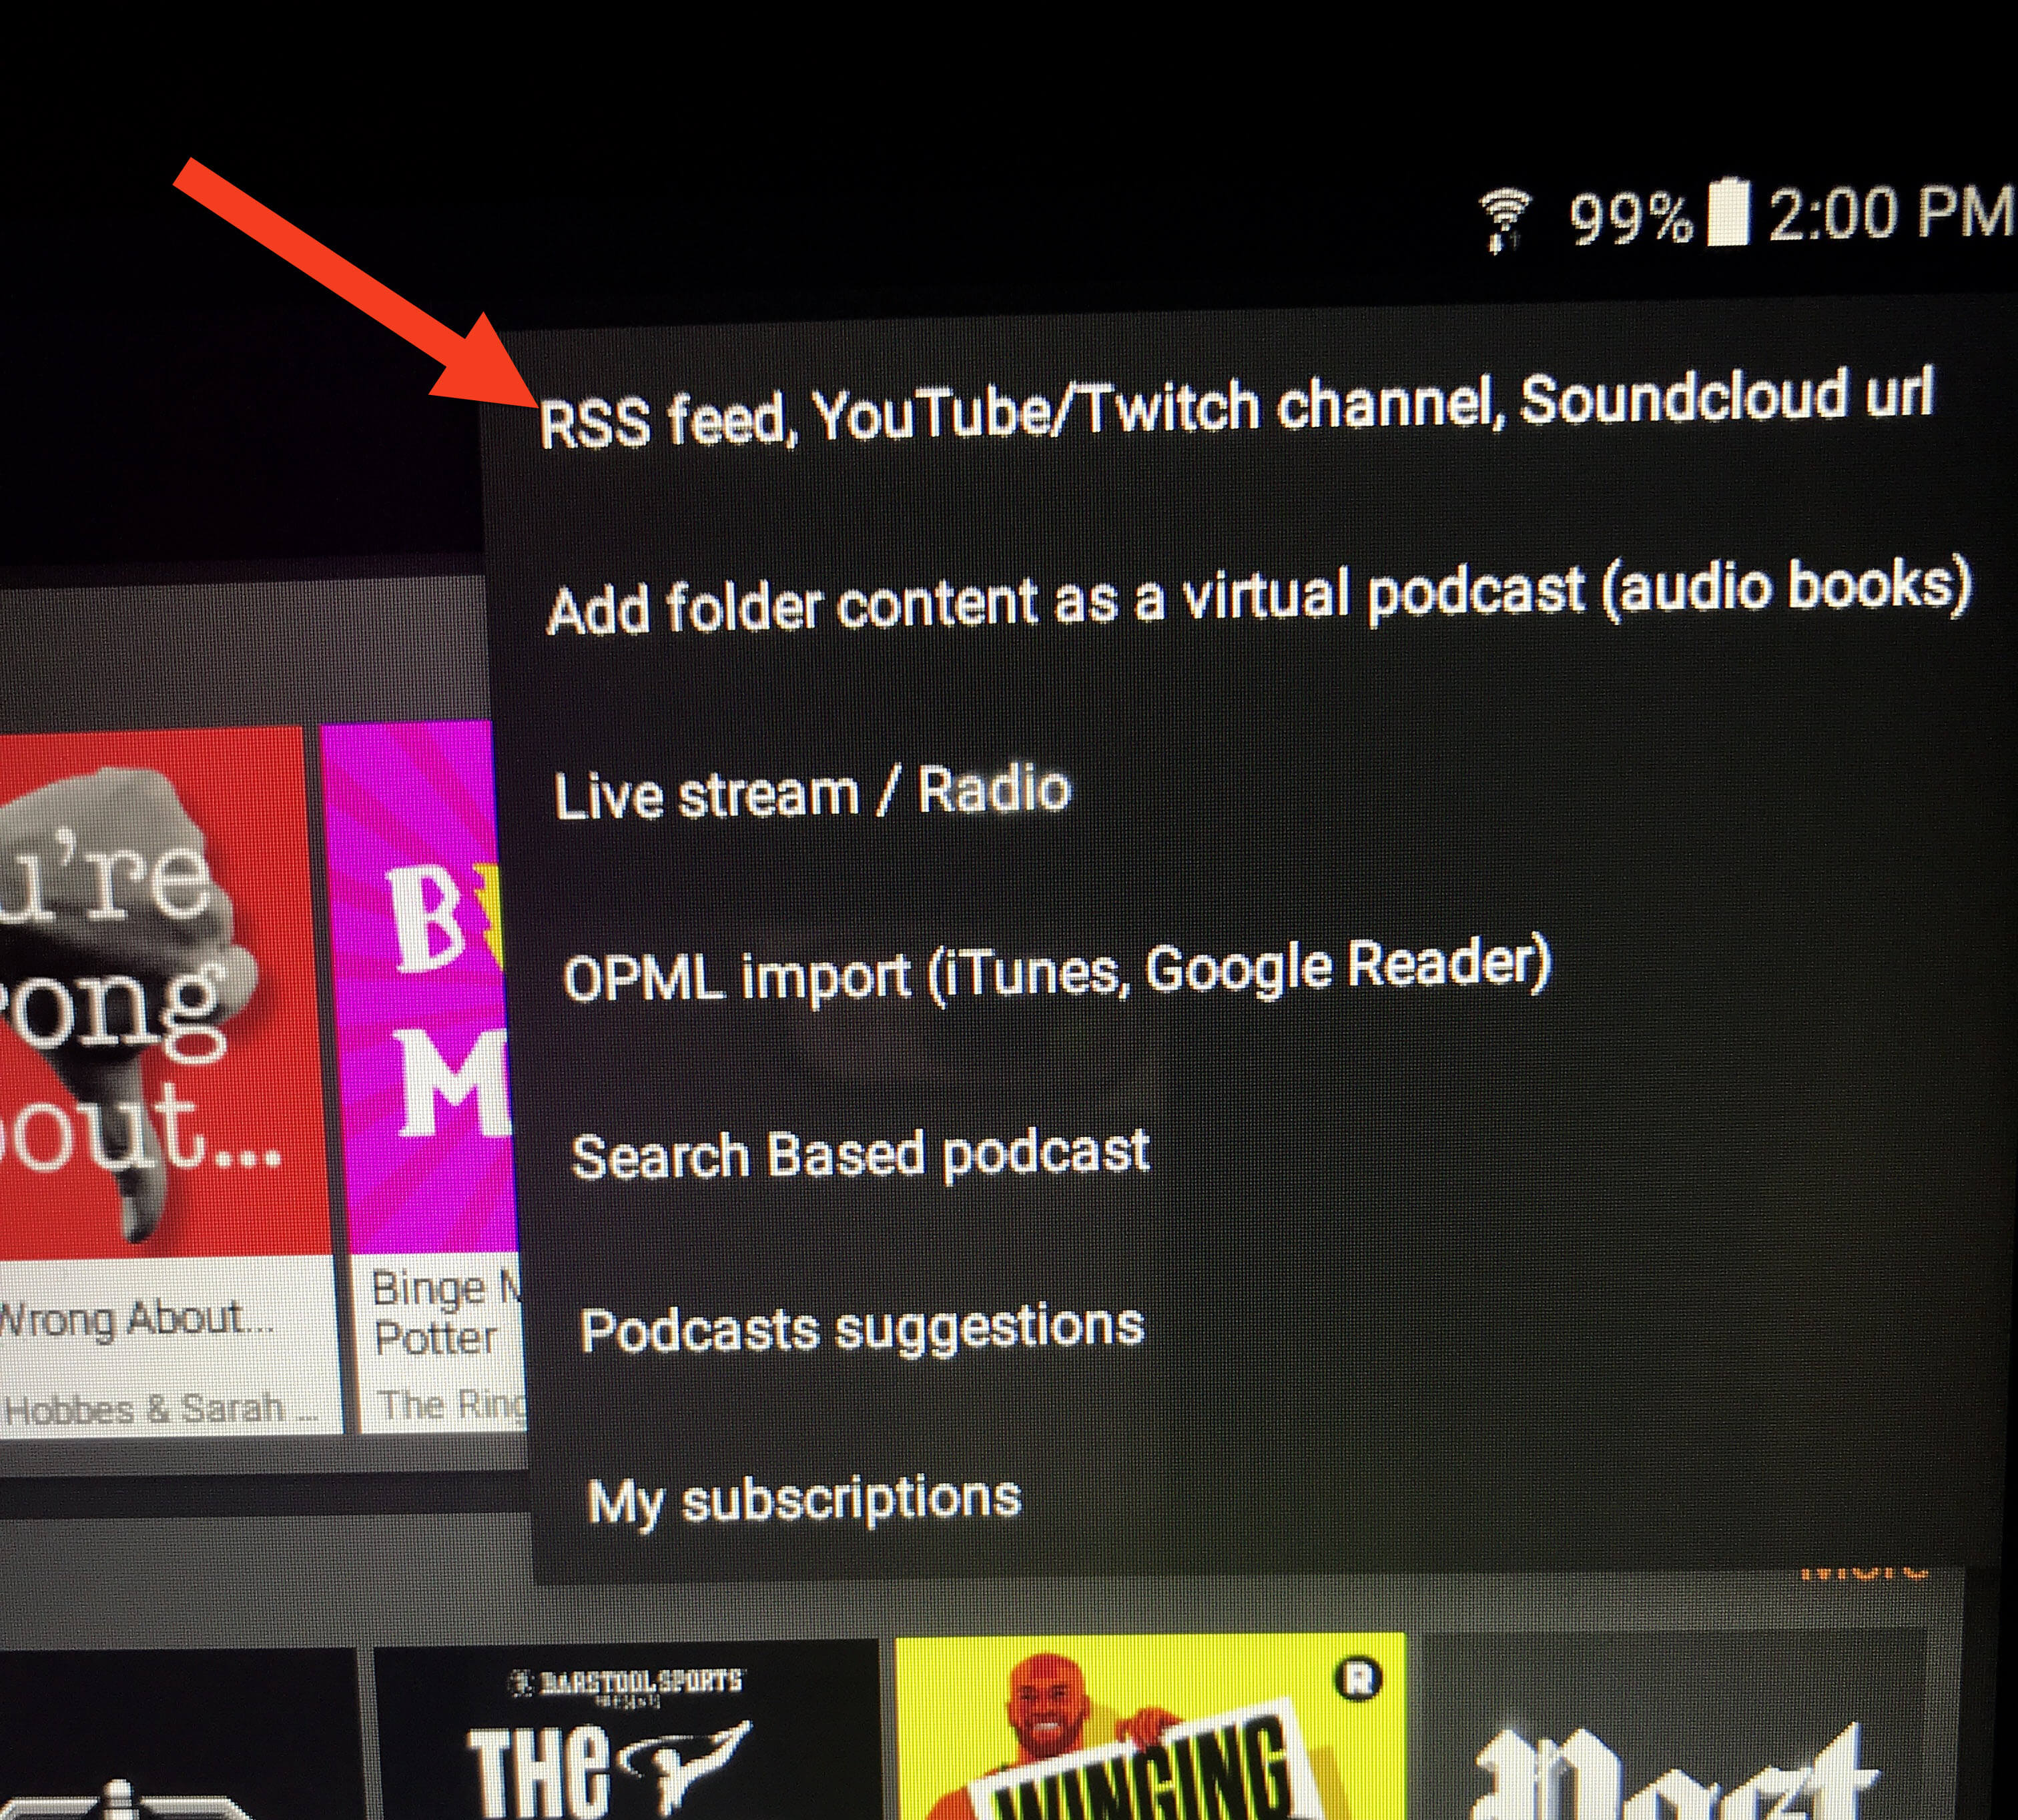
Tap the + icon to add a feed
Tap “RSS Feed, YouTube/Twitch Channel, Soundcloud URL”
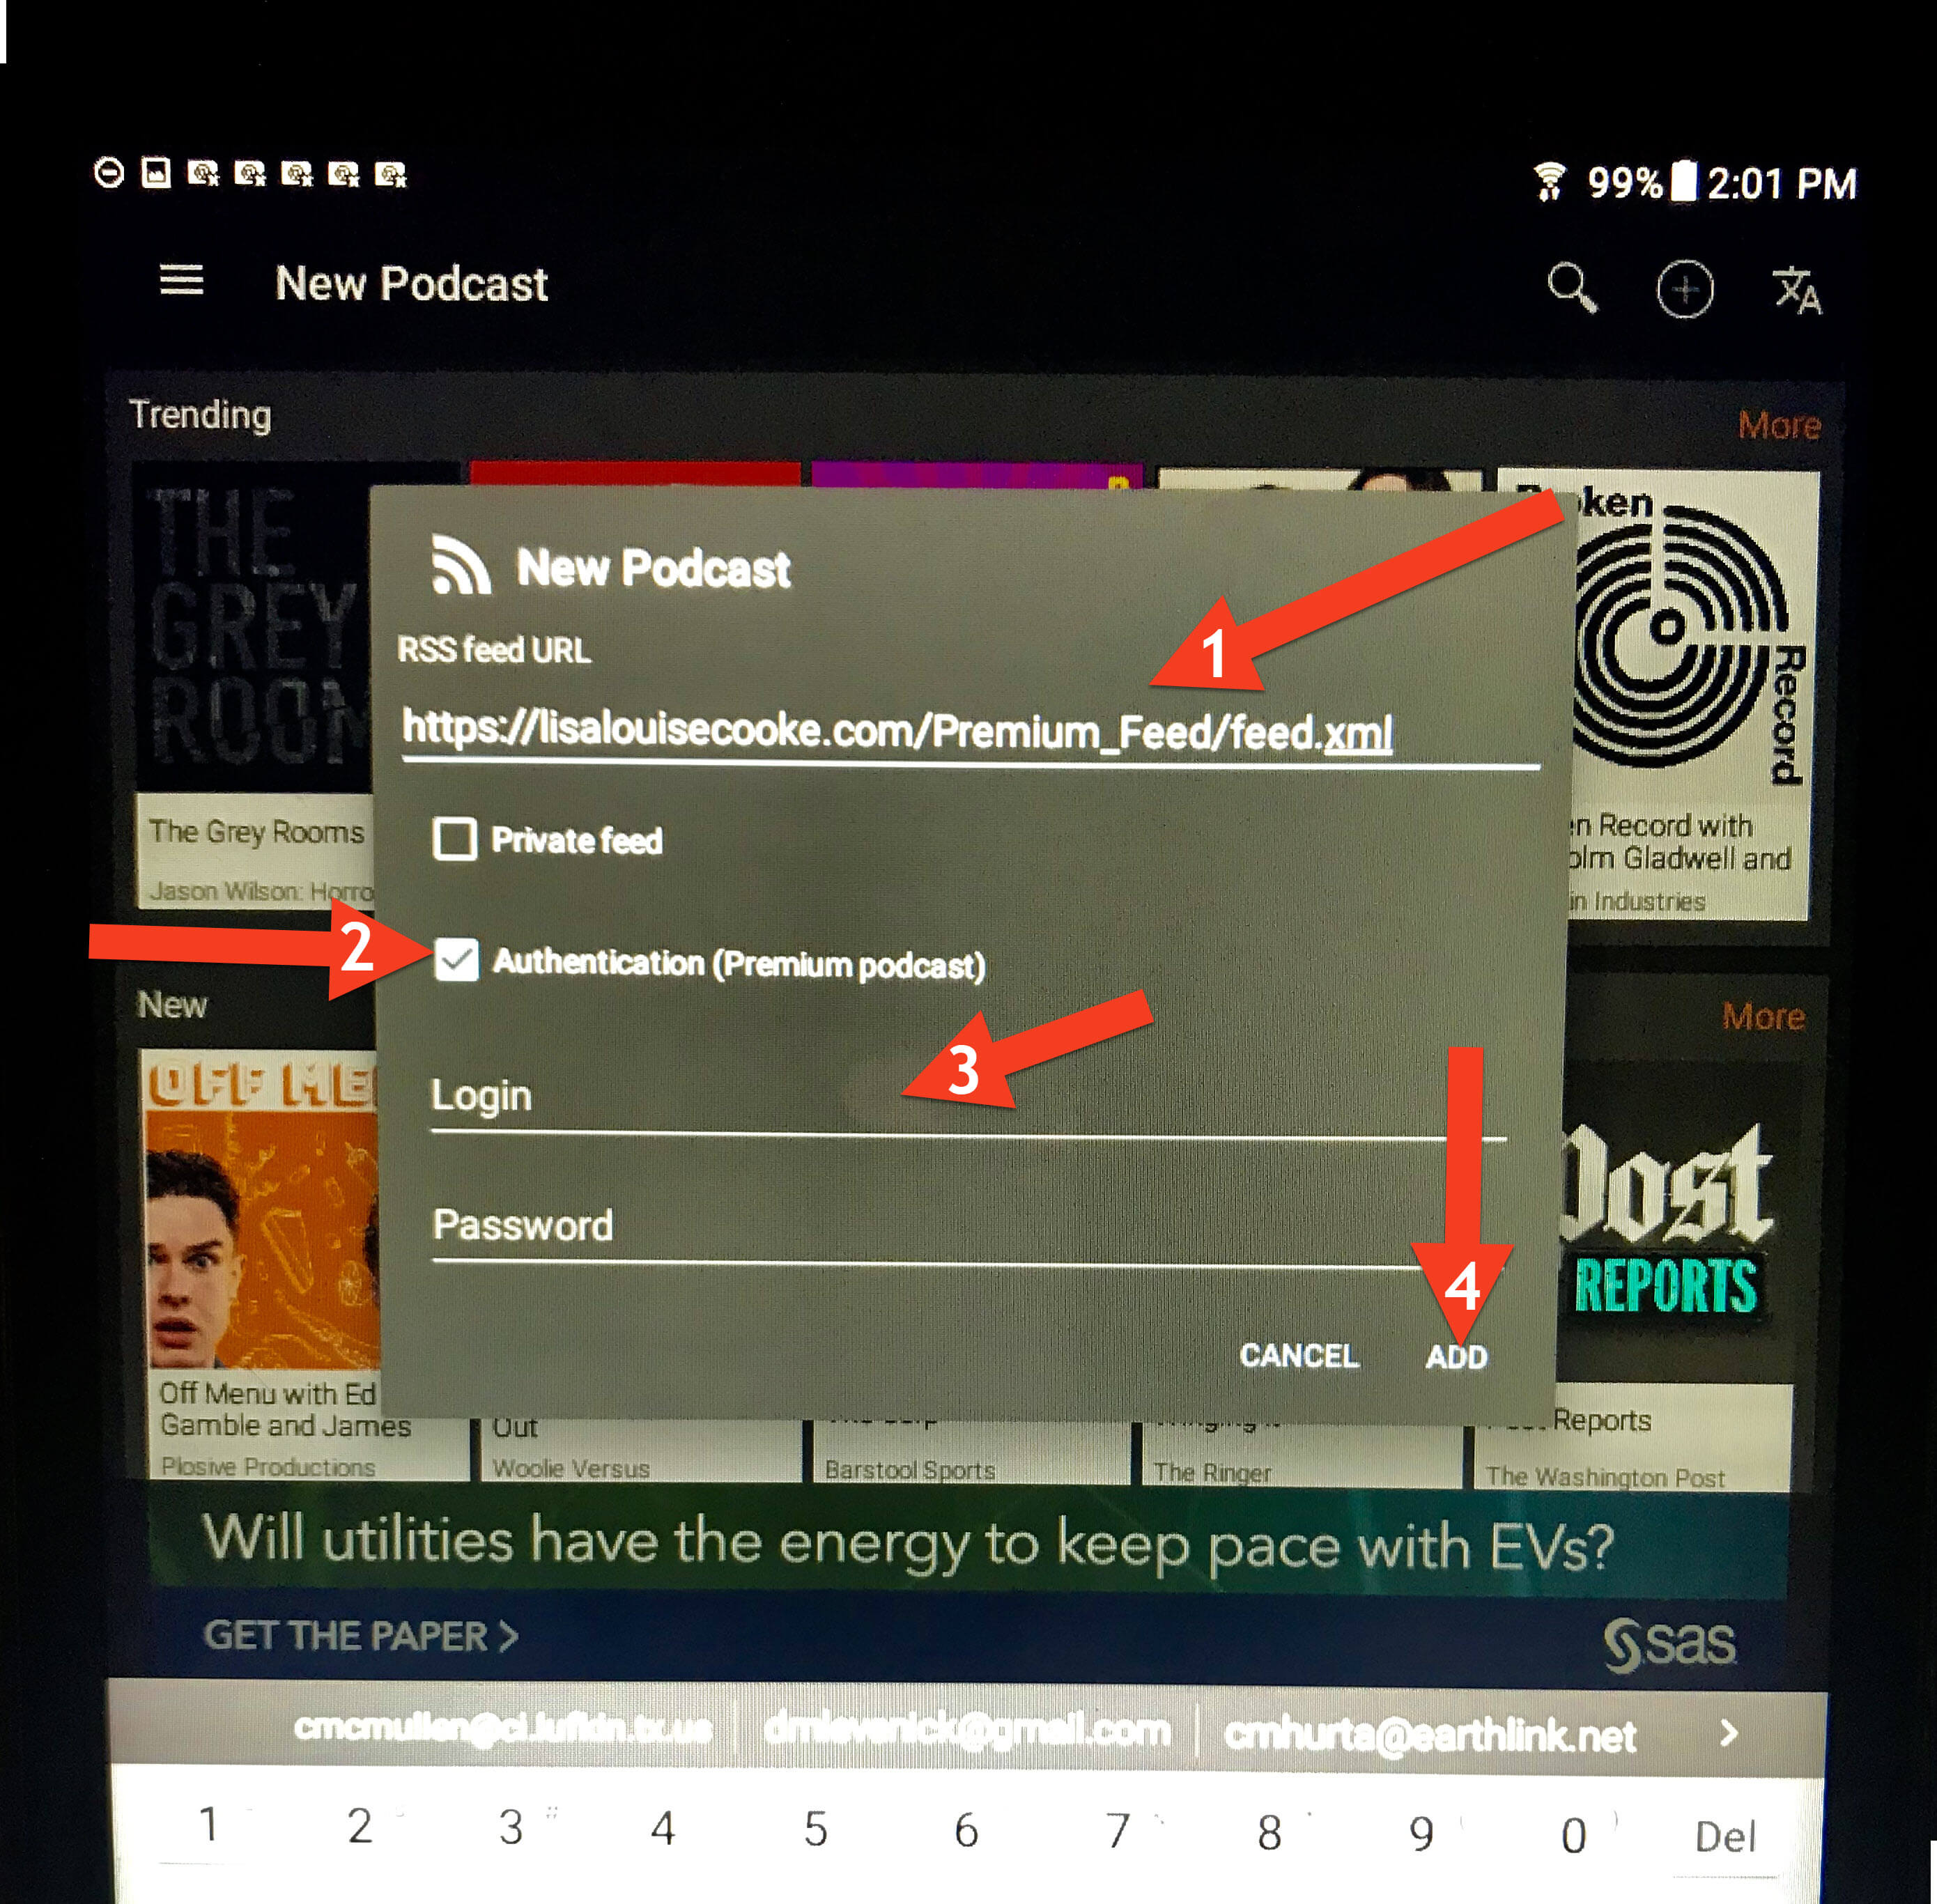
In the “RSS feed URL” field, copy and paste this address to ensure it is exactlycorrect with no extra spaces at the end (the feed address is case sensitive): https://lisalouisecooke.com/Premium_Feed/feed.xml
Check the box for “Authentication (Premium Podcast)”
Type in your Genealogy Gems Premium Membership username and password. You MUST use your membership username, NOT your email address.
Tap “Add”
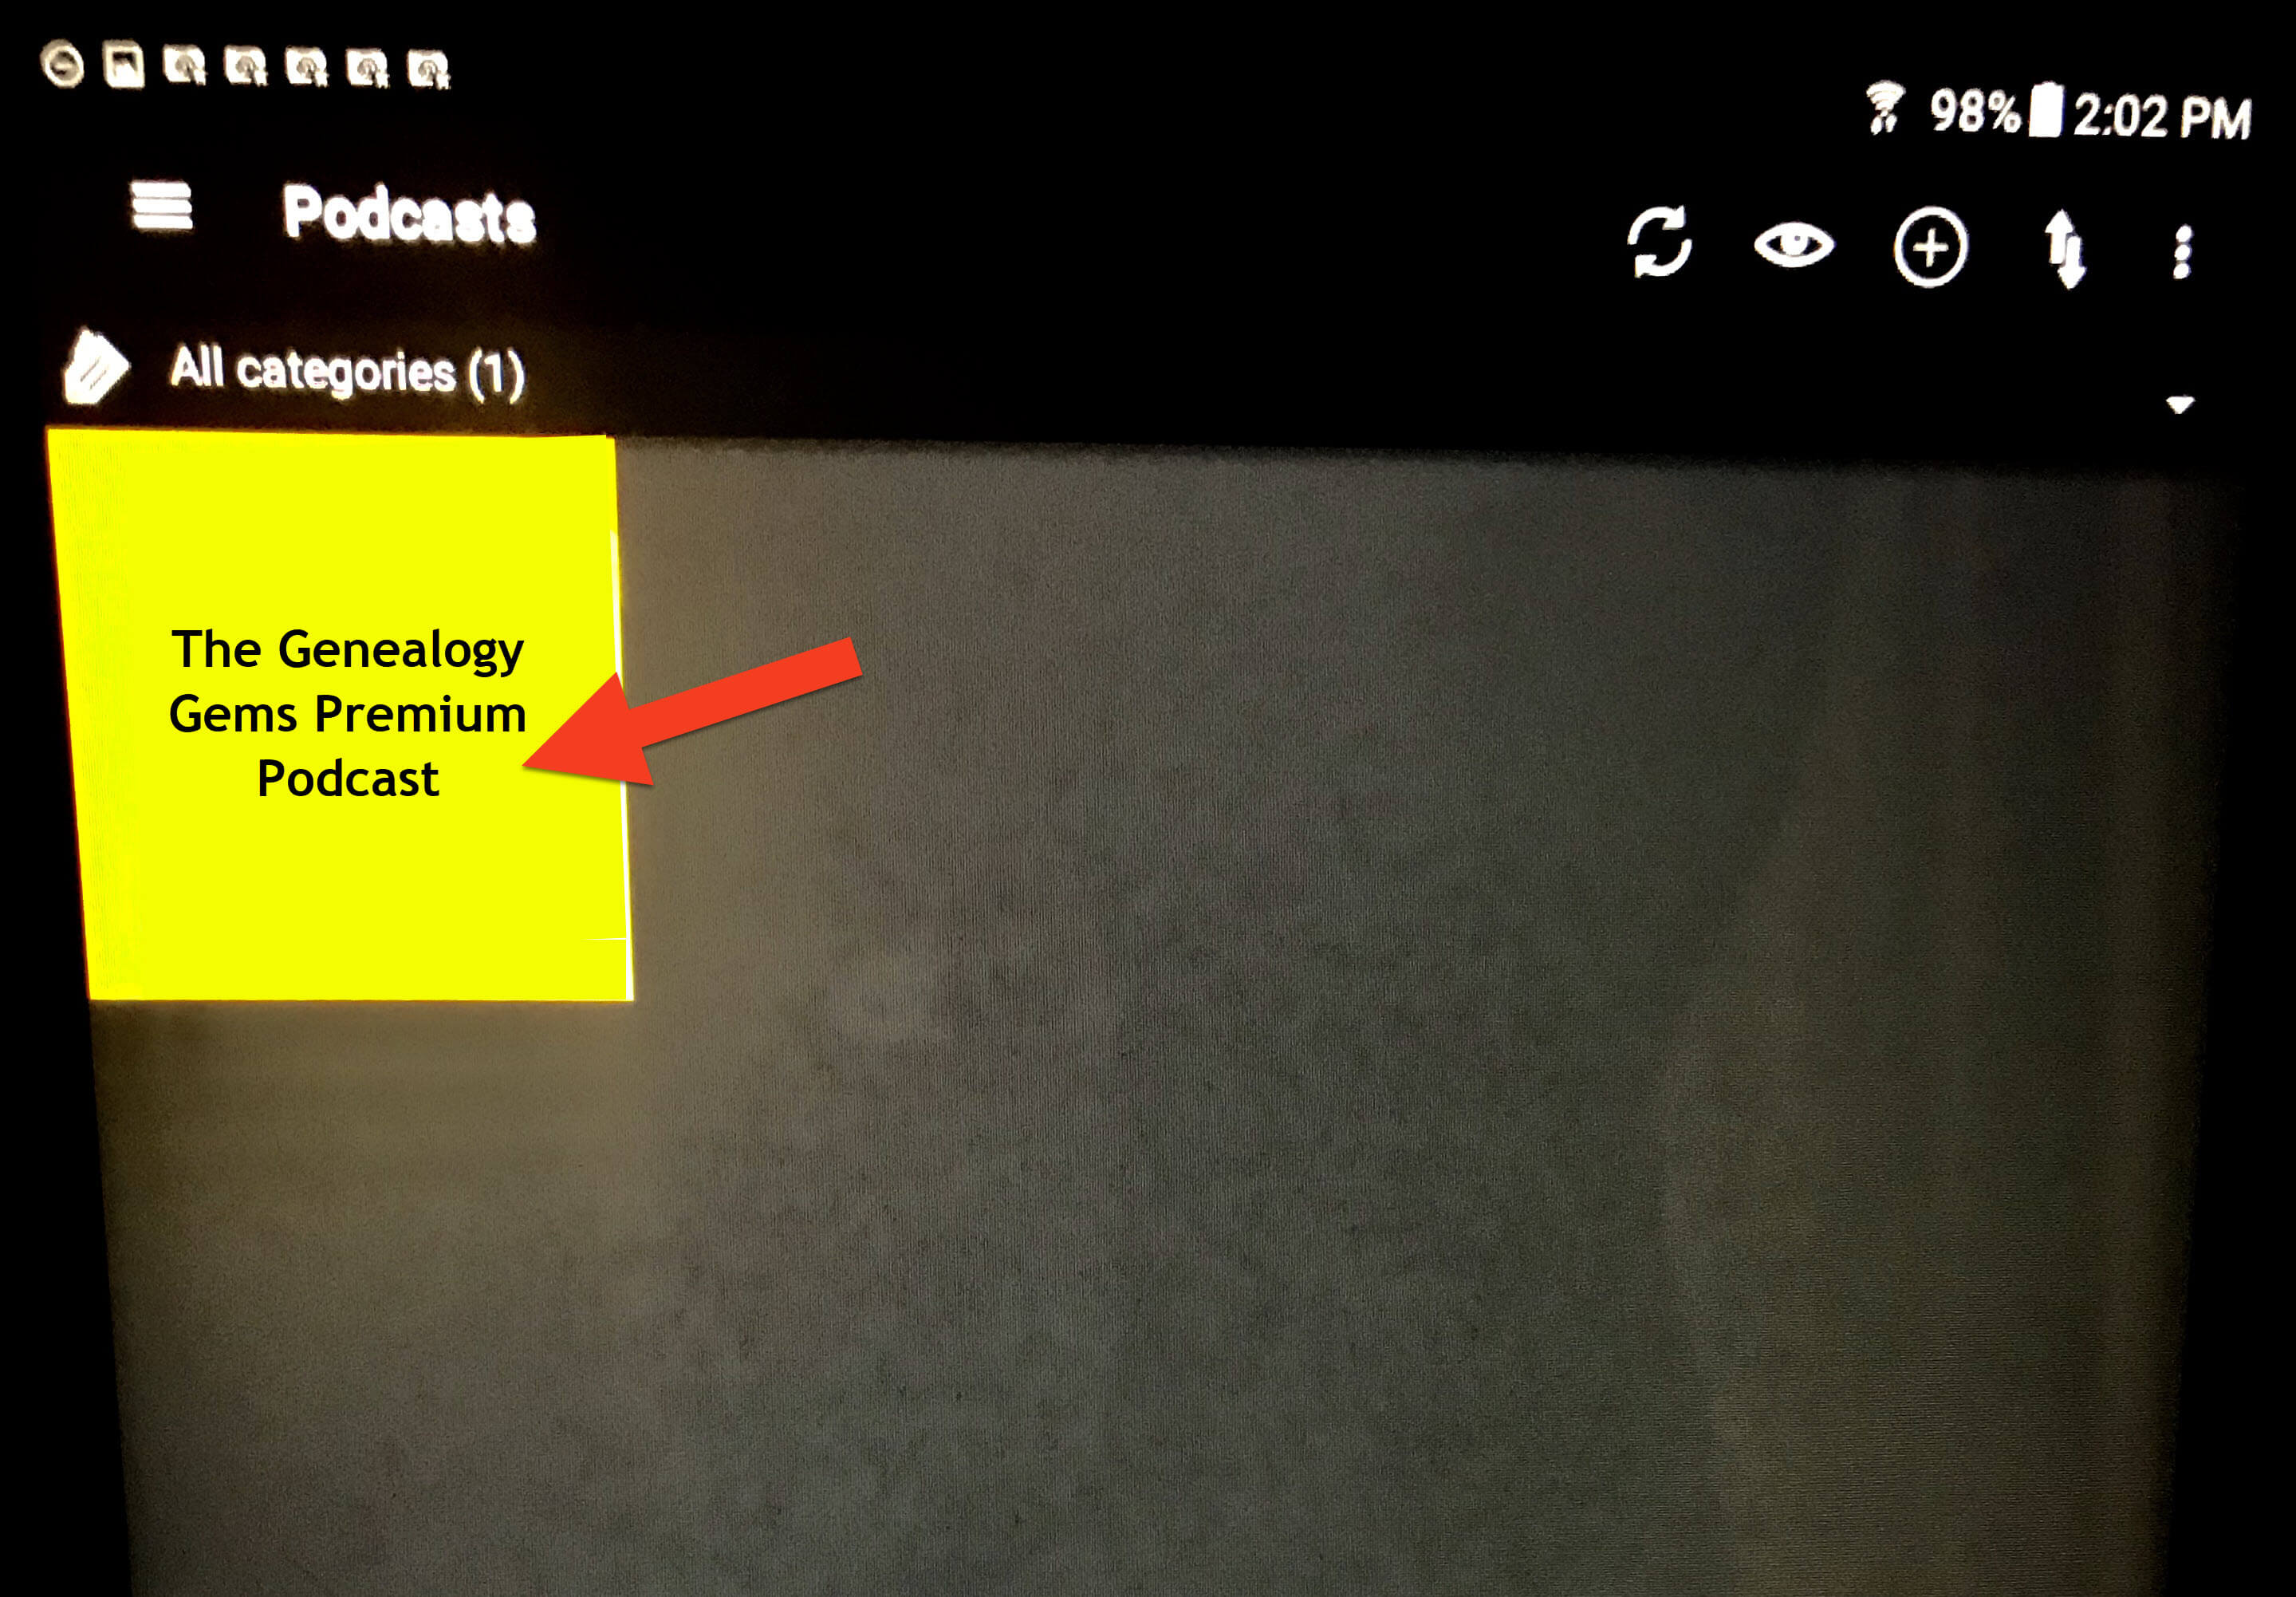
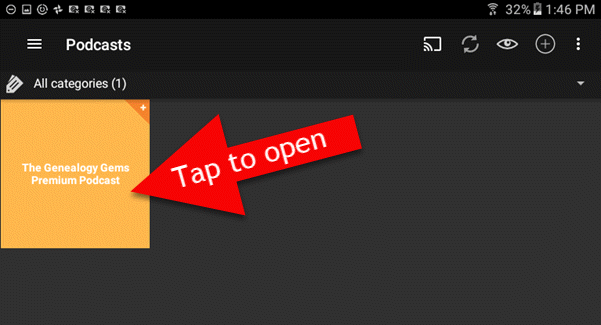
Your Podcast home screen will now have the Genealogy Gems Premium Podcast.
Tap the podcast icon. It may appear yellow like this or it may be our logo) to reveal all episodes, starting with the most recent episode at the top of the list.
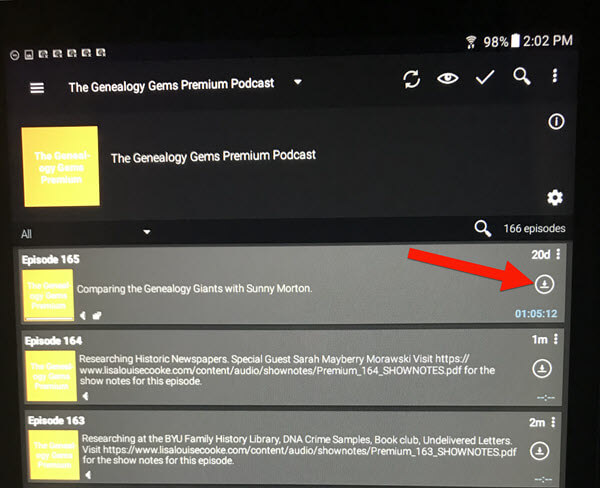
3. Downloading Episodes
You can download episodes so that you can listen offline, without an internet connection or using your device’s cellular data. Download an episode by tapping the down arrow icon on the right:
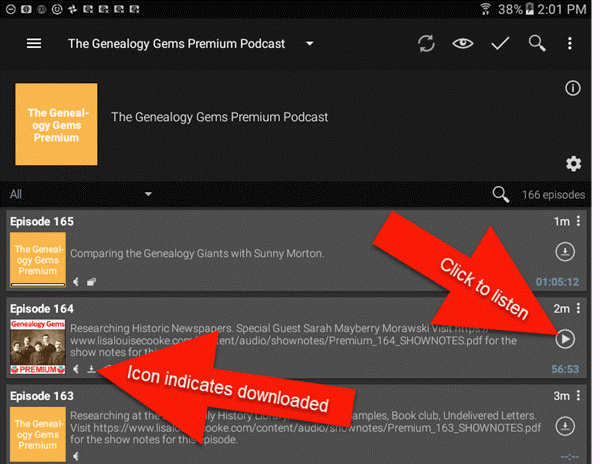
Once the episode is downloaded, a play button will appear that you can click to listen. A small download icon will appear indicating that this episode is downloaded to your device:
3. Listening to Episodes & Viewing Show Notes
When you open the app, tap the Genealogy Gems Premium podcast to access episodes:
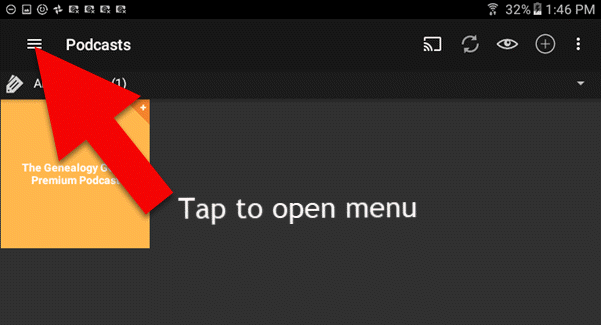
You can go straight to the episodes you’ve already downloaded through the app’s menu. Tap the three lines icon:
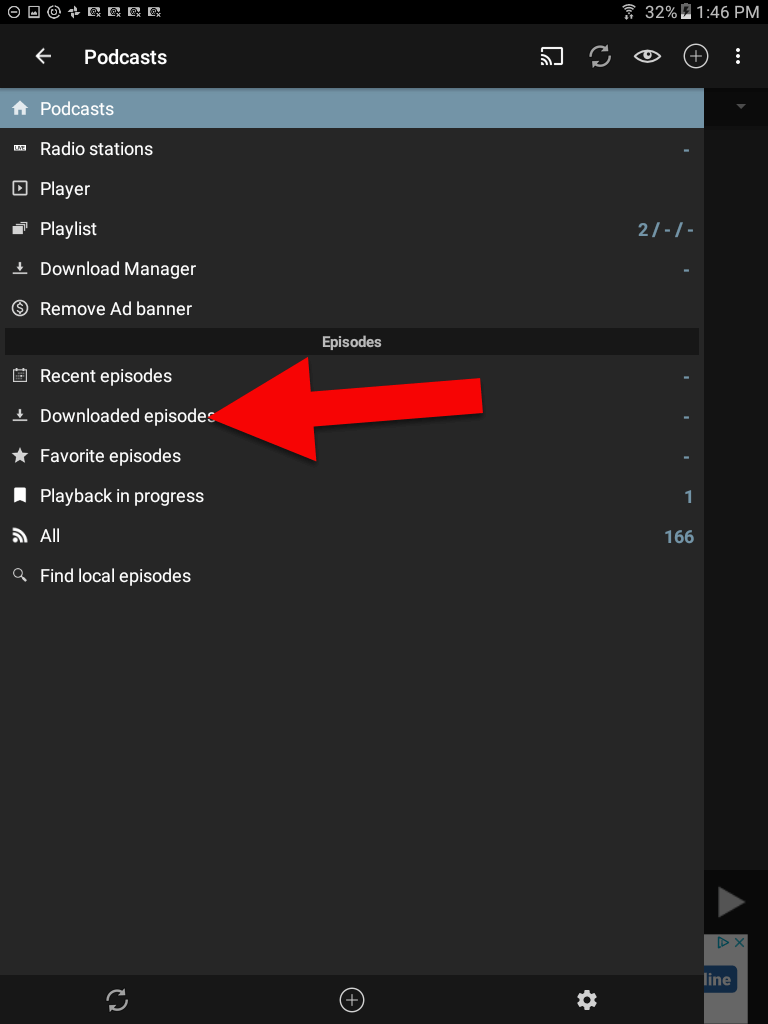
Then tap Downloaded episodes:
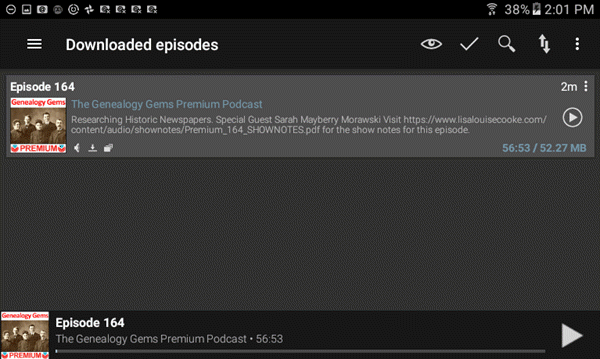
On this screen are only the episodes you have downloaded for offline listening. To return to all episodes just tap the 3 line icon in the upper left corner.
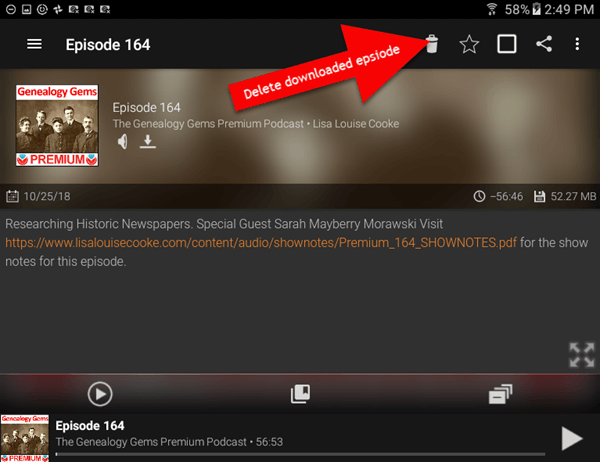
4. Deleting Downloaded Episodes
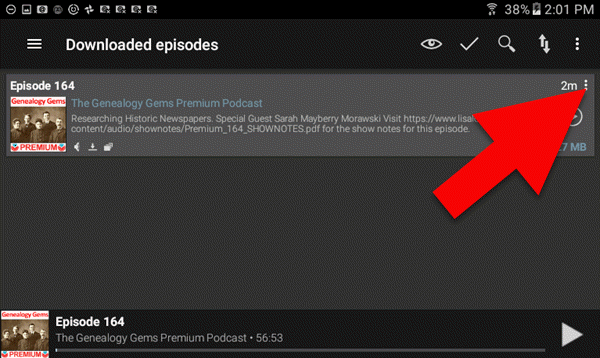
After you have listened to a downloaded episode, you can delete it to free up the space on your device. (Don’t worry, all of the episodes are still available through the main podcast feed in Podcast Addict.) To delete an episode in the Downloaded Episodes area, tap the 3 dots icon on the episode you want to delete:
(Note: If you want to delete all the episodes that you’ve already played, click the 3 dots icon at the very top of the right-hand corner, and then tap “Delete Played Episodes”)
On the page for that downloaded episode tap the trash can icon to delete it from your device:
Need More Help?
If you’re experiencing error messages or other technical difficulties, please visit our Premium eLearning FAQ page and head to the Troubleshooting section towards the bottom. You’ll find answers to the most common causes of problems and solutions and tips to fix them.


 Recommended app: