In this episode I’ve got another blast from the past for you. We have reached deep into the podcast archive and retrieved episodes 5 and 6.
In Episode 5 we touch on using the video website YouTube for genealogy, and then I walk you through how to Bring Sites Back From the Deadwith Google. Then we wrap things up with a cool little way to Spice Up Your Genealogy Database.
In episode 6 I have a gem for you called Cast a Shadow on Your Ancestors, and we cover the free genealogy website US GenWeb
Episode: # 05 Original Publish Date: March 25, 2007
MAILBOX
Email this week from Mike O’Laughlin of the Irish Roots Cafe: “Congratulations on your podcast! I am sure it will help many folks out there. I was glad to see the fine Irish families of Scully and Lynch on your latest show notes!”
GEM: You Tube Follow Up Note: The Genealogy Tech Podcast is no longer published or available.
YouTube in the news – the concern was raised by Viacom this month about YouTube benefiting from their programming without compensating them, which could mean copyright infringement. While the course of YouTube could change depending on the outcome of this suit, the attraction for family historians remains strong because of the nature of the content.
Software mentioned:
Pinnacle. Final Cut for MAC. Limits with Movie Maker
I posted 2 videos – A Nurse In Training Part 1 & 2
When you get a “File Not Found” error when clicking on a link, it doesn’t mean the information is always gone forever. You may be able to find it in the Cache version.
Google takes a snapshot of each page it examines and caches (stores) that version as a back-up. It’s what Google uses to judge if a page is a good match for your query. In the case of a website that no longer exists, the cache copy us a snapshot of the website when it was still active hidden away or cached.
Practically every search result includes a Cached link. Clicking on that link takes you to the Google cached version of that web page, instead of the current version of the page. This is useful if the original page is unavailable because of:
1.Internet congestion
2.A down, overloaded, or just slow website – Since Google’s servers are typically faster than many web servers, you can often access a page’s cached version faster than the page itself.
3.The owner’s recently removing the page from the Web
Sometimes you can even access the cached version from a site that otherwise require registration or a subscription.
If Google returns a link to a page that appears to have little to do with your query, or if you can’t find the information you’re seeking on the current version of the page, take a look at the cached version.
Hit the Back button and look for a link to a “cached” copy at the end of the URL at the end of the search result. Clicking on the “cached” link should bring up a copy of the page as it appeared at the time that Google indexed that page, with your search terms highlighted in yellow.
If you don’t see a cached link, it may have been omitted because the owners of the site have requested that Google remove the cached version or not cache their content. Also, any sites Google hasn’t indexed won’t have a cache version.
Limit: If the original page contains more than 101 kilobytes of text, the cached version of the page will consist of the first 101 Kbytes (120 Kbytes for pdf files).
Really looking for an oldie but a goody? Try the Wayback Machine
It allows you to browse through 85 billion web pages archived from 1996 to a few months ago.
To start surfing the Wayback, type in the web address of a site or page where you would like to start, and press enter. Then select from the archived dates available. The resulting pages point to other archived pages at as close a date as possible. Keyword searching is not currently supported.
GEM: Spice up your database
Search Google Images, then Right click and save to your hard drive.
Use Silhouettes
Find something that represents what you do know about that person. It really does help you see them more as a person and less as an entry in your database – their occupation, a reader, a sport, etc.
Episode: # 06 Original Publish Date: April 1, 2007
You can learn more about Jewish roots at the 350 Years of American Jewish History website JewishGen, The Home of Jewish Genealogy
GEM: Cast a Shadow on Your Ancestors
In the episode #5 I shared a little gem that would spice up your genealogical database – adding silhouettes and artistic images to the file of an ancestor when you don’t have a photograph.
Probably the most famous silhouette these days are the silhouettes used by Apple for advertising the iPod digital music and audio player. It may surprise your teenager or grandchild to learn that the first silhouettes were done hundreds of years ago.
Back then silhouettes (or shades as they were called), they paintings or drawings of a person’s shadow. They were popular amongst English royalty and the art form quickly spread to Europe. A silhouette can also be cut from black paper, and was a simple alternative for people who could not afford other forms of portraiture, which, in the eighteenth century, was still an expensive proposition.
The word took its name from Étienne de Silhouette, but it’s uncertain as to whether his name was attributed because he enjoyed this art form, or as the story goes because the victims of his taxes complained that they were reduced to mere shadows.
Either way, the popularity of Silhouettes hit new heights in the United States where they were seen in magazines, brochures and other printed material. But they faded from popularity as Photographs took over in the 1900s.
As a follow up, I want to share with you a simple technique for creating your own silhouettes. You can use ordinary snapshots to create a visual family record.
Take a photo of a person in profile against a neutral background.
Blanket the photo background with white acrylic or tempera paint
Fill in the image with a heavy black permanent marker, curing the shoulders down for a classical pose.
Add fun details like cowlicks, eyelashes, hats, and jewelry that express the person’s personality with a fine felt-tip pen.
Photocopy the doctored photos onto quality art paper. Since glossy papers work print best, you could also use your computer scanner to scan the image into your hard drive. From there you can add it to your database, or print it out onto glossy photo paper for mounting.
To represent folks in your family tree, create a silhouette of your father to represent his Great Great Grandfather, and add a farmer’s hat and rake to represent his profession of farming. Chances are dad has inherited some of his profile anyway. Have fun with it and be creative. But of course be very sure to label to silhouette appropriately as a creative interpretation rather than a literal rendering.
You can also do silhouettes of your family including extended family and arrange the portraits together on a wall. Use black painted frames in a variety of shapes and sizes and hang in a way that represents the family tree / relationships.
Silhouettes%20:%20Rediscovering%20the%20Lost%20Art<img%20src=”http:/www.assoc-amazon.com/e/ir?t=genegemspodc-20&l=as2&o=1&a=0970115105″%20width=”1″%20height=”1″%20border=”0″%20alt=””%20style=”border:none%20!important;%20margin:0px%20!important;”%20/>%20″ >Silhouettes: Rediscovering the Lost Art
Last year the website celebrated its 10th Anniversary. The USGenWeb Project consists of a group of volunteers working together to provide Internet websites for genealogical research in every county and every state of the United States. The Project is non-commercial and fully committed to free access for everyone. Organization within the website is by state and county.
You can go to the homepage of the website and click on the state of your choice from the left hand column. From the state page you can select the county you wish to search in. However, when I know they name of the county I want to search in, I’ve found it’s often quicker just to search at google.com and do a search like “genweb sibley county mn” The choice is yours.
Remember to use the Google search gem that I gave you in episode one (see episode #134 http://www.genealogygemspodcast.com/webpage/episode-145-a-blast-from-the-past ) to quickly search within the county website. Many don’t have search engines of their own, and so that’s when I first really started using that search technique. These county sites are often very rich though, and after a focused search, it’s rewarding just to wander the site. It will help you become more familiar with the county!
You’ll likely find databases of Births, Deaths, Marriages, townships histories, plat maps, surnames, and a host of other topics. Because each county has its own volunteer coordinator, the information you will find varies from county to county. And as always, info is being added regularly, so you need to book mark them and return on a regular basis to see what’s new.
Be sure and share your resources as well. That’s the power behind the GenWeb project – volunteers. Volunteering your county resources will enrich other’s experience and will likely lead to connections that will continue to further your own research.
Tracing your ancestors’ occupations can be one of the best ways to learn more about their everyday lives, skills, financial status and even their social status. Follow these tips and record types into the working lives of your relatives to enrich your family...
Show Notes: I’m excited to share with you my favorite new tool at Google Books. This is a game changer for utilizing the information you find on the digitized pages. Plus I’ll show you other new features recently added to Google Books.
Why use Google Books for genealogy? Well, Google Books features over 10 million free digitized books, most of which were published prior to 1927. That makes Google Books a gold mine for genealogy research. And when you visit Google Books, think “published on paper” NOT just books! In addition to books, the collection includes newspapers, magazines, journals, almanacs, city directories, catalogs, court papers and so much more!
Watch the Video
Why use Google Books for genealogy?
Google Books features over 10 million free digitized books, most of which were published prior to 1927. That makes Google Books a gold mine for genealogy research. And when you visit Google Books, think “published on paper” NOT just books! In addition to books, the collection includes newspapers, magazines, journals, almanacs, city directories, catalogs, court papers and so much more!
On the results page look for the filter menu. If you don’t see it, click the Tools
Click the down arrow for Any View
Click Full View
Now your results list only include free fully digitized materials.
If you haven’t been over to Google books for a while, this is going to look a little bit different. A while back they launched a new user interface. They’ve now made some improvements. The main difference is we’re going to see this menu along the bottom of the screen.
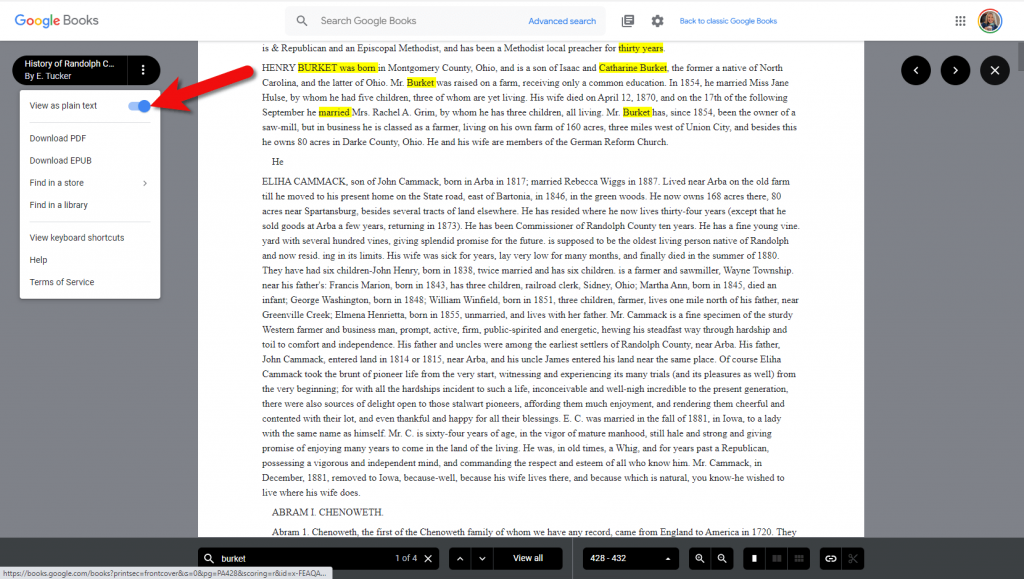
My favorite new feature: convert image to text
Before we even look at the new menu, I promised you my favorite item that they have added to Google Books.
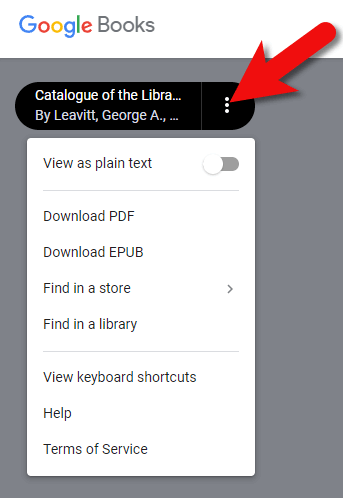
In the upper left corner, click the three vertical dots icon. This reveals a menu that gives you access to a lot of items that typically are kind of ‘behind’ the book. If you were to close this book, you would see the catalog entry for it.
New menu at Google Books
My favorite new feature here is View as Plain Text. Click the toggle button to convert the entire book to plain text. This makes the digitized images of the pages usable in many other projects and programs. Google applied optical character recognition to the books to be able to read the words on the images to make the books keyword searchable. In the past, we had to use the clipper tool to capture a bit of the image and convert it to text. The box was really small and inconvenient. This new feature provides the ability to instantly use as much of the text as you want.
Convert digitized books to text in Google Books
Because this book is fully digitized, it’s already been cleared for copyright. These books are in the public domain. They are available to use for free, copyright free. You are free to copy the text and include it in your projects, in your genealogy database, in a family history book, and so on.
Download a book
Back over at the three-dot menu in Google Books, you can also:
download the book as a PDF or EPUB for free,
find the book in a store, if you need a hard copy
find the book in a library at WorldCat.
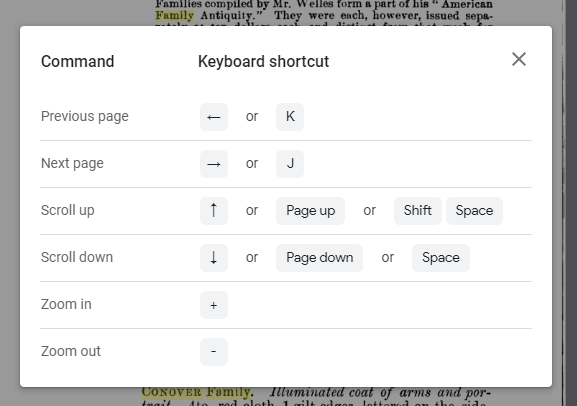
Keyboard Shortcuts Hot Keys
Another new feature is keyboard shortcuts.
Google Books shortcuts / hot keys
Find Book Catalog Entry
I mentioned that the catalog entry for this book is sort of ‘behind’ the book. To access that, click the X in the upper right corner of the screen. This removes the view of the book. We haven’t lost access to the book. You can still access it by clicking the blue Read free of charge button.
The nice thing about the book catalog entry page is that it contains all the details about the book such as where you can purchase it, finding copies at the library, and additional editions.
Source Citation Tool at Google Books
Also on the catalog entry page is the Source Citation tool. Click create citation to reveal the options. Click the desired style, and then copy the citation and paste it in your family tree database, or other places where you are referencing this book. So, there’s no reason not to cite your source for any book found at Google Books. Source citation is very important, because down the road you might discover something more about your family and realize that you need to access that book again. Without the source citation you may not remember where you got the original information. The source citation is your breadcrumb trail back to the previous research that you’ve done. Also, if anybody ever has a question about what you have put in your family tree, you can point them to the sources that you used.
New Google Books Menu
The final new feature at Google Books that I wanted to draw your attention to is the main menu for this item. It used to be at the top of the screen, but now you’ll find it at the bottom. At the top of the screen, we now have a search box that allows you to search the entire Google Books collection. But oftentimes, when you’re looking at a book, you’re going to want to be able to search for particular names, places, dates, events, topics. You will find the search field for that in the new menu at the bottom of the screen. Type in names or other words and press enter. You’ll be given all of the pages in the book that mention those words. Also, in this menu are:
zoom buttons,
chapters menu (if available for the book you are viewing)
page views (single, side by side or thumbnails.)
Clip and download an image from a book
Also in the new menu is the clipper tool. The materials in Google Books contain maps, drawings, photos and many other types of imagery that you may want a copy of. Or perhaps you just want an image of a section of text. The clipper tool allows you to capture it and save it to your computer as an image file.
Click the scissors icon, and your mouse cursor will turn into a clipper.
Draw a box around the desired area
In the pop-up box click to copy the link to the clipped image.
Open a new web browser tab and paste the link. (You can also paste the link into notes in your family tree, and other programs and documents.)
Press enter and the image will appear in the browser tab.
Right-click on the image.
Select Save Image As to save it to your computer’s hard drive.
There you have it, some of the exciting new features over at Google Books. There’s never been a better time to search for information about your family history in Google Books.
Use Google Earth for genealogy to find long-lost family locations on modern maps. Here’s how!
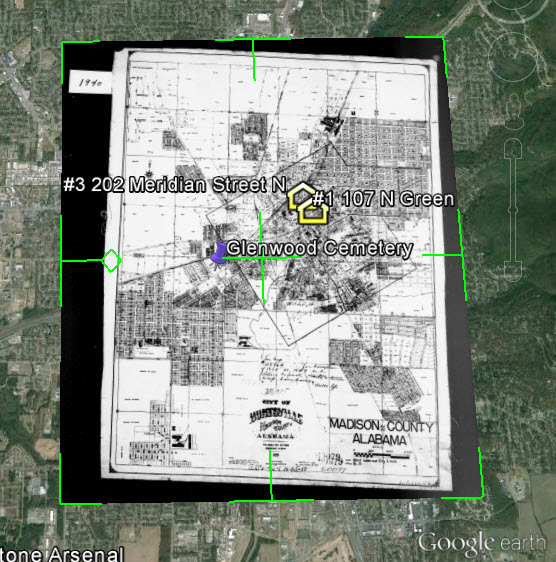
It can be very surprising to discover that you lived somewhere that you never knew you lived. That was the case for Professional genealogist Alvie Davidson, who recently wrote to me. He’d done some fantastic sleuthing on his own recent family history, and discovered that his family had lived in Huntsville, Alabama when he was a toddler. “This is the first I have even known they lived in Madison County, AL.” But he was not sure about how to use Google Earth to help him locate the family addresses he’d discovered.
“I have learned from the U S Government that my parents lived at (three) different addresses in Huntsville, Madison County, AL when I was a toddler in 1944….I never knew we lived in Huntsville but I learned my mother worked for munitions productions during World War II at Redstone Arsenal. She worked several months toward the end of 1944 and had to quit due to onset of pregnancy. We moved to Florida shortly after she left employment at Redstone Arsenal because we show up on the 1945 Florida State Census.”
Alvie sent me three family addresses. Then he asked for some step-by-step help instructions on how to put Google Earth to work to identify their location today.
4 Steps to Revealing More with Google Earth
1. Search each address in Google Earth. Enter the address in the search box in the upper left corner of Google Earth. If you get a hit, mark it with a placemark (clicking the button that looks like a push pin in Google Earth’s toolbar) and name it. In this case I found two of the three street addresses.
2. Locate a map of the area for the appropriate time period. With a little Google searching, I found the 1940 census enumeration map for Huntsville at the National Archives website. Here’s what that map looks like. (Image right) I then went in search of each of the three addresses on the map.
In this case, I conducted a block-by-block search of the 1940 enumeration district map for the missing address: 110 Winston Street. Unfortunately, not all the street names were clearly legible on this particular map, and I was unable to locate it.
3. Overlay and georeference the enumeration district map in Google Earth to compare the past to the present.Georeference just means to match up known landmarks on the historic map with physical locations on the modern-day map, thereby allowing you to match the two maps up together. By so doing, I was able to locate on the enumeration district map the modern-day locations of the two addresses that I found using Google Earth.
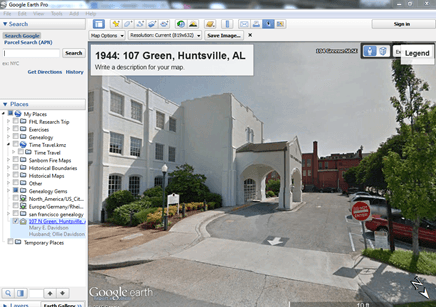
There are businesses in both locations today. Below right is a screen shot showing the current location of one of those addresses. Clearly no longer the old family home.
4. Dig deeper for addresses that have changed. As I mentioned previously, I searched for the 110 Winston Street address in Google Earth with no result. If that happens to you, remove the house number and run a second search on the street name alone. Numbers can change, but it is important to verify whether the street still exists today.
In this case, Google Earth did not locate a Winston Street in Huntsville, AL. Knowing that errors and typos can happen to the best of us, I ran a quick Google search for Huntsville, AL city directories, and verified that indeed Winston Street did exist at that time in history. So, at some point between 1940 and today, the name appears to have been changed.
I headed back to Google and ran the following search query:
“winston street” “huntsville alabama”
The quotation marks tell Google that each exact phrase must appear in all search results. The phrases will appear in bold in the snippet descriptions of each result.
The result above caught my eye because it mentions the “Winston Street Branch Library.” Even when street names change, buildings named for those streets often don’t. However, in this case, the website discusses the history of the library, and the Winston Street Elementary School. According to the website, the library “became a part of the Huntsville Public Library (now Huntsville-Madison County Public Library) in 1943. In 1947, the branch was renamed the Dulcina DeBerry Library.” Perhaps the street was renamed at that time as well.
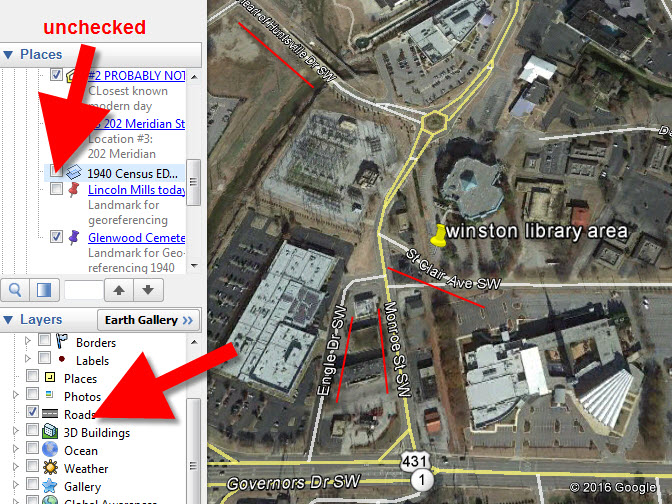
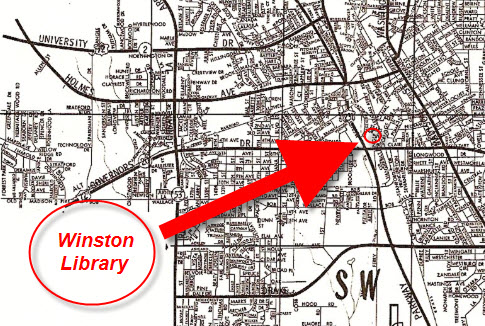
Jumping back into Google Earth I entered “Winston Street Branch Library” in the search box, and was immediately taken to the location, which is just south of the other two known addresses! At this point I would recommend to Alvie, who is a Genealogy Gems Premium Member, to watch my video class Best Websites for Finding Historical Mapsto track down additional maps from the time frame that may have Winston Street clearly marked on the map.
Once I identified this landmark, I then marked the location with a placemark. You can turn off the 1940 enumeration district map overlay by unchecking the box next to it in the Places Panel. Doing this revealed the location on the modern day map. Finally, I headed to the Layers panel and clicked the box next to the “Roads” overlay to reveal the modern day street names.
You can use this technique when you have more success than I did in finding an old address on an old map. Overlay the map, position a placemark on the location, and then turn the overlay off. With one click of the Roads layer you can now see the current street name for the old location you found on the map overlay.
Further digging online did deliver additional maps from the era and area:
We all have locations in our family history that have given way over time to new buildings and parking lots. By using the power of Google Earth, Google search, and historic maps, they don’t have to be lost forever.
Get Started with Google Earth for Genealogy
Learn all these Google skills–with step-by-step tutorials and video demonstrations–in Lisa’s book and Google Earth video tutorial. Click here for a special price on the bundle!
FREE video: Get Started with Google Earth for Genealogy
Google Bundle! The Genealogist’s Google Toolbox Second Edition PLUS learn how to create your own historical map overlays in my Google Earth for Genealogy 2-video CD set.