How to Use the NEW MyHeritage DNA Chromosome Browser
The new MyHeritage DNA chromosome browser offers two different kinds of browsing–and a triangulation tool. Here’s what these tools are and how to work with them. Just last year, if you had asked me if I thought anyone could catch AncestryDNA in their race to own...Three Southern Genealogy Record Types You Should Be Using
Researching your U.S. ancestors from the South can lead to frustrating brick walls. Isolation, the Civil War, and natural disasters are all playing a role in the shortage of records. But finding your Southern kin doesn’t have to be impossible. The experts at...Snagit versus Evernote Which One Should You Choose?
Show Notes: Over the years I’ve talked a lot about how to use Evernote and Snagit. Both are amazing tools for research and make it easy to do web clipping. If you’ve been wondering what the difference is between these two powerful tools, or if you haven’t and you’re trying to figure out which one you should start using, you’re in the right place. Today we’re doing a head-to-head comparison of Evernote and Snagit (with a focus on web clipping) and figuring out which one is best for you and your genealogy research.
I got an email from one of our Premium Members named Nancy, and she says, “Can you help me understand why I would need Evernote and Snagit? I have both installed on my computer, but need to spend time becoming proficient in both. If they duplicate one another wouldn’t want to spend time learning both if Snagit is superior.”
This is a really smart question because like the old saying, time is money. And in the case of genealogy, time is ancestors! No one wants to stop and learn yet another tech tool if they don’t have to. So, let’s look at Evernote vs. Snagit, in a head-to-head comparison, and dig into their strengths and weaknesses. If you have both, this will also help you decide what to use in any given situation.
Watch the Video
Show Notes
Downloadable ad-free Show Notes handout for Premium Members.
BONUS: Evernote vs. Snagit Comparison Cheat Sheet for Premium Members.
Comparing What They Can Do
Evernote is a cloud-based notetaking tool that includes a web clipper.
Snagit is a screen capture / AKA web clipper tool.
So, first and foremost the thing they have in common is that they both can capture all or a portion of content that appears on your computer screen. You can clip exactly the part you want and save it as an image for future reference or use.
That’s a pretty simplified description – but essentially, web clipping is the common denominator. But from there, they diverge.
Evernote is primarily a note taking tool. It takes all kinds of notes (audio, photo, video, documents, web clipping, typed, handwritten.) All notes are added to it, and you work in it like a workstation where you can organize and quickly search and retrieve your notes. It can apply OCR to your screen captured notes, making them keyword searchable and editable. Evernote allows you to instantly access your notes from any device that you are signed into your account.
Snagit is primarily a screen capture tool. In fact, it’s screen capture on steroids compared to Evernote. It’s not a place to store notes, but it’s a fantastic way to web-clip or capture information, edit, annotate and manipulate it, save it, and use it in other programs (and we’ll talk more about that in a moment.) Snagit can capture both images and video of content on the web, and it can do other things like use OCR to convert the text that appears in the web content you’re clipping as an image and turn it into editable text. When you web clip with Snagit, you are creating an image. That image must be saved to a cloud service like Dropbox in order to be able to access the note from all your devices.
You can learn a lot more about what these two tools do in my other videos:
You’ll find many more videos on Evernote and Snagit at Genealogy Gems Videos page under Technology.
Comparing Costs
Another thing they have in common is that they are both software programs.
Evernote: In addition to being able to use it as a software program on your computer, you can also use Evernote on your mobile device by downloading the app from your app store. You can also use it on any computer by simply signing into your account at Evernote.com. That being said, the software is preferred over the website because it resides on your computer and is faster.
Cost: About $9/monthly or about $80 for the yearly subscription ($6.67 / MONTH).
There is a free version, but you can only use it on 2 devices, it doesn’t include OCR and there are very strict limits on storage, which we’ll address in just a moment. If you’re going to use Evernote for your research and other things, you’re going to need the yearly subscription.
Snagit: Snagit is software that you download to your computer (whether desktop or laptop.) You can buy it as a stand alone purchase, or you can also purchase an ongoing maintenance subscription which provides you with upgrades. There is not mobile app.
Cost: About $64 for one software license + 1 year maintenance (free upgrade). You don’t have to pay for ongoing maintenance.
Conclusion: Unless the free version of Evernote is adequate for your needs, Snagit it more economical. 10 months of Evernote on-going subscription would cover the cost of the one-time purchase of Snagit. However, if you need all the features of Evernote, then go for the yearly subscription to keep the cost down.
Storage and Retention
Because Evernote is a subscription, this brings up the question of whether you can use your notes after you stop subscribing. And storage limits are also a concern.
Snagit: No storage limits. All the content you capture is stored on your computer, not the cloud. It’s yours forever. There’s no limit to how much you can clip or create.
Evernote: Evernote does store your notes on your computer, but it also stores them in the Evernote cloud. While Evernote doesn’t have an overall storage limit, it does have limits on how much you can create each month. There is a free version that allows you to 60 MB of monthly uploads. This is talking about the size of your notes. If you add photographs to Evernote, you’re going to use that up very quickly. There’s also a 25 MB maximum note size limit. No note or clipping can be larger than 25MB. With the subscription you get 10 GB of monthly uploads (which would be pretty hard to max out) and the note size limit is 200 MB.
Conclusion: You’ll need the yearly subscription to really be able to use Evernote for genealogy. And while there are limits, you’re likely never to reach them. And you can use it offline because notes are on your computer.
Snagit has no limits and stores only on your computer unless you share your content to other sources. And that brings us to comparing how these tools allow you to export your content. In other words, can you get stuff out that you put into it?
Exporting Content
The necessity for an ongoing subscription to Evernote brings up to the next important comparison: how can you export and use your web-clippings and in the case of Evernote other types of notes?
Evernote: Not easy. You can export your notes as the Evernote file format called ENEX or as HTML, which is used in structuring web pages. Keep in mind that web clippings are image files, and we normally need image files in JPEG or PNG format to be able to use them in a variety of other programs.
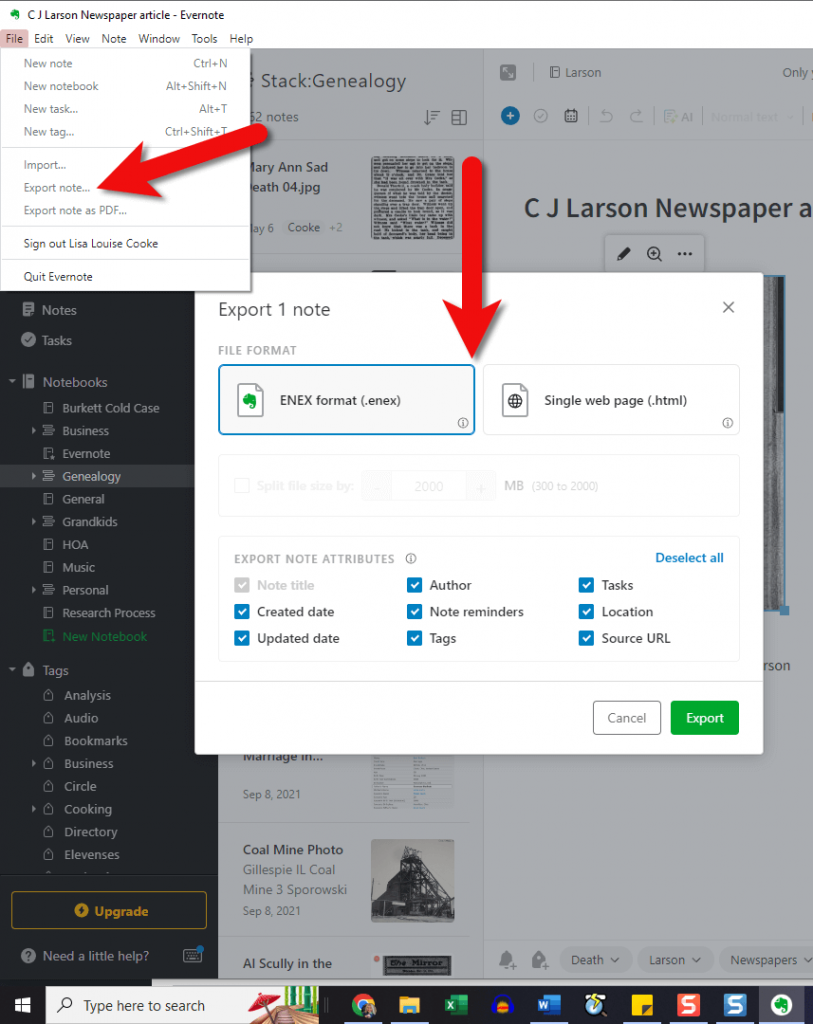
In the menu click File > Export Note. Available file types are limited.
Snagit: Easy. You can export your clippings in countless ways. Pretty much all major file types are supported. You can easily add content directly to a large number of popular programs such as Word, PowerPoint and even Evernote! So, if you’re writing a family history story or book and you want to clip something on the web and include it, Snagit can send it right to your document with just a click.
Conclusion: If you need to be able to easily get web clippings and captured content out of the program and use it in other ways, use Snagit. If you want to keep your clippings and notes all in one place and be able to keep them organized and find them easily, use Evernote.
Sharing Content
When it comes to sharing content with other researchers or your family, both Evernote and Snagit do a great job in their own way.
Evernote: Each note has a convenient Share button that allows you to invite other people to view just that note. It also gives you a unique link to the note that can be shared. And you can email notes. You can also put a group of notes into a notebook and then share the entire notebook. You can control whether the person being shared with can just view the notes or if they can edit them. So, it does facilitate collaboration by allowing you both to edit the same note. That permission can also be turned off. That all being said, Evernote is really a tool for you, and it’s not focused on sharing as a priority, or on sharing in order to be able to publish the content in many other ways.
Snagit: With Snagit, if you want to share with someone else to collaborate, you’ll need to send it to them, either by email or shared cloud storage. They can then edit the item in their Snagit software and send it back. So, it doesn’t offer the ability to collaborate quite as easily as Evernote. However, Snagit’s sharing and publishing capability is one of its greatest strengths and priorities. Just click Share in the menu and you’ll have the ability to save the content as a file to your computer, email it to someone, upload it to your own website, your printer, a wide range of software programs and cloud storage services, and yes, even to Evernote!
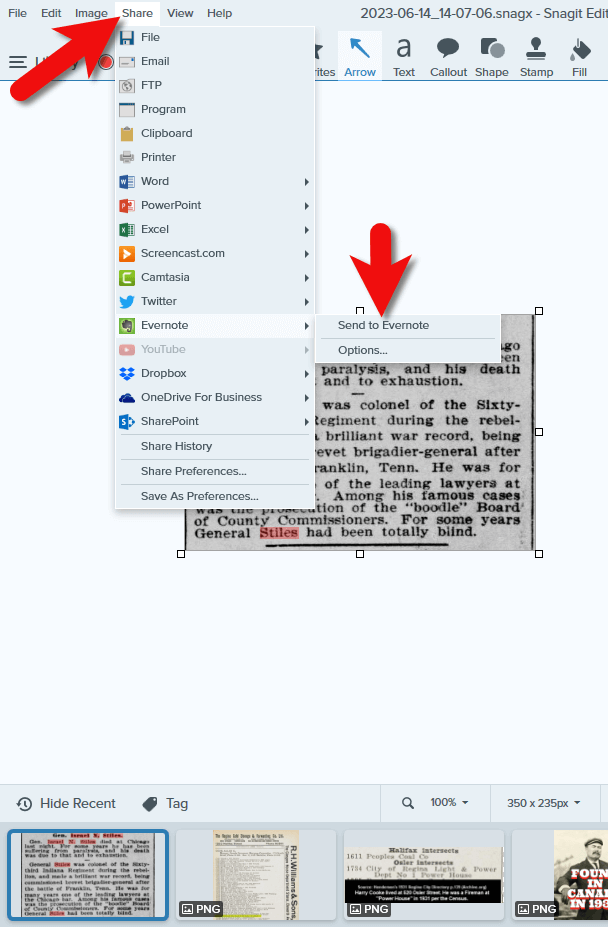
Click Share in Snagit’s menu
Conclusion: If you want to share with other people, both tools can do the job, although Evernote inches ahead because it facilitates both people being able to edit the same note within Evernote. If you want to share your content for use in other programs and publish it in other ways, Snagit is the best choice.
Evernote vs. Snagit Conclusions
After a head-to-head comparison, we’ve discovered that your selection between these two tools depends on your task and your goals:
Use Evernote if you want to be able to:
- keep all your work in one place organized and searchable
- create a wide variety of notes such as audio, video, web clippings, PDFs, typed notes, etc.
- have OCR automatically applied to web clippings and images
- collaborate with other people on your notes
- easily create notes on mobile
Use Snagit if you want to:
- create high-quality web clippings and videos in universally usable file formats that are exportable
- create web-clippings of hard to capture content like wide screen family trees, and information that appears further down a web page that you can’t see all on the screen at the same time
- be able manipulate your content with annotations or drop it into project templates
- easily export your captured content into a variety of other programs
- not have to pay an ongoing subscription.
Another way of looking at it is that Evernote is more of a final destination for content you’re collecting, and Snagit is a content collector that makes it easy to use that content wherever you need it.
Conclusion
If you want to have one place to store and use a wide variety of notes including web clippings, Evernote is the best choice. If you want full flexibility in capturing and creating online content and using it in other programs and projects, Snagit is the best choice. I like to use them in combination. I keep my genealogy and other notes organized in Evernote, and then I use Snagit to capture web content exactly the way I want it and send it into Evernote as needed. And I use both programs for a whole lot more than just genealogy! I clip recipes, projects and ideas, and I use Snagit for all the images I create for Genealogy Gems.
How do you use Evernote and Snagit?
Please leave a comment below.
Resources
- Downloadable ad-free Show Notes handout for Premium Members.
- BONUS: Evernote vs. Snagit Comparison Cheat Sheet for Premium Members.
- More videos on Evernote and Snagit at Genealogy Gems Videos page under Technology.
What to do with Inherited Genealogy – Episode 74
In Elevenses with Lisa episode 74 Lisa Louise Cooke answers the question “I inherited the family genealogy – NOW WHAT?!”
You’ll learn:
- how to get started dealing with genealogy research that’s been given to you
- organizational strategies
- incorporating the inherited genealogy into your research
- what to do with inherited genealogy materials you don’t want to (or can’t) keep
Original air date: Oct. 14, 2021.
Episode 74 Show Notes
(Get your ad-free cheat sheet download in the Resources section at the bottom of this page.)
I Got Handed the Family Genealogy, Now What?
Inheriting genealogy is a big responsibility and can be a bit overwhelming. Even if you haven’t been fortunate enough to receive much from other researchers in your family, chances are your descendants will be faced with inheriting your research. That’s why this week’s Elevenses with Lisa episode 74 is for everyone!
As exciting as it can be to receive new genealogical information, it presents challenges such as:
- figuring out if each piece of information is correct,
- finding a way to process it and blend it into what you already have (or if you’re new to genealogy, what you DON’T have!)
- finding a place to put it,
- and making the hard decisions about what you can’t keep.
So in this video I’m going to share with you my top strategies that I’ve used myself more than a few times. So take a deep breath, grab a soothing cup of Chamomile tea, and let’s get started.
I’ve received many emails over the years from folks who have faced the challenge of inheriting genealogy research done by another family member.
Jim R wrote me to say:
“I am going through my family tree and have a question. My aunt spent a lot of time back in about 1985 and had a huge hardback book of printed up of the family tree. But I was told by a few family members that some of the information in it isn’t true. How do I go about doing my own research, and properly compare the info? I need to figure out what is right and what is wrong. This is fun, but frustrating at the same time. Thanks.”
Don’t Take Inherited Genealogy at Face Value
Accuracy (or lack thereof) can a real issue when we receive someone else’s work. We can’t just take it at face value, especially if the researcher did not cite their sources. There’s no way to know if an ancestor on their tree is truly your ancestor until you look at the genealogical source documents for yourself. If they haven’t listed which sources they used, you’ll have to go find them. The good news is that it should be a little easier to find them based on the information provided about the ancestor. Usually when you get a family tree from a relative, it will at a minimum include important dates like birth, marriage and death, and hopefully some of the places where those events occurred.
Jim inherited a large, compiled history book, but you may be fortunate enough to receive an entire lifetime’s worth of research. Well, some folks would feel fortunate, others may not! No matter how much you’ve inherited, the genealogical process remains the same: start with yourself and work backwards. It may be tempting to start focusing on new ancestors you see in the family tree you just acquired, but resist the temptation. We must always prove the relationships connecting us to each generation going back in time so we don’t end up adding someone to the tree who doesn’t belong there.
So let’s stop for a moment and go back to the beginning, when you first inherit your relative’s genealogy research. What do we do first?
Assess what you have inherited.
Jim received one big book. But if you’re like me you may have received boxes of items, many loose and unorganized.
I like to divide it up by families and place each pile into a separate bin, in chronological order as much as possible. I use clear stackable bins because you can see what’s inside. I’ve used these for years and never detected an ounce of damage. Damage is more likely to come from heat, moisture and mishandling than stored undisturbed in a plain storage bin in a room temperature stable environment such as a closet.
Use 3×5 white index cards to label each bin. Use a medium black sharpie pen to write the family surname in large bold letters, and place the card inside the box at one end facing out. You will be able to see it through the clear bin. You can also simply tape it on the outside of the bin.
You’ll also need one location where all the bins can be stored until you’re ready to work on them. A spare closet or even under a bed can work. The important thing is they are all together undisturbed and easily accessible. Once items are sorted and stored, you can then pull out one bin at a time to work on.
If your inherited genealogy appears to be well organized, such as in scrapbooks, keep it in context. Don’t take it apart and divide it up. There’s something to be learned from the order in which things were added to the book.
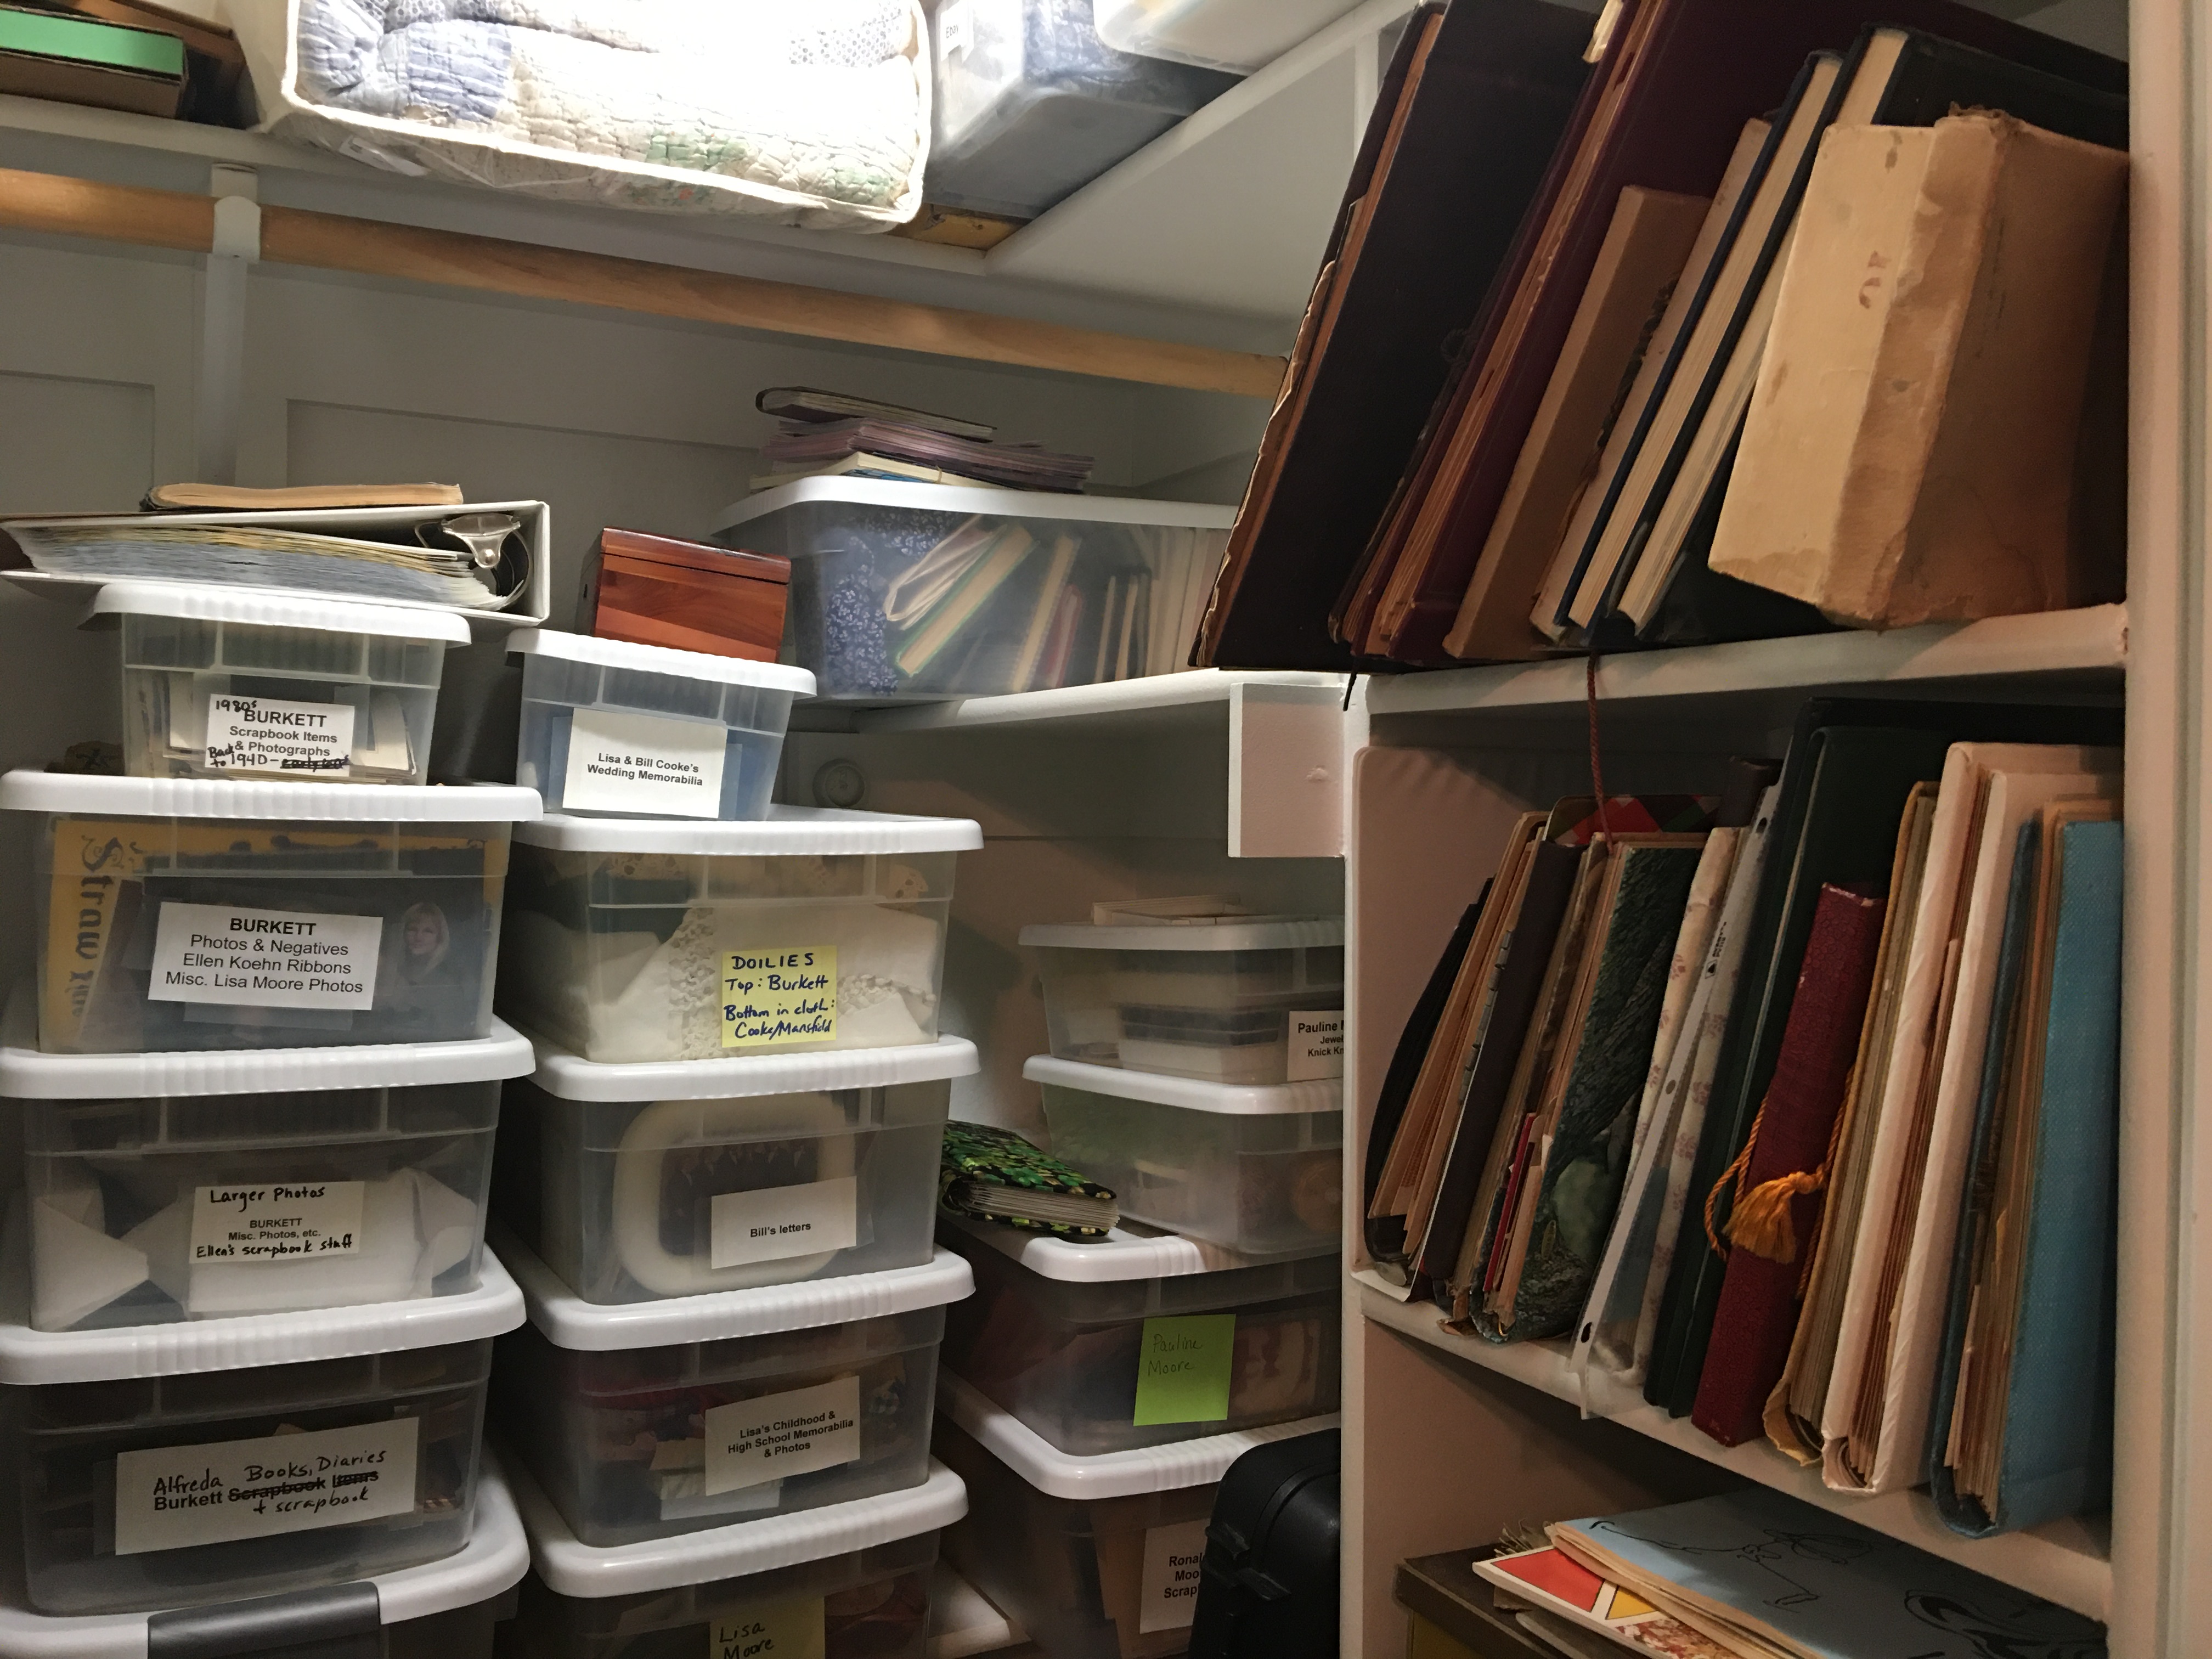
my spare closet with bins of inherited genealogy awaiting processing.
Take inventory and prepare to track your progress.
It’s important to recognize that it isn’t likely that all of the materials and information will be digestible in one sitting. And it helps tremendously when you set up a process that makes it easy to pick up the project and put it down easily while keeping track of where you left off.
You can track your progress in a variety of ways:
- a project log spreadsheet,
- Word document
- Evernote or One Note
- A spiral notebook
Take a moment up front to put your tracking mechanism in place and be as consistent as possible in using it.
I use Excel spreadsheets for my tracking. I find it very helpful to create a separate tab for each item within the collection (book, scrapbook, computer disk, address book, etc.) This helps provide me with a complete inventory at a glance. On each tab I add columns applicable to the type of item and information it contains.
Get a genealogy software program.
If you’re new to genealogy, or you’ve only had your family tree online, now is the time to get a genealogy software program. It will not only help you stay organized, but it will also give you a mechanism for consistently adding source citations. Your genealogy software database while also serve as the “brain” of all your efforts. The database gives you one place to focus your efforts and systematically add information. Also, it puts all of it in your control on your own computer, not solely in the hands of a genealogy website that could be gone tomorrow.
There are a handful of genealogy software database programs on the market. Family Tree Maker, Legacy and RootsMagic are all good and reliable. MyHeritage offers Family Tree Builder for free.
No matter which one you choose, download and install it on your computer. Then make sure that you have an automatic cloud backup service installed and running on that computer. I have used Backblaze for years. You can get a free 15 day trial here which will give you an opportunity to see how easy it is to get up and running. (Disclosure: this is an affiliate link.)
Learn more by watching my video classes on databases and organizing your genealogical materials.
Learn more with my Premium Member classes on organizing genealogy.
Start processing the inherited genealogical information.
Whether you are new to genealogy or a longer time researcher, start by entering the information you inherited starting with yourself or your parents and then add family members going back in time generation by generation. As I said previously, I know it can be tempting to jump to older generations to work on, but you must methodically prove each generational connection in order to have an accurate family tree.
In Jim’s case, he inherited a compiled history book from his aunt, so he will want to start by turning to the page that contains himself or his closest ancestor (probably his parents.) On his tracking spreadsheet he could include columns for ancestor’s name, page number and notes, and enter that information as he works on each person’s record. By doing so, he will always know where he left off.
A compiled history is just one source, and in fact, it is not even a primary source. This means that even if sources have been cited in the book, it’s important to locate and review those sources to confirm that you agree that the conclusion is accurate. After all, this is your tree and research now.
Never enter a new ancestor without cited sources. If the book or paperwork names someone, and even provides some specific information about them, your job is to go find the records to prove it. Once you are satisfied you are ready to enter the person and their information into your database, and of course, cite your sources.
A few decades ago, back when I was doing genealogy strictly as a hobby and not professionally, I found an amazing compiled family history on my Wolf family line. It contained thousands of people, was meticulously compiled and full of details, and did not include a single source!
Since the book wasn’t an heirloom or one of a kind, I found it very helpful and simple to make a small pencil tick mark next to each person as I worked on them. I set about painstakingly finding sources for every piece of information that was new or conflicting with what I had. As you can imagine, that’s a very big job. Since time is always at a premium I didn’t research everything, particularly information that was not critical to the identification of the ancestor, or perhaps was about a collateral individual. However, I did not enter anything into my database that was not researched and proven. This means you’ll need a way to keep track of what has not yet been researched. I used a red pencil to place a tick mark next to items yet to be researched about an ancestor. You could also opt to add a column to your spreadsheet to track it and then return to it later.
Did I add everyone listed in the book in my database? Absolutely not! I focused specifically on direct ancestors and included their children. Once I made my way as far back as I could go in the book, I selectively filled in additional people from collateral lines that were of particular interest or closely associated with areas that I wanted to research further. Rest assured there is no right or wrong way to do this. Do what is most important to you in the most accurate and methodical way you can.
Cite your sources every step of the way.
Talk to any experienced genealogist and you’ll probably hear some regrets about not citing their sources when they first began doing genealogy. Source citations are like an insurance policy. It’s not very satisfying to invest in it now when everything is fine, but down the road when trouble arises you’ll be glad you did.
So what kind of trouble are we talking about? No family tree is immune from occasional problems such as:
- discovering an inconsistency in your family tree
- uncovering a new source that directly contradicts one of your conclusions
- being contacted by another researcher who is challenging something you have posted or published about your family tree.
The only way to address these situations is to review the sources you used. And that’s where your source citation comes in mighty handy! They help answer the questions and also prevent timewasting duplication of effort.
If the only source for a particular event is the book, go out and find the original record to verify it is correct, and cite both in your database.
Learn more about citing your sources by watching my free video Source Citations for Genealogy (episode 60 of Elevenses with Lisa).

Elevenses with Lisa episode 60
What to do when you can’t keep all the genealogy you inherited.
As painful as it is to say, it isn’t always possible to keep all of the genealogical items that come your way. The reality is that shelf and closet space have limits, and our collection can grow unmanageable when added to the research of previous generations.
Start by seeing if you can reduce it. Strive to digitize all items that you want to save that are not originals, heirlooms or not readily available somewhere else.
Need help digitizing? I use Larsen Digital. Click our link and use the discount coupon codes found on the webpage.
Once digitized and recorded in your database, you can toss them. Recently I went through boxes of photographs I inherited from my paternal grandmother. Many were from the late 1970s and early 1980s when double prints were all the rage. By simply tossing duplicates and low quality photos (such as half of grandma’s hand over the camera lens) I was able to reduce the collection by almost a third!
Donation is also an excellent option. Digitize and take photos of the items and then they can be donated to a library, archive, genealogical society or other organization with an interest in them. Sometimes the shared interest is not as much in the particular families as the locations from which they hailed. One woman told me at a recent seminar that when she asked her local archive about her materials, they were ecstatic. They immediately spotted old buildings in the photos that no longer exist but held an important place in the town’s history. You never know what may be meaningful to others.
The Genealogy Center at the Allen County Public Library in Fort Wayne is an excellent resource for both free digitization and donation. Watch Elevenses with Lisa episode 31 to learn more.

Learn more about donating your genealogy in episode 31.
I recently heard from a Hal Horrocks, a long-time member of the Orange County California Genealogical Society. In 2017 they started a program called Rescue the Research. They strive to preserve the research done by their past members. It’s a great example of making hard-won genealogy research more accessible to others while reducing the burden on closet space.
Donation isn’t for everybody. However, sadly it is sometimes the only option when you don’t have descendants or relatives interested in retaining your research. Don’t despair. Donating your research is bound to elicit a genealogy happy dance from some future genealogist who comes across your research!
You can learn more about protecting, preserving and donating your genealogy research by watching my video class Save Your Research from Destruction (Elevenses with Lisa episode 10, available exclusively as part of Premium Membership.)
Your ancestors and your descendants will thank you.
It’s been famously said that “you can’t take it with you” when you leave this earth.
“You can’t take it with you”
By following these strategies and addressing that reality now, there’s one very important thing you will be leaving behind: the legacy of family history. One that avoids burdening the next generation while providing a lasting connection between all of the generations of your family tree.
Resources
Get My Free Genealogy Gems Newsletter – click here.
Bonus Download exclusively for Premium Members: Download the show notes handout.
Become a Genealogy Gems Premium Member today.

Click to learn more about Genealogy Gems Premium Membership.