Traveling ancestors created records when they left the country of their origin and when they arrived at their new residence. We often talk about immigration, with an I, but have you researched your ancestors emigration records with an E?
When our ancestors traveled from one place to another, they became two types of migrants. First, they were Emigrants with an E, and then, they were Immigrants with an I. Emigration with an E means someone exiting a country and immigration with an I means someone coming into it. Let’s learn more about emigration…with an E.
I live in a country that doesn’t have much in the way of historical emigration records, but other countries do. I have to remember these emigration records when I start looking overseas for my relatives who were crossing the pond to live here.
EXAMPLES OF EMIGRATION RECORDS
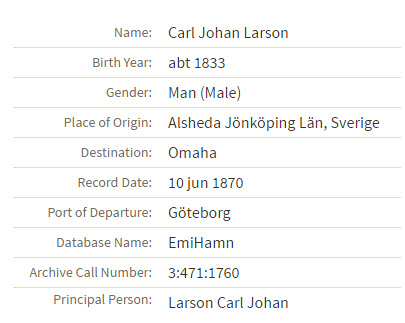
Swedish parishes kept emigration records which are now on Ancestry dating back to 1783. According to the database description, this record set is pretty complete, representing about 75% of those who actually left the country. These rich records can provide place of origin, destination, and the date and place of departure.
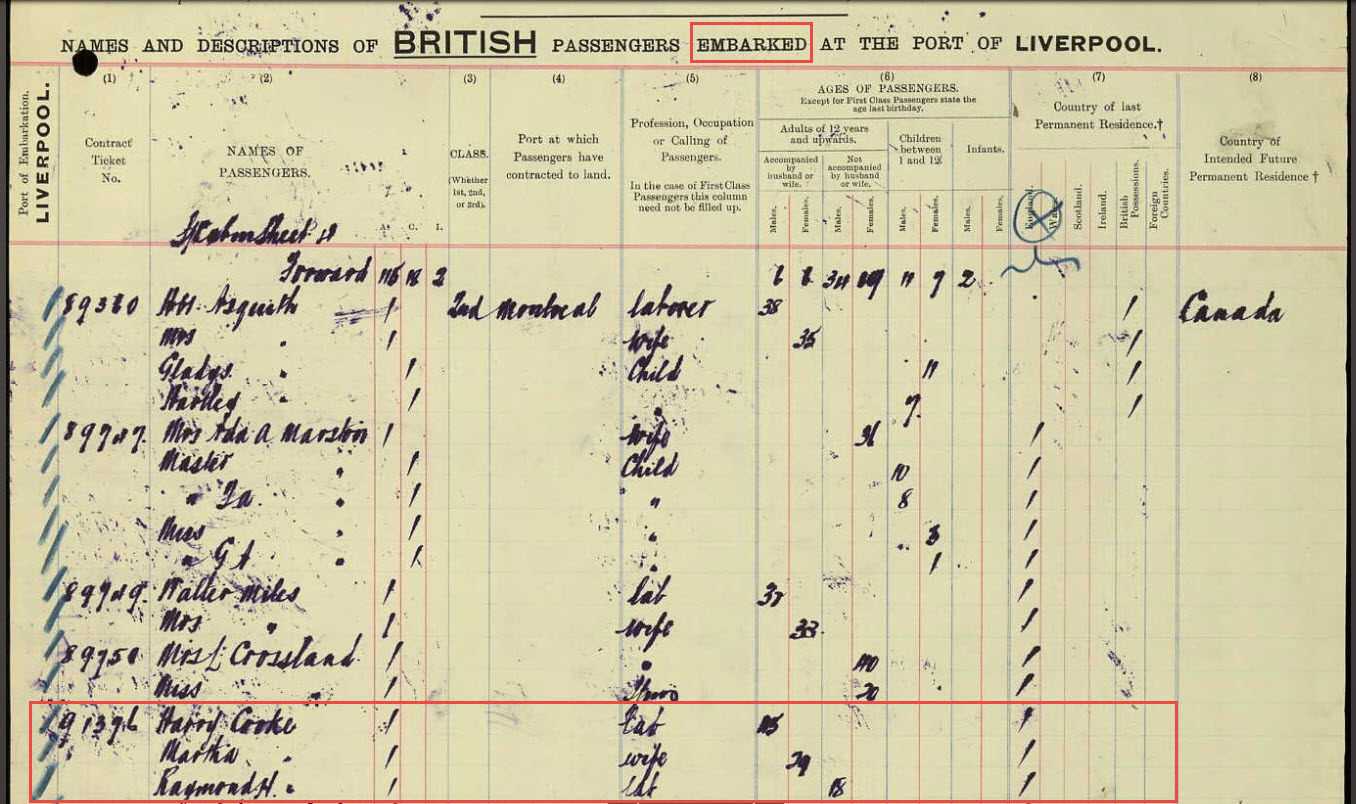
For a time, the U.K. also kept outward passenger lists of those leaving the U.K. ports for destinations outside of Europe. The lists include British citizens and those traveling through the U.K. These passenger lists no longer survive for the years before 1890, but they are on Ancestry for the years of 1890-1960. Of course, while writing this post I just had to take a moment to do a bit of searching myself, and that lead to this genealogy gem: my husband’s grandfather, and his parents embarking at Liverpool in 1912!
I also spotted this interesting item in the database description. Quoted from the U.K. National Archives website:
“Between 1890 and 1920, among the highest tonnage of ships were leaving British ports bound for North America. Many passengers were emigrants from Britain, Ireland, and Europe. European emigrants bound for America entered the United Kingdom because traveling steerage was less expensive from a British port than from a port in Europe. The shipping companies imposed restrictions on passengers registering; passengers had to have British residency of six weeks to qualify. Many passengers too impatient to qualify for residency changed their names to avoid detection.”
A name change would certainly present a challenge, but it’s very good to know to be on a look out for that situation. This is another example of why it is so important to read the description of the databases you search.
MORE EMIGRATION RECORD COLLECTIONS
A quick search of Ancestry’s card catalog shows emigration collections for Prussia, Switzerland, a few parts of Germany, Jewish refugees from several nations in Europe, and an interesting collection of Dutch emigrants who came to North America with the help of the Canadian and Dutch governments.
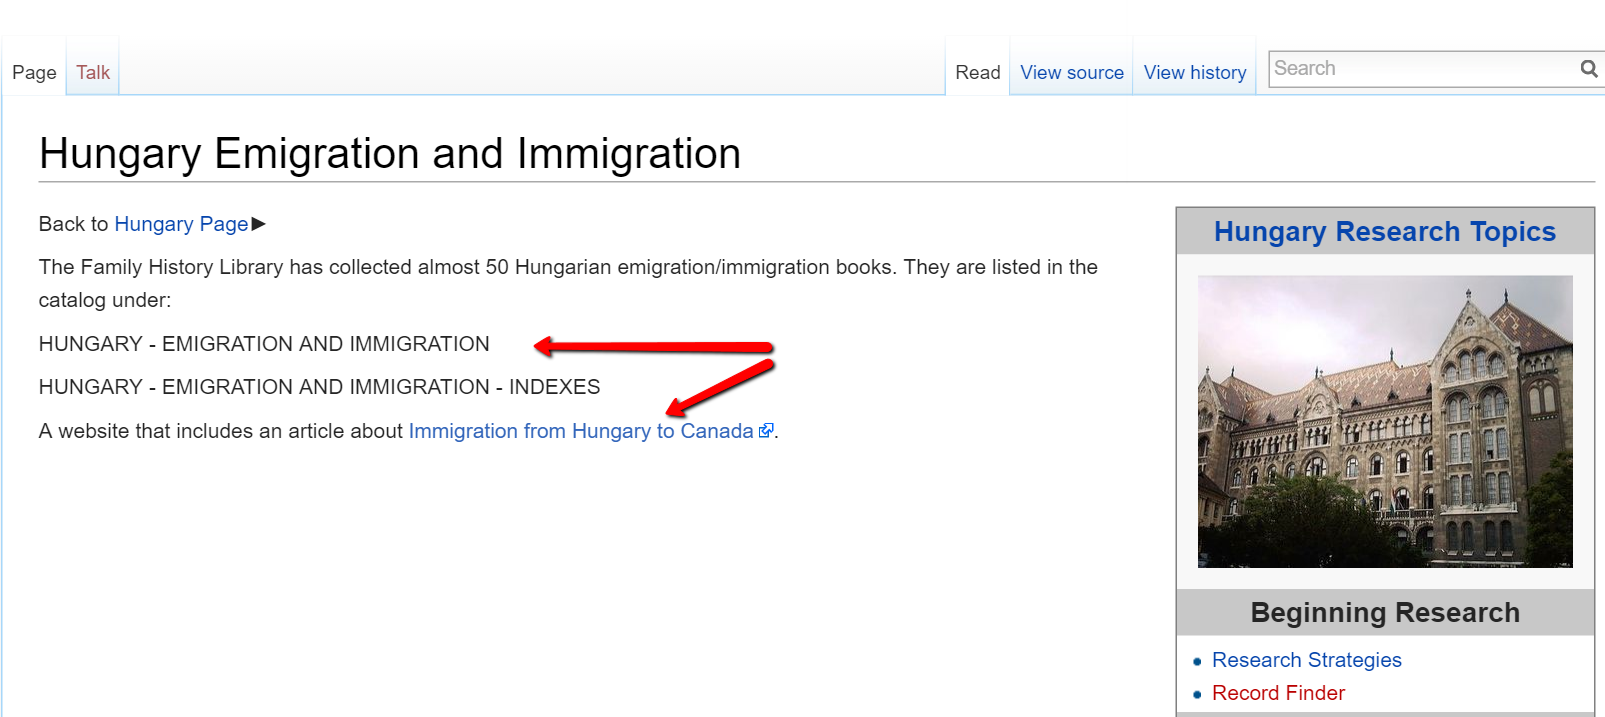
Another excellent resource is the FamilySearch Wiki. You can search for the name of the country and the word emigration (with an e) to find out more about your targeted area. I typed in Hungary emigration and found the following information.
Did your emigrant (or immigrant) ancestor generate records in the country he or she left from as well as the country he or she entered? Remember to check!
Records that have been created recently are difficult to find and access. Some privacy laws protect, and hinder, our being able to find more recent birth, marriage, and death records we need. Here are some tips for finding these and other genealogy records not yet online.
Recently, Tom in Olympia, Washington wrote us with a question about how to find recent genealogy records that are not online yet.
“My wife’s mother was adopted in 1925. We have found her biological mother’s name and through Ancestry.com, I’ve found several bits of information about her from census records. She also was a crew member on three steamships in the 1930s. On two of the ship manifests, her U.S. passport numbers are listed. Do you know any search options for finding information from passports in the 1930s?”
Maybe you have had a similar question. We hope our answer helps everyone more easily find genealogical records that are not online yet.
Obtaining Recent Passport Application Records
Tom will be interested in obtaining a passport application record which may hold more information about his targeted ancestor. As Tom already discovered, U.S. passport records are online at Ancestry and FamilySearch, but only those records prior to 1925.
My original hope was that the National Archives Records Administration would have had the passport application records for the 1930s. I googled passport applications National Archives, and the first search result took me to an excellent article. I learned the U.S. State Department has passport applications on microfilm between the years and dates of 1795 to 1905 and January 2, 1906 – March 31, 1925. Sadly, these were not the years Tom was looking for.
To find information about passport applications in the 1930s, I needed to go another route. I opened a new window and googled U.S. State Department passport applications request copy. The first search result took me right to the page I needed. The Passport Services maintain the U.S. passport records from 1925 to the present. These records are protected by the Privacy Act of 1974.
Passport records in this time frame for a third-party person are processed under the Freedom of Information Act. These records need to ordered by mail. Tom can make a request in writing and send that request to:
U.S. Department of State
Office of Law Enforcement Liaison
FOIA Officer
44132 Mercure Cir
P.O. Box 1227
Sterling, VA 20166
I suggested he mention his desire for the information is for genealogical purposes and what his relationship is to the person in question.
Using the Same Strategy for Other Recent Genealogy Records
Remember, this same kind of strategy applies to other genealogical records you might be looking for that were created recently. You can use Google searches and follow-up phone to find out where more recent records are and the access policies.
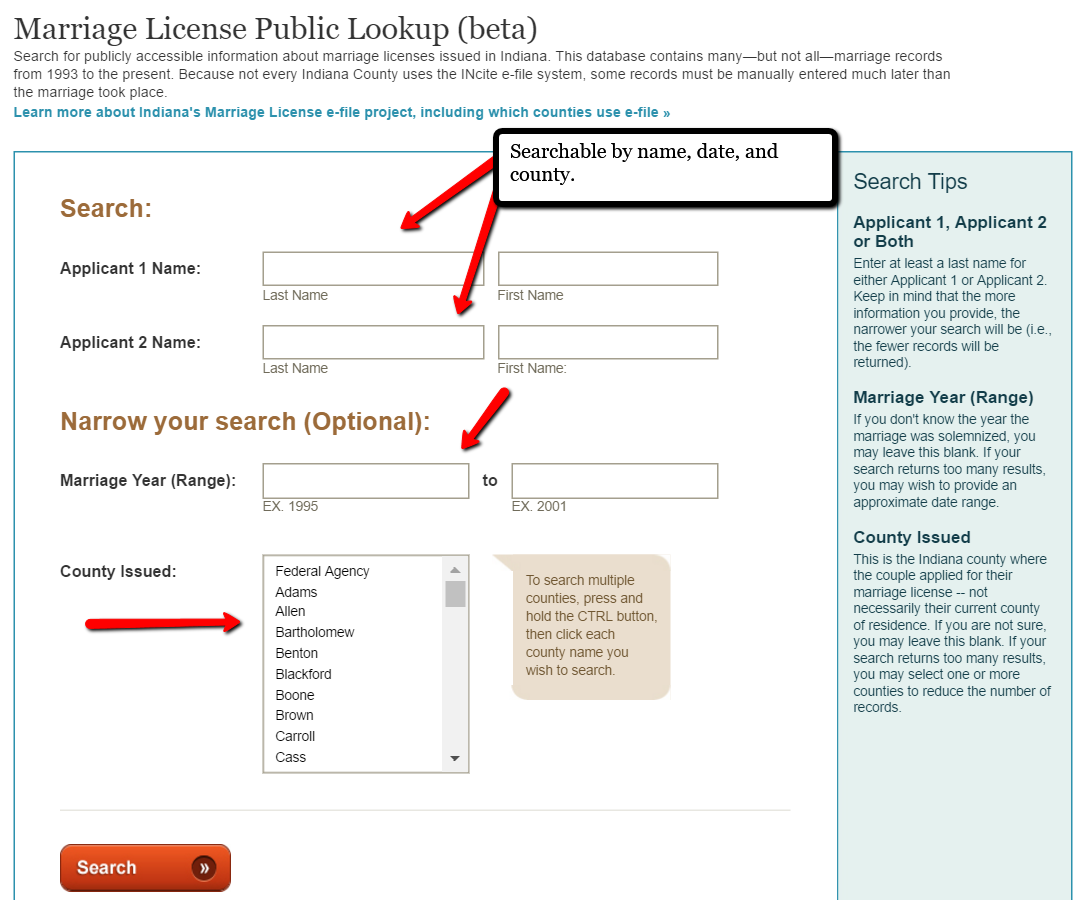
As an example, a recent Indiana marriage license index can be searched and viewed online for free at the Public Access records website for the state. I found this little goody by googling Indiana marriage records.
All of us at Genealogy Gems adore having the opportunity to find and share solutions like this one for overcoming the problem of locating recent genealogy records that aren’t online. If you haven’t done so already, sign-up for our weekly newsletter for more tips and tricks. Oh, and write to us anytime with your genealogy questions! We love to hear from you!
More Gems on Recent Genealogy Records
Other recent genealogy records in the U.S. are also available via the provisions of the Freedom of Information Act (FOIA). Click here to read about them! They include post-World War II draft registrations, immigration and naturalization documents and Social Security applications (SS-5).
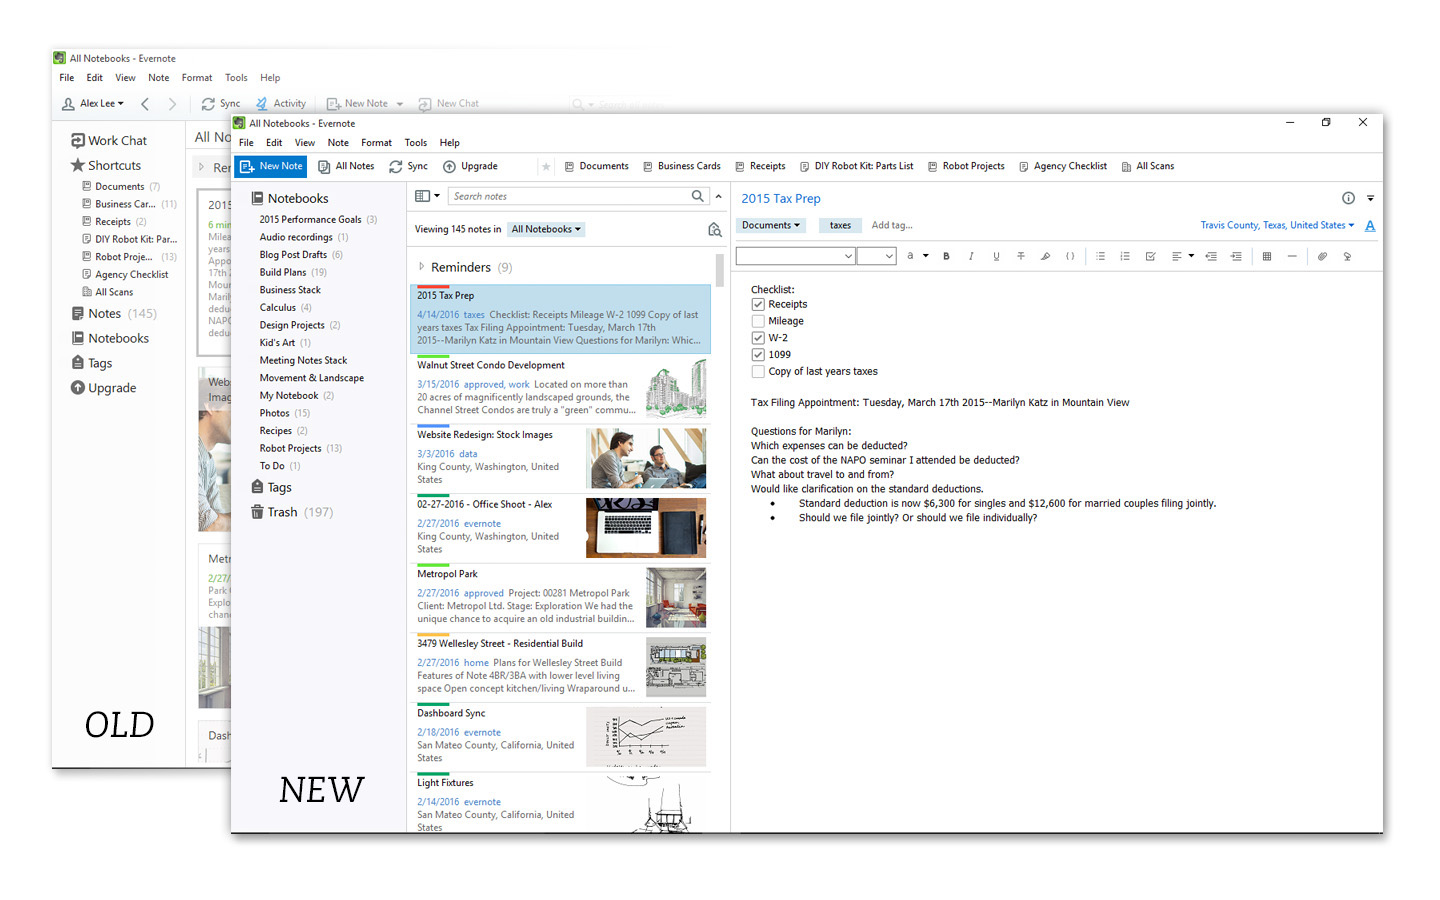
The Evernote for Windows upgrade has received a major face-lift. It is getting some great reviews online. Here’s what to love about it.
If you’re a Windows user and you’re still not using Evernote to organize your genealogy and the rest of your life, perhaps it’s time to take a look and see if it’s right for you and your research.
If you’re already a user, a new Evernote for Windows upgrade will make your experience all the better.
Evernote for Windows Upgrade New Look and Functionality
The Evernote blog explained that their goal “is to provide an experience that feels natural and familiar for Windows users. Our latest version is designed for all types of Evernote Windows users in mind, whether you have just a handful of notes or thousands of them.” They continue to say, “We began by paring down the left sidebar for a more streamlined workflow, so you can find and manage your content even faster.”
Here’s a run-down of the improvements they’re touting:
A new higher-resolution display looks crisp and clean, even on high-resolution screens.
The left sidebar is pared down for a more streamlined workflow. This makes it easier to find and manage content. For example, you can select Notebooks to pull up all notes in the Note list, and expand the Notebooks section to see all the notebook stacks and notebooks. You can drag and drop notebooks between stacks. The trash is now its own section.
A new quick navigation feature lets you hover over the Notebooks section and jump quickly to a specific notebook or create a new one. This also works for tags.
The search is smarter and more powerful, even for those with complex tags and tons of notes. It also feels more like web browser searching. You can widen or narrow your search to specific notebooks. The search system will rummage through your Evernote Trash now, too.
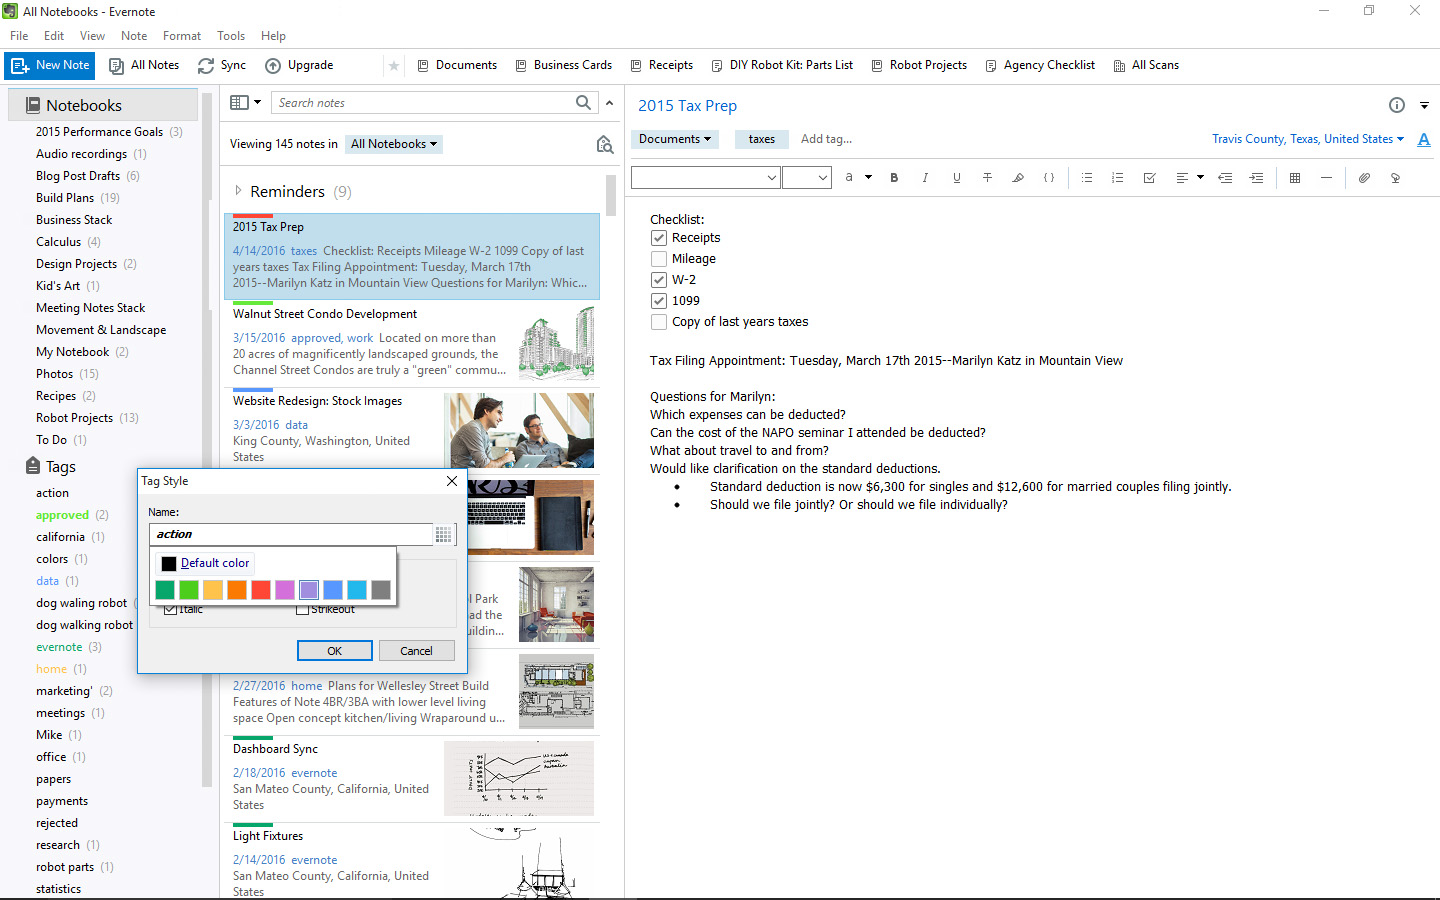
Image by Evernote.
There’s a new color-coding system to let you mark important notes. So far, this is pretty popular with dedicated Evernote users.
And finally, if you use Evernote Business, you’ll find a new separation between business and personal content.
It’s worth noting that the upgrade takes a while to complete and while it’s happening, you won’t be able to use Evernote. And at least for now, the saved searches of previous versions have disappeared. Evernote says that’s temporary.
What others are saying
TechTimes says the new Evernote for Windows has “a slew of improvements bound to enhance the overall experience.” Engadget.com calls the upgrade “a streamlined, cleaner approach with refinements addressing the sidebar’s design and functionality.”
How to get organized with Evernote!
Click here to learn about how to get started with Evernote, and more about using Evernote to organize your genealogy life.
What do you think about the new upgrade? Feel free to share your experience in the comments section below.
With about 1/3 of Americans claiming British ancestry, chances are that at some point you will need to extend your research across the Atlantic Ocean. Genealogical research in the British Isles has some important differences when compared to the United States. Guest blogger Kate Eakman, a Senior Researcher for Legacy Tree Genealogists, clarifies confusing terms and helps you get your research started on solid footing!
Britain? England? The United Kingdom?
When beginning British genealogy research, it’s important to first talk about the difference between British and English research. There are several terms which get used interchangeably but which really refer to different locations.
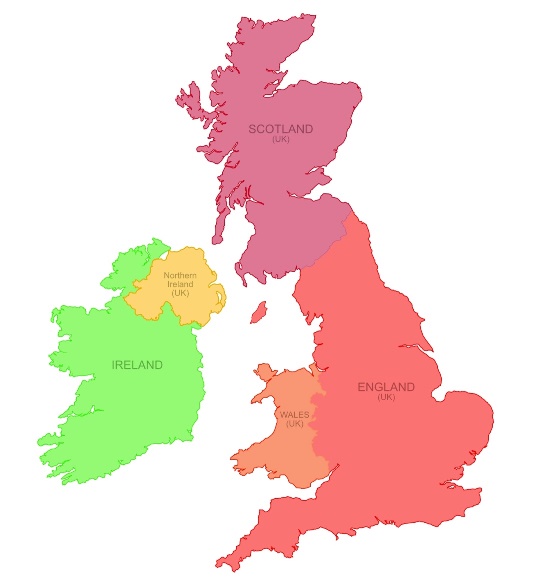
Great Britain is an island, the largest island in the British Isles.
On the island of Great Britain are three of the four sovereign nations which make up the United Kingdom, or the U.K.: England, Wales, and Scotland. Northern Ireland on the island of Ireland is the fourth country of the U.K.
The four countries of the United Kingdom and the Republic of Ireland. Map courtesy Nate Parker.
Usually, when people talk about their British ancestors, what they really mean are their English ancestors. Although we Americans often treat the two words as interchangeable they really aren’t, and I suspect our English friends giggle a bit when they hear us misuse the words.
The four countries of the U.K. have some similarities but many important differences, and that is equally true for genealogical research. Rather than trying to explain all of those differences, this post will focus on English research.
One last thing to keep in mind when we talk about genealogical research in England is that today the country is divided into counties, which are sort of the equivalent of states in the U.S. Older records might refer to those counties as shires, and over time the borders have shifted, shires and counties were added, divided, or absorbed into each other. So a good map or two will be a useful tool to keep handy while you research your English ancestors.
Usually, when people talk about their British ancestors,
what they really mean are their English ancestors
What do you know?
Before beginning British genealogy research and making that leap across the pond, it is a good idea to consider what you already know about your English ancestors. Of course, you have a name, and you probably have an approximate date of birth.
Were you fortunate enough to find the name of a town or county where that ancestor lived or do all of the census reports and vital records simply say “England”?
If the ancestor arrived as an adult, what occupation did he pursue?
When did he or she arrive in the U.S.? Are there any clues on the passenger list to tell you where to start looking?
Once you have reviewed all of the information you have already acquired about your English ancestor, it’s time to start your research.
Beginning British Genealogy Research with the Census
The first step in most genealogical research is to study the existing census reports. Designed as a means to count the population for a variety of years, the census of Great Britain (including Scotland) is taken every ten years with the earliest records available in 1841. Due to very restrictive privacy laws, the most recent census available is from 1911, with one really valuable exception being the 1939 Register, available at FindMyPast.
Used for genealogical purposes, the census can give a snapshot of the family at the time the census was taken, as well as provide invaluable information such as the birthplace of the individual being recorded, occupation, birth year, and familial relationships. Elderly parents, or widowed mothers, aunts, or sisters, can be discovered living with younger members of the family.
Drawbacks of using the census for genealogical purposes include inaccurate name spellings, inaccurate age reporting, and inaccurate assumptions made by the enumerator. Another thing to keep in mind is that in the 1841 census the enumerated rounded down to the nearest five years the ages of people over 15. So a person who was listed as 25 could have been 25 through 29 years old.
It is important to remember that for the census reports through 1901 the enumerator copied the household information into books, and these copies are what we have today. Of course, when information is copied it is susceptible to error. The person who completed the census form may have had difficult-to-read handwriting, or the enumerator may have entered things on the wrong line. The individual reports have been kept for the 1911 census and offer a greater likelihood that the information they contain is very accurate.
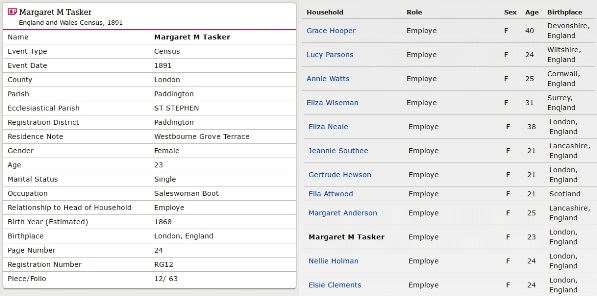
An example of a transcription from the 1891 English Census from Familysearch.org.
Detailed transcripts of English census records are available for free on FamilySearch and the images can be found for a fee at FindMyPast.
It is important to remember that for the census reports through 1901 the enumerator copied the household information into books, and these copies are what we have today.
Civil Registry of Vital Events
All English births, marriages, and deaths were required to be registered in a civil registration office beginning in July of 1837. In addition to the records themselves, there are indices which list the name of the person who was born, married, or died, the place where the event was registered, and the quarter and year in which the event occurred. Because the General Register Office (GRO) will only search one year on either side of the date provided, it is best, but not required, to include the index information when ordering documents from the GRO.
Free BMD is a free database which allows you the most freedom to search for the birth, marriage, and death index record of your relatives. You can enter whatever information you know including the place where the event happened, a specific year or range of years, age, and mother’s maiden name.
Depending on the time period, the index may be handwritten or mechanically printed. The information can then be used to order a copy of the actual record from the General Register Office (GRO) in England for about $10 per record.
An example of handwritten (left) and mechanically printed (right) birth index entries. Photos courtesy https://freebmd.org.uk.
The information contained in birth records includes:
Name, date, and place of birth;
Father’s name (if given at time of registration), occupation; and
Mother’s name, maiden surname.
The parents’ places of birth were added after 1969, and the mother’s occupation is listed after 1984.
Marriage records include:
Date and place of marriage;
Name, age and marital status (spinster/bachelor, widowed, divorced) of the bride and groom;
Occupation and usual address;
Name and occupation of the fathers of the bride and groom, with a note if either man was deceased at the time of the marriage;
Names of the witnesses;
Name of the person who solemnized the marriage.
Death records in the United States are often relied upon to provide the names of the parents. English death records do not include that information and therefore are not as useful for genealogical purposes. Each death record includes:
Name, date, and place of death;
Date and place of birth (before 1969 a certificate only showed age of deceased);
Occupation and usual address;
Cause of death;
The identity of the informant.
There are other records available, which we will talk about in a later post, which can be used to find and trace your English family members. The largest group are the religious records, and sometimes those can help you extend your family back in time to the 1600s – 400 years or more!
Beginning British Genealogy Important Take-Aways…
“Great Britain” is an island. “The United Kingdom” is a country. And “England” is a country. Normally, when people are talking about their British ancestors they are referring to their English ancestors.
England has counties, or what used to be known as “shires,” which function sort of like our states. The borders have changed over time, as have some of the names, so use a map when necessary to verify where you are researching.
Census records are available from 1841 through 1911. Really good transcriptions are available for free at Family Search, or on the for-fee site Find My Past. And remember that age idiosyncrasy about the 1841 census.
Finally, civil birth, marriage, and death records are available from the GRO. You can use the index listings to find the most likely match for your ancestor, and those can be found online at Free BMD.
Have fun and good luck finding your English ancestors!
Kate Eakman is a Senior Researcher for Legacy Tree Genealogists, a worldwide genealogy research firm with extensive expertise in breaking through genealogy brick walls.
Click here to learn more about Legacy Tree services and its research team.
(Read our Disclosure and Affiliate Disclaimer on this page)
Finding marriage records doesn’t have to be difficult. Let us share with you some top tips for locating those hard-to-find marriage records using the FamilySearch marriage record collections this week. Other new and updated record collections include Leicestershire county family history records and Jersey Church of England parish records.
United States – Marriage Records
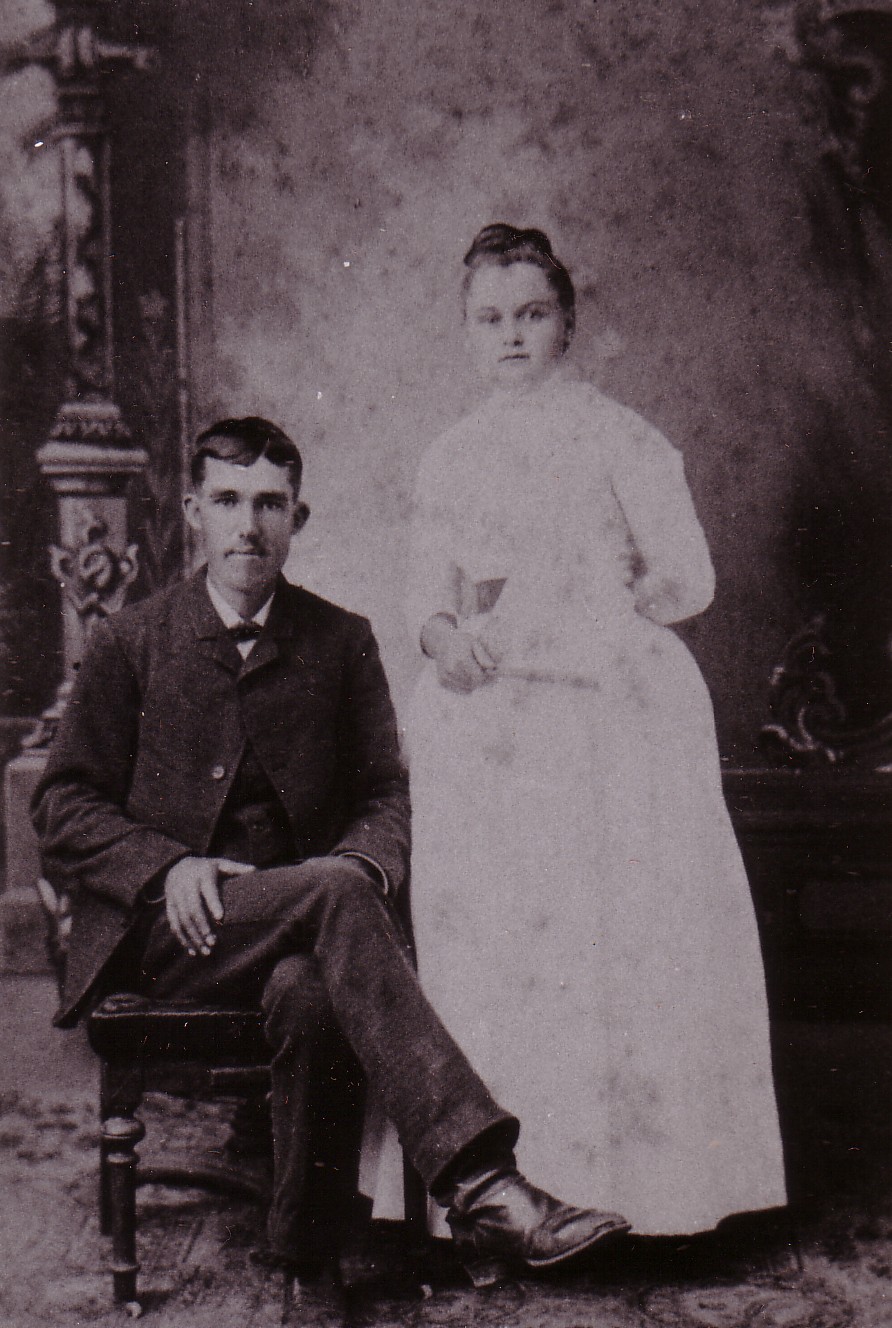
Harvey Hall and Edna Selby, 1886, Cameden County, Missouri. Photo courtesy of Sunny Morton.
The following states have had their marriage records updated at FamilySearch.org:
We know you know are familiar with how to use these marriage records, but maybe you have had trouble finding the marriage records you need. Here are 3 top tips you could try when searching for marriage records on FamilySearch.org:
1. Search first by the groom’s full name and then the bride’s full name, separately. In this way, if one of them is indexed incorrectly, you may be able to find their marriage record after all.
2. Search only by last name’s and location (county and/or state).
3. Search the states around your targeted state. Sometimes, it was easier to marry in a different state due to marriage laws. Like in the case of Ohio, it was common to go to Kentucky to marry because there was no time requirement between the time of the marriage license and the wedding.
Here is a quick video tutorial showing you exactly how to use these tips!
England – Jersey Church of England Marriage Records
Ancestry.com has also added records to their collection titled Jersey, Church of England Marriages, 1754-1940. The pre-civil registrations typically include the name of the bride and groom, the date of the marriage, and the parish of origin or residence of both parties. Sometimes the occupation of the groom is included or the parentage of the couple. After 1842, the registers of the parishes are all written in a standard format and record further details including the age, status, place of residence, place of birth, occupation, name of father, and father’s occupation.
United Kingdom – Leicestershire & Rutland County – Family History Records
Findmypast has just launched the first phase of a new landmark collection for five centuries of historic records for Leicestershire and Rutland counties. Over 3.5 million records dating back to the reign of Henry VII are now available online.
This new archive spans the years 1490 to 1991 and includes beautifully scanned images of original handwritten documents. When complete, the collection will be the largest online repository of Leicestershire family history records in the world.
There is a variety of documents, including parish records of baptisms, marriages, burials, wills, and probate records dating back to 1490. Also, millions of electoral registers spanning the years 1710 to 1974.
These records cover the ancient counties of Leicestershire and Rutland. However, as some of the collections are drawn from different jurisdictions or were subject to boundary changes, some areas now beyond today’s boundaries, such as Little Bowden and Over and Netherseal, are also included.
Some famous individuals appear in the records like:
The parents of the Elephant Man, Joseph Merrick which can be found in an 1861 marriage register from the parish of Thurmaston.
More on Finding Marriage Records
To learn even more about researching marriage records for family history, listen to Lisa’s free podcast episode titled Using Marriage Records in Family History. This episode is part of a series called Family History: Genealogy Made Easy. This specific podcast is all about marriage records and how to find and utilize them for your research.
If you have not yet taken the opportunity to engage with Genealogy Gems through our free podcast, please join us. You can find the free episodes listed here.
For further in-depth tips and techniques, subscribe as a Premium Member and enjoy the Premium Podcasts just for members! There is always something more to learn in the world of genealogy and we want to share it with you.
Disclosure: This article contains affiliate links and Genealogy Gems will be compensated if you make a purchase after clicking on these links (at no additional cost to you). Thank you for supporting Genealogy Gems!