Welcome to this step-by-step series for beginning genealogists—and more experienced ones who want to brush up or learn something new. I first ran this series in 2008. So many people have asked about it, I’m bringing it back in weekly segments.
Episode 4: Attending Genealogy Conferences and Vital Records Requests
In our first segment, our guest is the longtime online news anchorman of genealogy, Dick Eastman, the author of Eastman’s Online Genealogy Newsletter. He talks about the changing industry and the benefits of attending genealogy conferences.
Next, you’ll learn the ins and outs of using some “vital” sources for U.S. birth and death information: delayed birth records, Social Security applications (SS-5s) and death certificates.
Genealogy Conferences Conversation: A Few Updates
Dick and I talk about Footnote.com as a relatively small site. Has that ever changed! Footnote.com is now Fold3.com and it’s a go-to site for millions of online American military records.
Family History Exposstill offers an exciting conference, especially for first-timers. But there are others as well: In the United States, there’s RootsTech, the National Genealogical Society and many state and regional conferences (like one near my home, the Southern California Genealogical Society’s annual Jamboree). Find a nice directory at Cyndi’s List. Many conferences are starting to offer live streaming sessions for people who can’t attend: check websites for details. In addition, Family Tree University offers regular virtual conferences—where sessions and chat are all online! If you live outside the U.S., look for conferences through your own national or regional genealogical societies. If you can get to London, don’t miss Who Do You Think You Are Live.
Dick now writes all of his Plus content himself. If you haven’t already checked out Eastman’s Online Genealogy Newsletter, you should! Both his free and Plus newsletters are great insider sources on what’s new and great (or not-so-great) in the family history world.
The SS-5
You can order a copy of the application that your ancestor filled out when they applied for a Social Security Number: the SS-5. I have done this, and they really are neat, but they aren’t cheap. So let’s talk about the facts you’re going to find on them so you can determine if it is worth the expense.
The SS-5 has changed slightly over time, but may include the applicant’s name, full address, birth date and place and BOTH parents’ names (the mother’s maiden name is requested). If your ancestor applied prior to 1947 then you will also very likely find the name and address of the company they worked for listed, and possibly even their position title.
Here’s an example of a Social Security application form:
In the 1970s, the Social Security Administration microfilmed all SS-5 application forms, created a computer database of selected information from the forms, and destroyed the originals. So it’s important to order a copy of the microfilmed original, rather than a printout or abstract from the Administration’s database. And luckily now you can request a Social Security Application SS5 Form online under the Freedom of Information Act.
It will help to have your relative’s Social Security Number (SSN) when you apply for a copy of their SS-5. First, it gives you greater confidence that their SS-5 exists. Second, it’s cheaper to order the SS-5 when you have their SSN. Third, the Social Security Death Index, in which you’ll find their SSN, usually has death data that makes your application for their SS-5 stronger. Privacy concerns have caused some genealogy websites to pull the SSDI, but you can still search it (in many instances for free) at the links provided in Episode 3.
Finally, here’s a little background on the Social Security Number itself. The nine-digit SSN is made up of three parts:
The first set of three digits is called the Area Number. This number was assigned geographically. Generally, numbers were assigned beginning in the Northeast and moving westward. So people whose cards were issued in the East Coast states have the lowest numbers and those on the West Coast have the highest numbers.
Prior to 1972, cards were issued in local Social Security offices around the country and the Area Number represented the state in which the card was issued. This wasn’t necessarily the state where the applicant lived, since you could apply for a card at any Social Security office.
Since 1972, when the SSA began assigning social security numbers and issuing cards centrally from Baltimore, Maryland, the area number assigned has been based on the ZIP code of the mailing address provided on the application for the card. And of course, the applicant’s mailing address doesn’t have to be the same as their place of residence. But in general the area number does give you a good lead as where to look for an ancestor.
The next two digits in the number are called the Group Number, and were used to track fraudulent numbers.
The last set of four digits is the Serial Number, and these were randomly assigned.
UPDATE: The website for ordering Social Security applications (SS-5s) has changed since the podcast first aired. For current ordering instructions, including online ordering, click here. The cost is still $27 to order a deceased relative’s SS-5 if you know the Social Security number and $29 if you don’t know it.
Delayed Birth Certificates
After 1937 folks who qualified to apply for social security had to have proof of their age. If they were born prior to official birth certificates being kept in their state, they applied for a delayed birth certificate.
Anytime someone needs a birth certificate for any reason, they have to contact the state—and often the county—in which the birth occurred. If a birth certificate exists, they can simply purchase a certified copy. But if there were no birth certificates issued at the time of the person’s birth, they could have a “delayed birth certificate” issued by that state or county.
In order to obtain a delayed certificate, they had to provide several pieces of evidence of their age. If these are considered satisfactory, the government would issue the certificate and it would be accepted as legal proof of birth by all U.S. government agencies.
Originally people turned to the census for proof of age. But eventually the Social Security Administration began to ask for birth certificates. For folks like my great grandmother who was born at a time and place where birth certificates were not issued, that meant they had to locate documents that could prove their age and allow them to obtain a delayed birth certificate. Delayed just meaning it was issued after the time of the birth.
Delayed birth certificates are not primary sources. (Remember we talked about PrimarySources in Episode 2. Since the delayed certificate was based on other documents, and not issued at the time of the event by an authority, such as the attending physician, then it is not a primary source. This means that while it’s great background information, it is more prone to error. In order to do the most accurate genealogical research you would want to try to find a primary source if possible. Chances are your ancestor used another primary source, such as an entry in the family bible, to obtain the delayed birth certificate.
The process for ordering a delayed birth certificate is likely going to be the same as ordering a regular birth certificate. You would start with the checking with the county courthouse, and then the Department of health for the state you’re looking in. Let them know that the birth record is a delayed birth certificate. Also the Family History Library card catalogue would be a place to look as many were microfilmed. Go to www.familysearch.org and search for delayed birth records by clicking on Search from the home page. Then click Catalog and do the keyword search just as the episode instructs, using “delayed birth” as your keyword. (Within that search, you can also add parameters for the place name.)
So the lesson here is that even though your ancestor may have been born at a time or in a location where births were not officially recorded by the state, they may very well have a delayed birth certificate on file.
Ordering Death Certificates
The Social Security Death Index is just one resource for getting death information. But in the end you’re going to want the primary source for your ancestor’s death, and that’s the death certificate. While many of your ancestor’s born in the 1800s may not have a birth certificate, there is a much better chance that they have a death certificate since they may have died in the 20th century. Each state in the U.S. began mandating death certificates at a different time, so you have to find out the laws in the state, and probably the county, since death certificates were filed at the county level.
As I said before, the death certificate is going to be able to provide you with a wealth of information. Of course you’ll find the name, date of death and place of death, and possibly their age at death and the cause and exact time of death, place of burial, funeral home, name of physician or medical examiner and any witnesses who were present. The certificate is a primary source for this information.
You may also find information such as their date and place of birth, current residence, occupation, parent’s names and birthplaces, spouse’s name, and marriage status. But because this information is provided by someone other than the ancestor themselves it is really hearsay, and the certificate is considered a secondary source for that information.
And lastly you may find a name in the box that says Informant. This is the person who reported the death to officials. Informants are often spouses, children, and sometimes, depending on the person’s circumstances, just a friend or neighbor. But the informant is almost always someone that you want to investigate further because they obviously were close to your ancestor.
Once you think you know the location where your ancestor died, and the approximate if not exact death date, you’re ready to order a certificate. If the person died in the last 50 years you’ll probably have really good luck at the county courthouse Department of Vital Records. The older the record, the more likely it may have been shipped off by the county records department to the state Department of Health. Look for helpful links to death records at Cyndi’s List Death Records.
Here are some tips that will ensure that you don’t get bogged down in bureaucratic red tape:
Get the appropriate request form – this is usually available online.
Print neatly and clearly – if they can’t read it, they will send it back to be redone.
Provide as much information as you have.
Provide a self addressed stamped envelope.
Make one request per envelope.
Include a photocopy of your driver’s license to prove your identity.
Be sure to include your check for the exact amount required.
Make a copy of the request form for your records and follow up.
Lastly, keep in mind that county offices have limited personnel and are often swamped with paper work. So my best advice is that the more courteous and thorough you are the more success you’ll have.
Online Death Indexes
In the case of very old death certificates, as well as birth certificates, some state agencies have opted to hand them over to state Archives and Historical Societies, or at least make them available for digitizing.
And there you have it, lots of different avenues for tracking down your ancestor’s death records providing you with key information for climbing your family tree.
Genealogy Gems Podcast Episode 219 In this episode, Lisa shares the stories of Julianne Mangin, who has explored the tragic and twisted stories of her ancestors, Graziella and Philippe Metthe. These stories caught Lisa’s eye: “The tragic tale with...
In honor of Independence Day in the United States, AmericanAncestors.org is offering free access to databases on early New England ancestors starting TODAY through July 8.
If you have Mayflower, Pilgrim or Puritan ancestors (or want to confirm the rumor that you do!), you’ll want to take advantage of this offer from the New England Historic Genealogical Society. For many years the society has been researching “the 20,000 men, women, and children who crossed the Atlantic between 1620 and 1640, seeking opportunity and relief in New England.”
The Great Migration Study Project, as their work is known, has resulted in several databases, nine of which are open to the public for FREE during the first week of July 2015:
The Great Migration Begins. This database “attempts to identify and describe all those Europeans who settled in New England prior to the end of 1633,” states an NEHGS press release. “As a rough estimate, about 15 percent of the immigrants to New England arrived in the fourteen years from 1620 to 1633, with the remaining 85 percent coming over in half as many years, from 1634 to 1640.”
The Great Migration Newsletter. “This database comprises Volumes 1 through 20 of the Great Migration Newsletter, published between 1990 and 2011. Each 32-page issue contains one or two feature articles, a column with editor’s comments, and a review of recent literature on the Great Migration. Each issue also contains a section with detailed coverage of one of the towns settled during the Great Migration, or of a specific critical record, or group of records.”
The Great Migration: Immigrants to New England, 1634-1635, Volumes I—VII, A-Y. (7 separate databases) “As many as 2,500 people immigrated in 1634 and again in 1635….In May 1634, the population of Massachusetts doubled in just one month….Each alphabetical entry for a family or individual includes:
Place of origin, if known
Date and ship on which they arrived in New England, if known
Earliest known record of the individual or family
First residence and subsequent residences, when known
Return trips to their country of origin, whether temporary or permanent
Bibliographical information such as birth, death, marriage(s), children, and other important family relationships, church memberships, and civil and military offices held.”
Click here to access these databases for free between July 1-8, 2015. (Registration at AmericanAncestors.org is required as a FREE Guest Member.)
Looking for more FREE New England genealogy resources? Check out these blog posts!
When you’re working on our genealogy, you’ve got data and records coming from all directions: websites, interviews, archives, downloadable documents, and more. Some of it you’re actively working on, some of it you need to save for later, and the rest has already been analyzed and is ready for archiving. This variety of data requires a variety of storage locations.
Watch episode 71
In this week’s special episode of Elevenses with Lisa (episode 71) I’m going to share with you my genealogy data workflow. We’ll talk about how it all fits together to ensure an uncluttered desk and the ability to instantly put my hands on what I need when I need it. If that sounds like something that you need help with, please join me this week.
Three ways to watch: 1. Video Player (Live) – Watch live at the appointed time in the video player above. 2. On YouTube (Live) – Click the Watch on YouTube button to watch live at the appointed time at the Genealogy Gems YouTube channel. Log into YouTube with your free Google account to participate in the live chat. 3. Video Player above (Replay) – Available immediately after the live premiere and chat.
Episode 71 Show Notes
Barbara left a comment saying she found our recent videos that we called How Alice the Genealogist Avoids the Rabbit Hole helpful (episode 68 and episode 69), but she did had a question about Evernote. She asks, “Once you have processed (the genealogy record) and extracted the information you need, do you remove them from Evernote and place them in your digital genealogy filing system? I get a bit confused in thinking about what the other purposes of Evernote might be. Wouldn’t I just save my documents, newspaper clippings, etc. to my digital files on the hard drive and also to my Google Drive folders? Is there any need to also have them in Evernote?”
This is a great question, and I think the best way to answer it is to talk about my entire genealogy workflow in which programs like Evernote play a part.
It really helps to have a consistent way to capture and find what you’re actively working on. My workflow works great for me, but its just one way. Follow along with me and see if this might be a flow that will work for you.
The Genealogy Data Flow
Let’s start off with an overview of my workflow. And there are really 5 major workstations, if you will, that your data flows through. Some of these we’ve discussed previously here and also in several Premium Member videos:
Active Genealogy Work
This is the stuff we are working on currently. I several different tools to capture and work on these items: Evernote, genealogy website subscriptions, “pending” folders on my computer, pending tabs in my 3 ring notebooks and physical pending box on my desk. We discussed this in Elevenses with Lisaepisode 7.
Conclusions added to Master Genealogy Database (Software on your computer)
Archival Digital Storage (your computer.) See episode 8 (Digital Archiving) You can certainly keep archival items in Evernote as well.
Archival Paper Storage (your binders.) See episode 6(Paper Archiving)
Cloud backup. I use Backblaze at https://www.backblaze.com/lisa (affiliate link – thank you for your support of our free content)
Incoming Genealogy Sources
Not everything I find while researching is ready to be archived the moment I find it. Some items are actively being found and worked with such as:
Items I’m exploring for the potential application to my current research project
Items pending analysis
Unproven items
Items playing a role in a bigger research question that I want all together for now.
Bright Shiny Objects (BSOs) – stuff I found along the way that doesn’t relate to my current research goals
Not everything is captured on my computer. Many items (photos, audio and video records, typed notes) are captured on my phone and my iPad. So, I need an easy way to funnel everything back to one active workspace. A cloud-based notetaking service allows me to do this because it’s available as software on my computer and an app on my mobile devices. All synchronize through my account on the cloud. I use Evernote (affiliate link – thank you for your support of our free content) so I’ll refer to that, but there are others out there like OneNote, and Google Keep. (Learn more about how to user Evernote in episode 70.)
Evernote allows me to:
Capture and hold items
search and retrieve more effectively than on my computer thanks to OCR (subscription)
work my genealogy research plan
easily collaborate with another researcher by sharing a single link
Store and share media such as audio and video recordings
OK, so does everything go straight into Evernote? The answer is no. So let’s take a look at what happens to a digital item when I get it. I’m going to call it data, but it could be a downloaded genealogy record, a web clipping from a website, a photo of a gravesite I took with my phone, or anything else that includes information I want to use.
Working Your Genealogy Research Plan
When we work our genealogy research plan, we will inevitably locate documents. Typically, these are digital, but sometimes we find a physical document and make a digital copy of it.
Before a digital item is deemed relevant and ready to archive, we have a lot of work to do. We need to evaluate and analyze the document to determine its value and its possible application to our family history. If deemed reliable and applicable, we then need to extract the data and enter it into our family tree software. We may also decide to add some or all of the information to other places such as our online tree if we have one.
Many times, all of this work can’t happen in one sitting. We may need to be able to review and work with the item several times before we’re finished with it. I call this “processing” the document.
Even after its processed, we may still need the item nearby for reference as we work our research plan in the hopes of reaching our goal. At this stage, I consider this item to be “Active.” The opposite of that would be items I consider to be “Archived.” An archived item has been fully utilized and is no longer playing an active role in my research plan. That’s not to say I may not need to reference it again in the future, which is why it must be archived where I can retrieve it. The point is that the item is not relevant to my current active research. For example, perhaps it pertains to my mother’s side of the family and right now I’m working on my father’s side of the family.
My active digital items are typically added to Evernote, which I consider to be my Active workspace. It is not my archival space. However, this is not to say that you can’t store everything in Evernote forever if that’s what you want to do. You certainly could. I’ve given this a lot of thought and there are a few reasons why I don’t store everything in Evernote.
The main reason I don’t store everything in Evernote is that I’m a firm believer in retaining control of my data. If we store everything on a website or in a cloud service (which Evernote is), they (or their hosting provider) could pull the plug tomorrow and it would all be gone. I certainly don’t think that would happen overnight, although there are real cases of that happening. But I don’t want to take the risk, and I don’t want to have to scramble in a panic to move a mountain of data because I’ve been given a 30 day notice that a service is ending or has been sold to another company. (And let’s not even think about the possibility that the email notification of that happening went to my Spam folder!)
In order to retain control of my family history data, my long-term data storage needs to be within my control: my computer, external hard drives (both backed up with Backblaze) and paper print outs. That being said, when it comes to my active research project, I’m willing to trade the risk for the speed and convenience of using an online tool or service such as Evernote. My active research is a small fraction of my total research, most of which has been archived on my computer.
So, when I first find an item, I have a decision to make: where am I going to put it? Will I save it to my computer or to Evernote? It depends on what it is.
Items I save to Evernote:
Items needing OCR to be most useful. Examples: Newspaper articles, web clippings
Items created with my phone or tablet. Examples: Photos of gravesites and documents, interview audio recordings, videos of research trips
Items needing analysis before confirmed as pertaining to my family. Examples: Record downloaded from a genealogy website. I want these in Evernote because everything is together in one place. Tags and the search feature allow me to instantly retrieve any combination of records I need at any given time for cross reference. And if I need to share any or all of the items with another researcher it’s easy to do with just one share link. A cloud notetaking service make working your research plan much easier. (Premium Members watch my video class Collaborative Genealogy with Evernote.
Example:Items pertains to my family but not part of my current research project.
Downloaded genealogy records I don’t have time to process right now.
All items are tagged with relevant information to make them quick and easy to find in addition to keyword searching.
Items I save to my computer hard drive:
Items to I want to keep that have been processed.
Digital scans of visual items. Examples: Family Photos, old postcards
Large files created on my computer (audio, video).
I have a solid system for organizing my folders and file on my computer so it’s quick and easy to find them. If you’re a Premium Member you can watch my step-by-step classes on how to set that up for yourself on my website GenealogyGems.com.
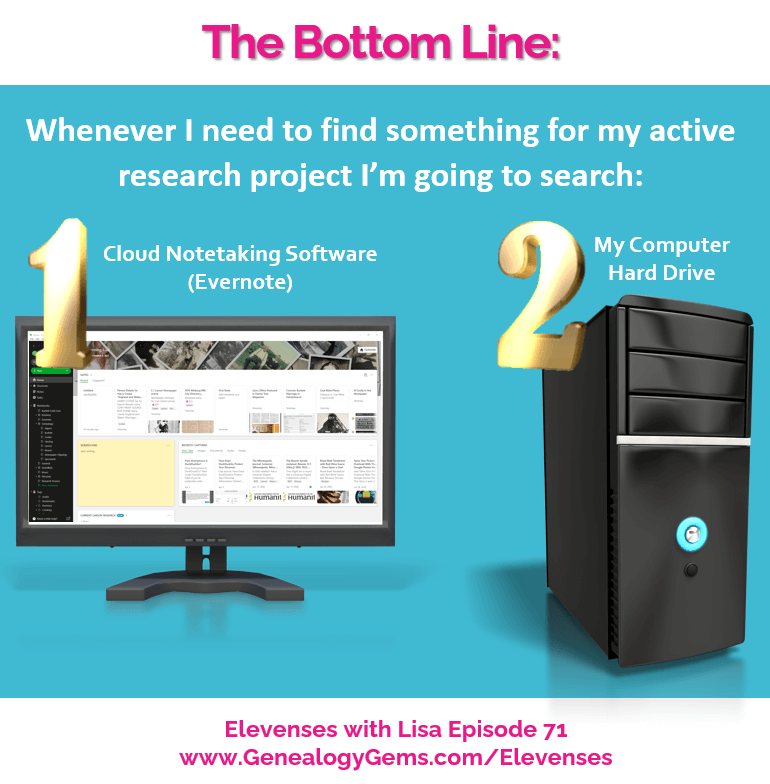
The bottom line is that whenever I need to find something for my active research project I’m going to search my notetaking service first, and then my computer hard drive.
Archiving Processed Items
Once I reach my research goal and I’m done actively using those sources, I’m ready to archive them. I could just leave everything in Evernote, but I want to make sure that all genealogical documents that I referenced as a source in my master database, are archived on my computer for long-term storage that I control, and that is being automatically backed up.
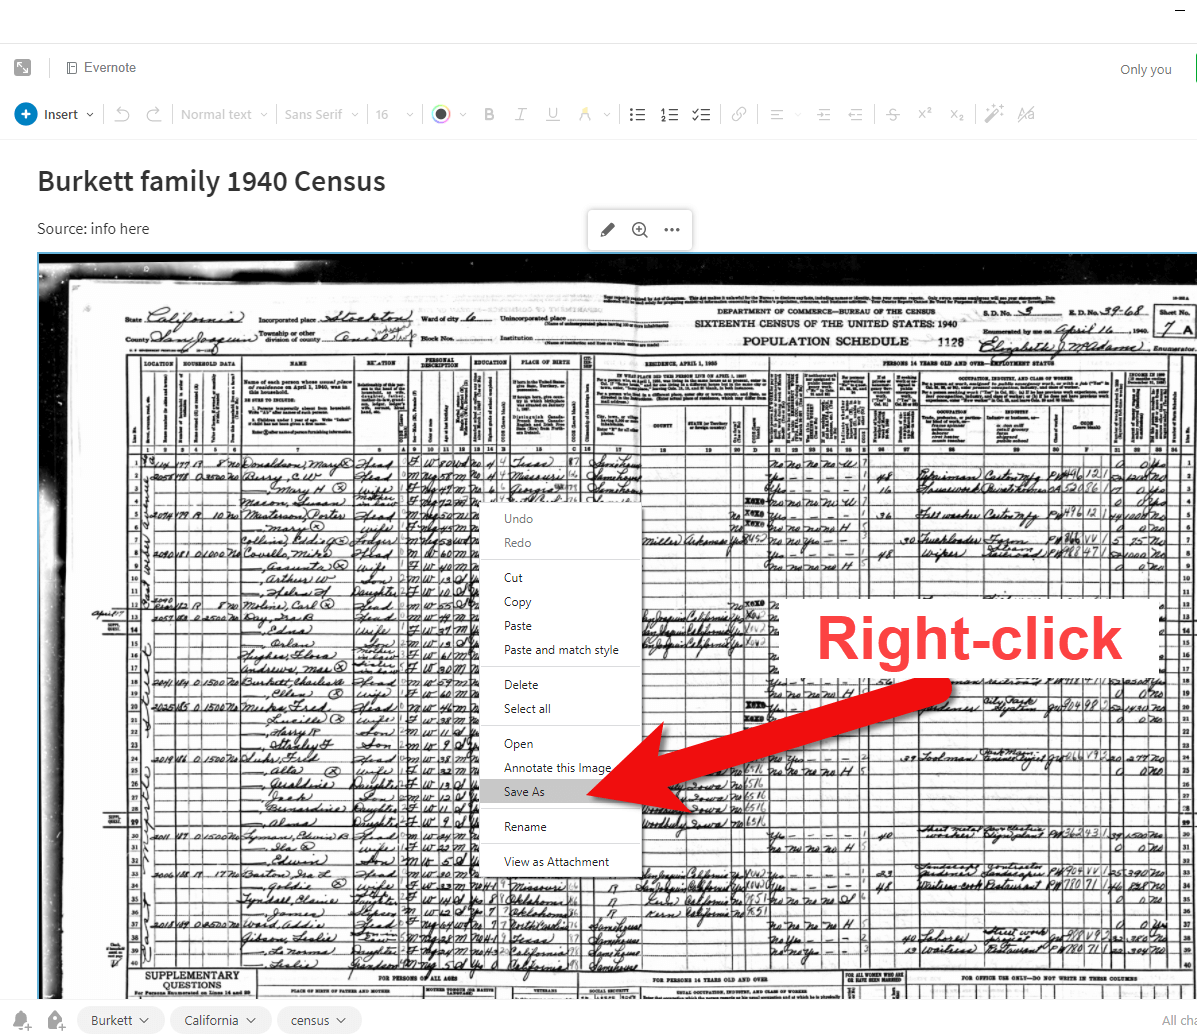
An important thing to understand about Evernote is that you can’t just download everything with one click in its original file format. However, you can save individual digitized items in your note, such as genealogical records, to your hard drive. Since there is no lifetime storage limit, I leave the note intact in Evernote, and I save the image to my computer hard drive. Save the image by right-clicking on it (in Windows, & I think it is Command click on a Mac) select Save As and save it to the appropriate archival folder. I do this at the end of the research project. Now you may feel like your “research project” never ends! But I’m referring to a genealogy research plan.
How to save a document image to your hard drive from Evernote.
You can learn how to create one in Evernote by watching my Premium video class Using Evernote to Create a Research Plan. (Premium membership required.) Of course, after I’ve answered my research question I quickly develop the next one and build a plan around it. So, you’re right, it never actually ends – thank goodness!
How Do I Find It Later?
My software database is the brain of my genealogy operations. I may have family tree information on various genealogy websites, on my computer, in Evernote and maybe even on my own family history website. But my database is the final word on what I have found and believe to be accurate. As I draw conclusions and add data to my family tree in my database, I cite my source. Therefore, everything I need to know about my tree is in one location I control on my own computer. If someone asks me a question about someone in my family tree, I can quickly look up the information and also see where I got it (the source).
“Your genealogy database software is the brain of the organization.” Lisa Louise Cooke
When I want to refer back to one of those sources I would look in one of three places:
My computer archival digital files (especially if it’s not part of my active research plan). This is easy to do because I know my folder system well, and it guides me. I’ve never lost anything yet!
Evernote (particularly if the source is part of my current research plan.)
The surname binder (if my citation tells me or I suspect it would be an archived piece of paper.)
Because I stick to my system, I usually instinctively know where to look. And because of they way each is set up, I can find things FAST!
Final Thoughts
Of course there are always exceptions to any rule, and there may be an item or situation that doesn’t fall perfectly neatly into a category or activity. Use your own best judgement on how to handle those. OCR search capability and great systems for digital and paper items will make it possible to find what you need when you need it. And most importantly, you’ll retain control over your family history legacy.
Be sure to share your Evernote credentials in a secure place and share them with a trusted relative so that the account can be passed on in the future. Learn more about protecting your legacy by watching my video class Saving Your Research from Destruction. (Premium membership required.)