The free Ellis Island Passenger Search database is home to 65 million records of passengers arriving at the Port of New York from 1820 to 1957. Kathryn Marks, Manager at The Statue of Liberty-Ellis Island Foundation explains the best strategies for finding your ancestors’ passenger list records in the Passenger Search Database on the Ellis Island website. Along the way, you’ll learn some surprising facts about Ellis Island and these invaluable records that will have your genealogy jumping for joy!
Here’s a list of the type of information you may be able to find in passengers lists, depending on the year:
Name
Age
Place of Birth
Physical Description
Occupation
Last Place of Residence
Where they are going
Ship name
What Else You Can Find at the Ellis Island Passenger Search
Crew Manifests
Ellis Island Detention Records and Records of Special Inquiry
How to find Ellis Island records about detained passengers:
Find the manifest in the database.
Look to the left of the name for markings. X or SI stands for Special Inquiry indicates the person was probably held on Ellis Island. LPC: Likely to Become a Public Charge.
Detention records will tell you why they were detained. Detention records aren’t indexed. You can find them by locating the manifest first, and then scrolling through the carousel of images to find them at the beginning or end of the ship’s list.
Determine the length of your ancestor’s detention by counting the number of meals recorded.
Ellis Island Records Through the Years
Ellis Island records coverage: 1820-1957
Pre-Ellis Island AKA Castle Garden Era Records: 1820-1892
Before 1892: Castle Garden was the state-run immigration station. The federal government took over the process of immigration, they built Ellis Island in 1892.
Pre-1897: Records are technically customs records. That’s why they have a very limited amount of information. Manifests were destroyed in a fire in 1897.
Peak Years at Ellis Island: 1892-1924
After 1907: Passenger lists became 2-page documents containing approximately 30 questions.
1924: Ellis Island’s focus turned to detention and deportation. Therefore, most people wouldn’t have actually stepped foot on Ellis Island.
Ellis Island closure: 1954
Records available through: 1957
Records were created at the port of departure. Upon arrival, Ellis Island inspectors asked the passenger the same questions to make sure they were answered the same way.
How to Search for Ancestors at Ellis Island Passenger Search
Select from a variety of wild card searches. Kathryn recommends Close Matches, Sounds Like, and Alternative Spelling.
If you get too many results, click Filters, or use the Wizard or OnePageform. Kathryn recommends the One Page form.
On the One Page form, Kathryn recommends using age at arrival, year of arrival, port of departure and/or country of origin. Pad the years to allow for errors and deviations.
If you’re searching outside the peak year period, don’t use the filters. This is because the records after 1924 were indexed differently. Many passenger lists are only indexed by the year of arrival and are given a placeholder date of Jan. 1. Therefore, if you search for a month or day, you will not get results.
5 Search Strategies for Ellis Island Passenger Lists
Strategy 1: Start by running a broad search.
Strategy 2: Use the original ethnic name, because names were recorded at the port of departure. If you’re unsure of the first name, try entering just the first initial and checking the Contains wildcard. This often helps because the first letter of the name is often the same regardless of the language.
Strategy 4: Be persistent. There are many factors that could lead to not initially finding your ancestor.
Strategy 5: Consider other scenarios.
Name variations – try searching many variations.
Remember that the clerks may have spelled names phonetically.
Many passenger lists are handwritten so they may have been transcribed and/or entered into the database incorrectly.
Your ancestors may have arrived at a different port of entry, such as Philadelphia, Boston, or Baltimore. Many of those passenger lists are also available online.
More Ellis Island Search Tips:
Italian women travel with their maiden name. Children may be under either the father or mother’s last name.
Jewish people may be traveling under their Yiddish name.
Families are listed together. If you can’t find the head of the family, try searching for the children.
In pre-Ellis records names may be abbreviated. Example: Wm. for William, and women may be listed under their husband’s name, such as “Mrs. Adam Smith”.
Coming to the Ellis Island Passenger Search in the Future
The Statue of Liberty-Ellis Island Foundation is planning on expanding and adding the records of all the other ports to the database.
Alternative Search Tool for the Ellis Island Database
Images make your family history more vivid. But how can you find just the right pictures to illustrate your family stories? These short, free video tutorials help genealogists find images online for family history.
When it comes to sharing your family history, pictures are not only worth a thousand words: they’re priceless. A single image can convey an ancestor’s physical appearance, mood or attitude, living or working conditions, social environment, and more. Pictures catch the eye whether they are on coffee tables, hanging on the wall in frames, or shared with loved ones on social media, where they are oh-so-clickable.
So I was happy to get this email from Phyllis, asking for some tips on how to find images online for family history:
“Hi Lisa, I know you’ve told us before what some great resources are for locating historical photos and images. I’m looking for some from the Ragtime era (1895-1918). I don’t find much at the Library of Congress. Can you send me a few links to some of your podcasts that delve into where to find images? Thank you for all the hard work you do for the genealogy world.”
How to Find Images Online for Family History
Most recently, I shared some tips for finding images in the free Genealogy Gems Podcast Episode 194. But I also recommend this series of short video tutorials, which show you exactly how to do this.
How to Find Images Online: Use Google Images
The first place I search online for images for family history is Google Images. Watch this brief tutorial video to see how to find images using your Google web browser:
If you want to use your tablet or smartphone to find images for family history, here’s another short tutorial just for you:
How to Find Images Online: Image Search in Google Books
When I am looking for pictures of people, places, buildings, historical events, maps, and other images that commonly appear in books, I also search Google Books separately for pictures that haven’t shown up in the main Google search results. You can do that, too! Here’s how:
After you’ve found images via Google Books, you’ll want to save them. Here’s one last quick video to show you how:
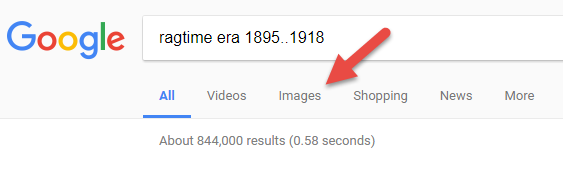
Using the tips given in the above video tutorials, I can run a Google search to answer Phyllis’s specific question. I’ll type ragtime era as a keyword phrase and enter the range of years, separated by two dots and no spaces, to tell Google to search for any numbers within that range. Then, as shown below, I’ll click Images to limit the results to pictures:
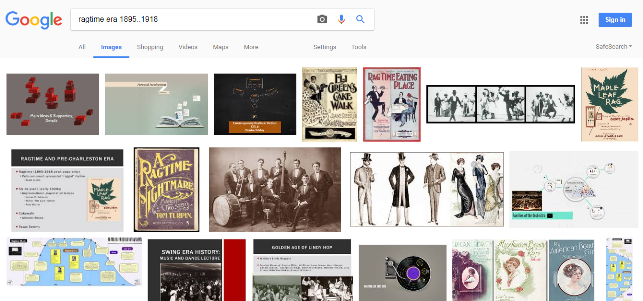
The Image search results include some fun photos, including a photo of a ragtime band, several sheet music covers, illustrations of “ragtime dress” and even a link to old video footage:
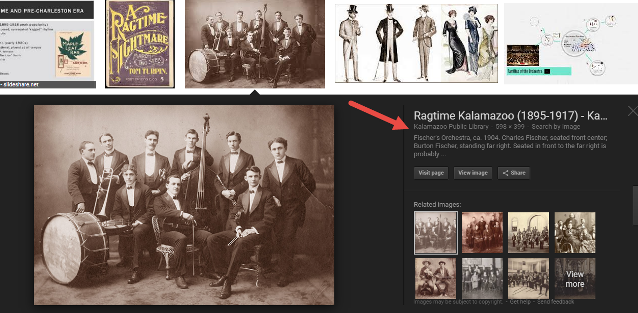
Click on an interesting-looking image to see a larger version and more details about it, including the website that’s hosting it. You’ll also see the options to click through to the webpage on which that image is found (“Visit page”), or to click through to the URL for that image (“View image”):
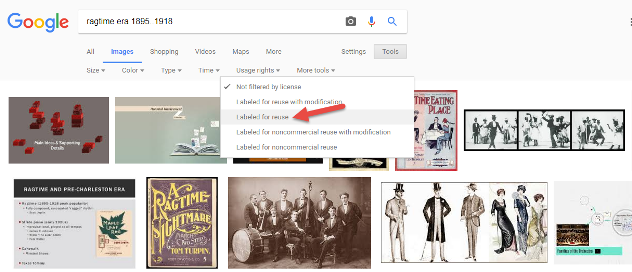
When I want to use an image, I will take one additional step: Click the TOOLS button and select Labeled for reuse from the Usage rights menu. This generally filters my results down to those that don’t have copyright restrictions on them (although it’s up to me to verify this and cite the image appropriately when I use it). Here’s what it looks like to filter my results to those labeled for reuse:
Unfortunately, in this case, when I do this, all search results disappear. If you want to use images for your own personal use, try the Labeled for noncommercial reuse option. Not all images that are copyright free or in the public domain will be marked, so if you don’t find what you need, go back to your original search results and look at individual images that you like to see whether any of them come from government, wiki, or other websites that commonly offer copyright-free images. Click through to read any image restrictions or use policies posted on the site, or contact the site for permission to use them. In this case, I do find several hosted by libraries, and I will focus on them.
One last tip: filter your search results again for Videos, instead of for Images. An entirely new set of search results will appear, largely from YouTube but also from other websites:
If the spirit and movement of ragtime during this time period is what you’re looking for, watch these videos! They may not work for you if you need static images for a book, but they’re great for sharing on your family history blog or in a social media post. Just click through to the video page, click Share and copy and paste the Embed code onto your site.
The Genealogy Gems YouTube channel is a vast resource. I invite you to visit, explore, and subscribe. In addition to tech tip video demos such as these, you’ll also find interviews with genealogy experts. research tips for maps, newspapers and other record types, how-to series for family history blogging, creating videos, and using Evernote for genealogy, family history craft tutorials and more! Here’s a tip: Use the search box to find what you’d like to watch. (Google search operators work in YouTube searches, too. Use them to zero in on the video or podcast episode you want.)
Browse-only databases at FamilySearch are easy to use and may hold the key to the genealogy brick wall you have been working on.
Don’t be scared off because the records haven’t been indexed. Guest blogger Amie Tennant Bowser show you how to take advantage of these great records!
New Genealogy Records Come Online Every Week
Each week, we report on the latest genealogy records to have come online.
Sometimes in our weekly record update articles we include databases from the free FamilySearch website that are not yet indexed. These collections are referred to as browse-only. Have you ever been disappointed when you realized the database you are most interested in is only able to be browsed?
The highlighted genealogy records in these collections are browse-only
You may be thinking, “Good grief! I can’t possibly browse thousands of records!” and we don’t expect you to. In this article we are going to share strategies that you can use to zero in on the genealogy records you want to browse.
Browse Only Records Versus Indexed Records
Most folks search for genealogy records at FamilySearch by typing in some key information at the home page. It might be just the first and last name, and the place where that ancestor lived. Here’s an example:
When you use this method, you are only searching for records that have been indexed.
Indexed records are great because they have already been reviewed by one of the thousands of FamilySearch volunteers. They use online software on the FamilySearch website to download images of historical documents. Then, they read the information on the image and transcribe the information.
A second, more experienced volunteer then reviews the transcribed information to ensure accuracy before it is submitted to the website where they can be searched. It’s a huge effort to help genealogists more easily search the online records.
So, it’s important to understand that not all digitized record images that are on the FamilySearch website have been indexed. This means there may be countless records that will not be retrieved by a name search.
Unindexed records can only be browsed until they are indexed. So as you can see, there is a very good chance that there are records on the site that apply to your family, but you won’t find them through the search engine.
Instead, you need to go in the virtual “back door” to locate these records. Follow along with me and I’ll show you how.
How to Find Browse-Only Records at FamilySearch
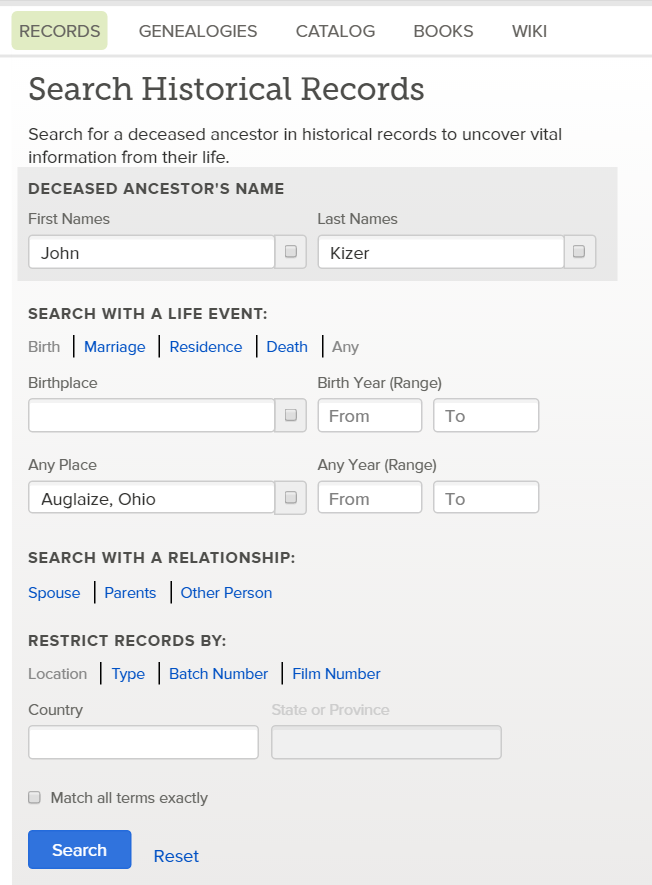
Let’s imagine you want to search probate records in Auglaize County, Ohio.
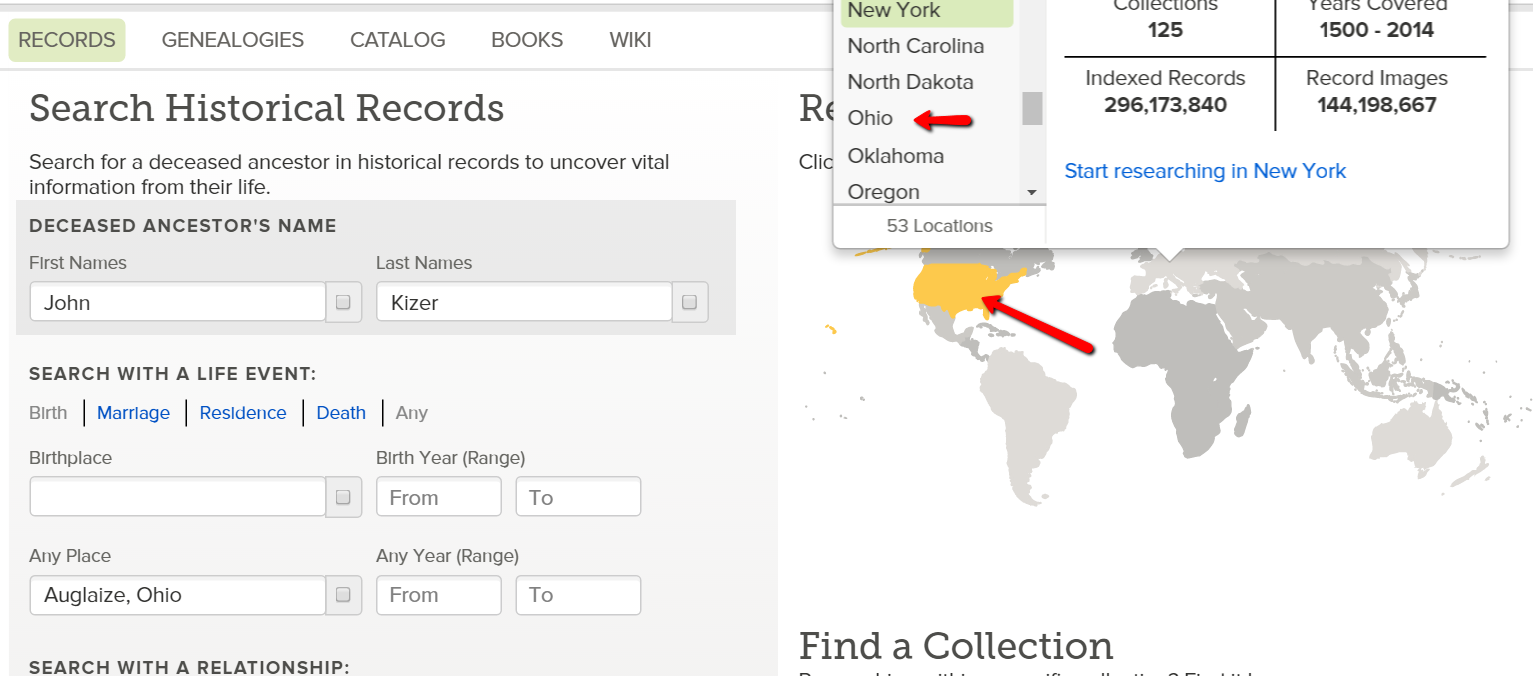
You would click the little map in the vicinity of the United States and choose “Ohio” from the pop-up box.
At the Ohio research page, you could do a general search of the Ohio collections. Again, this is only searching records that have been indexed.
Instead of using this method, scroll down until you see “Ohio Image Only Historical Records.” Look at all these databases you might have missed!
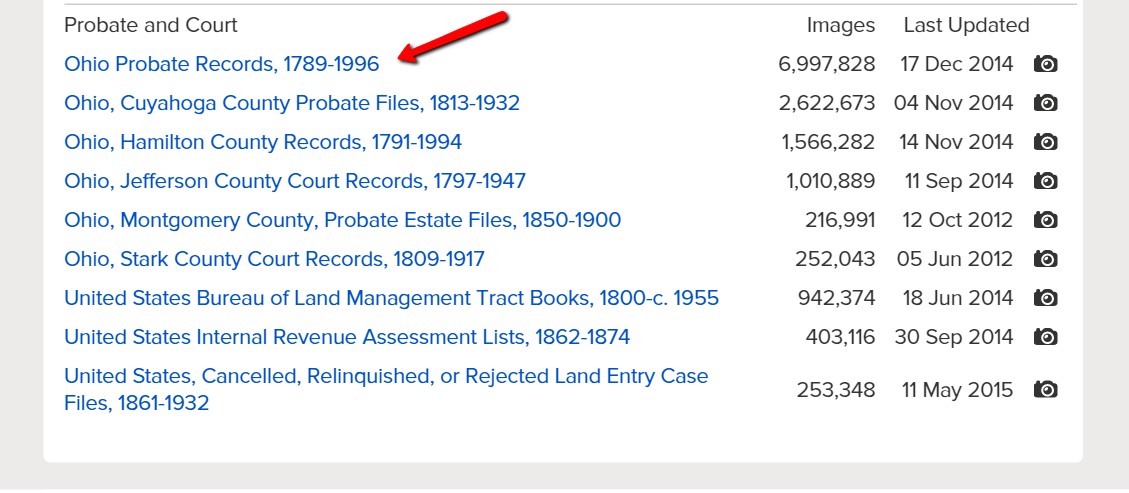
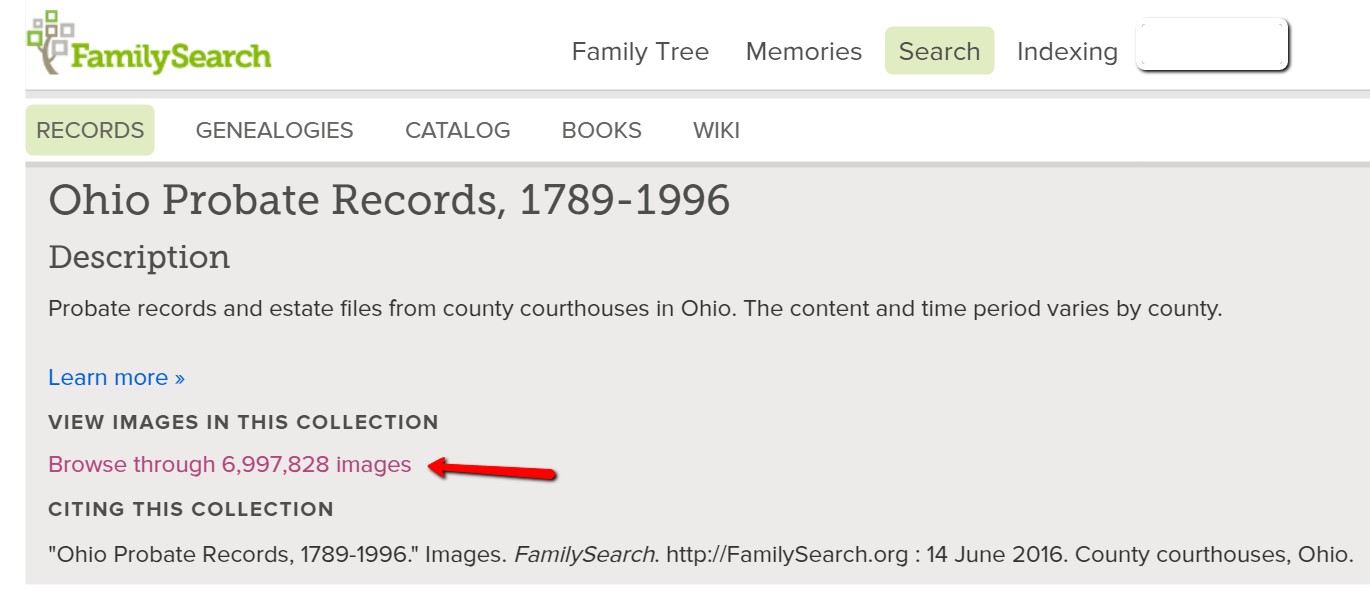
For our example, continue to scroll down until you see the database titled “Ohio Probate Records, 1789-1996” near the bottom. Click on it.
You will notice right away that there is no way to “search” this database.
Many people give up at this point, after all, who has time to search nearly 7,000,000 records. Click on it anyway!
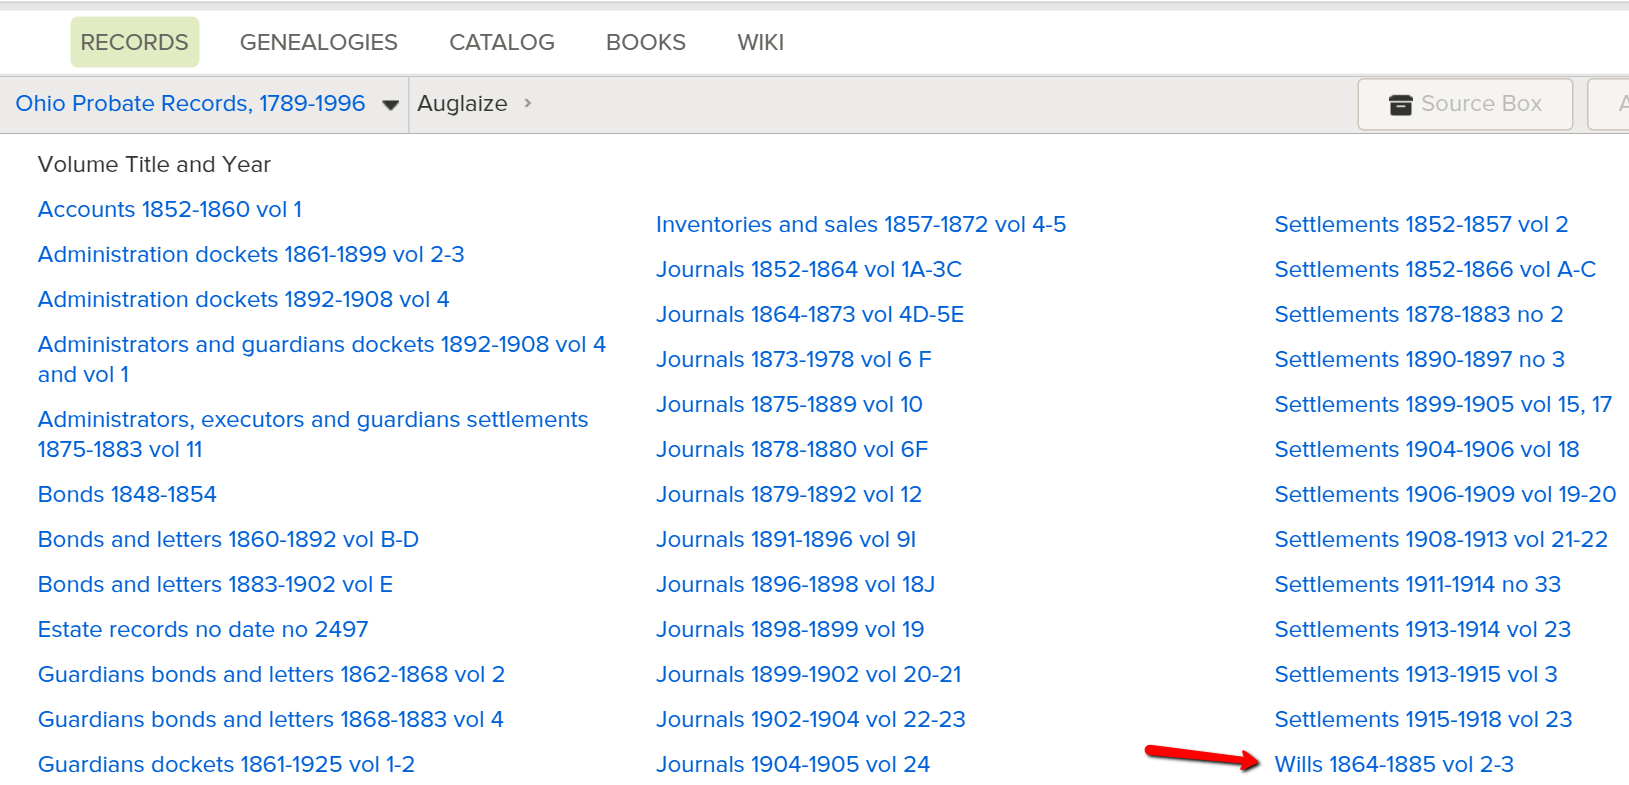
The next screen has been broken down by county name. Choose the desired county name. In this case, I’m selecting “Auglaize.”
You are then directed to a page listing the volumes of records for Auglaize county that have been digitized.
In this example, we are seeing bonds, settlements, wills, estates, and so much more:
It is as if you are standing in the courthouse probate office surrounded by volumes and volumes of the records you need.
Select the volume you want to search by clicking the title.
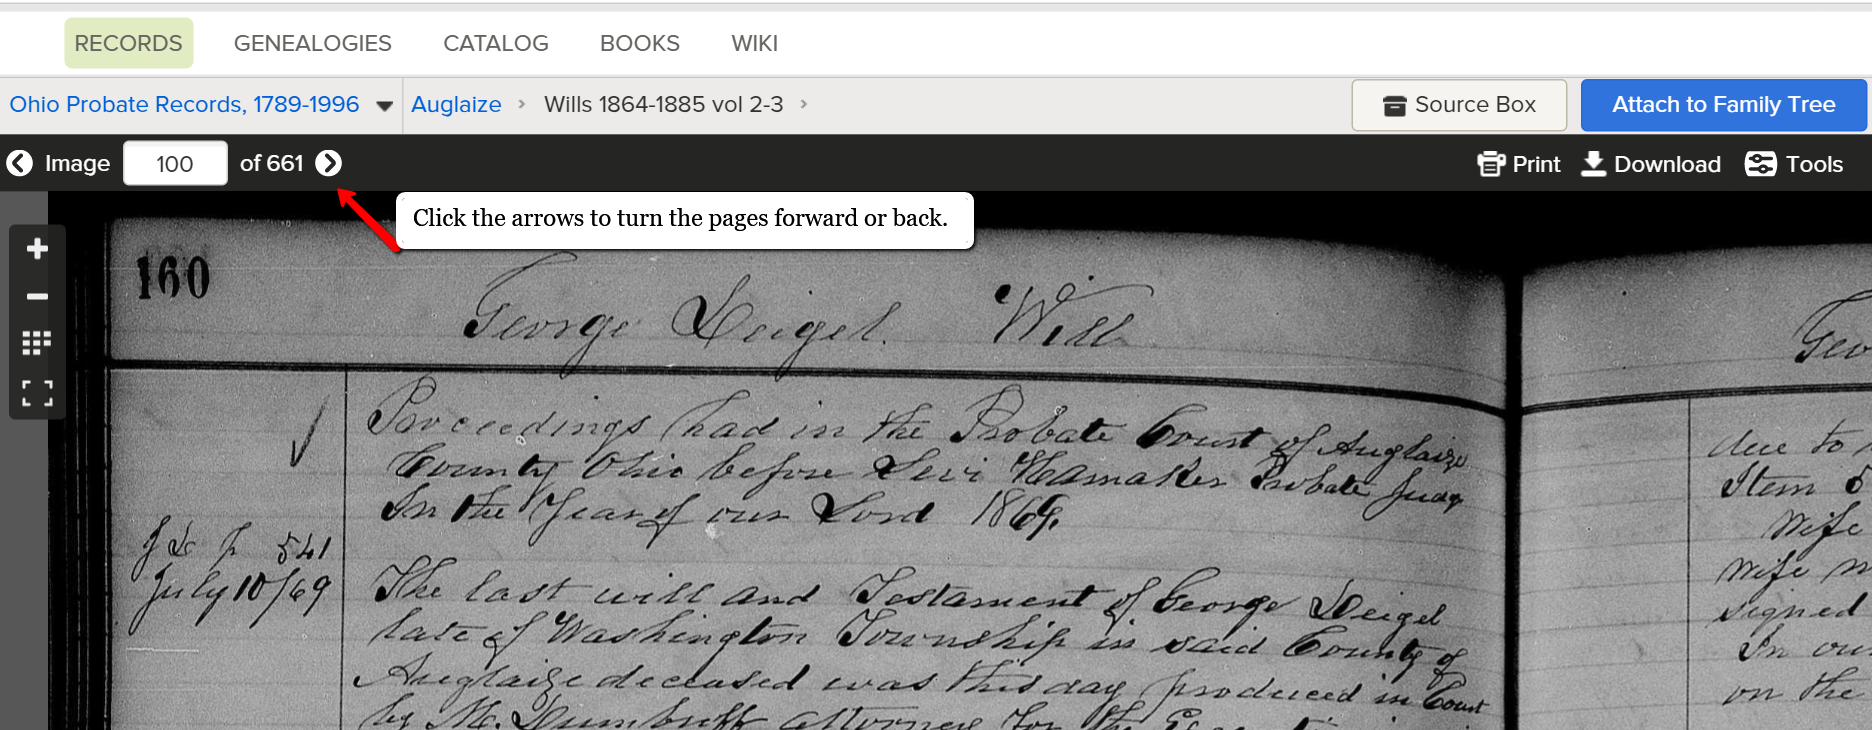
“Open” the pages of the book and search like you would as if you were flipping the pages of a book or scrolling through a roll of microfilm.
Click the arrow at the top of the screen to scroll through the pages.
Friends, we want you to get excited about all the new records that are coming online, even if they are browse only databases. If you like this tutorial, share this tip with your genie friends so they can do it too.
More Genealogy Gems on Records and Databases at FamilySearch
For more tips and tricks to help you in your genealogy journey, sign-up for our newsletter by entering your email address on this page.
If you’re looking for more genealogy records to mine, here are some of our articles. These will help you not only find new records, but also use other valuable genealogy indexes:
Bust a genealogy brick wall by learning to speak Google’s language. Proper use of Google’s basic search operators will have you plowing through walls in your research in nothing flat!
Genealogy information is sprinkled across the millions of websites on the web. Whether it’s a digital image of your great-great grandma on a distant cousins website or an out-of-print history book listed in the online card catalog in a library on the other side of the globe. Google can help you find it all.
Gaining access to that information is not as hard as you may think. I’d like to share a question I received recently from a Genealogy Gems Podcast listener, and show you how you can bust a brick wall by speaking Google’s language.
Here’s the email that I received from Ruth last week:
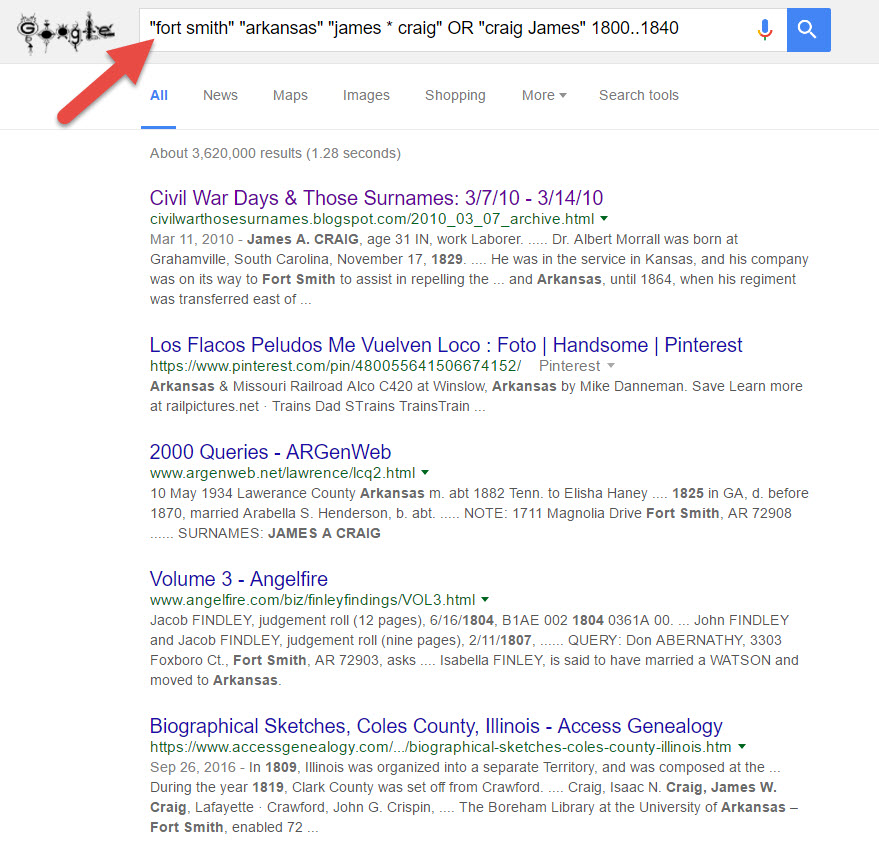
I’m sitting here listening to one of your free podcasts…I’m working, I’m listening, and I’m thinking…about my brick wall James Craig, what I know and what I’m trying to find out!
I know that James Craig was born about 1795-97 in New Jersey and was at Ft. Jesup, Louisiana in 1823, [and] that he was discharged in 1825. I researched New Jersey military records and found a James Craig, from Pittsgrove, Salem, New Jersey, who joined the Army [in] August 1820 for five years [and] he was sent to Fort Scott, Georgia. I read articles that state, when Fort Scott closed sometime around 1822/23, the men were sent to Fort Smith, Arkansas. Do you see the trail I’m following? It’s not hard to make the connection from Fort Smith, Arkansas to Fort Jesup, Louisiana. My problem is that I haven’t found any transfer papers!! So, how do I verify that James Craig from Pittsgrove, New Jersey is my 3rd great-grandfather. Is it possible that there are journals from the commanding officer of each encampment that might shed some light on this?
Thanks in advance for any thoughts you might have on this long standing brick wall!
Tips to Bust a Genealogy Brick Wall
Ruth asked “Is it possible that there are journals from the commanding officer of each encampment that might shed some light on this?” I certainly think it is possible! I would suggest using Google to search the web because such items might be digitized online, or they might be listed on a library or archive website as being available at their location. Either way, you would gain valuable information on how to access the items.
Here’s an example of a search I would run:
This search is based on my Google Excellent Method Search Let’s break down the pieces of this search query:
The quotation marks tell Google that the word or phrase must be in every search result (in other words, they are mandatory.) When used around a phrase, that means the phrase must appear exactly as searched.
The asterisk tells Google there might be a word or two between the words in a phrase, such as a middle initial.
By putting OR between two versions of the phrases, such as last name first and first name first, you cover all your bases. Note that the word OR must be capitalized to work as a Google operator.
Finally, two numbers separated by 2 dots is called a “numrange search” and that tells Google a number that falls within that range must appear in each search result. And of course, four digit numbers represent years to genealogists!
Your Genealogy Google Guru
Google packs a powerful punch for genealogists. Let me be your Genealogy Google Guru and watch my video below for even more helpful tips and tricks. Remember to subscribe to my Genealogy Gems YouTube channel so you’ll get all my upcoming Google video tips. Happy searching!
Show Notes: The 1931 Canadian Census was released by the Library and Archives Canada on June 1 of 2023. These digitized images can (as of now) be browsed by general location. The challenge with this census, like with other census records when they first come online, is that there is no index. Creating the index that makes the census searchable by name and other identifying factors takes a while. So right now, the digitized images are available online to browse. Ancestry.com is partnering with the Library and Archives Canada and using its artificial intelligence technology to generate the index. Until that happens, I have four strategies for you that are going to help you find your ancestors right now. And you’ll be able to find them much faster than if you just browsed the images one by one. Once the index comes out, it’s not necessarily going to be perfect. They never are. So, these strategies can help you if you run into trouble finding someone in the 1931 Canadian census. And they’ll also help you better understand the information that you do see in the images.
My first strategy for finding your ancestors in the 1931 census of Canada is to check the earlier census records. Our goal is to identify the enumeration sub-district and the municipality where they lived. If we can find it in an earlier census, we can use that information to find them more quickly in the 1931 Canadian Census.
In my case, the person I’m looking for in the 1931 Canadian census is my husband’s great-grandfather, Harry Cooke. He emigrated to Canada in 1912, along with his second wife, Martha. I started my search for them by seeing if I could find them in a census record sometime after 1912, but prior to 1931.
Harry lived in Regina, Saskatchewan. So, I was able to use the Census of Prairie Provinces that was taken in 1926 in Saskatchewan, Alberta, and Manitoba. You can use the Census Search Tool at the Library and Archives Canada website to search those census records.
If your ancestors lived in other provinces, again, that Census Search Tool is going to help you find the most recent census records available for them.
In 1926 Harry Cooke was in sub-district number 8 and the municipality was Sherwood, so I made note of that. Also, while looking at that 1926 census, I found there is an area where it talks about where each household is located. They list the Township, Range and Meridian. So, I also made note of the township number listed, which in this case was 17. If your ancestors happen to live in a city, there may be a street address listed. Though many people came to Canada to work the land, so you may not be fortunate and find that information. But make note of the street address if it’s listed. Sometimes it’s written right across the Township, Range and Meridian columns.
Strategy #2 Check City Directories for Addresses
I really easy way to look for city directories is just to google it. I found the 1931 city directory for Regina by going to Google.com and typing in 1931, Regina city directory. The very first result was the city directory for Regina in 1931 at Internet Archive. I happen to have heard that there was a directory for 1931, so that’s why I searched for it specifically. If you don’t happen to know the year you can run a Google search for a time frame. Do this by entering the name of the town or the closest big city to where your ancestors lived in the search field. Add the phrase city directory, and then enter a number range. Google calls this search operator a numrange. Here’s an example:
Regina city directory 1912..1931
This type of search brings up links to web pages that mention Regina, the words city directory, and also a four-digit number that falls within the specified range, which for us would be the year that the city directory was published!
The Internet Archive has thousands of digitized and searchable city directories. Many genealogy record websites use The Internet Archive as their cloud hosting service for their records. They digitize everything and upload it to Internet Archive where they can host it, and then link to it on their website. So that is a great place to look.
However, it’s a good idea to run a Google search because that way you are going across the internet, and hopefully you’ll find the city directories that you need.
In my case, in 1931 Harry and Martha are still at 520 Osler Street. So that reinforces what I had found in the 1926 census.
Strategy #3 Search at the Library and Archives Canada website
At the time of this writing, without an actual index, we’re going to enter the province name, the city / district if you have it, and the sub-district.
In the case of Harry and Martha Cooke, I found them in 1926 in sub-district #8, so that was the first place I searched. However, in 1931 sub-district #8 was not associated with the municipality of Sherwood. In fact, it didn’t mention township 17 either, so it was very suspicious.
It is possible that enumeration sub-districts can change over time. This can happen because as a country grows, the population grows. District lines must be redrawn in a way that allows a single census taker (enumerator) to cover the area within a certain given amount of time. In a more populated city, that can mean that the sub-district actually shrinks a little bit, and there are more sub-districts added. However, the previous sub-district does give you a great starting point. It’s very possible that the person you are looking for is in a sub-district close to the original. So, you’ll just have to browse a little further. And that takes us to strategy number four.
Strategy #4 Browse the Records Faster Using Clues
You could go through each digitized page of the 1931 Canadian census one by one looking for your relatives. That took an especially long time when the records were first released on June 1 of 2023. On my computer each image took at least two hours to load…it was crazy! But it’s not surprising, because I’m sure everybody and their brother wanted to look at these records.
Thankfully, now it’s running much faster. But it could still take quite a long time to look page by page. There are a few more things that you can do to make the process much faster.
First, as you pull up each sub-district, keep track of your search with a research log. After checking the sub-districts before and after the one Harry Cooke was in in 1926, I went back to the beginning and started with sub-district #1. The very first image in each sub-district is going to be a title card that will include the township number, and the municipality covered in that sub-district. So, since you already located that in the earlier census record, you are going to be able to immediately tell if that group of images is worth going through.
If it doesn’t match, go on to the next sub-district. This is why a research log is important. Genealogy Gems Premium Members can download the worksheet in the Resources section at the bottom of these Show Notes. It’s just a really simple way to keep track of everything that you’re finding and make sure that you’re not covering the same base twice.
You might come across a title card that has the right municipality but not the right township number, or vice versa. I found that in one case while looking for the Cookes. Just make note of it on your worksheet, and keep moving, looking for an exact match.
If you find a sub-district that looks really promising, perhaps it includes the township or the municipality you need, take a quick look at image number two. This is the first page that shows people in the neighborhood. There are a couple of things to look for.
If you know that your ancestors were British, like Harry and Martha were, then you might expect them to be in a neighborhood with predominantly British people. That was really common. When our ancestors left their homeland and came to a new country, they oftentimes emigrated with other people from the country that they knew. They may have heard about the opportunity from those people. And once they arrived, they tended to congregate together. They lived together in communities and neighborhoods because they shared a culture and language. They could support each other and help each other.
One of the things that tipped me off that sub-district #8 wasn’t the right place to be searching for the Cookes was that it was comprised primarily of Russians, Austrians, Romanians, and Hungarians. Harry and Martha didn’t speak those languages, so I would not expect them to be there. Also, when I looked at the 1926 census, I made note of who his neighbors were. And indeed, it was a very predominantly British neighborhood. So that was a clue to me that even though I might have had the right township number, it didn’t mention the right municipality, and it certainly had a completely different makeup when it came to the neighborhood.
Also, as you’re reviewing the surnames and going down the list on the image, take a look at the township column. As you’ll recall, we made note of the township number and / or the address that we found in the earlier census. As you scan the surnames on the page, also check if the correct township number or address is showing up.
In my search, I saw a lot of different street names (not Osler St.). I don’t know Regina very well, so in another browser tab, I opened up Google Maps. I did a search for 520 Osler St., and then I selected “Directions” and entered one of the street names that I was seeing on the census. And sure enough, they were miles and miles apart. That’s another clue you’re not in the right area for browsing.
Our goal is to find our relatives as quickly as possible without spending hours reviewing pages that are not likely to include them. So, again, if you don’t find that exact match of Township and Municipality on the sub-district index card, look at these other factors to see if you’re in the right ballpark.
In the end, I am happy to say I found Harry and Marth Cooke pretty quickly. They were in sub-district number 11. The title card showed that it covered township 17 and the municipality of Sherwood. It was an exact match! They were on image number 18 residing in a very predominantly British neighborhood on Osler St., exactly where I would expect them to be.
1931 Canadian Census Search Wrap Up
The 1931 Canadian Census is full of valuable information about your Canadian relatives. While it take a little more time to search without an index, these strategies can help you do so faster. You can also apply (and tweak) these techniques to other types of searches where an index is unavailable, or your relatives aren’t showing up in the search results. And remember, if you find an address, look up the location in Google Maps to see it for yourself.