Millions of records from around the world are new at FamilySearch this week, and are completely free! These new collections include Australia, Denmark, Finland, France, Italy, and South Africa. PERSI also got a big update this week at Findmypast, as well as new and updated records for Canada, England, and Ireland.
New collections free at FamilySearch
Australia. The new South Australia, Immigrants Ship Papers, 1849-1940 collection includes immigrants’ ships papers, containing a record of births and deaths aboard, 1849-1867 and 1873-1885. Indexed records in this collection include passenger lists arriving and departing from South Australia. (Original records in the State Records of South Australia, Adelaide.) Get started with Australian genealogy research with these tips from an expert at Legacy Tree Genealogists!
Denmark. FamilySearch has been adding census records for Denmark recently, and the latest new collection is the 1921 Denmark Census. This collection includes over 430,000 images, and these census collections were all provided by MyHeritage and previously from the National Archives of Denmark.
Finland.Church Census and Pre-Confirmation Books, 1657-1915: This collection contains church census books and pre-confirmation books kept by the Lutheran Church in Finland. These records come from a database at MyHeritage, citing Kansallisarkisto (National Archives of Finland), Helsinki.
France. Explore over half a million indexed records for Saône-et-Loire, Census, 1856, a complete indexing of the population censuses.
Italy. The Salerno, Civil Registration (State Archive), 1806-1949 collection includes civil registration (stato civile) records of births, marriages, and deaths within the custody of the State Archive of Salerno (Archivio di Stato di Salerno). Almost 6 million images are in this collection, and availability of records is largely dependent on time period and locality.
South Africa. Lastly, this collection of Pietermaritzburg Estate Files 1846-1950 is also new at FamilySearch. Records include death notices, vital records, wills, distribution accounts, and succession duty accounts.
Need help using FamilySearch? The Unofficial Guide to FamilySearch.org by Dana McCullough provides the guidance you need to discover your ancestors and make the most of the free site’s valuable resources. Learn how to maximize all of FamilySearch.org’s research tools–including hard-to-find features–to extend your family tree in America and the old country.
PERSI update at Findmypast
The Periodical Source Index (also known as PERSI) has had another large update at Findmypast. Almost 11,000 new articles and 30,000 new images have been added, covering Pennsylvania, Wyoming, Toronto, and Yorkshire. PERSI is an excellent resource for discovering articles, photos, and other material you probably won’t find using conventional online search methods.
From Libraries and Archives Canada: Digitization of the Canadian Expeditionary Force Personnel Service Files. “As of today, 502,740 of the 640,000 files are available online in our Personnel Records of the First World War database…Library and Archives Canada is digitizing the service files systematically, from box 1 to box 10686, which roughly corresponds to alphabetical order.”
Recently announced on Twitter: “The General Register Office for England and Wales (GRO) is piloting a service from 12 October 2017 to provide portable document format (PDF) copies of digitized historical birth and death records. The pilot will run for a minimum of 3 months to enable GRO to assess the demand for this service over a prolonged period.” England and Wales records which are available as PDFs in this extended pilot include births (1837 –1916) and deaths (1837 –1957).
Ireland: Historical Newspaper
A new historical newspaper title was added to the British Newspaper Archive this week for Northern Ireland. The Coleraine Chronicle 1844-1910 was published by Alpha Newspaper Group in Coleraine, Londonderry, Northern Ireland. The collection features nearly 3,500 issues and over 26,000 pages.
Get the most out of your genealogy records websites subscriptions!
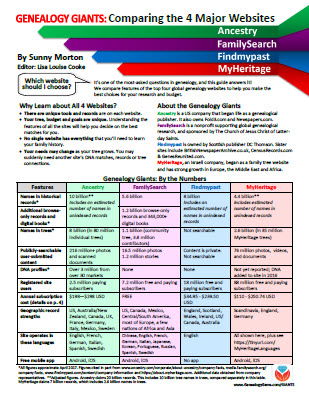
Use the jammed-packed Genealogy Giants cheat sheet by Sunny Morton to quickly and easily compare all of the most important features of the four biggest international genealogy records membership websites: Ancestry.com, FamilySearch.org, Findmypast.com, and MyHeritage.com. Then consult it every time your research budget, needs or goals change. Tables, bulleted lists, and graphics make this guide as easy to use as it is informative. Available in print or digital download.
Disclosure: This post contains affiliate links and Genealogy Gems will be compensated if you make a purchase after clicking on these links (at no additional cost to you). Thank you for supporting the free Genealogy Gems podcast and blog!
Genealogy Gems Yearly Premium Membership Featuring: Premium video classes – with downloadable ad-free handouts Elevenses with Lisa show video replays and handouts Premium Podcast (Audio) Episodes & Archive Downloadable handouts for free podcast and videos...
Read all about a new free Ukraine genealogy website, Yorkshire parish records, English workhouse records, German vital records and digitized newspaper coverage of England, Ireland and Scotland.
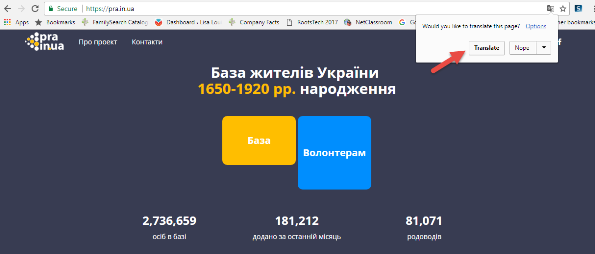
A New Ukraine Genealogy Website! Vital records and family trees
A new, free Ukraine genealogy website has launched with free family-tree building capability and an enormous database of nearly 300 years of genealogical records from present-day Ukraine. “The database includes 2.56 million people and is expected to reach 4 to 5 million in 2019,” reports EuroMaidan Press. “The access to its contents is and will remain free of charge. The sources of data are manifold: birth registers, fiscal and parish censuses, lists of nobility, voters, the military, and victims of repressions, address directories, and other documents produced under the Tsardom of Muscovy, Russian and Habsburg Empires, Poland and the Soviet Union. A Roman-letter version of the data index is reportedly to be enabled in the coming months.”
To translate the site, bring it up in Google Chrome and right-click.
The family tree-building feature has already proven incredibly popular, reports the same article: “nearly 18 thousand trees have been created in the first couple of days following the official inauguration of the site.” Automated tree-matching hinting will apparently be added in July 2017.
If you have Ukrainian roots, you may also want to read this article about how to request KGB files on relatives.
British Newspaper Archive: New content and free webinar!
The following historical newspaper coverage has been added to the British Newspaper Archive. They add about 100,000 pages every week–learn more about what they do in the free webinar, below.
Scotland: Rothesay Chronicle, covering the Isle of Bute, Isle of Arran, and the mainland. Added coverage for 1884-1892.
More Irish newspapers: Findmypast has added 20th-century coverage of Dublin in the form of about 155,000 news articles from The Catholic Standard. (Limit your search to this paper by using the filters along the left side of the webpage.) The coverage includes weekly news reports dating from 1933-1949 and 1951-1957.
England
1861 workhouse inmates. Ancestry.com subscribers can now search indexed images of a new collection, England and Wales, Long-Term Workhouse Inmates, 1861. “This collection comprises records and images from a volume listing every adult ‘pauper’ in each Workhouse in England and Wales, who had been resident there for five or more years in 1861,” states the collection description. The report was in response to a government mandate to record long-term residents of workhouses. “The report was printed on 30 July 1861 and listed 14,216 adults,” continues the collection description. “When compared with the total workhouse population of approximately 67,800 adult workhouse inmates (excluding vagrants) the percentage of long term inmates was just over 21%.”
Yorkshire parish records. Findmypast has published these new church record collections for Yorkshire:
Yorkshire baptisms. Over 600,000 records have been added for Sheffield and the East Riding to this database, which now has more than 5 million entries.
Yorkshire banns. Over 30,000 entries have been added for Sheffield and the East Riding.
Yorkshire marriages. Over 400,000 entries have been added for Sheffield and the East Riding. The database now has nearly 3 million records.
Yorkshire burials. Over half a million new burials have been added for Sheffield and the East Riding; this database now tops 4.7 million.
Germany: Church and civil records
Ancestry.com has a new browse-only collection of church records from 42 communities in Erfurt, the capital of Thuringia. According to a collection description, “The vast majority of the church records are from Protestant communities, but some Catholic and Jewish communities are also included. In one case, records from the ‘Kaufmannsgemeinde’ or merchants’ community are included.”
Also at Ancestry.com is a new collection of browse-only civil marriage records. Bischofswerda, Germany, Marriages, 1876-1922 includes government records of marriages from Bischofswerda and 11 other communities from the district of Bautzen; date ranges of records from each may vary.
Disclosure: This post contains affiliate links and Genealogy Gems will be compensated if you make a purchase after clicking on these links. Thank you for supporting Genealogy Gems!
Welcome to this step-by-step series for beginning genealogists—and more experienced ones who want to brush up or learn something new. I first ran this series in 2008. So many people have asked about it, I’m bringing it back in weekly segments.
Episode 6: Sleuthing Out Families and What Records Exist
We talk about sleuthing Sherlock Holmes-style for our families. My guest says, “Stop looking for names and start looking for families!” (Disclaimer: this episode was recorded several years ago and is not an endorsement of the guest at that time, and his opinions are his alone.)
In the second segment, I give an overview of the different kinds of historical records in which our ancestors may appear. Basically, whenever any life event happened that involved the government or a church, paperwork was generated: vital records, land sales, wills and probates, baptisms and burials. There was often a ripple effect, too, in which the event was reported in other sources, like newspapers. In future episodes, we’ll talk in depth about finding and using these different kinds of sources. But consider this episode your orientation to them!
The 40 millionth record has been added to WorldCat, the enormous multi-library catalog that helps people find library materials all over the world.
Even cooler, that 40 millionth record was harvested to WorldCat through the WorldCat Digital Collection Gateway. This gateway allows for “unique, open-access digital content” to be brought into WorldCat, according to owner OCLC. “Once there…collections are more visible and discoverable to end users who search WorldCat as well as Google and other popular websites.”
If you haven’t used WorldCat for genealogy, you may be missing out on a lot. Like published history books (regional, county, local, ethnic, religious and more). And published family histories (search by the surname as a subject). The holdings of the enormous Family History Library in Salt Lake City, Utah are now included in WorldCat, too (click here to read a blog post on that).
The idea that digital archives are integrating into WorldCat–hence becoming more searchable for us–is fantastic. What kinds of digitized materials might be cataloged here? Well, the Arizona Memory Project is the digital archive that provided that 40 millionth WorldCat record. The Arizona Memory Project “provide(s) online access to the wealth of primary sources in Arizona libraries, archives, museums and other cultural institutions including government documents, photographs, maps and objects that chronicle Arizona’s past and present.” Good stuff!
Remember to also search ArchiveGrid, WorldCat’s sister search interface for archival materials, for original family history documents.
 Get the most out of your genealogy records websites subscriptions!

 world.