Just announced: The FamilySearch microfilm lending service will end on August 30, 2017. Let’s cover what we know so far, how it may impact you, and strategies for getting the information you need.
WHAT: FamilySearch Microfilm Lending Ends
Most of the Family History Library’s microfilm vault has already been digitized and is online–or will be within a short time. According to the website:
“Over 1.5 million microfilms (ca. 1.5 billion images) have been digitized by FamilySearch, including the most requested collections based on microfilm loan records worldwide.”
However, the world’s largest lender of microfilmed genealogical records will be discontinuing the distribution of microfilms to Family History Centers in the near future.
“On September 1, 2017, FamilySearch will discontinue its microfilm distribution services,” announced the site yesterday. “The change is the result of significant progress in FamilySearch’s microfilm digitization efforts and the obsolescence of microfilm technology. Digital imaging has made it easier to find ancestors through the internet, mobile, and other technologies.”
This means the clock is now counting down your ability to borrow microfilmed genealogical records from the Family History Library. The last day you can place an order for delivery to your local Family History Center is August 31, 2017.
It’s a change I’ve seen coming, but it’s still a little disconcerting now that it’s here. But change is the norm in today’s busy world, so let’s break down the details we know so far together.
WHY: Why are they discontinuing microfilm lending before they’re done digitizing?
It’s just too expensive. “The cost of duplicating microfilm for circulation has risen dramatically, while demand has decreased significantly,” says a FamilySearch Q&A. “At the same time, it has become increasingly difficult and costly to maintain the equipment, systems, and processes required for film duplication, distribution, and access.” FamilySearch wants to redirect its microfilm lending resources to providing more and better electronic record access.
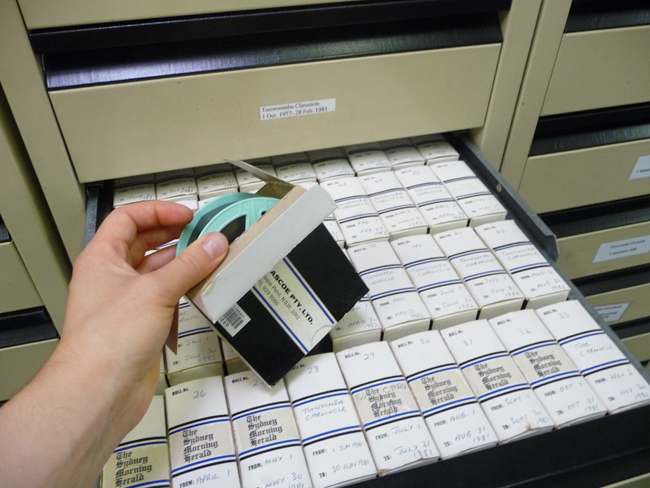
I have personally visited the microfilm distribution facility, and the best analogy I can give you is that it looks a bit like the inside of an Amazon warehouse. It’s a mammoth and expensive undertaking, certainly not something you open or close lightly. I’m thankful that in the decades before the Internet, FamilySearch devoted so many resources to helping all of us gain access to hard-to-find records from around the world.
Photo Credit: Lisa Louise Cooke
WHEN: What will be available online and when
According to FamilySearch, they hope to finish digitizing the records that they have permission to digitize, in 2020. Unfortunately, some films we will not be digitized because of contractual limitations, data privacy, or other restrictions. Look to the Catalog for access details for the records you want.
By Lhsunshine (Own work) [CC BY-SA 3.0 (http://creativecommons.org/licenses/by-sa/3.0)], via Wikimedia Commons
HOW: How to order FamilySearch microfilms between now and August 31, 2017
I encourage you to use the microfilm lending service while it is still available. While most microfilmed records will be eventually digitized, the fate of a small percentage may remain unknown for some time. Follow these steps to view them now:
1. Go to FamilySearch.org and log in, or create a free login. (You’ll need the login to order records.)
2. Under the Search menu, select Catalog.
3. Search by location, listing first the largest jurisdiction (such as the country) and proceeding to the smallest, such as “United States, Illinois, Cook, Chicago.”
4. Review search results by clicking on the record categories and then each entry. Within the entries, watch for interesting items that only list microfilm or microfiche formats.
5. Within record entries, order items you want by clicking the microfilm reel icon on the far right, under Format. Select the lending period and the correct currency. It currently costs $7.50 USD to borrow a microfilm reel for 90 days.
During the order process, you’ll select a family history center near you to receive the item(s). When your order arrives, you’ll be notified. Check the center’s schedule before visiting; most have limited hours. Centers are free to use. When you get there, identify yourself and request your film. Then put it in the microfilm reader and scroll through it until you find the item number and pages you need. (Here’s a helpful article: How to Use a Microfilm Reader.)
What about accessing microfilmed records after August 31, 2017?
You’ll still have several options. Sunny Morton, author of the quick reference guide Genealogy Giants: Comparing the 4 Major Websites, says the FamilySearch catalog will still be a go-to resource:
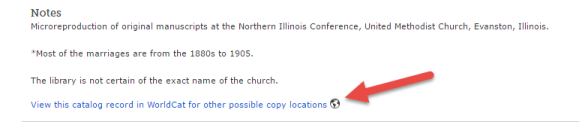
“At this point, the Family History Library in Salt Lake City, Utah still plans to keep on hand microfilmed copies of records that are not yet online. So your options include going to view them in person (since to the best of our knowledge the library won’t be lending them), arrange for someone else to view them (such as through the Random Acts of Genealogical Kindness Facebook group), or use the FamilySearch Catalog to identify the records and then attempt to locate them through other repositories and websites.
To find records you may borrow from other sources, click where it says ‘View this catalog record in WorldCat for other possible copy locations’ [see screenshot below]. This will take you directly to this item’s listings in WorldCat, which is the enormous, free multi-library online catalog. Look either for a copy at a library near you, or a copy at a facility that participates in inter-library loan. (This is the same process you already have to use to find copies of books you can borrow, since the Family History Library doesn’t lend these, either.)”
What about accessing the digitized records?
After August 31, 2017 many genealogists will be turning to the online FamilySearch catalog and Family History Center Portal. (Learn more about the Portal at the FamilySearch Wiki.) As you attempt to view records through the portal, you may be prompted to go to a Family History Center to view the record, and the site will link you to a map of all locations. It’s important to understand the difference between an official Family History Center and an Affiliate Center. We’ve learned that Affiliate Centers do not have access to what is called the Family History Portal. That portal is only accessible from an officially designated Family History Center.
So how do you know which location on the map is official, and which is an affiliate? I turned to genealogy blogger and friend of Genealogy Gems Amie Tennant for clarification:
The (online) FamilySearch map of Family History Centers is not accurate. With the new changes to microfilm loans, this is going to be a big problem. In other words…if a person assumes all FHCenters are the same and travels to the nearest one, they will be sorely disappointed to realize that this one will NOT have access to all the digitized microfilm. (Researchers) should call ahead to confirm whether the center they see on this map is an affiliate or a full FHC with access to the portal.
I’ve reached out to FamilySearch for additional official information on this and several other important questions that have arisen with the discontinuation of microfilm lending. I’ll report to you here on the Genealogy Gems blog and the podcast as more information becomes available. Check out Amie’s article for more information on the various levels of access.
What do you think?
The end of the FamilySearch microfilm lending service is a major milestone. It signals exciting future online access, but provides obstacles for the next few years. What suggestions do you have for researchers to gain additional access to essential microfilm? Please share with the Genealogy Gems community in the Comments below.
On January 28, 2015 Google announced that Google Earth PRO is now available for FREE! Not just a free trial. Google is allowing everyone to get a free key to Google Earth Pro!
In the past the software fee was hundreds of dollars. But now you can get Google Earth Pro for free and gain the ability to do things like “measure 3D buildings, print high-resolution images for presentations or reports, and record HD movies” inside Google Earth.To get your free key to Google Earth Pro sign up here. After submitting the form, you will be emailed the free license key. Copy the license key from the email, then click the link provided to download Google Earth Pro app for PC and Mac.
Everything I’ve taught you about using Google Earth still applies, but now you have more tools than ever!
Since I announced this in the last Genealogy Gems Newsletter, I’ve received several questions. Here’s what you need to know about Google Earth Pro:
From Sheri: “I did get it to finally work…..instead of my phone number running together….I added the dashes between the numbers and then it went through. FYI….in case you hear an issue from others.”
Thanks for the tip Sheri. Most likely the problem you were running into after the big announcement that Google Earth Pro went free was the sheer amount of traffic the site received. Googlers swarmed the site, and any people found it took several attempts to get a successful download. As time passes, it should get quicker and easier to download.
From Kathy: “I downloaded the Google Earth Pro BUT now I have regular and Pro on my computer and all the spots marked in regular seemed to have transferred to Pro—Question—should I now uninstall the regular version?”
Answer: That decision is really up to you. I’ve decided to keep both for a while, but only do work from this point forward in Pro. If in a few months everything is still running smoothly, then I will probably delete the old free version just to free up disk space on my computer. For now, it certainly doesn’t hurt to leave it there.
The good news is that both programs appear to pull from the same files on your computer. This means that when you create a file in Pro, you will also see it in your Places panel in the free version.
Question from Dea: “I downloaded Google Earth Pro on my main computer. I now want to use the same license key for my laptop and android, as I signed up for 2 to 5 users. I assumed that I could use the same license key. When I tried to sign up on my laptop it said I already was a user, but do not know how I can access it from my laptop. Help!”
Answer: Although the sign up page asks how many users will be using the program, my understanding is that each download key is for one device. I would guess that the user question is about how many people might be using the application on that device. (Unfortunately the website isn’t clear on this point.) I’m basing this on the fact that when it was a paid version, you had to purchase a license key for each device.
As with the original free version of Google Earth, each device you download Google Earth to has it’s own unique Places Panel. In other words, files you create on your desktop computer don’t show up on your laptop. This is because the files are stored on that particular device and not on the Cloud (for privacy reasons).
So the bottom line is that to get another license key for another device you will need to use a different email. If you only have one email address, you could create a second free email in Gmail just to have an email you can use.
Dea’s Reply: “Thank you for such a prompt reply. I am sure there must be more than one of you. I do not know how you get so much accomplished….saw you at Midwest Roots in Indianapolis and, again, at a webinar for our Genealogy Society in Terre Haute, IN. You are an excellent speaker, teacher as well as entertaining.”
Lisa: Now I’m blushing!!
Answers to more questions:
Do you really need Google Earth Pro? Probably not, because Pro was created originally for businesses. However there are some pretty cool extras that you get by going Pro:
Movie-Maker: Export Windows Media and QuickTime HD movies, up to 1,920×1,080-pixel resolution. (Sweet!)
High-resolution printing: Print images up to 4,800 x 3,200 pixel resolution. (The free version max: 1,000 pixels.)
Spreadsheet import: Ingest up to 2,500 addresses at a time, assigning place marks and style templates in bulk. (My geeky side is getting giddy!)
Exclusive pro data layers: Demographics, parcels, and traffic count.
Advanced measurements: Measure parking lots and land developments with polygon area measure, or determine affected radius with circle measure.
Resources:
Want to learn more about using Google Earth specifically for genealogy? Check out this free video class.
And there are several chapters on using Google Earth for genealogy in my brand new book The Genealogist’s Google Toolbox Second Edition (2015). You can pick up as a special bundle here with my 2 disc DVD set Google Earth for Genealogy.
Passenger Lists Records: Elevenses with Lisa Episode 34
Video & Show Notes Original air date: 11/19/20
If you’ve ever struggled to find a passenger list or figure out what it’s telling you about your family history, you’re in the right place. In this episode I’ll show you where to look, and how to interpret what you find. Click to watch the video and follow along with the notes below:
A Question About Passenger Lists
Genealogy Gems Premium Member and Elevenses with Lisa viewer Deborah Huber wrote in about some challenges she was having with passenger lists.
“Hi Lisa, I have a few questions about the passenger records I have found for my mother and grandparents. They are all from Ancestry.com.” Let’s go through Deborah’s questions step-by-step.
Deborah is looking for the Felberg Family:
Otto age 33 (Grandfather) b. 1894
Marta age 23 (Grandmother) b. 1904
Ruth age 3 (Mother) b. 1924
They Sailed March 25, 1927 from Hamburg Germany to New York
“My mother was born in Heinrichshoff on “Stork Day,” a day celebrating the return of the storks in the spring and welcoming them to their nests on top of the chimneys.”
Passenger List records to look for:
German Passenger list (the outbound record)
New York Passenger lists (the incoming record)
Searching for the New York Passenger List
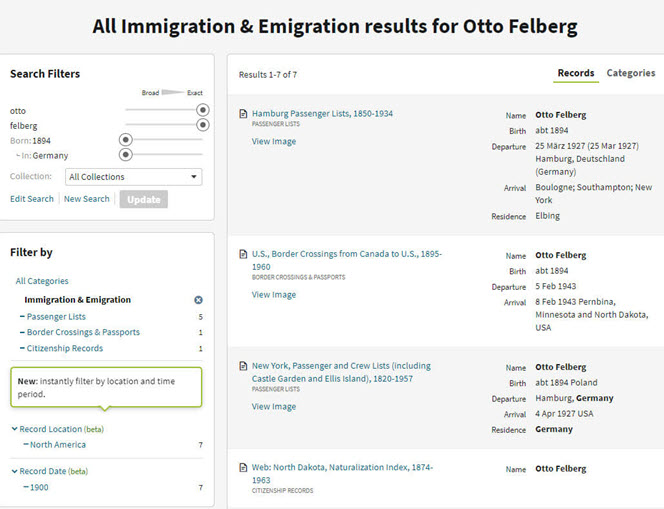
How to search for passenger lists at Ancestry: Search > Immigration & Travel > Search by name and birthdate. If you don’t see both expected passenger lists (ex. Hamburg and New York) check the Card Catalog. Example search: Hamburg passenger or Germany passenger. From the results page you might have the opportunity to click through and see a photo of the ship. You may also find a link to additional passenger lists (in this case, the Hamburg Passenger List).
Results page for Otto Felberg
Question: “Also, my mother always said that they didn’t go through Ellis Island but did land in NY City. I think Castle Gardens was already closed in 1927 so I’m trying to figure out where they did land.” Answer: The record collection title alerts us to what is included in the passenger list collection: New York, Passenger and Crew Lists (including Castle Garden and Ellis Island), 1820-1957
A quick Google search will tell us the dates that Castle Garden was in operation: “From August 3, 1855 to April 18, 1890, Castle Garden was America’s first official immigration center, a pioneering collaboration of New York State and New York City.”
Tip: Search Multiple Sources for Passenger Lists You may find the quality of the digitized image varies from one genealogy website to the next.
Top Free Resources for searching for Ellis Island passenger lists:
Tip:Finding Passengers When Names are Hard to Read When names are difficult to read, focus on other information that is easier to spot such as the person’s age. In the Felberg family’s case, Ruth was 3 years old. Looking for a “3” in the age column proved much easier than reading the names.
Identifying the Location Named in a Passenger List
Question: On the screenshot from the Hamburg list is says the destination was “Greenlake”. Is that a port? All I could find on the internet about Greenlake is that it is a NY state park. Answer: The “Greenlake” mentioned in the indexed passenger list record refers to the final destination, not the port of arrival. Carefully review both original passenger list records.
Tip: Don’t Miss Page 2 Like many genealogical records, passenger lists records may be more than one page. If the index refers to something that you do not see when you click through to the original record, it is a strong indication that there is another page. Always look at the pages before and after any digitized record. In this case, we find Greenlake, WI on page 2!
1820 – 1907: Ship manifests are 1 page in length
After 1907: Manifests are 2 pages with additional information provided.
Source: The Statue of Liberty – Ellis Island Foundation, Inc.
Now that we know that Greenlake is Greenlake, Wisconsin, we can run a quick Google search to find the correct name and county: Green Lake, Wisconsin. Then continue your googling to find more historical information such as old maps and postcards. Click “Images” on the results page to quickly review the results.
Here are a few of the resources we found for Green Lake, WI:
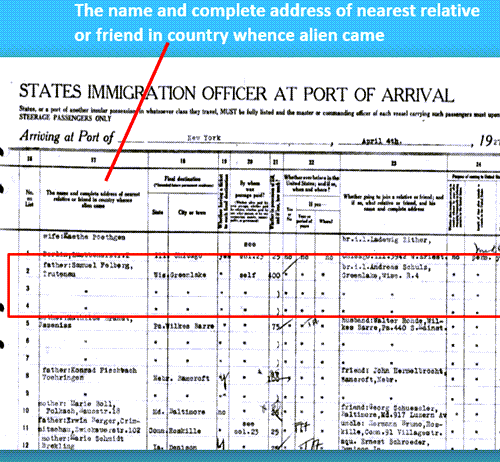
There is a wealth of information on the Felberg’s passenger list, starting with the name of Otto’s father and the town where he lived:
Nearest relative listed on a passenger list
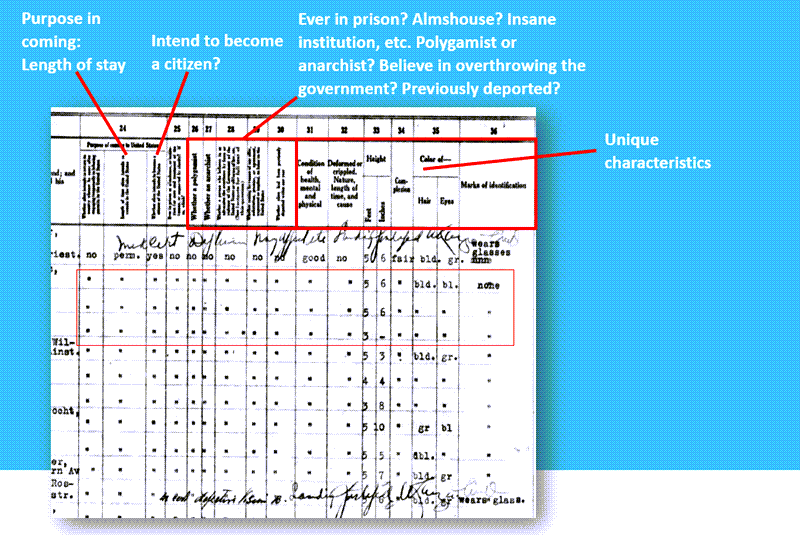
How to decipher an Ellis Island passenger list form.
Hamburg Passenger Lists
Question: “I can’t read the actual document which is the Hamburg Passenger List.” Answer: The Hamburg passenger list can be found in the Card Catalog. Card Catalog > Search Title (Hamburg Passenger Lists)
2 results: the passenger lists and the index.
We discovered that not only was the passenger list extremely difficult to read due to the ink copying over the page, but also the link did not go to the correct page. This is where the Index, found through the Card Catalog, because indispensable.
Band 161 (1927 F-J) (The year of their arrival and “F” for Felberg)
F (for Felberg)
Search the Index to locate the page number for the passenger’s record. Then go back to the original record and find the handwritten page number in the upper corner.
Tip: Quickly Navigate the Ancestry Record
Simply press the appropriate key on your computer keyboard to quickly navigate the pages.
“N” = Next page
“P” = Previous page
Visit Elevenses with LisaEpisode 17 for more Ancestry search tips and tricks.
We found the Felberg family on page 117, exactly where the index said they would be. It’s a good idea to search all the passengers for others with the same last name. In this case, Otto’s brother Rudolph Felberg was also on the ship. This aligned with the family lore that Rudolph may have sponsored the family’s move.
Genealogy Gems Premium Podcast Episode 153 Jackie Schalk, Director of the American Family Immigration History Center at The Statue of Liberty-Ellis Island Foundation, Inc discusses clues you may find in US passenger lists.
 “On September 1, 2017, FamilySearch will discontinue its microfilm distribution services,” announced the site yesterday. “The change is the result of significant progress in FamilySearch’s microfilm digitization efforts and the obsolescence of microfilm technology. Digital imaging has made it easier to find ancestors through the internet, mobile, and other technologies.”
 On January 28, 2015 Google announced
 Thanks for the tip Sheri. Most likely the problem you were running into after the big announcement that Google Earth Pro went free was the sheer amount of traffic the site received. Googlers swarmed the site, and any people found it took several attempts to get a successful download. As time passes, it should get quicker and easier to download.
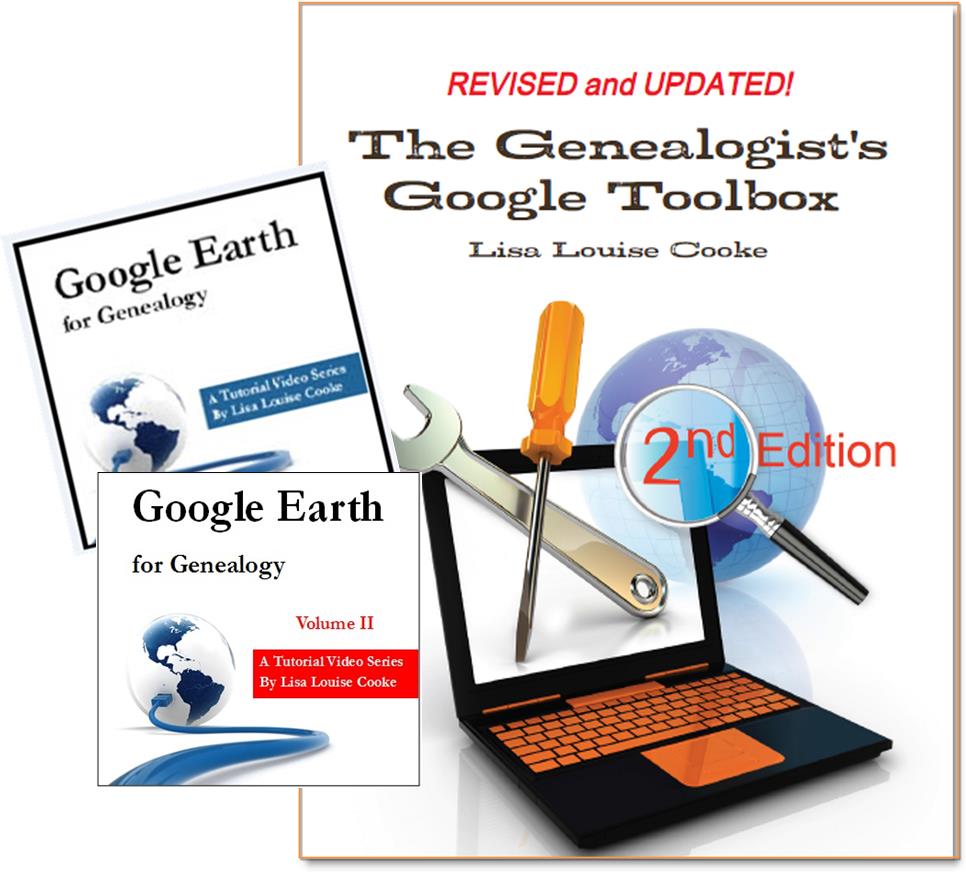 And there are several chapters on using Google Earth for genealogy in my brand new book The Genealogist’s Google Toolbox Second Edition (2015). You can pick up as a