These show notes feature everything we cover in this episode. Premium Members: download this exclusive ad-free show notes cheat sheet PDF. Not a member yet? Learn more and join the Genealogy Gems and Elevenses with Lisa family here.

Show Notes: How to use Google site search to search a website that doesn’t have a good search engine, or doesn’t have one at all. Google’s Site Search will help you find exactly what you need! This tip comes from the hour-long Premium Membership “Elevenses with Lisa” video called 5 Genealogy Search Hacks. Premium Members can download the exclusive cheat sheet PDF on the show notes page.
(Downloadable ad-free Show Notes handout & cheat sheet for Premium Members.)
Use Google’s Site search to dig into websites:
Essentially, you can use Google Site search as a custom search engine for a specific website.
For example, USGenWeb is a free genealogy website that has been around for a long time and has a vast number of pages and content. There isn’t a search box on the home page, but you can click Search & Site Map in the menu. However, you’ll notice that their search engine is powered by a third party called FreeFind which has been around since 1998. Because it’s free and a third party, the search field is definitely not secure. Since that’s the case, you might as well use the largest and most powerful search engine in the world, Google, to search to run your search instead. Google’s site search is the way to do that.
A note about websites like USGenWeb: Make sure that you are searching the correct website.
Notice the URL for the USGenWeb website: https://usgenweb.org/index.html. Click the desired state on the map on the home page. Now, look at the URL again.
Example: Indiana http://ingenweb.org/
Notice that it’s actually a different website. Each state has the two-letter state abbreviation at the beginning of the URL. Use the state address when conducting a site search.
Example Search: If I wanted to find all mentions of a surname in the state, my site search would look like this:
Hulse site:http://ingenweb.org/
You can use the Google search operators listed in my book The Genealogist’s Google Toolbox to be even more specific about what you want to find.

Available in the Genealogy Gems Store
These days we are all collecting more ebooks than ever before. We also have more devices than we’ve ever had before. Here’s a solution that gives you access to your ebooks from one convenient location no matter which device you are using.
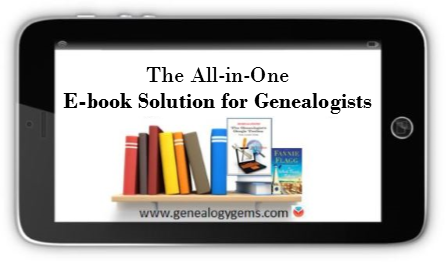
While you may love the feel of the pages of a book rifling through your fingers, there is a distinct advantage to collecting many of your genealogical reference materials and books ebooks. They don’t take up precious shelf space in your house!
However, I don’t live in a digital fantasy-land. I’m keenly aware that there are some challenges you may want to avoid:
If you’ve ever attended one of my genealogy classes, or watched one of my videos, at some point you’ve probably heard me say that I use Google Books on a daily basis for genealogy. I don’t say that just because the service provides access to over 25 million books, many of them fully digitized and searchable, and downloadable. It also provides you with your own personal library. Let’s take a look at how Google Books and Google Play Books work together to make that possible:
Google Books is a free and powerful service that also allows you to have your own library within it called My Library. As you search for and find ebooks to aid you in your genealogical research, you can save them to your library.
Google Play Books, is sort of the other side of Google Books. It is a vast ebook store that includes a feature called My Books. When you purchase an ebook, it is saved to your My Books. However, it also includes all ebooks that you have saved to your Google Books My Library. Even better, it allows you to upload your own ebooks! This makes it a central clearinghouse for all of your ebooks.
Here’s the bottom line. Think of My Books and My Library as the same thing in two different places: a personal library for your free, purchased and uploaded ebooks. The only reason they have different names is because Google Books has evolved over time into a book store as well. Don’t worry about that. Just know that whether you are searching through Google Books, or shopping in the Play book store, your library is right there with you, no matter what device you are using.
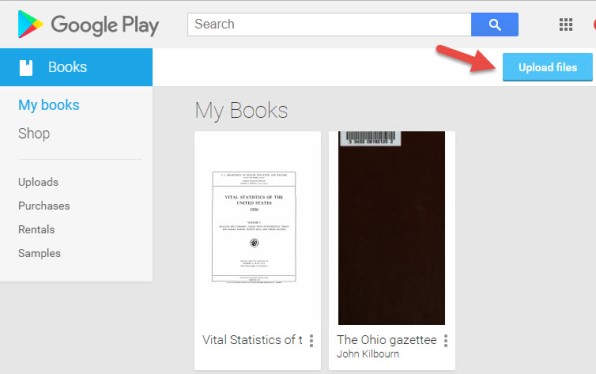
To get started, all you need is a free Google account, which you very likely already have. Go to https://play.google.com/books and sign in. In the menu on the left, click My Books. If you have ever saved a free ebook to your My Library in Google Books you should now see it on your screen.
This library is a place where you can save, upload, and access your digital books from any mobile device. This means everything is conveniently in one place, and accessible from all of your computing devices, both Apple and Android. You’ll have the freedom to read your favorite books on the go, and to access your digital genealogy research library at the drop of a hat.
Yes, there are some other services out there that could also do the job. But if you’re like me and don’t want to invest the time to learn and pay for yet another tech tool, Google Play Books is a great solution, because we are already using Google Books for our genealogy research.
Let me walk you through the simple steps to putting this free tool to work for you:
1. First, open your web browser and log in to your Google account.
2. Go to play.google.com/books.
3. Click Upload files.
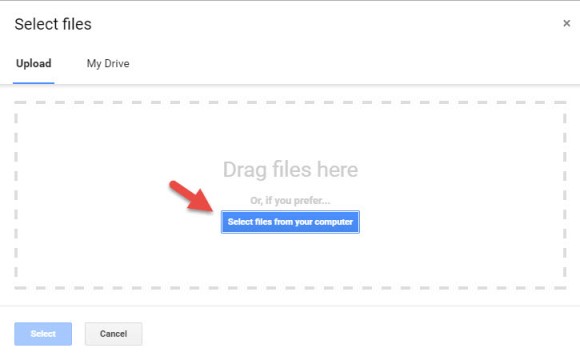
4. Select your ebook files from your computer folders, or drag them into the box shown. You can also click on My Drive to select files from Google Drive. You can choose epub documents or PDFs.
Now, let me stop right here for a second and distinguish between doing this on a computer, and doing it on a tablet or smartphone. What I’m illustrating here is on a computer. I always recommend when you purchase ebooks to download them first to your computer, regardless of whether you plan on uploading them to Google Play Books. However, if you do want to do this on a tablet, for example, there are currently two options from which to pull your ebooks:
Trust me, things will work more smoothly if you use your main computer as your hub for downloading, and then upload directly to your Google Books library.
Other things that are good to know:
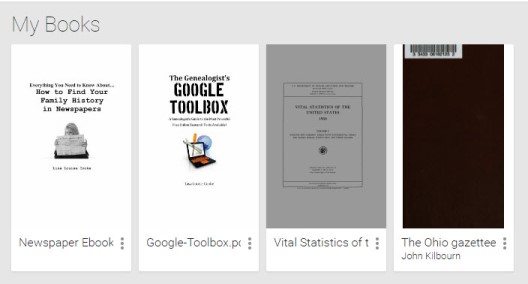
So now you have found free historical ebooks on Google Books (if you haven’t, take a moment and click here to read my article about using Google Books) and saved them to your Google Books My Library. Then, you uploaded your own ebooks and PDFs to Google Play Books. The final step is to jump on all of your smartphones and tablets and head to the app store. Search for Google Play Books and download the free Google Play Books app to each device. Sign in to the app with your same free Google account, and you’ll have access to all of your ebooks. Your library can now travel with you in your purse or tucked into your pocket.
In the app, tap the three horizontal lines icon in the upper left corner, and then tap My Library. You’ll find your ebooks sorted under the following tabs:
By tapping the three uneven horizontal lines icon in the upper right corner, in each category you can sort your books by:
 eBooks come in several different formats. While I’m not covering in this article how to convert file types or deal with DRM protected books, there are resources available to help you do so.
The answer? Just Google It!
And if you need help figuring out how to effectively Google search, I have a book for that! The Genealogist’s Google Toolbox–the ultimate guide to using all of Google, including a full chapter on Google Books.
Many white-papers, scholarly works, and quick reference guides come in PDF format, and they upload like a breeze.
PDFs are so versatile, and they play ever-so-nicely with Google Play Books. It’s just another reason to love your Google Books library.
Are you feeling like your Google Books Library has room to fill? All of our quick reference guides are easy-to-upload PDFs, and all of the following genealogy resources are available as digital downloads in the Genealogy Gems store:
For a hand-picked list of novels and other great leisure reading for genealogy lovers, visit the Genealogy Gems Book Club page. I know you’re going to love our suggested best-sellers and best-kept-secrets about family, the search for identity, and fascinating stories in history.
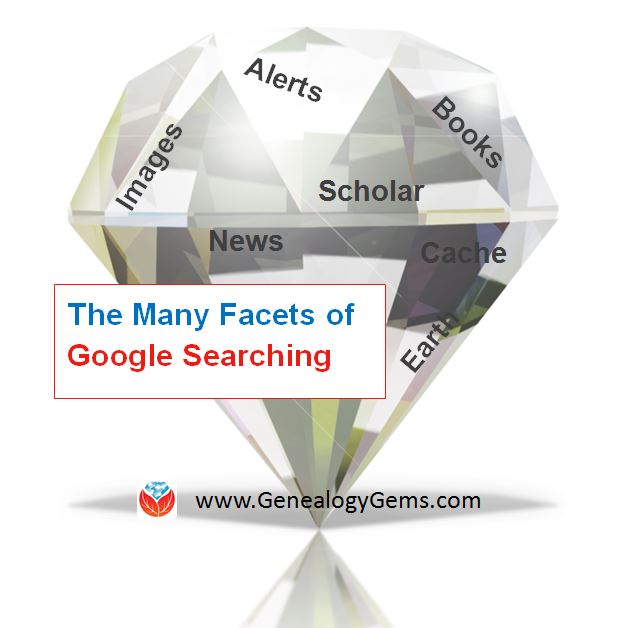 Google is a many-faceted gem when it comes to searching for ancestors online. Are you getting the most out of what Google offers?
Google searching–entering your ancestors’ names and other keywords into the main Google search box–is where you start using Google for genealogy. But the search box isn’t the only Google feature that can help you find hidden genealogy treasures online. Here are 7 important Google resources you need:
Google Alerts
Google will sweep the internet for your favorite keyword searches on a regular basis! Just set up as many of these searches as you need with Google Alerts. It’s free and you can customize it to search when and what you want. Click here to learn to set up Google Alerts for genealogy.
Google Books
You may already know that Google Books will keyword search within billions of pages of text in published books from around the world. Some of these books are even available to read in full on the site. Searching Google Books can lead you to facts, stories, new sources for your research and even images. For example, click here to read a post about finding old maps in Google Books.
Google Cache
Web content changes all the time. Sometimes the text, pictures or other content we most want just disappears. A page is revised, or a webpage or an entire website is taken offline. Use Google Cache to look at webpages that no longer exist! Click here to learn more.
Google Earth
I teach people all over the world how to use Google Earth in their genealogy research! Google Earth is the ultimate online map of the world: free, interactive, three-dimensional, multi-layered and crowd-sourced with all kinds of extra content. You can use it to identify ancestral hometowns and even their properties; zoom in to see what it looks like today; find old buildings, cemeteries, schools or churches relating to their lives, and more. Click here to watch a free video on using Google Earth for your genealogy.
Google Images
When using Google for genealogy you can also visualize your results. Google has a dedicated area for finding the images you want, like certain people, places or historical events: Google Images. Google Images will even narrow your results to certain parameters: black and white images only; maps or pictures of people only; photographs but not illustrations and–my favorite–images without copyright restrictions that you may re-use in your family history write-ups.
Google News Archive
Though no longer actively digitizing and indexing newspapers, Google News Archive can help you locate online content for specific newspapers. Click here to access its alphabetical listing of newspapers. You can also enter keyword-searches in the search box on that webpage for all the newspapers listed here.
Google Scholar
When you want to dig into scholarly articles, theses, dissertations and other academic sources, turn to Google Scholar. This resource specializes in searching the “smart stuff,” as I think of it. Sometimes you can find very specialized content, like a biography of a little-known minister or a history of a little tiny town. Read this inspiring story about using Google Scholar for genealogy!
Resource:
Ready to learn more about how to use Google for genealogy and mining it for your own genealogical treasures? The Genealogist’s Google Toolbox, is your go-to resource! In its chapters–fully revised and updated –you’ll learn more about all these Google tools and more. Better yet, after you learn how to use these tools for family history research, you’ll find yourself using them to find all kinds of things, from recipes to trivia, to a manual for your old car.

It’s Nice to Share
I’ll bet you have friends who would benefit from this article on how to use Google for genealogy. Share it and they will be doing the genealogy happy dance, and so will I!
Here are some handy sharing buttons, or just copy and paste the URL for this article into a Facebook post or email. Thanks!
The places where your ancestors lived can tell you a lot about their lives. I’m going to show you a free and easy technique for plotting land in Google Earth.
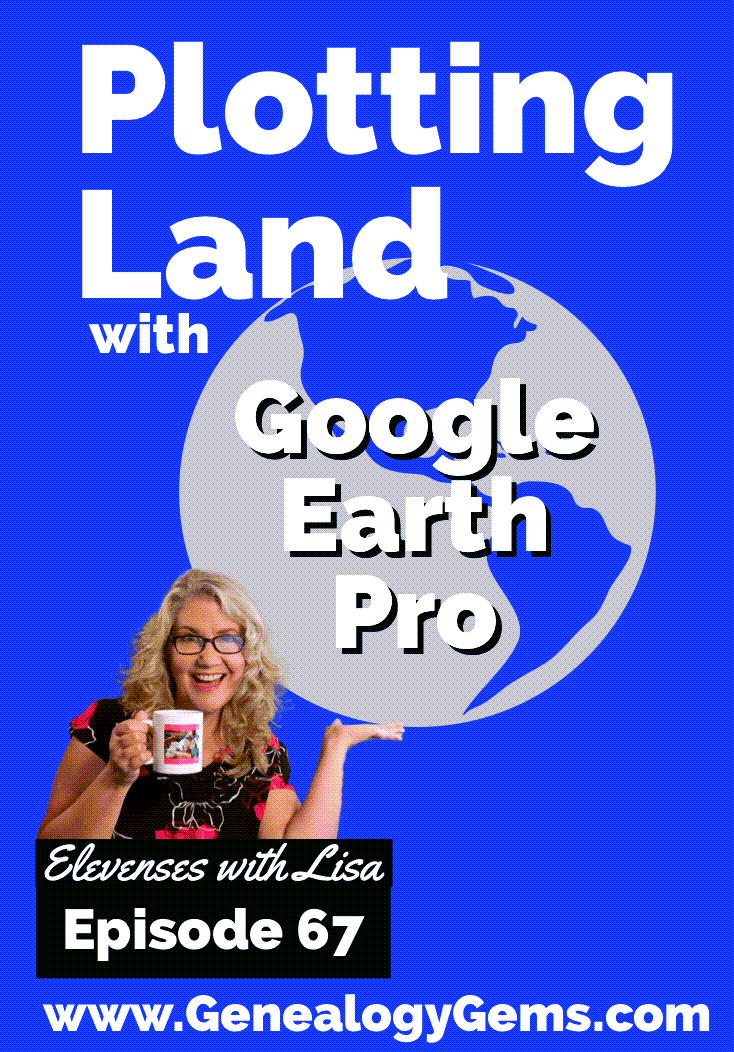
episode 67
Would you like to be able to find your ancestor’s property on a map today? Keep reading and watch the video to learn how. We’re going to take U.S. government survey legal land descriptions found in sources such as Federal Land Patents and quickly and easily plot the boundaries in Google Earth Pro. I’ll also show you an easy way to do it for property in Canada too.
(PREMIUM MEMBERS: Get your ad-free PDF cheat sheet for this episode in the Resources section at the bottom of this page. Not a member yet? Click here to join the Genealogy Gems family and get all the benefits.)
In the video I show you how to plot the boundaries of a piece of land in Google Earth. We’re going to take U.S. government survey legal land descriptions found in sources such as Federal Land Patents and quickly and easily plot the boundaries in Google Earth Pro. I’ll also show you an easy way to do it for property in Canada too. These strategies come from my book The Genealogist’s Google Toolbox,
These days there are actually three versions of Google Earth:
All are free, but they are not the same. The app and web browser versions are sort of “Google Earth lite.” The software is what you want because it has all the bells and whistles that will allow you to do all the things I’m going to show you today.
Plotting legal land descriptions in Google Earth has its advantages. If you’re plotting the land of your ancestors, you’ll be able to see what the area looks like today and what the current street names are. In Google Earth you’ll also have access to additional tools that you can use in conjunction with the boundaries you’re going to create, such as historic maps, area photos, and a wide range of data sets that provide more information about the area.
The first thing to do is check to make sure you have the most current version of Google Earth on your computer. Again, we’re using the software so you need to do this on your desktop or laptop computer. You want to make sure you have Google Earth Pro – LINK – A tell tale sign that you don’t is if the Google Earth globe icon on your desktop is grey and not blue. Open it and in the menu go to Help > About Google Earth. Here it should say Google Earth Pro and you can see the version number.
Check the current version number here, and if you don’t already have the program, go ahead and download it.
Now that you have it on your computer, open it up and leave it running in the background. You’ll need a decent internet connection for it to run.
Next pull up the legal land description that you want to plot. Here’s one that I have for some property owned by George Burket. I found this at the Bureau of Land Management Government Land Office Records website. This free website is where you can search for land patent that your ancestors once held.
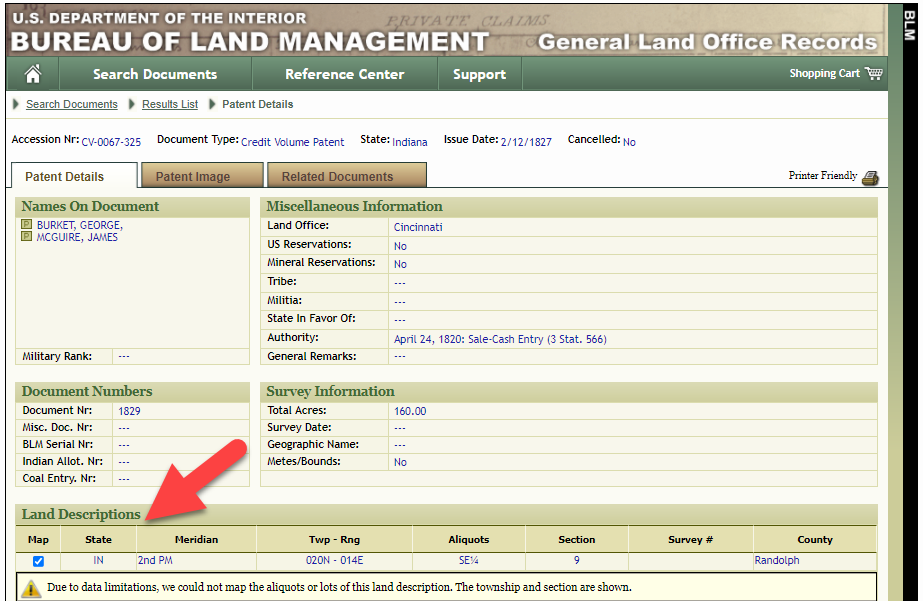
Legal land description at GLO
Even though the Bureau of Land Management places it on the map on their website, you can’t download this or add to it. The advantage of plotting this in Google Earth is that you will have access to much more geographic data, you can add many more details to the map, you can use it in conjunction with other related mapping work that you’re doing, and you can save and share it.
This description gives us the exact coordinates of the property. Jot down the land description or keep it open in your browser tab so you can refer to it.
In a new browser tab, we’re going to type in http://www.earthpoint.us. This will take us to the Earth Point website.
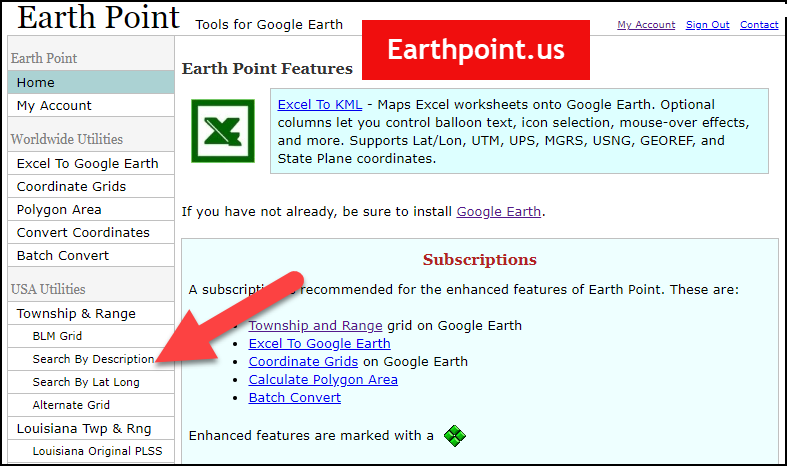
Search by legal land description at Earth Point
This website is free, although some of the features are available only with a paid subscription. Thankfully, the tool for plotting your ancestor’s land patent is free. Some of the free features do require that you sign up for a free account. The feature we are going to use currently does not.
On the Township and Range – Search by Description page you will see a field for each piece of information found in the land description. It’s important to enter this information in the order presented starting with the State. Select the state from the drop-down menu. Pause a moment to allow the fields to recalculate. This allows the appropriate data to be loaded into the next field based on your selection.
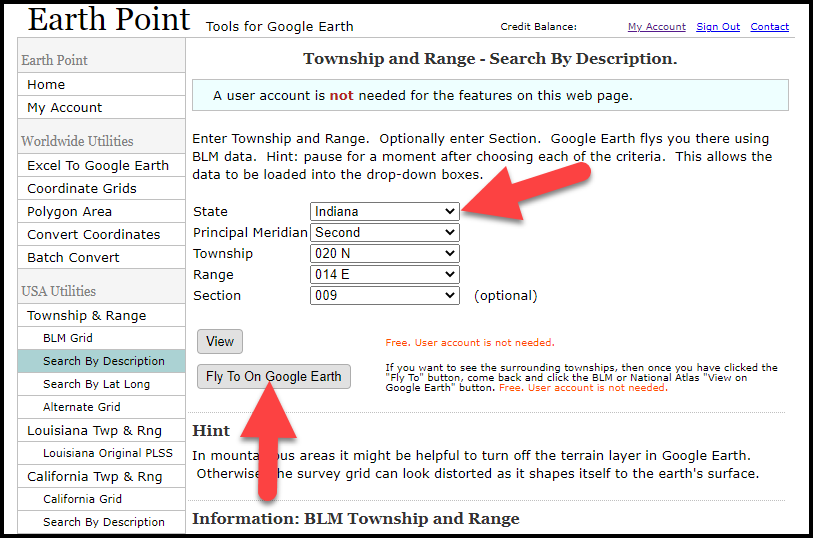
Entering data at Earth Point
After you have made each selection, click the Fly to on Google Earth button. This will generate a KML file which can be saved to your computer. KML stands for Keyhole Markup Language, which is the file type that Google Earth uses and understands. KMZ are zipped KML files which also are used by Google Earth.
Save the file to the desired location on your hard drive. Then click the file to open it. It will automatically open in Google Earth (which you already have open). The KML file is now located in your Temporary Places folder in the Places panel. The land is has now been automatically plotted on the map.
The orange outline is the township. In this example it is township T20N R14E. Click the orange ball in the center of the township for details. In the details you’ll find the total number of acres in the township, the latitude and longitude coordinates for the center of the township and corners.
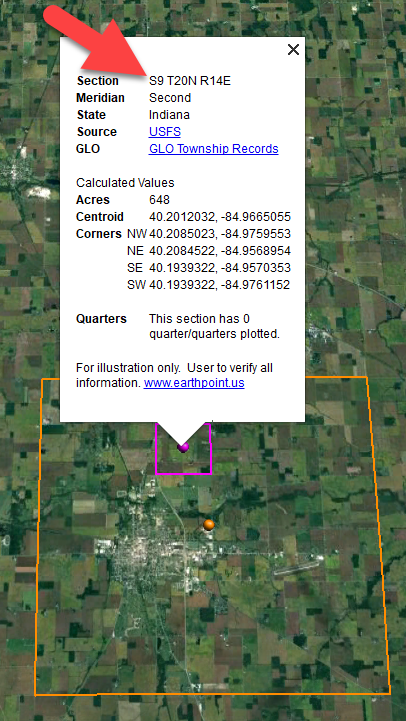
Township in Google Earth
The pink / magenta outline is the Section where the property is. Click the pink center dot for the details:
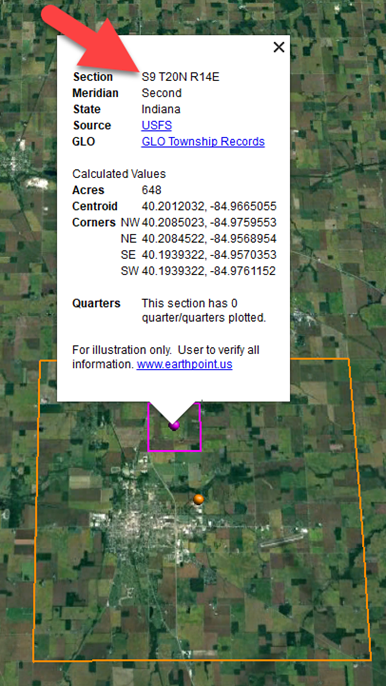
Land section in Google Earth
In this example Section 9 consists of 648 acres.
Notice that Earth Point was able to plot the land down to the Section level. However George Burket did not own the entire section. We must return to the land description for the Aliquots.
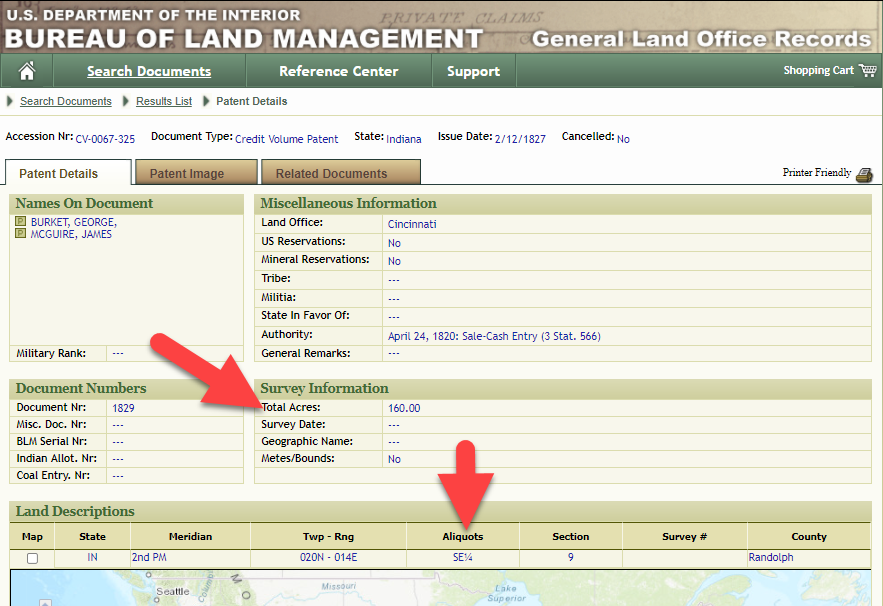
Aliquots in Legal Land Description
In this example, the land was the southeast quarter (SE1/4) of section 9. The land was a total of 160 acres.
We can use the Polygon tool in Google Earth to plot the 160 acres. In the toolbar, click the Polygon tool. This will open the New Polygon dialog box. Type a title, description and source citation.
As you hover your mouse over the map you will notice that the cursor is now a square shape. Click the screen on each of the four corners one at a time in order to set the four corners of the property – in this case the southeast quarter of the section. Once you have drawn the shape you can click on the handle on any corner to adjust precisely.
Click the Style / Color tab in the New Polygon dialog box to adjust the color and opacity of the acreage polygon. You can add color and thickness to the outline, and color and opacity to the fill of the shape. When you have it set the way you want it, click OK to close the New Polygon box. The Polygon is now set.
On the left side of the Google Earth screen you will see a series of panels: Search, Places and Layers. At the bottom of the Places panel is the Temporary folder. This is where the KML file was placed when it was opened. However, like its name implies, this is a temporary location. If you want to keep it, you’ll need to move it to a filed location within the Places panel. This will not change the position of the polygon on the map, only where it is filed and saved in the Places panel.
To file a polygon, click on the file in the Places panel, drag it to the desired location, and drop it. Next, go the main menu and click File > Save My Places. This will save your work so that when you close the program it will not be lost. Google Earth doesn’t auto-save.
The polygon plotting the acreage will be visible on the map when the box is checked in the Places panel. If you uncheck the box for the polygon it will still be there, but it will not be visible on the map. This allows you to create and save many items of interest without always having to have them displayed and cluttering up the map in Google Earth.
After your land polygon has been set, you may want to rename it. There are two ways to do this:
You can also restyle the polygon and edit the text. Start by going to the Places panel and click the arrow pointing at the Polygon’s globe icon. This will open it and show the nested content. Click to select the Polygon. Now you can right-click it (PC) and select Properties – OR – go to the menu under Edit > Properties. Either way it will reopen the Polygon dialog box so that you can make the desired changes. When you’re done, click the OK button to close the Polygon.
Snagit is the tool I used to capture the various views of the land I plotted in Google Earth. Learn more about Snag it by watching my videos and reading the show notes for episode 61 (for beginners) and episode 66 (advanced).
Although the Earth Point website doesn’t plot Canadian land, the Legal Land Description Converter website does. It can help you find land in Western Canada (British Columbia, Alberta, Saskatchewan & Manitoba) subdivided by the Dominion Land Survey (DLS) and the Alberta Township System (ATS).
These show notes feature everything we cover in this episode. Premium Members: download this exclusive ad-free show notes cheat sheet PDF. Not a member yet? Learn more and join the Genealogy Gems and Elevenses with Lisa family here.
Gwynn: I would like to know how to match plat with GPS coordinate/ current street address.
Answer: I cover how to overlay a plat map in Google Earth and discover the current street address in my book The Genealogist’s Google Toolbox.
Roger D: How exact do you need to be in picking points? Does Google snap to mid-points of lines?
Answer: Try to be as exact as you can, however as I showed in the video you can reposition them as needed. Google Earth doesn’t snap.
Lyn: Can I do this with English tithe maps?
Answer: There isn’t a website converter that I know of. However I do cover how to overlay digitized maps in Google Earth in my book The Genealogist’s Google Toolbox.
The manufacturer price is going up August 31, 2021. Now’s the perfect time to get your official Elevenses with Lisa mug.
You can also find them through the menu: Premium > Premium Videos > Elevenses with Lisa.