Original air date: 10/1/20 Join me for Elevenses with Lisa, the online video series where we take a break, visit and learn about genealogy and family history.
Google Lens with Lisa Louise Cooke
What is Google Lens?
Google Lens is a free technology that Google says helps you ”search what you see.” It uses the latest in Optical Character Recognition (OCR) and artificial intelligence to accomplish tasks.
In this video and article we’ll discuss where you can get Google Lens and how to use it for a wide variety of tasks.
Hang on tight to your phone and let’s jump in!
Google Lens is in Google Photos
Google Lens is doing much of the work in Google Photos. It can detect the faces in your photos, and allow you to search by face. It can also detect objects and text, making it a super fast way to search the photos and images you store in Google Photos.
If you’re not interested in storing all of your photos on Google Photos, that’s OK. As a genealogist, you could still use it for more strategic purposes. You could use it just for family history photos and related genealogical images like documents and photos of tombstones. All of the content you add can then be quickly and easily searched for and found. It can even help you identify a known ancestor in other photos where you may not have recognized it was the same person.
We will talk about specific ways to use Google Lens in Google Photos. But first, let’s talk about all of the ways you can get your hands on Google Lens.
Where can I find Google Lens on my phone or tablet?
Google Lens is available on most mobile devices but not all. Some Samsung devices don’t currently support it. Here’s where you can find Google Lens.
Google Lens is built into Google Photos – Download the Google Photos app to your phone. Pull up one of your photos and look for the Lens icon at the bottom of the screen. If it is there, your phone supports Google Lens.
Google Lens in the Google Search app – You will see the Lens icon in the search bar if your phone supports Google Lens.
The Google Lens app – On Android devices look for the Google Lens app in the Google Play app store.
Where can I find Google Lens on my computer?
Google Lens is primarily a mobile tool although Google Lens is built into the functionality of Google Photos. (It works behind the scenes – you won’t find a Google Lens icon.)
However, you can use your phone to user Google Lens to capture text and then send it to the Chrome browser on your desktop computer.
Using Lens in the Google Photos App
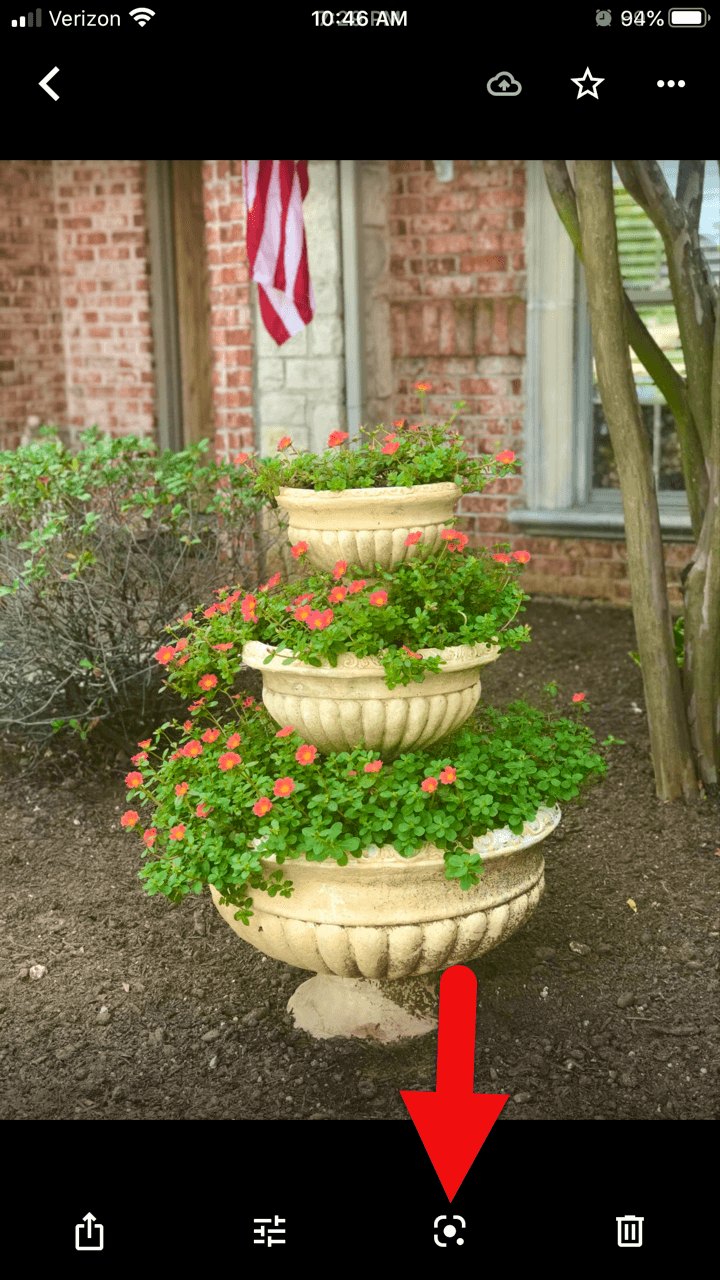
To use Google Lens on your photos in the Google Photos app, you’ll first need to give the app permission to receive the photos you take with your phone. You can then open the Google Photos app and select a photo. In this episode I used the example of a potted plant (Image A below).
(Image A) Google Lens in the Google Photos app
Tap the Google Lens icon at the bottom of the screen and you will receive search results that include the name of the plant, photo examples of the same plant, possible shopping options, and web pages providing more information about that plant.
Here’s another way you can use the Google Lens feature in the Google Photos app:
Take a photo of a business card. (I used Google’s PhotoScan app to do this. The app does a great job of removing glare and other distortions that can occur when you photograph something with your phone. You can download the free Google PhotoScan app from your device’s app store.)
Access the photo in the Google Photos app.
Tap the Google Lens icon.
Lens turns the information on the card into actionable buttons:
Add to contacts
Call now
search on the web
go to the website
Google Lens is in the Google Search app
On many mobile devices such as the iPhone (but not all devices) the Google Lens icon will appear in the search bar. If you’re not sure if you already have the Google Search app on your phone, go to the app store app on your phone and search for “Google Search.” You will see the app listed with a button that either says “Open” (because it is already on your phone) or “Install” (because it is not yet on your phone.)
You can also check to see if they app is on your phone by searching for “Google Search” in the search bar of your phone.
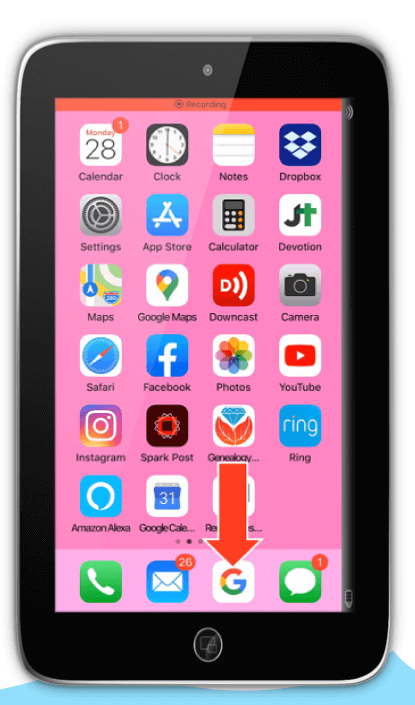
Here’s what the Google Search app looks like on a phone (Image B below):
(Image B) Look for the Google Search app on your phone.
The Google Lens App
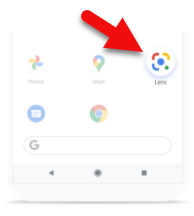
If you have an Android phone, search the Google Play store for the Google Lens app. Here’s what the app looks like (Image C below):
(Image C) Android users with phone’s supporting Google Lens will find the app in the Google Play app store.
What Google Lens Can Do
Once you start using Google Lens the possibilities for its use can seem endless. Here’s a list of the kinds of things Google Lens can do:
Shopping
Identify Objects
Copy Text from printed materials or objects
Search for Text on printed material or objects
Solve math problems
Read text to you
Translate text
How to Use Google Lens to Read a Book
Before you buy that next history book or go through the trouble of requesting it through inter-library loan, why not let Google Lens determine if it is already available for free online? This next tip works really well for old books that are likely to be in the public domain or printed before 1924.
Open the book to the title page
Open the Google Search app on your phone
Tap the Google Lens icon
Hold your phone over the title page
Tap the search button
If the book is available on Google Books, the title will appear along with a blue “Read” button
Tap the “Read” button to access, read and search the book on Google Books for free!
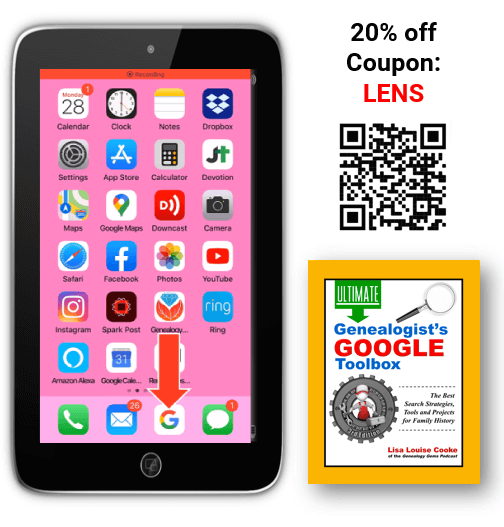
(Image D) Point your phone’s camera or Google Lens at the QR code
Open the camera on your phone and point it at the QR code above (Image D) to be taken to the book in the Genealogy Gems store. Use coupon code LENS to get 20% off!
One of the advantages of tuning into the live broadcast of each Elevenses with Lisa show is participating in the Live Chat and asking your questions.
From Rosalyn: Lisa are the old photos hanging on your wall the originals or copies? They are very nice. Lisa’s Answer: I always put copies in frames when I hang them on the wall because light can fade originals. They are all my family.
From Jn Rollins: Does it do the same identification for birds? Lisa’s Answer: I haven’t snapped a photo of a bird, but I’m sure it could. I used it on a photo of a bird, and it identified it perfectly.
From Susan: I have to download an app to get the lens icon? Lisa’s Answer: If you have an Android phone, you may be able to download the free Google Lens app from your app store. Otherwise, you will find the icon in the Google Search app or the Google Photos app on supported devices.
From Patriva: Is Google Go the same as Google Search? Lisa’s Answer: Google Go is a “lighter faster” search app. I think it may be geared more toward Samsung devices. I have a Samsung Tab and it doesn’t support Google Lens.
From Carrie: Does this work with the Google Chrome app? Lisa’s Answer: The Chrome app doesn’t have the Google Lens icon.
From Jn Rollins: I installed Lens a while ago on my Android phone, but when I open Google search the lens icon doesn’t appear next to the microphone icon. How can I change that? Lisa’s Answer: Some Android devices (like Samsung phones) don’t support Google Lens so you won’t see the icon. Check the app store to see if they offer the Google Lens app for your phone. However, I’m guessing it probably won’t be offered since it sounds like your phone doesn’t support Google Lens.
From Christine: I love this technology for speeding up research! But I have some reservations—what privacy are we giving away? How will Google use our search history? Lisa’s Answer: I would not use Google Lens for anything I consider “sensitive.” Go to the privacy settings in your Google MyActivity to learn more.
From Lynnette: Can you put the text into Evernote easily? Lisa’s Answer: Absolutely! Tap to copy the detected text, open an Evernote note, press your finger in the note and tap Paste to paste the text.
From Colleen: I see you are google searching. Does doing this with photos allow others to access my google photos when searching for an item? For example, the example you used with the purse? Lisa’s Answer: To the best of my knowledge your photos are not searchable by others online. However, it is possible that Google uses the image internally to “train” the machine learning. Go to the privacy settings in your Google MyActivity to learn more.
From Christine: Lisa, can this be used to compare photos to determine if they are the same person? Thanks for sharing all your wisdom! Lisa’s Answer: Yes! Watch my Premium membership video called Solving Unidentified Photo Album Cases.
From Caryl: Don’t know what a symbol is on a headstone? Now this would be oh so helpful!! Lisa’s Answer: Yes, indeed!
From Susan: I quickly took a photo of the book cover, so now I can get your book! Is it better to buy directly from you or go to Amazon? Lisa’s Answer: The book is available exclusively at my website: https://www.shopgenealogygems.com
From Debbie: Will FamilySearch’s app be independent, or will it work / integrate with Google? Lisa’s Answer: FamilySearch would not be integrated. However, as handwriting technology is developed I’m sure you’ll find it in use in both places.
Please Leave a Comment or Question
I really want to hear from you. Did you enjoy this episode? Do you have a question? Please leave a comment on the video page at YouTube or call and leave a voice mail at (925) 272-4021 and I just may answer it on the show!
If you enjoyed this show and learned something new, will you please share it with your friends? Thank you for your support!
We probably spend more time staring at our web browser than we do staring into the eyes of our loved ones. Since that’s the case, wouldn’t it be nice to be looking at a browser tab that not only makes you more productive but also inspires you? Well, you can and today I’ll show you how in the Chrome browser.
Plain Jane Chrome Browser Tabs
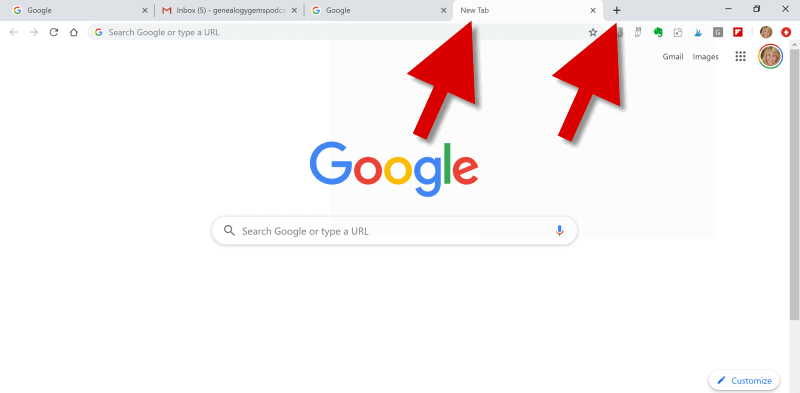
Normally when I click the plus sign on the right end of my browser tabs it opens a new tab that isn’t much to look at:
(Image above: Clicking the Plus sign opens a new browser tab.)
Well, recently I have been customizing the “New Tab” on my Chrome web browser, and the results have been helpful and enjoyable.
Now I find myself smiling each time I open a new browser tab. There, looking back at me, are ancestors. They are happily picnicking in a meadow under shady trees. They look relaxed in their white cotton shirts, sleeves casually rolled up, and glass bottled soda in hand.
(Image above: Chrome new browser tab with custom image.)
This sepia tone photo was taken early in the 20th century. It not only inspires me to keep up the genealogical search I am on, but also to take a chill pill when I hit a stubborn research brick wall.
Keep reading and I’ll show you how to add your own custom image to Chrome’s New tab.
Benefits of Customizing Chrome’s New Tab
My NewTab features more than just an old family photo. It also increases the speed of my online navigation by serving up the websites I need and use most often.
Notice the website shortcut icons I’ve added to the bottom of the page (image below.) With one click I’m on my way to search for historic newspapers at the Library of Congress Chronicling America website, or peruse the latest records at MyHeritage.
(Image above: Website shortcuts)
Customizing the New tab on your Chrome web browser can also increase your search speed.
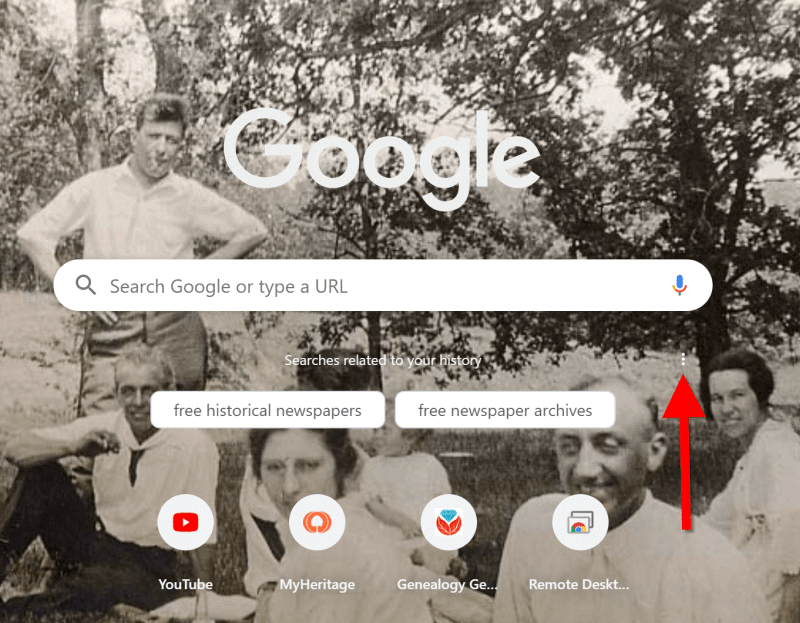
Notice the suggested related searches that fall between the search query box and the customized website shortcuts. Google has the ability to suggest additional searches based on my most recent previous search.
(Image above: Related searches suggested in Chrome’s New Tab.)
So why would this be beneficial?
Envision yourself conducting a Google search for a particular record collection. You receive the search results, and several look promising. You may even click through to one of those results and start reviewing the page. But as you read, it occurs to you that there may be a better way to state your query that could deliver better results. Or perhaps you wonder if you’re using the best terminology.
Rather than losing the search you’ve already run (and that website you’ve already started reading), you open a New web browser tab. With a customized New Tab, Google will start you out with some suggestions for additional searches. These aren’t just random. Google takes into account the most popular type of searches on the topic and the terminology or keywords that it has determined would retrieve good results.
Is it perfect? No. But suggested related searches can give you a jump start, and lead you to results you might not have otherwise found.
Google’s Customization versus a Browser Extension
Now before I show you how to customize your New Tab, you may be wondering why I’m not just using a browser extension to do the customization.
Yes, there are a variety of Chrome browser extensions that allow you to change the New Tab page. But the answer to this question comes down to security. Browser extensions have the potential to leak your private information. It’s always best to stick with the Google customizations if possible.
Since we don’t spend that much time on the New Tab page, the features we are about to customize should be all we need. However, if you decide to use a browser extension, I encourage you to do your homework to do your best to determine if the extension is trustworthy.
How to Add Your Own Image to the Chrome Browser New Tab
Probably the most difficult part about customizing the background of the New Tab is selecting the photo!
I spent more time on picking my photo than I did actually setting it up. But don’t fret too long about it. It’s so easy to change the image that you can change it on a daily basis and rotate images if you just can’t make up your mind. Let’s get started:
1. Click the Plus sign
At the top of your browser, click the plus (+) sign on the far right to open a New TabYou can also open a New Tab by using the keyboard shortcut Ctrl + T.
And here’s a tip: Keep the tab that this article appears in open so that you can easily jump back and forth between the instructions and the customization page.
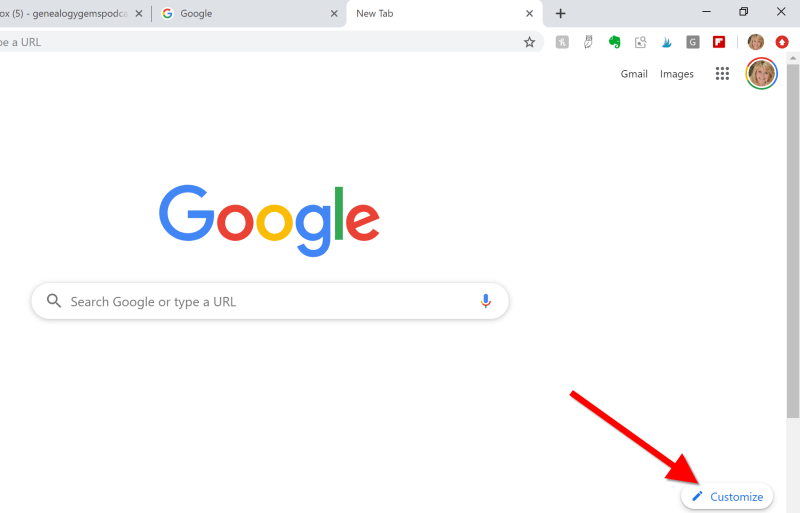
2. Click the Customize button
You’ll find the Customize button in the bottom right corner of the page.
(Image above: On the New Tab, click the Customize button.)
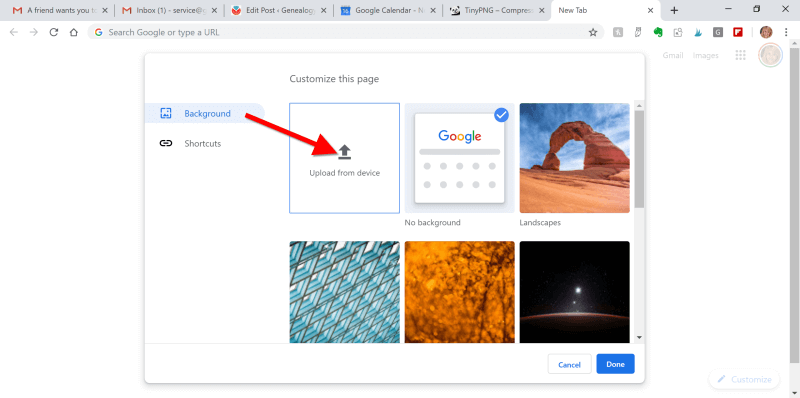
3.Upload the image
Select Background and click Upload from device:
(Image above: Upload image to the Chrome browser)
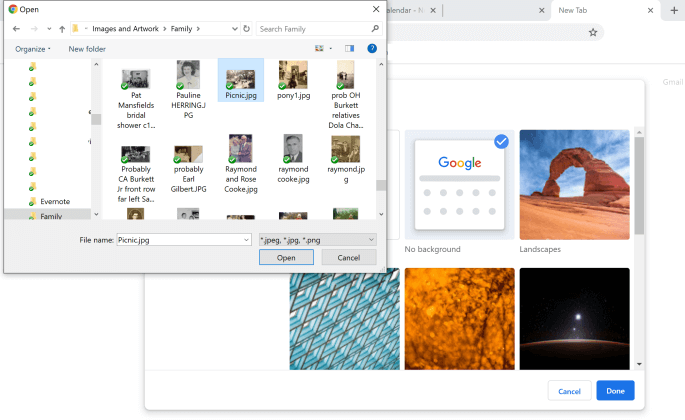
4. Find the Image
An Open dialog box will pop-up. Navigate to the desired image on your hard drive.
(Image above: Navigate in the “Open” dialogue box to the image that you want to use as your custom New Tab background.)
5. Select and open the image
Click to select the image and click the Open button. The image will now fill the screen. Don’t worry, you haven’t uploaded your photo into the public Google search engine. You are only customizing your Google account, and only you can see the photo.
Landscape images work the best for the New Tab page background. If you have a Portrait shaped photo, try cropping it to more of a landscape shape before uploading.
(Image above: Chrome new browser tab with uploaded image.)
If you want to change it back to plain or swap photos, simply click the customize icon in the bottom right corner that looks like a pencil.
How to Add Shortcuts to the NewTab
Now that you have your family looking back at your from your New browser tab, let’s add shortcuts to your favorite websites.
1. Click the Plus sign
Click the “Add Shortcut” plus sign beneath the search field.
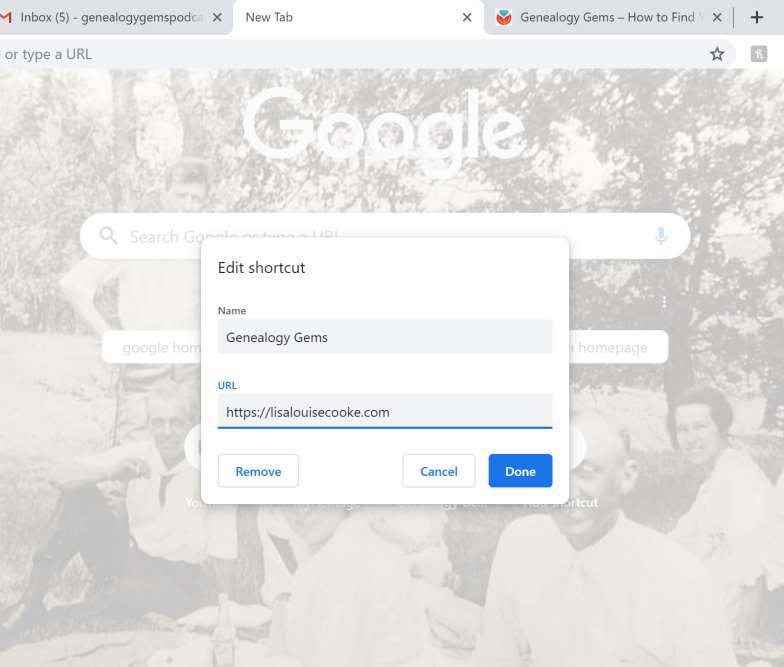
2. Add the name and URL
Open a new tab, navigate to the desired web site, and then copy the URL in the address bar. Go back to the tab with the customization page, and in the Edit Shortcut window, type the name of the website, and paste the URL you just copied.
(Image above: type in the website name and URL.)
3. Click the Done button
Once you click the Done button, you will see your new shortcut below the search field.
4. Repeat
Repeat the process to add additional website shortcuts.
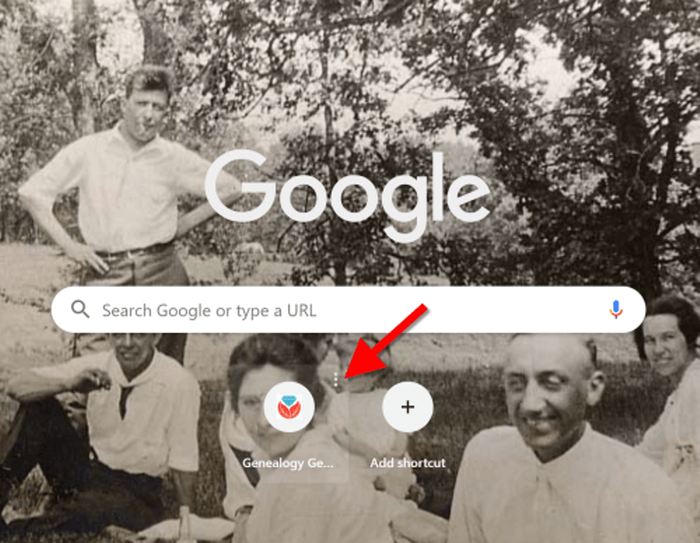
5. Edit Shortcuts
If you want to change one of the shortcuts that you’ve added, hover your mouse over it and click the three vertical dots in the upper right corner of the icon.
(Image above: Hover your mouse over the shortcut and click the three vertical dots to edit.)
Then you will have the option to edit or remove the shortcut.
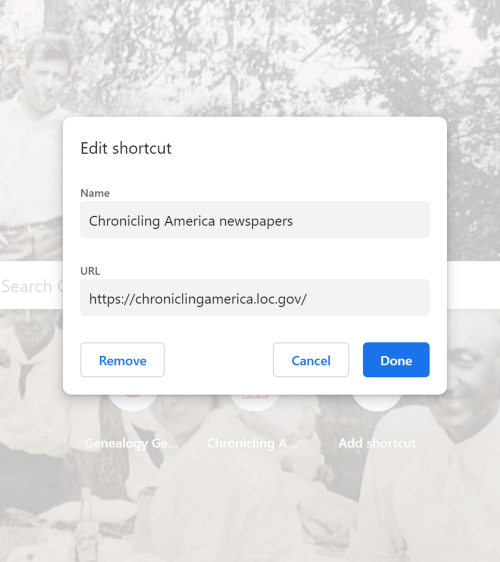
(Image above: Edit shortcut dialogue box.)
Related Search Prompts on Chrome’s New Tab
As I mentioned earlier in this article, Google will provide related search suggestions when you open a new tab. You fill find them between the search query box and the shortcuts.
These can be helpful in providing you additional keywords worth searching. Google bases these prompts on what people usually search for. Here’s an example of the related searches that appeared when I searched for Historic Newspapers:
(Image above: Related searches suggested in Chrome’s New Tab.)
These search suggestions will change as you search for different things using Google.
How to Remove Related Search Prompts
Not everyone appreciates Google’s efforts to be helpful. If you would rather see more of your background photo and not the related search prompts, they are easy to remove.
Simply click on the three vertical dots just to the upper right of the prompts:
(Image above: Click the three vertical dots.)
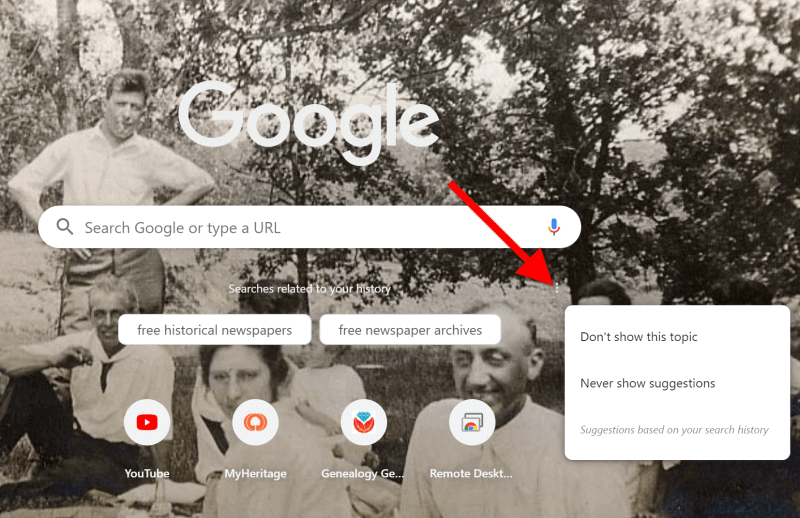
In the pop-up balloon you have two options:
Don’t Show This Topic tells Google not to show the topic appearing on the tab again. In my example, I would not use this because I expect to be searching for historic newspapers again in the future. But if my search were just a one time thing, or the search prompts were completely irrelevant, then I would let Google know I don’t want to see this topic in the future by selecting this option.
Never Show Suggestions tells Google to never show suggestions on the New Tab again.
Make your changes in the pop-up balloon.
How to Return to the New Tab Default Settings
I love having a customized New Tab to greet me each time I click the plus button. However, there may be a time when, for whatever reason, you will want to return the New Tab to its original state. That’s easy enough to do! Here’s how to remove or change the background image:
Click the pencil icon in the bottom right corner of the screen. This will take you back into Customize mode.
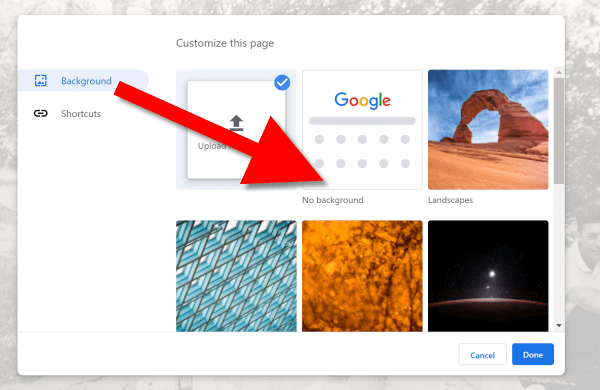
If you don’t want any background image, click No Background. If you would like something completely different, you can also select from a collection of photos provided by Google:
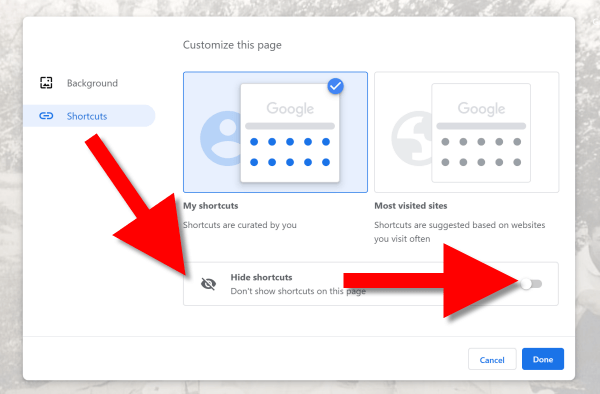
To remove the background image, select Background > No Background
In this same pop-up dialogue box you can also remove your shortcuts in one swoop. Click Shortcuts and then Hide Shortcuts, and then click Done:
More Googly Ideas
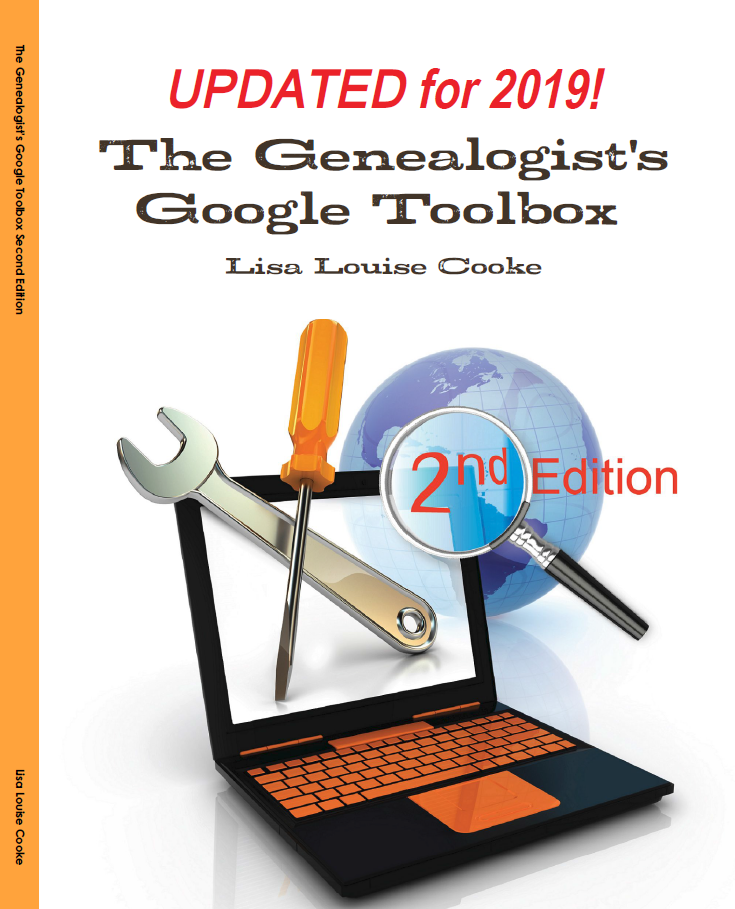
I hope you’ve enjoyed this simple way to spice up Chrome’s New browser tab. You’ll find tons of exciting ideas on how to use Google more effectively for genealogy and family history in my book The Genealogist’s Google Toolbox.
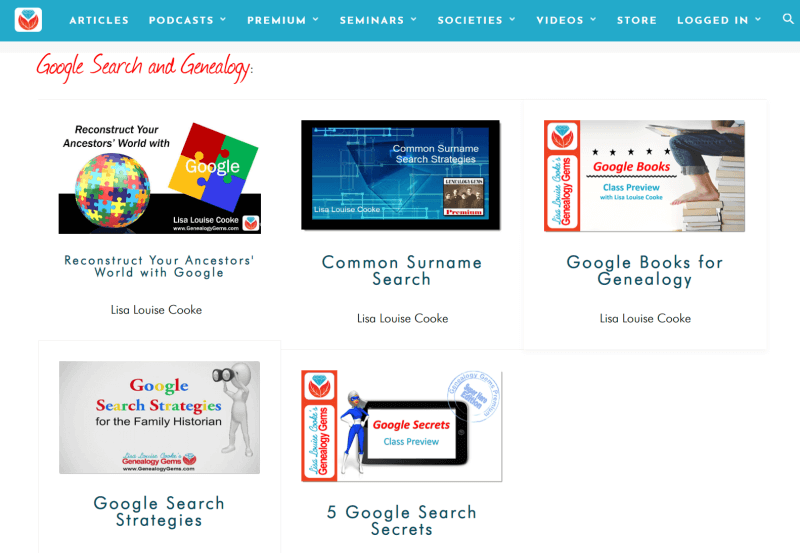
If you’re a Genealogy Gems Premium eLearning member, check out my current full-length Google search video classes. (Image below.) P.S. Don’t forget to download the PDF handout for each class!
Elevenses with Lisa Episode 23 Video and Show Notes
Live show air date: September 3, 2020
Join me for Elevenses with Lisa, the online video series where we take a break, visit and learn about genealogy and family history.
Today’s Topic: Google Photos for Beginners
Have you thought about using Google Photos but just weren’t sure how it worked or where to start? This video webinar will answer your questions and give you the confidence to use it effectively. In this introductory tour to Google Photos we will answer the questions:
What is Google Photos?
Is Google Photos private?
What features do I get with Google Photos?
How does Google Photos storage work? (Is Google Photos free?)
How do I start using Google Photos?
How do I upload my photos and videos?
How to search and retrieve photos and videos in Google Photos
How would Google Photos benefit genealogists, archivists and others?
Watch the video and follow along here with the show notes. Genealogy Gems Premium Members can download a PDF handout of these notes in the Resourcessection below.
What is Google Photos?
Google Photos is a free Cloud-based photo and video sharing and storage service. You can use the website on your computer and download the Google Photos app to all of your mobile devices.
Mobile: Search in your app store for the Google Photos app and download.
(May appear and behave differently on iPhone, Android, or Google Pixel phone, etc.)
Log in to each device with your Google account. If you don’t have a Google account, you can set it up for free. You will use this same account with all Google tools and products.
Sign up for a free Google account.
Sign into each device with this same account.
Google Photos can synchronize your photos between devices.
Google Photos Privacy
It’s understandable to be concerned about the privacy of your photos and videos. Here’s what you need to know about Google Photos privacy:
Your photos are only available to you
Your account is secured by your personal password
Your photos are not uploaded to the Internet or searchable with Google.com
Read the Terms of Service
Google Photos Features
There are a wide range of great features, some of which may not be obvious at first. Google Photos features include:
Massive storage (allowing you the option to free up space on your devices)
Reliable backup
Powerful search and retrieval
Facial recognition
Object recognition
Text recognition (OCR)
Organization
Sharing and creation tools
Google Photos Storage
You have two options when it comes to your Google Photos storage plan:
Free version called High Quality
Low cost subscription to upgrade photo storage capacity called Original Quality.
Let’s take a closer look at these two storage plan options.
Option #1: High Quality
Free
Unlimited storage
Image compression (takes up less storage space)
Photos (Larger than 16 Megapixels (MP) resized to 16MP. Good quality prints up to 24” x 16” meet most needs)
Videos (If higher than 1080p then resized to HD 1080p)
Option #2: Original Quality
($) Upgrade
No compression of photos or videos.
Uses the 15 GB of free storage in your Google account. This storage cap includes everything you have saved in Gmail, Google Drive, and all Google apps.
When you hit storage limit: Option to purchase additional storage called Google One.
Visit Google One to get all the latest information about plans and features.
High Quality versus Original Quality can be a bit confusing to remember. It may help to think of it this way:
High Quality (FREE)
compressed but still high quality and printable.
Original Quality ($ Storage)
Stored at original size. Larger sizes take up more storage space.
Google Photos Back Up and Storage Benefits
Considering the volume of photos and videos we take these days with our phones, and the volume of old family photos we have digitized, storage is a pressing issue. Google Photos can help because:
It can relieve the storage burden on your phone by giving you a place to store your photos. You can then elect to remove them from any of your devices if you wish.
The ability to upload, search, organize, edit and share your photos from any device.
If you lose or break your phone, your photos are stored on the cloud and can be accessed and downloaded again on any device that is signed into your Google account.
I strongly believe it is important to have multiple backups. So while I see Google Photos as one of my backups, all of my important photos and videos are on my computer which is backed up to the cloud. I use the Cloud backup service Backblaze and have for many years. If you decide to try them (and they usually offer a 15 day free trial here) , I do appreciate it if you use my link. We are compensated at no additional cost to you, and that helps make this free show and show notes possible.
How to Upload Photos to Google Photos
There are two ways to add photos from your computer:
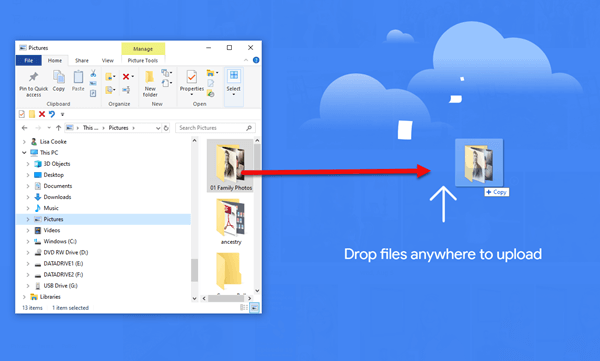
Click Upload at top of the page.
Drag and drop photos onto the Google Photos screen.
Drag and drop photos into Google Photos
When using the Google Photos App on a mobile device:
Tap your face in the upper right corner of the screen (your account)
Tap Photo Settings
Turn on Back Up & Sync.
I recommend turning off Use cellular data to back up photos / videos.
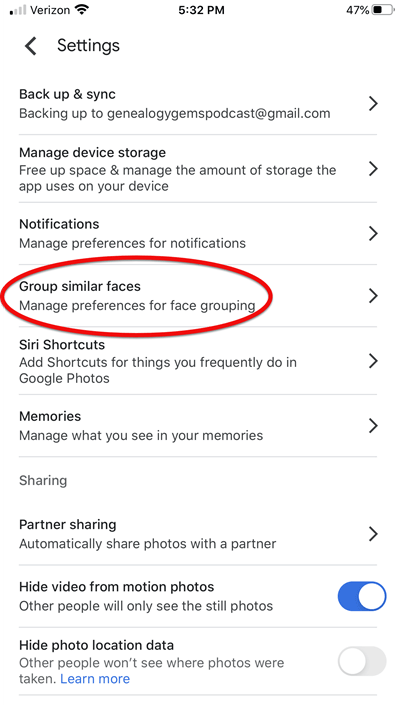
Also in the Settings you will find Manage device storage. You can opt to have the original photos and videos removed from your device once they are uploaded to Google Photos. This will free up space and manage the amount of storage the app uses on your device.
How to Delete and Archive Your Photos in Google Photos:
Click to select the photo or video (you can select one or multiple) on your computer or tap the photo in the app.
Click / tap the trash can icon.
Searching Your Photos and Videos in Google Photos
You can search your photos and videos for:
People & Pets
Places
Selfies
Screenshots
For example, type the word Selfie into the search field and Google Photos will retrieve all of the photos that were taken as selfies.
You can also search your photos and videos for:
Recently added items
Videos (Type the word Videos into the search field)
Favorites
Names
Dates (Find photos based on when they were taken. For example, you can search October 2019 through December 2019.)
Facial Recognition in Google Photos
After initial set up your backup, Google Photos starts to identify and group faces that are the same.
Check your Settings to ensure the feature is activated: Settings > Group similar faces > slide the Face Grouping button to the “on” position. It might take a few hours or a few days from your initial setup for this feature to activate. It depends on number of photos and your WiFi connection.
Group similar faces in Google Photos
Searching for photos and videos that include certain people (faces) is very easy to do.
Tap in the search box
Tap a face to see all photos for that face.
You can Show and Hide Faces and include or exclude Pet Faces in the Settings.
Keep in mind that facial recognition, and object and text search aren’t (and realistically can’t be) perfect. However, it improves every day thanks to machine learning. The Google Photos of today is more accurate than when the service was first launched.
You can help train Google Photos to more accurately identify faces in photos by adding names to the faces that you know. You can also answer the questions that Google Photos poses regarding whether two faces are the same or different person.
Object Search in Google Photos
You can search for objects that appear in your photos and videos. Simply type in the word that represents the object. The example I used in this video was: Wedding Dress
Notice that this search retrieved content that included weddings and dresses. In order to narrow in on strictly content where someone is wearing a wedding dress, I put quotation marks around the phrase: “Wedding Dress”
I also searched for Typewriter. This retrieved content that featured a typewriter predominately and even when a typewriter simply appeared in the background. It also found videos where a typewriter appeared briefly.
Text Search in Google Photos
Searching for words will retrieve any photo or video in Google Photos that mention that word. There are countless uses for this as a genealogist. In the example I showed in the video, photos of tombstones can be retrieved simply by searching for the surname that appears on the tombstone. This text recognition applies to all types of text including newspaper articles, signs and more. Again, we must keep in mind that Google Photos isn’t perfect and will have difficulty reading text that is unclear.
Create New Content in Google Photos
Google Photos creates fun projects and content using the photos and videos in your account including:
Photo Collages
Videos
Short Animations
Stylized Photos
The content Google Photos creates can only be seen by you. It is not public. You decide whether to keep it, share it or delete it.
I show an example in this session of creating a video by selecting a theme, and a face. Google Photos did the rest by retrieving and assembling the photos chronologically and adding appropriate music! You can download these projects to your computer, and share links too.
Premium Members: Watch the Premium Video Solving Unidentified Photo Album Cases available with your Genealogy Gems Premium Membership. From Debra H: “Your topic is so on track with me. I have been scanning old photos. What a great delight to see your Solving Unidentified Photo album Cases. It was perfect. Thanks!!”
From Gwynn: Does Google Photos have a way to share with a link?
Answer: Yes. In the video you can see how to do on a computer. On an iPhone: tap the photo, tap the Share icon, tap Share to, then tap Create link
Question: If you share the link on social media they can’t change it (the photo) right?
Answer: Correct.
From Kathy: With photos in the Cloud with Google Photos, can you tell the phone’s iCloud to disregard backing up your photos since you already have them in Google Photos?
Answer: Look at Settings > General > iPhone Storage> Disable iCloud Photos
Kelli: If I delete a photo on my phone does it delete from Google photo?
Answer: It depends exactly what you mean. If you delete the photo from your phone’s camera roll, no, it does not remove it from Google Photos. If you remove it from the Google Photos app on your phone, then yes it will remove it from Google Photos on your computer as well.
From Retta: Can you put a PDF on google photos?
Answer: No
From John: What add-on do you use to highlight your cursor? (in the video)
Answer: I use this software.
From Kathy: Is this good for sharing albums with family?
Answer: Yes!
From Natalie: Is there a limit of how many photos you can put in an album?
Answer: Currently 20,000 photos and videos.
From C: Synchronize means it downloads to all devises?
Answer: Yes, the photos and videos will be available through all of the devices in which you are signed into the same Google Photos account.
From GeneBuds: How do I access archive?
Answer: On a computer: You’ll find Archive on the left side of the screen under Library. On a phone: Tap Library in the menu at the bottom of the screen and then tap Archive.
Sarah: Somehow I have several copies of the same photo. Will Google photos help me sort those out so I can delete duplicates?
Answer: My understand is that Google Photos can detect identical duplicate images. If you already uploaded a photo to Google Photos, it will not re-upload the same photo. It will skip uploading that photo. It may look like Google Photos is uploading the photo again, but it isn’t. It’s just running it through identical duplicate detection.
From John: Where in Settings is “Group Similar Photos”? Does it vary by provider (like AT&T, Verizon)?
Answer: Look for Group Similar Faces in the Settings.
From Kelli: If they are on google photos only, how do you print them, say at Costco?
Answer: You can order prints from the For You section of Google Photos. Check the Costco website because I think they can coordinate with Google Photos.
From Cathy: Can I give one person more than 1 name? Like Lucy Haley and Mother Cline?
Answer: In the same name field. You can’t assign two completely separate names. If you include both names in the field you will be able to search for either one and retrieve the photo.
Show Notes: The FamilySearch Wiki is like an encyclopedia of genealogy! It’s an invaluable free tool that every genealogist needs. However, many folks get frustrated when they try to search the Wiki. In this week’s video premiere I’m going to help you navigate with ease.
Video and Show Notes below
You’ll learn:
what the Wiki has to offer,
how to access the FamilySearch Wiki
how to navigate the FamilySearch Wiki effectively
and how to overcome the number #1 reason people get frustrated when searching the Wiki!
(00:42) There are two ways to access the FamilySearch Wiki. The first is to visit the website direction at https://www.familysearch.org/wiki. This will take you to the home page of the Wiki. Although you can sign into your free FamilySearch account on this page (in the upper right corner) it isn’t necessary in order to use it.
The second way to access the Wiki is to go to the FamilySearch website. You will need to log into your FamilySearch account or sign up for a free account if you don’t already have one. Once you’re signed in, then in the menu under Search click Research Wiki. This will take you to the same FamilySearch Wiki home page. However, you will see that you are signed in and able to use some of the additional features like participating in discussions, posting and creating watchlists.
On the FamilySearch website: Search > Research Wiki
Searching the Wiki by Location
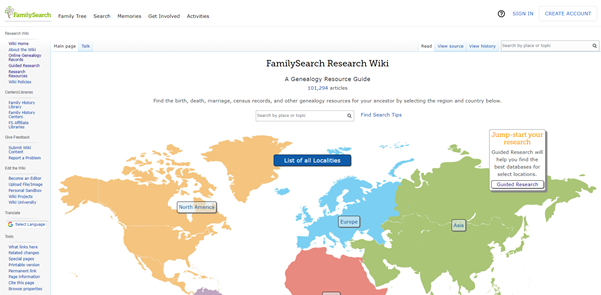
(01:21) On the home page, what you see a map of the world. This is a great way to search the Wiki because in genealogy, it’s really all about location. We need to know where geographically we want to search for ancestors, and from there we can narrow down the timeframe. Typically, you’ll have a sense of at least in which country you need to be researching. So, the map is typically the best way to start.
The FamilySearch Wiki Home Page
You’ll notice also on the home page, there is a search by place or topic search field. You could bypass using the map, and just start by typing in a place. If you do, you’ll notice that it starts to prompt you on the kinds of things that are commonly searched for. This could be kind of nice if you are really focused on a particular thing such as Italian census records. You can just start typing Italy and see if census is one of the prompts. If it is, simply click it and it will take you right there.
However, generally speaking, the map is the best way to search for records and information that is rooted in a location. Start by clicking the button for the continent, such as North America. Notice that if you go to click on the map itself, it isn’t an interactive map. You’ll need to actually click the button.
From there, select the county from the menu, such as United States, then drill down by state. This will take you to the Wiki entry for that state.
You’ll notice that the FamilySearch Wiki is a lot like Wikipedia. It’s like an encyclopedia of information. But the exciting part is that it’s genealogy specifically! This means you don’t usually have to worry about including the word genealogy in your searches.
Location-based FamilySearch Wiki Pages
Oftentimes, our research ends up taking us to a new location where the next set of great grandparents came from. If we’re not familiar with that location, let alone familiar with what’s available from a genealogical standpoint, that can pose a real challenge. You might be asking questions like when did they start recording birth records? Or did that state conduct a state census? Every state, every country, and every county has different types of records available.
Start your orientation over on the right-hand side of the wiki page. There you’ll typically find an overview box.
(04:15) This is a great place to quickly see what’s available here, and what you could dig into further. If you’re really new to research in this particular area, you might want to start with the guided research link. You may also see links to research strategies, and a record finder.
In the next section of the box you’ll find record types. This is going to be different depending on the area that you’re researching. For example, if they don’t happen to have any military records available you might not see that listed under record types. You should expect to see the most commonly used records included in the list. Click the link to the page for more information on that type of record. It will provide more details on record availability, and where you access the records.
Further down the box you’ll find links to background information on the area. It’s really easy to skim over this in excitement over records. But if you don’t want to get stuck at a brick wall, getting to know the place that you’re researching can make all the difference. Learning the background of an area can help you prepare the right questions to ask. It can help prevent you from looking for something that doesn’t exist or that wasn’t applicable to that area. You may find links to more reading, gazetteers and maps, migration patterns, periodicals, and the law. Understanding the law is going to help you understand why records were created, and who they affected. For example, if your ancestor was under 18 there might be certain records that don’t apply to them. Understanding the parameters of who was affected by the law will help guide you through the records themselves.
Next you’ll see cultural groups that you might expect to find in this area, and links to more specific information about researching them.
Under Resources you’ll find links to archives, libraries, societies, and the family history centers that are available in this particular area.
At the top of the main part of the page you’ll find the Getting Started section. Here you’ll find links to beginning step-by-step research strategies and some of the most popular records for that location such as vital records.
(08:35) You might be wondering who is putting this information together. Well, it starts with experts at the Family History Library in Salt Lake City. These are people who have worked the reference desks and found answers to thousands of patron questions.
Locating and Using the County Wiki Page
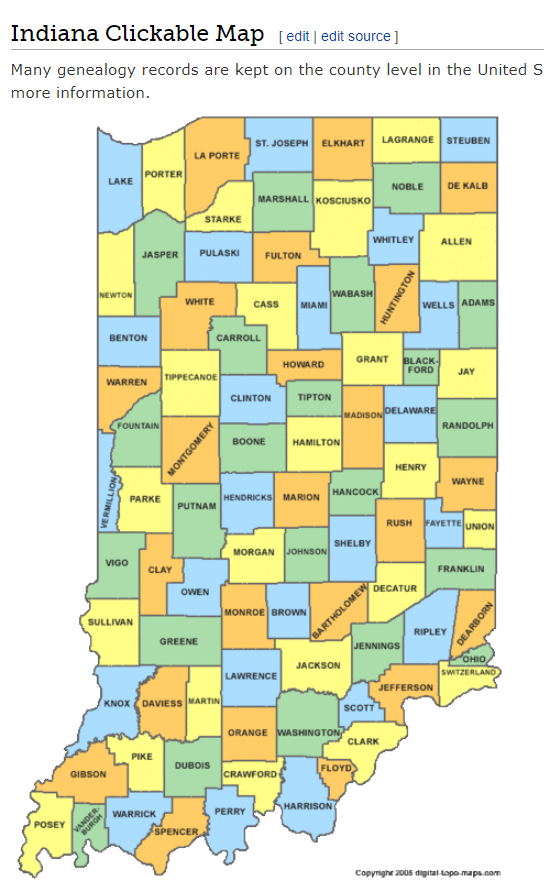
(09:22) Back on the state landing page scroll down further to the map of counties. Navigating by location is still important, even when we’ve narrowed it down to the state. Unlike the map on the homepage, you can hover your mouse over each county and click.
County map on the state wiki page
The county pages are where the real magic happens because many records such as birth, marriage, death, and court records are typically available at the county level. Here you’ll find out how to contact or visit the current county courthouse.
One of the most common questions new genealogists ask is “should I be looking at the county where the town is located today, or the county that it was when my ancestors lived there?” Counties certainly do change over time. The answer to the question is that we go to the county at the time that are ancestors lived in the area. In fact, the Wiki page provides the history, or genealogy, of the county. Look for Boundary Changes on the page.
Because these pages are often quite long and dense, use your computer’s Find on Page feature by pressing Control + F (PC) or Command + F (mac) on your keyboard. This gives you a nice little search box at the top of the page. Type in a keyword like Boundary and it will highlight all the locations on the page where the term appears. This is a great way to make quick use of the Wiki. This is also a good trick to use when you don’t see the record type or keyword that you’re looking for in the page’s table of contents. It may be called something else there, but if you search the page for your keyword, it should find it for you. An example of this is that you may not see Birth Records in the TOC because they list Vital Records. However, in the Vital Records section further down the page they definitely mention birth records.
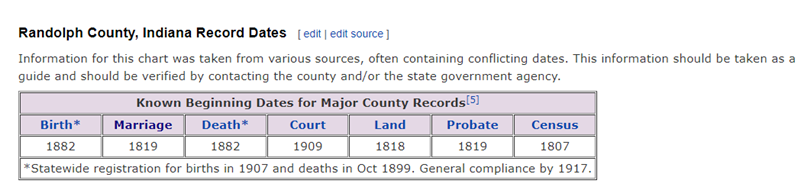
Finding the Dates that Records Began
(14:45) Here’s another reason the wiki is so helpful, and it makes things go so quickly. Remember, we talked about that location is key, but also timeframe. Well, if we are looking for genealogical records, we don’t want to look for a record in this county before they actually started creating those records. The wiki typically provides a nice little chart on each county page showing then some of the most important civil records such as birth, marriage and death were first created.
County record dates at FamilySearch Wiki
Often times civil records began much later than church records. Sometimes you will see an asterisk indicating when statewide registration for these civil records began and then another date indicating when general compliance was enforced. All of this is guiding us to success in finding genealogy records, and it’s saving the headache of investing time looking for records that did not yet exist.
(17:42) Further down the page you’ll find links to places. These may link to town pages on the Wiki, but more likely they will take you to Wikipedia where this information already exists. There will be a small icon indicating that the link will open in a new tab and take you to another website.
Next you’ll likely see a Timeline section which gives you a sense of when the first people settled in the county and who those people were. Again, it provides you more context to better understand the records.
In addition to all these individual records, many of them linked over toFamilySearch, Ancestry or MyHeritage, we see Research Facilities. Why is that so important? Because not all records are going to be online. When we’ve exhausted online records and resources we need to go offline, and there are lots of resources here on the wiki to work with: county archives, family history centers in the local area, libraries, museums, and genealogical societies. The wiki provides contact information and links to their website where you may be able to see a listing of what they have onsite so you can plan your visit.
Other website links may take you sites like USGenWebwhich is a fantastic free genealogy website. It’s organized by location much like the FamilySearch wiki website. Drill down to the state and then the county. You may also see links to the State Archive, or the state’s Memory project, and, of course, the FamilySearch catalog.
How to Overcome the #1 Search Problem
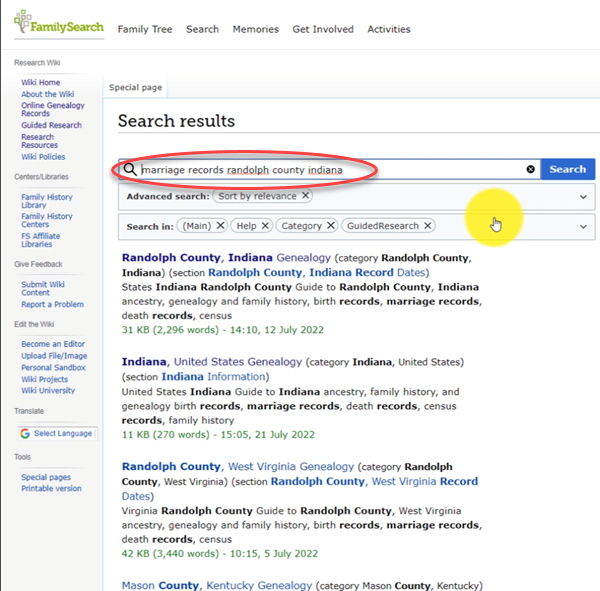
(22:01) The wiki really should be one of your first stops when you’re going to be starting research in a new area. Let’s wrap up with a quick conversation about the wiki’s search box. You could go ahead and put a topic in there. Many people will come in here and they’ll type in marriage records, Randolph, County, Indiana, and they will get a list of results. They don’t look as clear cut as Google results, and they may not all be on topic. This is where we can get lost. I think probably the number one reason why people give up on the wiki is they get these kinds of search results. They realize, wait a second, this isn’t even Indiana, it’s talking about Kentucky! Why am I getting all these? It can be frustrating.
The wrong way to search at the FamilySearch Wiki
This happens because we tried to do it ourselves, with our own keywords. Remember, like most search engines, they’ve indexed their content to make it searchable, so that means they’ve already decided how they want to talk about a particular topic. Rather than just addressing marriage record first, the wiki focuses on the location. Where is this marriage record? So, focus first on the place unless you are just looking for general information on a general genealogy topic such as genealogy software.
Pay attention to the pre-filled suggestions as you type because the wiki is going to suggest what it has in the format it has it. Again, you may want to first go to the country, state or county level page and then look for the record type.
What if you’re looking for marriage records but you don’t see them listed? Well, it might be that the word marriage isn’t the keyword the wiki uses. Or it might be that the type of record you’re looking for is a state or federal record. That’s another reason why the find on page feature (Ctrl + F) is so helpful. Don’t be discouraged if you don’t see what you want listed in the table of contents. It may just be a keyword issue. Let the work that they’ve already done in organizing their materials guide you. You’ll be more successful and also avoid frustration. The FamilySearch Wiki is just too good of a resource to miss.
Learn more about using Family Search at Genealogy Gems