by Lisa Cooke | Aug 15, 2015 | 01 What's New, images, Social Media
 Now you can choose whose Facebook activity shows up at the top of your news feed. We hope the Genealogy Gems Facebook page is on your See First list!
Facebook now has a new feature to allow you to select which friends and pages you want to see at the top of your news feed. Along with your close friends and relatives, we hope you’ll include the Genealogy Gems Facebook page on your See First list.
Here’s how to do it:
 1. Go to the Facebook friend or fan page you want to add to your See First list.
2. Look for the “Following” (for friends) or “Liked” (for fan pages) button on that profile picture.
3. Click it, then select “See First.”
It’s that easy! You can choose up to 30 people to see first in your feed.
Why bother? In the past, even if you “Like” a fan page like our Genealogy Gems page, it didn’t necessarily show up in your feed. And it could be easy to miss posts from the people you care most about (especially if they don’t post very often). Now you won’t have to chance missing updates from your “besties,” kids or grandkids, or favorite online groups.
 Add the Genealogy Gems Facebook page to your Facebook See First list, and you won’t miss any of our gems. Like our recent scoop about the new Social Security Application index: we’ve heard from SO many of you (on and off Facebook) how helpful this new database is. It just takes a second. Will you try it now?
by Lisa Cooke | Apr 4, 2018 | 01 What's New, Apps, Photographs
Here’s how to remove damage from photos, such as those commonly found on Polaroid Land pictures. It’s a simple digital photo restoration technique you can use to improve your old family photos. See how Lisa Louise Cooke cleaned up a precious family photo as a surprise for an guest she interviewed—and his touching response.

Last month, I asked esteemed film historian Sam Gill to send me some photos of himself that I could include on the “show notes” page for Genealogy Gems Podcast episode #215. The episode features our conversation on silent films, and the glimpse of early 20th century life that they provide.
One of the images he shared captures him (when he was in high school) and his mom. Sam told me that it was taken at the time when he started helping her with their family’s genealogy.
“I seem to have only one photograph of my mother and me at that time, which was what they called a Polaroid Land Pictures photo,” he continued. “In the days before selfies and digital cameras, this was a way to have a photo miraculously developed in sixty seconds. That was considered a miracle of photography at the time.
“Although these photos tended to leave streak marks and other blemishes, it’s all I got! I am hoping you might get a kick out of seeing this young kid and his intelligent, forever-curious and talented mother, Florence Louise Jones Gill (aka Mom).”
After learning how much the memories behind that photo meant to Sam, I took the liberty of doing some quick touch up work on it. It’s not perfect, but it’s certainly cleaner:
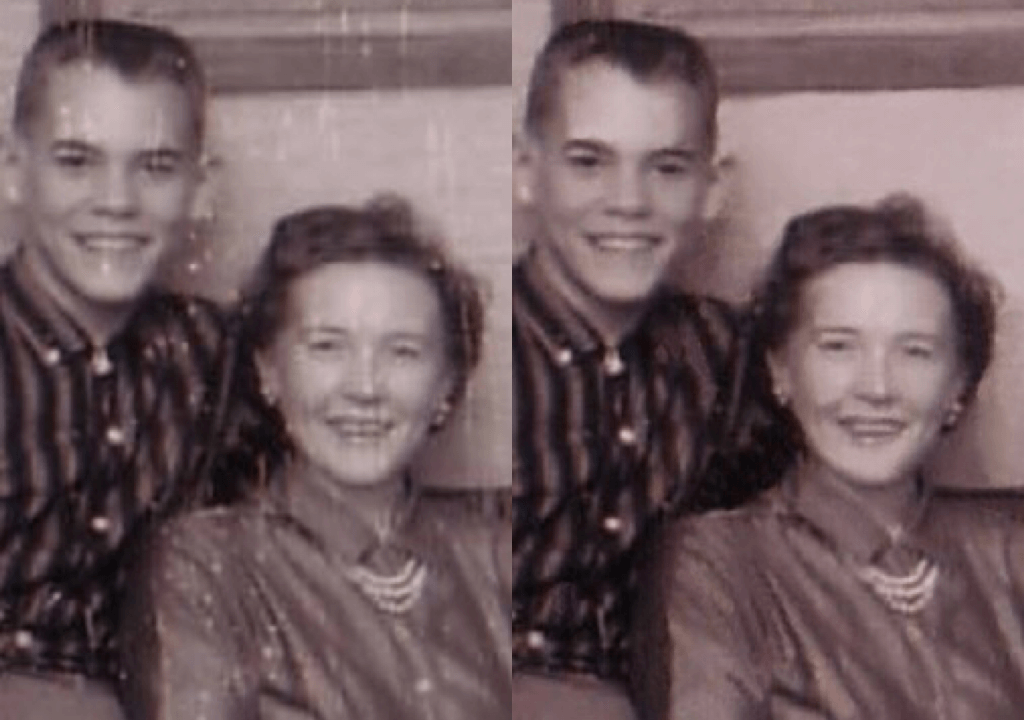
A treasured old photo of Sam and his mom.
You can try the same techniques I used to remove damaged areas from photos you’ve digitized. It’s easy and free! So, follow along with me, and then keep reading for Sam’s response to receiving the cleaned-up photo.
How to remove damage from photos
(Update) In the past I have downloaded and used the free Adobe PhotoShop Fix app. However, the Adobe Photoshop Express app has now taken its place. You can download it onto your phone or other mobile device for free from the App Store or Google Play. You will find the Retouch feature as a Premium feature.
Then follow these steps:
1. Add a Copy of the Digital Image
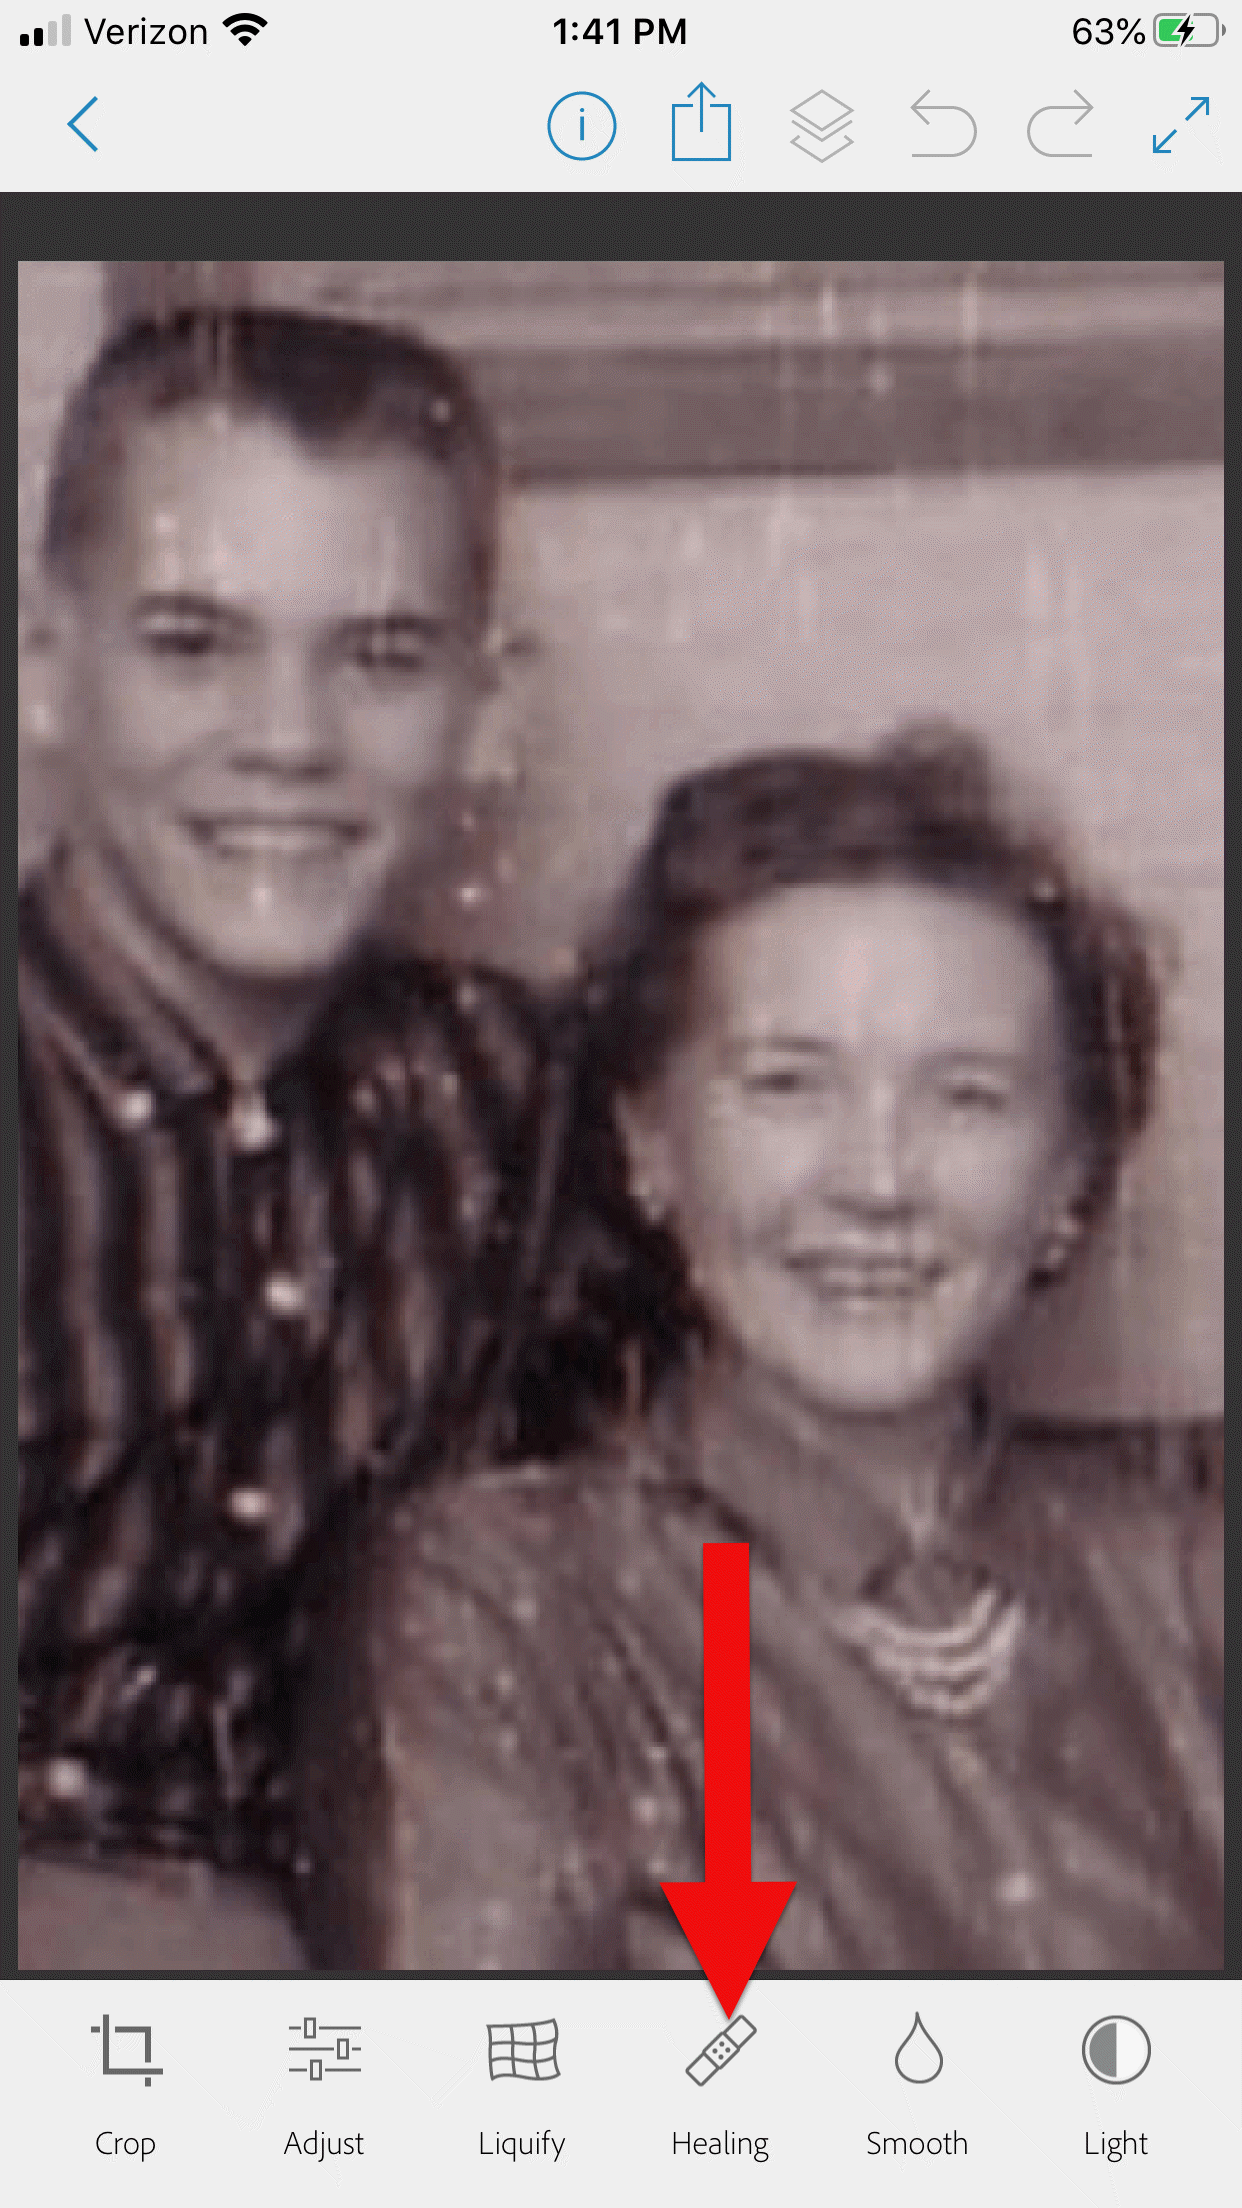
Open the app and tap the Plus sign to add your image. Don’t work with the original photo file. I save mine in Dropbox, but you can also pull your image copies from your phone, Adobe’s Creative Cloud, Facebook or Google Photos.
Tap the plus sign and select the location of your photo.
2. Tap Healing in the Menu
This will get you to the tools you will need to do the restoration.
3. Start with Minor Repairs
Start with the easy stuff (don’t go for the face right away,thought it’s tempting). Work on clothing and the backdrop first so you can get a feel for the repair work and refine your retouching movements.
4. Apply the Spot Heal Tool
Use Spot Heal first and see if it takes care of the problem area. Don’w worry about making mistakes. You can always tap the Undo at the top of the screen if you’re not happy with the results.
5. Apply Clone Stamp
Use the Clone Stamp tool to select an area on the existing photo that you want to duplicate to cover up a damaged area. For example you can select an unblemished area of the backdrop, duplicate it, and then “paste” it over a blemished area of the backdrop. Keep in mind that even in a single color backdrop, there can be shading, so move the clone stamp around to replicate it accurately.
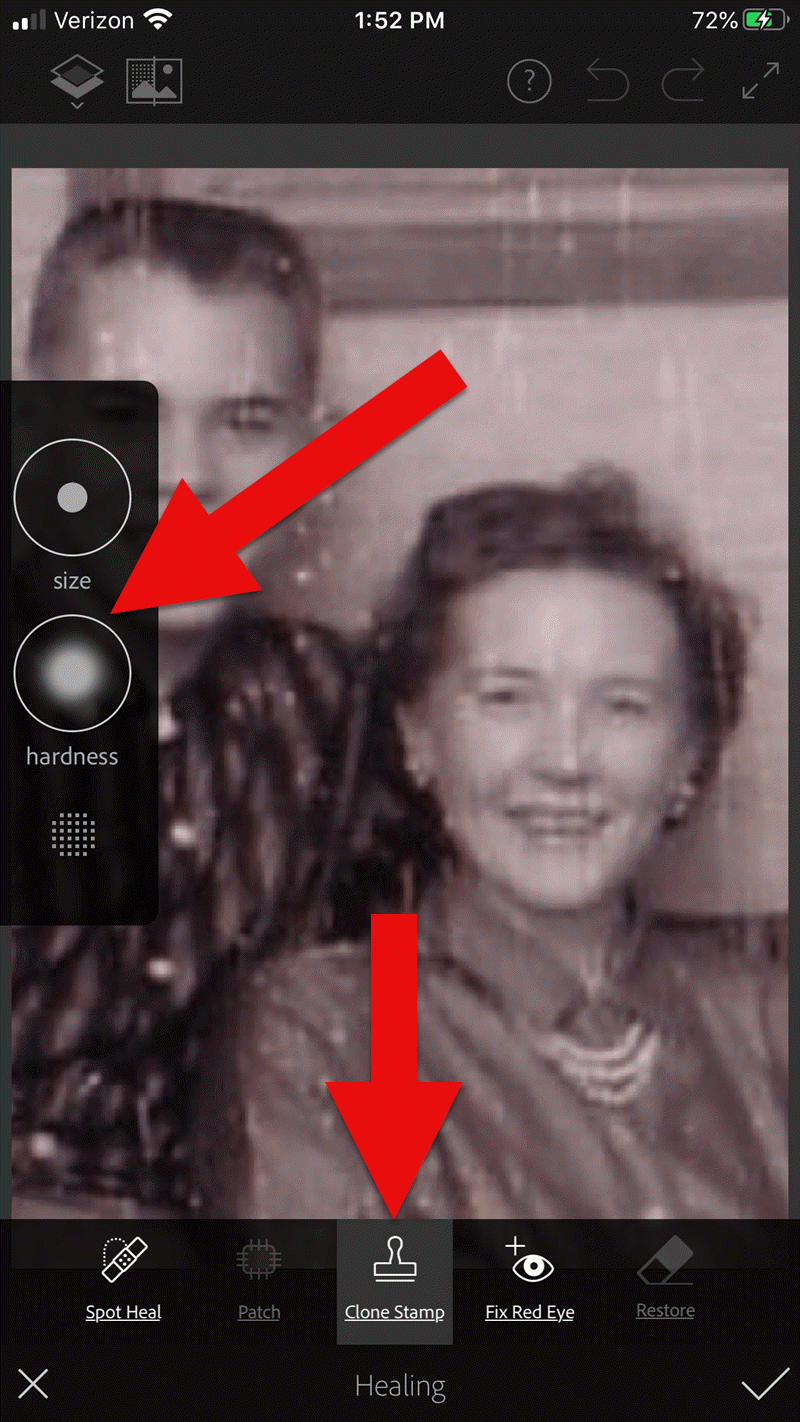
Tap Clone Stamp in the menu, and use the tools on the left to adjust.
You can adjust the size of the clone stamp selection tool by tapping “Size” in the pop out menu on the left. Selecting “hardness” will give you the ability to cone with a sharp edge or a more feathered edge which is a bit more forgiving when covering another area.
6. Zoom for Greater Detail
Zoom in for better accuracy. To do this, put two fingers together and then them spread apart to enlarge the area.
While zooming in can give you greater control, if you get too close you may start seeing individual pixels (depending on the size and resolution of the original photo) and those can be much trickier to change accurately. Zoom back out often to “stand back” and inspect your work!
7. Adjust as Needed
If you’re going to zoom in, take the time to adjust the size of the tool you are using, whether it’s Spot Heal or Clone Stamp. You can adjust the size of the circle and the “hardness” by tapping the tab on the left side of the screen.
When you’ve completed your initial re
8. Saving
Be sure to save to your work along the way. That way you can always go back to a previous version if you get a little too overzealous. I like to save the image to my device’s Photos, but the app offers a variety of saving locations.
9. Apply Smoothing
In the main menu, use the Smooth tool to refine your work. Start by tapping Face. Chances are you’ll like the effect as it smooths the skin tone. And again, you can always undo if you don’t.
Then tap to spot-smooth areas, particularly backdrops. Beware of over-smoothing – it won’t look natural.
10. Make Final Adjustments
After you complete the repair work, play with other options to improve the image quality. In the main menu tap Adjust. Play with Contrast first, then move on to testing Warmth, Saturation, Shadows and Highlights.
When you’re done, save the finished image one last time to your device’s Photos.
Take Mobile Photo Restoration a Step Further
When I work on improving and restoring my old photos, I often do so in more than one app. It’s rare to find an app that does everything you want, and each has it’s special strengths. Adobe has several other excellent apps, and PhotoShop Mix is one I use quite often after I complete my initial restoration in Adobe PhotoShop Fix.
Import the restored image into the free Adobe Photoshop Mix app. Here you’ll find even more tools for refining the image. Tap Adjust in the main menu. Experiment with these tools because you can always Undo!:
- Auto Fix – I avoid this one!
- Temperature
- Exposure
- Contrast
- Highlights
- Shadows
- Clarity – definitely give this a whirl
- Saturation
I was delighted how quickly I was able to significantly improve the photo. Sam and his mom’s faces just radiate happiness.
I sent it off and heard back from him almost immediately:
“I can’t tell you how much it means to me to see this extraordinary repair and restoration work you accomplished on that tiny Polaroid Land Picture of my mother and myself! This picture was taken at the exact same time I began to help my mother with her genealogical work.”
He then shared the story about that first research project with her. The two of them wanted to identify the relative who had rendered some beautiful old paintings hanging in his grandparents’ house. The trail led mother and teenage son to London, Ontario, Canada. As a budding genealogist, Sam was certainly thinking ahead!
“I convinced my mother to let me take along a tape recorder, as I was very interested in sound recordings, and so we recorded my mother’s interviews with family members still in London and related to the same…family.”
Sam and his mother identified the artistic ancestor who did those paintings: John Ashton. Their research culminated in a “delightful little family history, called The Descendants of John Ashton, of London, Ontario, Canada, and his Son-in-Law, John Ames Arnold, of Greencastle, Indiana (Lyons, Ks.: Lyons Publishing Co., 1964) compiled by my mother, Florence Jones Gill.”
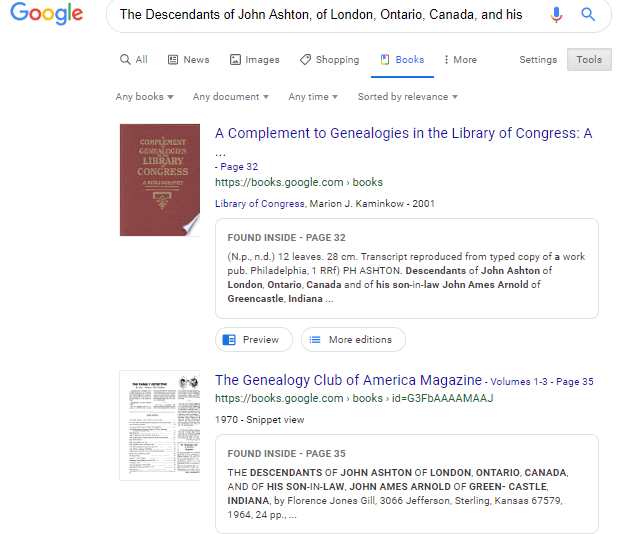
Sam proudly mentions that her book was favorably reviewed. A quick check of Google Books reveals that there was indeed quite a bit of “buzz” when she published her book! It was referenced in several genealogical publications. Here are the search results in Google Books:
Sam wrapped up his reply with a little life lesson that he learned from his mom, that we can all take to heart.
“You might get a kick out of this,” Sam wrote, “but the only mistake that my mother ever found after the book was published, was the date of her marriage to my father! It should have been 1935, not 1934. One never to take herself TOO seriously, she had quite a laugh over that one.
It was fun helping my mother. Also, as I look back over my life, I must say that I have never known a more “can-do” person than my mother. If something came up that needed attention–no matter what it was–my mother’s usual response was , “WELL, WE’VE GOT TO DO SOMETHING ABOUT THAT !!!”
So my dear Gems, next time we see our family’s history hidden behind damage in an old photo, let us hear Mrs. Gill’s words in our ears “WE’VE GOT TO DO SOMETHING ABOUT THAT!!!”
Read More About Working with Old Photos & Apps:
My book Mobile Genealogy is chock full of more innovative ideas for using your smartphone and tablet for family history. It’s available here in the Genealogy Gems store.
About the Author
Lisa is the Producer and Host of the Genealogy Gems Podcast, an online genealogy audio show and app. She is the author of the books The Genealogist’s Google Toolbox, Mobile Genealogy, How to Find Your Family History in Newspapers, and the Google Earth for Genealogy video series, an international keynote speaker, and producer of the Family Tree Magazine Podcast.
 Now you can choose whose Facebook activity shows up at the top of your news feed. We hope the Genealogy Gems Facebook page is on your See First list!
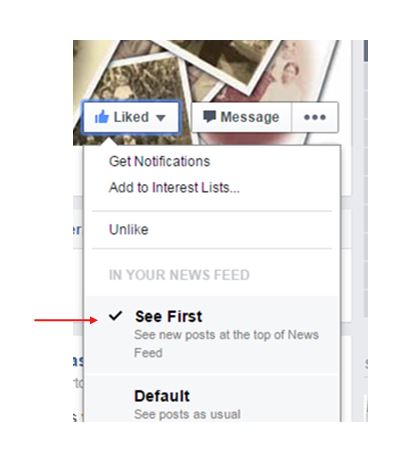 1. Go to the Facebook friend or fan page you want to add to your See First list.