The Best Way to Find Old Maps for Genealogy at the David Rumsey Website
Old maps are vitally important for genealogy because the characteristics of a location can change in many ways over time. Historic maps help us understand the world as it was at the time our ancestors lived.
Here is a short list of just a few of the things that may have changed:
- Street addresses
- roads
- town names
- county boundaries
- waterways that may have been filled in or opened up
- railway lines
In fact, the country itself where they lived may be a completely different country. For example, my German ancestors lived in Prussia in the 19th century. Today, that area is part of Poland. Therefore, all of the village names have been changed to Polish names.
The David Rumsey Map Collection is an excellent place to go to find maps of your ancestors homeland for free.
Watch the Map Search Video
I’m going to explain the 7 steps to finding the maps you need for your genealogy research at this wonderful website! I highly recommend that you watch the short video below to see it in action as you read. The player will stay with you as you scroll down the page.
Step 1: Go to the David Rumsey Map Collection Website
The first thing you need to do is go to the David Rumsey website here. You’ll be greeted on the home page with glorious historic maps. (Stay focused because it’s easy to get distracted by all the fascinating maps!)
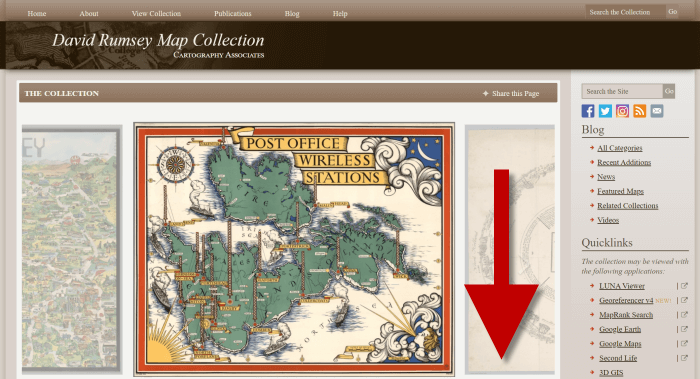
Scroll down on the David Rumsey website home page.
Step 2: Scroll Down to the Bottom of the David Rumsey Home Page
While you can search for a place name in the search box at the top of the page, there’s a better way to search. Scroll down the page until you get to Featured App: MapRank Search (it’s almost at the bottom.)
Step 3: Launch Map Rank Search
The Featured App – MapRank Search is the best place to search the website, but it’s easy to miss because it’s not at the top. So go ahead and click the Launch MapRank button in the upper corner of this section.
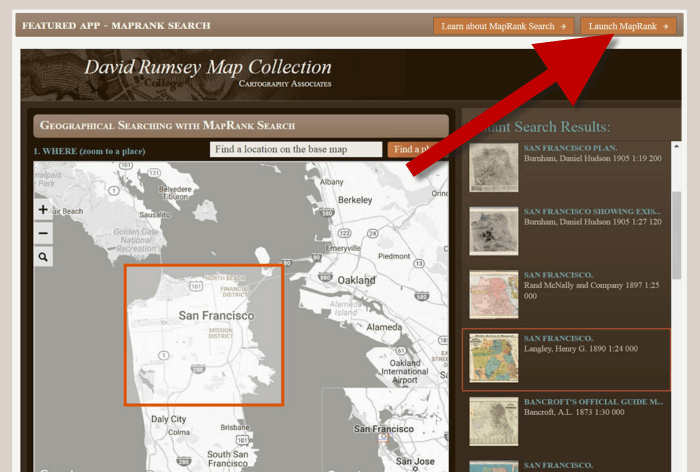
In the Featured App: MaprRank Search section click the Launch MapRank button
When you click the button it will open a new tab in your web browser which will take you to the Geographical Searching with MapRank Search page.
Quick Tip: The Fastest Way to MapRank Search
You can get there faster by going directly to https://rumsey.mapranksearch.com. I didn’t take you straight there from the beginning because I think it’s important to be aware of the home page and everything else it offers. However, today our focus is conducting the optimal search for old maps for you family history.
Step 4 Selecting the Map Time Frame
Here’s what the search page looks like.
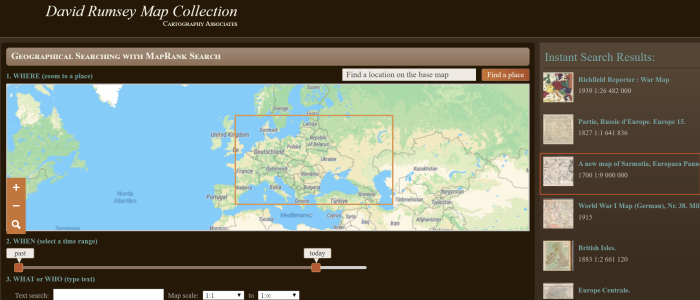
The DavidRumsey.com search page
There are two very important features on this app page that will help you get the best results possible: the time slider and the location search box.
The time slider is located beneath the map:
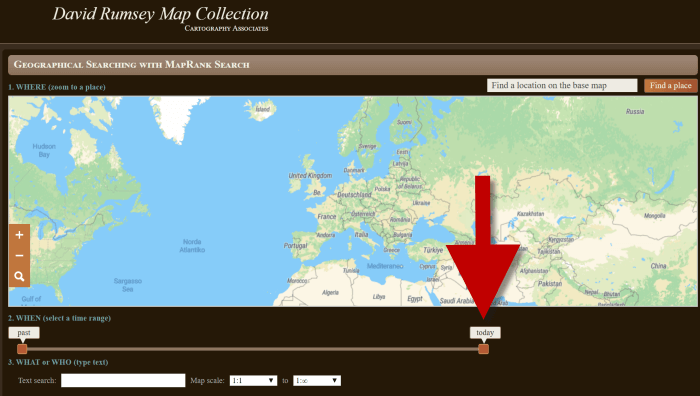
Time Slider for searching maps by time frame
It’s important to first select the time frame that you are searching because that will dictate the results you get when you search on the location name. (We’ll get to that in just a moment.)
There is a slider on each end of the timeline. Slide them to specify the desired time frame. In my example below, I’m looking for maps between 1800 and 1900.
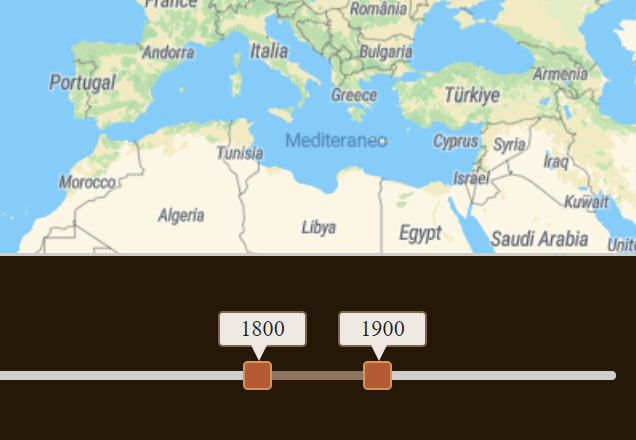
Searching for maps between 1800 and 1900
As you move the sliders, you’ll notice that the maps in the right hand column will change. This is because only maps that fall within the range you select will be offered in the Instant Search Results column. But before we look at those, we need to type in a location in the next step.
Step 5: Selecting the Location
With your time frame selected, now you’re ready to type the location in the search box.
As you type, the app will make suggestions. But wait! Before you click the Find a Place button to run the search, look carefully at the list of suggested locations that may appear. Many locations names can be found in different areas. That is certainly the case with the name of the tiny village where my great grandfather was born: Kotten.
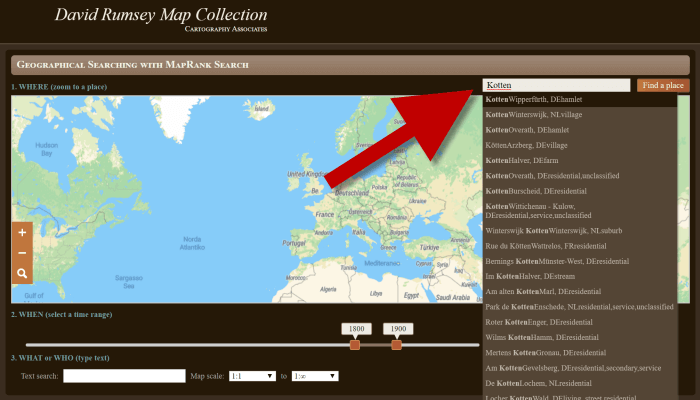
Type the location name to search the maps
In fact, the list doesn’t even include the Kotten I am looking for.
In cases like this, it is best to search a little more broadly. When Kotten was part of Prussia, it was located in Kreis Johannisburg so I could try searching for that. Even better might be to search for the largest city in the area since Kotten was such a tiny village. Arys was the largest city in the area.
Once you type in the name (and select from the suggestions if needed) click the Find a Place button just to the right of the search box.
Step 6: Analyze the Map Results
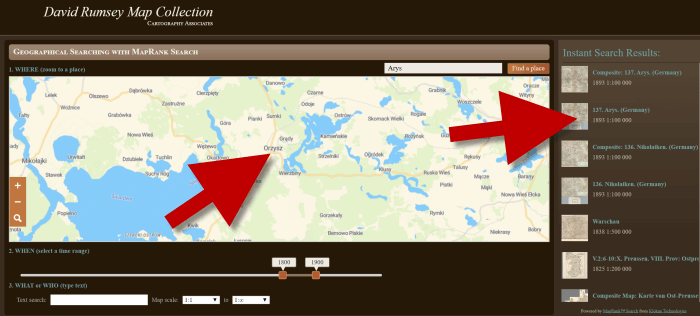
In my example of searching for the city of Arys (which is the name it was known by in the 19th century when it was part of East Prussia) the modern-day map displayed is actually Poland.
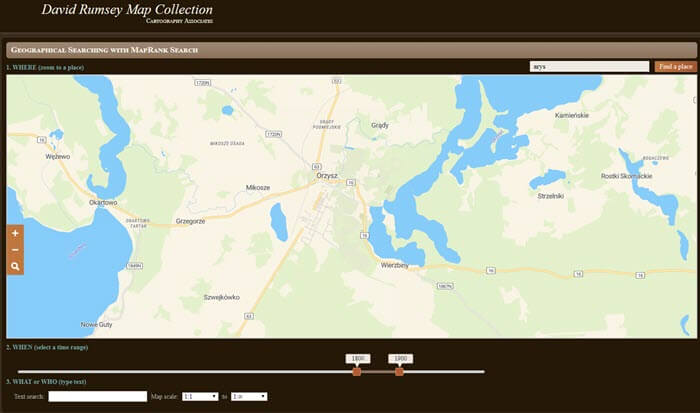
My search resulted in a map showing Orzysz, Poland
However, the David Rumsey website does a good job of cross-referencing the older German names (Arys) with the new Polish names (Orzysz). This is another reason why searching for a larger city works well. Larger cities are more likely to be in the David Rumsey system for cross-referencing, and of course they are easier to spot on the map. Generally speaking, the location you searched will be in the center of the display map.
Quick Tip: Verifying Location Names
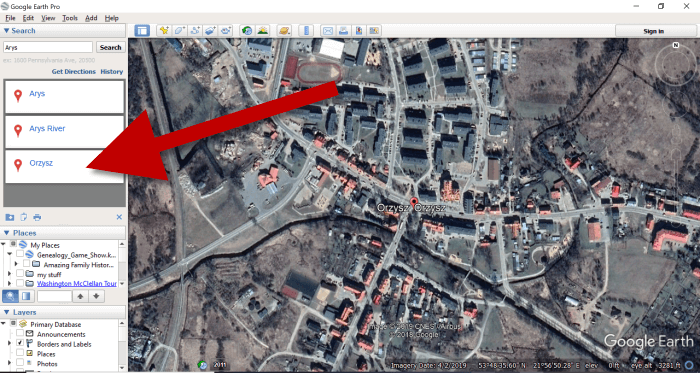
Another quick way to cross-reference location names (or verify your findings in David Rumsey) is by searching for the name in Google Earth. In the example below, I typed in the Prussian city of Arys. Google Earth will offer options if more than one matching result exists.
I was a bit surprised to see “Arys” as one of the three listed results since it is not called that today. When I clicked Arys it took me to the city of Arys in the Turkistan Region of Kazakhstan, far away from Poland! Clicking Orzysz in the results list took me to the area of Poland that was once East Prussia. This confirms the results I received at the David Rumsey website.
Learn more about using Google Earth for Genealogy by watching my free class here.
Now it’s time to review the map results listed in the Instant Search Results column on the right. Isn’t it fantastic that David Rumsey’s website not only presented me with the correct Polish location, but also maps published between 1800 and 1900 that include Arys? I think so!
Map results appear in the column on the right side of the page.
Click the map you think best suits your needs. The map will open in in a new tab in your web browser. (These browsers tabs provide a nice bread crumb trail for your searching activities.)
All of the source information about the historic map that you chose will appear in the column on the left. (See the image in Step 7.) If you decide to use this map you’ll definitely want to accurately cite the source. Learn more about the importance of source citations here.
Step 7: Export the Map
I was delighted to find the village of Kotten on this map of Arys published by Reichsamt fur Landesaufnahme in 1893!
When you find a map that you would like to use for your family history research, export it to your computer. To do this, click Export in the upper right corner of the map and select the desired size. You can select a size ranging from Small Thumbnail to Extra Extra Large. Keep in mind that the larger the size, the more clarity you will have as you zoom in closer and closer. This is very important if you plan on using the map in an overlay in Google Earth. You can learn how to create your own map overlays in my video tutorial series on using Google Earth for genealogy available here, and in my book The Genealogist’s Google Toolbox.
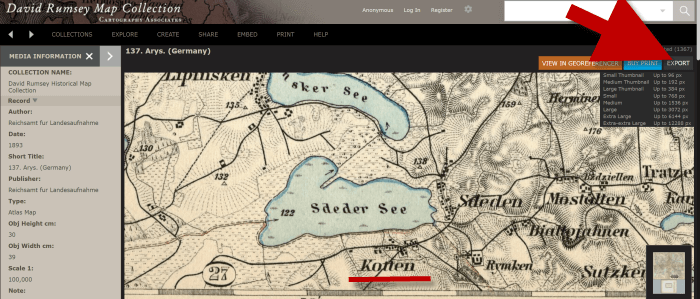
Click “Export” to save the map to your computer.
Be patient while downloading to your computer because it can take several moments to export a large map. The saved file will probably be zipped. To unzip it, on a PC right-click and select Extract All from the pop-up menu. This creates an open version of the folder containing the map.
Get Started Finding Your Ancestral Locations in Old Maps
With this step-by-step process you are now ready to explore any given ancestor’s world through the rich details of historic maps. I can’t wait to hear what you discover! Please be sure to leave a comment below. And if you found this tutorial helpful, will you please share it with your friends on social media so we can help even more people find the homes of their ancestors? Thank you!
Episode 194 Free Podcast Episode
The Genealogy Gems Podcast
with Lisa Louise Cooke
This blast from the past episode comes from the digitally remastered Genealogy Gems Podcast episodes 11 and 12 (originally recorded in 2007). They are now interwoven with fresh narration and updated show notes. Topics include: Google Images; Top 10 Tips for finding Graduation Gems in your family history; Display your family history with an easy to create Decoupage plate.

Did you know you can use Google to help identify images, to find more images like them online, and even to track down images that have been moved to a different place online? Find these great Google tech tips in this episode, along with 10 tech-savvy tricks for finding an ancestor’s school records. You will also hear how to create a family history photo decoupage plate: a perfect craft to give as a gift or create with children.
This “blast from the past” episode comes from the digitally remastered Genealogy Gems Podcast episodes 11 and 12 (originally recorded in 2007). They are now interwoven with fresh narration; below you’ll find all-new show notes.
Google Image searches: Updated tips
Click here to watch a short new tutorial video on using Google Images to find images for your genealogy research.
Conduct an initial search using the search terms you want. The Image category (along with other categories) will appear on the screen along with your search results. For images of people: enter name as search term in quotes: “Mark Twain.” If you have an unusual name or if you have extra time to scroll through results, enter the name without quotation marks. Other search terms to try: ancestral place names, tombstone, name of a building (school, church, etc.), the make and model of Grandpa’s car, etc.
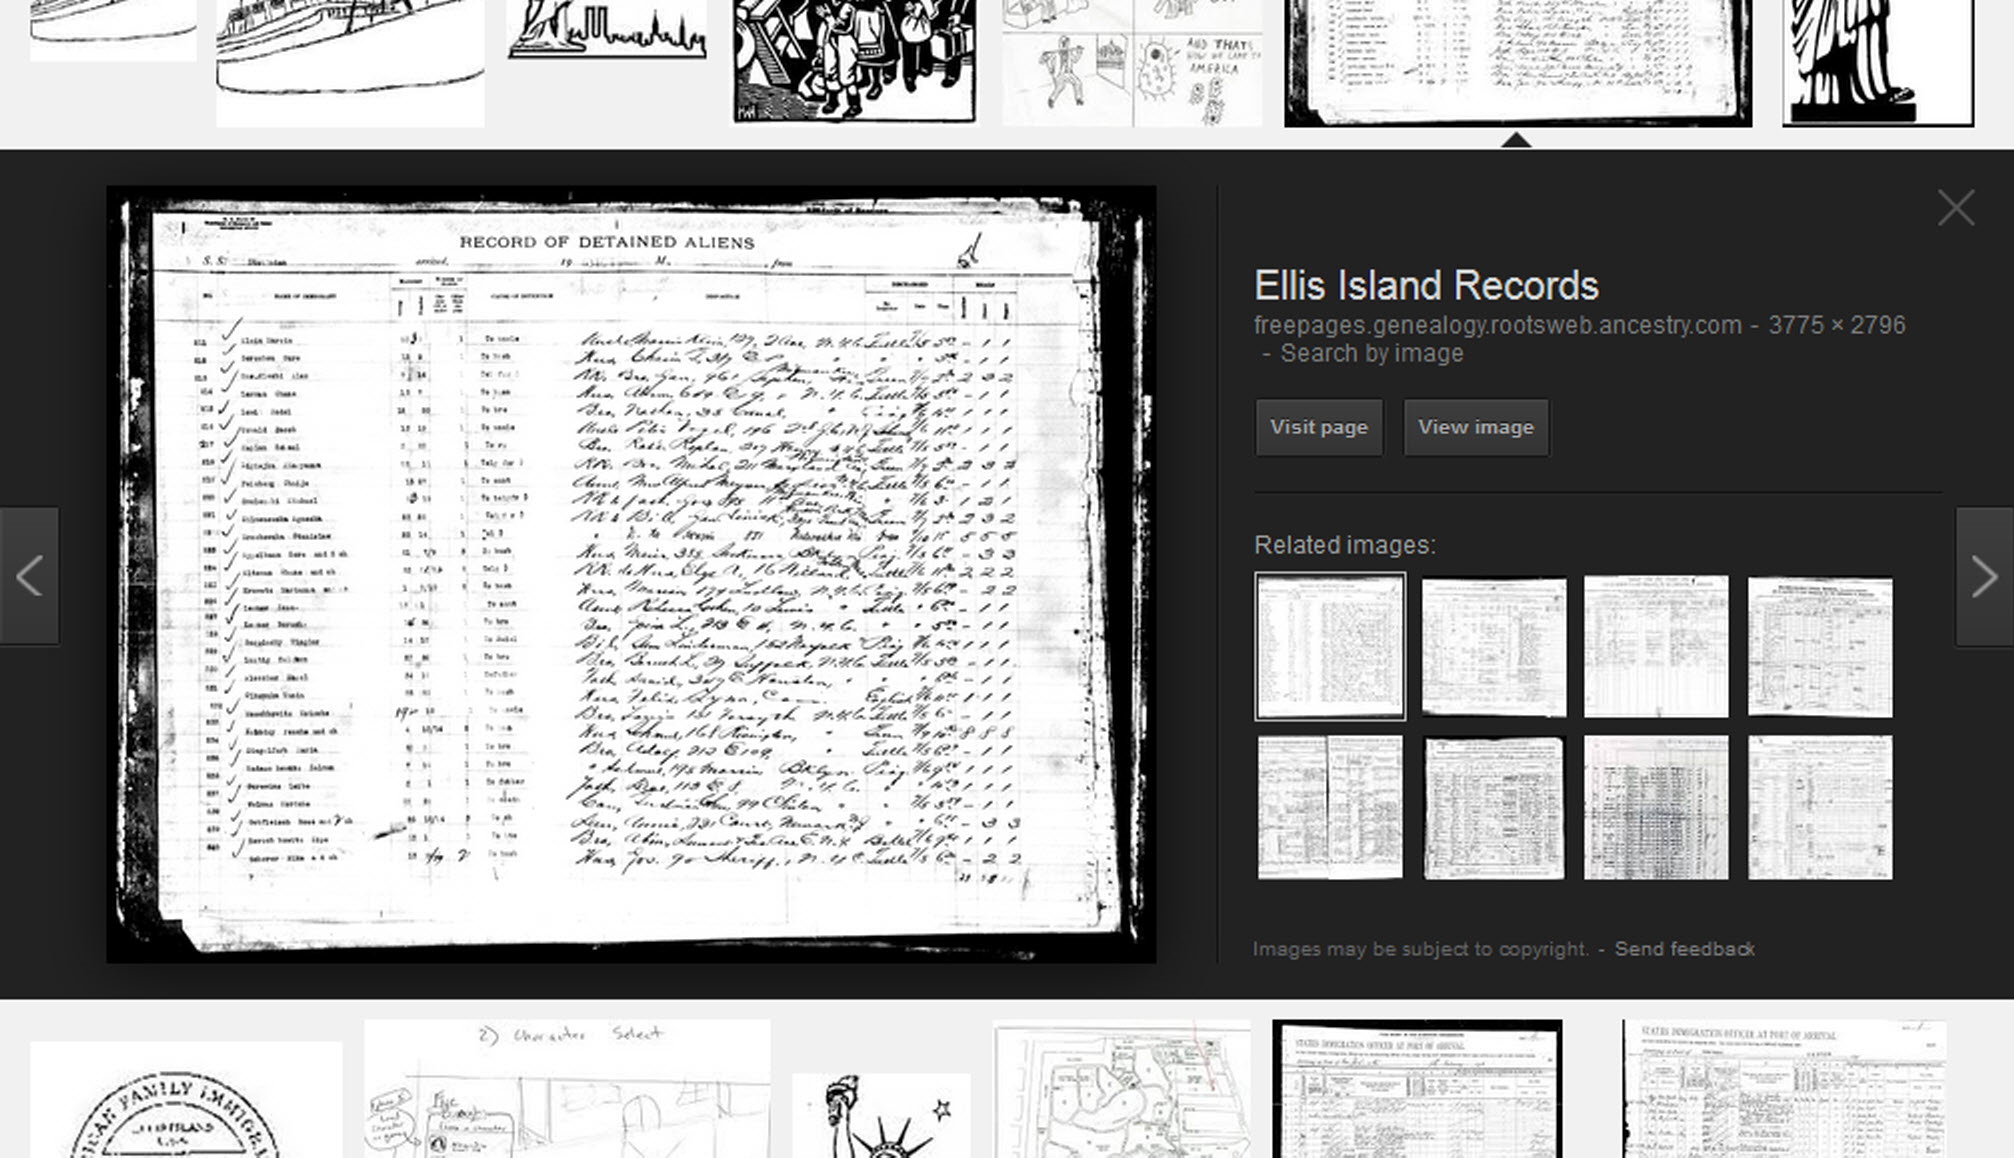
Click on one of the image thumbnails to get to a highlight page (shown here) where you can visit the full webpage or view the image. If you click View images, you’ll get the web address.
To retrieve images that no longer appear at the expected URL: Click on View image to get the image URL. Copy the image’s URL (Ctrl+C in Windows) and paste it (Ctrl+V) into your web browser to go to that image’s page. When you click through, you’re back in Web view. The first few search results should be from the website with the image you want. Click on a link that says “cache.” A cached version is an older version of the website (hopefully a version dated before the image was moved or removed). Browse that version of the site to find the image.
NEW Tip: Use Google Chrome to identify an image and find additional images showing the same subject, such as a place, person or subject.
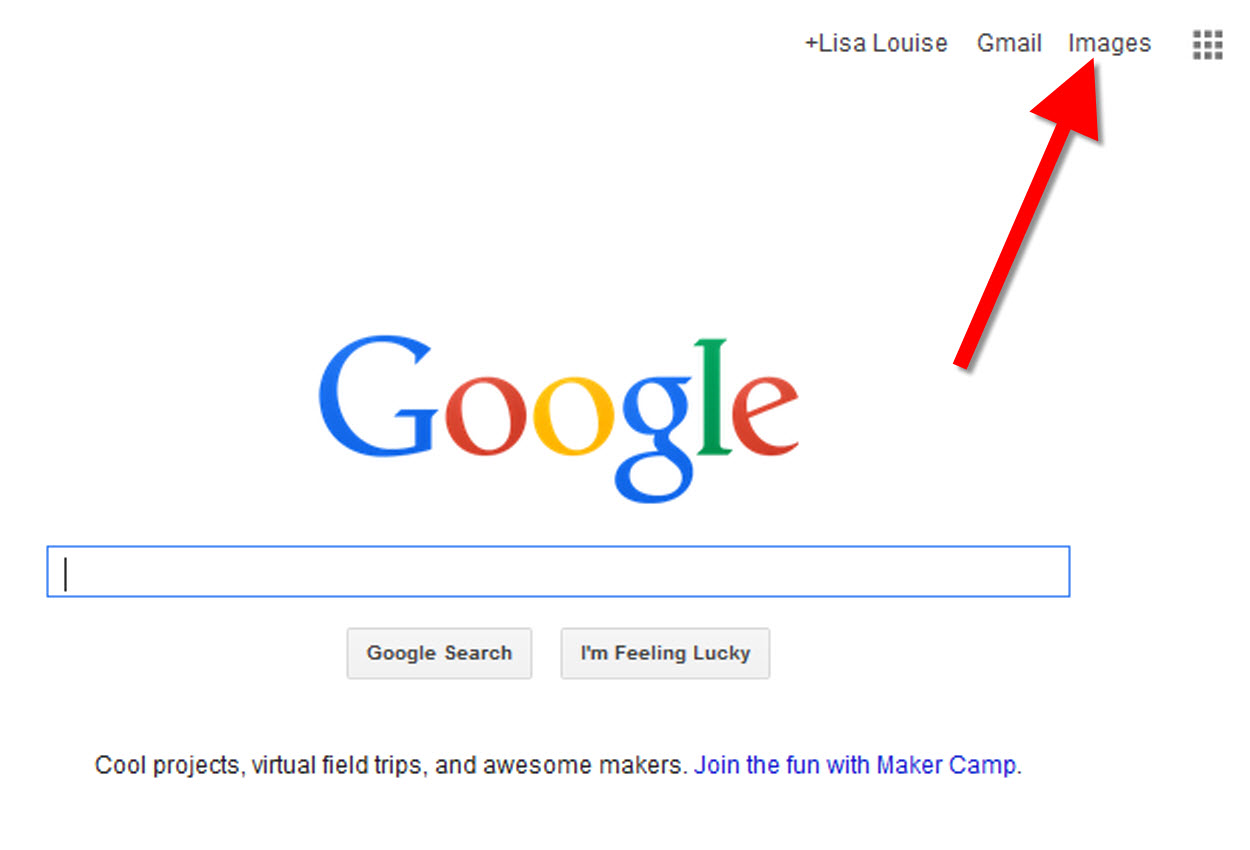
From the Google home page, click Images.
In the Google search box, you’ll see a little camera icon. Click on it.
If you have an image from a website, insert the URL for that image. If you have an image on your computer, click Upload an image. Choose the file you want.
Google will identify the image as best it can, whether a location, person, or object, and it will show you image search results that seem comparable.
Click here to watch a free video tutorial on this topic.
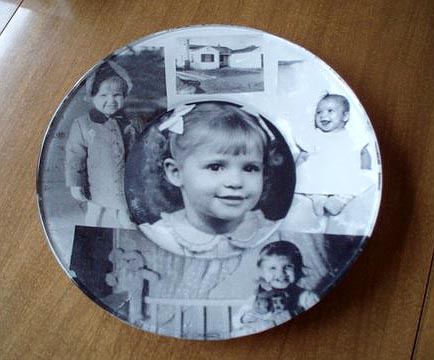
GEM: Decoupage a Family Photo Plate
Supply List:
- Clear glass plate with a smooth finish (available at
kitchen outlet and craft stores) - Sponge craft brush
- Decoupage glue
- Fine paper-cutting scissors (Cuticle scissors work well)
- Small bottle of acrylic craft paint in a color you would like for the back
- A flat paintbrush
- Painter’s tape
- Brush-on clear acrylic varnish for a glossy finish on the back of the plate
- A selection of photos (including other images that complement the photos)
Assembling your plate:
- Lay out your design to fit the plate
- Add words if desired. You can draw directly on the copy or print it out and cut it to fit.
- Put an even coat of glue on the front of each photo. Don’t worry about brush strokes, but be careful not to go over it too many times which could cause the ink to run.
- Apply the photos to the back of the plate, working in reverse order (the first images placed on the plate will be in the foreground of the design). Glue the edges firmly. Turn the plate over to check the placement of images. Smooth using craft brush.
- Brush glue over the back of each photo.
- Turn the plate around so you can see the image from the front and work out the air bubbles.
- Continue to place the images until the entire plate is covered. Let it dry 24 hours.
- Use painters’ tape to tape off the edges before you apply the acrylic paint to the back of the plate. Paint the back and let dry. Apply a second coat. Let dry.
- Apply an acrylic varnish for a glossy finish on the back. Let dry.
![]()
Lisa Louise Cooke uses and recommends RootsMagic family history software. From within RootsMagic, you can search historical records on FamilySearch.org, Findmypast.com and MyHeritage.com. And it is in the works for RootsMagic to be fully integrated with Ancestry.com, too: you’ll be able to sync your RootsMagic trees with your Ancestry.com trees and search records on the site.
![]()
Keep your family history research, photos, tree software files, videos and all other computer files safely backed up with Backblaze.com/Lisa, the official cloud-based computer backup system for Lisa Louise Cooke’s Genealogy Gems.
GENEALOGY GEMS BOOK CLUB

Our current book is Everyone Brave is Forgiven by Chris Cleave. Follow the story of Mary North, a wealthy young Londoner who signs up for the war effort when the Great War reaches England. Originally assigned as a schoolteacher, she turns to other tasks after her students evacuate to the countryside, but not before beginning a relationship that leads to a love triangle and long-distance war-time romance. As her love interest dodges air raids on Malta, she dodges danger in London driving ambulances during air raids in the Blitz.
This story is intense, eye-opening and full of insights into the human experience of living and loving in a war zone and afterward. Everyone Brave is Forgiven is inspired by love letters exchanged between the author’s grandparents during World War II.
Video: Chris Cleave on the U.S troops coming to Europe in World War II
Click here for more Genealogy Gems Book Club titles
GEM: Top 10 Tips for finding Graduation Gems in your family history
- Establish a timeline. Check your genealogy database to figure out when your ancestor would have attended high school or college.
- Consult family papers and books. Go through old family papers & books looking for senior calling cards, high school autograph books, journals and diaries, senior portraits, fraternity or sorority memorabilia and yearbooks.
- Search newspapers. Look for school announcements, honor rolls, sports coverage, end-of-year activities and related articles. Updated tips and online resources:
Ancestry.com has moved the bulk of its historical newspaper collection to its sister subscription website, Newpapers.com.
Search your browser for the public library website in the town where your ancestor attended school. Check the online card catalogue, look for a local history or genealogy webpage, or contact them to see what newspapers they have, and whether any can be loaned (on microfilm) through interlibrary loan.
Search the Library of Congress’ newspaper website, Chronicling America, for digitized newspaper content relating your ancestor’s school years. Also, search its U.S. Newspaper Directory since 1690 for the names and library holdings of local newspapers.
FamilySearch.org online catalog
Contact local historical and genealogical societies for newspaper holdings.
- Consult the websites of U.S. state archives and libraries: click here to find a directory of state libraries
- State historical and genealogical societies. In addition to newspapers, state historical and genealogical societies might have old yearbooks or school photograph collections. For example, the Ohio Genealogical Society library has a large (and growing) collection of Ohio school yearbooks. Local historical and genealogical societies may also have school memorabilia collections.
- RootsWeb, now at http://www.rootsweb.ancestry.com. Check the message board for the county and state you’re looking for. Post a message asking if anyone has access to yearbooks or other school info.
TIP: Use Google site search operator to find mentions of yearbooks on the county page you’re looking at. Add site: to the front of the Rootsweb page for the locale, then the word yearbook after it. For example:
- Search for online yearbooks at websites such as:
- Old-Yearbooks.com
- Classmates.com
- Ancestry.com now has a large yearbook collection
Yearbookgenealogy.com and the National Yearbook Project, mentioned in the show, no longer exist as such
- US GenWeb at www.usgenweb.org. Search on the county website where the school was located. Is there anyone willing to do a lookup? Is there a place to post which yearbooks you’re looking for?
- Call the school, if it’s still open. If they don’t have old yearbooks, they may be able to put you in touch with a local librarian or historian who does.
TIP: Go to www.whowhere.com and type the school name in “Business Name.” Call around 4:00 pm local time, when the kids are gone but the school office is still open.
- ebay: Do a search on the school or town you’re looking for to see if anyone out there is selling a yearbook that you need. Also search for old photographs or postcards of the school. Here’s my extra trick: From the results page, check the box to include completed listings and email potential sellers to inquire about the books you are looking for.
TIP: Don’t be afraid to ask ? ebay sellers want to sell! And if all else fails, set up an ebay Favorite Search to keep a look out for you. Go to and check out Episode #3 for instructions on how to do this.
MyHeritage.com is the place to make connections with relatives overseas, particularly with those who may still live in your ancestral homeland. Click here to see what MyHeritage can do for you: it’s free to get started.
FREE NEWSLETTER:
Subscribe to the Genealogy Gems newsletter to receive a free weekly e-mail newsletter, with tips, inspiration and money-saving deals.

Disclosure: This article contains affiliate links and Genealogy Gems will be compensated if you make a purchase after clicking on these links (at no additional cost to you). Thank you for supporting Genealogy Gems!
Google Slides for Genealogy
You can use Google Slides for genealogy to create one-of-a-kind presentations, a virtual scrapbook, or a virtual library list…and it’s free! Here’s how to take advantage of yet another awesome Google tool.
I was recently asked if there was a software program or app, something free perhaps, to share a slideshow or create a visual presentation. There is! It’s called Google Slides. Here’s how Lisa Louise Cooke, author of The Genealogist’s Google Toolbox, explains it:
Google Slides is an online presentation application, much like Microsoft’s Powerpoint. It’s part of Google’s free office suite of tools. As a genealogist, it provides the opportunity to create and visually share your family history.
It’s a Cloud-based service and that means you can access your presentations wherever you are and on any computing device. You will sign-in to Google Slides with your personal Google account. That means you will be able to keep everything private unless you decide to share it. Although it’s Cloud-based, you can use it offline too. Any new presentations you create or changes you make will be automatically updated when you get back online. You can show your presentation at the next family reunion or genealogy society meeting even if there’s no Internet access.
There’s a lot of potential for using this powerful tool for genealogy!
With that great introduction, I’d like to share a few unique examples of how a genealogist or a genealogy society could use Google Slides.
Google Slides for the Genealogist
Google Slides is an easy way to create a fun slide show of your ancestor photos. This can be shared at family gatherings or reunions right from your laptop. You can also share the presentation with a click-able link.
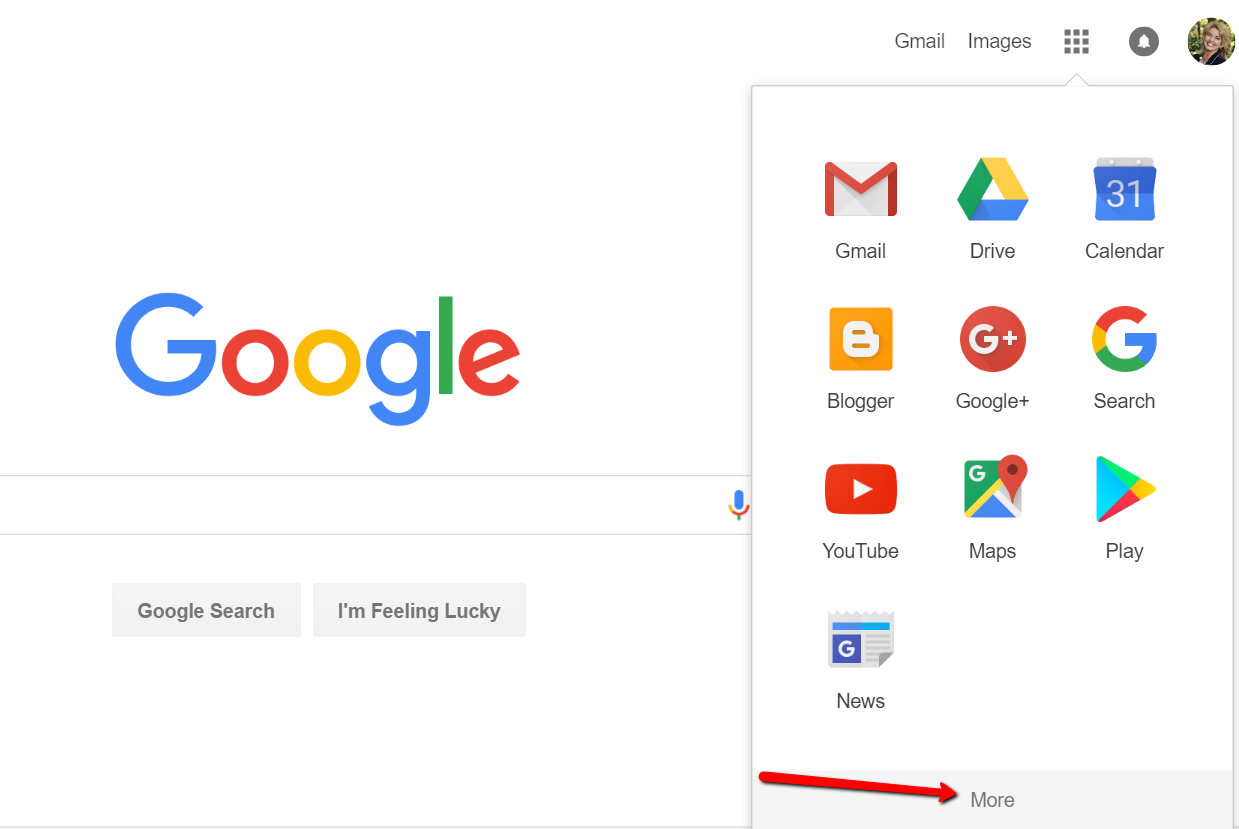
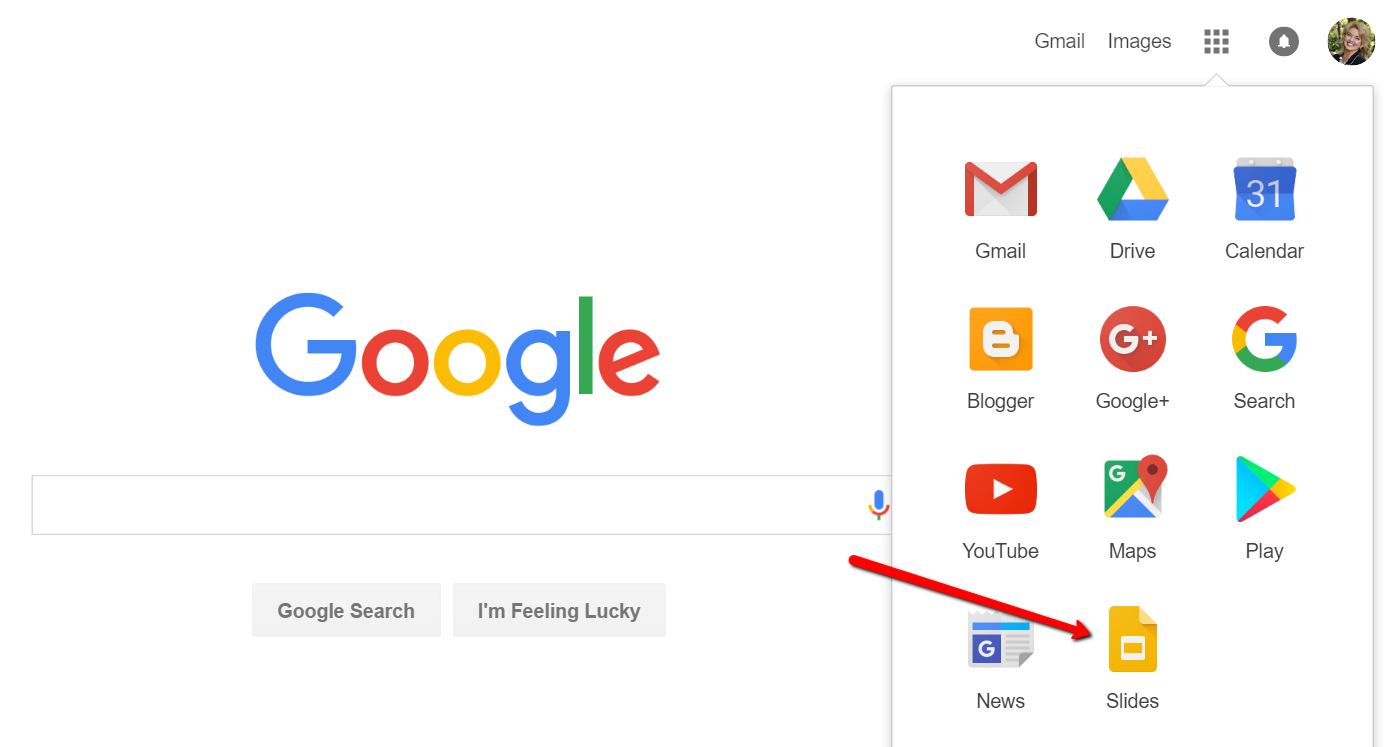
To begin, find Google Slides by going to Google.com and sign-in to your free Google account (or sign up if you don’t have one.) Click on the grid to the left of your sign-in avatar. This will bring down several options. If you don’t see Google Slides as an option, click More at the bottom.
If you still don’t see Google Slides as an option, click on Even More from Google. This will take you to another screen of all sorts of Google goodies! Scroll down until you find Google Slides and click on it.
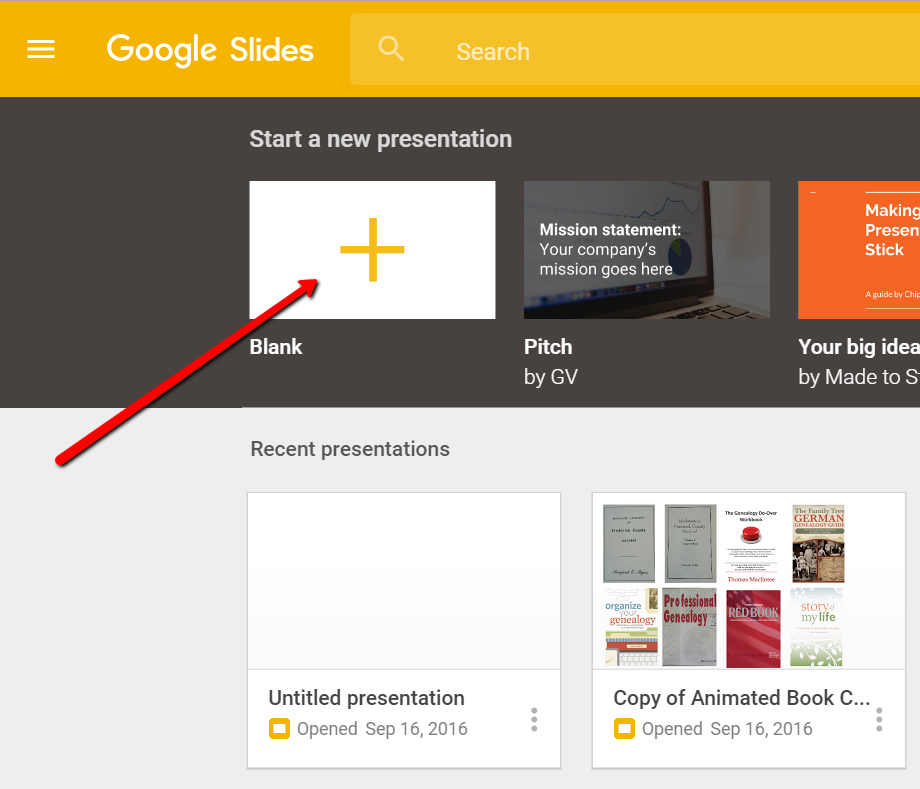
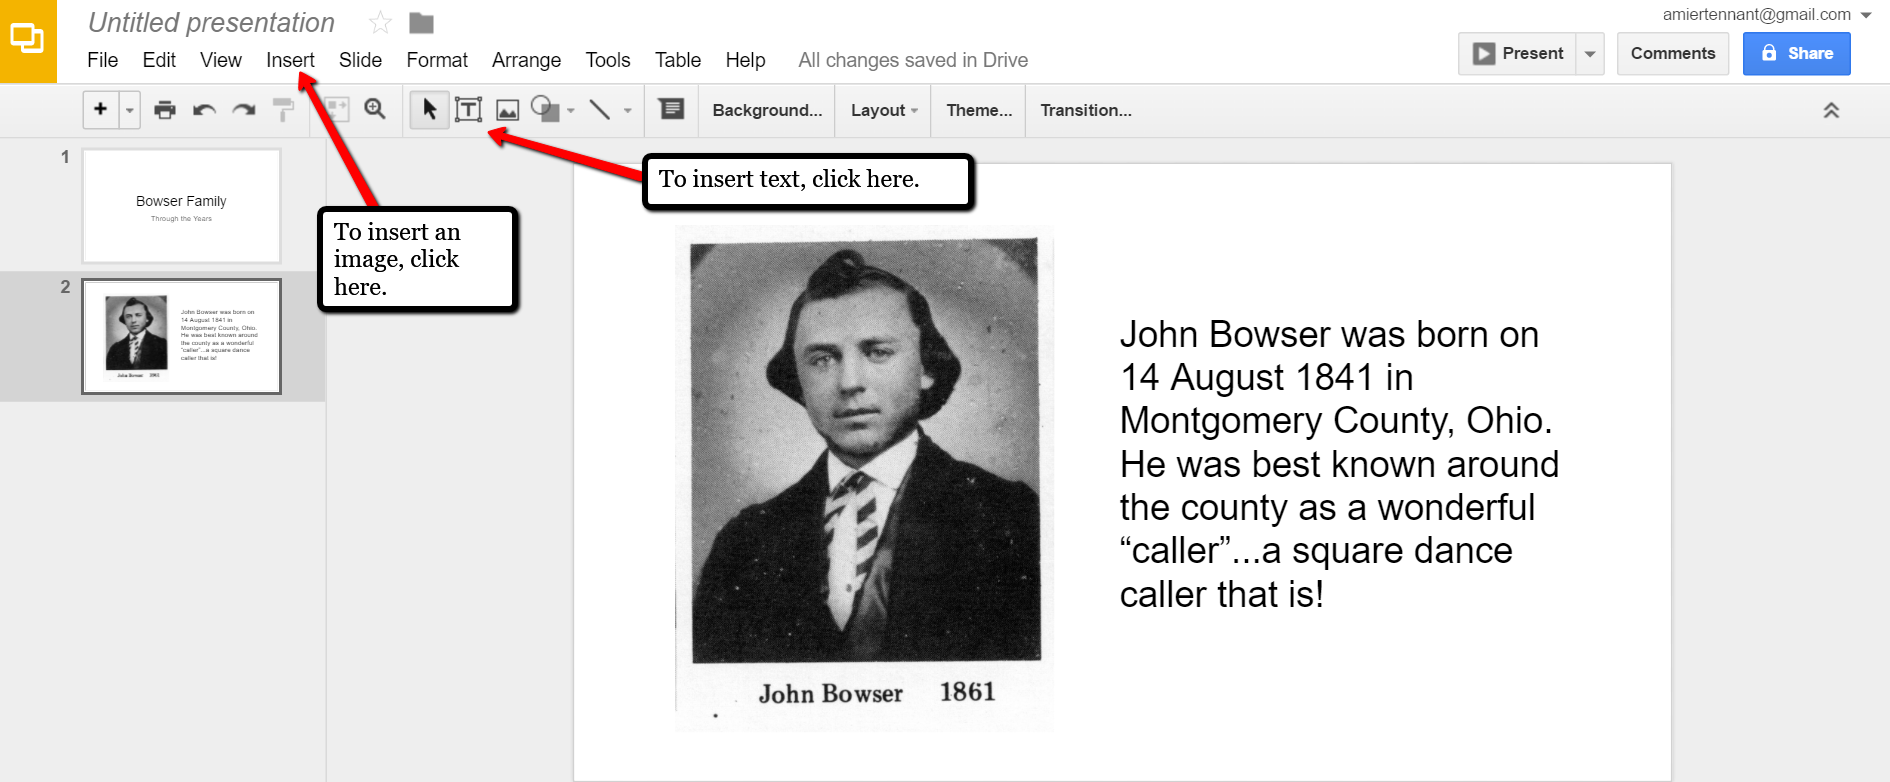
Once you have opened Google Slides, click the plus sign to begin.
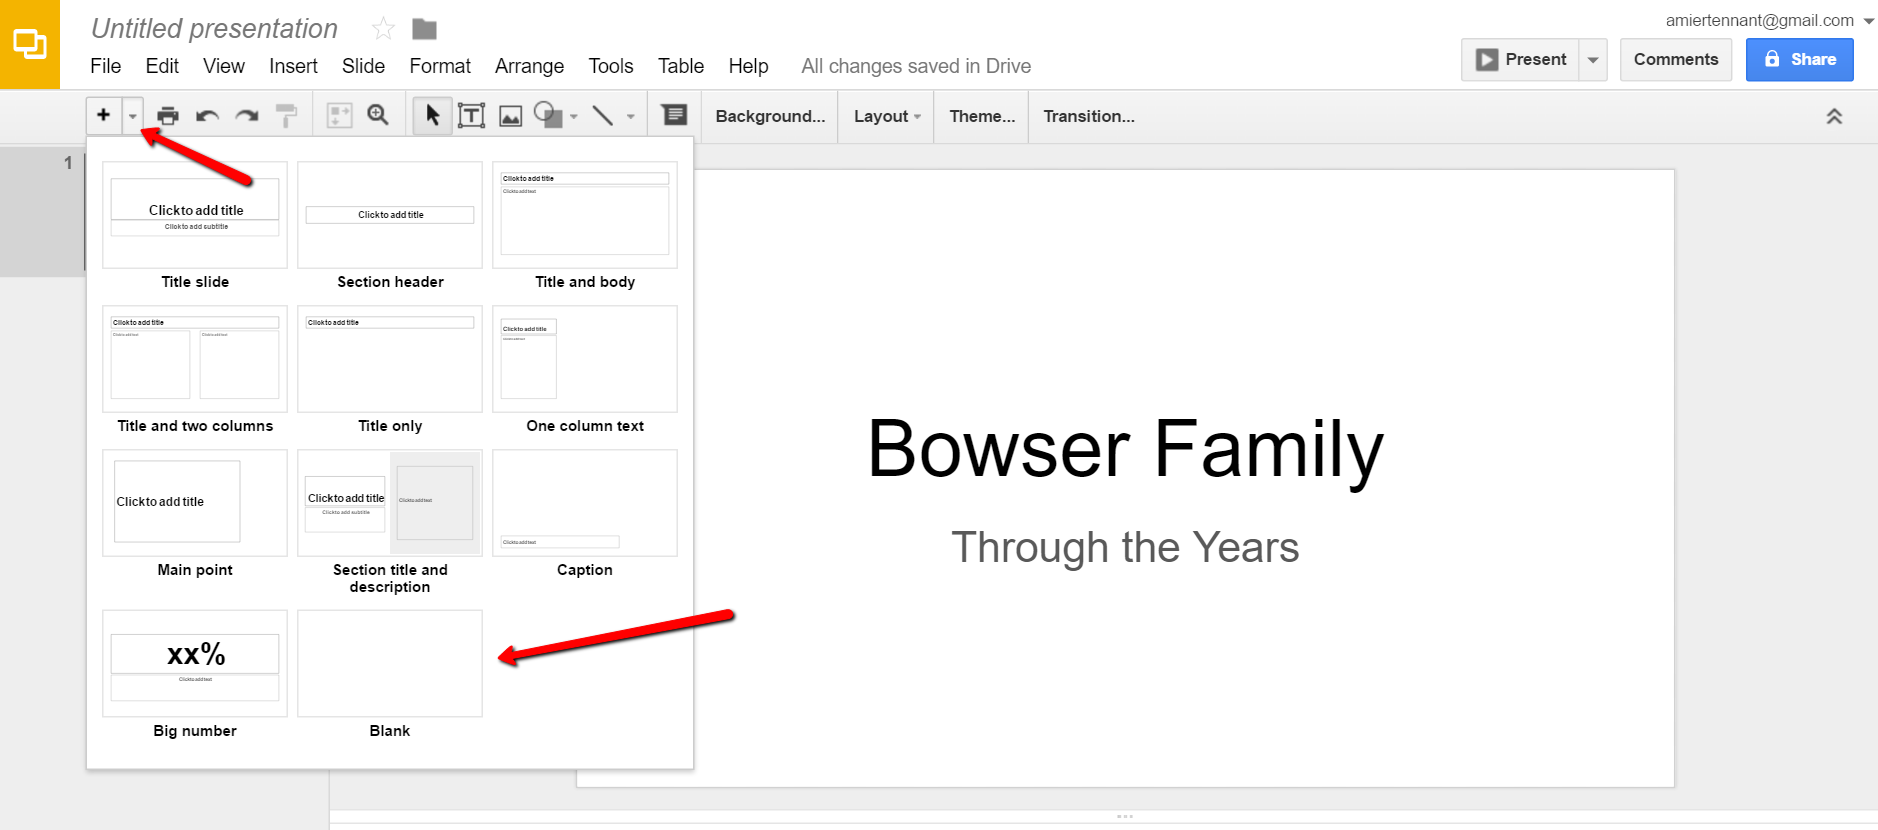
I added a title and then clicked the tiny arrow to the right of the plus sign to add a new blank slide.
At the new slide and each additional slide, you can add a picture by first clicking Insert from the labels listed across the top, then choose Image. A pop-up window will appear and allow you to Choose an Image to Upload. You will then find the image you have saved on your computer and click Open.
Keep adding your slides until you have all of them created.
Sharing Your Google Slides Presentation
Like many of us, I like to share my ancestor photos with my family and friends. While at a family gathering of a small group, I just set my laptop up on the coffee table and we huddle around. Bring up your Google Slides presentation on your laptop or mobile device and click on Present at the top right of the screen. The computer does the rest and presents a slideshow for your viewers.
You might also wish to share your slides with family and friends far away. You can do this by sharing a link. To create a shareable link, click Share at the top right corner.

A pop-up window will appear. Click the little drop-down menu next to the words “can view.” This option allows you to choose whether you wish people to be able to edit, comment, or view only. I typically choose the “view only” option. Then, a shareable link is created for you. Click Copy link and paste that into an email directly to a family member, to your family history blog, in a Tweet, or in a Facebook post. Wa-la! You have shared your Google Slides presentation.
Create a Virtual Book Cover List with Google Slides
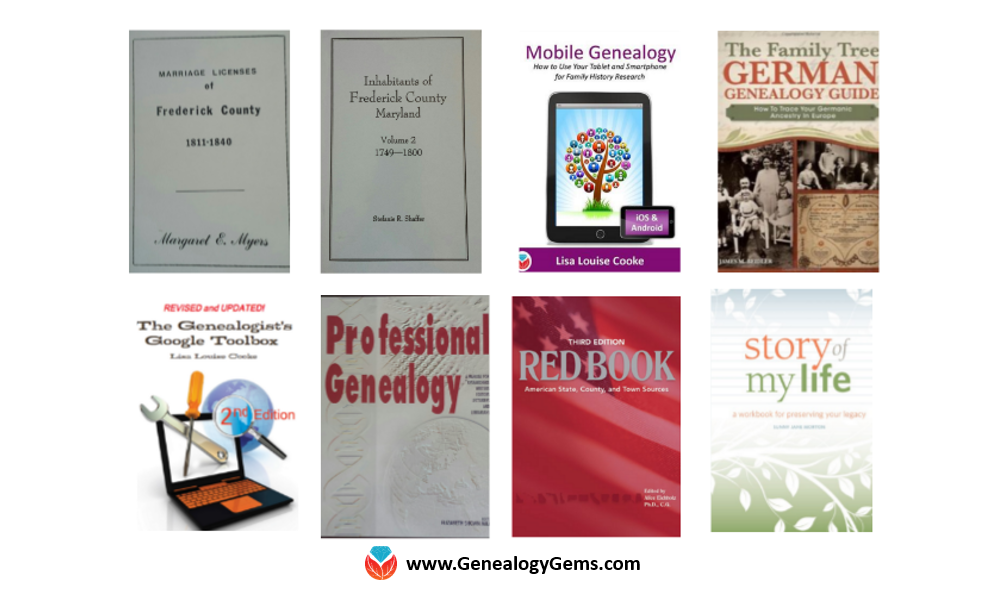
Another stellar way to use Google Slides for genealogy is to create a convenient virtual library list. A recent article found online gave me the idea of creating a library list using images of the covers of books.
For example, if you enjoy attending genealogy conferences and buying books for your society, you may get stuck wondering, “Do we already have that in our collection?” By creating a virtual book cover list, you won’t have to wonder anymore!
You will first need to begin this project by taking a picture of the covers of each of your books and saving the images to your computer or laptop. I took pictures, cropped them, and sharpened them up a bit with my smartphone. Then, I saved them to a file folder on my computer named Book Covers. [Tip: It would be an even better idea to save the Book Covers folder to your Google Drive!]
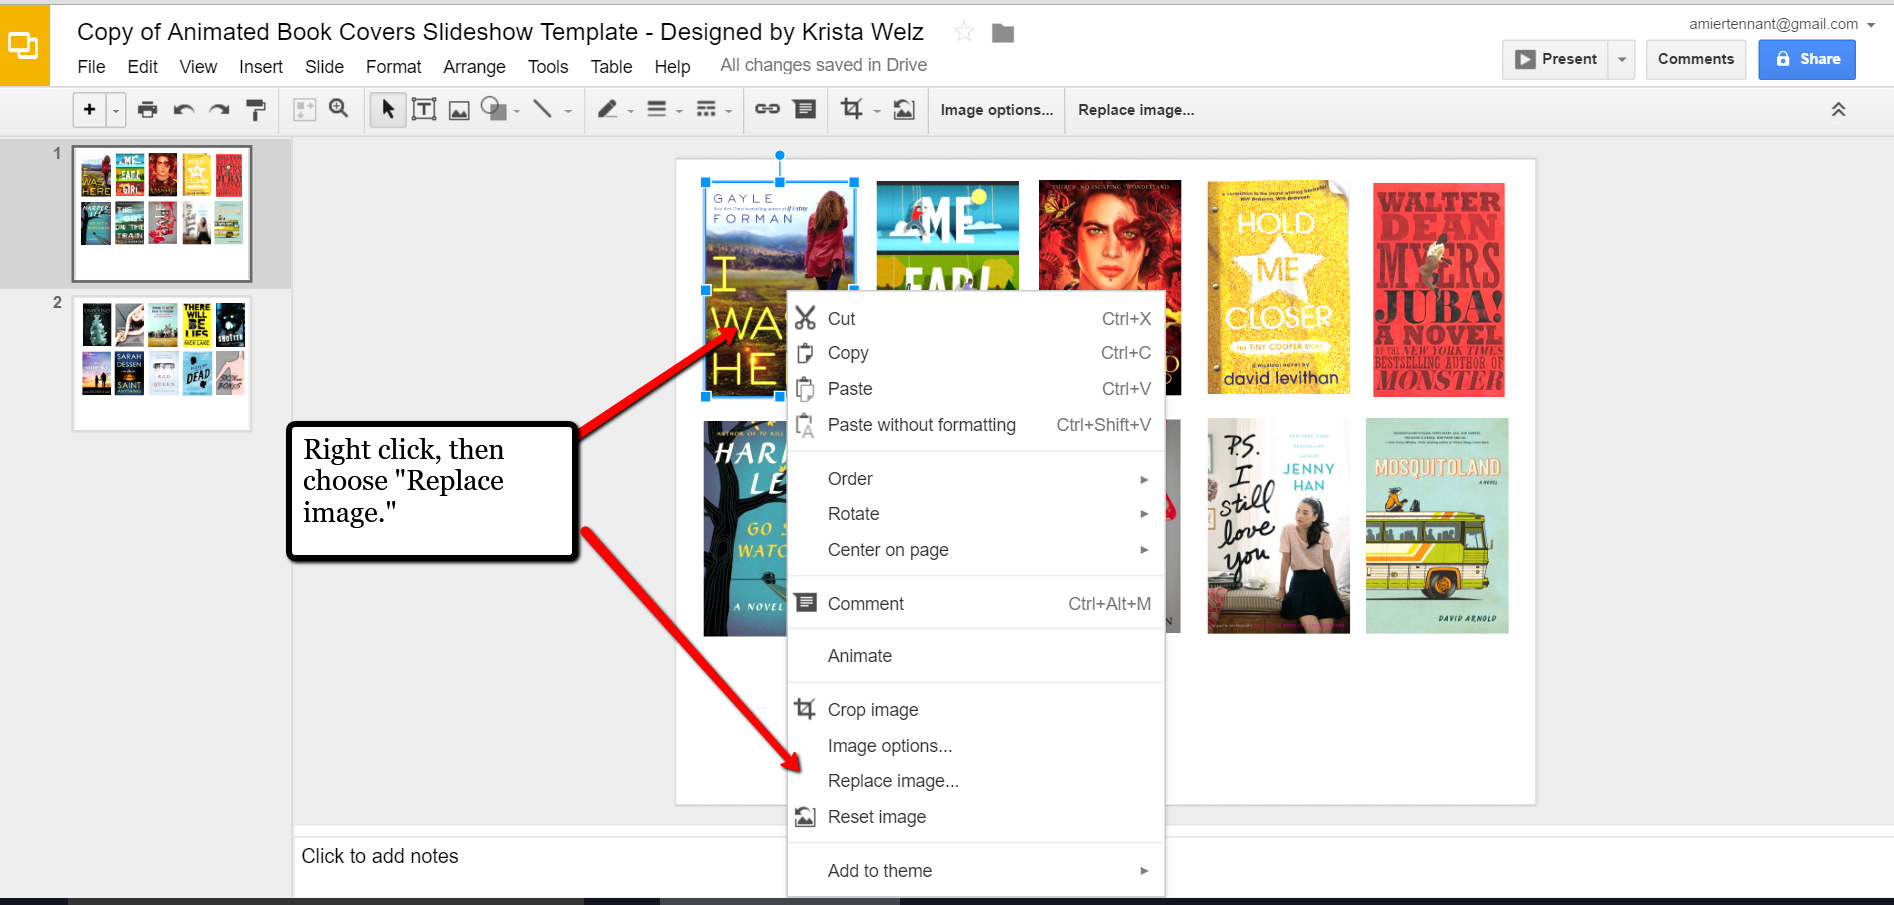
For something quick and easy, use the virtual book cover template here: Virtual Book Cover List Template. If you choose to use this link, when it opens, click Make a copy and Google Slides will open. Right click on any of the book cover images you see, a pop-up window appears. Choose Replace image and then find an image of one of your own book covers.
Once you have replaced each of the book covers with ones of your own, you can rearrange them with the click-and-drag method. You might want to put them in alphabetical order or perhaps categorize them by subject or place.
When you have finished, don’t forget to title it. There is no need to save it because Google Slides automatically saves for you. Google Slides is accessible from any of your devices and can even be viewed on-the-go from your mobile device. You’ll love this feature when you are trying to decide what books to add to your genealogy library.
How Can You Use Google Slides for Genealogy?
We are sure there are dozens of ways to use Google Slides for genealogy. Give Google Slides a try and if you think of another use for this wonderful tool, let us know about it in the comments below! Thanks for reading, friends.
 The Genealogist’s Google Toolbox