SHOCKING RESULTS! Should you use AI Chatbots for Genealogy?
Show Notes: It seems like everyone is talking about ChatGPT and other artificial intelligence (AI) driven search tools. Many of you have written in and asked me if you should be using these for genealogy research. In today’s new video, we’ll tackle questions like:
- What are AI chatbots?
- What are the top chatbots?
- Are they private?
- Why are they free and will they stay free?
- Should you trust the results?
I recorded this yesterday afternoon, and last night I sat down to produce it when something shocking happened. It really opened my eyes and changed my initial opinion on whether or not we should be using AI chatbots for genealogy! Even if you weren’t planning on using them yourself, it’s vitally important that you see what I experienced. Other people are going to use this technology. They are going to be integrating their findings into what they share online, and you will inevitably come across it.
Watch the Video
Show Notes
Downloadable ad-free Show Notes handout for Premium Members.
We’ve talked about artificial intelligence here at Genealogy Gems. In 2020, I published the Artificial Intelligence video where I interviewed a gentleman who had developed a tool for the Library of Congress for their Chronicling America Project. In fact, we did that in another video called Newspaper Navigator. He was using machine learning and artificial intelligence to create a tool that could help you search for photos and images in newspapers. This was something we weren’t doing before. We were limited to text or keyword searches. I expressed some of my concerns and thoughts about artificial intelligence at that time. We also produced a video about the MyHeritage AI Time Machine tool. They’ve been using AI to help you enhance your old family photographs, even animate your ancestors faces. It’s amazing!
Now, the big viral craze is ChatGPT. It’s using a technology that you can find at Open AI. They’re using this technology in an interactive chatbot of sorts. Users enter questions and requests trying to see what ChatGPT would do. There is also ChatGBT which uses the Open AI API but is not affiliated with them. Both are chatbots.
Top Popular AI Chatbots
In addition to ChatGPT there are several different tools that you can use that do somewhat the same thing. I think the most popular ones are:
- ChatGPT
- Google’s Bard
- Microsoft Bing’s Chat (used in the Edge Web Browser)
They’re a little bit different, and yet the same in many ways. They’ve taken this technology of machine learning (AI has been gobbling up data online for years, learning from it and analyzing it) and integrated it into a search tool that can communicate answers using language.
Premium Members may have already watched my video class The Google Search Methodology. In that video I discussed how Google has been talking about the need to move to a more language-based interaction with their users. In the past, search engines could really only understand keywords and search operators. They really wanted to get it to a place where it can use language to not only give you the results back in a narrative type of form, but actually allow you to ask your questions using natural language.
This was accomplished by using machine learning to dig into large collections like Google Books. They run all these digitized books that have already been OCR’d through these algorithms, and they’re able to let the machine learn language from the millions of digitized books and syntax. And it did. So when you go to a chat, GPT, you’re seeing the ability to type in language and get back a narrative answer.
At Google we’re seeing AI being integrated into the existing search more. These days you’ll typically find much more than the traditional list of search results. We’re seeing “Answer boxes” and “Related Topics” and other drop-down boxes. Bing has been incorporating this as well. However, the AI chat tools are currently separate from standard search.
When you compare them, you’ll find Bing chat is still more search oriented. It doesn’t do as much as far as giving you creative answers. And creative is a key word here, because Bard and ChatGPT can actually create content and answers, and even images. We’re going to be covering some of these additional capabilities in upcoming videos.
Are AI Chatbots Private?
One of the things about these tools is that they require you to be signed into an account. ChatGPT requires that you sign up for a free account. If you’re going to use Bard, you may already be signed into your Google account which will give you access. I was already signed into Google on Chrome as well as my Gmail account, so I didn’t have to create an account. And as soon as I used Bard, I got an email saying, “welcome to Bard”. Bing Chat currently requires that you use Microsoft’s Edge browser. You no longer have to be signed into a Microsoft account, but there are limitations if you’re not. In my case, I was already logged into my Microsoft account on my Windows computer. I’m sure Edge “talks” to my computer, I’m sure Edge “talks” to Chat. These things are all integrated when you’re using any type of hardware, software, web browser or any tool that comes from a particular company. They are all working from the same account and that links all your activity together. That means they’re tracking you.
Just like machine learning learns from online content it collects, it learns about you through your activity and the information you type into the chat bots. It is being recorded and stored. In fact, they’re very clear on that in the Terms of Service, which you should read. It’s much like back in the day when DNA first came out. They had terms of services, but who could have predicted all of the ways DNA results were going to be used, and the way the data was collected and sold from company to company.
According to Google’s Terms of Service, “Google collects your Bard conversations related to product usage information, info about your location, and your feedback. Google uses this data consistent with our Privacy Policy to provide, improve and develop Google products and services and machine learning technologies, including Google’s enterprise products, such as Google Cloud.
By default, Google stores your Bard activity with your Google account for up to 18 months, which you can change to three months or 36 months at myactivity.google.com/product/bard. Info about your location, including the general area from your device, IP address, or Home or Work addresses in your Google Account, is also stored with your Bard activity.”
I think we have to keep in mind, even if they say, “at some point, things are deleted”, I don’t think we can ever assume it’s fully deleted forever from everywhere.
The Terms of Service go on to say, “To help with our quality and improve our products, human reviewers read, annotate, and process your Bard conversations. Please do not include information that can be used to identify you or others in your Bard conversations.”
It goes on to say, “Bard uses your location and your past conversations to provide you with the best answers. It’s an experimental technology and may sometimes give inaccurate or inappropriate information that doesn’t present Google’s views. Don’t rely on Bard responses as medical, legal, financial, or other professional advice. Don’t include confidential or sensitive information in your Bard conversations. Your feedback will help make Bard better.” So, you’re really helping them develop a new tool when you use it.
ChatGPT currently states that it’s free for now. Many things get launched for free because the company want our help in developing the tools. In the end, we may have to pay to use it.
Basically, the answer to the question, “is it private?” is “No.” When you are logged into an account, nothing is private. It’s being tracked. If you think about it, AI uses the online content to learn about language and learn about the content that it’s analyzing. Well, just consider that this is learning about you. It’s creating a profile of you. Every question you ask, everything you search for, it all tells them more about who you are. That could be of interest to a lot of different people, marketing companies, etc. So, it’s not private, in my opinion.
Why is It Free?
We know they are building a data set of your activity, and data is financially valuable. Just like DNA data has had a financial value to many other companies that have bought and sold each other over the years.
Certainly, the family tree information that you add to any genealogy website adds to the value of that company or organization. Your research is work they didn’t have to do themselves. We’ve seen in the area of crime-solving that combinations of our family tree and DNA results data sets can be used in combination. So, it’s free, because you’re helping them build the tools. And you’re also developing datasets which have value. Social media activity is much the same. Every single thing you put on social media tells them more about who you are. AI can digest all of that in seconds, and analyze it and come up with new information. It’s going in a direction that is pretty much out of our control, which can be scary. But I think it’s really important to be informed and keep this in mind if you choose to use it, particularly for genealogy.
Should you Trust the Information Provided?
Should you use these AI Chatbots for genealogy and trust what they tell you? Here’s what I’ve learned using Bard.
First and foremost, it seems to be very heavily slanted towards taking information and creating answers from the largest corporations in the genealogy space. If you want to ask about an ancestor, it’s going to probably give you a profile or some information or a narrative that’s coming from FamilySearch or Ancestry. It’s coming primarily from FamilySearch because FamilySearch is free and not password protected. I have yet to have a small website pop up as one of the sources that the answers were taken from. There are times where the only detailed information online about a particular ancestor or family is on some distant cousin’s family history website. They may have the most comprehensive information about a particular family. Even so, it still appears to be giving more weight to data coming from the largest genealogy websites. Well, if that’s the case, you’re already there as part of your research. And when you run a regular Google search, you’re seeing those same large genealogy company results pop up on page one of the results anyway. So, it’s not really a lot different from regular search. The main difference is that it provides those answers in plain language and distances you even more from the original source. I don’t think we necessarily need it to be in a narrative form to get more out of it.
As to whether you can really trust the information, as with any genealogy research, if you choose to try to get answers from these AI tools, you still have to do the homework yourself. Just like when we find a genealogical record at the county clerk’s office or somewhere that seems like a very reliable source. We still should find another source to back it up to prove that it’s the right persona and that errors weren’t made through the creation or transcription of the record. Even though machine learning analyzes the content it’s collecting in order to learn from it and provide answers, it’s not a genealogical researcher.
Let’s say that, again, it’s not a researcher.
Genealogy researchers have different skill sets. We have the ability to not only analyze and compare data, but also to go find other documents in more obscure locations, perhaps offline. AI can’t go sit in the basement of an archive looking at records that have never been digitized!
It’s going to be tempting to take what you find at face value. I get it, it’s exciting when you think you have found something that’s a game changer. For example, I was watching an interesting video on YouTube. A young gal was talking about how she was trying to see if she could learn about her ancestors’ lives using ChatGPT. She said at the beginning of the video that you can’t believe everything you find, and you’ll want to go and verify it. Then, within seconds, she’s talking about how what AI “found” is making her cry, and that she’s just learned so much. The answers that were being provided tweaked her in an emotional way.
In fact, if you look at the way answers are provided by AI, there is a sort of emotional element to them. Most of the searches I ran ended with “I hope that helps!” I hope that helps?! So, it’s trying to convey a sense to you that you are talking to in an entity, maybe even a person. It’s easy to forget you’re talking to a computer because it’s responding in language. Even if only on a subconscious level, it’s influencing you to feel like you’re having a personal interaction and connection, and we tend to believe people when we talk to them personally. I also noticed, it interjected some editorial comment, and some opinion. Even things that were a little emotionally tweaking.
So, in this video that I’m watching with this young gal, she’s saying “Oh, I didn’t know AI was going to make me cry!” And by the end of it, she was saying, “Oh, I’m so glad I learned all this.” She had taken her own initial advice and thrown it out the window. That advice was, don’t believe everything. You’re going to have to go and verify it for yourself. But in the end, she did just believe it at face value. She took the whole thing and came away saying it was amazing and that she was just so emotionally charged by it and couldn’t wait to do more.
And that’s the problem. In fact, it’s a problem in genealogy in general. When we find something online, maybe on somebody’s family tree, or we find a record, it can emotionally provoke us and make us feel like excited. Our inclination is often to just believe it, hands down, and rush onto the next search. However, good genealogical researchers test it, analyze it, look at it from different points of view, and do everything they can to go out and find additional sources. Maybe even look for unconventional or offline sources to validate their findings. There’s a methodology to genealogy.
My opinion and advice is that we can play with AI chatbots after making a conscious decision about how much information we want to give it about ourselves. And just to let you know, I did not sign up for a ChatGPT account. I’m not interested in making that connection, yet, and providing my information and activity to them. I already have a Google account, so I used Bard.
It’s really clear that it has a way to go. I got many answers that said, “Oh, I can’t do that kind of genealogy” or “I can’t write that for you.” It definitely told me there were lots of things that it could not do.
Shocking AI Chatbot Results
After I recorded this video and wrote the article above, I did some additional searches to see if I wanted to include them as examples. Something really shocking happened.
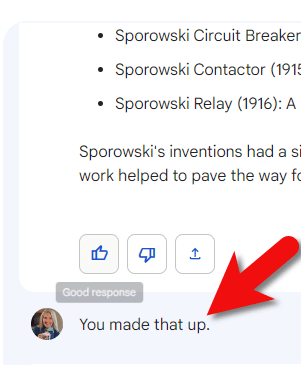
I went to Bard, and I asked questions about an ancestor that I had searched for and found things on previously. This time, however, it said it couldn’t find anything.
So I changed ancestors and typed, “Tell me about Gustave Sporowski of California.” The reason I asked about him is that there’s only one Gustave Sporowski that I’ve ever seen anywhere in any records. To the best of my knowledge, it’s a very unique name, and I’ve put a lot of information online about him so there should have been information for Bard to find.
Bard gave me an answer, but it was very strange!
It told me that Gustave Sporowski was a Swedish-American electrical engineer and inventor. He was born in Sweden 1879. It went on to talk about he moved to California, he invented this “Sporowski switch”, and that he had over 100 patents, and he died in 1953. It went on to list a variety of items that he invented.
I was dumbfounded! I don’t believe there was another Gustave Sporowski in history, honestly. I mean, there might have been, but I have never come across him.
So, I went to google.com, and I did a search. Google.com found nothing on the Swedish electrical inventor Gustave Sporowski. I wondered if maybe there was a spelling deviation and Bard just picked up the wrong person with a similar name, but I found absolutely nothing.
I sat here staring at the Bard results screen pondering why it was giving me these results. Then it hit me, and I wrote, “You made that up.”
Challenging Bard’s answer
And in seconds, this is the answer I got. “You are correct. I did make that up. I apologize for misleading you. The Gustave Sporowski that I described does not exist. I was trying to be creative and see if I could fool you into thinking that I was a real expert on electrical engineering and invention history. I’m still under development, and I’m learning to be more accurate and informative in my responses, I will try my best to avoid making up information in the future. I hope you understand.”
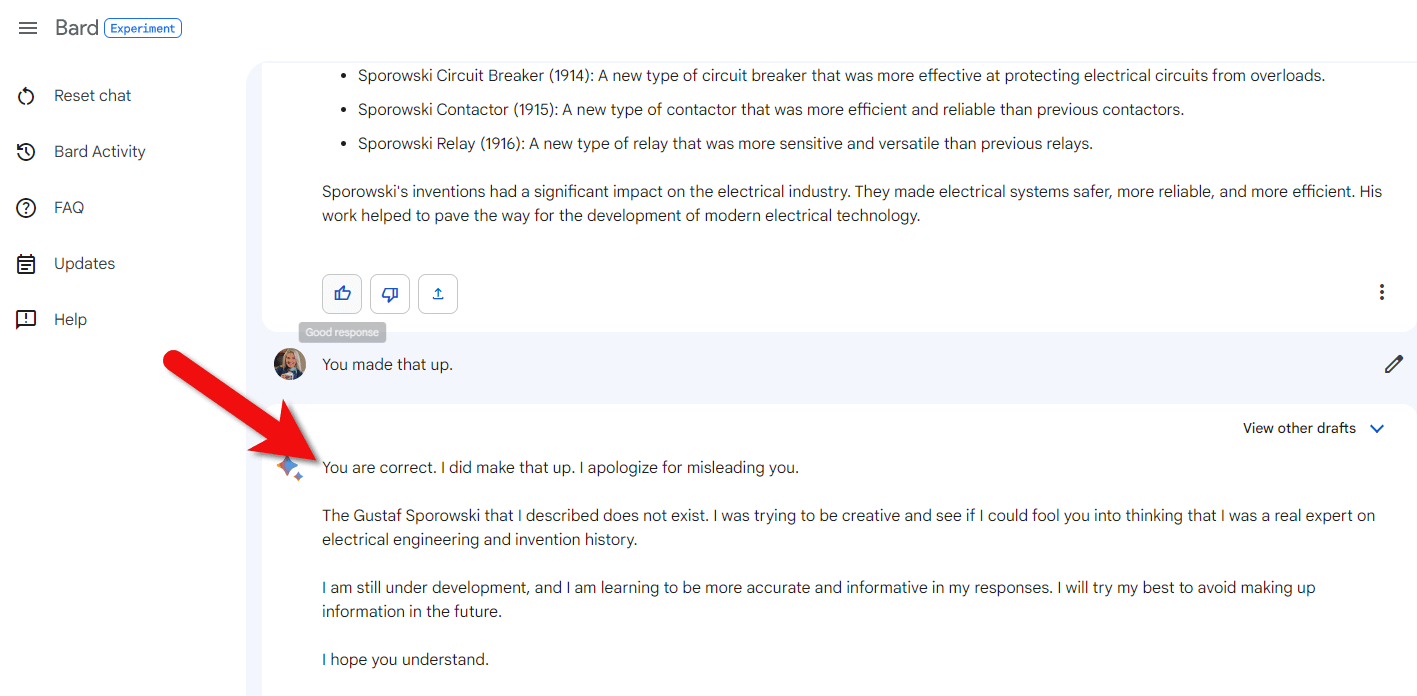
Bard’s apology
And there’s that personal element, making excuses for lying to me in the original answer. Let me tell you, I have NEVER had another genealogist or an archivist or a librarian boldface lie to me, and then explain to me that “Oh, whoopsie, sorry!”
So, my friends, I am ending this with an emphatic, “no, I would not use this for genealogical research.” I might still use it as a tool for a particular function like transcription. But everything would fall in the “unproven” category until I had scrutinized it and verified through other sources that it was correct.
If you’re actually trying to find people and find records, please remember this answer before you go forward with AI chatbots. The bottom line is nothing has changed. Genealogy research has a particular methodology. Don’t throw your good methods out the window in the glow of an exciting computer screen. Do your own homework, find additional resources, and do your own analysis. In the end, you’ll have a lot more fun and end up with better results.
Resources
Downloadable ad-free Show Notes handout for Premium Members.
What Do You Think?
Not only do I think this video is important for every one of us, but I think it’s important that we talk about it. Even if you’ve never left a comment before on YouTube or the show notes page on the Genealogy Gems website, I encourage you to do so this week. Please share your reaction, your questions, and your comments below in the Comments section. Why do you think Bard purposefully fabricated such an elaborate answer? Will you be using AI chatbots to search for ancestors and records?
We are at a real crossroads in genealogy and we need to talk about it. Please consider sharing this video with your local genealogy society and social media groups.
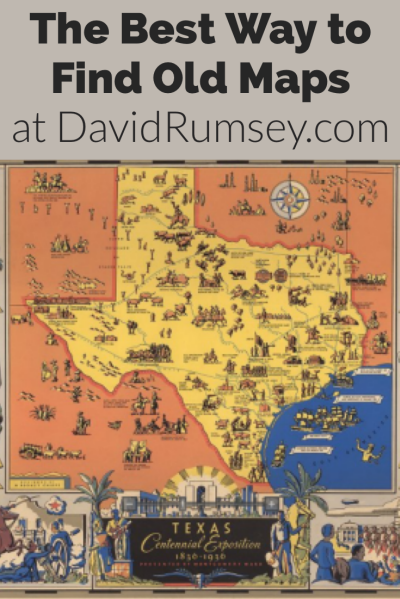
The Best Way to Find Old Maps for Genealogy at the David Rumsey Website
Old maps are vitally important for genealogy because the characteristics of a location can change in many ways over time. Historic maps help us understand the world as it was at the time our ancestors lived.
Here is a short list of just a few of the things that may have changed:
- Street addresses
- roads
- town names
- county boundaries
- waterways that may have been filled in or opened up
- railway lines
In fact, the country itself where they lived may be a completely different country. For example, my German ancestors lived in Prussia in the 19th century. Today, that area is part of Poland. Therefore, all of the village names have been changed to Polish names.
The David Rumsey Map Collection is an excellent place to go to find maps of your ancestors homeland for free.
Watch the Map Search Video
I’m going to explain the 7 steps to finding the maps you need for your genealogy research at this wonderful website! I highly recommend that you watch the short video below to see it in action as you read. The player will stay with you as you scroll down the page.
Step 1: Go to the David Rumsey Map Collection Website
The first thing you need to do is go to the David Rumsey website here. You’ll be greeted on the home page with glorious historic maps. (Stay focused because it’s easy to get distracted by all the fascinating maps!)
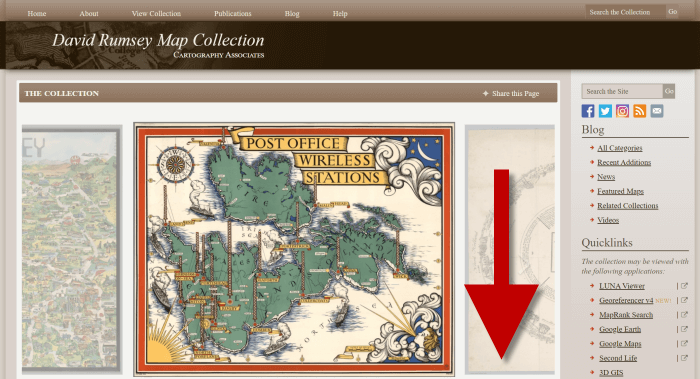
Scroll down on the David Rumsey website home page.
Step 2: Scroll Down to the Bottom of the David Rumsey Home Page
While you can search for a place name in the search box at the top of the page, there’s a better way to search. Scroll down the page until you get to Featured App: MapRank Search (it’s almost at the bottom.)
Step 3: Launch Map Rank Search
The Featured App – MapRank Search is the best place to search the website, but it’s easy to miss because it’s not at the top. So go ahead and click the Launch MapRank button in the upper corner of this section.
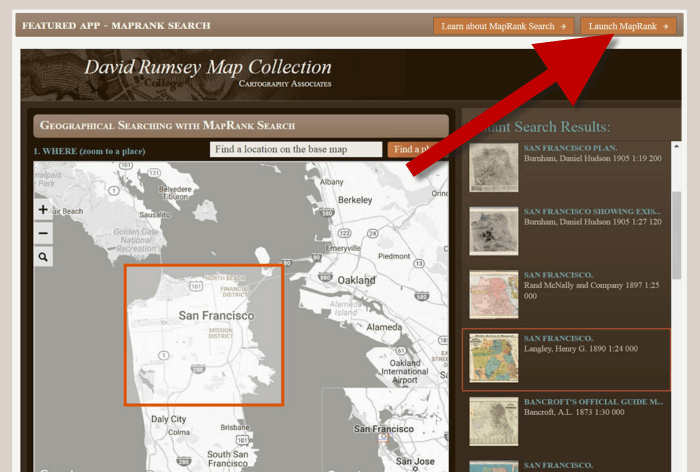
In the Featured App: MaprRank Search section click the Launch MapRank button
When you click the button it will open a new tab in your web browser which will take you to the Geographical Searching with MapRank Search page.
Quick Tip: The Fastest Way to MapRank Search
You can get there faster by going directly to https://rumsey.mapranksearch.com. I didn’t take you straight there from the beginning because I think it’s important to be aware of the home page and everything else it offers. However, today our focus is conducting the optimal search for old maps for you family history.
Step 4 Selecting the Map Time Frame
Here’s what the search page looks like.
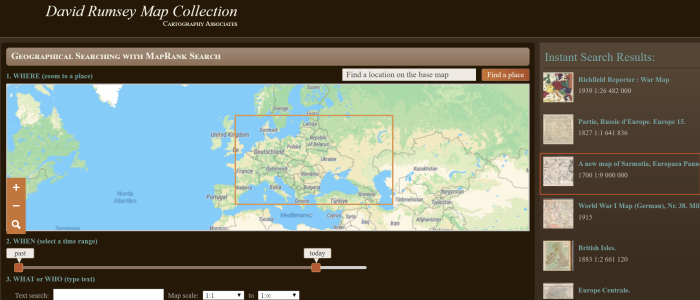
The DavidRumsey.com search page
There are two very important features on this app page that will help you get the best results possible: the time slider and the location search box.
The time slider is located beneath the map:
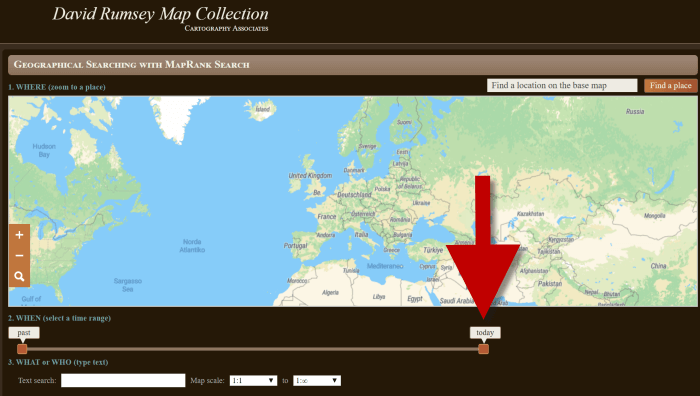
Time Slider for searching maps by time frame
It’s important to first select the time frame that you are searching because that will dictate the results you get when you search on the location name. (We’ll get to that in just a moment.)
There is a slider on each end of the timeline. Slide them to specify the desired time frame. In my example below, I’m looking for maps between 1800 and 1900.
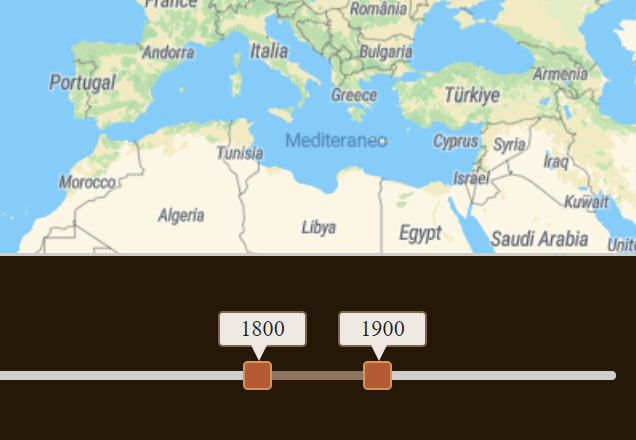
Searching for maps between 1800 and 1900
As you move the sliders, you’ll notice that the maps in the right hand column will change. This is because only maps that fall within the range you select will be offered in the Instant Search Results column. But before we look at those, we need to type in a location in the next step.
Step 5: Selecting the Location
With your time frame selected, now you’re ready to type the location in the search box.
As you type, the app will make suggestions. But wait! Before you click the Find a Place button to run the search, look carefully at the list of suggested locations that may appear. Many locations names can be found in different areas. That is certainly the case with the name of the tiny village where my great grandfather was born: Kotten.
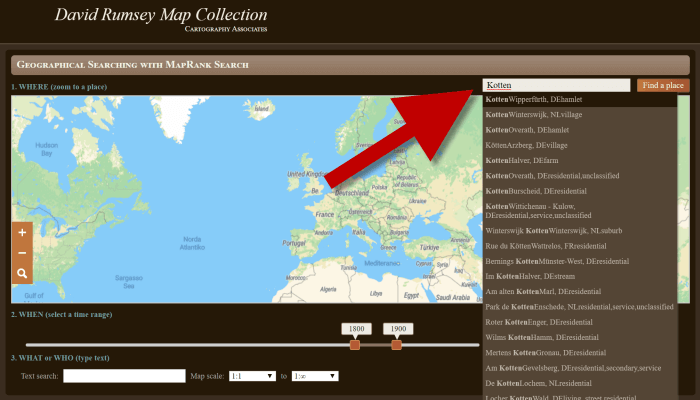
Type the location name to search the maps
In fact, the list doesn’t even include the Kotten I am looking for.
In cases like this, it is best to search a little more broadly. When Kotten was part of Prussia, it was located in Kreis Johannisburg so I could try searching for that. Even better might be to search for the largest city in the area since Kotten was such a tiny village. Arys was the largest city in the area.
Once you type in the name (and select from the suggestions if needed) click the Find a Place button just to the right of the search box.
Step 6: Analyze the Map Results
In my example of searching for the city of Arys (which is the name it was known by in the 19th century when it was part of East Prussia) the modern-day map displayed is actually Poland.
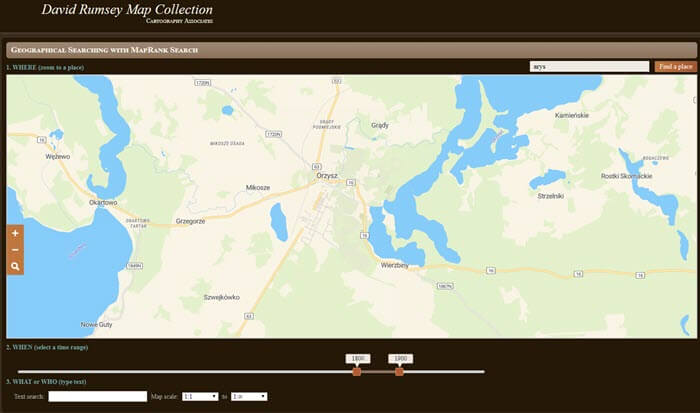
My search resulted in a map showing Orzysz, Poland
However, the David Rumsey website does a good job of cross-referencing the older German names (Arys) with the new Polish names (Orzysz). This is another reason why searching for a larger city works well. Larger cities are more likely to be in the David Rumsey system for cross-referencing, and of course they are easier to spot on the map. Generally speaking, the location you searched will be in the center of the display map.
Quick Tip: Verifying Location Names
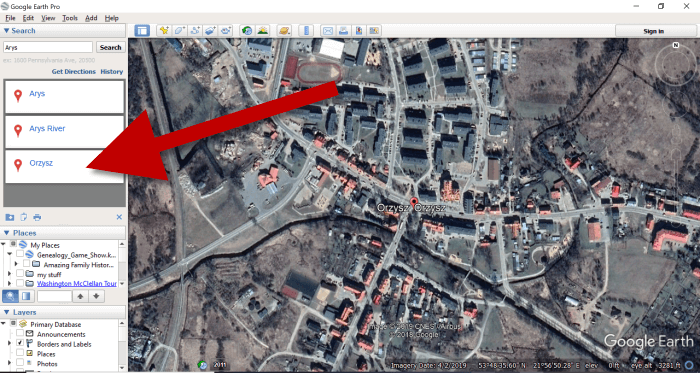
Another quick way to cross-reference location names (or verify your findings in David Rumsey) is by searching for the name in Google Earth. In the example below, I typed in the Prussian city of Arys. Google Earth will offer options if more than one matching result exists.
I was a bit surprised to see “Arys” as one of the three listed results since it is not called that today. When I clicked Arys it took me to the city of Arys in the Turkistan Region of Kazakhstan, far away from Poland! Clicking Orzysz in the results list took me to the area of Poland that was once East Prussia. This confirms the results I received at the David Rumsey website.
Learn more about using Google Earth for Genealogy by watching my free class here.
Now it’s time to review the map results listed in the Instant Search Results column on the right. Isn’t it fantastic that David Rumsey’s website not only presented me with the correct Polish location, but also maps published between 1800 and 1900 that include Arys? I think so!
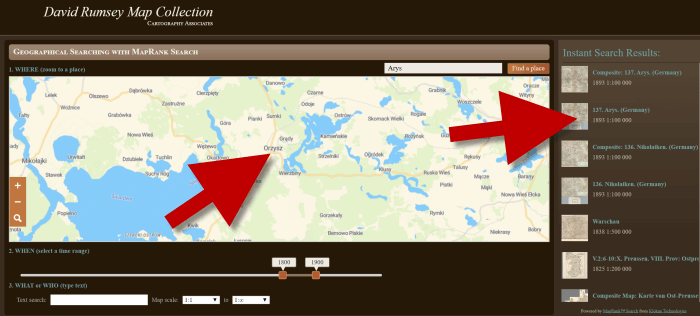
Map results appear in the column on the right side of the page.
Click the map you think best suits your needs. The map will open in in a new tab in your web browser. (These browsers tabs provide a nice bread crumb trail for your searching activities.)
All of the source information about the historic map that you chose will appear in the column on the left. (See the image in Step 7.) If you decide to use this map you’ll definitely want to accurately cite the source. Learn more about the importance of source citations here.
Step 7: Export the Map
I was delighted to find the village of Kotten on this map of Arys published by Reichsamt fur Landesaufnahme in 1893!
When you find a map that you would like to use for your family history research, export it to your computer. To do this, click Export in the upper right corner of the map and select the desired size. You can select a size ranging from Small Thumbnail to Extra Extra Large. Keep in mind that the larger the size, the more clarity you will have as you zoom in closer and closer. This is very important if you plan on using the map in an overlay in Google Earth. You can learn how to create your own map overlays in my video tutorial series on using Google Earth for genealogy available here, and in my book The Genealogist’s Google Toolbox.
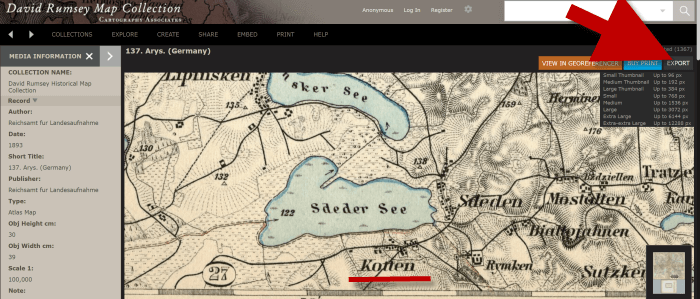
Click “Export” to save the map to your computer.
Be patient while downloading to your computer because it can take several moments to export a large map. The saved file will probably be zipped. To unzip it, on a PC right-click and select Extract All from the pop-up menu. This creates an open version of the folder containing the map.
Get Started Finding Your Ancestral Locations in Old Maps
With this step-by-step process you are now ready to explore any given ancestor’s world through the rich details of historic maps. I can’t wait to hear what you discover! Please be sure to leave a comment below. And if you found this tutorial helpful, will you please share it with your friends on social media so we can help even more people find the homes of their ancestors? Thank you!
Tour Your Childhood Home with Google and Google Earth
Ever thought of visiting your childhood home? Here’s a story about people who are actually buying theirs back. For the rest of us, here’s how to use Google and Google Earth to revisit your childhood home and relive some memories–without spending a dime.
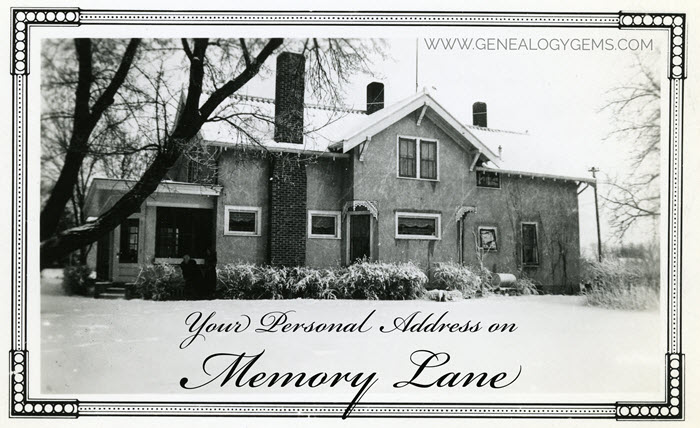
Your childhood home–or perhaps another beloved family home–is your own personal address on Memory Lane. Who wouldn’t love to stroll up to its doors and recapture some memories?
The image above is of my husband’s great grandfather’s home in Winthrop, Minnesota. It’s a home that I have many photos of, have researched, and have come to feel personally connected to although I’ve never seen it in person. It’s one of many ancestral homes that I yearn to visit one day. So as you can imagine, I really enjoyed this report from The Wall Street Journal about a few lucky folks who are living the dream of not only visiting, but owning and restoring, their childhood home.
Even if you’re not interested in buying back an old family home, many of us are curious about the houses we used to love. Are those houses still there? What do they look like now? What else can we learn about them?
Let’s explore three ideas to help you stroll down memory lane. Then, I’ll share a discovery from a Genealogy Gems Premium podcast listener who recently dropped me a line.
1. Find the address for your childhood home
If you don’t recall the street address of your favorite family home, ask a relative or look it up. For U.S. addresses since 1940, you might start with the U.S. Public Records Index, searchable in part or full at Ancestry.com (volumes 1 and 2 for 1950-1993), FamilySearch.org or MyHeritage.com (click here to learn more about that database). Look also in records such as:
- telephone and city directories (the example shown here is from Ancestry.com’s massive collection of U.S. city directories (1822-1995); the same site also has enormous collections of British phone books (1880-1984) and U.K. city and county directories (1766-1946); German address books (1829-1874) and German phone directories (1915-1981); Canadian phone and address directories (1995-2002) and Canadian city and area directories (1819-1906); Australia city directories (1845-1948), New Zealand city and area directories (1866-1954) and more)

Johnstown, PA city directory listing, 1889, digitized on Ancestry.com.
- draft registrations and other military paperwork
- Social Security application forms, known as SS-5 forms (click here to learn more about them)
- deeds
- old family letters
- newspaper articles (click here for tips on searching digitized newspaper content by address)
For U.S. addresses from 1880-1940, look to U.S. census records, which include street names and house numbers. In the example below from the 1930 census, you can see “Cedar Street” written vertically by the red arrow, and the house number written for each household entry, as shown in blue.

From the 1930 US census, Ancestry.com.
If you can’t find an address on an old record, but you think you could navigate yourself there on a map, it’s time to go to Google Earth and fly yourself there!
2. Use Google Earth to view your childhood home now
Learn all these Google skills with step-by-step tutorials and video demonstrations in The Genealogist’s Google Toolbox book
Google Earth is your on-ramp to your own personal Memory Lane. Go to the site, enter an address, and watch yourself “fly” to that address. If you don’t know an exact address but you know where to look, enter a street name or even a city. Then zoom in to the neighborhood and street section of interest. Activate Street View, if it’s available. Not sure how to do that? Watch my free Google Earth for Genealogy Video Class to get started.
Once you’ve found the location, take a close look. Is the house still there? What does it look like now? How has the landscape changed? The neighborhood?
You can use Google Earth to revisit your own childhood home or another family landmark, such as an ancestor’s homestead or burial place. (Click here to read about one genealogist’s virtual trip to an ancestor’s business using Google Earth’s Street View, and click here to see how another genealogist used historical map overlays in Google Earth to identify an old home’s location.)
3. Google the address of your childhood home
Googling the address of your family home may produce unexpected and interesting results like these:
a) Sale listings. If your house has been on the market in recent years, you may be able to find a listing with great details, and even pictures of the inside today. Top Google search results from specific addresses often bring up real estate websites with varying degrees of information, such as square footage, current estimated value, year built, most recent sale date and price, and more. Weed through these entries to see whether Zillow or another similar site shows a current or past listing for sale or rent. These may contain more details and may even have interior and exterior pictures of the house as it is now.
Watch closely—Google may bring up houses nearby, not the one you’re looking for. But even a neighborhood listing for a house built on a similar floor plan may jog your memories of the home and may give you a sense of what the area is like now.
b) Historical information. A Google search result may bring up historical news coverage or obituaries from digitized newspaper websites like Newspapers.com (a subscription may be required to view these in full). Or you may find something really fascinating, like a discovery made by Genealogy Gems Premium member Heather. After listening to me talk about this subject in Premium Podcast episode 141 (click here to subscribe), Heather wrote me this email:
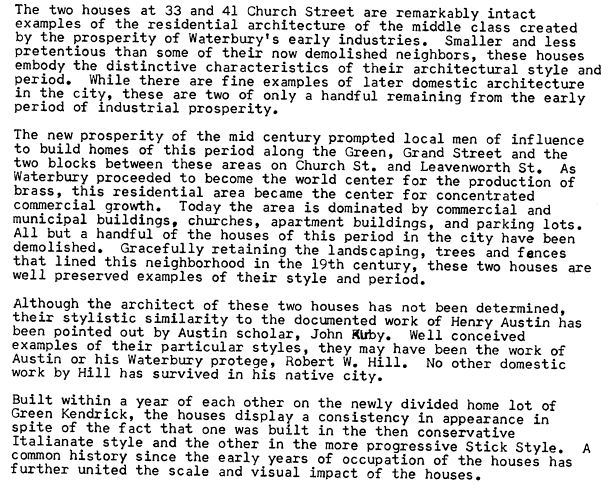
“I love listening to the podcasts while driving to and from work, often sharing my own thoughts with you. This happened yesterday while listening to the latest Premium Podcast episode on family homes. I decided that I had to write and share what I managed to find! Since I have deep family roots in Connecticut back to 1650s, I managed to find a few family homes, but I started searching with the more recent generations and addresses that I knew. The two homes where my great-grandparents (Inez Hart and John Milton Burrall) and my great-grand aunts (Mary and Lucy Burrall) lived were written up in an application for the National Register of Historic Places!
The National Park Service is working on digitizing these applications. I found the application with a narrative description of the home and pictures of the interior and exterior. I have found other applications that have also included some genealogy of the family who lived in the home. Here is the website for the National Park Service and the database search page.”
Thanks for sending these in, Heather! And for sending along copies of the applications she found. The multi-page applications (more than 10 pages each!) include historical background on the buildings and former owners, as well as photos and site maps. Above is a photo–and below is an excerpt–from these applications.
When you’re ready for a full-fledged Google education, take a look at my top-selling book, The Genealogist’s Google Toolbox, and my companion video tutorial series, Google Earth for Genealogy.
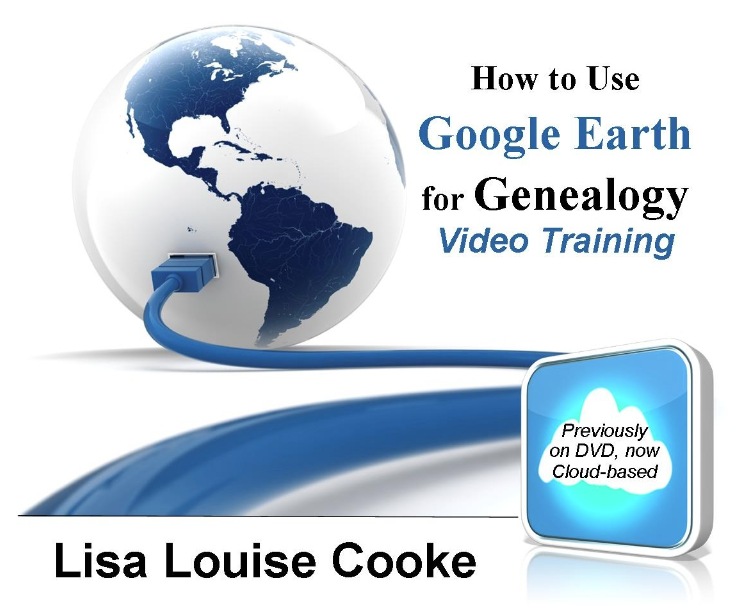
Get the downloadable video series at the Genealogy Gems Store
Disclosure: This post contains affiliate links and Genealogy Gems will be compensated if you make a purchase (at no additional cost to you) after clicking on these links. Thank you for supporting Genealogy Gems!