by Lisa Cooke | Jan 15, 2014 | 01 What's New, FamilySearch, Records & databases
Are you a FamilySearch indexer, or have you considered joining this worldwide volunteer effort? FamilySearch has just launched a new website that’s 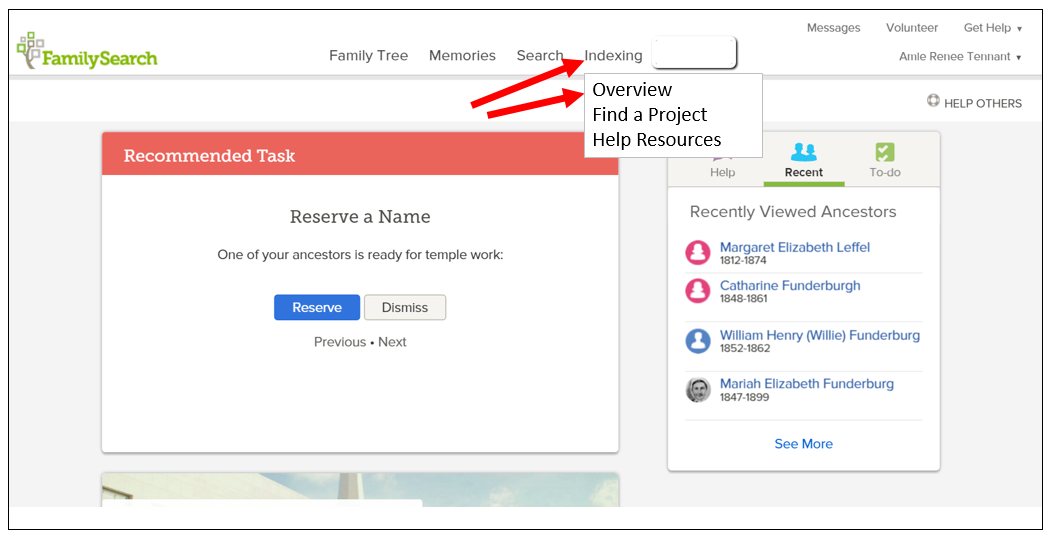 all about making indexing EASIER.
If you’re already an indexer, here are the highlights of the new site, according to FamilySearch:
- Getting started with indexing just got easier. With an easy-to-navigate Overview page and an all-new Get Started page, the new website is the perfect introduction to indexing.
- Looking for more indexing help? Check out the completely redesigned resource guide. Now called Help Resources, this page guides you to the help you need.
- Find projects you want faster. In the old indexing website, you had to scroll through over 200 projects, now you can click on an interactive map and filter the project list based on language and country.
But wait, there’s more! According to FamilySearch, “The change in the indexing website is just the first step in a total redesign and improvement of the indexing experience. The coming year will see the all-new indexing program become more integrated with FamilySearch.org, bringing indexing to your Internet browser, enabling indexing on tablet devices, and much more.”
They plan to announce more at RootsTech next month, where there will be a session on FamilySearch indexing and where the FamilySearch booth will have hands-on opportunities to try out the new system. (Haven’t registered for RootsTech yet? Register here! Early-bird pricing has been extended until Monday, Jan. 27.)
 P.S. WHY INDEX?
Indexers for FamilySearch have already generated more than a billion names that are free to search at FamilySearch.org. The company’s press release points out that improvements to the indexing site have in the past accelerated the pace of indexing and they expect that to happen over the coming year, too.
Here’s my favorite tip for the researcher who wants a little more out of indexing for themselves. Use indexing to become more familiar with different record types. Do a few batches of naturalization records, border crossings, church registers, etc., from different places or time periods, and you’ll quickly become more familiar with that record type. You’ll also become more adept at reading old handwriting, picking out the genealogical details from the legalese and other skills that will help you in your own research.
by Lisa Cooke | Apr 30, 2014 | 01 What's New, Family Tree Magazine, Research Skills, Technology

We’ve all got genealogy brick walls in our research: family mysteries we have so far found unsolvable. In the new issue of Family Tree Magazine (May/June 2014), Lisa’s got a great article packed with 14 strategies for SOLVING those perplexing questions.
The article is “Warming Up a Cold Case,” and it’s got a fun criminal investigator theme. I won’t give all 14 of her tips away, but some of my favorites include re-examining old evidence, finding new witnesses and going on a genealogical stakeout. And one that made me laugh out loud: “Post wanted posters.” And then I just had to put my ancestor’s face on a wanted poster (right).
How do you really create a wanted poster for your ancestor? Lisa shares these ideas in the article:
1. Post their names on genealogy online message boards (like at Ancestry.com). But fill in those “wanted” details. Instead of height, weight and hair color, add what you know about their births, marriages, deaths, family relationships and residences.
2. Post your family tree online at any number of sites for free. Sites organize their trees in one of two ways. Ancestry.com, MyHeritage.com and others can i buy medication without insurance offer the individual tree model. You upload (or build on the site) and maintain your own tree. FamilySearch.org, WikiTree, Geni.com and WeRelate.org are community tree sites. You may work from a view of your own tree, but the site is merging your tree with others behind the scenes to create a single world family tree (each does this a slightly different way).
3. Start your own family history blog. Write keyword-rich blog posts that make it easy for Google searchers to find your ancestors there. Check out Lisa’s free four-part series on how to create a genealogy blog at the Genealogy Gems YouTube Channel. This link will take you to the 4 part video playlist.

Find the entire article in the May/June issue Family Tree Magazine. Even better: Genealogy Gems Premium Members can also watch Lisa’s one hour video class Brick Walls: Cold Case Investigative Techniques. Not a Premium Member yet? You’re missing out on 24/7 access for a year to some of her most popular classes on Google, Google Earth, organization, Evernote, newspaper research and more. Learn more about Genealogy Gems Premium Membership here.
by Lisa Cooke | May 6, 2017 | 01 What's New, British, Legacy Tree Genealogists
With about 1/3 of Americans claiming British ancestry, chances are that at some point you will need to extend your research across the Atlantic Ocean. Genealogical research in the British Isles has some important differences when compared to the United States. Guest blogger Kate Eakman, a Senior Researcher for Legacy Tree Genealogists, clarifies confusing terms and helps you get your research started on solid footing!
Britain? England? The United Kingdom?
When beginning British genealogy research, it’s important to first talk about the difference between British and English research. There are several terms which get used interchangeably but which really refer to different locations.
Great Britain is an island, the largest island in the British Isles.
On the island of Great Britain are three of the four sovereign nations which make up the United Kingdom, or the U.K.: England, Wales, and Scotland. Northern Ireland on the island of Ireland is the fourth country of the U.K.
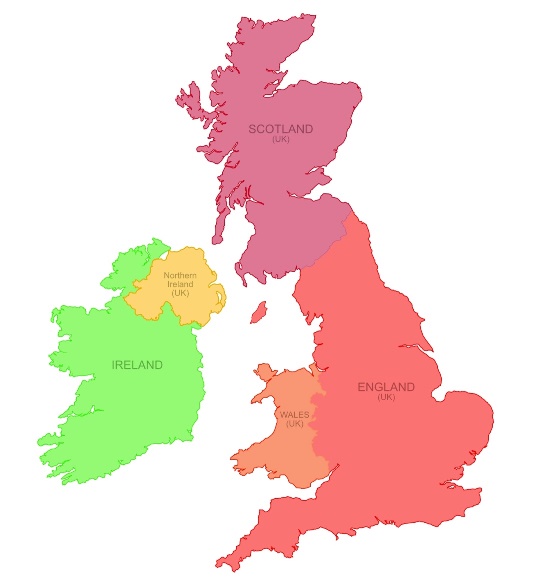
The four countries of the United Kingdom and the Republic of Ireland. Map courtesy Nate Parker.
Usually, when people talk about their British ancestors, what they really mean are their English ancestors. Although we Americans often treat the two words as interchangeable they really aren’t, and I suspect our English friends giggle a bit when they hear us misuse the words.
The four countries of the U.K. have some similarities but many important differences, and that is equally true for genealogical research. Rather than trying to explain all of those differences, this post will focus on English research.
One last thing to keep in mind when we talk about genealogical research in England is that today the country is divided into counties, which are sort of the equivalent of states in the U.S. Older records might refer to those counties as shires, and over time the borders have shifted, shires and counties were added, divided, or absorbed into each other. So a good map or two will be a useful tool to keep handy while you research your English ancestors.
Usually, when people talk about their British ancestors,
what they really mean are their English ancestors
What do you know?
Before beginning British genealogy research and making that leap across the pond, it is a good idea to consider what you already know about your English ancestors. Of course, you have a name, and you probably have an approximate date of birth.
- Were you fortunate enough to find the name of a town or county where that ancestor lived or do all of the census reports and vital records simply say “England”?
- If the ancestor arrived as an adult, what occupation did he pursue?
- When did he or she arrive in the U.S.? Are there any clues on the passenger list to tell you where to start looking?
- Once you have reviewed all of the information you have already acquired about your English ancestor, it’s time to start your research.
Beginning British Genealogy Research with the Census
The first step in most genealogical research is to study the existing census reports. Designed as a means to count the population for a variety of years, the census of Great Britain (including Scotland) is taken every ten years with the earliest records available in 1841. Due to very restrictive privacy laws, the most recent census available is from 1911, with one really valuable exception being the 1939 Register, available at FindMyPast.
Used for genealogical purposes, the census can give a snapshot of the family at the time the census was taken, as well as provide invaluable information such as the birthplace of the individual being recorded, occupation, birth year, and familial relationships. Elderly parents, or widowed mothers, aunts, or sisters, can be discovered living with younger members of the family.
Drawbacks of using the census for genealogical purposes include inaccurate name spellings, inaccurate age reporting, and inaccurate assumptions made by the enumerator. Another thing to keep in mind is that in the 1841 census the enumerated rounded down to the nearest five years the ages of people over 15. So a person who was listed as 25 could have been 25 through 29 years old.
It is important to remember that for the census reports through 1901 the enumerator copied the household information into books, and these copies are what we have today. Of course, when information is copied it is susceptible to error. The person who completed the census form may have had difficult-to-read handwriting, or the enumerator may have entered things on the wrong line. The individual reports have been kept for the 1911 census and offer a greater likelihood that the information they contain is very accurate.
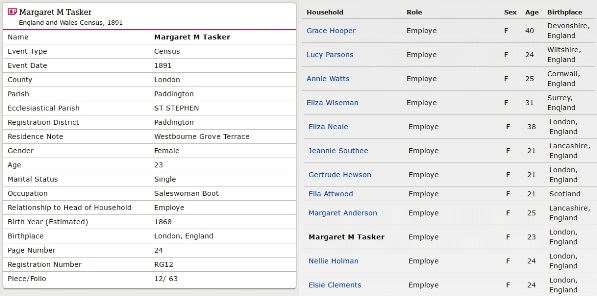
An example of a transcription from the 1891 English Census from Familysearch.org.
Detailed transcripts of English census records are available for free on FamilySearch and the images can be found for a fee at FindMyPast.
It is important to remember that for the census reports through 1901 the enumerator copied the household information into books, and these copies are what we have today.
Civil Registry of Vital Events
All English births, marriages, and deaths were required to be registered in a civil registration office beginning in July of 1837. In addition to the records themselves, there are indices which list the name of the person who was born, married, or died, the place where the event was registered, and the quarter and year in which the event occurred. Because the General Register Office (GRO) will only search one year on either side of the date provided, it is best, but not required, to include the index information when ordering documents from the GRO.
Free BMD is a free database which allows you the most freedom to search for the birth, marriage, and death index record of your relatives. You can enter whatever information you know including the place where the event happened, a specific year or range of years, age, and mother’s maiden name.
Depending on the time period, the index may be handwritten or mechanically printed. The information can then be used to order a copy of the actual record from the General Register Office (GRO) in England for about $10 per record.

An example of handwritten (left) and mechanically printed (right) birth index entries. Photos courtesy https://freebmd.org.uk.
The information contained in birth records includes:
- Name, date, and place of birth;
- Father’s name (if given at time of registration), occupation; and
- Mother’s name, maiden surname.
The parents’ places of birth were added after 1969, and the mother’s occupation is listed after 1984.
Marriage records include:
- Date and place of marriage;
- Name, age and marital status (spinster/bachelor, widowed, divorced) of the bride and groom;
- Occupation and usual address;
- Name and occupation of the fathers of the bride and groom, with a note if either man was deceased at the time of the marriage;
- Names of the witnesses;
- Name of the person who solemnized the marriage.
Death records in the United States are often relied upon to provide the names of the parents. English death records do not include that information and therefore are not as useful for genealogical purposes. Each death record includes:
- Name, date, and place of death;
- Date and place of birth (before 1969 a certificate only showed age of deceased);
- Occupation and usual address;
- Cause of death;
- The identity of the informant.
There are other records available, which we will talk about in a later post, which can be used to find and trace your English family members. The largest group are the religious records, and sometimes those can help you extend your family back in time to the 1600s – 400 years or more!
Beginning British Genealogy Important Take-Aways…
- “Great Britain” is an island. “The United Kingdom” is a country. And “England” is a country. Normally, when people are talking about their British ancestors they are referring to their English ancestors.
- England has counties, or what used to be known as “shires,” which function sort of like our states. The borders have changed over time, as have some of the names, so use a map when necessary to verify where you are researching.
- Census records are available from 1841 through 1911. Really good transcriptions are available for free at Family Search, or on the for-fee site Find My Past. And remember that age idiosyncrasy about the 1841 census.
- Finally, civil birth, marriage, and death records are available from the GRO. You can use the index listings to find the most likely match for your ancestor, and those can be found online at Free BMD.
Have fun and good luck finding your English ancestors!
 Kate Eakman is a Senior Researcher for Legacy Tree Genealogists, a worldwide genealogy research firm with extensive expertise in breaking through genealogy brick walls.
Click here to learn more about Legacy Tree services and its research team.
(Read our Disclosure and Affiliate Disclaimer on this page)
by Diahan Southard | Apr 29, 2014 | 01 What's New, Beginner, Family History Podcast, Immigration
Family History: Genealogy Made Easy Podcast
with Lisa Louise Cooke
Republished April 29, 2014

with Lisa Louise Cooke
https://lisalouisecooke.com/familyhistorypodcast/audio/fh29.mp3
Download the Show Notes for this Episode
Welcome to this step-by-step series for beginning genealogists—and more experienced ones who want to brush up or learn something new. I first ran this series in 2008-09. So many people have asked about it, I’m bringing it back in weekly segments.
Episode 29: Immigration and Naturalization Records for Family History, Part 1
In this podcast episode, one of my favorite experts talks about one of my favorite topics: immigration and naturalization records. Stephen Danko, PhD is a genealogy lecturer and a very popular blogger. In this episode he’s helping U.S. genealogists cross the pond through the use of immigration and naturalization records. He’ll talk to us about the challenges we’ll face in locating these records—and some documents you may not even know existed: certificates of arrival.
In the next episode, we’ll continue our conversation with a discussion of Departure Passenger Lists. Departure information from European ports is often available on microfilm at the Family History Library, on Ancestry.com or other websites. Some of the passenger steamship lines themselves kept departure lists, like the White Star Line or the Red Star Line, and these are on microfilm.
Here are my favorite tips from the episode:
Once you find an ancestral hometown, use Stephen Morse’s advanced search tools (see below) to look for others who arrived from the same place. This can help you identify other relatives, friends and others who part of a group or chain migration.
Usually we start with the most recent records and work backward. But when we look for immigration and naturalization records, look FIRST for immigration papers. THEN look for naturalization papers they may have filed later. You know they arrived—but not every immigrant naturalized, and their naturalization papers may have been filed in multiple places and may not be indexed.
Beginning in 1926, applicants for naturalization who arrived in 1906 or later had to be issued a certificate of arrival. These certificates were issued after their names were confirmed by the government on the original passenger lists. Between 1926 and 1943, information about certificates of arrival was noted on the original passenger lists.
The certificate of arrival information helps you in two ways:
- The date tells you about when they applied for naturalization
- The first part of the certificate number is the naturalization district (Northeast, Midwest, West coast, etc), to help you narrow down where to look.
Anything that helps you narrow down a search for naturalization records helps!
Updates and Links
About 70 million immigration and naturalization records have been indexed in recent years through an enormous community indexing project led by FamilySearch. Check out their site (below) to see what records are searchable now.
Ancestry.com
Ellis Island.org
FamilySearch.org Immigration and Naturalization Online Resources
One-Step Webpages by Stephen P. Morse (Ellis Island Search Tool)
Timeline of U.S. Immigration Laws