Do you have old pictures but aren’t sure where they were taken? Sometimes Google Earth has the answer. Check out this question from podcast listener Dennis:
Q: “I am scanning slides from my only trip to my ancestor’s home in rural Germany and don’t recall the names or locations of a few people. The clue hear is ‘slides’. They were taken in 1986! I have a question regarding something I thought I heard on one of your podcasts regarding identifying a building via a picture that is uploaded to a web site. Can you give me some help with this?”
A: Yes! On my website, I offer a FREE video in which I demonstrate how to identify a building in an old photo using Google Earth. You can watch the free video by going to www.GenealogyGems.com, hover your mouse over VIDEO, and click on Google Earth for Genealogy in the drop down menu.
Another option is to use the free Google app on your smart phone or tablet. Open the app, tap in the search box, tap the Camera icon, and take a photo of the photo you have that contains the building you want to identify. (This works best with more well known locations.) It’s a long shot, but you never know – Google just may be able to identify it.
Good luck, Dennis–and all the rest of you out there who are puzzling over how to identify old photos’ locations.
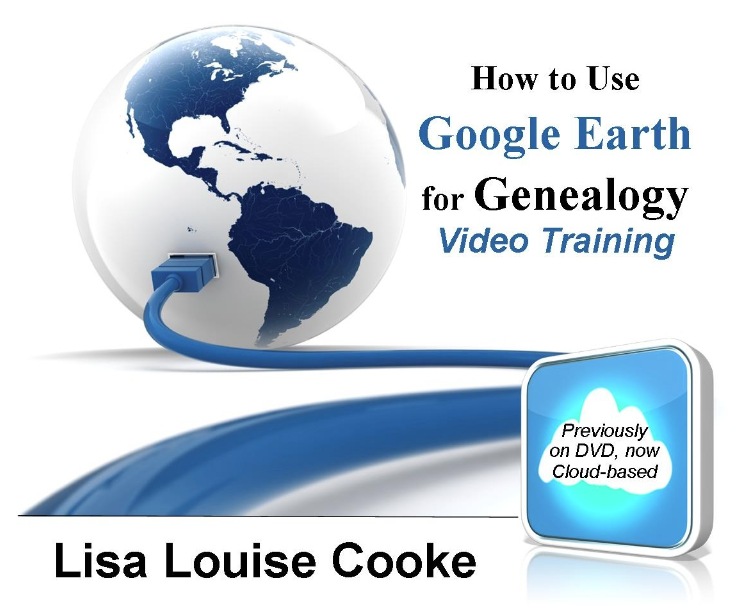
Find more tips on using Google Earth for Genealogy in my popular Google Earth for Genealogy 2-Disk Bundle. The free video is just the beginning of what you can do with Google Earth!
Join me for Elevenses with Lisa, the online video series where we take a break, visit and learn about genealogy and family history. (scroll down to watch the video)
Genealogy Consultation Provides a Strong Hypothesis
My 45-minute consultation with a genealogy expert Kate Eakman at Legacy Tree Genealogists broke things wide open on my Irish family lines and gave me the information and resources I needed to make all of the progress I shared in this episode. It’s the best investment I’ve made in my genealogy in a long time. They have experts in all areas. Learn more about how easy it is to book a consultation here.
After my consultation I needed to update my research plan and get to work collecting more genealogical evidence.
Let’s quickly recap what happened when I started working on my brick wall last week in episode 18:
Margaret Lynch’s death certificate said her parents were James Scully and Bridget Madigan.
Her obituary said she was born in Limerick Ireland.
There was one couple by those names in Limerick, having children and the right time. There is a gap in the records where Margaret should be.
Her husband Michael Lynch dies in Stillwater MN. St. Michael’s Catholic church. Found their marriage record in Stillwater. It was a large booming town, and a good place to focus. The Lynch family had a farm across the river in Farmington, Wisconsin.
My research question: Was this couple we found, James Scully and Bridget Madigan, who married in Kilcolman, Limerick, Ireland in 1830, the parents of Margaret Scully?
What Kate Eakman of Legacy Tree Genealogists helped me do in my 45-minute consultation:
Become acquainted with a variety of excellent Irish research websites
Located the indexed marriage record for James and Bridget
Located the original marriage record for James and Bridget
Located the indexed baptismal records for all of the children who had James and Bridget listed as their parents.
A Genealogy Research Plan for Collecting Evidence
After the consultation I developed a new research question: Are the children that we found records for in Ireland the siblings of my Margaret Lynch?
My research plan included:
Verify if there were any other couples by the names James Scully and Bridget Madigan married in Ireland, particularly in the time from of circa 1830. (Location of source: RootsIreland.ie)
Search in the U.S., starting in the area where Margaret lived, for each child. I’m looking for records that name these same parents, and show the child at an age that correlates with the baptismal date.
I identified several sources I believed would help me accomplish my goals.
Marriage Records – I conducted a search for James in Bridget in all counties in Ireland. I discovered that the couple Kate found during my consultation is the only couple in the RootsIreland database with those names married in Ireland. This gives me more confidence that I have the correct couple.
U.S. Records – Armed with the names and ages of the children of James and Bridget, it was time to return to America. I needed to search U.S. records to see if any of the children came to America (perhaps living near Margaret) and if these parents were named.
Records to look for:
U.S. Federal Census (Ancestry, FamilySearch), and State Census (Minnesota Historical Society, Ancestry, FamilySearch)
Death records (Minnesota Historical Society, FamilySearch.)
Before I began my search I created an excel spreadsheet to capture the information. I included columns for what their ages should be in each census.
Using a spreadsheet to track my findings.
Now I was ready to start the genealogical hunt!
U.S. Census
Search each sibling one at a time in the census.
Focus on Washington Co., Minnesota (marriage and death location for Margaret & Michael Lynch)
Move on to Polk County Wisconsin, and greater Wisconsin.
Search both U.S. Federal Census & State Census
Top locations identified for this search: Ancestry.com, Familysearch.org, Minnesota Historical Society
Results:
Found individuals matching the sons in Stillwater and Baytown (Washington County)
Found Bridget Scully (Mother) living with various sons in various census records.
Immigration years listed for some of Margaret’s siblings.
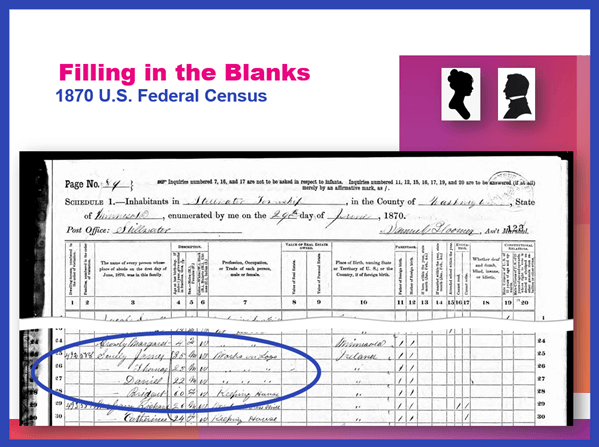
Found in the 1870 U.S. Federal Census: James, Thomas, Daniel and Bridget.
I created folders for each sibling marked MAYBE and collected the records on my hard drive.
Learn more about hard drive organization in Elevenses with Lisaepisode 8.
Searched FamilySearch and the Minnesota Historical Society for a death record for each son.
Found Thomas and James.
James Scully and Bridget Madigan listed as parents
Ages matched
Next step: order the death certificates
Newspapers
Next I searched the Minnesota Historical Society website for newspapers.
Results:
170+ articles
Two obituaries for Bridget Scully! (8 children, immigration year, husband died in Ireland implied)
Found James Scully working with his brother and his obituary
Research Tip: Look at a map and identify nearby towns and larger cities. Expand your search to these areas.
I found a James Scully in the 1860 census with Bridget and his brothers, and working with Thomas in many newspaper articles.
Bridget’s obituary said she came to America with 8 children. 7 had baptismal records in Ireland. James and Margaret were not found in the baptismal records but were confirmed in U.S. records to have the same parents. That would be a total of 9 children. It’s possible one of the daughters that have not yet been found in U.S. records may have died in Ireland prior to their leaving for America.
I then combed back through my Lynch binder – I might spot something that I marked as unsure, or that might jump out at me now that didn’t 20 years ago.
Found History of the St. Croix Valley I had photocopied a section. Names Daniel Scully (who I have since found in the census, newspapers and death records) and says his parents are James Scully and Bridget Madigan!
Looked the book up in Google Books. It’s fully digitized. Now I can extensively read and search it.
Tech Tip: Clip and combine newspaper clippings with SnagIt software
Clipping and saving newspapers poses a unique challenge for genealogists:
Clipping a small portion of a very large digital newspaper page can result in a low resolution file.
If you clip an article you don’t always capture which newspaper and issue it came from
Articles often continue in different locations on the page or pages, making it impossible to capture the entire article in one image.
I use SnagIt software to clip my newspaper finds. I can then save them to Evernote or archive them on my hard drive. SnagIt can save your clippings in wide range of file types and can even clip video. You can get your copy of SnagIt here. It’s a one time fee and download – no subscription! (Thank you for using my link – it financially supports this free without any added expense to you.)
How to combine multiple clippings with Snagit:
Clip the paper title and date
Clip the article
Clip any additional applicable sections of the article
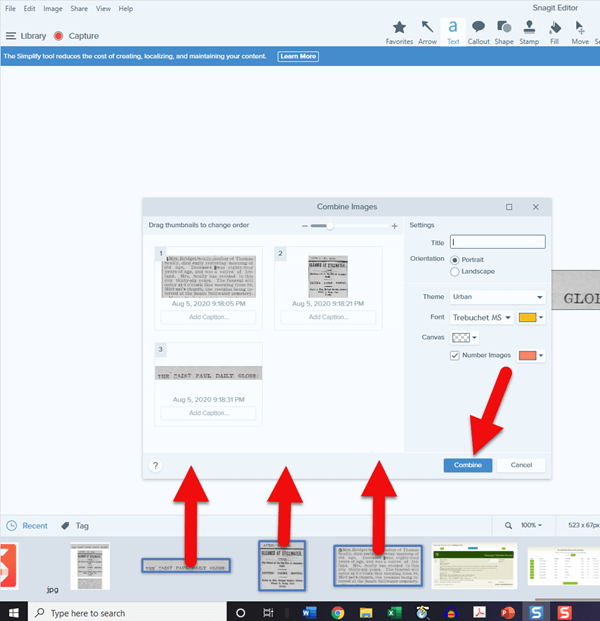
In the SnagIt menu under Image click Combine Images
Drag and drop the clippings into the desired order
Click the Combine button
Save the combined image: In the menu File > Save As (you can select from a wide variety of file types)
Research Tip: Using Street Addresses in Google Earth
When you find a street address, whether in a newspaper, city directory, census or other genealogical record, use it to find the location in the free Google Earth software program. You can then save an HD quality image of the location.
How to find a location in Google Earth (on a computer):
Type the address into the search field in the upper left corner
Click the Search button
The map will automatically “fly to” the location and a pin will mark the general spot.
Hover your mouse pointer in the upper right corner of the to reveal the navigation tools. Click the plus sign to zoom in closer.
How to view the location with Street View:
Zoom in relatively close so that the street and buildings are distinctly visible.
Just above the zoom tool you will find the Street View icon (the yellow “peg man”). Click on the icon and drag it over the street in front of the building / location. Don’t release your mouse. It may take a second or two for the blue line to appear indicating that Street View is available in that location. If no blue line appears street view is not available.
When the blue line is visible, drop the Street View icon directly onto the blue line in front of the location you want to view. by releasing your mouse. If you miss the line and the picture looks distorted, click the Exit button in the upper right corner and try again.
Once on Street View, you can use your keyboard arrow keys to navigate. You can also click on further down the street to move forward that direction.
How to save an image of a street view location:
Position yourself in the best view of the desired location using your mouse and keyboard arrow keys as described above.
In the toolbar at the top of the screen, click the Image icon (it looks like a portrait-oriented page, near the printer icon)
A Title and Description box will appear at the top of the screen beneath the toolbar. Click it and type in a title and description for your image if desired.
You can adjust the size (resolution) of the image you will be saving by clicking the Resolution button above the title box.
When you’re ready to save the image to your hard drive, click the Save Image
Learn more about using Google Earth for genealogy in Elevenses with Lisaepisode 12.
Order the video training series at the Genealogy Gems Store featuring 14 exclusive step-by-step video tutorials. The perfect companion to the book The Genealogists’s Google Toolbox by Lisa Louise Cooke.
After a week of post-consultation research:
Question: Who were the parents of Margaret Scully born in Limerick Ireland on approximately July 9, 1840?
Answer: James Scully and Bridget Madigan, married in Limerick, Ireland June 13, 1830. (Though I feel confident about this, I still have additional records I want to find in order to further solidify this conclusion.)
Question: In what Parish was Margaret Lynch born?
Answer: Most likely Kilcolman based on the baptismal locations of her siblings.
My Next Research Steps:
Browse search through the baptismal parish records at NLI 1839-1842 for Margaret, and 1834-1836 for James Scully.
Look for marriages of Margaret’s female siblings, and family burials.
(Contact St. Michael’s church, Stillwater, MN.)
Go through newspapers.com – there are several Minneapolis and St. Paul papers running articles from Stillwater.
Resume my search of passenger list records with the newly revised date of c. 1851.
Search for the death record of Bridget’s husband James at RootsIreland and NLI.
How to Book a Genealogy Consultation
My 45-minute consultation with a genealogy expert Kate Eakman at Legacy Tree Genealogists broke things wide open on my Irish family lines and gave me the information and resources I needed to make all of the progress I shared in this episode. It’s the best investment I’ve made in my genealogy in a long time. They have experts in all areas. Learn more about how easy it is to book a consultation here.
Learn More:
For more step-by-step instructions for using Google Earth read my book The Genealogist’s Google Toolbox available at the Genealogy Gems Store.
Recommended Genealogy Gems Premium Member Videos with downloadable handouts:
Here’s our link for purchasing your copy of Snagit (screen clipping tool) Thank you for using our link. Use coupon code GENE15 to get 15% off.(We will be compensated at no additional cost to you, which makes the free Elevenses with Lisa show and notes possible.)
You’re going to learn:
What Snagit does and the problems it can solve for you as a genealogist!
How to screen capture using Snagit
Amazing advanced new features you didn’t know Snagit had and how to use them.
How to do scrolling and panoramic screen clipping (perfect for family trees, historic maps, long web pages and so much more.)
How I specifically use it for my genealogy research.
Add my YouTube channel to your “Favorites” list on YouTube:
Click here to add my channel to your YouTube favorites. Clicking the red “Subscribe” button at the Genealogy Gems YouTube channel will add my channel to your YouTube library which makes it super easy to return to my channel and Elevenses with Lisa any time you’re on YouTube.
How to Use Snagit
One of the things that we all work really hard to do is solve family history mysteries. And as we do that, we are finding all kinds of goodies. But the trick is that we have to capture them. Right? If we don’t, then we may end up losing the trail.
Last week, we talked about citing the sources that we find. This week, we’re going to be capturing our findings in a very visual way, and actually incorporating those source citations. And we’re going to be doing it with the tool that I really absolutely use every single day. And that’s Snagit.
The Image-Capturing Challenges that Genealogists Face
To understand the value of a tool we need to make identify the problems we face and see how it solves them. Here are some of the challenges genealogists face when it comes to capturing images:
We don’t need or want to save the whole page. (Why waste all that ink printing it or storage space saving it?) We may not want to download or copy an image from an unknown website. (No one wants to accidentally put a virus on their computer!)
The page in its entirety is blurred when printed. (This often happens with newspaper pages.)
We need to capture a very long or wide page that can’t be displayed in its entirety on the screen.
We want to annotate or add a citation to the source image.
It takes extra time to save to items to your computer and then add them to other documents in other programs.
Do you identify with some of these challenges? I sure do.
Let’s say that you find an article, a document, or something else, and you want to add an annotation. Maybe you want to add the source citation, a watermark, or just notes to yourself directly onto the image.
It would be time-consuming to clip the image with perhaps the free snipping tool that comes on your computer and save it to your hard drive, and then pull it into another program to annotate it. I don’t know about you, but there’s never enough time for family history so anything that we can do to save time, means we’re going to be able to spend more time with ancestors.
The solution is using Snagit.
Snagit Functionality
Here are just some of the things that Snagit can do:
“Capture” items that appear on your screen
Create videos with audio (Create > Video from Images)
Edit images (You can edit clipped and imported images and photos. You can also send screen shots automatically when using your computer’s snipping tool.)
Convert text on an image to typed text (Grab Text)
Create documents using templates (Create > Image from Template)
“Share” items to other programs with one click.
I have found that snag is so robust, and it has so many different options, I still can’t exhaust all the things that it offers me. But it’s also simple. It’s simple in the way that you use it. It certainly solves simple, everyday problems. And most importantly, it is a program that I can use not just for genealogy, but also for my business and personal use. I like to have tech tools that serve me across the board, if possible, because it takes time to get up to speed on any program. If you’re just getting programs that are only for genealogy, then you end up needing a second program to be able to do similar things in other parts of your life. Why not find tech tools that can serve you across the board. That’s what certainly Snagit does. So, while I’m focusing on showing you genealogical applications for using Snagit, just know that if you’re new to family history, or you stumbled across us this article, and you don’t do genealogy, you’re going to be able to use Snagit for just about everything.
How to Get Started with Snagit
Purchase the software
Download and install
Open it and let it run in the background so you have easy access from your task bar
Yes, there may be a snipping tool built into your computer, and you can use Print Screen. Snagit can blow them away.
How to Capture a Screen Image with Snagit
Display the desired page on your screen
Click the orange Snagit icon in your task bar (Snagit should be running in the background on your computer.) This is the Capture If you don’t see it, click the blue Snagit icon to open the editor and then click the red circle Capture button at the top of the program. After your first capture, the orange Capture icon will then be open and available in your task bar.
Select the Image tab
Set the Selection to Region
Click the large red Capture button
Use your mouse to draw a box around the desired area. You may see flashing arrows. If you click one you will be ablet to scroll that direction to capture more of the page.
When you release your mouse the image will appear in the Snagit editor.
Sometimes we find an item that is larger than is visible on the screen. The page may scroll side to side or up and down. Use Scrolling capture to capture everything in one piece.
How to Scrolling Capture with Snagit
Display the desired page on your screen
Click the orange Snagit icon in your task bar
Select the Image tab
Set Selection to Scrolling Window
Click the large red Capture button
You will see flashing arrows. Click the arrow pointing in the direction that you want to scroll in Snagit will automatically scroll down and capture. Click Stop at any time if you don’t want to capture the entire page.
When you release your mouse the image will appear in the Snagit editor. You can then trim all sides by simply grabbing the handles and dragging.
In some situations you will need more flexibility in your scrolling. Panoramic capture allows you to select the region and then scroll manually, capturing exactly what you want to capture. Think of it as image capture and scrolling capture merged together. Panoramic capture allows you move both up and down and side to side.
How to Panoramic Capture with Snagit
Display the desired page on your screen
Click the orange Snagit icon in your task bar
Select the Image tab
Set Selection to Panoramic
Use your mouse to draw a box around the desired area
When you release your mouse a panoramic capture bar will appear. Click the Start button to being your panoramic capture.
Click in the captured image area and drag the image as needed. The more precise you are in your movement the better the final image will be. You can move in any direction.
When you release your mouse the image will appear in the Snagit editor. You can then trim all sides by simply grabbing the handles and dragging.
Panoramic captures work great for large items like maps, online family trees and newspaper articles just to name a few things. If you zoom out in order to capture these types of items in their entirety you will end up with a blurry item when you zoom in for a closer look. Panoramic solves this problem.
Let’s discuss a few more options for capturing hard to clip items like newspapers. Sometimes, the article you need is continued on a different page or column. With Snagit you can capture the individual pieces and then combine them.
How to Combine Captured Images with Snagit
Capture each section of the article individual using Image Capture (Region)
In the Snagit editor press Control / Command on your keyboard and click each item you want to be included in the combined image.
Press Control + Alt + C on your keyboard or at the top of the screen click Create > Image from Template.
Select the desired page layout. Custom Steps or Steps Portrait works well for articles.
Click on any items (such as numbered steps) and press delete on your keyboard to remove them.
The combined image can then be saved to your computer or shared to another program.
Editing and Highlighting Images
There are many ways to annotate and edit images (both captured and imported) in Snagit including adding:
arrows
text (perfect for adding source citations directly onto the image
call outs
shapes
stamps (Images on images)
lines
squiggles and drawing
step by step numbering
You can also modify images by cutting out portions, blurring and erasing areas, and even magnifying an area on the image!
Snagit Advanced Features and Strategies
Once you’ve mastered the basics there are many more ways to use this tool to power-up your genealogy research. Here are a few more ideas we covered in the video.
How to Grab Text from an Image with Snagit
Option 1 – Grab text from existing image:
Select the image in the editor so that it is displayed in the editing area
In the menu Edit > Grab Text. This will grab all of the text that appears in the image. If you only want a portion of it, click the Selection tool at the top of the screen and draw a box around the area you want to grab the text from.
The converted text will appear in a pop-up window
Copy the text to your computer’s clipboard by clicking Copy All.
Paste wherever you want the text to appear (another document, etc.)
Option 2 – Grab Text While Clipping:
Display the desired page / item on your screen
Click the orange Snagit icon in your task bar
Select the Image tab
Set the Selection to Grab Text
Click the large red Capture button
Use your mouse to draw a box around the desired area. You may see flashing arrows. If you click one you will be ablet to scroll that direction to capture more of the page.
When you release your mouse the image will appear in the Snagit editor. The converted text will appear in a pop-up window
Copy the text to your computer’s clipboard by clicking Copy All.
Paste wherever you want the text to appear (another document, etc.)
Grab Text from Windows Not Easily Copied
We’ll use the example of copying the titles of computer folders into an Excel spreadsheet. Open your file explorer and navigate to the desired folders. Since a mouse can’t be used to copy all the names in one swoop, we will use Option 2 – Grab Text While Clipping instructions above.
Create Videos with Snagit
You can compile separate images into a video and add voice narration.
In the editor select Create > Video from Images
Click to select the first image in the tray
Click the microphone button in the video recording bar if you want to record narration.
Click the Webcam button if you want to appear on screen
Click the red Record button to begin recording.
Click each image in the order desired for the amount of time you want it to appear on the screen.
Press the Stop button when done.
How to Create a Timeline with Snagit Templates
In the editor add images either by importing (File > Import) or capturing
Select the images to be include by holding down the Control / Command key and clicking on them
Create > Image from Template
Select the timeline template
Add a title and captions as desired
Click the Combine button
Productivity with Snagit
One of my favorite features of Snagit is how easy it is to share items to other programs directly instead of having to save them first to my computer. It’s easy to do. Simply select and display the image to be shared and in the menu go to Share > and select the program.
 Do you have old pictures but aren’t sure where they were taken? Sometimes Google Earth has the answer. Check out this question from podcast listener Dennis:
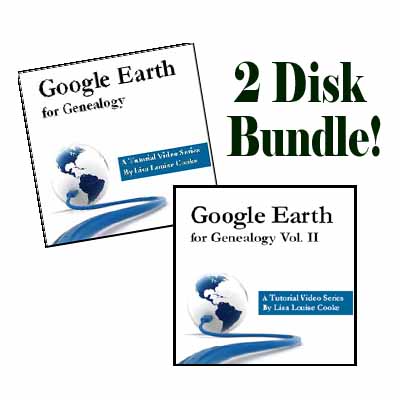 Good luck, Dennis–and all the rest of you out there who are puzzling over how to identify old photos’ locations.