Show Notes: WorldCat.org just got a facelift. That means it’s time to revisit this library catalog website and do these 5 important things so you can effectively use it for your genealogy research.
Video Premiere with Live Chat
Show Notes: WorldCat
If you are interested in finding out more about your family history and you want to build out your family tree, you are going to need records and resources. That’s exactly what the WorldCat website provides.
WorldCat.org is a free website that provides access through its card catalog to millions of materials from libraries around the world. You’ll find items such as:
United States Civil War and other military records
Family Bibles, church histories, and records
Publications such as directories, handbooks, and magazines
Birth, marriage, death, wills, and obituary indexes
Microfilmed genealogy and local history collections
Newspapers from around the world
Photographs
Town histories
probate records
It’s important to keep in mind that not all libraries participate in WorldCat, and they can participate at different levels. Therefore, you’ll find different amounts of information about these different repositories.
The WorldCat website has received a facelift and now sports a new user interface, making it a great time to get reacquainted with this rich resource. Here are five things you should do right now to take advantage of WorldCat:
#1 Sign up for a free account or transfer your existing account.
To use all the features at WorldCat that we will be discussing you’ll need to have a free user account.
To create your WorldCat account, click the Create an Account link and follow the prompts.
If you already have a WorldCat account you will need to transfer it. Click the Sign In link and follow the prompts for transferring. You can transfer your favorited libraries and lists. However, because of the new website, the following data will not be transferred: profile picture, reviews, saved searches, watched lists, interests, and tags.
Transferring can take quite a while. Leave your browser open until it completes. In fact, when I transferred it never showed complete, so after about an hour I refreshed the page and attempted to sign in again. I was prompted to create a new password, which I did, and was then able to access my account and my transferred data did appear.
Sign into your account whenever you visit the site so that you can take advantages of the many features offered, including our next item, Lists.
#2 Create and Search Lists
Lists are a great way to organize the wide range of resources you can find through WorldCat. I like to create lists for surname and subject research.
How to Create a WorldCat List:
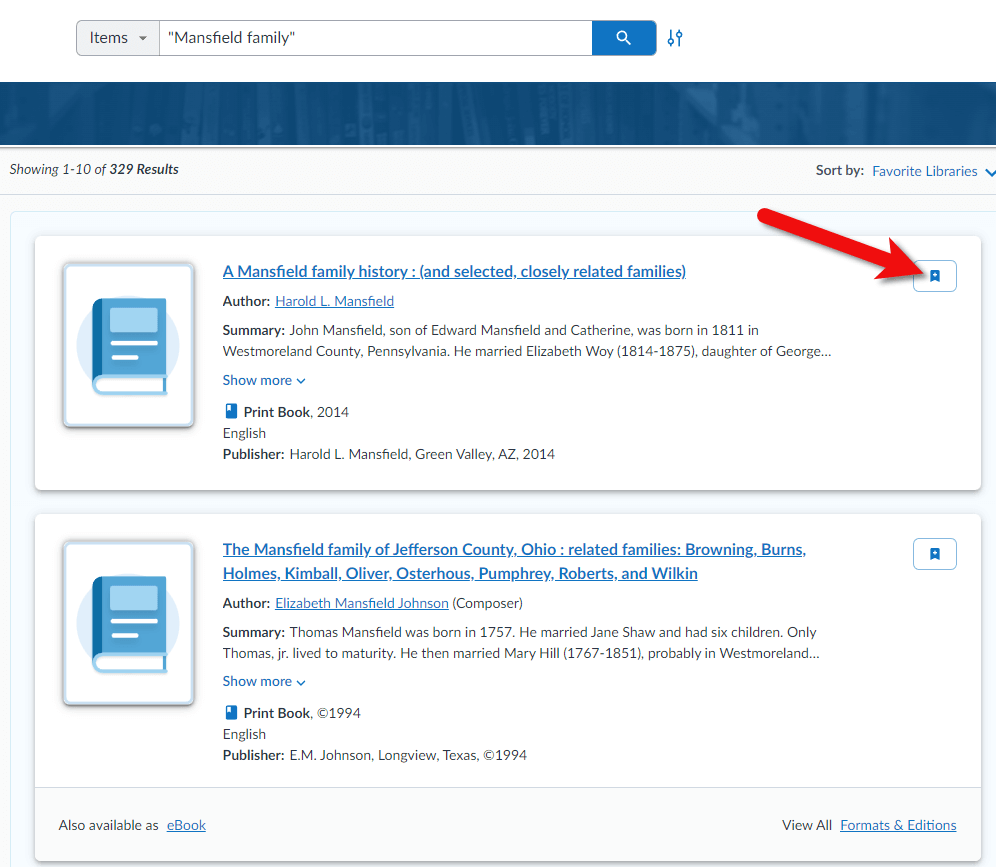
After you run a search you will receive a list of results. Click the List (bookmark) icon on any item
Click the List icon
The add Item to List box will appear. In this box you can add the item to an existing list or click the Create List button to create a new list.
Name the list, enter a description and indicate whether it is public or private.
Click the Create button to save the list.
You can find all your lists by clicking on your account icon (upper right corner on desktop) and select My Lists
In addition to creating your own lists, you can search the public lists of other WorldCat users. Click Lists in the menu to browser popular lists. To search for a list by keyword, go to the search bar and select Lists from the drop-down menu, and search by keyword. When you find a helpful list, click the Follow button.
You can have up to 50 lists with up to 500 items.
#3 Discover Libraries
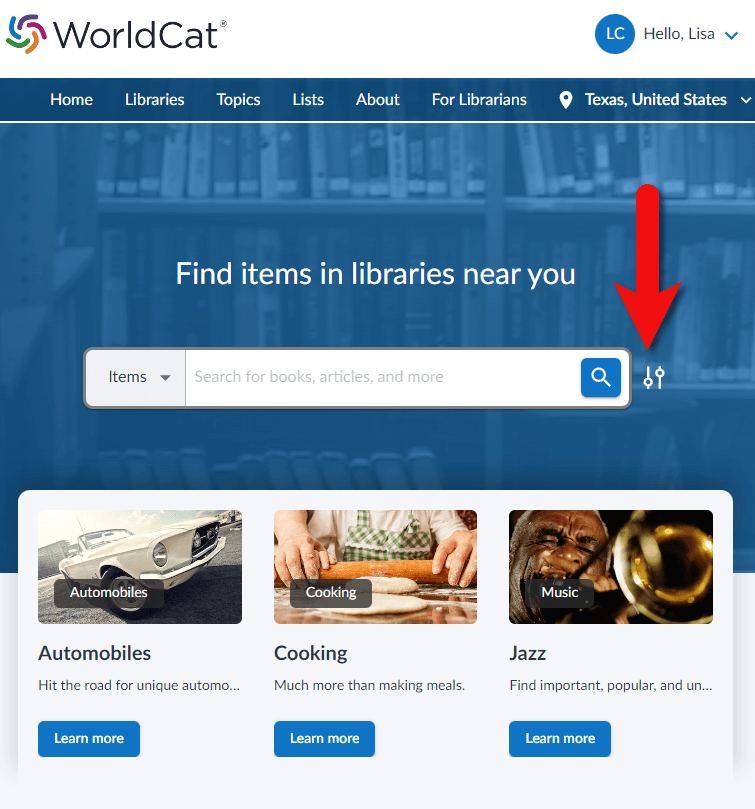
The best way to discover libraries near you is to add your location. Click the Update Location icon just under your account profile icon. Enter your town or zip code and libraries will be prioritized based on their proximity to you. If you’re going on a research trip, try changing the location to the zip code of the place you are traveling to, and then search for libraries and materials.
To browse libraries near you click Libraries in the menu. Add libraries to your list of favorite libraries by clicking the star icon on the library entry.
You can find your list of favorite libraries by going to the account icon and selecting Favorite Libraries.
#4 Use the Advanced Search Feature
The best way to search for items is to use the Advanced Search feature from the beginning. Click the Advanced Search icon to the right of the search box. (See image below)
Click the Advanced Search icon next to the search box
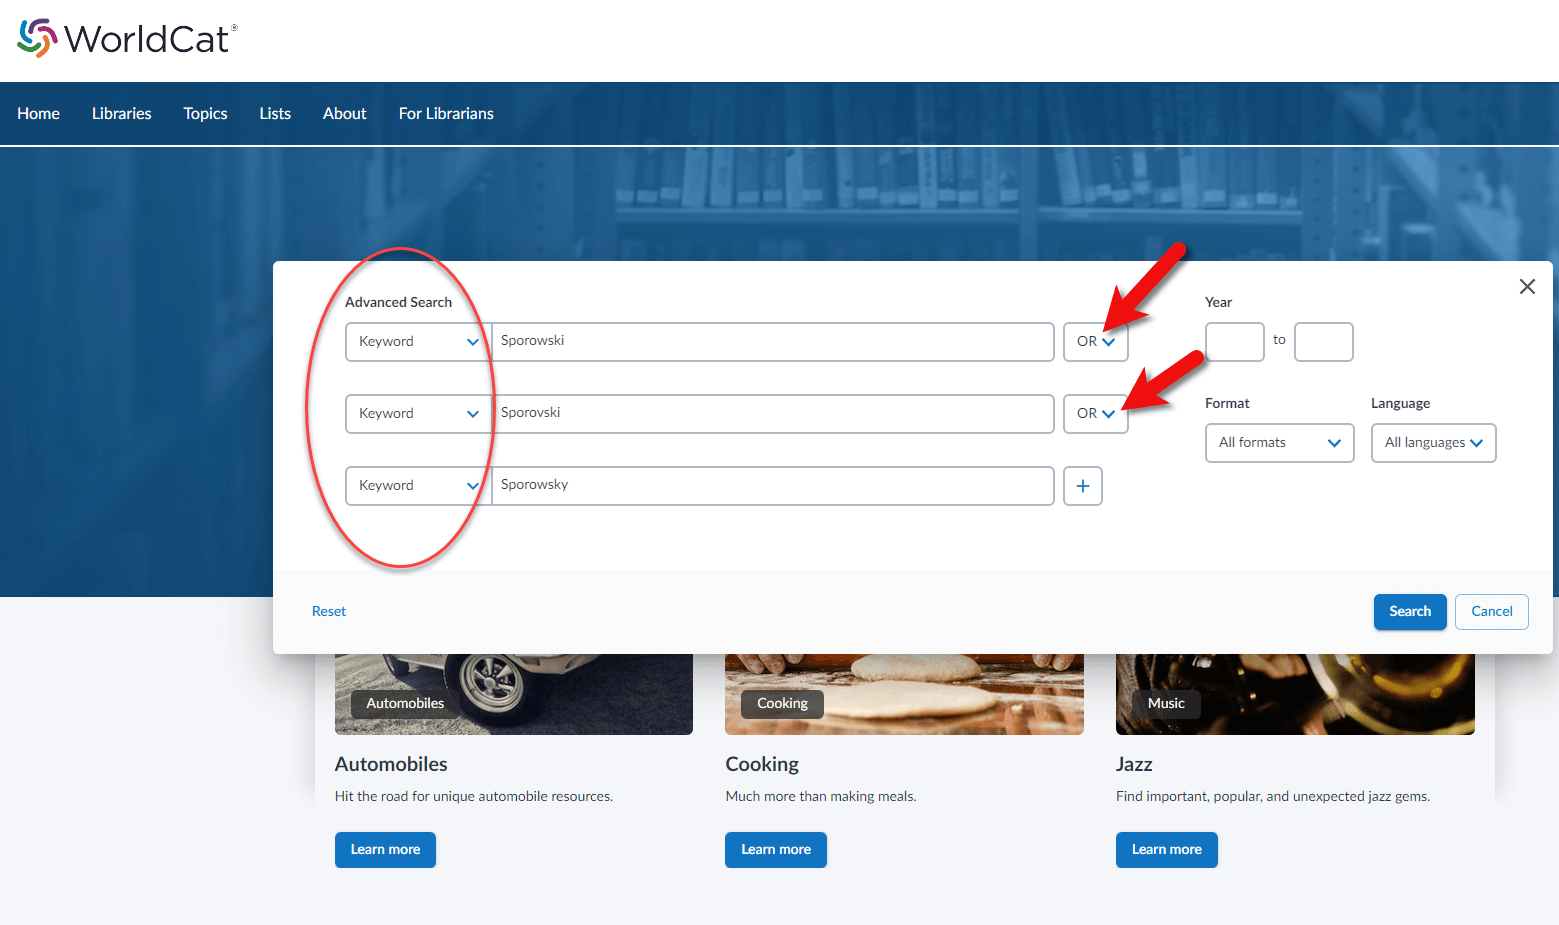
Start your search by selecting the type of thing you want to search from the first drop-down menu. For example, select Keyword and then type a word (such as a surname) in the field next to it. To the right of the field, select what you want done with that keyword, AND, OR, or NOT. This will include, exclude or make the keyword options. Then go to the next line and do the same thing. You can set up to three parameters.
Next add a year range if desired. For example, 1900 to 1950. Then select the type of materials you want in the results by clicking Format. For example, you could leave it on All Formats to receive all types of materials or select just Newspapers.
You can also narrow your search by language. Once you’ve made all your selections, click the Search button.
On the results page you have the option to adjust the filters in the left-hand column.
#5 Search Name Variations
As you search for family surnames, it’s important to understand that it will not automatically search for name variations. Either search for variations in separate searches or use the Advanced Search using the OR or the AND feature. (See example below)
How to search for name variations at WorldCat
More strategies for getting great search results at WorldCat
Search for family names by entering the family name followed by the word “family” (e.g., “Mansfield family”)
Search for specific people by entering the person’s full name (e.g., “Emily Mansfield”)
Search for organizations by entering terms to describe the organization (e.g., “Lutheran”)
Search for geographic locations by placing name in combination with the abbreviated and full state name (e.g., “Union City IN” and “Union City Indiana”)
You can then narrow your search by returning to the main search page and entering more specific search terms such as “Mansfield family bible”.
Include multiple search terms in one search (e.g., “Lutheran” and “Union City IN”)
Final Thoughts on the New WorldCat
Like with any change to a website, the new WorldCat takes a little getting used to, and there are a few bugs that still need to be worked out. However, by doing these 5 things you’ll have access to millions of rich resources that can help you climb your family tree.
Show Notes: Over the years I’ve talked a lot about how to use Evernote and Snagit. Both are amazing tools for research and make it easy to do web clipping. If you’ve been wondering what the difference is between these two powerful tools, or if you haven’t and you’re trying to figure out which one you should start using, you’re in the right place. Today we’re doing a head-to-head comparison of Evernote and Snagit (with a focus on web clipping) and figuring out which one is best for you and your genealogy research.
I got an email from one of our Premium Members named Nancy, and she says, “Can you help me understand why I would need Evernote and Snagit? I have both installed on my computer, but need to spend time becoming proficient in both. If they duplicate one another wouldn’t want to spend time learning both if Snagit is superior.”
This is a really smart question because like the old saying, time is money. And in the case of genealogy, time is ancestors! No one wants to stop and learn yet another tech tool if they don’t have to. So, let’s look at Evernote vs. Snagit, in a head-to-head comparison, and dig into their strengths and weaknesses. If you have both, this will also help you decide what to use in any given situation.
Evernote is a cloud-based notetaking tool that includes a web clipper.
Snagit is a screen capture / AKA web clipper tool.
So, first and foremost the thing they have in common is that they both can capture all or a portion of content that appears on your computer screen. You can clip exactly the part you want and save it as an image for future reference or use.
That’s a pretty simplified description – but essentially, web clipping is the common denominator. But from there, they diverge.
Evernote is primarily a note taking tool. It takes all kinds of notes (audio, photo, video, documents, web clipping, typed, handwritten.) All notes are added to it, and you work in it like a workstation where you can organize and quickly search and retrieve your notes. It can apply OCR to your screen captured notes, making them keyword searchable and editable. Evernote allows you to instantly access your notes from any device that you are signed into your account.
Snagit is primarily a screen capture tool. In fact, it’s screen capture on steroids compared to Evernote. It’s not a place to store notes, but it’s a fantastic way to web-clip or capture information, edit, annotate and manipulate it, save it, and use it in other programs (and we’ll talk more about that in a moment.) Snagit can capture both images and video of content on the web, and it can do other things like use OCR to convert the text that appears in the web content you’re clipping as an image and turn it into editable text. When you web clip with Snagit, you are creating an image. That image must be saved to a cloud service like Dropbox in order to be able to access the note from all your devices.
You can learn a lot more about what these two tools do in my other videos:
Another thing they have in common is that they are both software programs.
Evernote: In addition to being able to use it as a software program on your computer, you can also use Evernote on your mobile device by downloading the app from your app store. You can also use it on any computer by simply signing into your account at Evernote.com. That being said, the software is preferred over the website because it resides on your computer and is faster.
Cost: About $9/monthly or about $80 for the yearly subscription ($6.67 / MONTH).
There is a free version, but you can only use it on 2 devices, it doesn’t include OCR and there are very strict limits on storage, which we’ll address in just a moment. If you’re going to use Evernote for your research and other things, you’re going to need the yearly subscription.
Snagit: Snagit is software that you download to your computer (whether desktop or laptop.) You can buy it as a stand alone purchase, or you can also purchase an ongoing maintenance subscription which provides you with upgrades. There is not mobile app.
Cost: About $64 for one software license + 1 year maintenance (free upgrade). You don’t have to pay for ongoing maintenance.
Conclusion: Unless the free version of Evernote is adequate for your needs, Snagit it more economical. 10 months of Evernote on-going subscription would cover the cost of the one-time purchase of Snagit. However, if you need all the features of Evernote, then go for the yearly subscription to keep the cost down.
Storage and Retention
Because Evernote is a subscription, this brings up the question of whether you can use your notes after you stop subscribing. And storage limits are also a concern.
Snagit: No storage limits. All the content you capture is stored on your computer, not the cloud. It’s yours forever. There’s no limit to how much you can clip or create.
Evernote: Evernote does store your notes on your computer, but it also stores them in the Evernote cloud. While Evernote doesn’t have an overall storage limit, it does have limits on how much you can create each month. There is a free version that allows you to 60 MB of monthly uploads. This is talking about the size of your notes. If you add photographs to Evernote, you’re going to use that up very quickly. There’s also a 25 MB maximum note size limit. No note or clipping can be larger than 25MB. With the subscription you get 10 GB of monthly uploads (which would be pretty hard to max out) and the note size limit is 200 MB.
Conclusion: You’ll need the yearly subscription to really be able to use Evernote for genealogy. And while there are limits, you’re likely never to reach them. And you can use it offline because notes are on your computer.
Snagit has no limits and stores only on your computer unless you share your content to other sources. And that brings us to comparing how these tools allow you to export your content. In other words, can you get stuff out that you put into it?
Exporting Content
The necessity for an ongoing subscription to Evernote brings up to the next important comparison: how can you export and use your web-clippings and in the case of Evernote other types of notes?
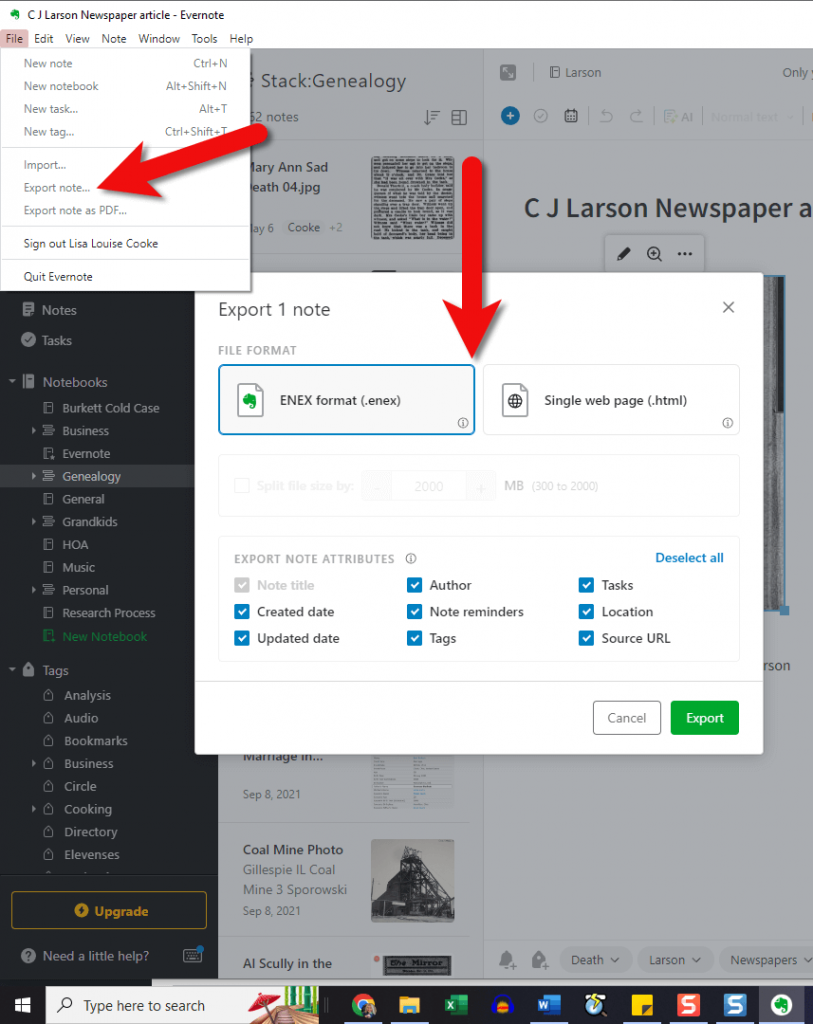
Evernote: Not easy. You can export your notes as the Evernote file format called ENEX or as HTML, which is used in structuring web pages. Keep in mind that web clippings are image files, and we normally need image files in JPEG or PNG format to be able to use them in a variety of other programs.
In the menu click File > Export Note. Available file types are limited.
Snagit: Easy. You can export your clippings in countless ways. Pretty much all major file types are supported. You can easily add content directly to a large number of popular programs such as Word, PowerPoint and even Evernote! So, if you’re writing a family history story or book and you want to clip something on the web and include it, Snagit can send it right to your document with just a click.
Conclusion: If you need to be able to easily get web clippings and captured content out of the program and use it in other ways, use Snagit. If you want to keep your clippings and notes all in one place and be able to keep them organized and find them easily, use Evernote.
Sharing Content
When it comes to sharing content with other researchers or your family, both Evernote and Snagit do a great job in their own way.
Evernote: Each note has a convenient Share button that allows you to invite other people to view just that note. It also gives you a unique link to the note that can be shared. And you can email notes. You can also put a group of notes into a notebook and then share the entire notebook. You can control whether the person being shared with can just view the notes or if they can edit them. So, it does facilitate collaboration by allowing you both to edit the same note. That permission can also be turned off. That all being said, Evernote is really a tool for you, and it’s not focused on sharing as a priority, or on sharing in order to be able to publish the content in many other ways.
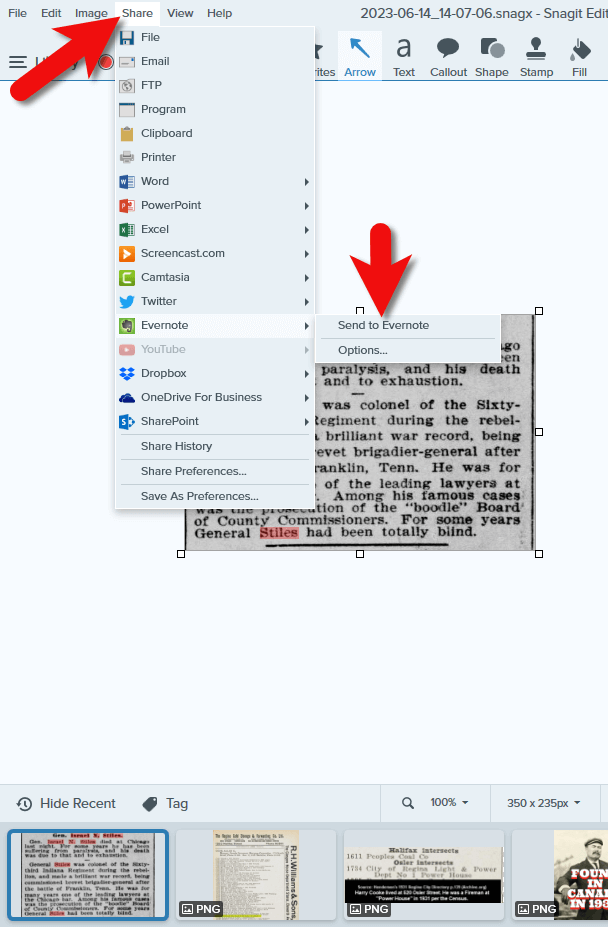
Snagit: With Snagit, if you want to share with someone else to collaborate, you’ll need to send it to them, either by email or shared cloud storage. They can then edit the item in their Snagit software and send it back. So, it doesn’t offer the ability to collaborate quite as easily as Evernote. However, Snagit’s sharing and publishing capability is one of its greatest strengths and priorities. Just click Share in the menu and you’ll have the ability to save the content as a file to your computer, email it to someone, upload it to your own website, your printer, a wide range of software programs and cloud storage services, and yes, even to Evernote!
Click Share in Snagit’s menu
Conclusion: If you want to share with other people, both tools can do the job, although Evernote inches ahead because it facilitates both people being able to edit the same note within Evernote. If you want to share your content for use in other programs and publish it in other ways, Snagit is the best choice.
Evernote vs. Snagit Conclusions
After a head-to-head comparison, we’ve discovered that your selection between these two tools depends on your task and your goals:
Use Evernote if you want to be able to:
keep all your work in one place organized and searchable
create a wide variety of notes such as audio, video, web clippings, PDFs, typed notes, etc.
have OCR automatically applied to web clippings and images
collaborate with other people on your notes
easily create notes on mobile
Use Snagit if you want to:
create high-quality web clippings and videos in universally usable file formats that are exportable
create web-clippings of hard to capture content like wide screen family trees, and information that appears further down a web page that you can’t see all on the screen at the same time
be able manipulate your content with annotations or drop it into project templates
easily export your captured content into a variety of other programs
not have to pay an ongoing subscription.
Another way of looking at it is that Evernote is more of a final destination for content you’re collecting, and Snagit is a content collector that makes it easy to use that content wherever you need it.
Conclusion
If you want to have one place to store and use a wide variety of notes including web clippings, Evernote is the best choice. If you want full flexibility in capturing and creating online content and using it in other programs and projects, Snagit is the best choice. I like to use them in combination. I keep my genealogy and other notes organized in Evernote, and then I use Snagit to capture web content exactly the way I want it and send it into Evernote as needed. And I use both programs for a whole lot more than just genealogy! I clip recipes, projects and ideas, and I use Snagit for all the images I create for Genealogy Gems.
Genealogical records and research for your Denmark ancestors has just gotten a little easier! New and updated genealogical collections for Danish genealogy have been added to FamilySearch. Also new this week, new and updated records for Sweden, Hungary, Britain, and Ireland.
Denmark – Census
It was truly a Danish delight when we heard the 1916 Denmark Census is now available at FamilySearch. Danish genealogy is just a bit easier with the availability of this census, especially when paired with the already published 1911 Denmark Census, also at FamilySearch.
This is an every-name index to the 1916 census of Denmark. This index was created by MyHeritage from images provided by the National Archives of Denmark. The collection at FamilySearch includes an index or abstract version in English and a digital image of the original.
This census was taken for the countries of Denmark, the Faroe Islands, Greenland, and the Danish West Indies, however, only the records for Denmark are available at FamilySearch. The enumeration for Denmark was divided into three sections with a different form for each of the sections: Copenhagen city, other cities, and rural areas.
This census names each individual in the home and includes: sex, calculated birth date and year, marital status, relationship to head-of-household, and residence.
Other genealogy record collections for Denmark can be found on FamilySearch, too. See the entire list here.
Sweden – Church Records
FamilySearch has four Swedish church record collections that have recently been updated. Church records are especially helpful when civil records such as birth, marriage, and deaths, are not available. Check out these four updated collections and their titles below.
The records are bound volumes of pre-printed forms with event information recorded by hand. From 1895 through 1906, the forms are one page per event, but beginning in 1907 each event occupies one row in a printed table, so there are multiple events recorded per page. The records are in Hungarian.
Civil registrations include birth, marriage, and death records. You may be able to find the following information in each of these groups:
Birth records:
Date and place of birth
Name of child
Gender and religion
Parents’ names and mother’s age
Parents’ religion
Signature of informant
Marriage records:
Date and place of marriage
Groom’s name, date and place of birth
Groom’s religion and occupation
Groom’s parents’ names
Bride’s name, date and place of birth
Bride’s religion and occupation
Bride’s parents’ names
Witnesses’ names and their residence
Additional remarks
Death records:
Name and age of deceased
Date, time, and place of death
Deceased’s residence and occupation
Deceased’s religion
Spouse’s name
Parents’ names
Cause of death
Signatures of informant
United Kingdom – 1939 Register
Like a census, the Register can tell you a lot about how your ancestors. You can find names, occupations, and more. The 1939 Register of more than 32.8 million records is now available at Findmypast.
The 1939 Register is pretty unique. It required people to explain exactly what they did. General terms, such as Foreman, Overseer, Doctor, Mill-hand, Porter or Farmer, were not acceptable. Instead, people were asked to be as specific as possible, giving details of the trade.
Additional information you will find on the Register includes:
Name
Full date of birth
Address
Marital status
Occupation
Ireland – Directories
Also at Findmypast, the Ireland, 19th Century Directories allow you to search more than 120 volumes of directories that contain more than 74 thousand records. Listings may include your ancestor’s occupation, place of business, or home address.
These directories were published annually, which means that you can easily track your ancestor year to year.
You will want to be aware that most of the details in the directories were collected six months before publication; therefore, all the listings are six months old.
The records are presented as PDFs (portable digital files). This feature allows you to narrow your search by publication, year and page number. After selecting an image, you can read through the whole directory by using the previous and next buttons at the top of the image.
Disclosure: This article contains affiliate links and Genealogy Gems will be compensated if you make a purchase after clicking on these links (at no additional cost to you). Thank you for supporting Genealogy Gems!
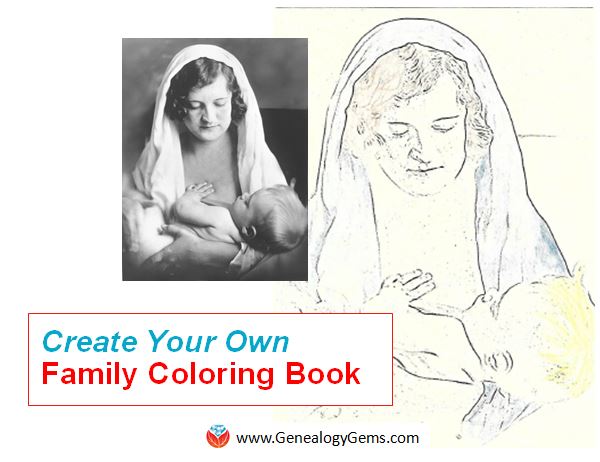
Coloring books are all the rage for adults and kids. Let this project and these free online tools inspire you to create a coloring book to celebrate your heritage.
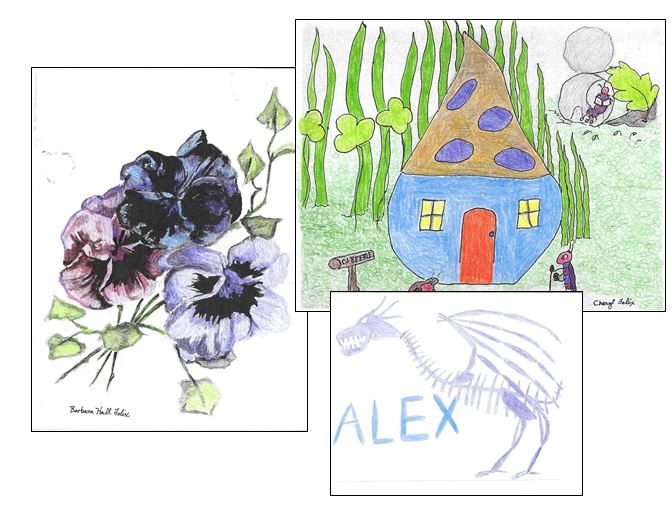
Last Christmas, my mom Cheryl McClellan created a coloring book for our extended family out of family artwork. She requested copies of line drawings from every willing relative, especially her grandchildren (ages 3-20). Then she added her own childhood artwork, some of mine, and some of her mother’s, so four generations are represented.
The flowers on the left, originally painted by my grandma, wasn’t as easily colored because of all the dark areas. My mom’s childhood drawing and my son’s, on the right, both made very “colorable” images.
Then she simply photocopied each page to make it into a coloring page. She experimented with the black-and-white settings until she got the best quality reproductions for coloring.
The grandchildren’s artwork came out the best because they created images meant to be colored (with lots of lines and spaces and no shading). The older artwork reproduced with varying degrees of success. But all were fun to include. She chose not to bind the completed book, so the pages would be easier to color, but instead put each person’s collection of coloring pages in large envelopes.
More tools and ideas: Create a coloring book
To create your own family coloring book, gather family photos (or artwork) from your family archive that would be interesting to color. Consider pictures of relatives, homes, heirlooms, or other objects of significance to your current family life or your family history. The best images will have plenty of contrast in them (lights and darks).
Choose your favorite free online photo editing tool, if you have one. Examples include Pixlr.com and Snapstouch.com. I chose Snapstouch because it’s super easy. Here are the instructions on Snapstouch:
1. From the home page, select which final visual effect you prefer: I chose Sketch. (Depending on the photo and the desired effect, you might also choose Drawing or Outline.)
2. Choose your image file from your computer.
3. Select additional options, as shown here. (In Sketch mode, you can choose a darker pencil sketch and faces to be refined).
4. Click UPLOAD. Wait for the file to upload to the site.
5. After the upload is complete, you’ll see the option to click SKETCH. Click and wait for a moment.
6. If the final image is not to your liking, play with the options (you don’t need to re-upload the photo to do this). OR switch to a different visual effect and experiment.
7. Click DOWNLOAD when you’ve got the image you want.


 Coloring books are all the rage for adults and kids. Let this project and these free online tools inspire you to create a coloring book to celebrate your heritage.