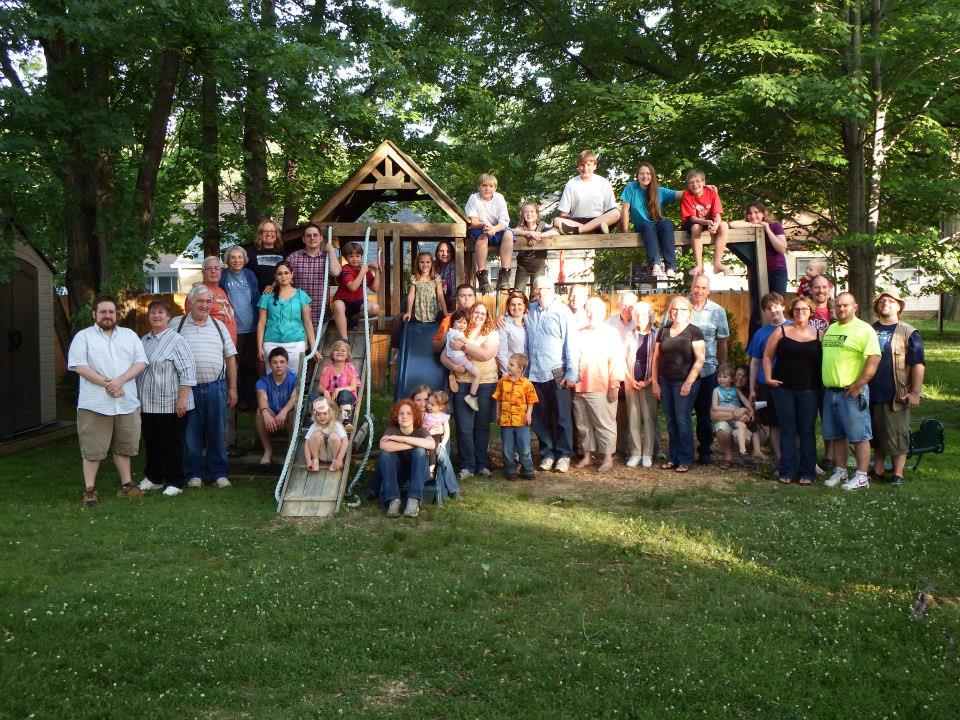
McClellan Family Reunion, Summer 2014, Cleveland, Ohio.
A couple weeks ago, I helped host 47 people at my family reunion here in Cleveland, Ohio. Local relatives made up about half the group: the rest flew and drove in from Arkansas, Nevada and Washington state. We spent 4 days splashing in Lake Erie, driving through the countryside, visiting an Amish-run cheese house and local historic sites, kayaking, hiking in the woods, wading in the sparkling shallows of the Cuyahoga River, and visiting, eating, and visiting some more (and then eating some more). The fundraising auction in my backyard raised such an ruckus that neighbors at the other end of the block asked what in the WORLD was going on at our house that night.
One of the most surprising things about the reunion–other than my brother’s natural gifts as a comedian-auctioneer–was the degree to which it worked to communicate on Facebook. My grandparents were the only ones we needed to actually call about all the reunion plans. We sent no letters–not one!
Here are my 9 tips for organizing your family reunion on Facebook (mostly.) Some of these we did well and others we’ll do better in the future:
1.Make sure at least one member of each nuclear family is active on Facebook. You want a significant percent of relatives participating. If you’re family just isn’t on Facebook, look for other ways to be in touch (group text?).
2.Create a family Facebook page. Click here to learn how. This lets your family post reunion- and family-related items in your own secure group.
3. Reserve the date up to a year in advance. Suggest a time frame and/or a few specific dates on Facebook. Tag everyone on the post to get them to notice and respond. However, you may not get much response. At least in our family, people tend not to volunteer or comment if they’re not personally, directly being asked about something urgent. Once you’ve given people a reasonable amount of time to comment on your suggested dates (and consulted those not on Facebook), JUST PICK A DATE. Then post it (and call the non-Facebookers). Again, tag everyone so you know they see it.
4. Start advertising immediately. Those who travel some distance may need more incentive to come. It’s especially helpful when you can convince the in-laws that they want to come. Do this by catering to people’s interests and hobbies. Post pictures of places you plan to visit together, images of recipes you plan to serve, the website of the local golf course/shopping district/historic site/art gallery/amusement park or any other local attraction that might persuade people to make the trip (whether this is officially part of the reunion activities or not). Tag people in those posts and include URLs to attraction websites: “Uncle Albert, I know how much you love to golf. Why don’t you stay for an extra day and play 18 holes on this championship course?” In the media world, this is called creating “buzz.”
5. Encourage long-distance relatives to introduce themselves and their families. My aunts and uncles were amazed at how much the kids had all grown. They see us so infrequently that it was super helpful to post the kids’ names, updated pix and interests before the reunion. That way, they could talk to my son about his cello playing and my daughter about her upcoming 8th birthday. We’ve asked everyone to start sharing family news and events on the family page, not just their own page. That way we can capture the highlights of all the big family milestones before the next reunion.
6. Play travel agent. Post information about the local airport, bus route, hotels, etc, several months in advance. Encourage relatives to share their hotel information so they can stay together (hotel pool party!) or coordinate travel plans.
7. Post details about the upcoming gathering. What should people plan to bring, wear and do? Do they need to bring beach wear, walking shoes, an umbrella, a baby picture of themselves, or a T-shirt to decorate? Tell them on Facebook ahead of time. Post the initial meeting place and time, along with its address (almost EVERYONE, including the over-60s used GPS to get around while they were here). You can hand out the rest of the itinerary at the reunion, if you need to.
8. Post DURING the reunion. Offer a prize for the best picture posted during the reunion (or the most pictures posted). That tells everyone at home what they’re missing while building excitement among attendees and preserving memories for the future. When uncles are tagging their nephews in photos (and vice versa), they’re building relationships. Remembering names. “Friend-ing.” I don’t suggest posting last-minute changes in plans: when traveling, not everyone makes Facebook-checking a priority. Only do this if everyone knows to check the Facebook page frequently during your gathering.
9. Follow up. Is everyone supposed to send a donation to the reunion fund afterward, mail a card to the great-aunt who couldn’t make it, or share all their reunion pictures on a photo-sharing site? Thank the reunion hosts, planners and those who sacrificed a lot (in time or money) to be present. When is the next reunion? Whoever’s planning the next one can pick up where you left off.
Thinking about attending RootsTech in Salt Lake City, Utah in 2014? Then I’m guessing a trip to the Family History Library (FHL) is part of your plan. Here’s a great tip: bring your iPad or tablet computer and don’t make a single photocopy while you’re there!
Last year, I spent two days researching at the FHL before RootsTech got going. I was up and down a lot between floors, looking at all kinds of books, microfilmed and microfiched materials and even big old maps. On a previous trip, I would have spent a LOT of money on photocopying, even though the copy services there are very low priced. I would have wanted color copies of the maps, so that would have cost more. I would have wasted a lot of time in line to use the copiers–time I would have wanted to spend researching.
But I didn’t waste any time or money. I used my iPad. I have a generation 4 with the rear-facing, 5 megapixel camera, and I used it practically nonstop…
1. Copying material from books. Whenever I found a book page (or a few pages) I wanted to copy, I first imaged the cover pages with the source citation info. Then I imaged the inside pages, making sure the image captured the page number. When I needed to record that a book didn’t have anything on my ancestors, I put a sticky note on the inside front cover saying “checked for Johnsons, didn’t find” (or whatever), then imaged the page with the sticky note on it. This was easy and fast. I sometimes imaged books while standing right in the library stacks! I didn’t have a scanning app on my iPad at the time, but remember you can also use an app like Scanner Pro to scan multipage documents, convert them to PDFs and straighten out and enhance the images.
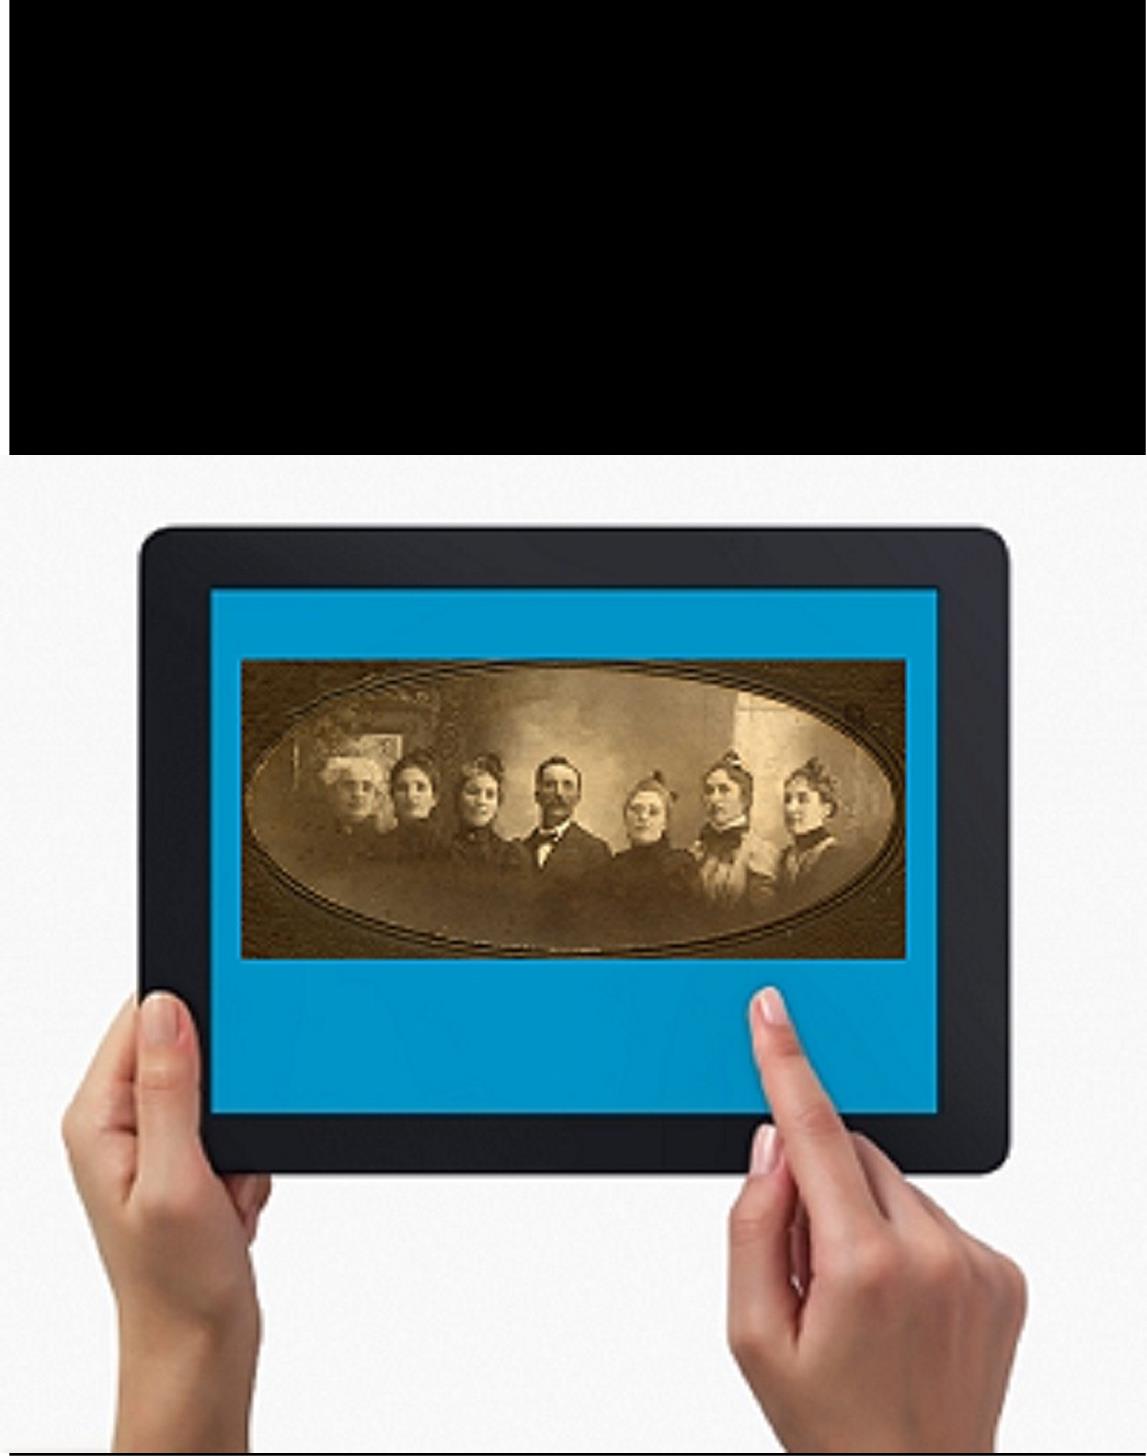
2. Copying material from microfilm. Okay, it’s not perfect quality, but you can take decent digital images of microfilmed material right from the microfilm reader. First, image the microfilmed page at the beginning saying what the source is (or a note with the source description or even the box with the microfilm number on it). Then stand just in front of the microfilm reader with the iPad. Point the camera down to the displayed image, taking care not to block the projection of the image from the reader above. Here’s an example of what it looks like. Like I said, it’s not perfect because of the angle and lighting. Glare can be a problem so you may want to take a few shots. But you can read these images and most of the time, you don’t need keepsake quality out of microfilm. You just need to capture data. I followed up with some cropping and enhancement editing right on my iPad.
3. Copying material from a map or other folio items. The same general idea applies to imaging maps and other oversized materials. First, image the source citation information, often found on a label at the bottom of the page or on the back. Image the map key, including which way is north, scale, and other details. Then image as much of the map as possible to get an “establishing shot.” Finally, zoom in to the areas of greatest importance to you. Again, it’s not perfect. Laminated items may have glare issues as you can see by the shot shown here. But you may get what you need out of your digital image, especially if you move around so the glare isn’t covering the important areas on the map.
Remember to organize all your images when you get back to your hotel room or home while your memory of the visit is still fresh. Keep source citation shots together with the images you took. Load them into Evernote, if you use it. Organize them as you would other computerized research materials: in surname files, etc.
Finally, remember that fair use and copyright laws still apply to all images you take, whether on a photocopier or your personal digitizing equipment. The Family History Library does allow people to take their own digital images, but not all libraries and archives do. Some repositories rely on the income from copying to fund their facilities. ASK before using your iPad at other libraries! But as you can see, you can save yourself time and money–and have all your research notes and copies already digitized and ready for use on-the-go.
This post was written by Genealogy Gems Contributing Editor Sunny Morton. (Just so you know, I’m not a longtime iPad pro. I learned everything I know about using an iPad for genealogy from reading Turn Your iPad into a Genealogy Powerhouse. Then I adapted what Lisa taught me for the way I research.)
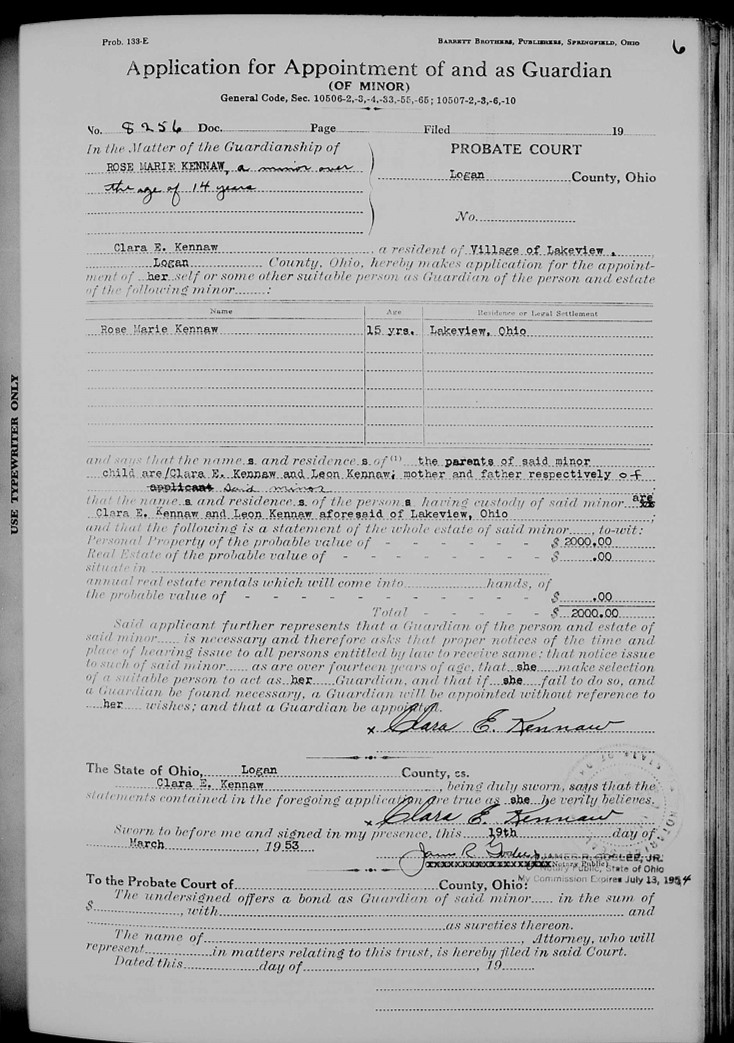
I have thoroughly enjoyed having Amie Tennant as a blogger for the past year. In her final blog post for Genealogy Gems she takes us on a tour of her home state’s digital records. Then she will be turning all of her attentions to her own genealogical certification. Thank you Amie for all of your helpful and thoroughly enjoyable posts! – Lisa Louise Cooke
Ohio genealogy research goes digital. You can now virtually walk into any courthouse in Ohio with the click of the mouse. Check out the amazing browse-only databases at FamilySearch for Ohio and other states, and take your family history research to the next level.
I use FamilySearch.org to search courthouse record books all the time. In particular, the Ohio Probate Records, 1789-1996 now have nearly 7 million digital images of county record books such as wills, estate files, guardianship records, naturalization records, minutes, bonds, and settlements. In fact, many other states have their court record books online at FamilySearch, too. So, why haven’t you noticed before?
Browse-only Databases vs. Indexed Databases
You may have read our previous post on step-by-step instructions to using browse-only databases at FamilySearch. If you didn’t, you should know that when you are searching for records at FamilySearch using the traditional search fields, you are only searching for records that have been indexed. In other words, there may be thousands of records you need on the site, but you won’t find them. They have not been indexed by a searchable name, place, or date. Instead, you need to go in the virtual “back door.”
Step 1: First, go to FamilySearch and sign in. Next, click Search at the top right. Now you will see a map of the world. Click on the desired location. I have chosen the U.S., but you can choose any country you are interested in.
Step 2: Once you choose your desired country or continent, a pop-up list will be available and allow you to choose the state (or country) you wish to search in. In this case, a list of the U.S. states appears and I clicked on Ohio.
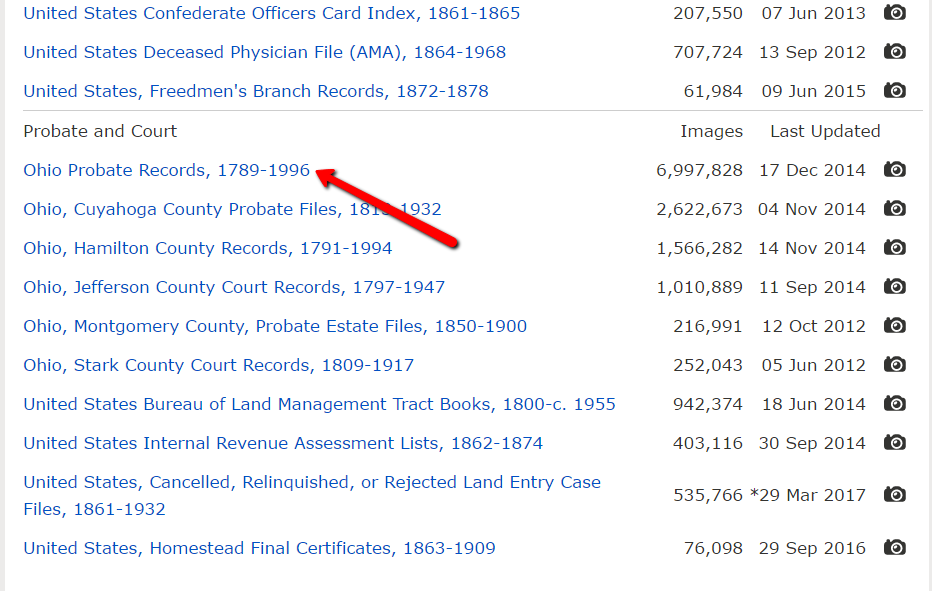
Step 3: The system will direct you to a new page. You will first see the Ohio Indexed Historical Records. These are the records and collections that have been indexed and are searchable by name, date, and place. Though these are great, they are not the record collections I want to share with you today.
Instead, scroll down until you see the heading Ohio Image Only Historical Records. You will notice several databases such as cemetery records, church records, naturalization records, etc. All of these are browseable. That means you will use them like you would microfilm.
Step 4: I want to bring your attention to a specific record collection, so scroll down even further until you see Ohio Probate Records, 1789-1996. Click it.
At the next screen, you will see you can browse the 6,997,828 Ohio probate records and you are probably thinking, “What!? I can’t possibly browse through nearly 7 million records!” But, you can, so go ahead and click it!
Step 5: At the new screen, you will see everything is broken up into counties. Click on the county you are interested in researching. You will next see a list of possible record books available for that county. Each county will vary, so where you may find guardianship records available in one county, you might not find them in another.
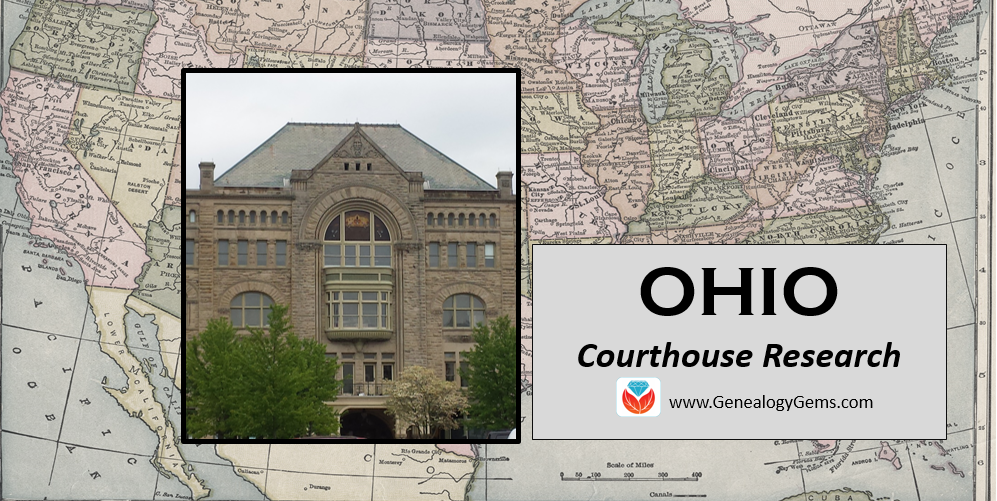
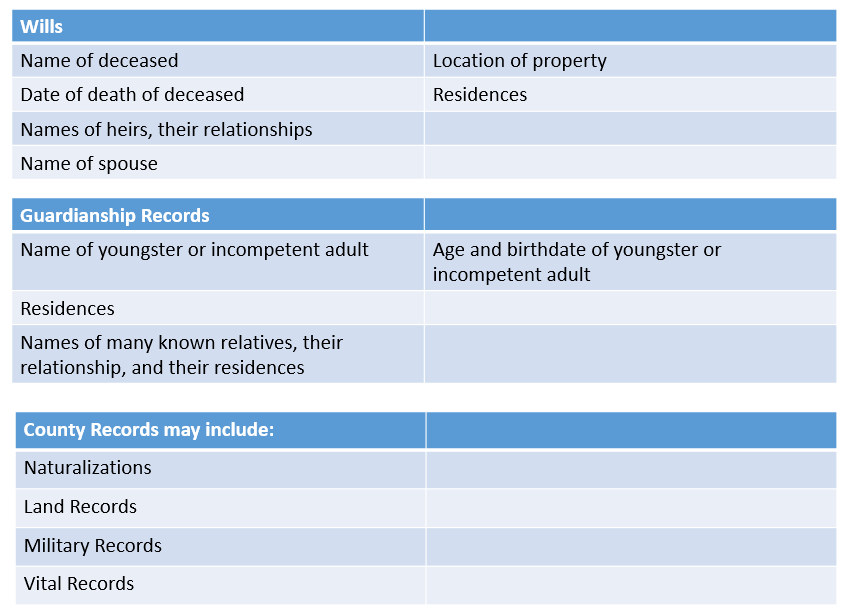
Ohio Genealogy Research at the Courthouse
As a refresher, courthouse research is often imperative to thorough genealogy research. Here is a helpful chart of the type of information you may find in these types of court records. Be sure to remember: records and the amount of information they contain change over time.
More on Courthouse Research Techniques
Are you looking to understand the value of courthouse research and how to use those records to overcome brick walls in your family tree? Read 4 Ways to Power Up Your Courthouse Research Skillsfrom our own Sunny Morton.
A local genealogist used these strategies to help identify old photos taken on holiday in England by an Australian family. Read more about her savvy tips below and view the free video on using Google image search by Lisa Louise Cooke.
Sandra Stocks can’t resist solving genealogical mysteries–her own, or someone else’s. So when she saw an article in the Huddersfield Daily Examiner of West Yorkshire titled, “Can you solve the mystery of these old photographs?” she had to answer.
The photos in the article belonged to an Australian family. They included a series of images taken in the 1930s while the party was on holiday along the Great British coast. A partly-legible name and address on a picture postcard in the group provided a clue.
A few of the article’s readers responded with assistance. One of these readers was Sandra, who volunteers with the Kirkheaton Family History Group. Her answer was featured in a follow-up article (“Mystery SOLVED!”). We reached out to Sandra ourselves, to see if she would share the research strategies she used to identify these old photos. Very generously, she did!
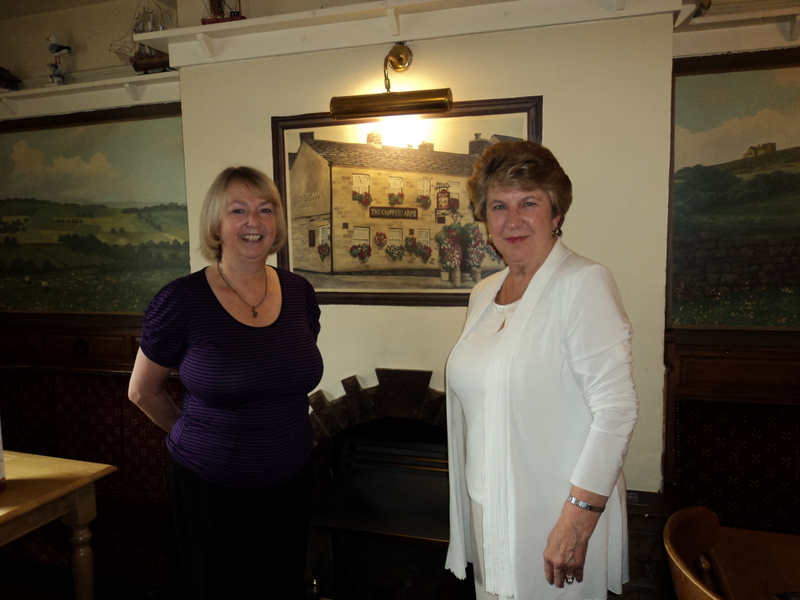
Sandra Stocks, left, with Ann from Canada. Their grandfathers were cousins; they met via Ancestry.com and Ann visited England. They met up at The Croppers Arms pub, where a mutual ancestor was a 19th-century landlord. Photo courtesy of Sandra Stocks.
How-to Identify Old Photos in 4 Easy Steps
Genealogy Gems Premium website members can listen to her full answer in the Genealogy Gems Premium Episode 143. In the meantime, here’s a helpful summary for everyone:
1. Look closely at the photo for any identifying names or words. Sandra begins by saying, “Although the name on the postcard looked like Mr. J. Stogley, when I looked on the newspaper’s website there were other photographs, one which showed the name P. Hogley, Druggist, above a shop window.” (Don’t see anything? Skip to step 4, below.)
2. Use any names or places you identify to consult historical records for that place and time. Sandra continues, “I then searched on Ancestry.co.uk for Joseph Hogley, which, being an unusual name, was easy to find…In the 1911 English census he was living with his wife at the address on the postcard, so I knew I had the right chap. I then searched for him in [an] earlier census and found his family, and his brother Percy Hogley, a druggist, the writer of the postcard.”
3. Follow up in other historical records to identify additional relatives–and possible subjects in the photos. Sandra most often consults birth, marriage, and death records on Ancestry.co.uk and Findmypast.co.uk. “Not everybody wants to pay for a subscription,” she acknowledges, so she also recommends FreeBMD.org.uk “which allows you to search births, marriages, and deaths in England and Wales. A quick search of births for Hogley between 1850 and 1932 would have given me the births of Joseph and Percy Hogley in Huddersfield in 1875 and 1877, respectively. I used FreeBMD to discover that Joseph and his wife had a son, Bernard Thomas Hogley, in 1913 and Bernard married in 1945.”
4. If the photos have no identifying names or places, go straight to those who might recognize them: the locals. Lastly, Sandra shares, “There is a great family history forum where I could have posted a photograph and within a very short time somebody would have told me an approximate year when the picture was taken. The website is RootsChat.com and they also have pages for each English and Welsh county where local people are more than happy to help with genealogy queries.”
More on How-to Identify Old Photos
Unidentified old photos exist in nearly everyone’s family history holdings. Pull those old photos out and discover what else you can discern using these additional tips in Lisa Louise Cooke’s free video titled “How to Google Image Search to Identify Old Photos Using a Smartphone & Tablet.” By learning how to match the images you have to other images on the web, you may find some great new clues for your genealogy! This trick works great for distinct or well-known images, such as a location, or perhaps an important person in your family tree. Give it a try!
The US Public Records Index can be useful for genealogy–if you understand what it is and how to use it properly. Here’s an example and some tips.
Not long Russ sent in this tip recommending the US Public Records Index for genealogy:
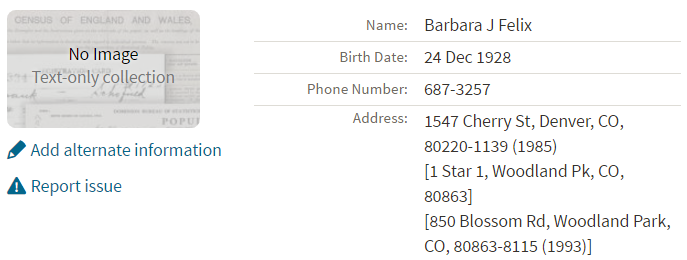
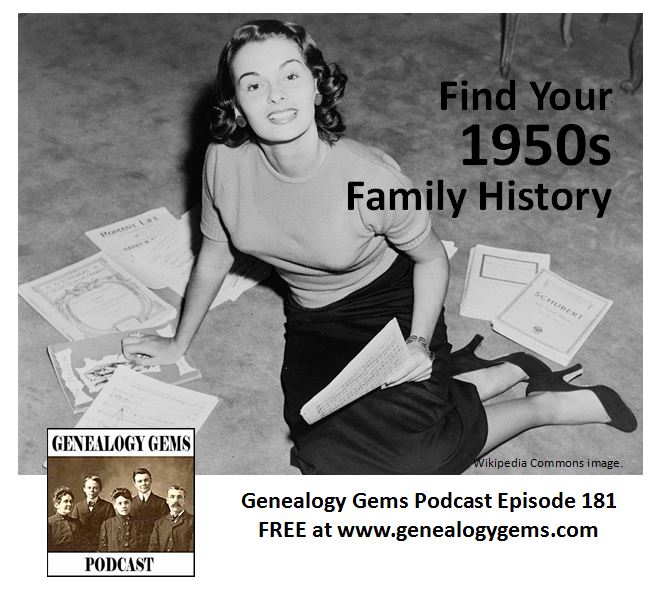
“I was listening to Genealogy Gems Podcast 181 [in which] you were talking about where do we search while we are waiting for the 1950 Census….I recently discovered a wonderful resource, on Ancestry.com, that I have used along with city directories. The name of the record group doesn’t sound interesting but it can be a Gem for you: the US Public Record Index, 1950-1993, Volume 1 and 2. Volume 1 is far more interesting with more data. A search will return a name AND birth date, along with more than one address, zip code and sometimes phone numbers.”
Here’s a sample search result:
Russ kindly sent me Ancestry’s description of its online database for Volume 1, which says that original data comes from public records spanning all 50 states, such as voter registration lists, public record filings, historical residential records and other household database listings.
Collection Profile
What: U.S. Public Records Index
Where: Ancestry, FamilySearch, MyHeritage
Years Spanned: 1950-2009
Source Type: Lacking original source citations.“Hints to go on and follow up with further research into verifiable sources.”
Then he shared the following example of using the US Public Records Index to find recent relatives that he can’t look up yet in the 1950 census:
“I had a hint for a cousin in a yearbook. I know that she recently lived in Philadelphia, Pennsylvania. I didn’t know where she went to college and I know her birthday. The name is not unique, not also not common. At the same time, I had the hint for the Public Record Index. You know those things we can’t use in a proof argument, but there [she] was in Philadelphia. The yearbook had her picture and only her name, not spelled the way I know it, but the Public Record Index puts her in Philadelphia at the right time and place.
I have seen 2 or 3 addresses for folks in the 1980s and 1990s in these indexes. Not all addresses have dates, but some do. I have one cousin with 5 addresses since 1983 and he won’t be in a census until the 1960 Census Records are released.”
The U.S. Public Records Index pops up in my search results sometimes, too. Both volume 1 and volume 2 are searchable on Ancestry.com, as Russ says, in separate databases. Each has over 400,000 records in it. There’s also a free partial version of this database for 1970-2009 at FamilySearch.org and yet a third version at MyHeritage, with 816 million records, with nearly the same time frame. The FamilySearch database says its data comes from “telephone directories, property tax assessments, credit applications, and other records available to the public.”
More on the US Public Records Index
Here are a few tips worth mentioning about the US Public Records Index. Some of these points come from the FamilySearch wiki:
Not everyone who lived in the U.S. appears in the index, and you’re more likely to find birth information for those born between 1900 and 1990. What you’ll find is primarily where someone lived, and often when they lived there.
It’s rarely possible to positively identify a relative in this index since there’s limited information and it spans the entire country for up to a half-century, and you can’t follow up on the record it comes from because the index doesn’t say where individual records come from. So as Russ says, this is a great resource to use in combination with other records. It’s a similar concept to the way you might consult family trees that lack sources: hints to go on and follow up with further research into verifiable sources.
When you find more recent listings, you can sometimes find telephone numbers for living distant relatives. If the thought of cold-calling distant relatives seems a little intimidating, listen to my Family History: Genealogy Made Easy podcast, episodes 14-15, for tips–and to get your courage up!
 of your plan. Here’s a great tip: bring your iPad or tablet computer and don’t make a single photocopy while you’re there!
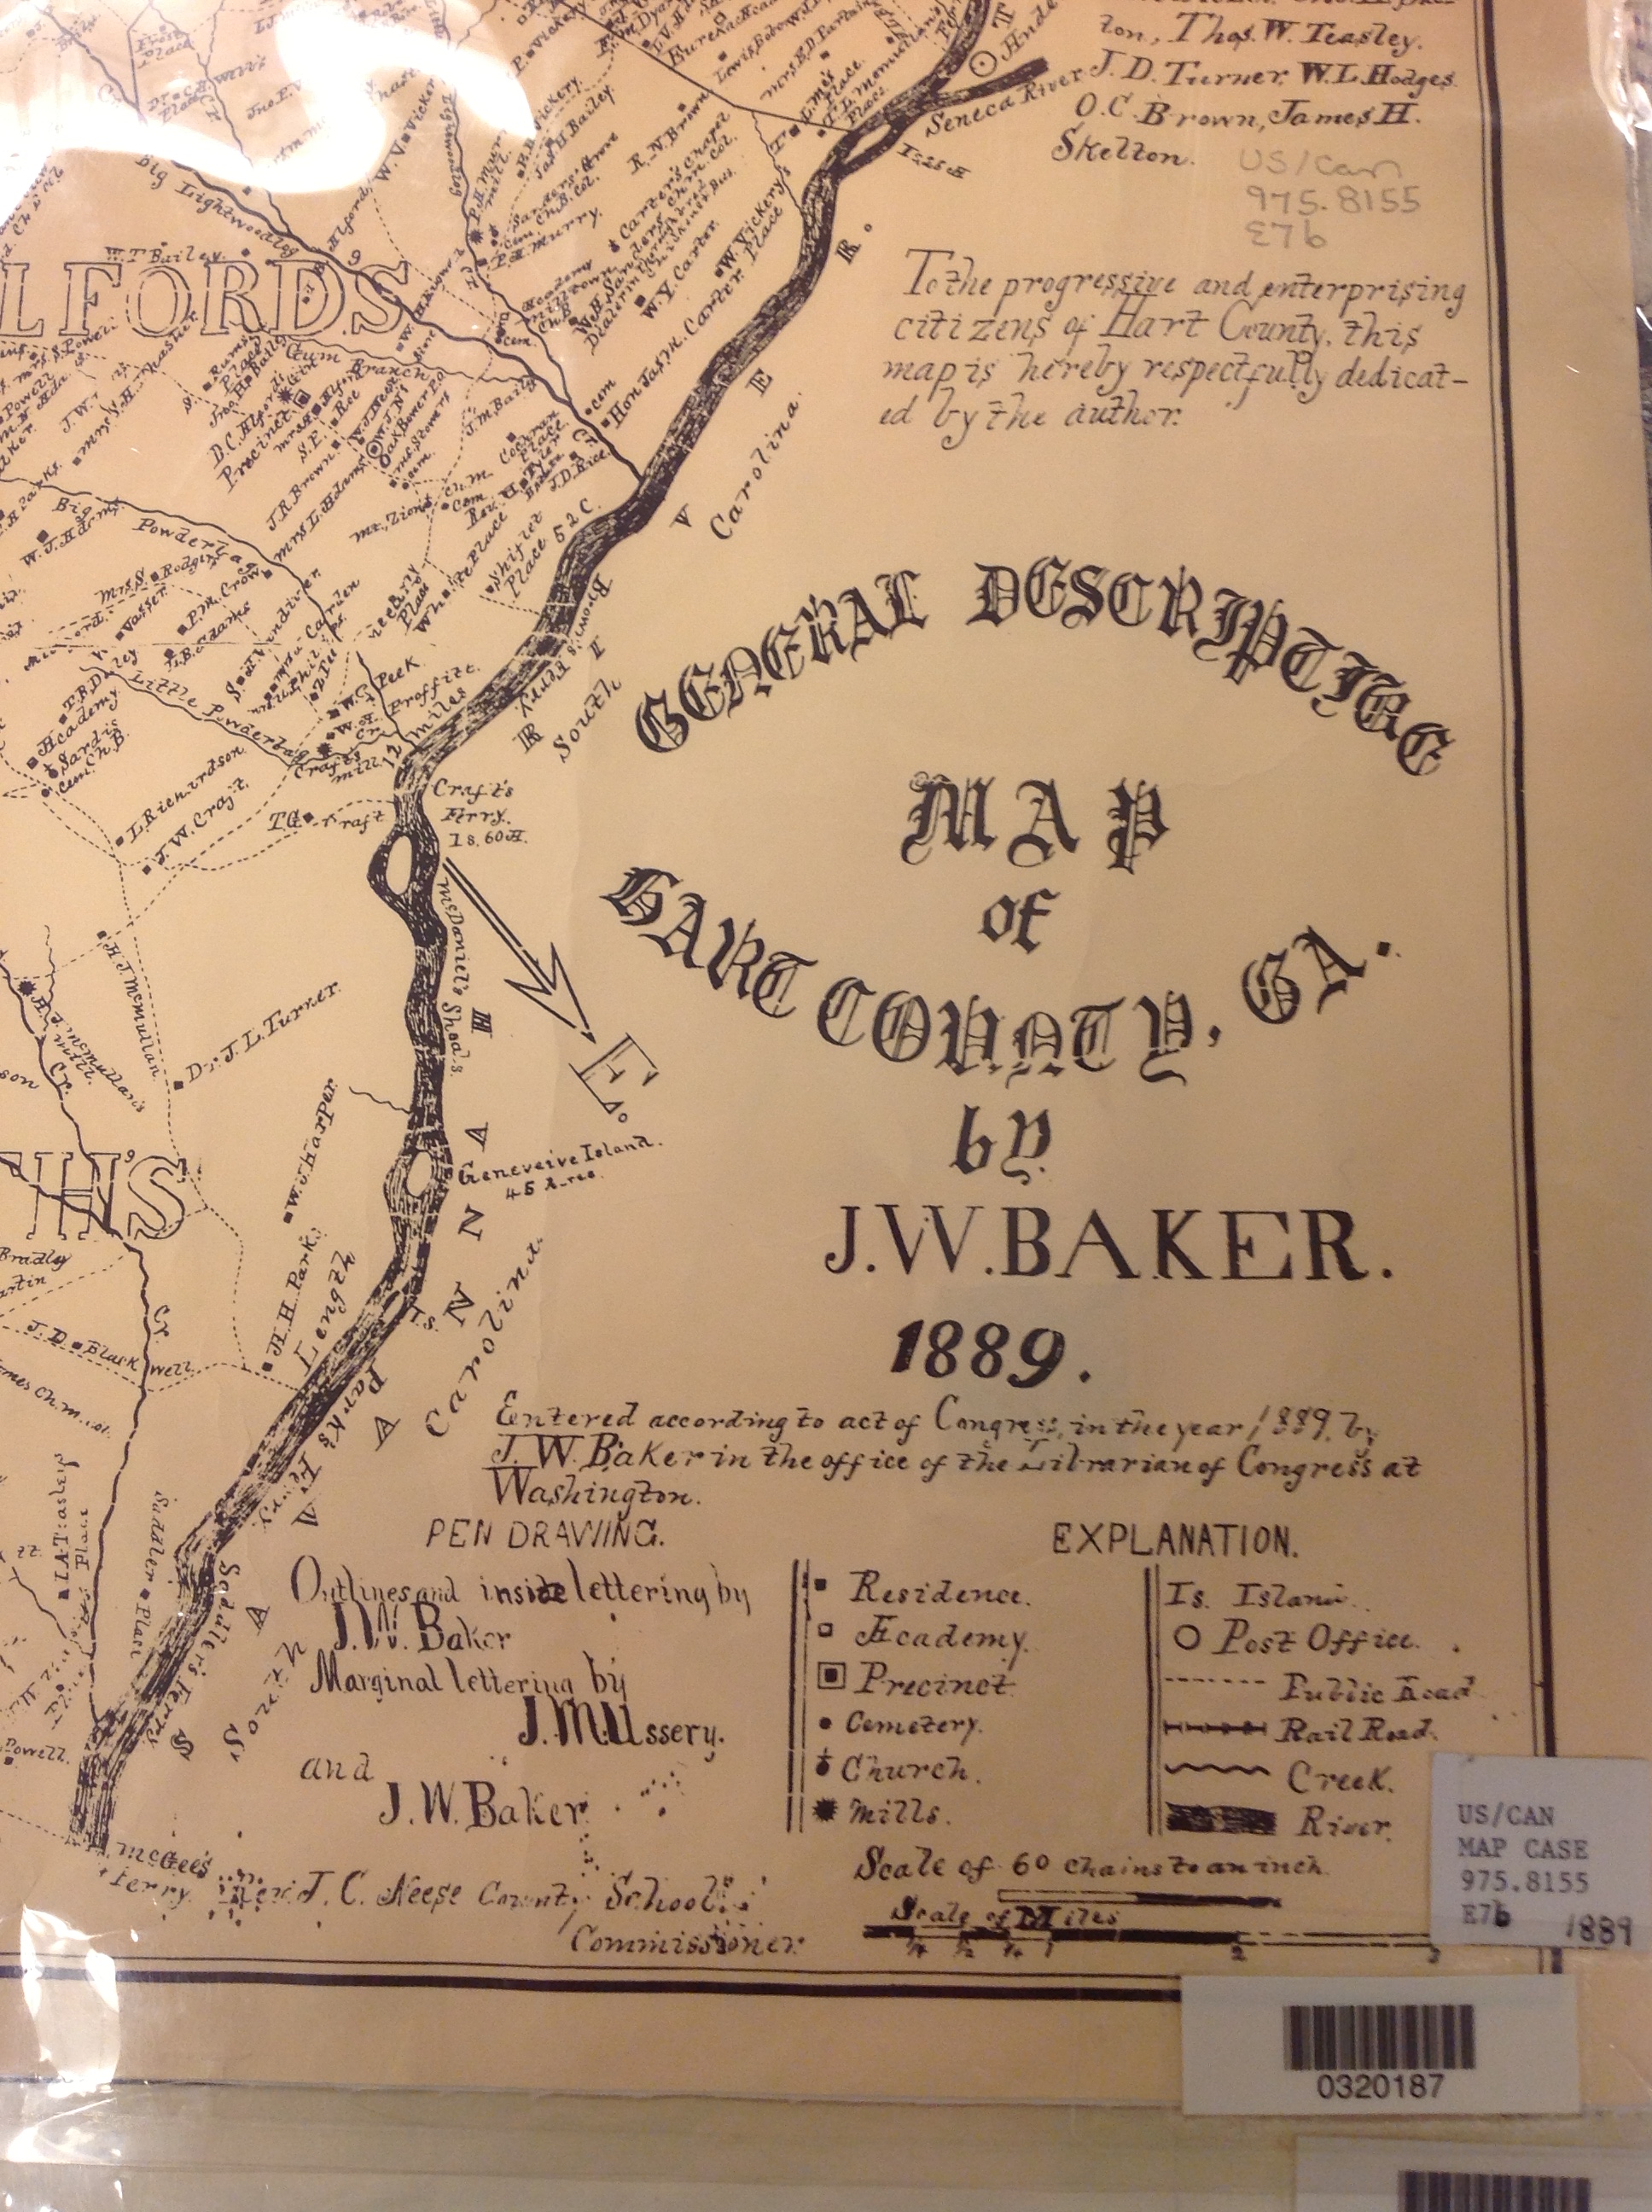 3. Copying material from a map or other folio items.
 You may have read our previous post on
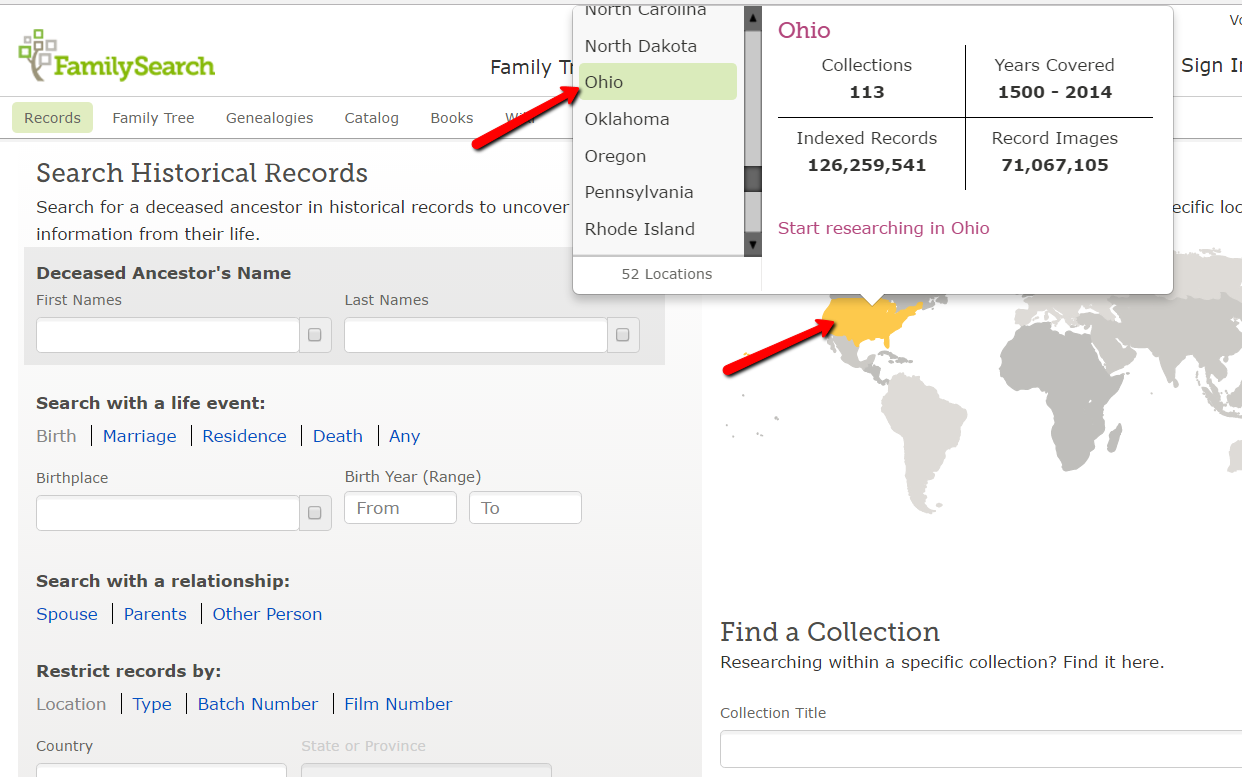
 More Gems on Researching Recent Relatives